Toro 29518 User manual

FormNo.3404-205RevA
30inStand-OnAerator
ModelNo.23518—SerialNo.315000001andUp
ModelNo.29518—SerialNo.315000001andUp
ModelNo.33518—SerialNo.315000001andUp
ModelNo.39518—SerialNo.315000001andUp
Registeratwww.Toro.com.
OriginalInstructions(EN)*3404-205*A
WARNING
CALIFORNIA
Proposition65Warning
Thisproductcontainsachemicalorchemicals
knowntotheStateofCaliforniatocausecancer,
birthdefects,orreproductiveharm.
Theengineexhaustfromthisproduct
containschemicalsknowntotheStateof
Californiatocausecancer,birthdefects,
orotherreproductiveharm.
ThissparkignitionsystemcomplieswithCanadianICES-002.
Important:Thisengineisnotequippedwithaspark
arrestermufer.ItisaviolationofCaliforniaPublic
ResourceCodeSection4442touseoroperatetheengine
onanyforest-covered,brush-covered,orgrass-covered
land.Otherstatesorfederalareasmayhavesimilarlaws.
Theenclosed
Engine Owner's Man ual
issuppliedfor
informationregardingtheUSEnvironmentalProtection
Agency(EPA)andtheCaliforniaEmissionControl
Regulationofemissionsystems,maintenance,and
warranty.Replacementsmaybeorderedthroughthe
enginemanufacturer.
Introduction
Thisaeratorisintendedtobeusedbytrainedoperators
inresidentialandcommercialapplications.Itis
primarilydesignedforaeratingareasofwell-maintained
lawnsonresidentialgrounds,parks,sportselds,and
oncommercialgrounds.
Readtheinformationinthemanualcarefullytolearnhow
tooperateandmaintainyourproductproperlyandtoavoid
injuryandproductdamage.Youareresponsibleforoperating
theproductproperlyandsafely.
YoumaycontactTorodirectlyatwww .Toro.comforproduct
andaccessoryinformation,helpndingadealer,ortoregister
yourproduct.
Wheneveryouneedservice,genuineToroparts,oradditional
information,contactanAuthorizedServiceDealerorToro
CustomerServiceandhavethemodelandserialnumbersof
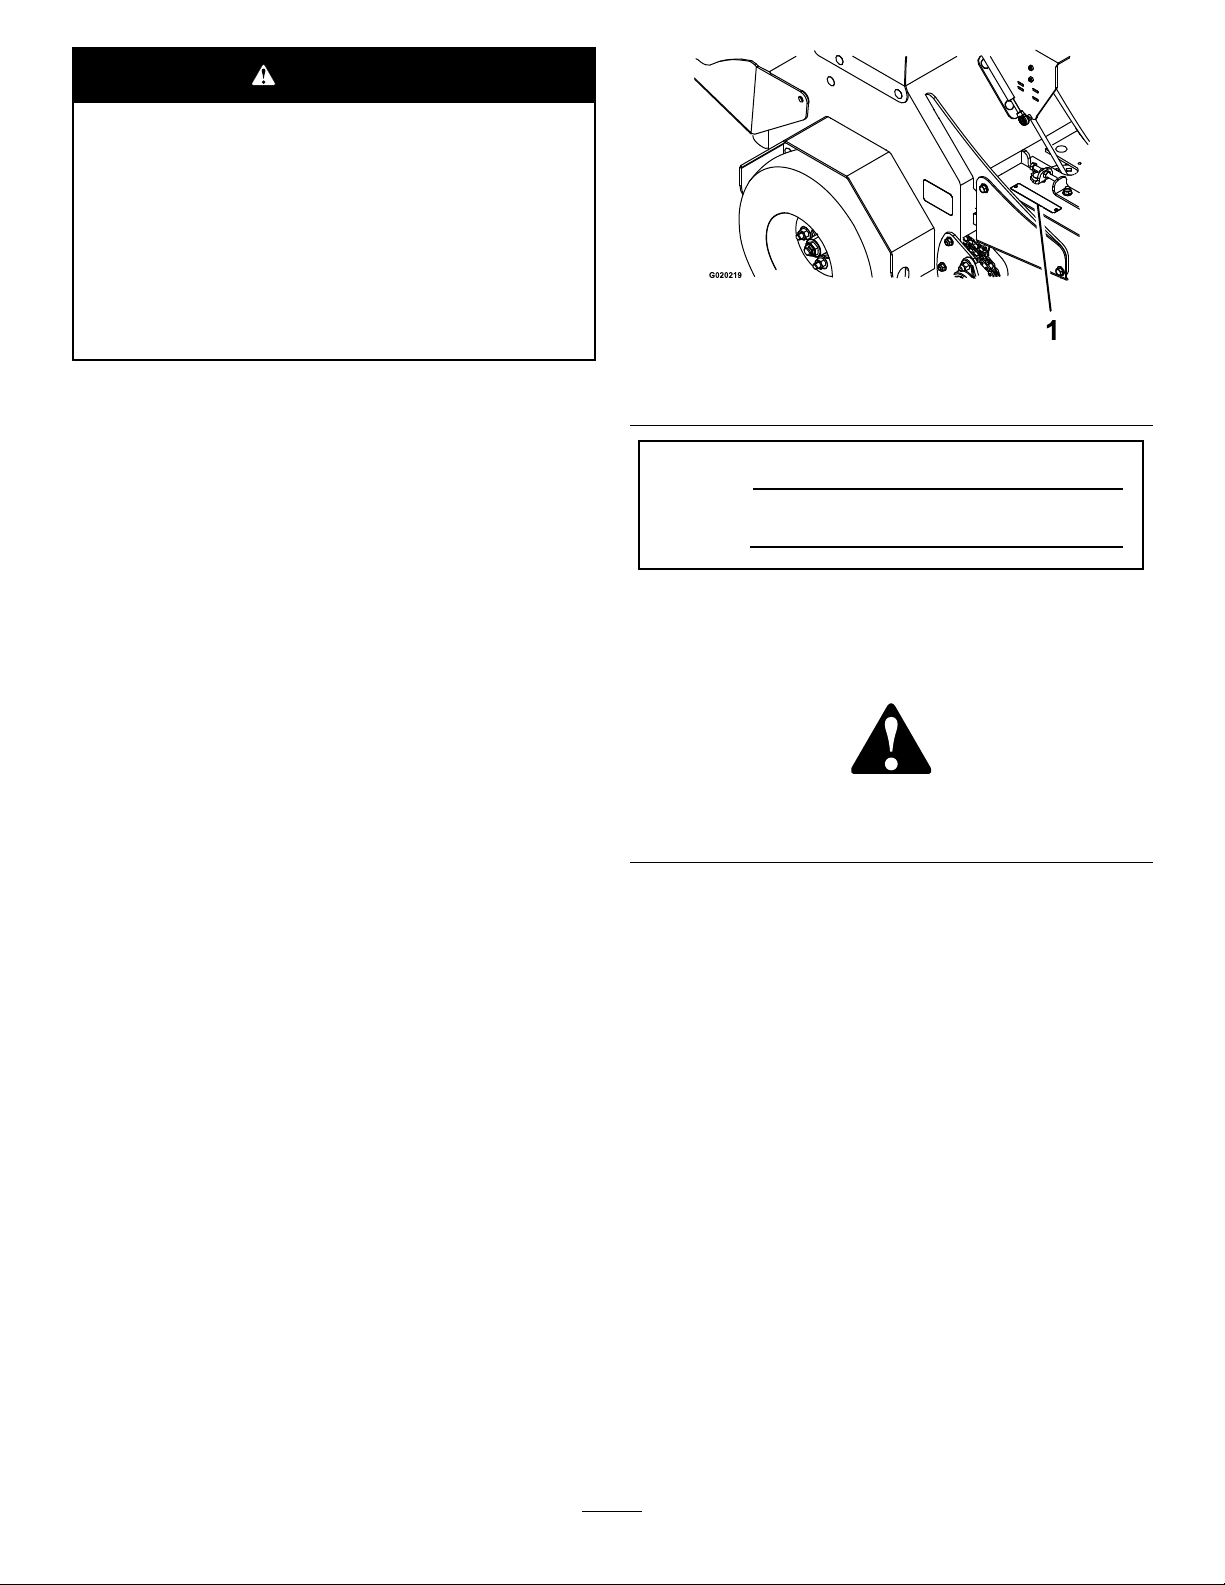
yourproductready.Figure1illustratesthelocationofthe
modelandserialnumbersontheproduct.Writethenumbers
inthespaceprovided.
Figure1
1.Locationofthemodelandserialnumbers
ModelNo.
SerialNo.
Thismanualidentiespotentialhazardsandhassafety
messagesidentiedbythesafetyalertsymbol(Figure2),
whichsignalsahazardthatmaycauseseriousinjuryordeath
ifyoudonotfollowtherecommendedprecautions.
Figure2
1.Safetyalertsymbol
Thismanualuses2wordstohighlightinformation.
Importantcallsattentiontospecialmechanicalinformation
andNoteemphasizesgeneralinformationworthyofspecial
attention.
©2016—TheToro®Company
8111LyndaleAvenueSouth
Bloomington,MN554202
Contactusatwww.Toro.com.
PrintedintheUSA
AllRightsReserved

Contents
Safety...........................................................................4
SafeOperatingPractices...........................................4
AeratorSafety.........................................................6
SlopeIndicator.......................................................7
SafetyandInstructionalDecals.................................8
Setup...........................................................................11
1CheckingTirePressure.........................................11
2ServicingtheBattery............................................11
3ServicingtheEngineOil.......................................12
4ServicingtheTransmissionOil...............................13
5ServicingtheAuxiliaryHydraulicOil......................13
6RemovingCylinderStop(forModel
33518)...............................................................14
ProductOverview.........................................................15
Controls...............................................................15
Specications........................................................17
Operation....................................................................17
CheckingtheEngine-OilLevel.................................17
AddingFuel...........................................................18
LubricatingtheChains............................................19
CheckingtheSafetyInterlockSystem........................20
CheckingforLooseHardware..................................21
OperatingtheMachine............................................21
TransportingtheMachine........................................23
Maintenance.................................................................26
RecommendedMaintenanceSchedule(s)......................26
PremaintenanceProcedures........................................27
PreparingfortheMachineforMaintenance................27
AccessingtheConsoleCompartment........................27
Lubrication...............................................................28
LubricatingtheGreaseFittings.................................28
LubricatingtheCasters............................................28
EngineMaintenance..................................................30
ServicingtheAirCleaner.........................................30
ServicingtheAirCleaner.........................................30
ServicingtheEngineOil..........................................31
CheckingtheSparkPlugs........................................33
ServicingtheSparkPlug..........................................33
CheckingtheSparkArrester(ifequipped)..................34
FuelSystemMaintenance...........................................34
ServicingtheFuelFilter...........................................34
ElectricalSystemMaintenance....................................35
ServicingtheBattery...............................................35
ServicingtheFuses.................................................37
DriveSystemMaintenance.........................................37
CheckingtheAirPressureintheTires........................37
CheckingtheWheelHubNuts.................................37
CheckingtheTorqueoftheWheelLug
Nuts.................................................................37
AdjustingtheCasterPivotBearingsPre-Load.............38
MaintainingtheChain.............................................38
CheckingtheTransmissionOutputShaftNut
Torque..............................................................39
BrakeMaintenance....................................................40
AdjustingtheParkingBrake.....................................40
AdjustingtheBrakeSwitch......................................40
BeltMaintenance......................................................41
CheckingtheConditionandTensionofthe
Belts.................................................................41
AdjustingtheAuxiliaryPumpDriveBelt....................41
ReplacingtheTransmission-DriveBelt......................41
ControlsSystemMaintenance.....................................42
AdjustingtheTraction-ControlLinkage.....................42
HydraulicSystemMaintenance....................................43
MaintainingtheAuxiliaryHydraulicSystem................43
MaintainingtheTransmission..................................45
TineMaintenance......................................................47
CheckingtheTines.................................................47
AdjustingtheTine-DriveChain................................47
Cleaning...................................................................48
CleaningtheEngineandtheExhaustSystem
Area..................................................................48
RemovingtheEngineShroudsandCleaningthe
CoolingFins......................................................48
CleaningtheDebrisfromtheMachine.......................48
WasteDisposal.......................................................48
Storage........................................................................49
Troubleshooting...........................................................50
Schematics...................................................................52
3

Safety
Improperuseormaintenancebytheoperatororowner
canresultininjury.Toreducethepotentialforinjury,
complywiththesesafetyinstructions,andpayattentionto
thesafetyalertsymbol,whichmeansCaution,Warning,or
Danger—“personalsafetyinstruction.”Failuretocomply
withtheinstructionsmayresultinpersonalinjuryor
death.
WARNING
Removalormodicationoforiginalequipment,
partsand/oraccessoriesmayalterthewarranty,
controllability,andsafetyofthemachine.
Unauthorizedmodicationstotheoriginal
equipmentorfailuretouseoriginalToroparts
couldleadtoseriousinjuryordeath.Unauthorized
changestothemachine,engine,fuelorventing
system,mayviolateapplicablesafetystandardssuch
as:ANSI,OSHAandNFPAand/orgovernment
regulationssuchasEPAandCARB.
Replaceallpartsincluding,butnotlimitedto,tires,
belts,andfuelsystemcomponentswithoriginal
Toroparts.
Important:Thismachinewasmanufacturedaccording
totheappropriateregulatorystandardsineffectatthe
timeofmanufacture.Modifyingthismachineinany
waymaycauseittobeoutofcompliancewiththose
standardsandwiththeinstructionsinthisOperator’s
Manual.Modicationstothismachineshouldonlybe
madebyeitherthemanufactureroranAuthorizedToro
Dealer.
Thisproductiscapableofinjuringyourhandsandfeet.
Followallsafetyinstructionstoavoidseriousinjuryordeath.
Theowner/usercanpreventandisresponsibleforaccidents
orinjuriesoccurringtopeople,ordamagetoproperty.
Anyuseofthismachineotherthanaeratingturfgrasscould
provedangeroustotheuserandbystanders.
Important:Theadditionofattachmentsmadebyother
manufacturersthatdonotmeetANSIcerticationmay
causenoncomplianceofthismachine.
SafeOperatingPractices
ThefollowinginstructionsarefromANSIstandard
B71.4-2012.
Training
•ReadtheOperator'sManualandothertrainingmaterial.
Note:Iftheoperator(s)ormechanic(s)cannotreadthe
manuallanguage,itistheowner'sresponsibilitytoexplain
thismaterialtothem.
•Becomefamiliarwiththesafeoperationoftheequipment,
operatorcontrols,andsafetysigns.
•Alloperatorsandmechanicsshouldbetrained.The
ownerisresponsiblefortrainingtheusers.
•Neverletchildrenoruntrainedpeopleoperateorservice
theequipment.
Note:Localregulationsmayrestricttheageofthe
operator.
•Theowner/usercanpreventandisresponsiblefor
accidentsorinjuriesoccurringtohimselforherself,other
people,ordamagetoproperty.
Preparation
•Evaluatetheterraintodeterminewhataccessoriesand
attachmentsareneededtoproperlyandsafelyperform
thejob.Onlyuseaccessoriesandattachmentsapproved
bythemanufacturer.
•Wearappropriateclothing;includingahardhat,safety
glasses,longpants,safetyshoes(rubberboots,gloves,
andhearingprotection.
Important:Longhair,looseclothingorjewelrymay
gettangledinmovingparts.
•Inspecttheareawheretheequipmentistobeusedand
ensurethatallobjectsareremovedfromtheareabefore
use.
•Useextracarewhenhandlingfuels.Theyareammable
andvaporsareexplosive.
–Useonlyanapprovedcontainer.
–Donotremovethefuelcaporaddfuelwiththe
enginerunning.Allowtheenginetocoolbefore
refueling.Donotsmokenearthemachinewhenthe
engineisrunning.
–Donotrefuelordrainthemachineindoors.
•Checkthattheoperator'spresencecontrols,safety
switches,andshieldsareattachedandfunctioning
properly.Donotoperatethemachineunlesstheyare
functioningproperly.
Operation
•Lightningcancausesevereinjuryordeath.Iflightning
isseen,orthunderisheardinthearea,donotoperate
themachine;seekshelter.
•Donotrunanengineinanenclosedarea.
•Onlyoperateinwell-litareas,keepingawayfromholes
andhiddenhazards.
•Ensurethatalldrivesareinneutralandthattheparking
brakeisengagedbeforestartingengine.Onlystartthe
enginefromtheoperator’sposition.
•Makesurethatyouhavegoodfootingwhileusingthis
machine,especiallywhenbackingup.
4

Note:Reducedfootingcouldcauseslipping.
•Slowdownanduseextracareonhillsides.Besureto
travelsidetosideonhillsides.Turfconditionscanaffect
thestabilityofthemachine.Usecautionwhileoperating
neardrop-offs.
•Slowdownandusecautionwhenmakingturnsandwhen
changingdirectionsonslopes.
•Donotoperatethemachinewithouttheshieldsor
otherguardssecurelyinplace.Besureallinterlocksare
attached,adjustedproperly,andfunctioningproperly.
•Donotchangetheenginegovernorsettingoroverspeed
theengine.
•Stoponlevelground,disengagedrives,engagethe
parkingbrake(ifprovided),shutofftheenginebefore
leavingtheoperator'spositionforanyreason.
•Stopequipmentandinspectthetinesafterstrikingobjects
orifanabnormalvibrationoccurs.Makethenecessary
repairsbeforeresumingoperations.
•Keepyourhandsandfeetawayfromthetineassembly.
•Lookbehindanddownbeforebackinguptoensurea
clearpath.
•Keeppetsandbystandersawayfromanoperating
machine.
Stopthemachineifanyoneentersthearea.
•Slowdownandusecautionwhenmakingturnsand
crossingroadsandsidewalks.Fullyraisethetinesifyou
arenotaerating.
•Donotoperatethemachineundertheinuenceof
alcoholordrugs.
•Usecarewhenloadingorunloadingthemachineinto
orfromatrailerortruck.
•Usecarewhenapproachingblindcorners,shrubs,trees,
orotherobjectsthatmayobscurevision.
Safehandlingoffuels
•Toavoidpersonalinjuryorpropertydamage,use
extremecareinhandlinggasoline.Gasolineisextremely
ammableandthevaporsareexplosive.
•Extinguishallcigarettes,cigars,pipes,andothersources
ofignition.
•Useonlyanapprovedfuelcontainer.
•Donotremovethefuelcaporaddfuelwiththeengine
running.
•Allowtheenginetocoolbeforefueling.
•Donotfuelthemachineindoors.
•Donotstorethemachineorfuelcontainerwherethere
isanopename,spark,orpilotlightsuchasonawater
heateroronotherappliances.
•Donotllcontainersinsideavehicle,onatruck,orona
trailerbedwithaplasticliner.Alwaysplacecontainerson
thegroundawayfromyourvehiclebeforelling.
•Removeequipmentfromthetruckortrailerandfuelit
ontheground.Ifthisisnotpossible,thenaddfuelwith
suchequipmentasaportablecontainer,ratherthanfrom
afueldispensernozzle.
•Keepthenozzleincontactwiththerimofthefueltank
orcontaineropeningatalltimesuntilfuelingiscomplete.
Donotuseanozzlelockopendevice.
•Iffuelisspilledonclothing,changeyourclothing
immediately.
•Donotoverllfueltank.Replacefuelcapandtighten
securely.
MaintenanceandStorage
•Donotallowuntrainedpersonneltoservicemachine.
•Donottouchequipmentorattachmentpartswhichmay
behotfromoperation.Allowallofthepartsofthe
machinetocoolbeforeattemptingtomaintain,adjust,or
servicethemachine.
•Keephandsandfeetawayfrommovingparts.Ifpossible,
donotmakeadjustmentswiththeenginerunning.
•Disengagethedrives,raisethetines,settheparkingbrake,
stopengine,andremovekeyordisconnectspark-plug
wire.Waitforallmovementtostopbeforeadjusting,
cleaningorrepairing.
•Disconnectthebatteryorremovethespark-plugwire
beforemakinganyrepairs.Disconnectthenegative
terminalrstandthepositiveterminallast.Reconnect
thepositiverstandnegativelast.
•Usecarewhencheckingthetines.Wrapthetine(s)or
weargloves,andusecautionwhenservicingthem.Only
replacetines;donotstraightenorweldthem.
•Cleangrass,dirt,anddebrisfromthetines,drives,
mufers,andenginetohelppreventres.
•Cleanupoilorfuelspillage.
•Parkmachineonlevel,hardground.Neverallow
untrainedpersonneltoservicemachine.
•Usejackstandstosupportcomponentswhenrequired.
•Carefullyreleasepressurefromcomponentswithstored
energy.
•Donotstorefuelnearamesordrainindoors.
•Lettheenginecoolbeforestoring.
•Keepallpartsingoodworkingconditionandallhardware
tightened.Replaceallwornordamageddecals.
Hauling
•Usecarewhenloadingorunloadingthemachineintoa
traileroratruck.
•Usefull-widthrampsforloadingmachineintoatrailer
oratruck.
•Tiethemachinedownsecurelyusingstraps,chains,cable,
orropes.Bothfrontandrearstrapsshouldbedirected
downandoutwardfromthemachine.
5

AeratorSafety
ThefollowinglistcontainssafetyinformationspecictoToro
productsandothersafetyinformationyoumustknow.
GeneralOperation
•Checkcarefullyforoverheadclearances(i.e.branches,
doorways,electricalwires,etc.)beforeoperatingunder
anyobjects,anddonotcontactthem.
•Usecautionwhenyouareridingontheplatformand
drivingthemachineovercurbs,rocks,roots,orother
obstructions.
•Donotjerkthecontrols;useasteadymotion.
•Donotcarrypassengers.
•Donotcarryequipmentonthemachine.
SlopeOperation
Useextremecautionwhenaeratingand/orturningonslopes
aslossoftractionand/ortip-overcouldoccur.Theoperator
isresponsibleforsafeoperationonslopes.
•UseFigure3tohelpyoudeterminetheappropriateslope
angleofareatoaerate
•Removeormarkobstaclessuchasrocks,treelimbs,etc.
fromtheaeratingarea.
•Watchforholes,rutsorbumps.
Note:Tallgrasscanhideobstacles.
•Usecautionneardrop-offs,ditches,orembankments.
Note:Themachinecouldsuddenlyturnoverifawheel
goesovertheedgeofaclifforditch,orifanedgecavesin.
•Beawarethatoperatingonwetgrass,acrosssteepslopes
ordownhillmaycausethemachinetolosetraction.Loss
oftractiontothedrivewheelsmayresultinslidinganda
lossofbrakingandsteering.
•Donotaerateslopesgreaterthan15degrees.
•Avoidsuddenstartsandstopswhenaeratinguphill
becausethemachinemaytipbackward.
Note:Themachineismorestablegoinguphillwiththe
tinesraised.
•Keepallmovementonslopesslowandgradual.
•Donotmakesuddenchangesinspeedordirection.
•Reducethetine-downpressuretopreventthedrivetires
fromraisingoffthegroundandtopreventthefronttires
fromraisingoffthegroundwhileaeratinguphill.
•Followthemanufacturer’srecommendationsforwheel
weightsorcounterweightstoimprovestability.
•Useextracarewithattachments.
Note:Useofattachmentscanchangethestabilityof
themachine.
Service
•Tobestprotectyourinvestmentandmaintainoptimal
performanceofyourToroequipment,countonToro
genuineparts.Whenitcomestoreliability,Torodelivers
replacementpartsdesignedtotheexactengineering
specicationsofourequipment.Forpeaceofmind,insist
onTorogenuineparts.
•Neverremoveortamperwithsafetydevices.Checktheir
properoperationregularly.Neverdoanythingtointerfere
withtheintendedfunctionofasafetydeviceortoreduce
theprotectionprovidedbyasafetydevice.
•Checkbrakeoperationfrequently.Adjustandserviceas
required.
6

SlopeIndicator
G01 1841
Figure3
Thispagemaybecopiedforpersonaluse.
1.Themaximumslopeyoucansafelyoperatethemachineonis15degrees.Usetheslopecharttodeterminethedegreeofslope
ofhillsbeforeoperating.Donotoperatethismachineonaslopegreaterthan15degrees.Foldalongtheappropriateline
tomatchtherecommendedslope.
2.Alignthisedgewithaverticalsurface,atree,building,fencepole,etc.
3.Exampleofhowtocompareslopewithfoldededge.
7

SafetyandInstructionalDecals
Safetydecalsandinstructionsareeasilyvisibletotheoperatorandarelocatednearanyareaofpotential
danger.Replaceanydecalthatisdamagedorlost.
93–6686
1.Hydraulicoil2.ReadtheOperator's
Manual.
115-2047
1.Warning—donottouchthehotsurface.
116-9391
117–2718
120-9570
1.Warning—stayawayfrommovingparts,keepallguards
andshieldsinplace.
121-6150
1.Cuttinghazardofhandandfoot–stayawayfrommoving
parts.
121–6161
1.Entanglementhazard,belt—stayawayfrommovingparts;
keepallguardsinplace.
121–6162
1.Cutting/dismembermenthazardofhandorfoot—lower
thetinestotheground;readtheOperator’sManualfor
disassemblyprocedure.
8

121–6163
1.Presstolowerthetines.2.Releasetoraisethetines.
126-2054
1.Wheellugnuttorque129N-m(95ft-lb)(4x)
2.Wheelhubnuttorque319N-m(235ft-lb)
3.ReadandunderstandtheOperator’sManualbefore
performinganymaintenance,checktorqueevery100
hours.
121–6164
1.Fast6.Wheelsandtinesrotatewhenmoving
backward
11.Warning—keepbystandersasafe
distancefromthemachine.
2.Slow7.Continuousvariablesetting12.Warning—donotoperatethemachine
unlessyouaretrained.
3.Neutral8.Choke—on13.Thrownobjecthazard—pickupdebris
beforeoperatingthemachine.
4.Reverse9.Choke—off14.Warning—keepawayfrommoving
parts;keepallguardsinplace.
5.Wheelsandtinesrotatewhenmoving
forward
10.Warning—readtheOperator’sManual.15.Warning—stoptheengine,engagethe
parkingbreak,andremovetheignition
keybeforeleavingthemachine.
126-4528
1.Rotatecounterclockwisetodecreasepressure5.Parkingbrake-release
2.Rotateclockwisetoincreasepressure6.Parkingbrake-engage
3.On-tinegroundengagementfootswitch7.Cutting/dismembermenthazardofhandorfoot,tines–stay
awayfrommovingparts;keepallguardsinplace
4.Off-tinegroundengagementfootswitch
9

121–6166
1.Tippinghazard—donotturnsharplywhiletravellingfast;slow
downandturngradually.
3.Warning;tippinghazard—donotusesplitramps;usefull
widthrampstoloadamachinefortransport;usealoading
rampatamaximumof15degrees.
2.Tippinghazard—donotoperatethemachineonslopes
greaterthan15degrees;donotoperatethemachinenear
drop-offs.
116–9392
1.Readtheinstructionsbeforeservicingorperformingmaintenance;readtheOperator’sManualforinformationonlubricating
themachine.
10
Setup
MediaandAdditionalParts
DescriptionQty.Use
Operator'sManual1Readbeforeoperatingthemachine.
Key2Startthemachine.
1
CheckingTirePressure
NoPartsRequired
Procedure
1.Checkthetirepressureinthedrivetires.
Note:Properinationfordrivetiresis83to97kPa
(12to14psi).
2.Adjustthetirepressureifnecessary.
2
ServicingtheBattery
NoPartsRequired
Procedure
WARNING
CALIFORNIA
Proposition65Warning
Batteryposts,terminals,andrelated
accessoriescontainleadandleadcompounds,
chemicalsknowntotheStateofCalifornia
tocausecancerandreproductiveharm.
Washhandsafterhandling.
Note:Themachineisshippedwithalled,lead-acidbattery.
DANGER
Chargingorjumpstartingthebatterymayproduce
explosivegases.Batterygasescanexplodecausing
seriousinjury.
•Keepsparks,ames,orcigarettesawayfrom
battery.
•Ventilatewhenchargingorusingbatteryinan
enclosedspace.
•Makesurethattheventingpathofbatteryis
alwaysopenoncethebatteryislledwithacid.
•Alwaysshieldeyesandfacefrombattery.
DANGER
Batteryelectrolytecontainssulfuricacid,whichis
poisonousandcancausesevereburns.Swallowing
electrolytecanbefatalorifittouchesskincan
causesevereburns.
•Wearsafetyglassestoshieldyoureyesand
rubberglovestoprotectyourskinandclothing
whenhandlingelectrolyte.
•Donotswallowelectrolyte.
•Intheeventofanaccident,ushwithwaterand
calladoctorimmediately.
11

1.MovetheignitionswitchtotheOffpositionand
removethekey.
2.Measurethevoltageofthebatterywithavoltmeter.
3.Usethetablebelowtolocatethechargestateorthe
battery,andifneeded,thebattery-chargersettingand
chargingintervalrecommendedtochargethebattery
to12.6voltsorgreater;refertothebatterychargetable
below .
Important:Makesurethatthenegativebattery
cableisdisconnectedandthebatterychargerused
forchargingthebatteryhasanoutputof16volts
and7ampsorlesstoavoiddamagingthebattery
(seechartforrecommendedchargersettings).
BatteryChargeTable
Voltage
Reading
Percent
Charge
Maximum
Charger
Settings
Charging
Interval
12.6or
greater
100%16volts/
7amps
NoCharging
Required
12.4–12.675–100%16volts/
7amps
30Minutes
12.2–12.450–75%16volts/
7amps
1Hour
12.0–12.225–50%14.4volts/
4amps
2Hours
11.7–12.00–25%14.4volts/
4amps
3Hours
11.7orless0%14.4volts/
2amps
6Hoursor
More
CAUTION
IftheignitionisintheOnpositionthere
ispotentialforsparksandengagementof
components.Sparkscouldcauseanexplosion
ormovingpartscouldaccidentallyengage
causingpersonalinjury.
BesureignitionswitchisintheOffposition
beforechargingthebattery.
4.Ifthepositivecableisalsodisconnected,connectthe
positive(red)cabletothepositivebatteryterminal
andslipterminalcoveroverthepositiveterminal.
5.Removethescrew ,washer,andgroundcablefromthe
engine.Connectthenegativebatterycableasshown
inFigure4.
Figure4
1.Screw4.Negativebatterycable
2.Washer5.Engine
3.Groundwire
Note:Iftimedoesnotpermitchargingthebattery
orifchargingequipmentisnotavailable,connectthe
negativebatterycablesandrunthevehiclecontinuously
for20to30minutestochargethebattery.
3
ServicingtheEngineOil
NoPartsRequired
Procedure
Theengineisshippedwithoil;checkengine-oilleveland,if
necessary,addtotheappropriatelevel.RefertoChecking
theEngine-OilLevel(page17)forinstructionsandtheoil
specication.
12
4
ServicingtheTransmissionOil
NoPartsRequired
Procedure
Transmissionoiltype:ToroHypr-oil500
Themachineisshippedwithhydraulicoilintheexpansion
tank.
1.Runthemachineforapproximately15minutestoallow
anyextraairtopurgeoutofthehydraulicsystem.
2.Shutofftheengineandallowthemachinetocooloff.
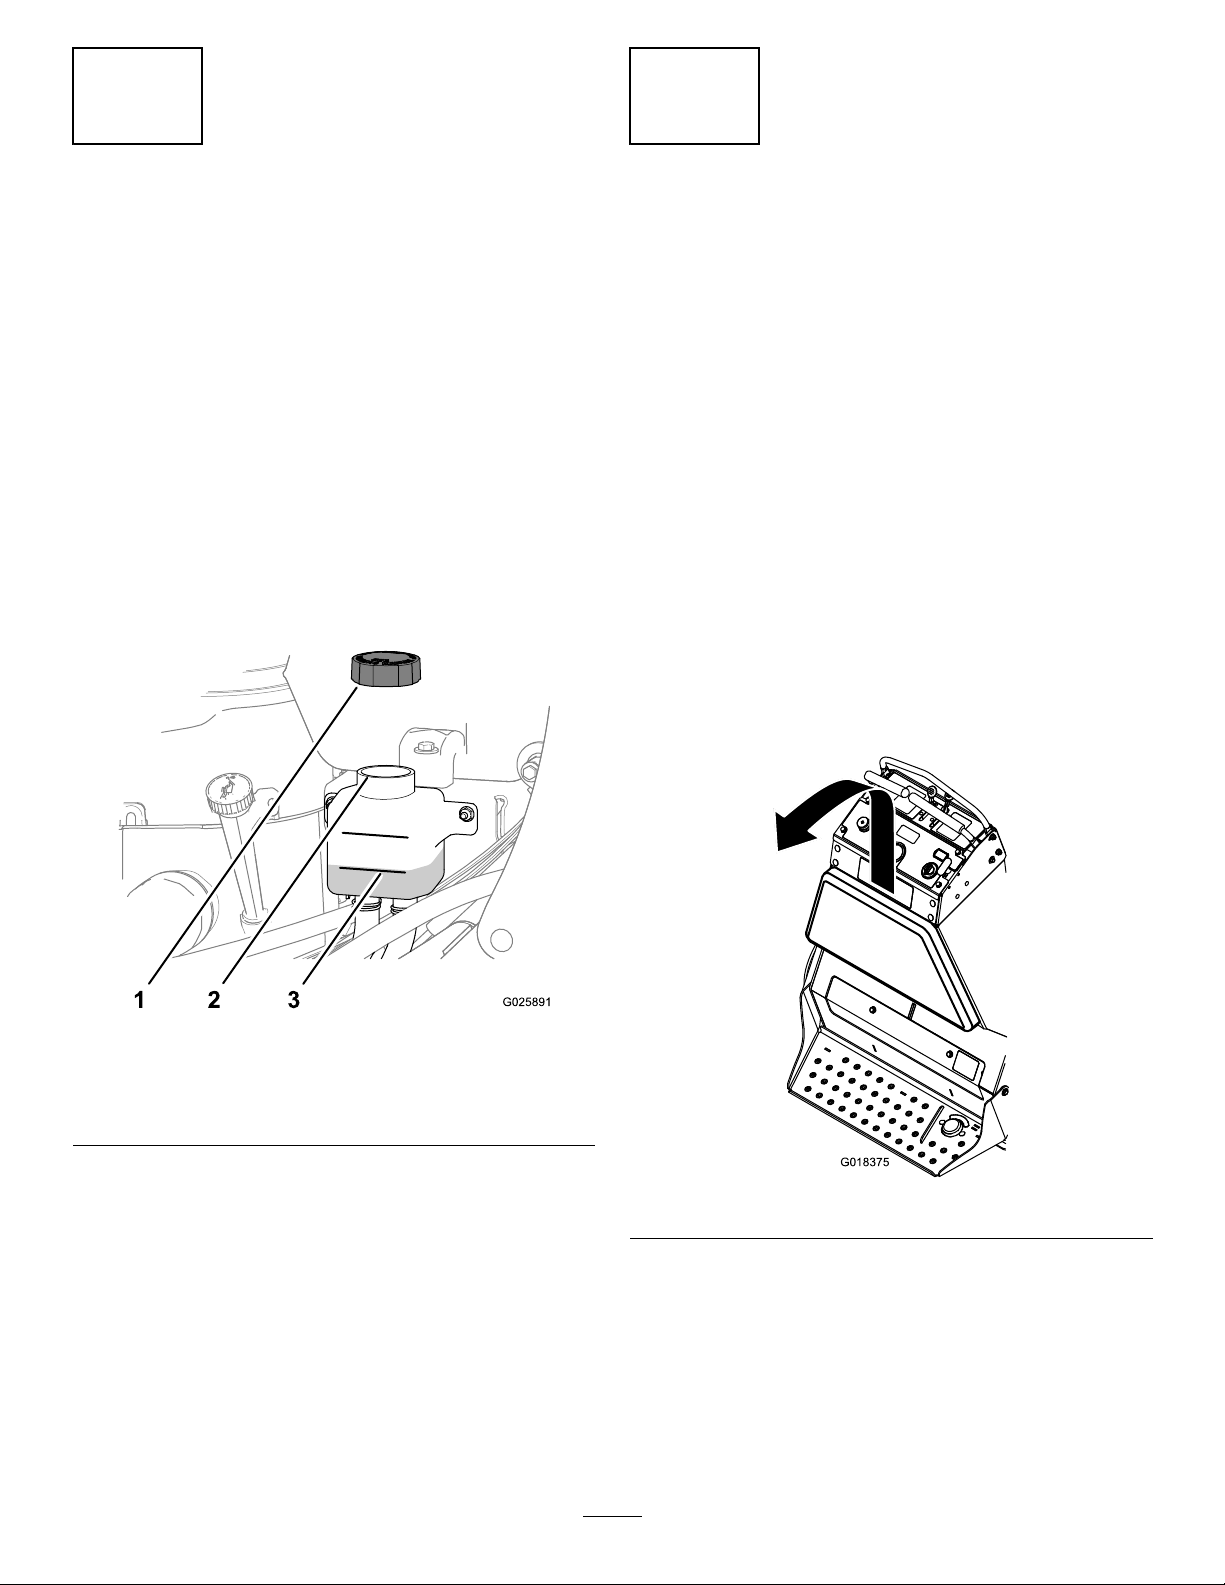
3.Checkthehydraulic-oillevelintheexpansiontank
(Figure5).
Note:Thetransmission-oillevelshouldcovertheFull
Coldlinemoldedintothesideofthetank.
Figure5
1.Cap3.FullColdline
2.Fillerneck(expansion
tank)
4.Ifnecessary,addthespeciedtransmissionoiluntil
theoillevelisattheFullColdlineoftheexpansion
tank(Figure5).
5.Replacecapontotheexpansion-tankandtightenthe
capuntilitissnug.
Note:Donotovertightenexpansion-tankcap.
5
ServicingtheAuxiliary
HydraulicOil
NoPartsRequired
Procedure
Hydraulicoiltype:AW-32hydrooil
Note:Themachineisshippedwithhydraulicoilinthe
reservoir.
1.Runthemachineforapproximately15minutestoallow
anyextraairtopurgeoutofthehydraulicsystem.
2.Completelyraiseandlowertines3timestopurgethe
air.
3.Shutofftheengineandallowthemachinetocool
down.
4.Loosenthe4boltsinsidetheframesecuringthepad
tothemachine.
5.Liftthepadupandbacktoremoveit(Figure6).
G018375
Figure6
6.Removethecapandcheckhydraulicoillevelinthe
reservoir(Figure7).
Note:Thehydraulicoillevelshouldcovertheword
Coldthatisembossedintothebafeofthereservoir.
13

Figure7
1.Coldoillevel2.Hotoillevel
7.Ifnecessary,addthespeciedhydraulicoiltothe
reservoiruntiltheoilcoverstheColdoillevelonthe
bafe(Figure7).
Note:ThebafeinthereservoirislabeledHotand
Cold.Youwillllthereservoirtotheappropriatelevel
dependinguponthetemperatureoftheoil.Theoil
levelwillvarywiththetemperatureoftheoil.The
Coldlevelshowstheleveloftheoilwhenitisat24°C
(75°F).TheHotlevelshowsthelevelofoilwhenit
isat107°C(225°F).
Forexample:Iftheoilisatambient-airtemperature
(about24°C(75°F)),llonlytotheColdlevel.Ifthe
oilisabout65°C(150°F),lltohalfwaybetweenthe
HotandColdlevels.
8.Replacehydraulicreservoircapandtightenuntilsnug
(Figure7).
Note:Donotovertightenthereservoircap.
9.Installthepadthatyouremovedinsteps4and5top
theframe,andtightenthe4boltsto1978to2542
N-cm(175to225lb-in).
6
RemovingCylinderStop(for
Model33518)
NoPartsRequired
Procedure
Note:Thetinesmustbeintheraisedpositionbefore
removingthecylinderstop.Runningtheenginewillcharge
thehydraulicsystemandraisethetines.
1.Addasmallamountoffueltothefueltank;referto
AddingFuel(page18).
2.Openthefuel-shutoffvalvebyaligningtheleverforthe
fuel-shutoffvalvewiththefuelline;refertoOpening
theFuelShut-offValve(page21).
3.Movethetraction-controlleverstotheneutralposition
andsettheparkingbrake;refertoTraction-Control
Levers(page15).
4.PlacethethrottlemidwaybetweentheSlowandFast
positions;refertoThrottleLever(page15).
5.Pushforwardthechokelevertosetthechoketothe
Onposition;refertoChokeLever(page15).
6.TurntheignitionswitchtotheStartposition;referto
IgnitionSwitch(page16).
Note:Releasetheswitchassoonastheenginestarts.
Important:Donotcranktheenginecontinuously
formorethan10secondsatatime.Iftheengine
doesnotstart,allowa60secondcool-downperiod
betweenstartingattempts.Failuretofollowthese
guidelinescanburnoutthestartermotor.
7.GraduallymovetheleverforthechokelevertotheOff
positionastheenginewarmsup.
Note:Allowtheenginetorunanadditional30
seconds
8.TurntheignitionswitchtotheOffpositiontostop
theengine.
9.Removethekeyandpullthewiresoffofthespark
plugs.
Note:Pushthewiresasidesotheydonotaccidentally
contactthesparkplugs.
10.Removeandretainthehairpin,clevispin,andcylinder
stopasshowninFigure8.
Figure8
1.Hairpin3.Cylinderstop
2.Clevispin4.Cylinder
11.Replacethespark-plugwires.
14
ProductOverview
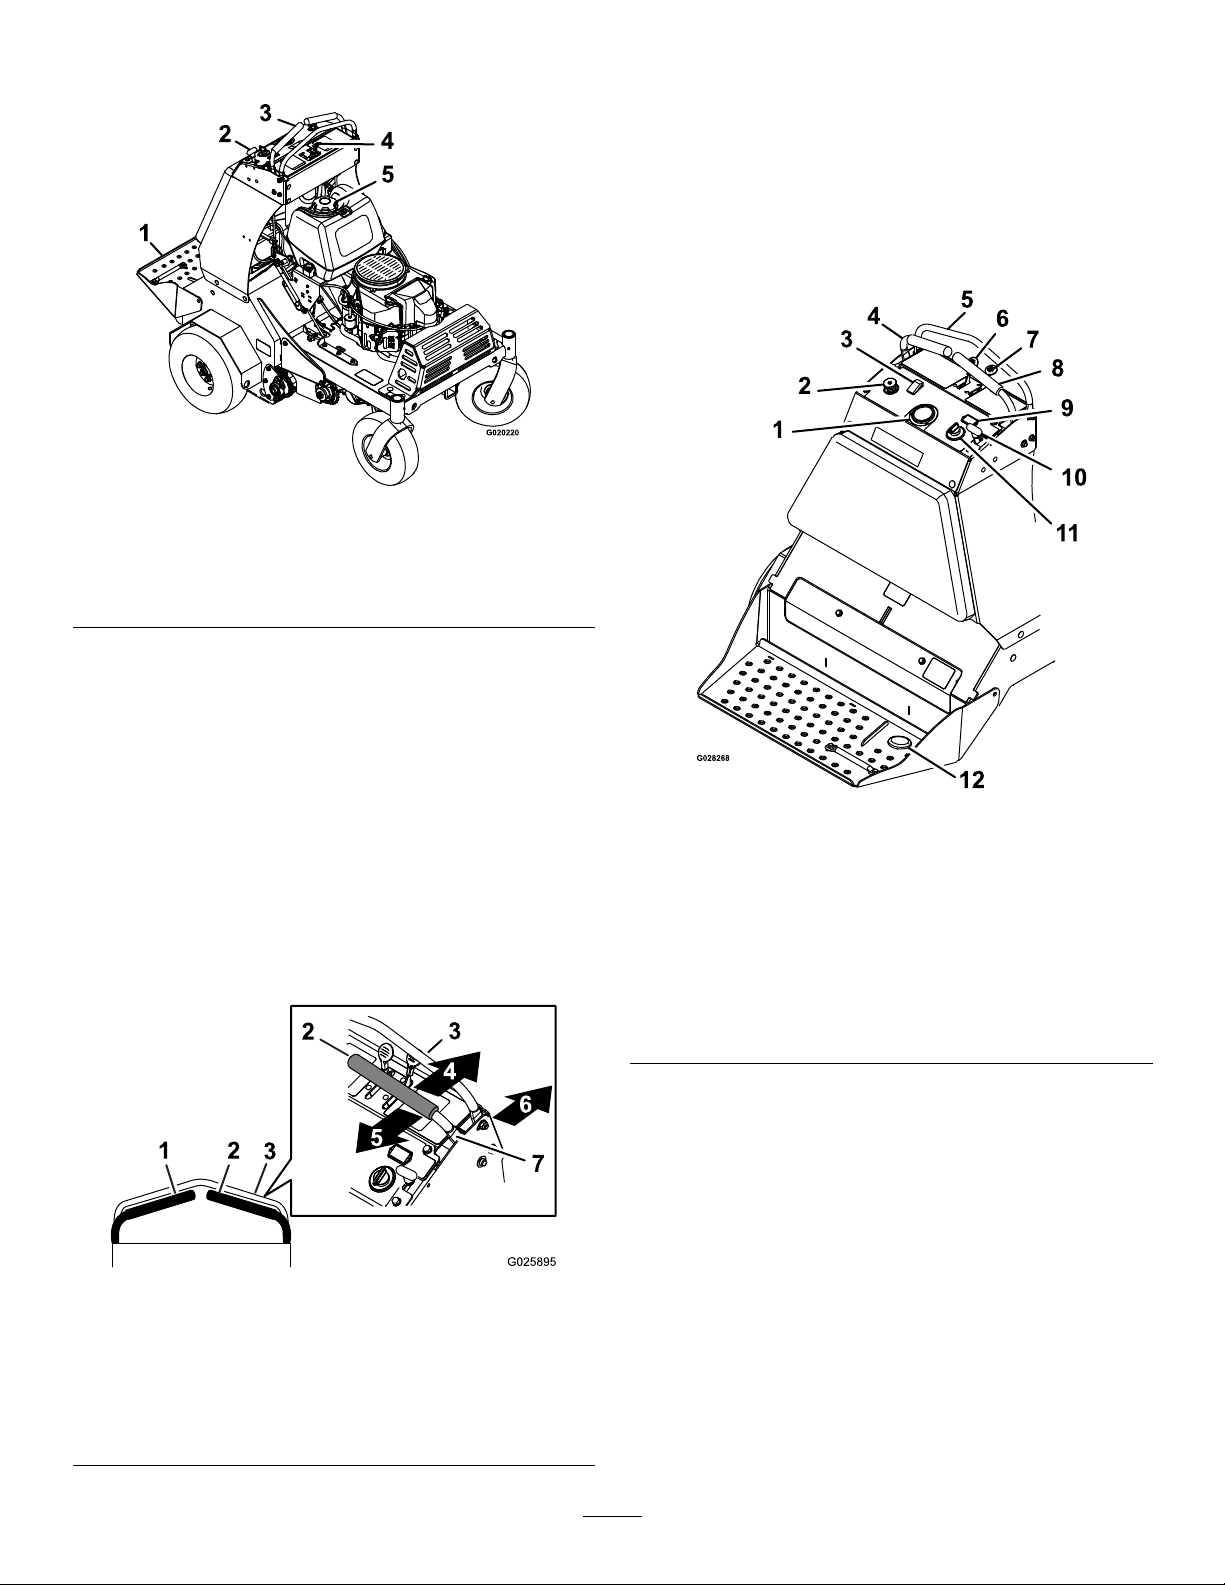
Figure9
1.Platform4.Enginecontrols
2.Parking-brakeknob5.Fuelcap
3.Traction-controllevers
Controls
Traction-ControlLevers
Thetraction-controlleversarelocatedoneachsideofthe
topconsole,andcontroltheforwardandreversemotionof
themachine.
Movetheleversforwardorbackwardtocontrolthedrive
wheelonthesamesideforwardorreverserespectively.The
wheelspeedisproportionaltotheamounttheleverismoved.
Important:Thetinesrotatewhenthetraction-control
leversaremovedoutoftheNeutralposition.
Figure10
1.Lefthandtraction-control
lever
5.Reverse
2.Righthandtraction-control
lever
6.Frontofthemachine
3.Frontreferencebar7.Neutral
4.Forward
Tine-PressureControl
Thetine-pressurecontrolislocatedontheleftsideofthe
controlconsole(Figure11).
Usetheties-pressurecontroltoadjustthedownward
pressureonthetinesandcoredepth.Rotatethecontrol
counterclockwisetodecreasethepressureandthelengthof
theaerationplug;rotateclockwisetoincreasepressureand
increasethelengthoftheaerationplug.
Figure11
1.Tinedownpressuregauge7.Choke
2.Tinedownpressure
control
8.RHMotioncontrollever
3.On/Off-Tineground
engagementfootswitch
9.Hourmeter
4.LHMotioncontrollever10.Parkbrake
5.Frontreferencebar11.Ignitionswitch
6.Throttle12.Tinegroundengagement
footswitch
ThrottleLever
Thethrottlelever(Figure11)islocatedonthecontrolconsole
(redlever).
Usethethrottlelevertocontrolenginespeed.Movethe
throttleleverforwardtoincreaseenginespeed;movingthe
throttlelevertotherearwardtodecreaseenginespeed.
Note:Movethethrottleleverforwardintothedetentfor
fullthrottle.
ChokeLever
Thechokelever(Figure11)islocatedonthecontrolconsole
(blacklever).
15
Usethechokeleverisusedtoaidinstartingacoldengine.
MovethechokeleverforwardtosetthechoketotheOn
position;movethechokelevertotherearwardtoreducethe
choke.
Note:Pullthechokeleverbackintothedetenttosetthe
choketotheOffposition.
Note:DonotrunawarmenginewithchokeintheOn
position.
Parking-BrakeHandle
Theparking-brakehandleislocatedonthecontrolconsole,
totherightoftheignitionswitch(Figure11).
Note:Thebrakehandlesetsaparkingbrakeineachofthe
transmissions.
•Tosetthebrake,pullhandleoutandslideitrearward.
•Torelease,pushthehandleforwardintothedetent.
Whenparkingonasteepslope,thewheelsmustbechocked
orblockedinadditiontothebrakebeingset.Themachine
mustbetieddownandbrakesetwhentransporting.
HourMeter
Thehourmeterislocatedabovetheignitionswitch(Figure
11).
Thehourmeterdisplaysthetotalnumberofhoursthatyou
haverunthemachine.
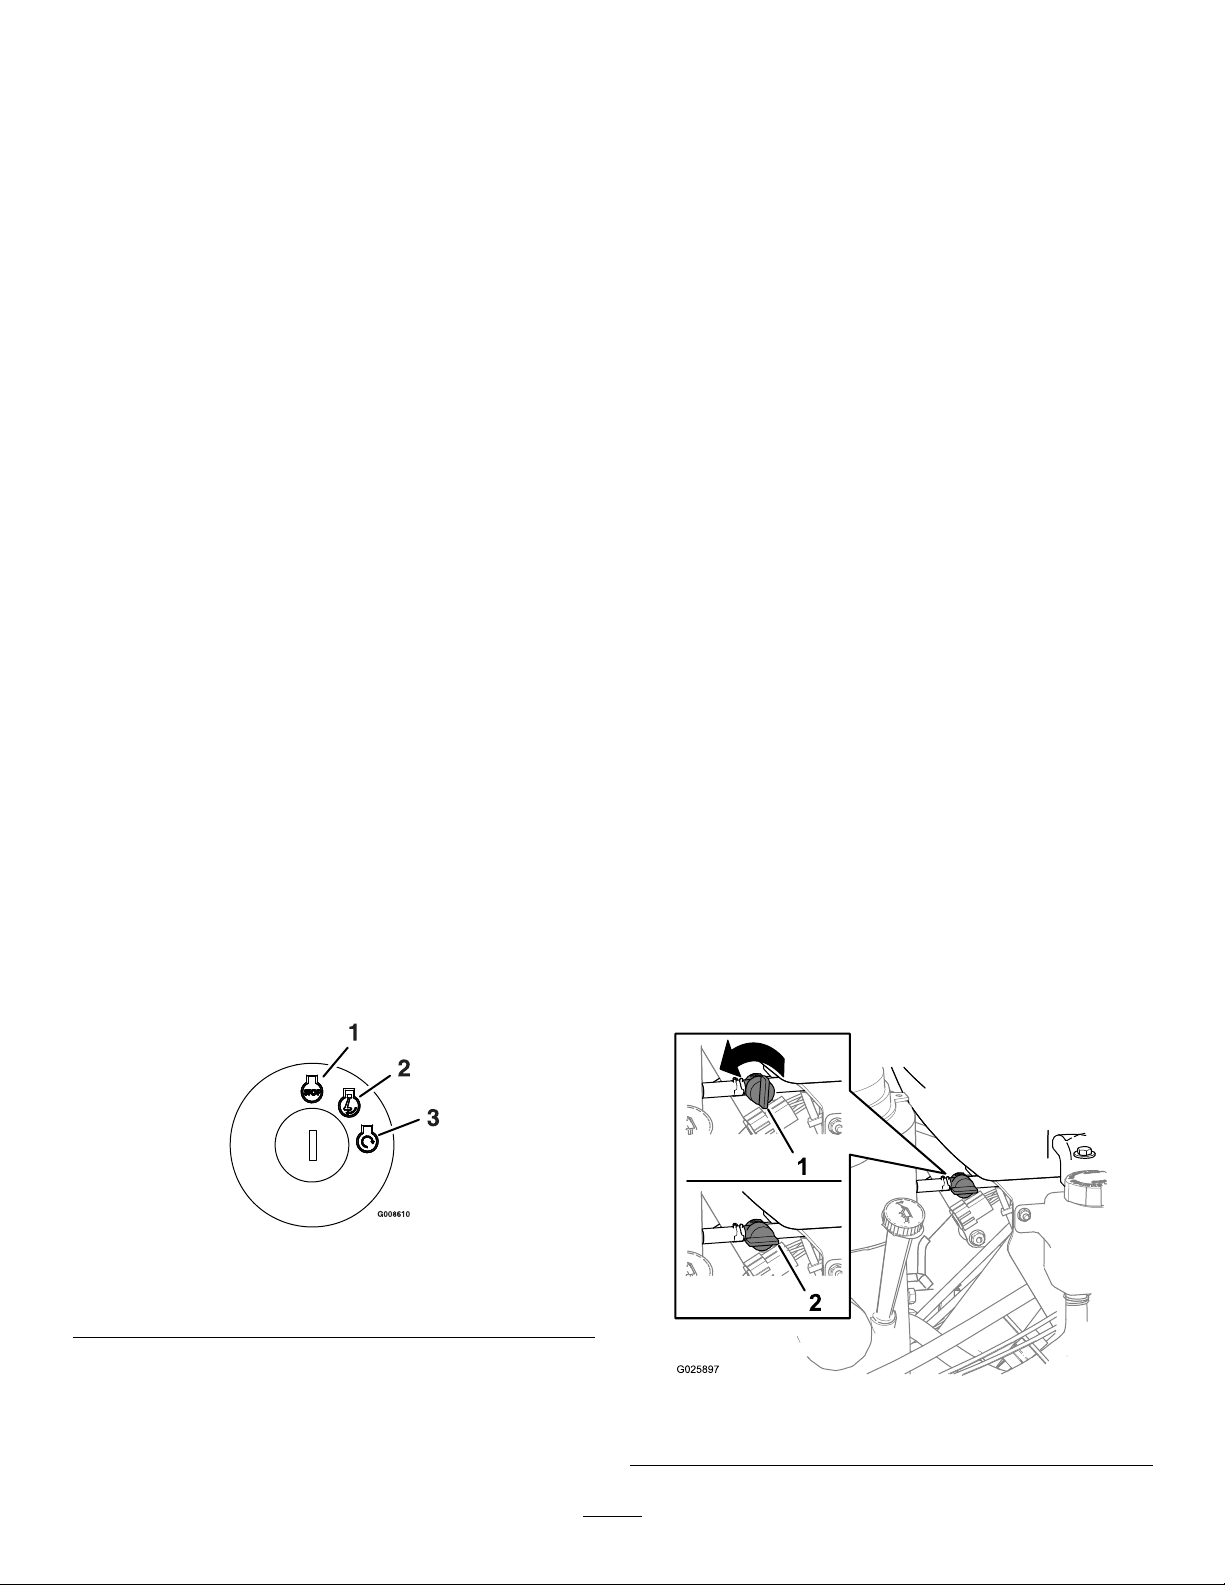
IgnitionSwitch
Theignitionswitchislocatedontherightsideofthecontrol
console(Figure11).
Usetheignitionswitchisusedtostartandstoptheengine.
Theswitchhas3positions:Off,On,andStart(Figure12).
Figure12
1.Off3.Start
2.On
On/OffTineGroundEngagementFoot
Switch
Locatedabovethetinedownpressurecontrolonthecontrol
console.
Pushdownonthetopoftheswitchtoenablethetines
groundengagementfootswitch.Pushdownontherearof
theswitchtodisablethefootswitch..
Tine-PressureGauge
Thetine-pressuregaugeislocatedinthemiddleofthecontrol
console(Figure11).
Thetine-pressuregaugetoindicatesthedownwardpressure
themachineexertsonthetineswhenaerating.
Tines-ElevationSwitch
Keephandsandfeetawayfromthetines.Makesurethe
tinesareaisclearofanyobstructionsbeforeloweringit.
Thetine-elevationswitchislocatedontheoperatorplatform
(Figure11).
Tolowerthetinesintotheground,standonthetine-elevation
switch.Toraisethetines,removeyourfootfromtheswitch.
FuelShut-OffValve
Thefuelshut-offvalveislocatedbehindtheengineandunder
thefueltank(Figure13).
Usethefuel-shutoffvalvetoshutoffthefuelwhenthe
machinewillnotbeusedforafewdays,whentransporting
themachinetoandfromthejobsite,orwhenthemachineis
parkedinsideabuilding.
•Toopenforfuelshut-offvalve,rotatethehandleofthe
fuelshut-offvalveuntilitisalignedwiththefuelline.
•Toclosethefuelshut-offvalve,rotatethehandle90°to
thefuelline.
Figure13
1.Offposition2.Onposition
16
Specications
Height132.1cm(52inches)
Length162.6cm(64inches)
Width121.3cm(47.75inches)
AerationWidth76.2cm(30inches)
Coringrange5.1–12.7cm(2–5inches)
Weight460kg(1,015lb)
Operation
Note:Determinetheleftandrightsidesofthemachine
fromthenormaloperatingposition.
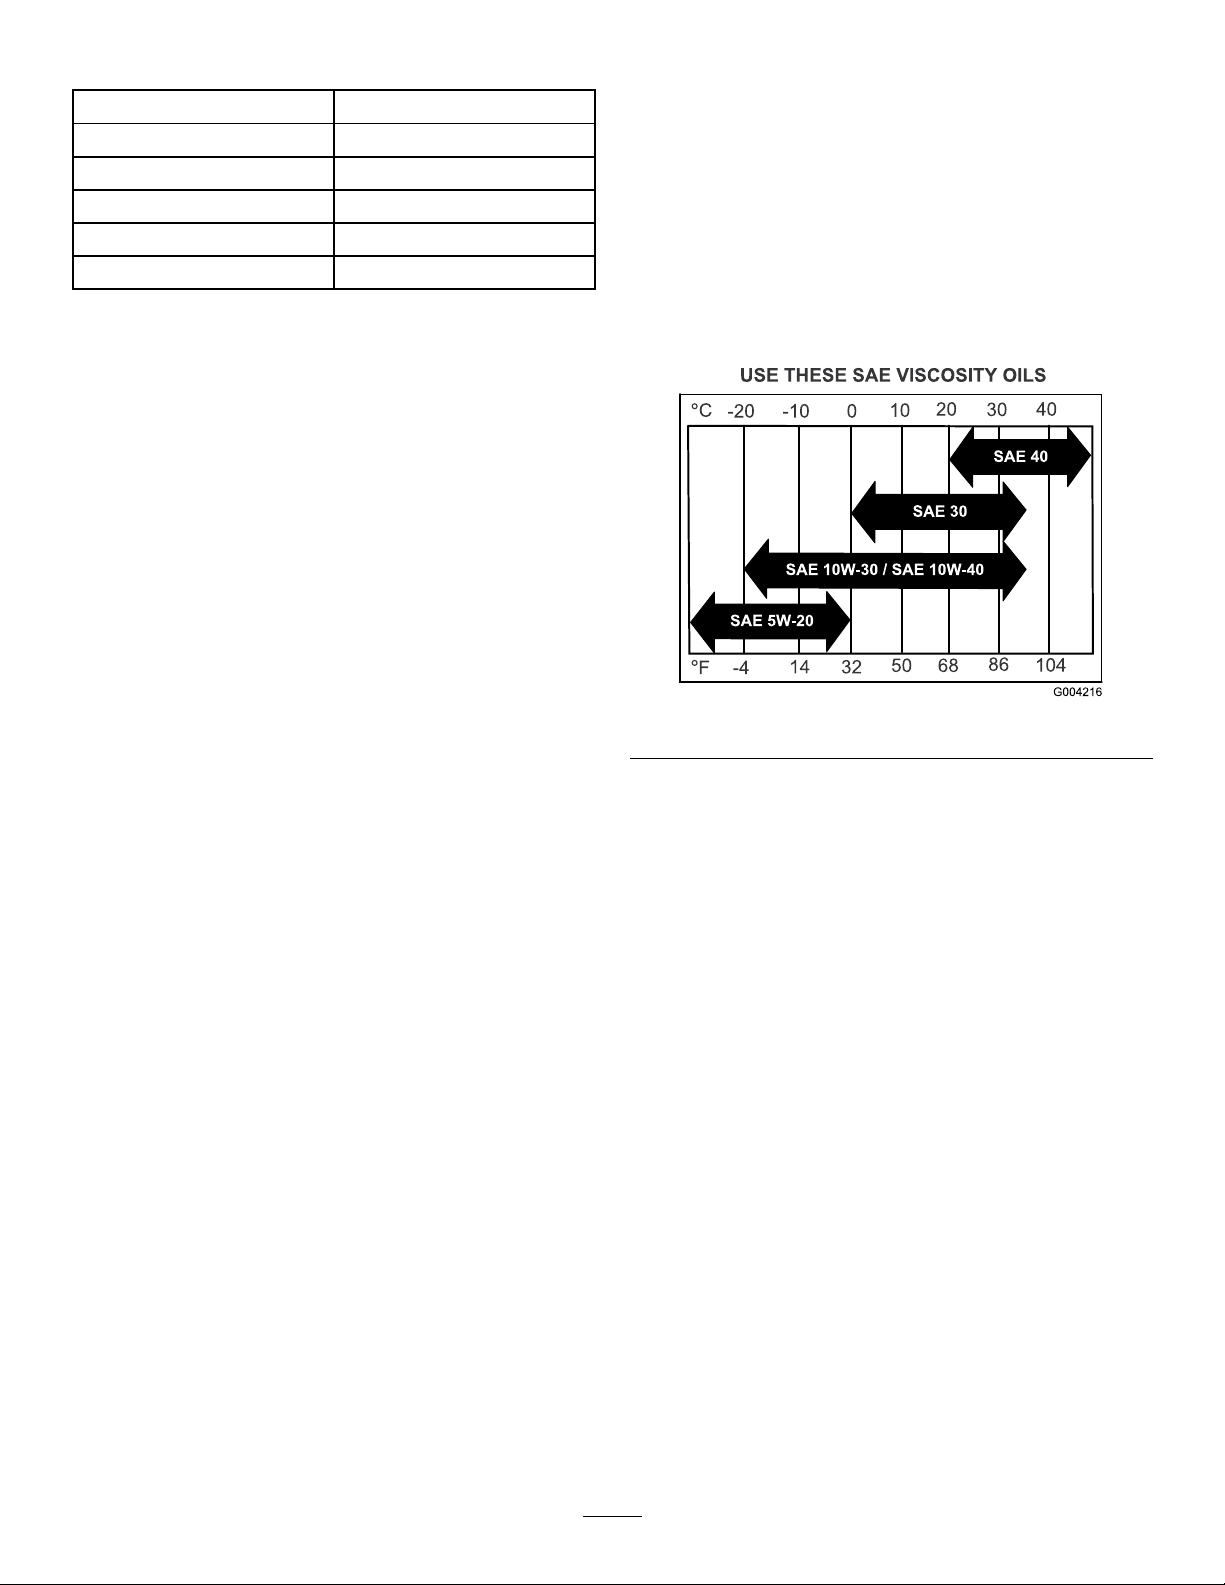
CheckingtheEngine-OilLevel
ServiceInterval:Beforeeachuseordaily
OilType:Detergentoil(APIserviceSJorhigher)
Oilviscosity:Refertothetablebelow.
Figure14
Important:Donotoperatetheenginewiththeoillevel
belowtheLow(orAdd)markonthedipstick,orover
theFullmark.
1.Stoptheengine,removethekey,andwaitforallmoving
partstostopbeforeleavingtheoperatingposition
2.Allowtheenginetocool.
3.Checktheengine-oillevelasshowninFigure15.
17

Figure15
4.Iftheoillevelislow ,wipeofftheareaaroundtheoil
llcap,removecapandaddthespeciedoiluntilthe
oillevelisattheFullmarkonthedipstick.
Note:Donotoverlltheenginewithoil.
AddingFuel
Fueltankcapacity:18.9l(5USGallons)
•Forbestresults,useonlyclean,fresh(lessthan30days
old),unleadedgasolinewithanoctaneratingof87or
higher((R+M)/2ratingmethod).
•ETHANOL:Gasolinewithupto10%ethanol(gasohol)
or15%MTBE(methyltertiarybutylether)byvolume
isacceptable.EthanolandMTBEarenotthesame.
Gasolinewith15%ethanol(E15)byvolumeisnot
approvedforuse.Neverusegasolinethatcontainsmore
than10%ethanolbyvolume,suchasE15(contains15%
ethanol),E20(contains20%ethanol),orE85(contains
upto85%ethanol).Usingunapprovedgasolinemay
causeperformanceproblemsand/orenginedamage
whichmaynotbecoveredunderwarranty.
•Donotusegasolinecontainingmethanol.
•Donotstorefueleitherinthefueltankorfuelcontainers
overthewinterunlessafuelstabilizerisused.
•Donotaddoiltogasoline
DANGER
Incertainconditions,gasolineisextremely
ammableandhighlyexplosive.Areorexplosion
fromgasolinecanburnyouandothersandcan
damageproperty.
•Fillthefueltankoutdoors,inanopenarea,and
whentheengineiscold.Wipeupanygasoline
thatspills.
•Donotllthefueltankcompletelyfull.Add
gasolinetothefueltankuntilthelevelis6to13
mm(1/4to1/2inch)belowthebottomofthe
llerneck.Thisemptyspaceinthetankallows
thegasolinetoexpand.
•Neversmokewhenhandlinggasoline,andstay
awayfromanopenameorwhereasparkmay
ignitethegasolinefumes.
•Storegasolineinanapprovedfuelcontainerand
keepitoutofthereachofchildren.
•Neverbuymorethana30-daysupplyof
gasoline.
18

DANGER
Incertainconditionsduringfueling,static
electricitycanbereleasedcausingasparkwhich
canignitethegasolinevapors.Areorexplosion
fromgasolinecanburnyouandothersandcan
damageproperty.
•Alwaysplacegasolinecontainersontheground
awayfromyourvehiclebeforelling.
•Donotllgasolinecontainersinsideavehicleor
onatruckortrailerbedbecauseinteriorcarpets
orplastictruckbedlinersmayinsulatethe
containerandslowthelossofanystaticcharge.
•Whenpractical,removegas-poweredequipment
fromthetruckortrailerandrefueltheequipment
withitswheelsontheground.
•Ifthisisnotpossible,thenrefuelsuch
equipmentonatruckortrailerfromaportable
container,ratherthanfromagasolinedispenser
nozzle.
•Ifagasolinedispensernozzlemustbeused,
keepthenozzleincontactwiththerimofthe
fueltankorcontaineropeningatalltimesuntil
fuelingiscomplete.
WARNING
Gasolineisharmfulorfatalifswallowed.Long-term
exposuretovaporscancauseseriousinjuryand
illness.
•Avoidprolongedbreathingofvapors.
•Keepfaceawayfromnozzleandgastankor
conditionerbottleopening.
•Avoidcontactwithskin;washoffspillagewith
soapandwater.
UsingStabilizer/Conditioner
Useafuelstabilizer/conditionerinthemachinetoprovide
thefollowingbenets:
•Keepsgasolinefreshduringstorageof90daysorless.
Forlongerstorageitisrecommendedthatthefueltank
bedrained.
•Cleanstheenginewhileitruns
•Eliminatesgum-likevarnishbuildupinthefuelsystem,
whichcauseshardstarting
Important:Donotusefueladditivescontaining
methanolorethanol.
Addthecorrectamountofgasstabilizer/conditionerto
thegas.
Note:Afuelstabilizer/conditionerismosteffective
whenmixedwithfreshgasoline.Tominimizethechance
ofvarnishdepositsinthefuelsystem,usefuelstabilizer
atalltimes.
FuelingtheMachine
1.Cleanaroundthefueltankcap.
2.Removethecapfromthetank.
3.Fillthefueltankwithunleadedgasolinetowithin6to
13mm(1/4to1/2inch)fromthetopofthetank.Do
notllintothellerneck.
Important:Donotllthetankmorethan6mm
(1/4inch)fromthetopofthetankbecausethe
gasolinemusthaveroomtoexpand.
4.Installthefueltankcapandwipeupanyspilled
gasoline.
LubricatingtheChains
CheckingtheConditionofthe
Sprockets
ServiceInterval:Beforeeachuseordaily
1.Stopengine,settheparkingbrake,waitforallmoving
partstostop,andremovekey.
2.Inspectsprocketsforwearandreplaceasrequired
(Figure16).
19

Figure16
1.Sprockets2.Chains
CheckingtheConditionoftheChains
ServiceInterval:Beforeeachuseordaily
1.Stopengine,settheparkingbrake,waitforallmoving
partstostop,andremovekey.
2.Checkthechaintension(Figure16)atbothsidesof
themachine.
Note:Thechainsshouldmoveupanddown6to12
mm(1/4to1/2inch).
3.Ifchainspoporsnap;refertoAdjustingtheJackshaft
DriveChainTension(page38),AdjustingtheDrive
WheelChainTension(page39),orAdjustingthe
Tine-DriveChain(page47).
LubricatingtheChains
ServiceInterval:Beforeeachuseordaily
Important:Donotlubricatechainswithpenetratingoil
orsolvents.Useoilorchainlubricant.
1.Stopengine,settheparkingbrake,waitforallmoving
partstostop,andremovekey.
2.Raisethemachineandsupportitwithjackstandswith
a460kg(1,015lb)capacity.
CAUTION
Raisingthemachineforserviceor
maintenancerelyingsolelyonmechanical
orhydraulicjackscouldbedangerous.The
mechanicalorhydraulicjacksmaynotbe
enoughsupportormaymalfunctionallowing
themachinetofall,whichcouldcauseinjury.
Donotrelysolelyonmechanicalorhydraulic
jacksforsupport.Useadequatejackstands
orequivalentsupport.
3.Startengineandmovethrottlelevelaheadto1/2
throttleposition.
WARNING
Enginemustberunninganddrivewheels
mustbeturningsoadjustmentscanbe
performed.Contactwithmovingpartsorhot
surfacesmaycausepersonalinjury.
Keepngers,hands,andclothingclearof
rotatingcomponentsandhotsurfaces.
4.Releasetheparkingbrake.
5.Withtheenginerunning,slowlymovethe
traction-controlleversforwardandlubricateallsix
chains(Figure16).
6.Checktheconditionandtensionofthechains;referto
CheckingtheConditionoftheChains(page20).
CheckingtheSafetyInterlock
System
ServiceInterval:Beforeeachuseordaily
CAUTION
Ifsafetyinterlockswitchesaredisconnectedor
damagedthemachinecouldoperateunexpectedly
causingpersonalinjury.
•Donottamperwiththeinterlockswitches.
•Checktheoperationoftheinterlockswitches
dailyandreplaceanydamagedswitchesbefore
operatingthemachine.
UnderstandingtheSafetyInterlockSystem
Thesafetyinterlocksystemisdesignedtopreventtheengine
fromstartingunlessthetraction-controlleversareinthe
neutralposition.
CheckingtheSafetyInterlockSystem
1.Disconnectthespark-plugwires;refertoCheckingthe
SparkPlugs(page33).
20
This manual suits for next models
3
Table of contents
Other Toro Tiller manuals


Popular Tiller manuals by other brands


Billy Goat
Billy Goat AE401 owner's manual

SNOWJOE
SNOWJOE Sunjoe 24V-X2-TLR14-RM Operator's manual

Rinieri
Rinieri Velox Series Instructions for use and maintenance

Benassi
Benassi BL 10 Use and maintenance handbook

Troy-Bilt
Troy-Bilt PONY 664D Operator's manual

Troy-Bilt
Troy-Bilt 12174 Owner's/operator's manual


