Toro 23515 User manual

FormNo.3397-179RevA
21inWalk-BehindAerator
ModelNo.23515—SerialNo.315000001andUp
ModelNo.33515—SerialNo.315000001andUp
Registeratwww.Toro.com.
OriginalInstructions(EN)*3397-179*A

WARNING
CALIFORNIA
Proposition65Warning
Thisproductcontainsachemicalorchemicals
knowntotheStateofCaliforniatocausecancer,
birthdefects,orreproductiveharm.
Theengineexhaustfromthisproduct
containschemicalsknowntotheStateof
Californiatocausecancer,birthdefects,
orotherreproductiveharm.
ThissparkignitionsystemcomplieswithCanadianICES-002.
Important:Thisengineisnotequippedwithaspark
arrestermufer.ItisaviolationofCaliforniaPublic
ResourceCodeSection4442touseoroperatetheengine
onanyforest-covered,brush-covered,orgrass-covered
land.Otherstatesorfederalareasmayhavesimilarlaws.
Introduction
Thisaerator,whichiscontrolledbyawalkingoperator,
isintendedtobeusedbytrainedoperatorsinresidential
andcommercialapplications.Itisprimarilydesignedfor
aeratingsmalltomid-sizedareasofwell-maintainedlawnson
residentialgrounds,parks,sportselds,andoncommercial
grounds.
Readthisinformationcarefullytolearnhowtooperateand
maintainyourproductproperlyandtoavoidinjuryand
productdamage.Youareresponsibleforoperatingthe
productproperlyandsafely.
YoumaycontactTorodirectlyatwww .Toro.comforproduct
safetyandoperationtrainingmaterials,accessoryinformation,
helpndingadealer,ortoregisteryourproduct.
Wheneveryouneedservice,genuineToroparts,oradditional
information,contactanAuthorizedServiceDealerorToro
CustomerServiceandhavethemodelandserialnumbersof
yourproductready.Figure1illustratesthelocationofthe
modelandserialnumbersontheproduct.Writethenumbers
inthespaceprovided.
Figure1
1.Locationofthemodelandserialnumbers
ModelNo.
SerialNo.
Thismanualidentiespotentialhazardsandhassafety
messagesidentiedbythesafetyalertsymbol(Figure2),
whichsignalsahazardthatmaycauseseriousinjuryordeath
ifyoudonotfollowtherecommendedprecautions.
Figure2
1.Safetyalertsymbol
Thismanualuses2wordstohighlightinformation.
Importantcallsattentiontospecialmechanicalinformation
andNoteemphasizesgeneralinformationworthyofspecial
attention.
©2015—TheToro®Company
8111LyndaleAvenueSouth
Bloomington,MN554202
Contactusatwww.Toro.com.
PrintedintheUSA
AllRightsReserved

Contents
Safety...........................................................................3
SafeOperatingPractices...........................................3
SlopeIndicator.......................................................5
SafetyandInstructionalDecals.................................6
Setup............................................................................9
UnfoldingtheHandle..............................................9
CheckingtheOilLevel.............................................9
ProductOverview..........................................................9
Controls................................................................9
Specications........................................................10
Attachments/Accessories........................................10
Operation....................................................................10
CheckingtheEngine-OilLevel.................................10
FillingtheFuelTankwithGasoline...........................11
StartingtheEngine.................................................12
StoppingtheEngine...............................................12
DrivingtheMachine...............................................13
Aerating................................................................13
AddingWeight.......................................................14
AdjustingtheCoringDepth.....................................14
AdjustingtheTine-ControlLever.............................15
TransportingtheMachine........................................15
OperatingTips......................................................15
Maintenance.................................................................16
RecommendedMaintenanceSchedule(s)......................16
PremaintenanceProcedures........................................17
AccessingtheTines................................................17
TippingtheMachine...............................................17
Lubrication...............................................................18
GreasingtheTineShaftBearings..............................18
LubricatingandCheckingtheDriveChainsand
Sprockets...........................................................18
EngineMaintenance..................................................19
ServicingtheAirCleaner.........................................19
ChangingtheEngineOil.........................................19
ChangingtheOilFilter............................................20
ServicingtheSparkPlug..........................................21
CheckingtheSparkArrester(ifequipped)..................21
FuelSystemMaintenance...........................................22
EmptyingtheFuelTankandCleaningtheFuel
Filter.................................................................22
ReplacingtheFuelFilter..........................................22
DriveSystemMaintenance.........................................23
CheckingtheTirePressure......................................23
AdjustingtheTensionofTine-DriveChains...............23
BeltMaintenance......................................................24
CheckingtheHydrostaticDriveBelt.........................24
ControlsSystemMaintenance.....................................24
AdjustingtheSelf-PropelDrive................................24
HydraulicSystemMaintenance....................................25
ChangingtheHydraulicTransmissionFluid................25
TineMaintenance......................................................26
Checking/ReplacingTines.......................................26
Storage........................................................................27
Troubleshooting...........................................................28
Safety
Improperuseormaintenancebytheoperatoror
ownercanresultininjury.Toreducethepotential
forinjury,complywiththesesafetyinstructionsand
alwayspayattentiontothesafetyalertsymbol,which
means
Caution
,
W ar ning
,or
Danger
—personalsafety
instruction.Failuretocomplywiththeinstructionmay
resultinpersonalinjuryordeath.
SafeOperatingPractices
ThefollowinginstructionsareadaptedfromtheANSI
B71.4—2012andB71.8(R2005)standard.
Training
•ReadtheOperator’sManualandothertrainingmaterial.If
theoperator(s)ormechanic(s)cannotreadEnglishitis
theowner’sresponsibilitytoexplainthismaterialtothem.
•Becomefamiliarwiththesafeoperationoftheequipment,
operatorcontrols,andsafetysigns.
•Alloperatorsandmechanicsshouldbetrained.The
ownerisresponsiblefortrainingtheusers.
•Neverletchildrenoruntrainedpeopleoperateorservice
theequipment.Localregulationsmayrestricttheageof
theoperator.
•Theowner/usercanpreventandisresponsiblefor
accidentsorinjuriesoccurringtohimselforherself,other
peopleorproperty.
Preparation
•Evaluatetheterraintodeterminewhataccessoriesand
attachmentsareneededtoproperlyandsafelyperform
thejob.Onlyuseaccessoriesandattachmentsapproved
bythemanufacturer.
•Wearappropriateclothingincludingsafetyglasses,hearing
protection,andsubstantial,slip-resistantfootwear.Long
hair,looseclothing,orjewelrymaygettangledinmoving
parts.
•Inspecttheareawheretheequipmentistobeusedand
removeallobjectssuchasrocks,toys,andwirewhichcan
becontactedbytheaerator.
•Useextracarewhenhandlinggasolineandotherfuels.
Theyareammableandvaporsareexplosive.
–Useonlyanapprovedcontainer.
–Neverremovethegascaporaddfuelwiththeengine
running.
–Allowtheenginetocoolbeforerefueling.
–Donotsmoke.
–Neverrefuelordraintheaeratorindoors.
•Checkthatthecontrols,safetyswitches,andshieldsare
attachedandfunctioningproperly.Donotoperateunless
theyarefunctioningproperly.
3

Operation
•Neverrunanengineinanenclosedarea.
•Onlyoperateingoodlight,keepingawayfromholesand
hiddenhazards.
•Besurealldrivesareinneutralbeforestartingengine.
•Neveroperatewithouttheshields,covers,orotherguards
securelyinplace.Besureallinterlocksarefunctioning
properly.
•Donotchangetheenginegovernorsettingoroverspeed
theengine.
•Raisethetines,stopthemachine,andstoptheengine
beforeleavingtheoperator’spositionforanyreason.
•Stoptheequipmentandinspectthetinesafterstrikingan
objectorifanabnormalvibrationoccurs.Makenecessary
repairsbeforeresumingoperation.
•Keephandsandfeetawayfromthetinearea.
•Bealert,slowdown,andusecautionwhenmakingturns.
Lookbehindandtothesidebeforechangingdirections.
•Slowdownandusecautionwhencrossingroadsand
sidewalks.
•Donotoperatetheaeratorundertheinuenceofalcohol
ordrugs.
•Lightningcancausesevereinjuryordeath.Iflightning
isseenorthunderisheardinthearea,donotoperate
themachine;seekshelter.
•Useextremecarewhenloadingorunloadingtheaerator
intoatrailerortruck.
•Usecarewhenapproachingblindcorners,shrubs,trees,
orotherobjectsthatmayobscurevision.
•Alwaysbeawareofobstaclesthatmaybeintheareaof
operation.Planyouraerationpathtoavoidcontactwith
anyobstaclebyyouorthemachine.
SlopeOperation
•Donotmakesuddenturnsorrapidspeedchanges.
•Reducespeedanduseextremecautiononslopes.
•Removeormarkobstaclessuchasrocks,treelimbs,etc.
fromtheoperatingarea.Tallgrasscanhideobstacles.
MaintenanceandStorage
•Waitforallmovementtostopbeforeadjusting,cleaning,
orrepairing.Raisethetines,stopthemachine,stopthe
engine,anddisconnectthespark-plugwire.
•Cleangrassanddebrisfromthetines,drives,mufers,and
enginetohelppreventres.Cleanupoilorfuelspillage.
•Lettheenginecoolbeforestoringanddonotstorenear
ame.
•Shutoffthefuelwhilestoringortransportingontrailers.
Donotstorefuelnearamesordrainindoors.
•Parktheaeratoronlevel,hardground.Neverallow
untrainedpersonneltoserviceit.
•Usejackstandsorsafetylatchestosupportthemachine
whenworkingunderit.
•Removethespark-plugwirebeforemakinganyrepairs.
•Keephandsandfeetawayfrommovingparts.Ifpossible,
donotmakeadjustmentswiththeenginerunning.
•Keepallpartsingoodworkingconditionandallhardware
tightened.Replaceallwornordamageddecals.
•UseonlyToro-approvedattachments.Thewarranty
maybevoidedifthemachineisusedwithunapproved
attachments.
4

SlopeIndicator
G01 1841
Figure3
Thispagemaybecopiedforpersonaluse.
1.Themaximumslopeyoucansafelyoperatethemachineonis20degrees.Usetheslopecharttodeterminethedegreeofslope
ofhillsbeforeoperating.Donotoperatethismachineonaslopegreaterthan20degrees.Foldalongtheappropriateline
tomatchtherecommendedslope.
2.Alignthisedgewithaverticalsurface,atree,building,fencepole,etc.
3.Exampleofhowtocompareslopewithfoldededge.
5
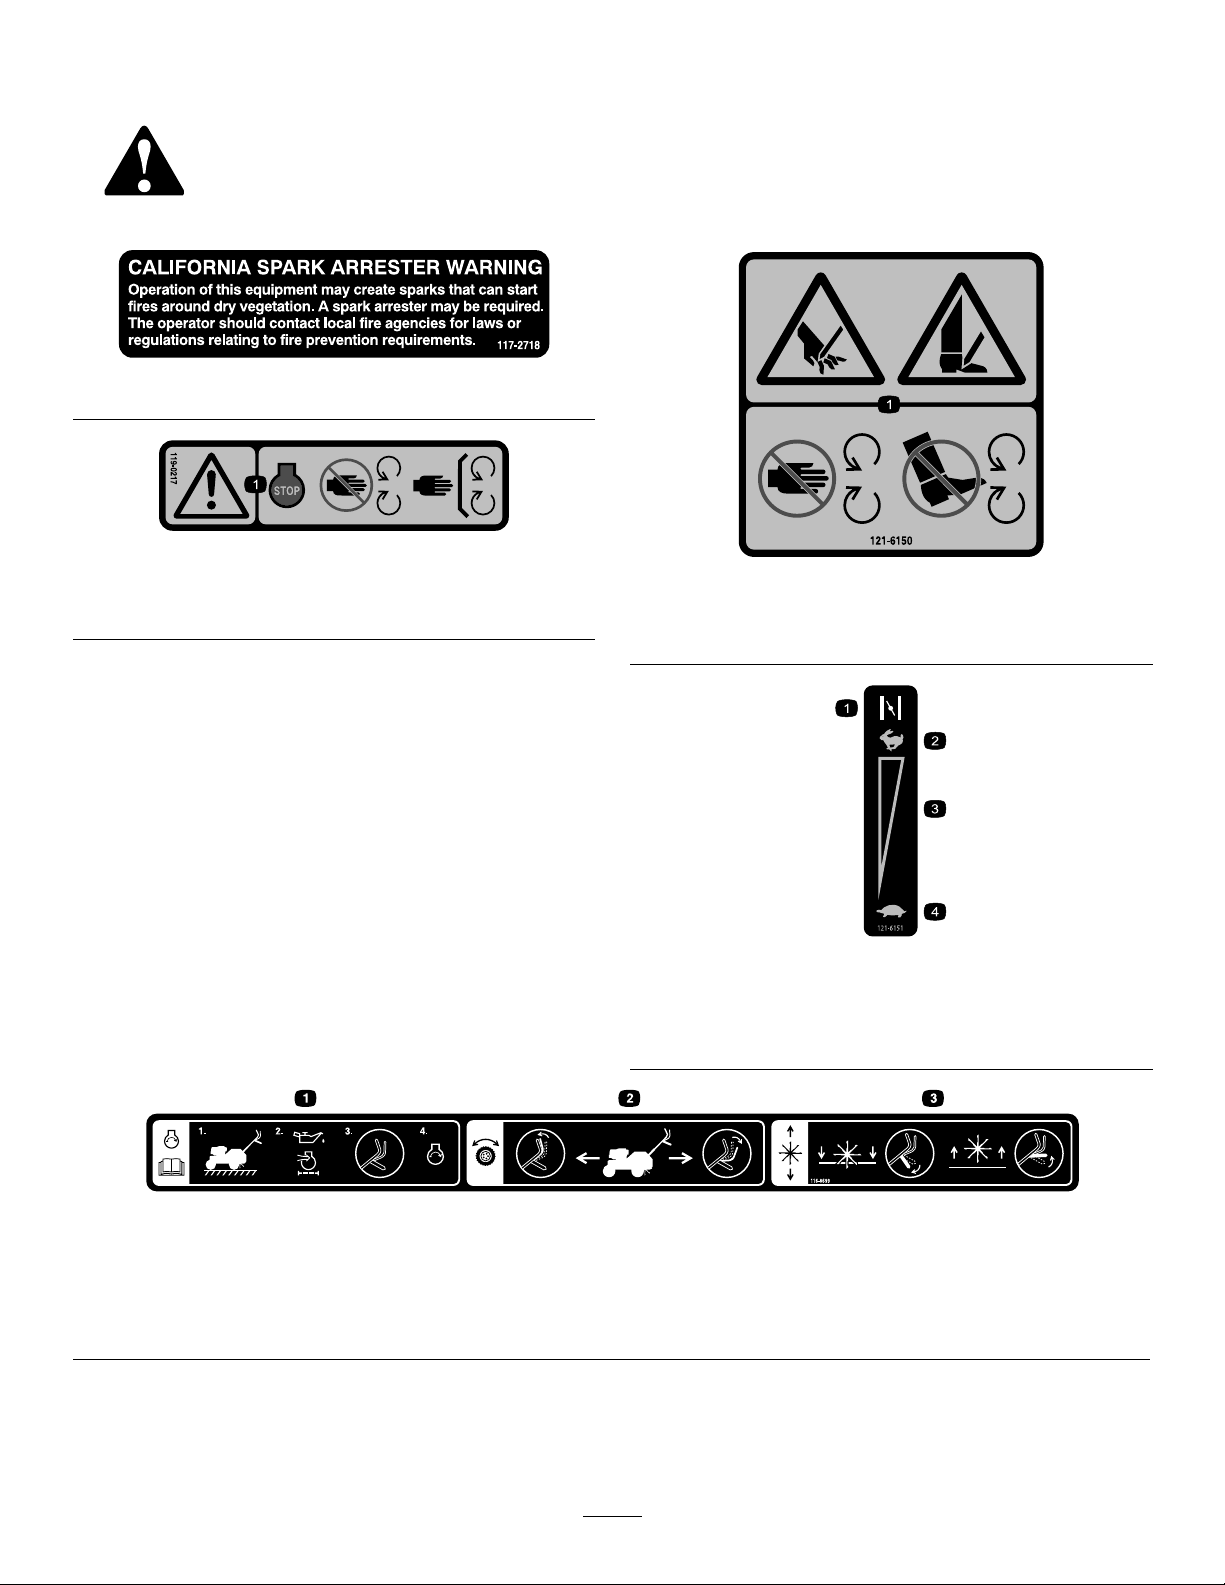
SafetyandInstructionalDecals
Safetydecalsandinstructionsareeasilyvisibletotheoperatorandarelocatednearanyareaofpotential
danger.Replaceanydecalthatisdamagedorlost.
117–2718
119-0217
1.Warning—stoptheengine;stayawayfrommovingparts;
keepallguardsandshieldsinplace.
121-6150
1.Cuttinghazardofhandandfoot–stayawayfrommoving
parts.
121-6151
1.Choke–on3.Continuousvariable
setting
2.Throttle–fast4.Throttle–slow
116-8699
1.Tostarttheengine,readtheOperator’s
Manual—(1)Parkthemachineona
levelsurface(2)Filltheenginewithoil
(3)Movethecontrolbarstoaneutral
position(4)Starttheengine.
2.Tractiondrive—movethetraction
controlleverforwardtomovethe
machineforward;movethetraction
controlleverbackwardtomovethe
machinebackward.
3.Raising/Loweringthetines—pushthe
controlleverdowntolowerthetines;
pullthecontrolleveruptoraisethe
tines.
6
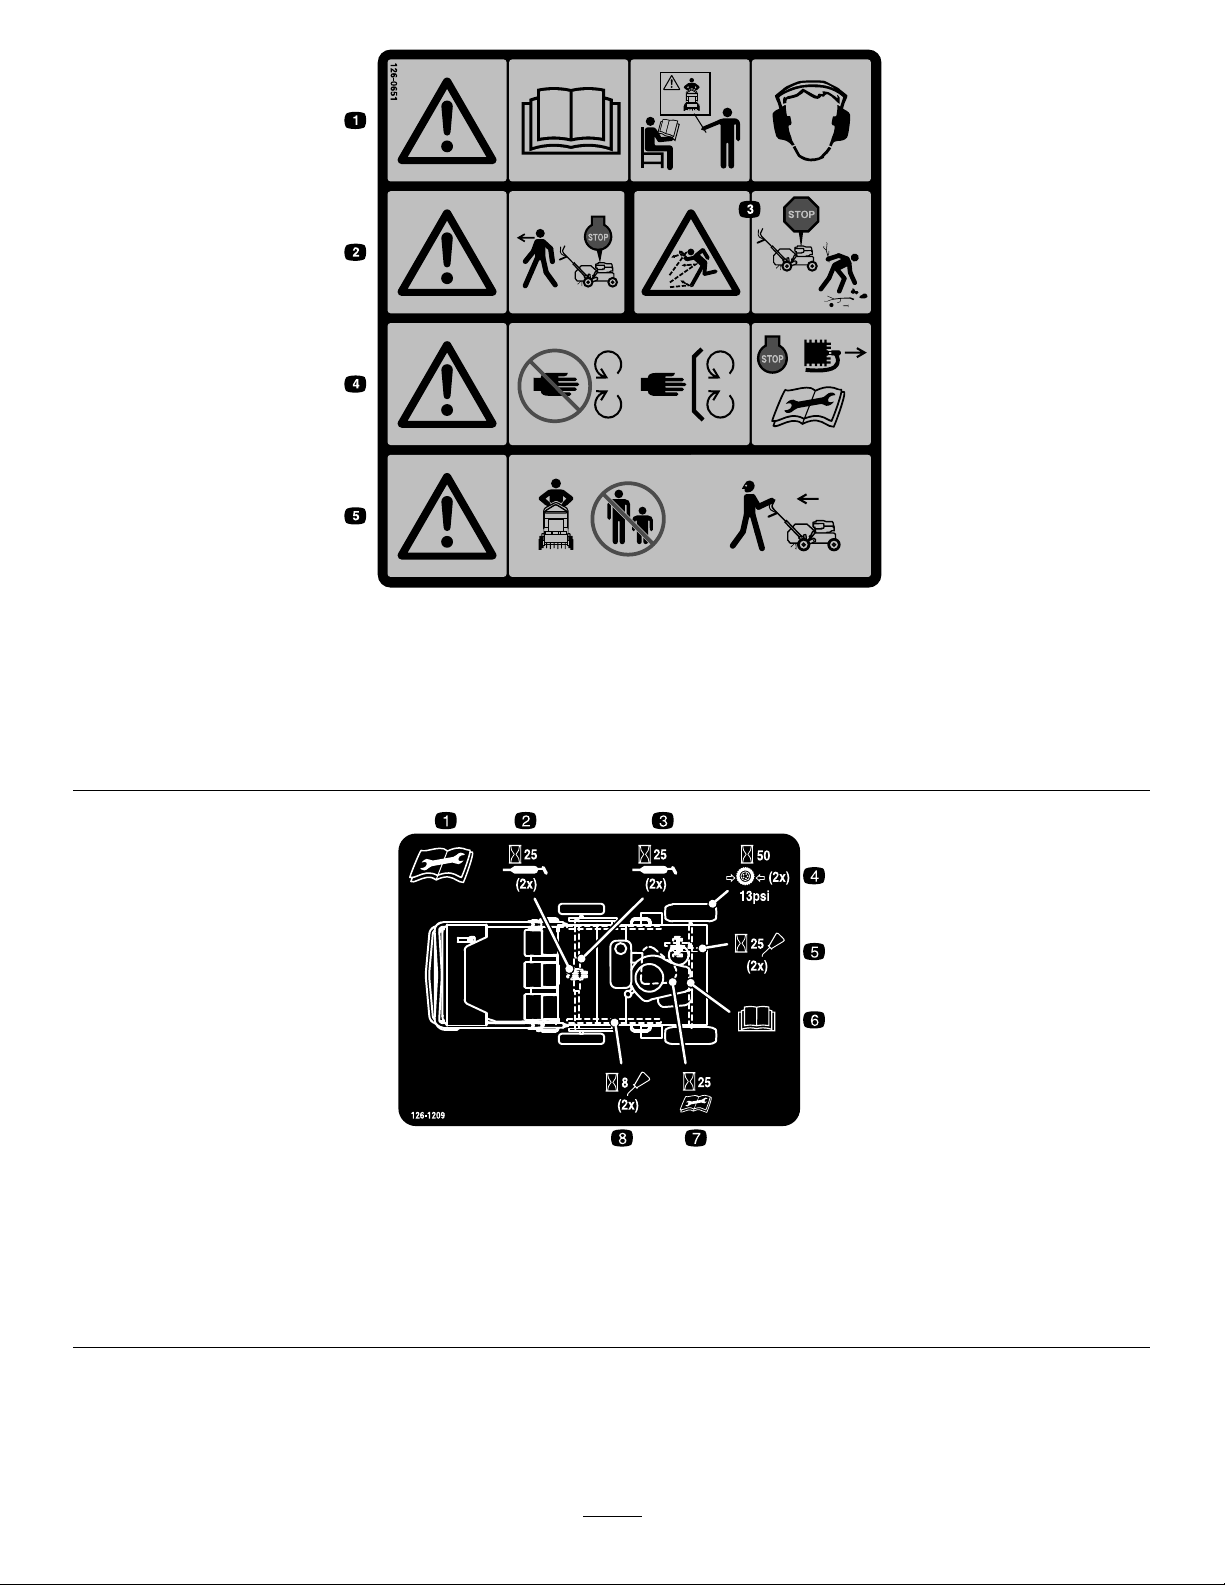
126-0651
1.Warning—readtheOperator’sManual.Donotoperatethis
machineunlessyouaretrained.Wearhearingprotection.
4.Warning—stayawayfrommovingparts;keepallguardsin
place.Stoptheengineandremovethesparkplugbefore
adjusting,servicing,orcleaning.
2.Warning—disengagethetinesandstoptheenginebefore
leavingtheoperator’sposition.
5.Warning—donotoperatewhenpeopleandpetsareinthe
area.Lookbehindyouwhenbackingup.
3.Thrownobjecthazard—pickupobjectsbeforeoperating.
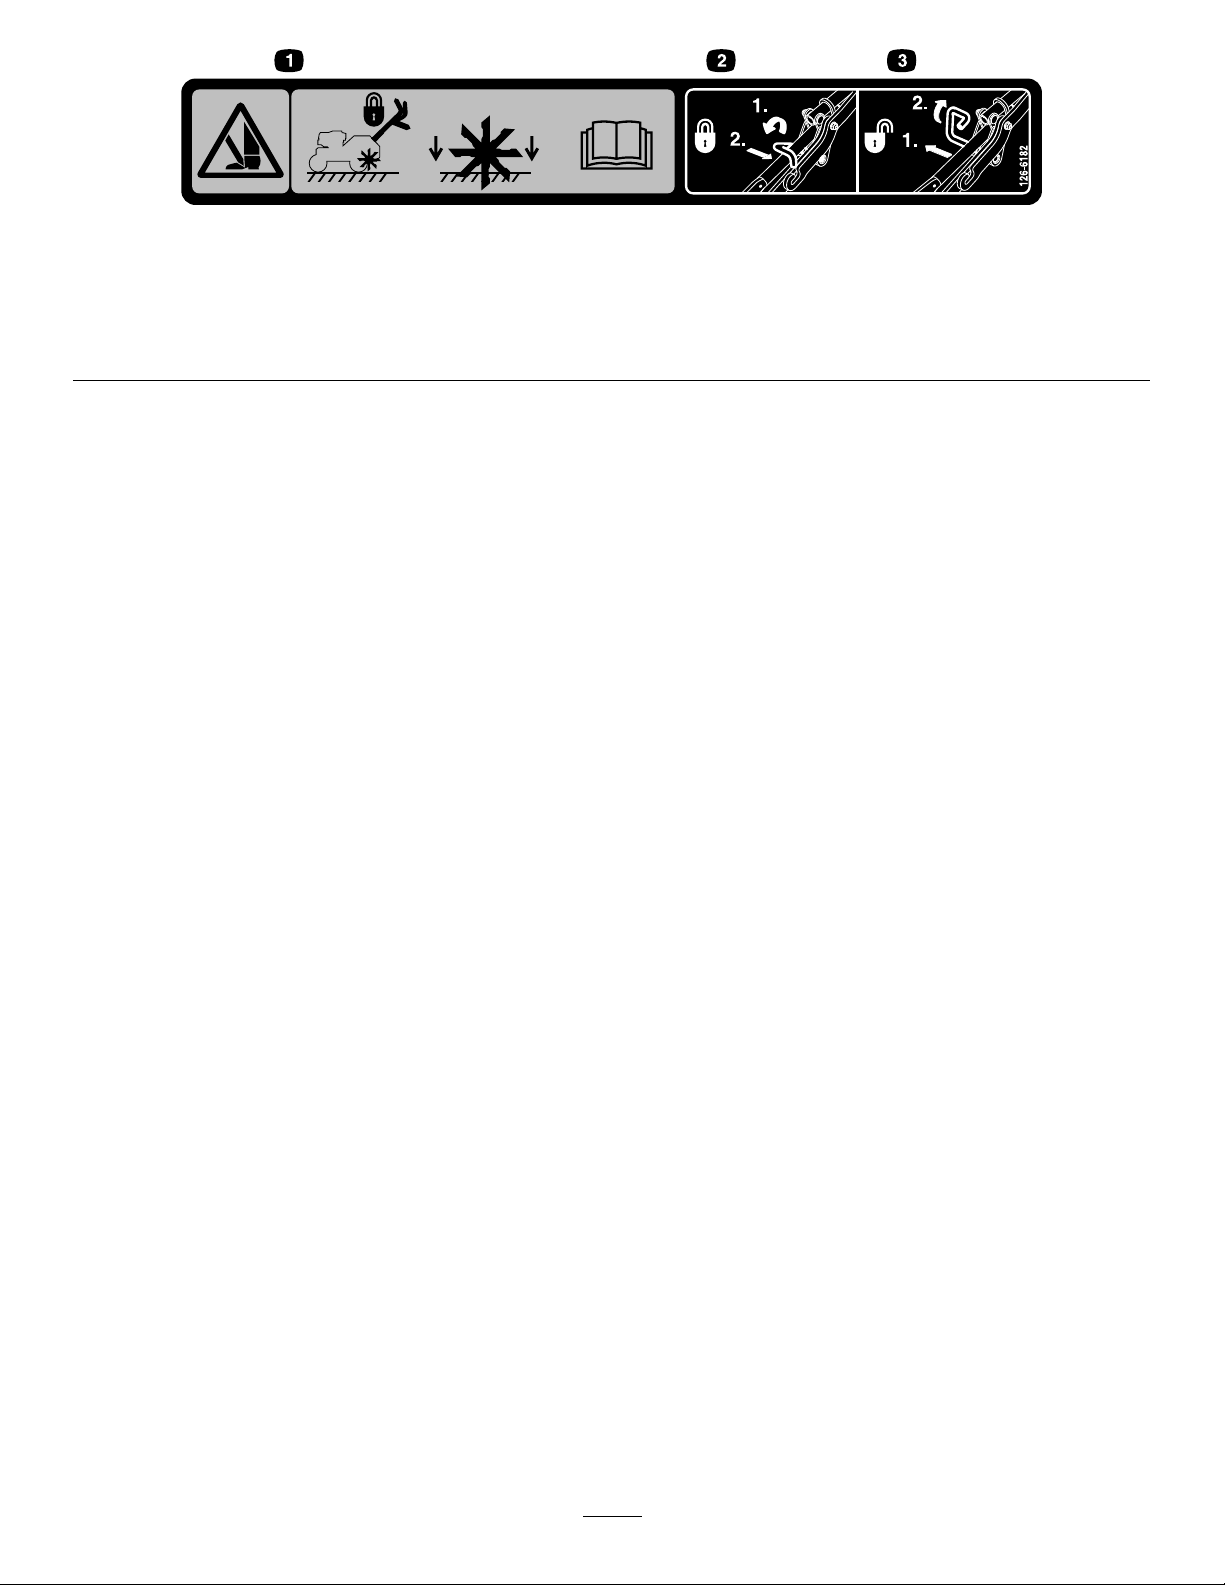
126-1209
1.Readandunderstandtheoperator’s
manualbeforeservicingthismachine.
4.Checktirepressure—90kPa(13psi)
(2x)every50hours.
7.Checktransmissionbeltdrivetension
every25hours.
2.Greasetineshaftbearings(2x)every
25hours.
5.Cleanandoilchains(2x)every25
hours.
8.Cleanandoilchainsandcheckchain
tension(2x)every8hours.
3.Greasetineassemblyidlers(2x)every
25hours.
6.Seeengineowner’smanualforservice.
7
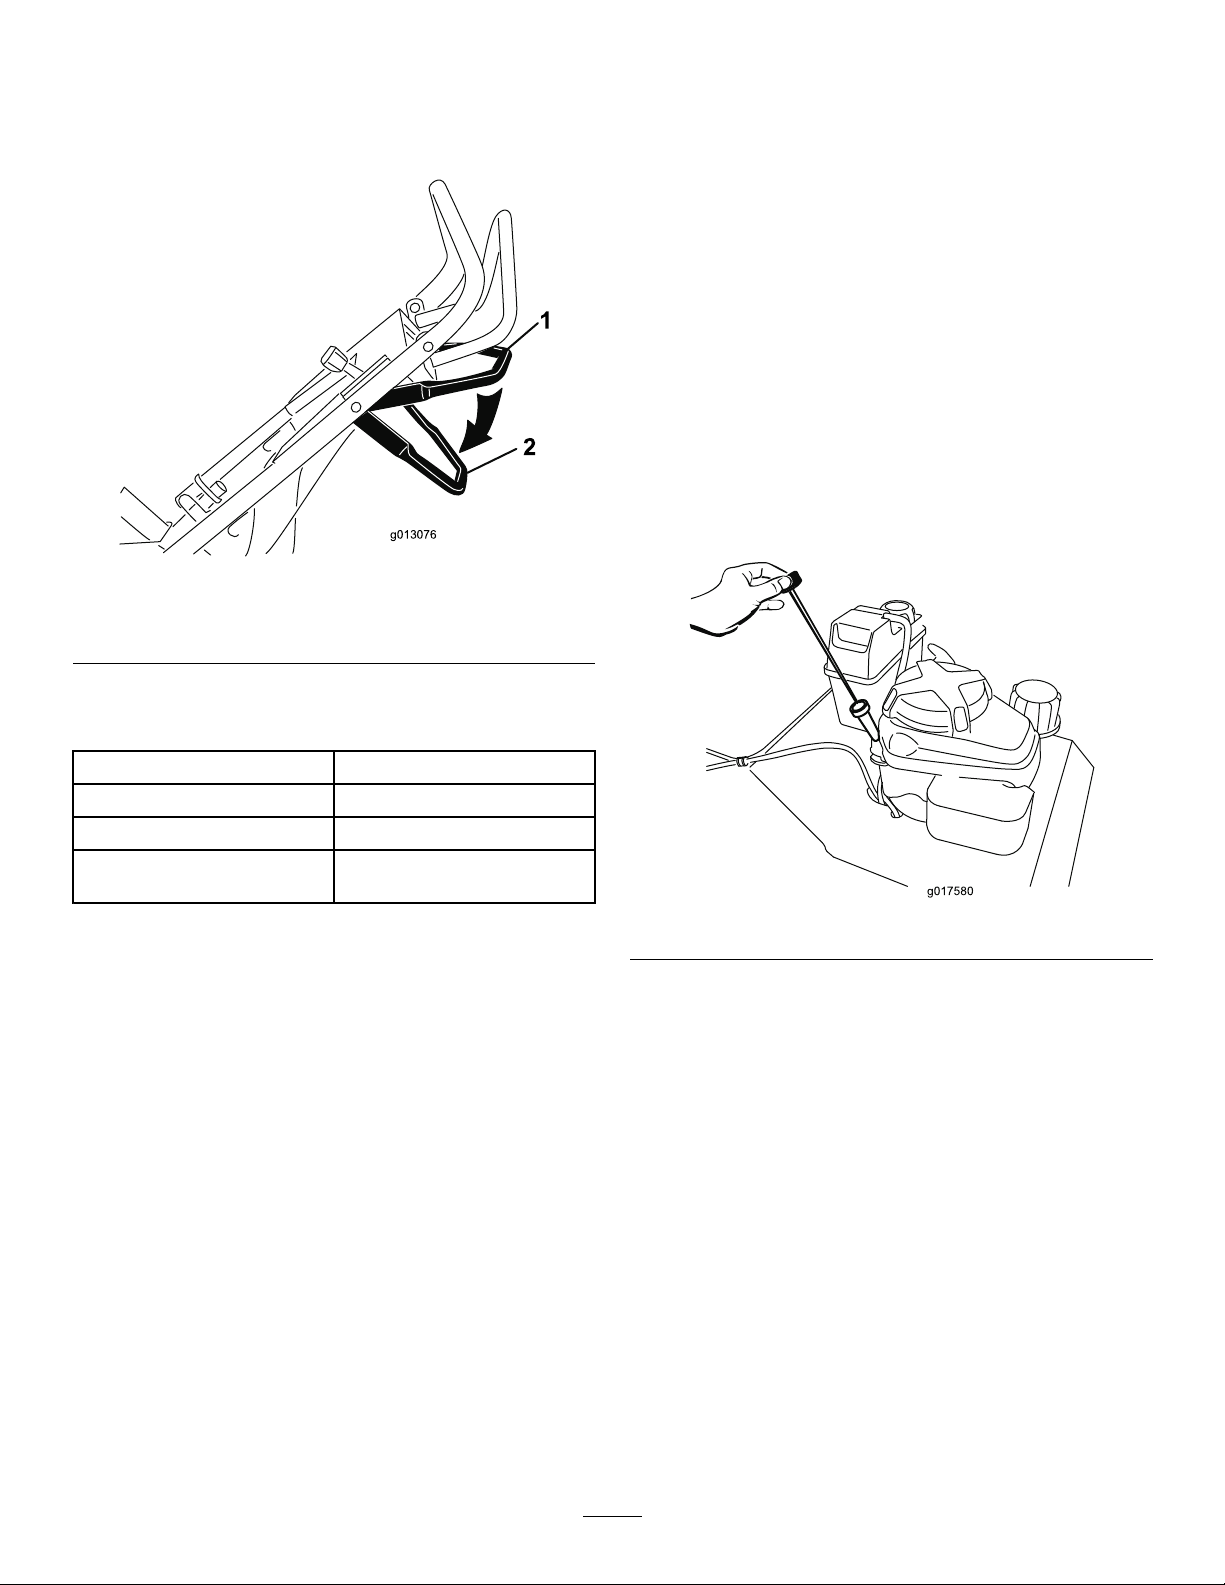
126-6182
1.Cutting/dismembermenthazardoffoot,tines—keepfeetaway
fromtineswhenpullingupandlockinghandle—tinesmay
dropwhenintransportpositioniflockisnotengaged;read
theOperator’sManual.
3.Tinetransportunlock—1)Pulloutward;2)Rotaterearward
2.Tinetransportlock—1)Rotateforward;2)Pushinward
8

Setup
UnfoldingtheHandle
1.Removethecabletiesecuringtheupperarmtothe
upperhandle.
2.Rotatethehandletotheoperatingposition.
Note:Makesurethatthetransportlatchpinisinthe
lockedposition(Figure4).
Figure4
1.Transportlatch
pin—Unlockedposition
3.Rotatethelatchpinover
thehandle.
2.Pushintothelowerarm.4.Transportlatch
pin—Lockedposition
3.Slidetheovallockingringsdowneachsideofthe
upperhandleoverthelowerhandle,lockingthehandle
sectionstogether.
CheckingtheOilLevel
Beforeoperating,checktheengineoilleveltoensurethatit
hasenoughoil.RefertoChangingtheEngineOil(page19),
foroilspecicationsandinstructions.
ProductOverview
Figure5
1.Tine-controllever4.Fueltank
2.Traction-controllever5.Recoilstarter
3.Handle
Controls
RecoilStarter
Pulltherecoil-starterhandletostartengine(Figure5).
Fuel-ShutoffValve
Closethefuel-shutoffvalvewhentransportingorstoringthe
machine.
ThrottleLever
Beforestartingacoldengine,movethethrottlelever(Figure
5)forwardtotheCHOKEposition.Aftertheenginestarts,
pullthethrottleleverbacktotheFASTposition.
Note:Awarmenginerequireslittleornochoking.
Traction-ControlLever
Thetraction-controllevercontrolstheforward,reverse,and
neutralactionsofthemachine.RefertoDrivingtheMachine
(page13)formoreinformation.
Tine-ControlLever
Thetine-controlleverliftstherearwheels,causingtherear
ofthemachinetobesupportedontheaeratingtines.Push
theleverdowntoliftthewheelsanddropthetines.Pullthe
leveruptolowerthewheelsandraisethetinesoutofthe
ground(Figure6).
9
Note:Raisingthetinesmayrequiresignicanteffortifyou
addedextraoptionalweightstothemachine.
Note:Makesurethatthetransport-lockpinisengagedwhen
transportingthemachine(seeFigure4).
g013076
1
2
Figure6
1.Tine-controllever—raised
position
2.Tine-control
lever—loweredposition
Specications
Length150cm(59inches)
Width79cm(31inches)
Height127cm(50inches)
Weight(asshippedwith2
weights)
172.4kg(380lb)
Attachments/Accessories
AselectionofToroapprovedattachmentsandaccessoriesis
availableforusewiththemachinetoenhanceandexpand
itscapabilities.ContactyourAuthorizedServiceDealeror
Distributororgotowww .Toro.comforalistofallapproved
attachmentsandaccessories.
Operation
Note:Determinetheleftandrightsidesofthemachine
fromthenormaloperatingposition.
CheckingtheEngine-OilLevel
ServiceInterval:Beforeeachuseordaily
Theenginecrankcasecanhold0.55L(20oz)ofoil.Use
onlyhigh-qualitySAE10W-30weightdetergentoilthathas
theAmericanPetroleumInstitute(API)serviceclassication
SH,SJ,Slorhigher.
Note:Whenthecrankcaseisempty,pourabout3/4ofthe
crankcasecapacityofoilinthecrankcase,thenfollowthe
procedureinthissection.
1.Movethemachinetoalevelsurface.
2.Cleanaroundthedipstick(Figure7).
g017580
Figure7
3.Removethedipstickbyrotatingthecap
counterclockwiseandpullingitout.
4.Wipethedipstickcleanwithacleancloth.
5.Insertthedipstickintothellerneck,butdonot
rotatethecap,thenremoveit.
6.Readtheoillevelonthedipstick.
7.Iftheoillevelreadingisbelowthelowerlimitmarkon
thedipstick,removethedipstickandslowlypouronly
enoughoilintothellerholetoraisetheoillevelto
theupperlimitmarkonthedipstick.
Important:Donotoverllthecrankcasewithoil
andruntheengine;enginedamagewillresult.
Draintheexcessoiluntiltheoillevelreachesthe
upperlimitmarkonthedipstick.
8.Insertthedipstickintothellerneckandrotatethecap
clockwiseuntilitistight.
10

FillingtheFuelTankwith
Gasoline
•Fueltankcapacity:3.8L(1USgallon)
•Forbestresults,useonlyclean,fresh(lessthan30days
old),unleadedgasolinewithanoctaneratingof87or
higher((R+M)/2ratingmethod).
•Ethanol:Gasolinewithupto10%ethanol(gasohol)
or15%MTBE(methyltertiarybutylether)byvolume
isacceptable.EthanolandMTBEarenotthesame.
Gasolinewith15%ethanol(E15)byvolumeisnot
approvedforuse.Neverusegasolinethatcontains
morethan10%ethanolbyvolume,suchasE15
(contains15%ethanol),E20(contains20%ethanol),or
E85(containsupto85%ethanol).Usingunapproved
gasolinemaycauseperformanceproblemsand/orengine
damagewhichmaynotbecoveredunderwarranty.
•Donotusegasolinecontainingmethanol.
•Donotstorefueleitherinthefueltankorfuelcontainers
overthewinterunlessafuelstabilizerisused.
•Donotaddoiltogasoline.
Important:Donotusefueladditivesotherthanafuel
stabilizer/conditioner.Donotusefuelstabilizerswithan
alcoholbasesuchasethanol,methanol,orisopropanol.
DANGER
Incertainconditions,gasolineisextremely
ammableandhighlyexplosive.Areorexplosion
fromgasolinecanburnyouandothersandcan
damageproperty.
•Fillthefueltankoutdoors,inanopenarea,and
whentheengineiscold.Wipeupanygasoline
thatspills.
•Donotllthefueltankcompletelyfull.Add
gasolinetothefueltankuntilthelevelis6to13
mm(1/4to1/2inch)belowthebottomofthe
llerneck.Thisemptyspaceinthetankallows
thegasolinetoexpand.
•Neversmokewhenhandlinggasoline,andstay
awayfromanopenameorwhereasparkmay
ignitethegasolinefumes.
•Storegasolineinanapprovedfuelcontainerand
keepitoutofthereachofchildren.
•Neverbuymorethana30-daysupplyof
gasoline.
DANGER
Whenfueling,undercertaincircumstances,astatic
chargecandevelop,ignitingthegasoline.Areor
explosionfromgasolinecanburnyouandothers
anddamageproperty.
•Alwaysplacegasolinecontainersontheground
andawayfromyourvehiclebeforelling.
•Donotllgasolinecontainersinsideavehicleor
onatruckortrailerbedbecauseinteriorcarpets
orplastictruckbedlinersmayinsulatethe
containerandslowthelossofanystaticcharge.
•Whenpractical,removegasoline-powered
equipmentfromthetruckortrailerandrefuel
theequipmentwithitswheelsontheround.
•Ifthisisnotpossible,thenrefuelsuch
equipmentonatruckortrailerfromaportable
container,notfromagasolinedispensernozzle.
•Ifyoumustuseagasolinedispensernozzle,
keepthenozzleincontactwiththerimofthe
fueltankorcontaineropeningatalltimesuntil
fuelingiscomplete.
1.Cleanaroundthefuel-tankcap(Figure8).
Figure8
1.Fuel-tankcap
2.Removethecapfromthetank.
3.Fillthefueltankwithunleadedgasolinetowithin6to
13mm(1/4to1/2inch)fromthetopofthetank.Do
notllintothellerneck.
Important:Donotllthetankmorethan6mm
(1/4inch)fromthetopofthetankbecausethe
gasolinemusthaveroomtoexpand.
11
4.Installthefuel-tankcapandwipeupanyspilled
gasoline.
StartingtheEngine
1.Connectthewiretothesparkplug.
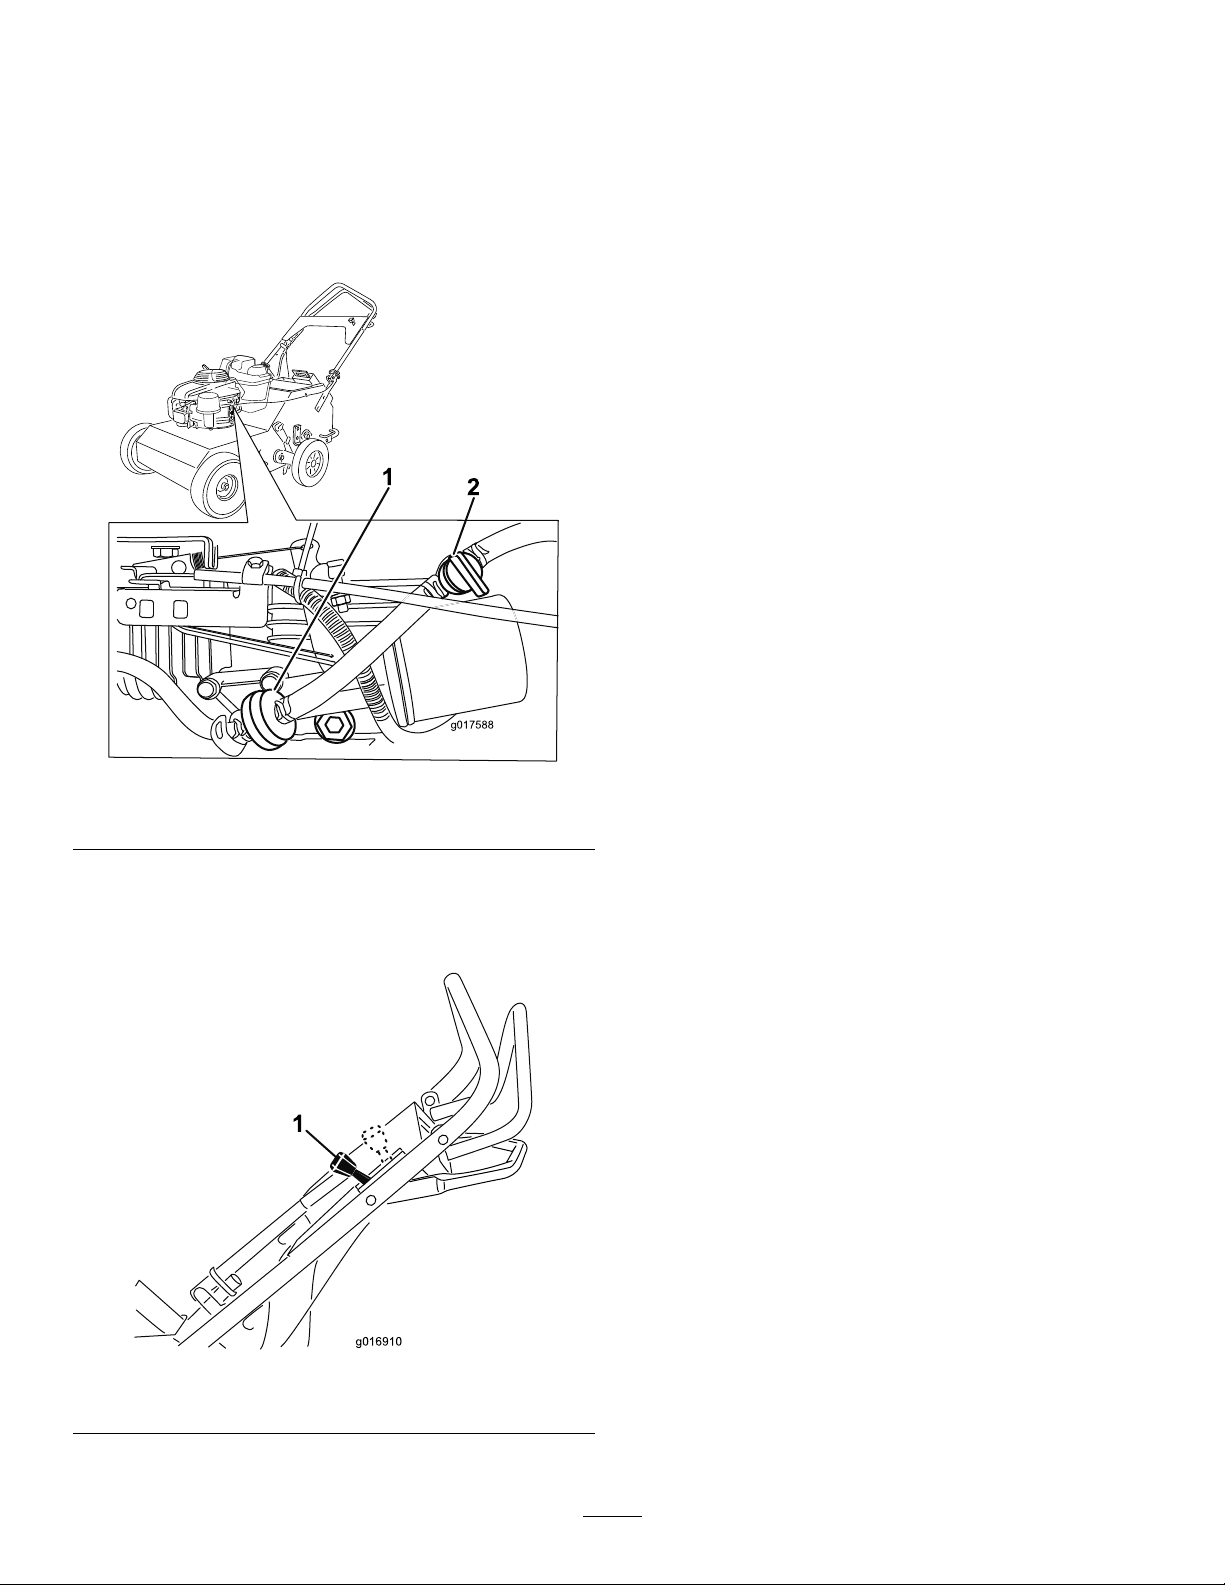
2.Openthefuelvalvebyturningitin-linewiththefuel
hose(Figure9).
12
g017588
Figure9
1.Fuellter2.Fuelvalve—OFFposition
3.Movethethrottlecontrolallthewayforwardtothe
CHOKEposition(Figure9).
Note:Donotusethechokewhentheengineiswarm.
g016910
1
Figure10
1.Throttlecontrol
4.Pullthestarterhandlelightlyuntilyoufeelresistance,
thenpullitsharply.Allowtheropetoreturntothe
handleslowly.
5.Whentheenginestarts,movethethrottlecontrolto
theFASTposition.
Note:Thethrottlesettinggovernsthemaximumdrive
speedoftheaerator.
StoppingtheEngine
1.Releasethetractioncontrolleverandallowittoreturn
toNEUTRAL.
2.Movethethrottleleverallthewayrearwardtostop
theengine.
12

DrivingtheMachine
•Tomoveforward,pressthecontrolleverforward(Figure
11).Thefurtherforwardyoupushit,thefasterthe
machinewilltravel.
•Tomoveinreverse,pullthecontrolleverrearward
(Figure11).Thefurtherrearwardyoupullit,thefaster
themachinewilltravel.
WARNING
Theaeratortinesaresharpandcanpuncture
yourfeetorotherbodyparts.
Useextremecarewhenmovinginreverseso
thatyoudonotallowyourfeettogoclosetothe
tines.Watchforandavoidobstaclesyoucould
tripover.
•Toturnthemachine,moveslowlyandpressdownonthe
handles;turnthemachineinthedesireddirectionthen
resumenormaloperation.
•Tomakezeroturns,pulluponthetineground
engagementleverandraisethetines.
Important:Donotmakeazeroturnwhenthetines
aredown.Turningwiththetinesdownwillresult
inturftearing.
•Tostop,releasethecontrollever(Figure11).
g017583
Figure11
1.Forward3.Reverse
2.Neutral(Stop)
Aerating
1.Drivethemachinetothedesiredlocationandstopit.
2.Pushthetinecontrolleverdownandforwardtoraise
therearwheelsandengagethetines.
g013076
1
2
Figure12
1.Tinecontrollever—tinesdisengagedfromtheground
2.Tinecontrollever—tinesengagedintotheground
3.Drivethemachinetoaeratethedesiredarea.
Note:Themachineaeratesinbothforwardand
reverse.
4.Whennished,stopthemachineandpullthetine
controlleverrearwardanduptolowertherearwheels
andliftsthetinesoutoftheground.
Important:Donotdrivethemachineacross
pavementorotherhardsurfaceswithoutrst
raisingthetines.Crossinghardsurfaceswiththe
tinesloweredwilldamagethetines.
13

AddingWeight
Toensurethatthetinespenetratefullyintothesoil,youcan
addweighttothebackofthemachine.Themachinehas
3weightpocketsthatholdtheweights(Figure13).When
placingweights,ensurethatyouhaveabalancedload;ifusing
only1weight,placeitinthecenterpocket,andifusing2
weights,placetheminthesidepockets.
g017584
Figure13
1.Weight
AdjustingtheCoringDepth
Acoringdepthof6.35cm(2-1/2inches)isrecommended,
butyoucanchangethedepthasfollows:
1.Stopengine,waitforallmovingpartstostop.
2.Disconnectthewirefromthesparkplug.
3.Loosenthenutssecuringthewheelstopontheright
sideofthemachine(Figure14).
Figure14
1.Wheelstop3.Indicatorhole
2.Nuts4.Indicatornotches
4.Lowerthewheelstoptoreducethedepth.Raiseitto
increasethecoringdepthandasrequired.
Note:Theremovableweightsareheavy.Usecare
whenliftingthem.Makesurethatyoucanhold
themsecurelybeforeliftingthem.Usecautionwhen
positioningyourhandssothatyoudonotsetthem
downonyourhandsorngers.
5.Tightenthenutssecurelytolockthewheelstopin
place.
6.Repeatsteps3through5forthewheelstopontheleft
sideofthemachine.Usethevisualindicatornotches
inthewheelstopandindicatorholesintheframeto
setthewheelstopstothesameheightoneachside
(seeFigure14).
14

AdjustingtheTine-Control
Lever
1.Stopengine,waitforallmovingpartstostop.
2.Disconnectthewirefromthesparkplug.
3.Raisethetinestothetransportposition.
4.Attempttolockthetransportlatchpinintothelower
arm(seeFigure15).
Figure15
1.Transportlatch
pin—unlocked
3.Rotatelatchpinover
handle.
2.Pushintolowerarm.4.Transportlatch
pin—locked
Note:Ifthepinengagesandlocks,thennoadjustment
isnecessary.Ifthepindoesnotengageorlock,then
proceedwiththefollowingsteps.
5.Notethelocationofthepininrelationtothebushing.
6.Loosenthejamnutsontheadjusterbolt(Figure16).
Note:Ifthetransportlatchpinisbelowthebushing,
rotatetheboltcounterclockwiseuntilyoucanlock
thepin.
Ifthetransportlatchpinisatthetopofthebushing,
rotatetheboltclockwiseuntilyoucanlockthepin.
Figure16
1.Jamnut2.Adjusterbolt
7.Tightenthejamnutsandverifythatthetransportlatch
pincanbelockedandunlocked.
TransportingtheMachine
Important:Donotoperateordrivethemachineon
roadways.
1.Drivethemachineontoatrailer,stopthemachine,
stoptheengine,turnoffthefuelvalve,anddisconnect
thespark-plugwire.
Important:Ifyoudonotturnoffthefuelvalve,
theenginemayoodduringtransport.
2.Movethetransportlockingpinonthehandleintothe
TRANSPORTposition.
3.Liftthehandletolockitinthetransportposition.
4.Slidethetransportlatchpinthroughthebushingin
thetopofthelowerarm.
5.Rotatethetransportlatchpindownandlocktheend
overthehandletube.
6.Securethemachinetothetrailerwithchainsorstraps
usingthetie-down/liftloops.
OperatingTips
•Forbestperformanceandmaximumtinepenetration,
watertheturfthoroughlythedaybeforeaerating.
•Cleantheareaofdebrisbeforeusingthemachine.
•Markandavoidshallowobstaclessuchassprinklerheads
andinvisiblefencewires.
15

Maintenance
RecommendedMaintenanceSchedule(s)
MaintenanceService
IntervalMaintenanceProcedure
Aftertherst5hours•Changetheengineoil.
Beforeeachuseordaily
•Checktheengineoillevel.
•Checktheconditionandtensionofthetine-drivechains.
•Checktheconditionofthefrontdrivechains.
•Checktheconditionofthedrivechainsprockets.
•Lubricatethetine-drivechains.
•Checktheconditionofthecoringtinesandreplaceanythataredamagedor
excessivelyworn.
•Checkforloosefasteners.
•Cleantheengineandexhaustsystemarea.
•Cleangrassanddebrisbuildupfromthemachine.
Every25hours
•Greasetineshaftbearings.
•Greasetineassemblyidlers.
•Lubricatethefrontdrivechains.
•Cleanthefoampre-cleaner(morefrequentlyindustyconditions).
•Checkthetensionofthehydrostaticdrivebelt.
Every50hours
•Changetheengineoil.
•Checkthesparkarrester(ifequipped).
•Checkforleaksinthefuelsystemsand/ordeterioratingfuelhose.
•Checkthetirepressures.
Every100hours
•Changetheoillter.
•Inspect,clean,andadjustthesparkplug;replaceitifnecessary.
•Cleanthefuellterelement.
•Changethehydraulictransmissionuid.
Every200hours•Replacethesparkplug.
Every250hours•Replacethefuellter(morefrequentlyindustyconditions).
Every300hours•Replacetheaircleanerelements(morefrequentlyindustyconditions).
Yearlyorbeforestorage•T ouchupchippedpaint.
CAUTION
Ifyouleavethesparkpugwireconnected,someonecouldaccidentlystarttheengineandseriouslyinjure
youorotherbystanders.
Beforeperforminganymaintenance,parkthemachineonalevelsurface,stoptheengine,anddisconnect
thespark-plugwire.Setthewireasidesothatitdoesnotaccidentallycontactthesparkplug.
16

Premaintenance
Procedures
AccessingtheTines
Themachinehasarearaccesspanelthatyoucanremoveto
accessandmaintainthetines(Figure17).
Figure17
1.Rearaccesspanel
WARNING
Ifyouoperatethemachinewiththerearaccess
panelremoved,someonecouldbeseverelyinjured
bycontactwiththemovingtinesorbyyingdebris.
Alwayssecurelyinstalltherearaccesspanelbefore
operatingthemachine.
TippingtheMachine
Ifyouneedtoworkontheundersideofthemachine,you
cantipitbackward(Figure18).Donottipthemachine
forwardoryouwilllltheaircleanerwithgasoline.Secure
themachinewithajackstandbeforeworkingunderit.
g017586
1
Figure18
1.Jackstand
WARNING
Mechanicalorhydraulicjacksmayfailtosupport
themachineandcauseaseriousinjury.
•Usejackstandswhensupportingthemachine.
•Donotusehydraulicjacks.
17

Lubrication
GreasingtheTineShaft
Bearings
ServiceInterval:Every25hours
Every25hours
1.Raisethetines,stopthemachine,stoptheengine,and
disconnectthespark-plugwire.
2.Removetherearaccesspanel;refertoAccessingthe
Tines(page17).
3.LubricatettingswithNGLIgradeNo.2
multi-purposegungrease.
Refertothefollowingchartforttinglocationsand
lubricationschedule.
LubricationChart
Fitting
Locations
Initial
Pumps
Numberof
Places
Service
Interval
1.TineShaft
Bearings
1225hours
2.Tine
AssemblyIdlers
1-2225hours
LubricatingandCheckingthe
DriveChainsandSprockets
ServiceInterval:Beforeeachuseordaily—Checkthe
conditionandtensionofthetine-drive
chains.
Beforeeachuseordaily—Checktheconditionofthe
frontdrivechains.
Beforeeachuseordaily—Checktheconditionofthe
drivechainsprockets.
Beforeeachuseordaily—Lubricatethetine-drive
chains.
Every25hours
1.Raisethetines,stopthemachine,stoptheengine,and
disconnectthespark-plugwire.
2.Raisethefrontofthemachinetogainaccesstothe
chains(Figure19)andblockitinplace.
CAUTION
Ifyoudonotsecurelyblockupthefrontofthe
machine,themachinecouldfallonyouduring
service,injuringyou.
Ensurethatyouplaceajack-standorblock
underthefrontofthemachinetoholditup
securely.
Important:Donotraisetherearofthemachine.
Raisingtherearofthemachinecausestheengine
tooodandtheaircleanertobefouledwith
gasoline.
3.Rotatethefrontwheelsandapplyoilorchainlubricant
ontothelinksofthelowerspansofthefrontdrive
chains(Figure19).
Figure19
1.Tine-drivechains2.Frontdrivechains
4.Checkthefrontdrivechains(Figure19)forwear,
damage,andpropertension.
Note:Ifchainspoporsnap,replacethesprockets
andchains.
5.Rotatetineshaftsandapplyoilorchainlubricantonto
allthelinksofthelowerspansofthetine-drivechains
(Figure19).
6.Checkthechainsonbothsidesofthemachinefor
wear,damage,andpropertension.
Note:Thechainsshouldbeabletomoveupand
down6mm(1/4inch)maximum.
Note:Ifchainsarenottightenoughortheypopor
snap,adjustthechaintension;referto(page).
7.Inspectallchainsprocketsforwearandreplacethem
asrequired.
8.Wipeupanyoilthatspilledandlowerthemachineto
thegroundwhennished.
18

EngineMaintenance
ServicingtheAirCleaner
ServiceInterval:Every25hours—Cleanthefoam
pre-cleaner(morefrequentlyindusty
conditions).
Every300hours—Replacetheaircleanerelements
(morefrequentlyindustyconditions).
Important:Donotoperatetheenginewithouttheair
lterassembly;extremeenginedamagemayoccur.
1.Stoptheengineandwaitforallmovingpartstostop.
2.Disconnectthewirefromthesparkplug.
3.Removethecoverandcleanitthoroughly(Figure20).
Note:Becarefultopreventdirtanddebrisfrom
fallingintothebase.
g017587
1
2
3
Figure20
1.Cover3.Paperairlter
2.Foampre-cleaner
4.Removethefoampre-cleanerandwashitwithamild
detergentandwater,thenblotitdry(Figure20).
5.Removeandinspectthepaperairlter(Figure20);
discarditifitisexcessivelydirty.
Important:Donottrytocleanapaperlter.
6.Wipedirtfromthebaseandthecoverwithamoistrag.
Note:Becarefultopreventdirtanddebrisfrom
enteringtheairductleadingtothecarburetor.
7.Installthefoampre-cleanerontothepaperairlter.
Note:Useanewpaperairlterifyoudiscardedthe
oldone.
8.Installtheairlterassemblyandcover.
ChangingtheEngineOil
ServiceInterval:Aftertherst5hours
Every50hours
OilCapacity
Withoillter0.85L(29oz)
Withoutoillter0.65L(22oz)
1.Runtheenginetowarmtheengineoil.
Note:Warmoilowsbetterandcarriesmore
contaminants.
WARNING
Oilmaybehotafterenginehasbeenrun,and
contactwithhotoilcancauseseverepersonal
injury.
Avoidcontactingthehotengineoilwhenyou
drainit.
2.Stoptheengineandwaitforallmovingpartstostop.
3.Disconnectthewirefromthesparkplug.
4.Placeadrainpanonthegroundtotherightofthe
machine.
5.Removethedipstick(Figure21).
G016924
Figure21
6.Removethedrainplug(Figure22)andtipthemachine
sotheoilowstothepan.
19
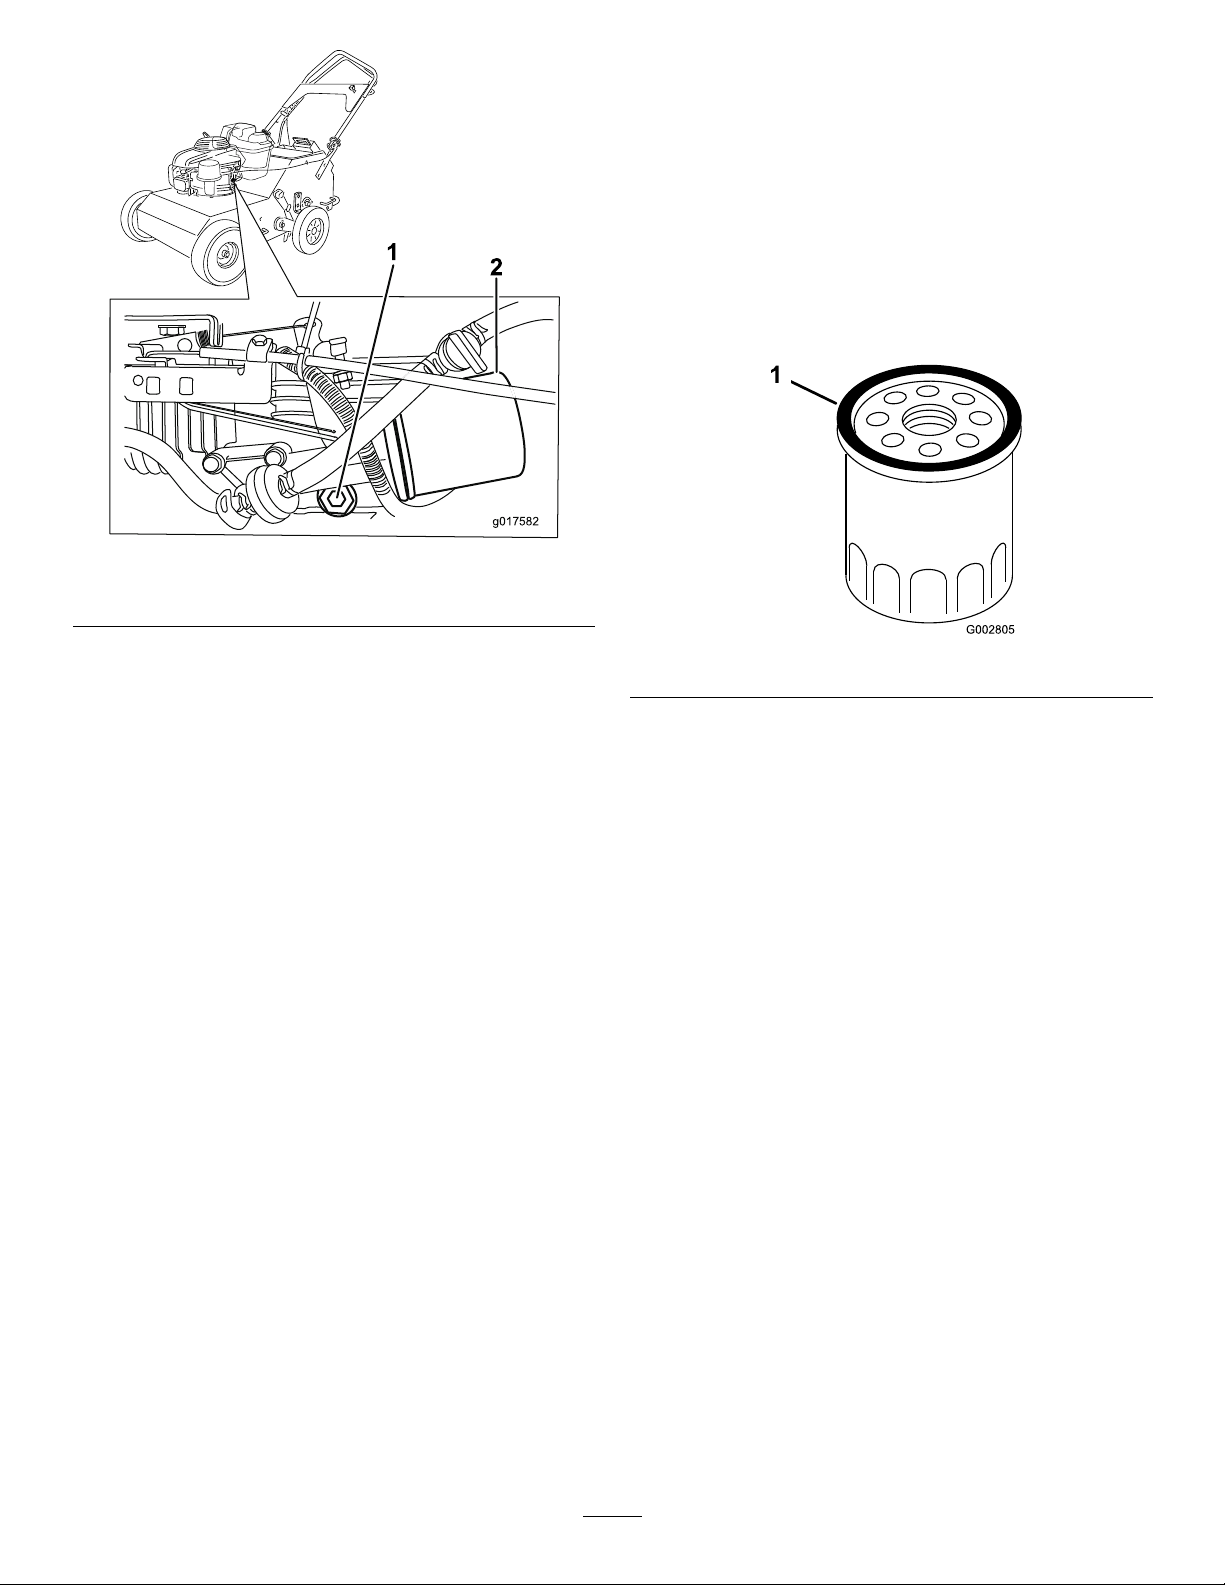
g017582
12
Figure22
1.Oil-drainplug2.Oillter
7.Tipthemachineuprightagain,cleantheoilfromthe
framewitharapandreplacethedrainplug.
8.Insertthedipstickintothellerneckandrotatethecap
clockwiseuntilitistight.
9.Slowlypouroilintotheoillltube,periodically
checkingthelevelwiththedipstick,untilthedipstick
indicatesthattheengineisfull.Donotoverll.(Max.
ll:0.55L(20oz),type:SAE30Wdetergentoilwith
anAPIserviceclassicationofSH,SJ,SL,orhigher.)
Note:Ifyouoverlltheengine,poursomeoilout
ofit.
10.Installthedipsticksecurely.
11.Recycletheusedoilaccordingtolocalcodes.
ChangingtheOilFilter
ServiceInterval:Every100hours
1.Draintheengineoil;refertoChangingtheEngineOil
(page19).
2.Placearagundertheoillter(Figure22)tocatchany
oilthatmayleakoutasyouremovethelter.
3.Removetheoillter.
4.Useyourngertocoatthegasketonthenewlter
withoil(Figure23).
Figure23
5.Installthenewlterandhandtightenit2/3turnonly.
6.Insertthedipstickintothellerneckandrotatethecap
clockwiseuntilitistight.
7.Slowlypouroilintotheoillltube,periodically
checkingthelevelwiththedipstick,untilthedipstick
indicatesthattheengineisfull.Donotoverll.(Max.
ll:0.55L(20oz),type:SAE30Wdetergentoilwith
anAPIserviceclassicationofSH,SJ,SL,orhigher.)
Note:Ifyouoverlltheengine,poursomeoilout
ofit.
8.Installthedipsticksecurely.
9.Connectthewiretothesparkplug.
10.Runtheengineforabout3minutes.
11.Stoptheengine,waitforallmovingpartstostop,and
checkforoilleakagearoundthelter.
12.Checkandaddoiltocompensatefortheoilintheoil
lter.Donotoverll.
13.Recycletheusedoillteraccordingtolocalcodes.
20
Other manuals for 23515
4
This manual suits for next models
1
Table of contents
Other Toro Tiller manuals


Toro
Toro 58604 User manual

Toro
Toro 23515 User manual

Toro
Toro 29518 User manual

Toro
Toro 23516 User manual

Toro
Toro Power Shovel 39909 User manual

Toro
Toro 58603 User manual

Toro
Toro 9701 User manual

Toro
Toro GREENS AERATOR 09120 User manual

Toro
Toro 09802 HydroJect 3010 User manual

Toro
Toro 23518 User manual


Popular Tiller manuals by other brands


Poulan Pro
Poulan Pro 403701 owner's manual

Villager
Villager VTB 375 Original instruction manual

Troy-Bilt
Troy-Bilt 21AE682W766 Operator's manual

White Outdoor
White Outdoor ROTO BOSS 510 215-310-190 Parts list and instruction manual

Craftsman
Craftsman C459-62304 Operator's manual

MTD
MTD 215-100AB2 Owner's operating service instruction manual