Toro 22542 User manual
FormNo.3429-967RevB
Tiller
TXL2000ToolCarrier
ModelNo.22542—SerialNo.318000001andUp
Registeratwww.Toro.com.
OriginalInstructions(EN)*3429-967*B

WARNING
CALIFORNIA
Proposition65Warning
Useofthisproductmaycauseexposure
tochemicalsknowntotheStateof
Californiatocausecancer,birthdefects,
orotherreproductiveharm.
Introduction
ThistillerisintendedtobeusedonaTorotoolcarrier
forbreakingthroughhardsoilconditionsonresidential
orcommercialproperties.Usingthisproductfor
purposesotherthanitsintendedusecouldprove
dangeroustoyouandbystanders.
Readthisinformationcarefullytolearnhowtooperate
andmaintainyourproductproperlyandtoavoid
injuryandproductdamage.Youareresponsiblefor
operatingtheproductproperlyandsafely.
Visitwww.Toro.comforproductsafetyandoperation
trainingmaterials,accessoryinformation,helpnding
adealer,ortoregisteryourproduct
Wheneveryouneedservice,genuineToroparts,or
additionalinformation,contactanAuthorizedService
DealerorToroCustomerServiceandhavethemodel
andserialnumbersofyourproductready.Figure1
identiesthelocationofthemodelandserialnumbers
ontheproduct.Writethenumbersinthespace
provided.
Important:Withyourmobiledevice,youcan
scantheQRcodeontheserialnumberdecal(if
equipped)toaccesswarranty,parts,andother
productinformation.
g271842
Figure1
1.Modelandserialnumberlocation
ModelNo.
SerialNo.
Thismanualidentiespotentialhazardsandhas
safetymessagesidentiedbythesafety-alertsymbol
(Figure2),whichsignalsahazardthatmaycause
seriousinjuryordeathifyoudonotfollowthe
recommendedprecautions.
g000502
Figure2
1.Safety-alertsymbol
Thismanualalsouses2wordstohighlightinformation.
Importantcallsattentiontospecialmechanical
informationandNoteemphasizesgeneralinformation
worthyofspecialattention.
©2019—TheToro®Company
8111LyndaleAvenueSouth
Bloomington,MN554202
Contactusatwww.Toro.com.
PrintedintheUSA
AllRightsReserved

Contents
Safety.......................................................................3
GeneralSafety...................................................3
SlopeSafety.......................................................4
TillerSafety.........................................................4
MaintenanceandStorageSafety........................4
SafetyandInstructionalDecals..........................5
ProductOverview.....................................................5
Specications....................................................5
Operation..................................................................6
InstallingandRemovingtheAttachment.............6
StartingtheTiller.................................................6
TransportPosition..............................................7
OperatingTips...................................................7
Maintenance.............................................................8
RecommendedMaintenanceSchedule(s).............8
GreasingtheTiller..............................................8
ReplacingtheTillerTines....................................8
ReplacingtheRotorAssembly............................9
CheckingtheHydraulicLines...........................10
Storage...................................................................10
Troubleshooting.......................................................11
Safety
DANGER
Theremaybeburiedutilitylinesinthework
area.Diggingintothemmaycauseashock
oranexplosion.
Havethepropertyorworkareamarkedfor
buriedlinesanddonotdiginmarkedareas.
Contactyourlocalmarkingserviceorutility
companytohavethepropertymarked(for
example,intheUS,call811orinAustralia,
call1100forthenationwidemarkingservice).
GeneralSafety
Alwaysfollowallsafetyinstructionstoavoidserious
injuryordeath.
•Donottransportanattachmentwiththe
armsraisedorextended;alwaystransportthe
attachmentclosetotheground,withtheloader
armsretracted;refertoTransportPosition(page
7).
•Havethepropertyorworkareamarkedforburied
linesandotherobjects,anddonotdiginmarked
areas.
•ReadandunderstandthecontentofthisOperator’s
Manualbeforestartingtheengine.
•Useyourfullattentionwhileoperatingthe
machine.Donotengageinanyactivitythat
causesdistractions;otherwise,injuryorproperty
damagemayoccur.
•Neverallowchildrenoruntrainedpeopleto
operatethemachine.
•Keepyourhandsandfeetawayfromthemoving
componentsandattachments.
•Donotoperatethemachinewithouttheguards
andothersafetyprotectivedevicesinplaceand
workingonthemachine.
•Keepbystandersandpetsasafedistanceaway
fromthemachine.
•Stopthemachine,shutofftheengine,andremove
thekeybeforeservicing,fueling,orunclogging
themachine.
Improperlyusingormaintainingthismachinecan
resultininjury.Toreducethepotentialforinjury,
complywiththesesafetyinstructionsandalways
payattentiontothesafety-alertsymbol,which
meansCaution,Warning,orDanger—personalsafety
instruction.Failuretocomplywiththeseinstructions
mayresultinpersonalinjuryordeath.
Youcanndadditionalsafetyinformationwhere
neededthroughoutthisOperator’sManual.
3

SlopeSafety
•Operatethemachineupanddownslopeswith
theheavyendofthemachineuphill.Weight
distributionchangeswithattachments.This
attachmentmakesthefrontofmachinetheheavy
end.
•Keeptheattachmentintheloweredposition
withtheloaderarmsretractedwhenonslopes.
Raisingtheattachmentorextendingtheloader
armsonaslopeaffectsthestabilityofthemachine.
•Slopesareamajorfactorrelatedtolossofcontrol
andtip-overaccidents,whichcanresultinsevere
injuryordeath.Operatingthemachineonany
slopeoruneventerrainrequiresextracaution.
•Establishyourownproceduresandrulesfor
operatingonslopes.Theseproceduresmust
includesurveyingthesitetodeterminewhich
slopesaresafeformachineoperation.Always
usecommonsenseandgoodjudgmentwhen
performingthissurvey.
•Slowdownanduseextracareonhillsides.Ground
conditionscanaffectthestabilityofthemachine.
•Avoidstartingorstoppingonaslope.Ifthe
machinelosestraction,proceedslowly,straight
downtheslope.
•Avoidturningonslopes.Ifyoumustturn,turn
slowlyandkeeptheheavyendofthemachine
uphill.
•Keepallmovementsonslopesslowandgradual.
Donotmakesuddenchangesinspeedor
direction.
•Ifyoufeeluneasyoperatingthemachineona
slope,donotdoit.
•Watchforholes,ruts,orbumps,asuneventerrain
couldoverturnthemachine.Tallgrasscanhide
obstacles.
•Usecautionwhenoperatingonwetsurfaces.
Reducedtractioncouldcausesliding.
•Donotoperatethemachineneardrop-offs,
ditches,embankments,orbodiesofwater.The
machinecouldsuddenlyrolloverifawheelor
trackgoesovertheedgeortheedgecavesin.
Maintainasafedistancebetweenthemachine
andanyhazard.
•Donotremoveoraddattachmentsonaslope.
•Donotparkthemachineonahillsideorslope.
TillerSafety
•Keepbystandersatleast15m(50feet)awayfrom
themachine.
•Runthetillersothatdebrisisthrownawayfrom
thetractionunit.
•Keepawayfromtherotatingtineswhileoperating
thetiller.
•Afterstrikingaforeignobject,shutofftheengine,
removethekey,thoroughlyinspecttheattachment
foranydamage,andrepairthedamagebefore
startingandoperatingtheattachment.
•Alwayslowertheattachmenteachtimeyoushut
offthemachineorleavetheoperatingposition.
MaintenanceandStorage
Safety
•Checkfastenersatfrequentintervalsforproper
tightnesstoensurethattheequipmentisinsafe
operatingcondition.
•RefertotheOperator’sManualforimportant
detailsifyoustoretheattachmentforanextended
periodoftime
•Maintainorreplacesafetyandinstructionlabels,
asnecessary.
4
SafetyandInstructional
Decals
Safetydecalsandinstructionsare
easilyvisibletotheoperatorandare
locatednearanyareaofpotential
danger.Replaceanydecalthatis
damagedormissing.
decal125-6128
125-6128
1.Highpressureuidhazard,injectionintothebody—read
theOperator’sManualbeforeperformingmaintenance.
decal133-8061
133-8061
decal138-0539
138-0539
1.Warning—readthe
Operator’sManual.
3.Thrownobject
hazard—keepbystanders
away.
2.Cuttinghazard
ofthefoot,tiller;
cutting/dismemberment
hazardofthehand,
tiller—waitforallmoving
partstostop;stayaway
frommovingparts.
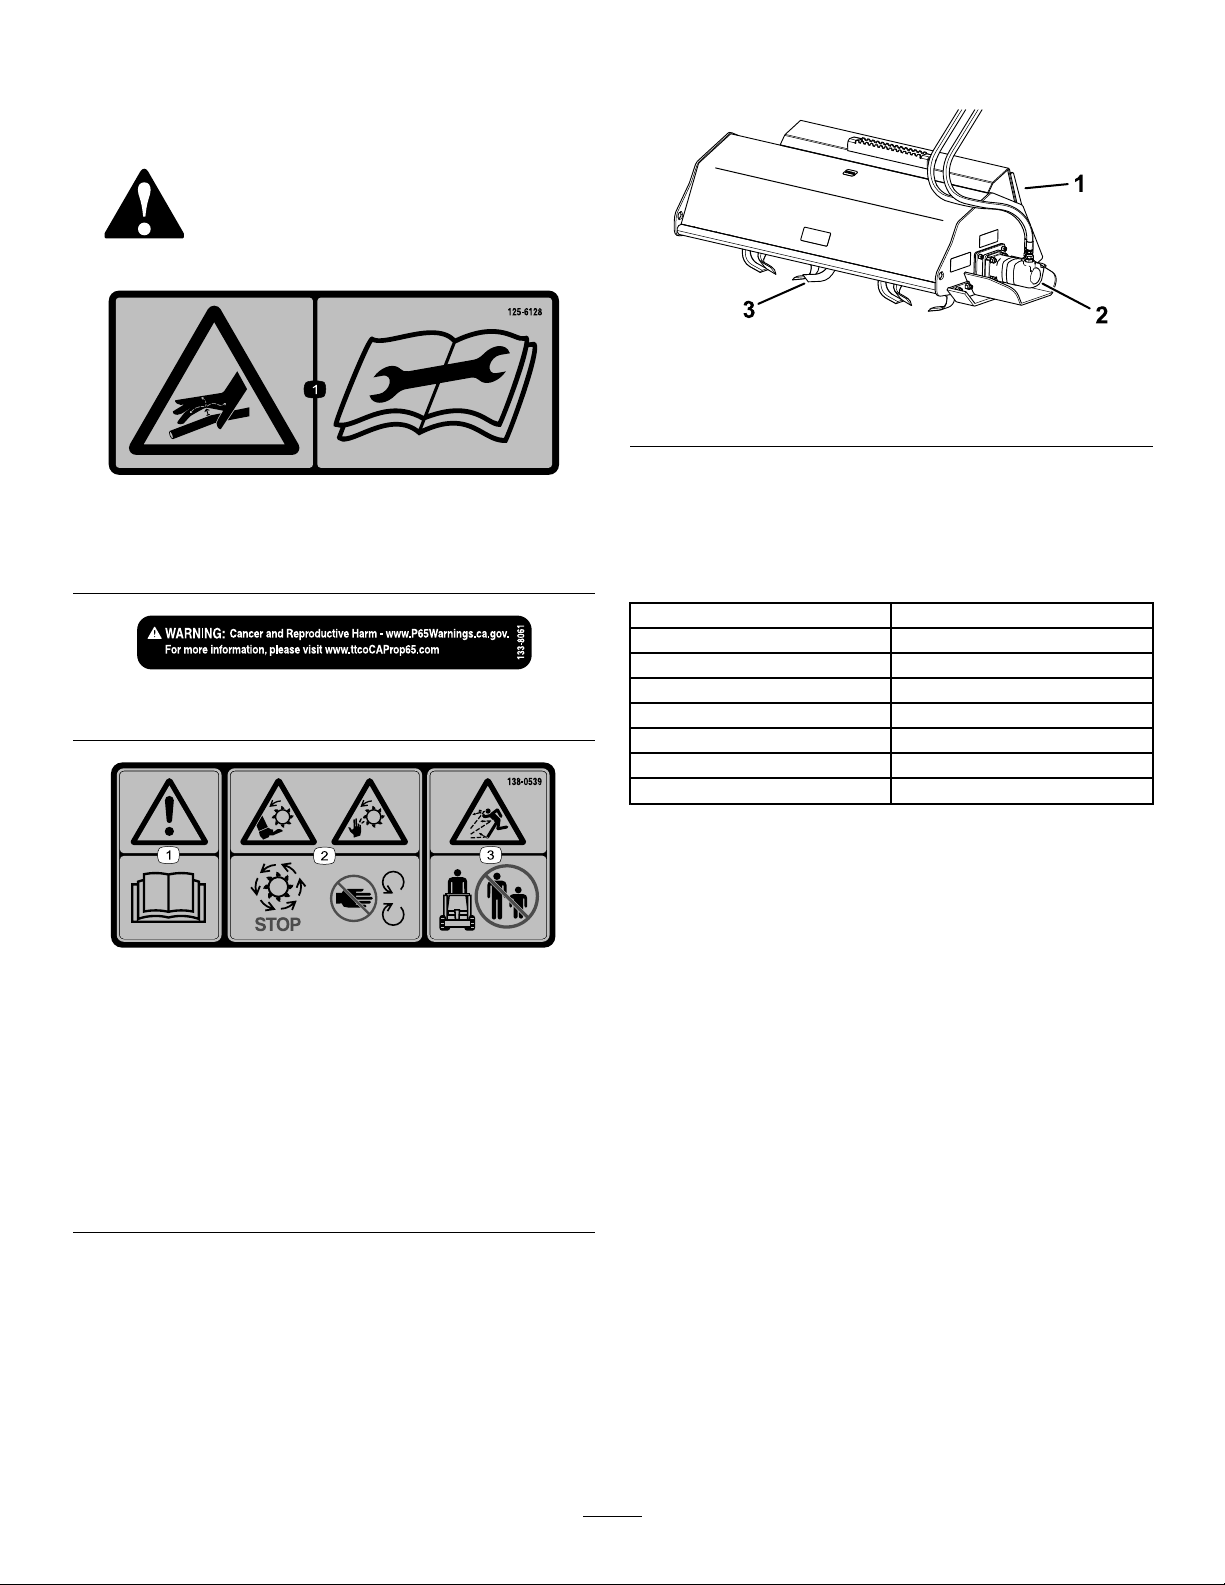
ProductOverview
g271879
Figure3
1.Attachment-mountplate3.Tine
2.Motor
Specications
Note:Specicationsanddesignaresubjectto
changewithoutnotice.
Overallwidth180cm(71inches)
Tillingwidth137cm(54inches)
Overalldepth81cm(32inches)
Tillingdepth15cm(6inches)
Height71cm(28inches)
Rotordiameter56cm(22inches)
Weight387kg(854lb)
Numberoftines28
Toensureoptimumperformanceandcontinuedsafety
certicationofthemachine,useonlygenuineToro
replacementpartsandaccessories.Replacement
partsandaccessoriesmadebyothermanufacturers
couldbedangerous,andsuchusecouldvoidthe
productwarranty.
5

Operation
Determinetheleftandrightsidesofthemachinefrom
thenormaloperatingposition.
InstallingandRemoving
theAttachment
RefertotheOperator’sManualforthetractionunitfor
theinstallationandremovalprocedure.
Important:Beforeinstallingtheattachment,
positionthemachineonalevelsurface,ensure
thatthemountplatesarefreeofanydirtordebris,
andensurethatthepinsrotatefreely.Ifthepins
donotrotatefreely,greasethem.
Note:Alwaysusethetractionunittoliftandmove
theattachment.
WARNING
Ifyoudonotfullyseatthequick-attach
pinsthroughtheattachmentmountplate,
theattachmentcouldfalloffthemachine,
crushingyouorbystanders.
Ensurethatthequick-attachpinsarefully
seatedintheattachmentmountplate.
WARNING
Hydraulicuidescapingunderpressurecan
penetrateskinandcauseinjury.Fluidinjected
intotheskinmustbesurgicallyremoved
withinafewhoursbyadoctorfamiliarwith
thisformofinjury;otherwise,gangrenemay
result.
•Ensurethatallhydraulic-uidhoses
andlinesareingoodconditionandall
hydraulicconnectionsandttingsaretight
beforeapplyingpressuretothehydraulic
system.
•Keepyourbodyandhandsawayfrom
pinholeleaksornozzlesthateject
high-pressurehydraulicuid.
•Usecardboardorpapertondhydraulic
leaks;neveruseyourhands.
CAUTION
Hydrauliccouplers,hydrauliclines/valves,
andhydraulicuidmaybehot.Ifyoucontact
hotcomponents,youmaybeburned.
•Weargloveswhenoperatingthehydraulic
couplers.
•Allowthemachinetocoolbeforetouching
hydrauliccomponents.
•Donottouchhydraulicuidspills.
StartingtheTiller
1.Startthetractionunitengineandsetthethrottle
toHIGHIDLE.
2.Engagetheauxiliaryhydraulics.
3.Slowlylowerthetillertotheground.
4.Movethetractionunitforwardorbackwardas
desired.
Note:Fortherotortooperateeffectively,rotate
itinthesamedirectionthatthetractionunitis
moving.Thedirectionoftherotorrotationis
controlledbythetractionunithydrauliccontrols;
refertothefollowingtable.
Important:Disengagetheauxiliary
hydraulicsandwaitfortherotortostop
completelybeforechangingtherotor
direction.
RotorDirectionTravelDirection
6

TransportPosition
Whentransportingtheattachment,keepitasclose
tothegroundaspossible,nomorethan15cm(6
inches)abovethelowestposition.Tiltitrearward.
g271854
Figure4
1.Nomorethan15cm(6
inches)abovethelowest
position
2.Tilttheattachment
rearward.
OperatingTips
•Cleantheareaoftrash,branches,androcks
beforetillingtopreventequipmentdamage.
•Mowandremovetallgrassandweedsbefore
tillingtominimizegrassandweedswrapping
aroundtherotor.
•Alwaysbegintillingwiththeslowestgroundspeed
possible.Increasespeedifconditionspermit.
•Alwaysusefullthrottle(maximumenginespeed).
•Iftherotorstalls,slowdownthetravelspeedor
decreasetherotordepthbyraisingtherotor
•Donottillunderwetconditions;soilstucktothe
rotorandteethdecreasesperformance.
•Youmayneedtomakemultiplepasseswhen
workinginsodorcompactedsoil.
•Tillinlong,straightpasses.Donotmaketurns
whilethetillerisintheground,asequipment
damagemayresult.
•Avoidexcessivetillingofthesoil,asnelytilled
soildoesnotabsorbmoistureeasilyandpuddles
ofwatermayform.
•Whentillinghardpacked,verydry,orvirginsoil,
raisethetillersoonlytheverytopofthesoilis
penetrated.Onsucceedingpassesthedepthmay
belowered.
•Runthetillersothatthedirtisthrownawayfrom
you.
•Waitforthetillertostopbeforechangingthe
rotationdirection.
•Ifarockorotherobstructiongetsintothetiller
tines,reversetherotationdirectiontodislodgeit.
7

Maintenance
Determinetheleftandrightsidesofthemachinefromthenormaloperatingposition.
CAUTION
Ifyouleavethekeyintheswitch,someonecouldaccidentlystarttheengineandseriously
injureyouorotherbystanders.
Removethekeyfromtheswitchbeforeyouperformanymaintenance.
RecommendedMaintenanceSchedule(s)
MaintenanceService
IntervalMaintenanceProcedure
Beforeeachuseordaily
•Greasethebearings(immediatelyaftereverywashing).
•Checkthetinesandtinebolts(replaceasrequired).
•Checkthehydrauliclinesforleaks,loosettings,kinkedlines,loosemounting
supports,wear,weather,andchemicaldeterioration.
Beforestorage•Greasethebearings
GreasingtheTiller
ServiceInterval:Beforeeachuseordaily
(immediatelyaftereverywashing).
Beforestorage
Greaseimmediatelyaftereverywashing.
GreaseType:General-purposegrease
1.Parkthemachineonalevelsurfaceand
disengagetheauxiliaryhydraulics.
2.Shutofftheengine,removethekey,andwait
forallmovingpartstostopbeforeleavingthe
operatingposition.
3.GreasetherotorbearingshowninFigure5.
4.Wipeupanyexcessgrease.
g271903
Figure5
ReplacingtheTillerTines
ServiceInterval:Beforeeachuseordaily—Check
thetinesandtinebolts(replaceas
required).
Note:Wornordulltinesdegradetheperformance
ofthetiller.
1.Parkthemachineonalevelsurfaceand
disengagetheauxiliaryhydraulics.
2.Shutofftheengine,removethekey,andwait
forallmovingpartstostopbeforeleavingthe
operatingposition.
3.Notethedirectionthatthetillertineisoriented.
4.Removethebolt(5/8x1-3/4inch),nut(5/8
inch),andtine(Figure6).
g271900
Figure6
1.Bolt(5/8x1-3/4inch)3.Nut(5/8inch)
2.Tine
5.Cleandirtanddebrisfromthetinepocket.
8

6.Installthenewtine,orientingitthesame
directionastheoldtine(Figure6).
7.Torquetheboltto183to223N∙m(135to165
ft-lb).
ReplacingtheRotor
Assembly
RemovingtheRotorAssembly
1.Removethetillerfromthetractionunit.
2.Useahoisttolaythetillerbackonthe
attachmentplate.
3.Removethenut(5/8inch)andbolt(5/8x4
inches)securingthedriveadaptertotherotor
assembly(Figure7).
g271906
Figure7
1.Boltandnut2.Driveadapter
4.Removethe4nuts(9/16inch)securingthe
motormount(Figure8).Removethemountwith
themotor.
g271905
Figure8
1.Nut—9/16inch(4)2.Motormount
5.Supporttherotorassemblyusingahoistand
removethe4locknuts(5/8inch),4washers,
and4bolts(5/8x2-1/2inches)securingthe
bearingguardandbearingoneachendofthe
rotorassembly(Figure9).
g271907
Figure9
1.Locknut,washer,andbolt
(4)
2.Bearingguardandbearing
6.Removetherotorassembly.
9

InstallingtheRotorAssembly
1.Installtherotorassemblywiththe2bearing
guardsandbearingsusing4locknuts(5/8inch),
4washers,and4bolts(5/8x2-1/2inches)for
bothsetsofguardsandbearings(Figure9).
Torquetheboltsto183to224N∙m(135to165
ft-lb).
2.Using4nuts(9/16inch),installtherotormount
andmotor(Figure8).T orquethenutsto127to
157N∙m(94to116ft-lb).
3.Securethedriveadaptertotherotorassembly
usinganut(5/8inch)andbolt(5/8x4inches)
asshowninFigure7.Torquetheboltto183to
224N∙m(135to165ft-lb)
CheckingtheHydraulic
Lines
ServiceInterval:Beforeeachuseordaily
WARNING
Hydraulicuidescapingunderpressurecan
penetrateskinandcauseinjury.Fluidinjected
intotheskinmustbesurgicallyremoved
withinafewhoursbyadoctorfamiliarwith
thisformofinjury;otherwise,gangrenemay
result.
•Keepyourbodyandhandsawayfrom
pinholeleaksornozzlesthateject
high-pressurehydraulicuid.
•Usecardboardorpapertondhydraulic
leaks;neveruseyourhands.
Storage
1.Beforelong-termstorage,washtheattachment
withmilddetergentandwatertoremovedirtand
grime.
2.Paintallscratchedorbaremetalsurfaces.
Note:PaintisavailablefromyourAuthorized
ServiceDealer.
3.Storetheattachmentinaclean,drygarageor
storagearea.Coverittoprotectitandkeepit
clean.
Important:Storethetilleronapalletor
concrete.Donotstoreitontheground.
10

Troubleshooting
ProblemPossibleCauseCorrectiveAction
1.Ahydrauliccouplerisnotcompletely
connected.
1.Checkandtightenallcouplers.
2.Oneormorehydrauliccouplersare
damaged.
2.Checkthecouplersandreplaceany
thataredamaged.
3.Thereisanobstructioninahydraulic
hose.
3.Findandremovetheobstruction.
4.Theauxiliaryvalveonthetractionunit
isnotopening.
4.Repairtheauxiliaryvalve.
5.Thereisanobstructioninthetiller
(e.g.,rockorroot).
5.Findandremovetheobstruction.
6.Adrivechainisbroken.6.Repairorreplacethechain.
7.Adrivechainisloose.7.Adjustthechaintension.
8.Ahydraulicvalveisnotworking
properly.
8.Replaceorrepairthehydraulicvalve.
Thetillerdoesnotoperate.
9.Adrivemotorisnotworkingproperly.9.Replaceorrepairthedrivemotor.
11

CaliforniaProposition65WarningInformation
Whatisthiswarning?
Youmayseeaproductforsalethathasawarninglabellikethefollowing:
WARNING:CancerandReproductiveHarm—www.p65Warnings.ca.gov.
WhatisProp65?
Prop65appliestoanycompanyoperatinginCalifornia,sellingproductsinCalifornia,ormanufacturingproductsthatmaybesoldinorbroughtinto
California.ItmandatesthattheGovernorofCaliforniamaintainandpublishalistofchemicalsknowntocausecancer,birthdefects,and/orother
reproductiveharm.Thelist,whichisupdatedannually,includeshundredsofchemicalsfoundinmanyeverydayitems.ThepurposeofProp65isto
informthepublicaboutexposuretothesechemicals.
Prop65doesnotbanthesaleofproductscontainingthesechemicalsbutinsteadrequireswarningsonanyproduct,productpackaging,orliteraturewith
theproduct.Moreover,aProp65warningdoesnotmeanthataproductisinviolationofanyproductsafetystandardsorrequirements.Infact,the
CaliforniagovernmenthasclariedthataProp65warning“isnotthesameasaregulatorydecisionthataproductis‘safe’or‘unsafe.’”Manyofthese
chemicalshavebeenusedineverydayproductsforyearswithoutdocumentedharm.Formoreinformation,gotohttps://oag.ca.gov/prop65/faqs-view-all.
AProp65warningmeansthatacompanyhaseither(1)evaluatedtheexposureandhasconcludedthatitexceedsthe“nosignicantrisklevel”;or(2)
haschosentoprovideawarningbasedonitsunderstandingaboutthepresenceofalistedchemicalwithoutattemptingtoevaluatetheexposure.
Doesthislawapplyeverywhere?
Prop65warningsarerequiredunderCalifornialawonly.ThesewarningsareseenthroughoutCaliforniainawiderangeofsettings,includingbutnot
limitedtorestaurants,grocerystores,hotels,schools,andhospitals,andonawidevarietyofproducts.Additionally,someonlineandmailorder
retailersprovideProp65warningsontheirwebsitesorincatalogs.
HowdotheCaliforniawarningscomparetofederallimits?
Prop65standardsareoftenmorestringentthanfederalandinternationalstandards.TherearevarioussubstancesthatrequireaProp65warning
atlevelsthatarefarlowerthanfederalactionlimits.Forexample,theProp65standardforwarningsforleadis0.5μg/day,whichiswellbelow
thefederalandinternationalstandards.
Whydon’tallsimilarproductscarrythewarning?
•ProductssoldinCaliforniarequireProp65labellingwhilesimilarproductssoldelsewheredonot.
•AcompanyinvolvedinaProp65lawsuitreachingasettlementmayberequiredtouseProp65warningsforitsproducts,butothercompanies
makingsimilarproductsmayhavenosuchrequirement.
•TheenforcementofProp65isinconsistent.
•CompaniesmayelectnottoprovidewarningsbecausetheyconcludethattheyarenotrequiredtodosounderProp65;alackofwarningsfora
productdoesnotmeanthattheproductisfreeoflistedchemicalsatsimilarlevels.
WhydoesToroincludethiswarning?
Torohaschosentoprovideconsumerswithasmuchinformationaspossiblesothattheycanmakeinformeddecisionsabouttheproductstheybuyand
use.T oroprovideswarningsincertaincasesbasedonitsknowledgeofthepresenceofoneormorelistedchemicalswithoutevaluatingthelevelof
exposure,asnotallthelistedchemicalsprovideexposurelimitrequirements.WhiletheexposurefromT oroproductsmaybenegligibleorwellwithinthe
“nosignicantrisk”range,outofanabundanceofcaution,TorohaselectedtoprovidetheProp65warnings.Moreover,ifTorodoesnotprovidethese
warnings,itcouldbesuedbytheStateofCaliforniaorbyprivatepartiesseekingtoenforceProp65andsubjecttosubstantialpenalties.
RevA
This manual suits for next models
1
Table of contents
Other Toro Tiller manuals


Popular Tiller manuals by other brands


 Operator's manual")


SNOWJOE
SNOWJOE Sunjoe 24V-TLR-CT-RM Operator's manual

Texas
Texas Pro Trac 1350BE user manual

Echo
Echo ProPaddle 99944200620 Operator's manual

Remington
Remington Garden Wizard 109312-01 owner's manual

Craftsman
Craftsman INCREDI.PULL 316.299371 Operator's manual

Gama Garden
Gama Garden GT 250C instruction manual