Toro 23513 User manual

FormNo.3384-539RevA
18inDethatcher
ModelNo.23513—SerialNo.314000001andUp
ModelNo.33513—SerialNo.314000001andUp
g025335
Registeratwww.Toro.com.
OriginalInstructions(EN)*3384-539*A

WARNING
CALIFORNIA
Proposition65Warning
Thisproductcontainsachemicalorchemicals
knowntotheStateofCaliforniatocausecancer,
birthdefects,orreproductiveharm.
Theengineexhaustfromthisproduct
containschemicalsknowntotheStateof
Californiatocausecancer,birthdefects,
orotherreproductiveharm.
ThissparkignitionsystemcomplieswithCanadianICES-002.
Important:Thisengineisnotequippedwithaspark
arrestermufer.ItisaviolationofCaliforniaPublic
ResourceCodeSection4442touseoroperatetheengine
onanyforest-covered,brush-covered,orgrass-covered
land.Otherstatesorfederalareasmayhavesimilarlaws.
Introduction
Thismachinedethatchesturf.Itisintendedforsmall-to
medium-sizedlawnapplicationsinresidentialandcommercial
properties.
Readthisinformationcarefullytolearnhowtooperateand
maintainyourproductproperlyandtoavoidinjuryand
productdamage.Youareresponsibleforoperatingthe
productproperlyandsafely.
YoumaycontactTorodirectlyatwww .Toro.comforproduct
andaccessoryinformation,helpndingadealer,ortoregister
yourproduct.
Wheneveryouneedservice,genuineToroparts,oradditional
information,contactanAuthorizedServiceDealerorToro
CustomerServiceandhavethemodelandserialnumbersof
yourproductready.Figure1illustratesthelocationofthe
modelandserialnumbersontheproduct.Writethenumbers
inthespaceprovided.
g025340
1
Figure1
1.Locationofthemodelandserialnumbers
ModelNo.
SerialNo.
Thismanualidentiespotentialhazardsandhassafety
messagesidentiedbythesafetyalertsymbol(Figure2),
whichsignalsahazardthatmaycauseseriousinjuryordeath
ifyoudonotfollowtherecommendedprecautions.
Figure2
1.Safetyalertsymbol
Thismanualuses2wordstohighlightinformation.
Importantcallsattentiontospecialmechanicalinformation
andNoteemphasizesgeneralinformationworthyofspecial
attention.
©2014—TheToro®Company
8111LyndaleAvenueSouth
Bloomington,MN554202
Contactusatwww.Toro.com.
PrintedintheUSA.
AllRightsReserved

Contents
Introduction..................................................................2
Safety...........................................................................3
SafeOperatingPractices...........................................3
SlopeIndicator.......................................................5
SafetyandInstructionalDecals.................................6
Setup............................................................................8
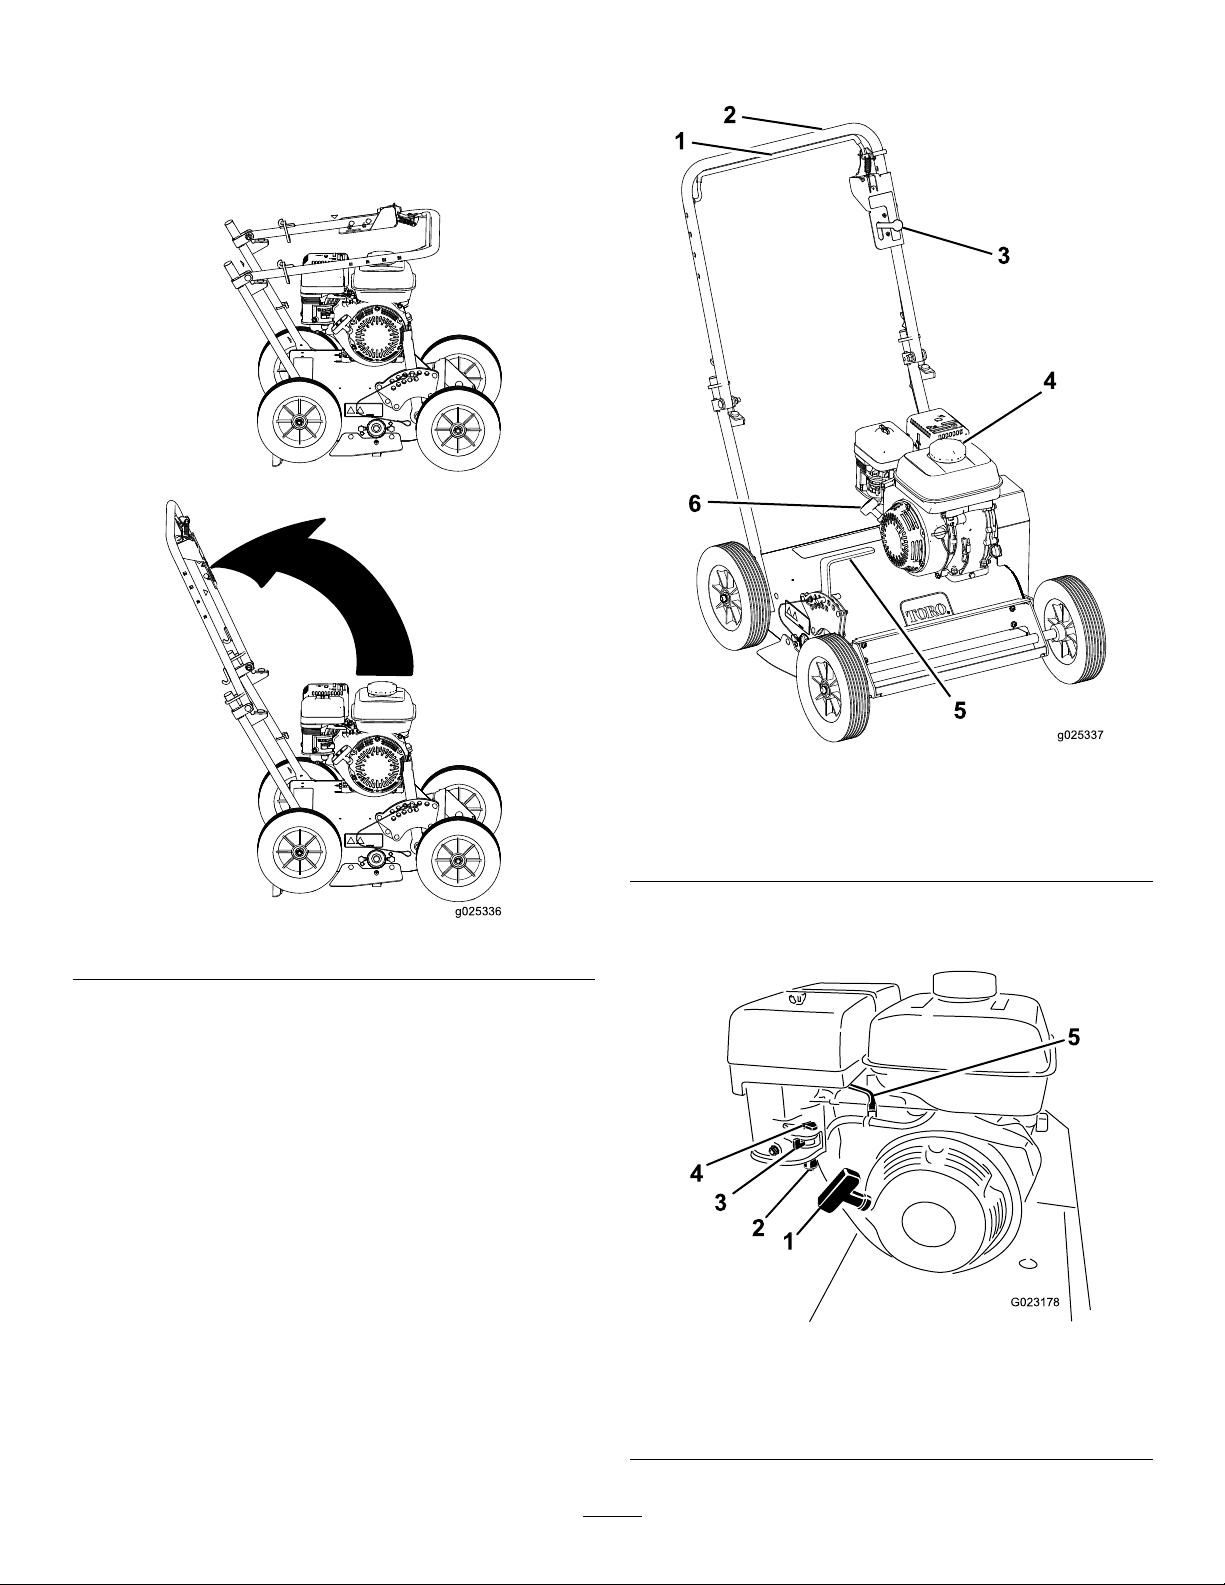
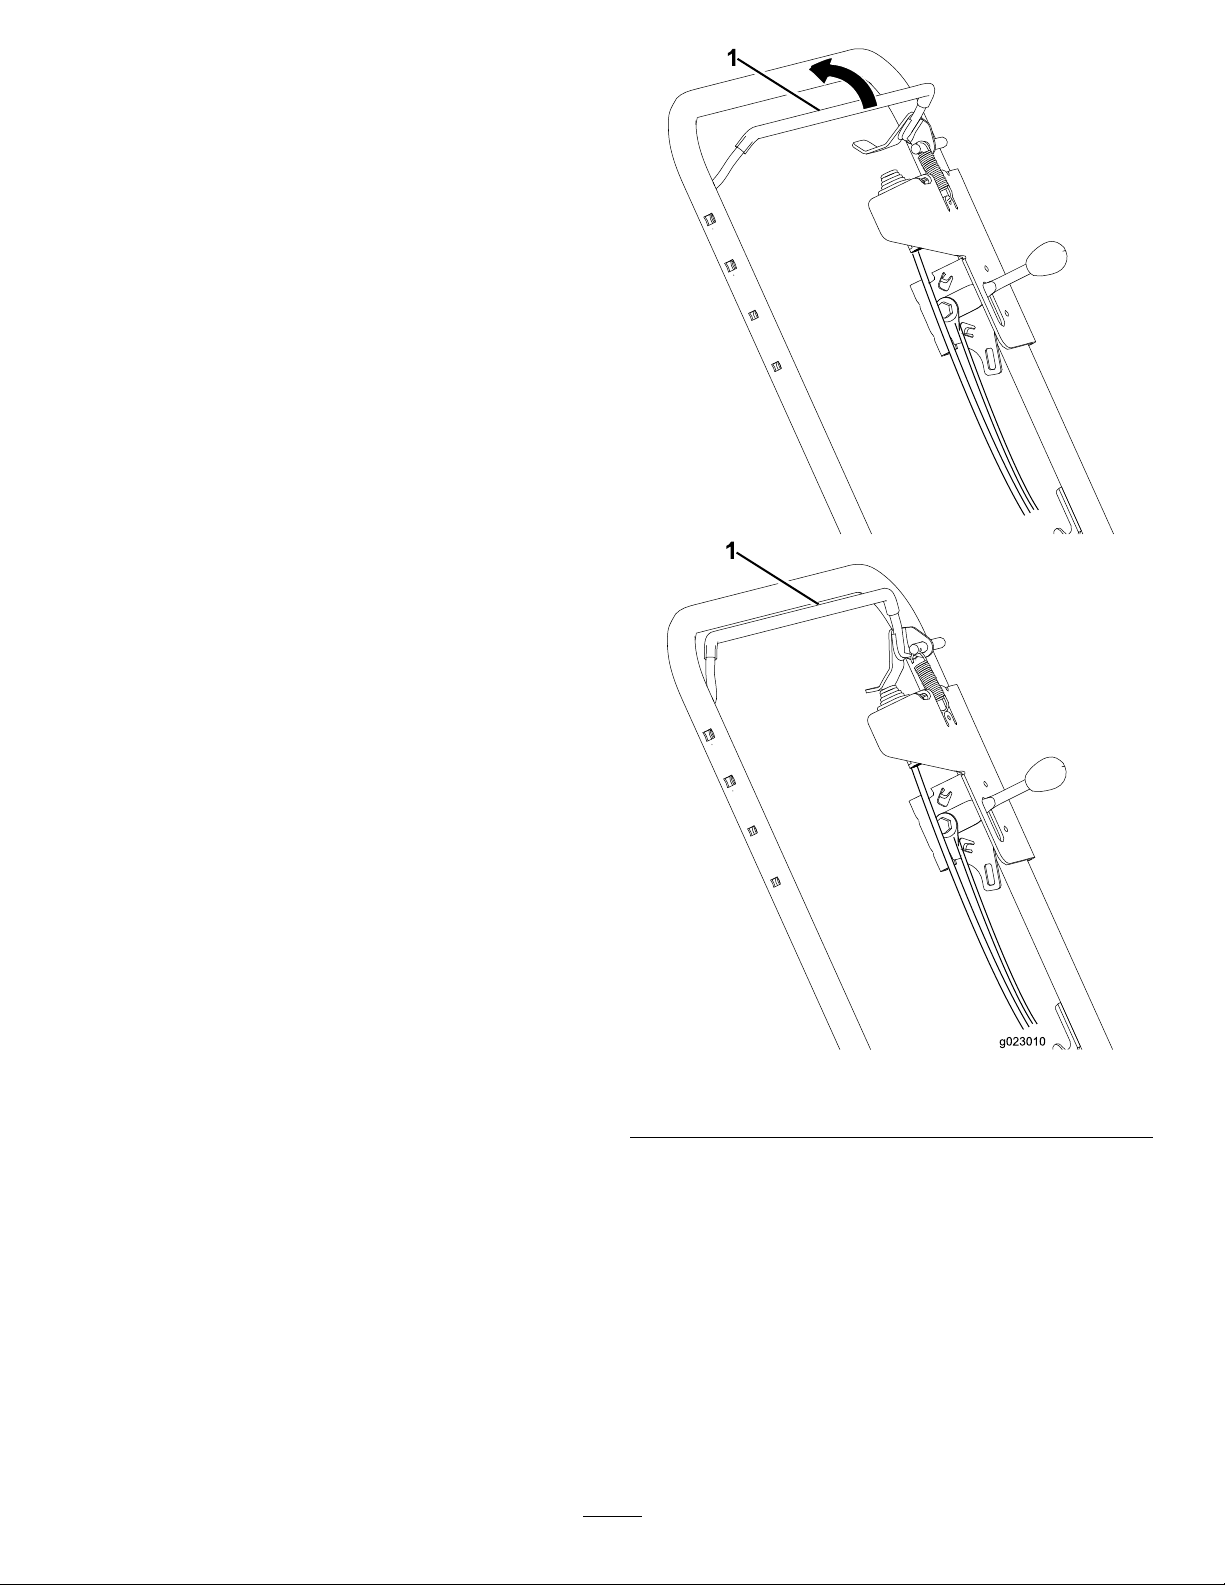
UnfoldingtheHandle..............................................8
CheckingtheEngine-OilLevel..................................8
ProductOverview..........................................................8
Controls................................................................8
Specications........................................................10
Attachments/Accessories........................................10
Operation....................................................................11
CheckingtheEngine-OilLevel.................................11
CleaningDebrisfromtheMachine............................11
AddingFuel...........................................................11
StartingandStoppingtheEngine..............................13
OperatingtheMachine............................................13
OperatingTips......................................................13
Maintenance.................................................................14
RecommendedMaintenanceSchedule(s)......................14
PremaintenanceProcedures........................................14
DisconnectingtheSpark-PlugWire...........................14
EngineMaintenance..................................................15
ServicingtheAirCleaner.........................................15
ServicingtheEngineOil..........................................15
CleaningtheSedimentCup......................................16
ServicingtheSparkPlug..........................................16
BeltMaintenance......................................................17
CheckingtheBeltTension.......................................17
AdjustingtheBeltTension.......................................17
MaintainingtheFlailBlades.........................................18
InspectingtheFlailBlades.......................................18
ReplacingtheFlailBlades........................................18
Storage........................................................................19
RemovingtheMachinefromStorage.........................19
Safety
Improperuseormaintenancebytheoperatoror
ownercanresultininjury.Toreducethepotential
forinjury,complywiththesesafetyinstructionsand
alwayspayattentiontothesafetyalertsymbol,which
means
Caution
,
W ar ning
,or
Danger
—personalsafety
instruction.Failuretocomplywiththeinstructionmay
resultinpersonalinjuryordeath.
SafeOperatingPractices
ThefollowinginstructionsarebasedontheANSI
B71.4—2004standard.
Training
•ReadtheOperator’sManualandothertrainingmaterial.If
theoperator(s)ormechanic(s)cannotreadEnglish,itis
theowner’sresponsibilitytoexplainthismaterialtothem.
•Becomefamiliarwiththesafeoperationoftheequipment,
operatorcontrols,andsafetysigns.
•Alloperatorsandmechanicsshouldbetrained.The
ownerisresponsiblefortrainingtheusers.
•Neverletchildrenoruntrainedpeopleoperateorservice
theequipment.Localregulationsmayrestricttheageof
theoperator.
•Theowner/usercanpreventandisresponsiblefor
accidentsorinjuriesoccurringtohimselforherself,other
people,orproperty.
Preparation
•Evaluatetheterraintodeterminewhataccessoriesand
attachmentsareneededtoproperlyandsafelyperform
thejob.Onlyuseaccessoriesandattachmentsapproved
bythemanufacturer.
•Wearappropriateclothingincludingsafetyglassesand
hearingprotection.Longhair,looseclothing,orjewelry
maygettangledinmovingparts.
•Inspecttheareawheretheequipmentistobeusedand
removeallobjectssuchasrocks,toys,andwire,whichcan
becontactedbythemachine.
•Useextracarewhenhandlinggasolineandotherfuels.
Theyareammableandvaporsareexplosive.
–Useonlyanapprovedcontainer.
–Neverremovethegascaporaddfuelwiththeengine
running.
–Allowtheenginetocoolbeforerefueling.
–Donotsmoke.
–Neverrefuelordrainthemachineindoors.
•Checkthattheoperatorpresencecontrols,safetyswitches,
andshieldsareattachedandfunctioningproperly.Donot
operatethemunlesstheyarefunctioningproperly.
3

Operation
•Neverrunanengineinanenclosedarea.
•Onlyoperateingoodlight,keepingawayfromholesand
hiddenhazards.
•Starttheengineonlyfromtheoperator’sposition.
•Neveroperatewithouttheshields,covers,orotherguards
securelyinplace.Besureallinterlocksarefunctioning
properly.
•Donotchangetheenginegovernorsettingoroverspeed
theengine.
•Raisetheailblades,stopthemachine,andstopthe
enginebeforeleavingtheoperator’spositionforany
reason.
•Stoptheequipmentandinspecttheailbladesafter
strikinganobjectorifanabnormalvibrationoccurs.
Makenecessaryrepairsbeforeresumingoperation.
•Keephandsandfeetawayfromtheailbladearea.
•Nevercarrypassengers,andkeeppetsandbystanders
away.
•Bealert,slowdown,andusecautionwhenmakingturns.
Lookbehindandtothesidebeforechangingdirections.
•Donotoperatethemachinewhileundertheinuence
ofalcoholordrugs.
•Lightningcancausesevereinjuryordeath.Iflightning
isseenorthunderisheardinthearea,donotoperate
themachine;seekshelter.
•Useextremecarewhenloadingorunloadingthemachine
intoatrailerortruck.
•Usecarewhenapproachingblindcorners,shrubs,trees,
orotherobjectsthatmayobscurevision.
•Alwaysbeawareofobstaclesthatmaybeinthearea
ofoperation.Planyourpathtoavoidcontactwithany
obstaclebyyouorthemachine.
SlopeOperation
•Donotoperateneardrop-offs,ditches,steepbanks,or
water.Wheelsdroppingoveredgescancauserollovers,
whichmayresultinseriousinjuryordeath.
•Donotoperateonslopeswhengrassiswet.Slippery
conditionsreducetractionandcouldcauseslidingand
lossofcontrol.
•Donotmakesuddenturnsorrapidspeedchanges.
•Reducespeedanduseextremecautiononslopes.
•Donotoperateonaslopegreaterthan20degrees.
•Removeormarkobstaclessuchasrocks,treelimbs,etc.
fromtheoperatingarea.
•Watchforditches,holes,rocks,dips,andrisesthatchange
theoperatingangle,asroughterraincouldoverturnthe
machine.
•Alwaysavoidsuddenstartingorstoppingonaslope.If
tireslosetraction,disengagetheailbladesandproceed
slowlyofftheslope.
•Followtherecommendationsforwheelweightsor
counterweightstoimprovestability.
MaintenanceandStorage
•Waitforallmovementtostopbeforeadjusting,cleaning,
orrepairing.Raisetheailblades,stopthemachine,stop
theengine,anddisconnectthespark-plugwire.
•Cleangrassanddebrisfromtheblades,drives,mufers,
andenginetohelppreventres.Cleanupoilorfuelspills.
•Lettheenginecoolbeforestoring,anddonotstorethe
machinenearaame.
•Shutoffthefuelwhilestoringortransportingthemachine
ontrailers.Donotstorefuelnearamesordrainindoors.
•Parkthemachineonlevel,hardground.Neverallow
untrainedpersonneltoserviceit.
•Usejackstandsorsafetylatchestosupportcomponents
whenrequired.
•Carefullyreleasepressurefromcomponentswithstored
energy.
•Removethespark-plugwirebeforemakinganyrepairs.
•Keephandsandfeetawayfrommovingparts.Ifpossible,
donotmakeadjustmentswiththeenginerunning.
•Keepallpartsingoodworkingconditionandallhardware
tightened.Replaceallwornordamageddecals.
•UseonlyToro-approvedattachments.Thewarranty
maybevoidedifthemachineisusedwithunapproved
attachments.
4

SlopeIndicator
G01 1841
Figure3
Thispagemaybecopiedforpersonaluse.
1.Themaximumslopeyoucansafelyoperatethemachineonis20degrees.Usetheslopecharttodeterminethedegreeofslope
ofhillsbeforeoperating.Donotoperatethismachineonaslopegreaterthan20degrees.Foldalongtheappropriateline
tomatchtherecommendedslope.
2.Alignthisedgewithaverticalsurface,atree,building,fencepole,etc.
3.Exampleofhowtocompareslopewithfoldededge.
5

SafetyandInstructionalDecals
Safetydecalsandinstructionsareeasilyvisibletotheoperatorandarelocatednearanyareaof
potentialdanger.Replaceanydecalthatisdamagedorlost.
117–4979
1.Warning—stayawayfrommovingparts;keepallguardsin
place.
93–7321
1.Warning—stayawayfrommovingparts;keepallguardsin
place.
125–3809
1.Warning—readtheOperator’sManual.5.Thrownobjecthazard—keepbystandersawayfromthe
machine.
2.Warning—donotoperatethismachineunlessyouaretrained.6.Warning—stoptheenginebeforewalkingawayfromthe
machine.
3.Thrownobjecthazard—stoptheengineandremoveany
debrisfromyourpath.
7.Warning—stoptheengineanddisconnectthesparkplugwire
beforeperformingmaintenanceonthemachine.
4.Warning—stayawayfrommovingparts;keepallguardsin
place.
125–3897
1.Warning-stayawayfrommovingparts;keepallguardsand
shieldsinplace.
6

127–4061
1.Cuttingblades4.Holdthehandletostart
theengine.
2.Fast5.Releasethehandletostop
theengine.
3.Slow
7

Setup
UnfoldingtheHandle
1.Raisethehandletotheoperatingposition(Figure4).
g025336
Figure4
2.Slidetheovallockingringsdowneachsideoftheupper
handleoverthelowerhandle(Figure4),lockingthe
handlesectionstogether.
CheckingtheEngine-OilLevel
Themachinecomesfromthefactorywithoilintheengine
crankcase,however,itmaybenecessarytoaddoil(Changing
theEngineOil(page15).Addonlyenoughoiltoraisethe
leveltotheFullmarkonthedipstick;refertoFigure11.
ProductOverview
g025337
1
2
3
4
5
6
Figure5
1.Operator-presencebail4.Fueltank
2.Handle5.Depth-controllever
3.Throttle-controllever6.Recoil-starterhandle
Controls
G023178
Figure6
1.Recoilstarter4.Chokelever
2.Sedimentcup5.Throttlelever
3.Fuelshutoffvalve
8

RecoilStarter
Pulltherecoilstarterhandletostartengine(Figure6).
FuelShutoffValve
Closethefuelshutoffvalvewhentransportingorstoringthe
machine(Figure6).
ChokeLever
Beforestartingacoldengine,movethechokeleverforward.
Aftertheenginestarts,regulatethechoketokeeptheengine
runningsmoothly.Assoonaspossible,movethechokelever
allthewayrearward.
Note:Awarmenginerequireslittleornochoking.
Operator-PresenceBail
Theoperator-presencebailallowsthemachinetostart/run.
Tostartthemachine,holddowntheoperatorpresencebail
(Figure7).Continuetoholddowntheoperatorpresencebail
toallowthemachinetorun.
Figure7
1.Operator-presencebail
9

ThrottleLever
Movethecontrolforwardtoincreasetheenginespeed,and
rearwardtodecreasespeed;refertoFigure8.
Figure8
1.Throttlelever
DepthControlLever
Thedepthcontrolleverallowsyoutosetthedepthofthe
ailbladesin10cuttingpositionsalongwith1positionfor
transportation.Toadjustthedepth,removethehairpin
cotter,pullthelockingpinout,andmovetheleverforwardor
rearwardtothedesireddepthsetting(Figure9).
Important:Donotpulltheleverside-to-sideasthis
willbendit.
1
2
3
4
g025338
Figure9
1.Depth-controllever3.Hairpincotter
2.Transport-positionhole4.Lockingpin
Specications
Note:Specicationsanddesignaresubjecttochange
withoutnotice.
Width69.9cm(27.5inches)
Length(operating)111.8cm(44inches)
Length(withhandlestored)86.4cm(34inches)
Height(operating)94cm(37inches)
Height(withhandlestored)63.5cm(25inches)
Weight61.2kg(135lbs)
Attachments/Accessories
Approvedattachmentsandaccessoriesareavailableforuse
withthemachinetoenhanceandexpanditscapabilities.
ContactanAuthorizedServiceDealerorDistributororgo
towww.Toro.comforalistofallapprovedattachmentsand
accessories.
10

Operation
Note:Determinetheleftandrightsidesofthemachine
fromthenormaloperatingposition.
CheckingtheEngine-OilLevel
ServiceInterval:Beforeeachuseordaily
1.Stoptheengine,disengagetheailblades,andwaitfor
allmovingpartstostop.
2.Cleanaroundthedipstick(Figure10)sothatdirt
cannotfallintothellerholeanddamagetheengine.
Note:Makesurethattheengineislevel.
Figure10
1.Dipstick
3.Unscrewthedipstickandwipetheendclean(Figure
10).
4.Insertthedipstickfullyontothellertube.Donot
screwitin.(Figure10).
5.Removethedipstickagainandlookattheend.Ifthe
engine-oillevelislow,slowlypouronlyenoughoilinto
thellertubetoraisetheleveltothemiddleofthe
dipstick(Figure11).
12
3
4
g019686
5
Figure11
1.Fillertube4.Lowerlimit
2.Dipstick5.Oil-drainbolt
3.Upperlimit
Important:Donotoverllthecrankcasewith
engineoilandruntheengine;enginedamage
mayresult.
CleaningDebrisfromthe
Machine
ServiceInterval:Beforeeachuseordaily
1.Disengagetheailblades,stoptheengine,andwaitfor
allmovingpartstostop.
2.Brushdirtanddebrisawayfromtheaircleanerand
engineopenings.
AddingFuel
RecommendedFuel:
•Forbestresults,useonlyclean,fresh(lessthan30days
old),unleadedgasolinewithanoctaneratingof87or
higher((R+M)/2ratingmethod).
•Ethanol:Gasolinewithupto10%ethanol(gasohol)
or15%MTBE(methyltertiarybutylether)byvolume
isacceptable.EthanolandMTBEarenotthesame.
Gasolinewith15%ethanol(E15)byvolumeisnot
approvedforuse.Neverusegasolinethatcontains
morethan10%ethanolbyvolume,suchasE15
(contains15%ethanol),E20(contains20%ethanol),or
E85(containsupto85%ethanol).Usingunapproved
gasolinemaycauseperformanceproblemsand/orengine
damagewhichmaynotbecoveredunderwarranty.
•Donotusegasolinecontainingmethanol.
11

•Donotstorefueleitherinthefueltankorfuelcontainers
overthewinterunlessafuelstabilizerisused.
•Donotaddoiltogasoline.
Important:Toreducestartingproblems,addfuel
stabilizertothefuelallseason,mixingitwithgasoline
lessthan30daysold;runthemachinedrybeforestoring
itformorethan30days.
Donotusefueladditivesotherthanafuel
stabilizer/conditioner.Donotusefuelstabilizers
withanalcoholbasesuchasethanol,methanol,or
isopropanol.
DANGER
Incertainconditions,gasolineisextremely
ammableandhighlyexplosive.Areorexplosion
fromgasolinecanburnyouandothersandcan
damageproperty.
•Fillthefueltankoutdoors,inanopenarea,
whentheengineiscold.Wipeupanygasoline
thatspills.
•Neverllthefueltankinsideanenclosedtrailer.
•Donotllthefueltankcompletelyfull.Add
gasolinetothefueltankuntilthelevelis6to13
mm(1/4to1/2inch)belowthebottomofthe
llerneck.Thisemptyspaceinthetankallows
gasolinetoexpand.
•Neversmokewhenhandlinggasoline,andstay
awayfromanopenameorwheregasoline
fumesmaybeignitedbyaspark.
•Storegasolineinanapprovedcontainerand
keepitoutofthereachofchildren.Neverbuy
morethana30-daysupplyofgasoline.
•Donotoperatewithouttheentireexhaust
systeminplaceandinproperworkingcondition.
DANGER
Incertainconditionsduringfueling,static
electricitycanbereleased,causingasparkwhich
canignitethegasolinevapors.Areorexplosion
fromgasolinecanburnyouandothersandcan
damageproperty.
•Alwaysplacegasolinecontainersontheground
awayfromyourvehiclebeforelling.
•Donotllgasolinecontainersinsideavehicleor
onatruckortrailerbed,becauseinteriorcarpets
orplastictruckbedlinersmayinsulatethe
containerandslowthelossofanystaticcharge.
•Whenpractical,removegas-poweredequipment
fromthetruckortrailer,andrefuelthe
equipmentwithitswheelsontheground.
•Ifthisisnotpossible,thenrefuelsuch
equipmentonatruckortrailerfromaportable
containerratherthanfromagasolinedispenser
nozzle.
•Ifagasolinedispensernozzlemustbeused,
keepthenozzleincontactwiththerimofthe
fueltankorcontaineropeningatalltimesuntil
fuelingiscomplete.
FillingtheFuelTank
1.Disengagetheailblades,stoptheengine,andwaitfor
allmovingpartstostop.
2.Allowtheenginetocool.
3.Cleanaroundthefueltankcapandremoveit(Figure
12).
Note:Thecapistetheredtothefueltank.
g013315
Figure12
4.Addunleadedgasolinetothefueltankuntilthelevel
isjustinsidethemeshlterbasket.
Important:Thisspaceinthetankallowsgasoline
toexpand.Donotllthefueltankcompletelyfull.
12

5.Installthefueltankcapsecurely.
6.Wipeupanyspilledgasoline.
StartingandStoppingthe
Engine
StartingtheEngine
1.Turnonthefuelvalve.
2.Movethechokelevertotheleftifyouarestartinga
coldengine.
3.MovethethrottlelevermidwaybetweentheSlow
(turtle)andFast(rabbit)positions.
Note:Awarmorhotenginemaynotrequirechoking.
4.Withonehand,holddowntheoperatorpresencebail.
5.Pulltherecoilhandlesharplytostarttheengine.
6.Aftertheenginestarts,graduallymovethechoketo
theright.
Note:Iftheenginestallsorhesitates,movethechoke
leftagainuntiltheenginewarmsup.
7.Movethethrottlelevertodesiredsetting.
StoppingtheEngine
1.Releasetheoperatorpresencebail.
2.Turnthefuelvalveoff.
3.Waitforallmovingpartstostop.
OperatingtheMachine
1.Movethedepthcontrollevertothedesiredsetting.
2.Starttheengine.
3.Pushdownonthehandletoraisethefrontwheelsoff
theground.
4.Slowlylowerthefrontwheelstotheground,allowing
thebladestograduallyworkintothegrassandsoil.
5.Whennished,releasetheoperatorpresencebail,stop
theengine,andraisethecuttingbladestothetransport
setting.
OperatingTips
Dethatching
•Settheailblades3to6mm(1/8to1/4inch)intothe
earth(belowthezeroposition).
•Mowyardshorterthannormalmowinglengthbefore
dethatching.
•Dethatchalawnbeforetheprimegrowingseason.
•Afterdethatching,removethatchanddebrisfromlawn
withrake.
•Usetimeofsoilexposuretofertilizeandseedlawn.
•Givelawnextrawateringafterdethatching.
PowerRaking/Renovation
Tobreaknewgroundortillanexistinglawn,settheail
blades6to12mm(1/4to1/2inch)intotheearth(below
thezeroposition).Allowthemachinetomoveatitsown
pacethroughthesoil,goingforwardandbackwardoverthe
areatobeleveled,ormakingmultiplepassesfromdifferent
directions.
13

Maintenance
RecommendedMaintenanceSchedule(s)
MaintenanceService
IntervalMaintenanceProcedure
Aftertherst25hours•Changetheengineoil.
Beforeeachuseordaily
•Checktheengineoillevel.
•Cleandebrisfromthemachine.
•Inspecttheaircleanerelements.
•Checkthebelttension.Iftheengineisworkingbutailsseemunderpowered,
checkbelttension
•Checktheailbladesforwearordamage.
•Checkforloosefasteners.
Every50hours•Cleantheairlterelements.Cleanthemmorefrequentlyindustyoperating
conditions.
Every100hours
•Changetheengineoil.
•Cleanthesedimentcup.
•Inspect,clean,andadjustthesparkplug;replaceitifnecessary.
Every200hours•Replacethesparkplug.
Every300hours•Replacethepaperaircleanerelement.Replaceitmorefrequentlyindustyoperating
conditions.
Yearlyorbeforestorage•T ouchupchippedpaint.
Premaintenance
Procedures
DisconnectingtheSpark-Plug
Wire
Beforeperforminganymaintenanceontheengine,belts,
orcuttingblades,disconnectthesparkplugwirefromthe
spark-plug(Figure13).
G019426
Figure13
1.Spark-plugwire
14

EngineMaintenance
ServicingtheAirCleaner
ServiceInterval:Beforeeachuseordaily—Inspecttheair
cleanerelements.
Every50hours—Cleantheairlterelements.Clean
themmorefrequentlyindustyoperatingconditions.
Every300hours/Yearly(whichevercomes
rst)—Replacethepaperaircleanerelement.Replace
itmorefrequentlyindustyoperatingconditions.
Important:Donotoperatetheenginewithouttheair
lterassembly;extremeenginedamagewilloccur.
1.Stoptheengineandwaitforallmovingpartstostop.
2.Disconnectthewirefromthesparkplug.
3.Removethenutthatsecuresthecover(Figure14).
G019427
Figure14
1.Nut3.Paperelement
2.Cover4.Foamelement
4.Removethecover.
Note:Becarefultopreventdirtanddebrisfrom
fallingintothebase.
5.Removenutrestrainingairlterassembly.
6.Removethefoamandpaperelementsfromthebase
(Figure14).
7.Removethefoamelementfromthepaperelement
(Figure14).
8.Inspectthefoamandpaperelements,andreplacethem
iftheyaredamagedorexcessivelydirty.
9.Ifthepaperelementisexcessivelydirty,replaceit.
Note:Nevertrytobrushdirtoffthepaperelement;
brushingforcesthedirtintothebers.
10.Cleanthefoamelementinwarm,soapywaterorina
nonammablesolvent.
Note:Donotusegasolinetocleanthefoamelement
becauseitcouldcreateariskofreorexplosion.
11.Rinseanddrythefoamelementthoroughly.
12.Dipthefoamelementincleanengineoil,thensqueeze
outtheexcessoil.
Note:Excessoilinthefoamelementrestrictstheair
owthroughtheelementandmayreachthepaper
lterandclogit.
13.Wipedirtfromthebaseandthecoverwithamoistrag.
Note:Becarefultopreventdirtanddebrisfrom
enteringtheairductleadingtothecarburetor.
14.Installtheaircleanerelementsandensurethattheyare
properlypositioned.
15.Securewithnut.
16.Securelyinstallthecoverwithnut.
ServicingtheEngineOil
OilType:Detergentoil(APIserviceSJorhigher)
CrankcaseCapacity:37oz(1.1l)
Viscosity:Seetablebelow
g013375
0 20 40 60 80 100 F
-20 -10 0 10 20 30 40 C o
o
30
5W - 30 / 10W - 30
Figure15
ChangingtheEngineOil
ServiceInterval:Aftertherst25hours
Every100hours
WARNING
Oilmaybehotaftertheenginehasbeenrun,and
contactwithhotoilcancauseseverepersonalinjury.
Avoidcontactingthehotengineoilwhenyoudrain
it.
1.Stoptheenginebyreleasingtheoperatorpresencebail,
disengagetheailblades,andwaitforallmovingparts
tostop.
15

2.Disconnectthewirefromthesparkplug.
3.Raisethefrontwheelsafewinchesoffthegroundand
placeapanunderthedrainplugtocatchtheoil.
4.Removethedrainplug(Figure16).
G019428
Figure16
1.Drainplug
5.Whentheoilhasdrainedcompletely,lowerthefront
wheelstotheground,replacethedrainplug,and
torqueto18N–m(13ft-lb).
Note:Disposeoftheusedoilatacertiedrecycling
center.
6.Removethedipstickandslowlypouroilintotheller
holeuntiltheoillevelreachesthemiddleofthedipstick
(Figure11).
7.Replaceandsecurethedipstick.
8.Wipeupanyspilledoil.
9.Connectthewiretothesparkplug.
CleaningtheSedimentCup
ServiceInterval:Every100hours
DANGER
Incertainconditions,gasolineisextremely
ammableandhighlyexplosive.Areorexplosion
fromgasolinecanburnyouandothersandcan
damageproperty.
•Stoptheengineandkeepheat,sparks,and
ameaway.
•Handlefuelonlyoutdoors.
•Wipeupspillsimmediately.
•Donotsmokewhilehandlingfuel.
1.Stoptheengineandwaitforallmovingpartstostop.
2.Disconnectthewirefromthesparkplug.
3.MovethefuelshutoffvalvetotheOffposition.
4.RemovethesedimentcupandO-ring(Figure17).
1
2
g020282
Figure17
1.O-ring2.Sedimentcup
5.Washthesedimentcupinanonammablesolventand
dryitthoroughly.
6.PlacetheO-ringinthefuelvalveandinstallthe
sedimentcup,tighteningitsecurely.
7.Movethefuelshut-offlevertotheOnposition.
Ifanyfuelleaks,repeatthisprocedureandreplacethe
O-ring.
ServicingtheSparkPlug
ServiceInterval:Every100hours—Inspect,clean,and
adjustthesparkplug;replaceitif
necessary.
Every200hours—Replacethesparkplug.
UseanNGKBPR6ESsparkplugorequivalent.
1.Stoptheengineandwaitforallmovingpartstostop.
2.Disconnectthewirefromthesparkplug.
3.Cleanaroundthesparkplug.
4.Removethesparkplugfromthecylinderhead.
Important:Replaceacracked,fouled,ordirty
sparkplug.Donotcleantheelectrodesbecause
gritenteringthecylindercandamagetheengine.
5.Setthegapontheplugto0.76mm(0.030inch)(Figure
18).
16

Figure18
1.Center-electrodeinsulator
2.Sideelectrode
3.Airgap(nottoscale)
6.Carefullyinstallthesparkplugbyhand(toavoidcross
threading)untilitishandtight.
7.Tightenthesparkpluganadditional1/2turnifitis
new;otherwise,tightenitanadditional1/8to1/4turn.
Important:Aloosesparkplugcanbecomevery
hotandcandamagetheengine;overtighteninga
sparkplugmaydamagethethreadsinthecylinder
head.
8.Connectthewiretothesparkplug.
BeltMaintenance
CheckingtheBeltTension
ServiceInterval:Beforeeachuseordaily—Checkthebelt
tension.Iftheengineisworkingbutails
seemunderpowered,checkbelttension
1.Stopthemachineonalevelsurface,stoptheengine,
disconnectthespark-plugwire,andraisetheailblades
tothehighestposition.
2.Removethe4boltssecuringthebeltcovertotheleft
sideofthemachineandremovethecover(Figure19).
Figure19
1.Belt3.Bolts
2.Cover
3.Checkthetensionofthebelt(Figure19).
Note:Thebeltshouldnotexmorethana12mm
(1/2inch)withmoderatengerpressureappliedtothe
spanjustabovethemachineframe.
4.Ifthebelttensionisloose,refertoAdjustingtheBelt
Tension(page17).
5.Installbeltcoverbeforeoperatingthemachine.
AdjustingtheBeltTension
1.Stopthemachineonalevelsurfaceandstoptheengine
byreleasingtheoperatorpresencebail.
2.Totightenthebelt,loosenthe4mountingnuts
securingtheenginetotheframe.
17

1
g025339
Figure20
1.Mountingnuts
3.Movetheenginetotightenthebelttotheproper
tension.
4.Securethefourmountingnutsandbolts.
Note:Torquetheboltsthatsecuretheenginetothe
frame271N-m(200in-lb).
MaintainingtheFlail
Blades
InspectingtheFlailBlades
ServiceInterval:Beforeeachuseordaily—Checktheail
bladesforwearordamage.
Whentheailbladesareworndownandarenolonger
functioningproperly;refertoReplacingtheFlailBlades(page
18).
Important:Performthisprocedurewhenthefueltank
isemptyornearlyempty.Tipthemachineforwardto
keepairlterup.
ReplacingtheFlailBlades
Whentheailbladesareworndownandnolonger
functioningproperly,replacethemasfollows:
Important:Preformthisprocedurewhenthefueltank
isemptyornearlyempty.
1.Stopthemachineonalevelsurface,andstopthe
enginebyreleasingtheoperatorpresencebail.
2.Lowertheailbladestothelowestposition.
3.Tiltthemachineforwardontoitsnose,restingona
blockofwood.
Note:Itwilltake2peopletotipthemachineforward
safely.
4.Spintheailbladeassembly.
Note:Itshouldspinfreely.Ifitmakesagrinding
noiseandishalting,thebearingsareworn;replace
themwhenyoureplacetheblades.
5.Removethecotterpinfromrodwiththeworndown
ail(Figure21).
6.Carefullypullouttherodtoreleasetheailsand
spacers(Figure21).
7.Replaceworndownailswithnewonesanddiscard
theoldails.
18

Figure21
1.Rod3.Spacer
2.Flail4.Cotterpin
8.Carefullyaddailsandspacerstorodinthesameorder
astheywereremoved.
Important:Makesuretoaligntherodwith
formedheadtowardthecenterofthemachine.
9.Addcotterpintolockrod,ails,andspacersintoplace.
Storage
1.Raisetheailblades,stopthemachine,stoptheengine,
anddisconnectthespark-plugwire.
2.Removedirtandgrimefromtheentiremachine.
Important:Youcanwashthemachinewithmild
detergentandwater.Donotpressurewashthe
machine.Avoidexcessiveuseofwater,especially
neartheengine.
3.Servicetheaircleaner;refertoServicingtheAir
Cleaner(page15).
4.Changetheengineoil;refertoChangingtheEngine
Oil(page15).
5.Forstorageover30days,preparethetractionunitas
follows:
A.Addapetroleumbasedstabilizer/conditionerto
fuelinthetank.Followmixinginstructionsfrom
stabilizermanufacturer(1oz.pergallon).Do
notuseanalcoholbasedstabilizer(ethanol
ormethanol).
Note:Afuelstabilizer/conditionerismost
effectivewhenmixedwithfreshgasolineandused
atalltimes.
B.Runtheengineuntilitstopsfromrunningout
offuel.
C.Choketheengine.
D.Startandruntheengineuntilitwillnotstartagain.
E.Disposeoffuelproperly.Recyclethefuel
accordingtolocalcodes.
Important:Donotstorestabilizer/conditioned
gasolineover90days.
6.Checkandtightenallbolts,nuts,andscrews.Repairor
replaceanypartthatisdamaged.
7.Paintallscratchedorbaremetalsurfaceswithpaint
fromanAuthorizedServiceDealer.
8.Storethemachineinaclean,drygarageorstoragearea.
9.Coverthemachinetoprotectitandkeepitclean.
RemovingtheMachinefrom
Storage
1.Checkandtightenallfasteners.
2.Inspectthesparkplugandreplaceitifitisdirty,worn,
orcracked;refertotheengineOwner’sManual.
3.Installthesparkpluguntilitishand-tight,thenan
additional1/2turnifitisnew,otherwise,tightenitan
additional1/8to1/4turn.
4.Performanyneededmaintenanceprocedures;referto
Maintenance(page14).
19
Other manuals for 23513
1
This manual suits for next models
1
Table of contents
Other Toro Tiller manuals

Toro
Toro 29517 User manual

Toro
Toro 22542 User manual

Toro
Toro Soil Cultivator User manual

Toro
Toro 09802 HydroJect 3010 User manual

Toro
Toro 23515 User manual

Toro
Toro 58604 User manual

Toro
Toro 22445 User manual

Toro
Toro 58601 User manual

Toro
Toro 33513 User manual

Toro
Toro 09802 HydroJect 3010 User manual