Toro 23518 User manual

FormNo.3397-997RevA
30inStand-OnAerator
ModelNo.23518—SerialNo.316000001andUp
ModelNo.39518—SerialNo.316000001andUp
Registeratwww.Toro.com.
OriginalInstructions(EN)*3397-997*A

WARNING
CALIFORNIA
Proposition65Warning
Thisproductcontainsachemicalorchemicals
knowntotheStateofCaliforniatocausecancer,
birthdefects,orreproductiveharm.
Theengineexhaustfromthisproduct
containschemicalsknowntotheStateof
Californiatocausecancer,birthdefects,
orotherreproductiveharm.
ThissparkignitionsystemcomplieswithCanadianICES-002.
Important:Thisengineisnotequippedwithaspark
arrestermufer.ItisaviolationofCaliforniaPublic
ResourceCodeSection4442touseoroperatetheengine
onanyforest-covered,brush-covered,orgrass-covered
land.Otherstatesorfederalareasmayhavesimilarlaws.
Theenclosed
Engine Owner's Man ual
issuppliedfor
informationregardingtheUSEnvironmentalProtection
Agency(EPA)andtheCaliforniaEmissionControl
Regulationofemissionsystems,maintenance,and
warranty.Replacementsmaybeorderedthroughthe
enginemanufacturer.
Introduction
Thisaeratorisintendedtobeusedbytrainedoperators
inresidentialandcommercialapplications.Itisprimarily
designedforaeratingareasofwell-maintainedlawnson
residentialgrounds,parks,sportselds,andcommercial
grounds
Readthisinformationcarefullytolearnhowtooperateand
maintainyourproductproperlyandtoavoidinjuryand
productdamage.Youareresponsibleforoperatingthe
productproperlyandsafely.
YoumaycontactTorodirectlyatwww .Toro.comforproduct
safetyandoperationtrainingmaterials,accessoryinformation,
helpndingadealer,ortoregisteryourproduct.
Wheneveryouneedservice,genuineToroparts,oradditional
information,contactanAuthorizedServiceDealerorToro
CustomerServiceandhavethemodelandserialnumbersof
yourproductready.Figure1identiesthelocationofthe
modelandserialnumbersontheproduct.Writethenumbers
inthespaceprovided.
Figure1
1.Locationofthemodelandserialnumbers
ModelNo.
SerialNo.
Thismanualidentiespotentialhazardsandhassafety
messagesidentiedbythesafety-alertsymbol(Figure2),
whichsignalsahazardthatmaycauseseriousinjuryordeath
ifyoudonotfollowtherecommendedprecautions.
Figure2
1.Safety-alertsymbol
Thismanualuses2wordstohighlightinformation.
Importantcallsattentiontospecialmechanicalinformation
andNoteemphasizesgeneralinformationworthyofspecial
attention.
©2015—TheToro®Company
8111LyndaleAvenueSouth
Bloomington,MN554202
Contactusatwww.Toro.com.
PrintedintheUSA
AllRightsReserved

Contents
Safety...........................................................................4
SafeOperatingPractices...........................................4
AeratorSafety.........................................................5
SlopeIndicator.......................................................7
SafetyandInstructionalDecals.................................8
Setup...........................................................................11
1CheckingTirePressure.........................................11
2ServicingtheBattery............................................11
3CheckingFluidLevels...........................................12
4RemovingCylinderStop(forModel
33518)...............................................................13
ProductOverview.........................................................14
Controls...............................................................14
Specications........................................................16
Operation....................................................................16
CheckingtheEngine-OilLevel.................................16
AddingFuel...........................................................17
LubricatingtheChains............................................18
CheckingtheSafety-InterlockSystem........................19
CheckingforLooseHardware..................................20
OperatingtheMachine............................................20
OperatingtheMachine............................................22
TransportingtheMachine........................................25
LoadingtheMachine..............................................25
Maintenance.................................................................27
RecommendedMaintenanceSchedule(s)......................27
PremaintenanceProcedures........................................28
PreparingfortheMachineforMaintenance................28
AccessingtheConsoleCompartment........................28
Lubrication...............................................................29
LubricatingtheGreaseFittings.................................29
LubricatingtheCasters............................................29
EngineMaintenance..................................................31
ServicingtheAirCleaner.........................................31
ServicingtheEngineOil..........................................31
CheckingtheSparkPlugs........................................34
ServicingtheSparkPlug..........................................34
CheckingtheSparkArrester(ifequipped)..................35
FuelSystemMaintenance...........................................35
ServicingtheFuelFilter...........................................35
ElectricalSystemMaintenance....................................36
ServicingtheBattery...............................................36
ServicingtheFuses.................................................38
DriveSystemMaintenance.........................................38
CheckingtheAirPressureintheTires........................38
CheckingtheWheelHubNuts.................................38
CheckingtheTorqueoftheWheelLug
Nuts.................................................................38
AdjustingtheCasterPivotBearingsPre-Load.............39
MaintainingtheChain.............................................39
CheckingtheTransmissionOutputShaftNut
Torque..............................................................40
BrakeMaintenance....................................................41
AdjustingtheParkingBrake.....................................41
AdjustingtheBrakeSwitch......................................41
BeltMaintenance......................................................42
CheckingtheConditionandTensionofthe
Belts.................................................................42
AdjustingtheAuxiliaryPumpDriveBelt....................42
ReplacingtheTransmission-DriveBelt......................42
ControlsSystemMaintenance.....................................43
AdjustingtheTraction-ControlLinkage.....................43
HydraulicSystemMaintenance....................................44
MaintainingtheAuxiliaryHydraulicSystem................44
MaintainingtheTransmission..................................46
TineMaintenance......................................................48
CheckingtheTines.................................................48
AdjustingtheTine-DriveChain................................48
Cleaning...................................................................49
CleaningtheEngineandtheExhaustSystem
Area..................................................................49
RemovingtheEngineShroudsandCleaningthe
CoolingFins......................................................49
CleaningtheDebrisfromtheMachine.......................49
WasteDisposal.......................................................49
Storage........................................................................50
Troubleshooting...........................................................51
Schematics...................................................................53
3

Safety
Improperuseormaintenancecanresultininjury.Toreduce
thepotentialforinjury,complywiththesesafetyinstructions,
andpayattentiontothesafety-alertsymbol,whichmeans
Caution,Warning,orDanger—personalsafetyinstruction.
Failuretocomplywiththeinstructionsmayresultinpersonal
injuryordeath.
WARNING
Removalormodicationoforiginalequipment,
partsand/oraccessoriesmayalterthewarranty,
controllability,andsafetyofthemachine.
Unauthorizedmodicationstotheoriginal
equipmentorfailuretouseoriginalToroparts
couldleadtoseriousinjuryordeath.Unauthorized
changestothemachine,engine,fuelorventing
system,mayviolateapplicablesafetystandardssuch
as:ANSI,OSHAandNFPAand/orgovernment
regulationssuchasEPAandCARB.
Replaceallpartsincluding,butnotlimitedto,tires,
belts,andfuelsystemcomponentswithoriginal
Toroparts.
Important:Thismachinewasmanufacturedaccording
totheappropriateregulatorystandardsineffectatthe
timeofmanufacture.Modifyingthismachineinany
waymaycauseittobeoutofcompliancewiththose
standardsandwiththeinstructionsinthis
Operator’ s
Man ual
.Modicationstothismachineshouldonlybe
madebyeitherthemanufactureroranAuthorizedToro
Dealer.
Thisproductiscapableofinjuringyourhandsandfeet.
Followallsafetyinstructionstoavoidseriousinjuryordeath.
Theowner/usercanpreventandisresponsibleforaccidents
orinjuriesoccurringtopeople,ordamagetoproperty.
Anyuseofthismachineotherthanaeratingturfgrasscould
provedangeroustotheuserandbystanders.
Important:Theadditionofattachmentsmadebyother
manufacturersthatdonotmeetANSIcerticationmay
causenoncomplianceofthismachine.
SafeOperatingPractices
ThefollowinginstructionsarefromANSIstandard
B71.4-2012.
Training
•ReadtheOperator'sManualandothertrainingmaterial.
Note:Iftheoperator(s)ormechanic(s)cannotreadthe
manuallanguage,itistheowner'sresponsibilitytoexplain
thismaterialtothem.
•Becomefamiliarwiththesafeoperationoftheequipment,
operatorcontrols,andsafetysigns.
•Alloperatorsandmechanicsshouldbetrained.The
ownerisresponsiblefortrainingtheusers.
•Neverletchildrenoruntrainedpeopleoperateorservice
theequipment.
Note:Localregulationsmayrestricttheageofthe
operator.
•Theowner/usercanpreventandisresponsiblefor
accidentsorinjuriesoccurringtopeopleordamageto
property.
Preparation
•Evaluatetheterraintodeterminewhataccessoriesand
attachmentsareneededtoproperlyandsafelyperform
thejob.Onlyuseaccessoriesandattachmentsapproved
bythemanufacturer.
•Wearappropriateclothing;includingahardhat,safety
glasses,longpants,safetyshoes(rubberboots,gloves,
andhearingprotection.
Important:Longhair,looseclothingorjewelrymay
gettangledinmovingparts.
•Inspecttheareawheretheequipmentistobeusedand
ensurethatallobjectsareremovedfromtheareabefore
use.
•Checkthattheoperator'spresencecontrols,safety
switches,andshieldsareattachedandfunctioning
properly.Donotoperatethemachineunlesstheyare
functioningproperly.
Operation
•Lightningcancausesevereinjuryordeath.Iflightning
isseen,orthunderisheardinthearea,donotoperate
themachine;seekshelter.
•Donotrunanengineinanenclosedarea.
•Onlyoperateinwell-litareas,keepingawayfromholes
andhiddenhazards.
•Ensurethatalldrivesareinneutralandthattheparking
brakeisengagedbeforestartingengine.Onlystartthe
enginefromtheoperator’sposition.
•Makesurethatyouhavegoodfootingwhileusingthis
machine,especiallywhenbackingup.
Note:Reducedfootingcouldcauseslipping.
•Slowdownanduseextracareonhillsides.Besureto
travelsidetosideonhillsides.Turfconditionscanaffect
thestabilityofthemachine.Usecautionwhileoperating
neardrop-offs.
•Slowdownandusecautionwhenmakingturnsandwhen
changingdirectionsonslopes.
4

•Donotoperatethemachinewithouttheshieldsor
otherguardssecurelyinplace.Besureallinterlocksare
attached,adjustedproperly,andfunctioningproperly.
•Donotchangetheenginegovernorsettingoroverspeed
theengine.
•Beforeleavingoperatorsposition:
–Stoponlevelground.
–Disengagetheparkingbrake(ifprovided).
–Shutofftheengine.
•Stoponlevelground,disengagedrives,engagethe
parkingbrake(ifprovided),shutofftheenginebefore
leavingtheoperator'spositionforanyreason.
•Stopequipmentandinspectthetinesafterstrikingobjects
orifanabnormalvibrationoccurs.Makethenecessary
repairsbeforeresumingoperations.
•Keepyourhandsandfeetawayfromthetineassembly.
•Lookbehindanddownbeforebackinguptoensurea
clearpath.
•Keeppetsandbystandersawayfromanoperating
machine.
•Slowdownandusecautionwhenmakingturnsand
crossingroadsandsidewalks.Fullyraisethetinesifyou
arenotaerating.
•Donotoperatethemachineundertheinuenceof
alcoholordrugs.
•Usecarewhenapproachingblindcorners,shrubs,trees,
orotherobjectsthatmayobscurevision.
SafeHandlingofFuels
•Toavoidpersonalinjuryorpropertydamage,use
extremecareinhandlinggasoline.Gasolineisextremely
ammableandthevaporsareexplosive.
•Useonlyanapprovedfuelcontainer.
•Donotremovethefuelcaporaddfuelwiththeengine
running.
•Allowtheenginetocoolbeforefueling.
•Neverrefuelordrainthemachineindoorsanddonot
smokewhilerefuelingordraining.
•Donotstorethemachineorfuelcontainerwherethere
isanopename,spark,orpilotlightsuchasonawater
heateroronotherappliances.
•Donotllcontainersinsideavehicle,onatruck,orona
trailerbedwithaplasticliner.Alwaysplacecontainerson
thegroundawayfromyourvehiclebeforelling.
•Removeequipmentfromthetruckortrailerandfuelit
ontheground.Ifthisisnotpossible,thenaddfuelwith
suchequipmentasaportablecontainer,ratherthanfrom
afuel-dispensernozzle.
•Keepthenozzleincontactwiththerimofthefueltank
orcontaineropeningatalltimesuntilfuelingiscomplete.
Donotuseanozzlelockopendevice.
•Iffuelisspilledonclothing,changeyourclothing
immediately.
•Donotoverllfueltank.Replacefuelcapandtighten
securely.
MaintenanceandStorage
•Donotallowuntrainedpersonneltoservicemachine.
•Donottouchequipmentorattachmentpartswhichmay
behotfromoperation.Allowallofthepartsofthe
machinetocoolbeforeattemptingtomaintain,adjust,or
servicethemachine.
•Keephandsandfeetawayfrommovingparts.Ifpossible,
donotmakeadjustmentswiththeenginerunning.
•Disengagethedrives,raisethetines,settheparkingbrake,
stopengine,andremovekeyordisconnectspark-plug
wire.Waitforallmovementtostopbeforeadjusting,
cleaning,orrepairing.
•Disconnectthebatteryorremovethespark-plugwire
beforemakinganyrepairs.Disconnectthenegative
terminalrstandthepositiveterminallast.Reconnect
thepositiverstandnegativelast.
•Usecarewhencheckingthetines.Wrapthetine(s)or
weargloves,andusecautionwhenservicingthem.Only
replacetines;donotstraightenorweldthem.
•Cleangrass,dirt,anddebrisfromthetines,drives,
mufers,andenginetohelppreventres.
•Cleanupoilorfuelspillage.
•Parkmachineonlevel,hardground.Neverallow
untrainedpersonneltoservicemachine.
•Usejackstandstosupportcomponentswhenrequired.
•Carefullyreleasepressurefromcomponentswithstored
energy.
•Lettheenginecoolbeforestoring.
•Keepallpartsingoodworkingconditionandallhardware
tightened.Replaceallwornordamageddecals.
Hauling
•Usecarewhenloadingorunloadingthemachineintoa
traileroratruck.
•Usefull-widthrampsforloadingmachineintoatrailer
oratruck.
•Tiethemachinedownsecurelyusingstraps,chains,cable,
orropes.Bothfrontandrearstrapsshouldbedirected
downandoutwardfromthemachine.
AeratorSafety
ThefollowinglistcontainssafetyinformationspecictoToro
productsandothersafetyinformationyoumustknow.
5

GeneralOperation
•Checkcarefullyforoverheadclearances(i.e.branches,
doorways,electricalwires,etc.)beforeoperatingunder
anyobjects,anddonotcontactthem.
•Usecautionwhenyouareridingontheplatformand
drivingthemachineovercurbs,rocks,roots,orother
obstructions.
•Donotjerkthecontrols;useasteadymotion.
•Donotcarrypassengers.
•Donotcarryequipmentonthemachine.
SlopeOperation
Useextremecautionwhenaeratingand/orturningonslopes
aslossoftractionand/ortip-overcouldoccur.Theoperator
isresponsibleforsafeoperationonslopes.
•UseFigure3tohelpyoudeterminetheappropriateslope
angleofareatoaerate
•Removeormarkobstaclessuchasrocks,treelimbs,etc.
fromtheaeratingarea.
•Watchforholes,rutsorbumps.
Note:Tallgrasscanhideobstacles.
•Usecautionneardrop-offs,ditches,orembankments.
Note:Themachinecouldsuddenlyturnoverifawheel
goesovertheedgeofaclifforditch,orifanedgecavesin.
•Beawarethatoperatingonwetgrass,acrosssteepslopes
ordownhillmaycausethemachinetolosetraction.Loss
oftractiontothedrivewheelsmayresultinslidinganda
lossofbrakingandsteering.
•Donotaerateslopesgreaterthan15degrees.
•Avoidsuddenstartsandstopswhenaeratinguphill
becausethemachinemaytipbackward.
Note:Themachineismorestablegoinguphillwiththe
tinesraised.
•Keepallmovementonslopesslowandgradual.
•Donotmakesuddenchangesinspeedordirection.
•Reducethetine-downpressuretopreventthedrivetires
fromraisingoffthegroundandtopreventthefronttires
fromraisingoffthegroundwhileaeratinguphill.
•Followthemanufacturer’srecommendationsforwheel
weightsorcounterweightstoimprovestability.
•Useextracarewithattachments.
Note:Useofattachmentscanchangethestabilityof
themachine.
Service
•Toensureoptimumperformanceandcontinuedsafety
certicationofthemachine,useonlygenuineToro
replacementpartsandaccessories.Replacementparts
andaccessoriesmadebyothermanufacturerscouldbe
dangerous,andsuchusecouldvoidtheproductwarranty.
•Neverremoveortamperwithsafetydevices.Checktheir
properoperationregularly.Neverdoanythingtointerfere
withtheintendedfunctionofasafetydeviceortoreduce
theprotectionprovidedbyasafetydevice.
•Checkbrakeoperationfrequently.Adjustandserviceas
required.
6

SlopeIndicator
G01 1841
Figure3
Thispagemaybecopiedforpersonaluse.
1.Themaximumslopeyoucansafelyoperatethemachineonis15degrees.Usetheslopecharttodeterminethedegreeofslope
ofhillsbeforeoperating.Donotoperatethismachineonaslopegreaterthan15degrees.Foldalongtheappropriateline
tomatchtherecommendedslope.
2.Alignthisedgewithaverticalsurface,atree,building,fencepole,etc.
3.Exampleofhowtocompareslopewithfoldededge.
7

SafetyandInstructionalDecals
Safetydecalsandinstructionsareeasilyvisibletotheoperatorandarelocatednearanyareaofpotential
danger.Replaceanydecalthatisdamagedorlost.
93–6686
1.Hydraulicoil2.ReadtheOperator's
Manual.
115-2047
1.Warning—donottouchthehotsurface.
116-9391
117–2718
120-9570
1.Warning—stayawayfrommovingparts,keepallguards
andshieldsinplace.
121-6150
1.Cuttinghazardofhandandfoot–stayawayfrommoving
parts.
121–6161
1.Entanglementhazard,belt—stayawayfrommovingparts;
keepallguardsinplace.
121–6162
1.Cutting/dismembermenthazardofhandorfoot—lower
thetinestotheground;readtheOperator’sManualfor
disassemblyprocedure.
8

121–6163
1.Presstolowerthetines.2.Releasetoraisethetines.
126-2054
1.Wheellugnuttorque129N-m(95ft-lb)(4x)
2.Wheelhubnuttorque319N-m(235ft-lb)
3.ReadandunderstandtheOperator’sManualbefore
performinganymaintenance,checktorqueevery100
hours.
121–6164
1.Fast6.Wheelsandtinesrotatewhenmoving
backward
11.Warning—keepbystandersasafe
distancefromthemachine.
2.Slow7.Continuousvariablesetting12.Warning—donotoperatethemachine
unlessyouaretrained.
3.Neutral8.Choke—on13.Thrownobjecthazard—pickupdebris
beforeoperatingthemachine.
4.Reverse9.Choke—off14.Warning—keepawayfrommoving
parts;keepallguardsinplace.
5.Wheelsandtinesrotatewhenmoving
forward
10.Warning—readtheOperator’sManual.15.Warning—stoptheengine,engagethe
parkingbreak,andremovetheignition
keybeforeleavingthemachine.
126-4528
1.Rotatecounterclockwisetodecreasepressure5.Parkingbrake-release
2.Rotateclockwisetoincreasepressure6.Parkingbrake-engage
3.On-tinegroundengagementfootswitch7.Cutting/dismembermenthazardofhandorfoot,tines–stay
awayfrommovingparts;keepallguardsinplace
4.Off-tinegroundengagementfootswitch
9

121–6166
1.Tippinghazard—donotturnsharplywhiletravellingfast;slow
downandturngradually.
3.Warning;tippinghazard—donotusesplitramps;usefull
widthrampstoloadamachinefortransport;usealoading
rampatamaximumof15degrees.
2.Tippinghazard—donotoperatethemachineonslopes
greaterthan15degrees;donotoperatethemachinenear
drop-offs.
116–9392
1.Readtheinstructionsbeforeservicingorperformingmaintenance;readtheOperator’sManualforinformationonlubricating
themachine.
10

Setup
MediaandAdditionalParts
DescriptionQty.Use
Operator'sManual1Readbeforeoperatingthemachine.
Key2Startthemachine.
1
CheckingTirePressure
NoPartsRequired
Procedure
1.Checkthetirepressureinthedrivetires.
Note:Properinationfordrivetiresis83to97kPa
(12to14psi).
2.Adjustthetirepressureifnecessary.
2
ServicingtheBattery
NoPartsRequired
Procedure
WARNING
CALIFORNIA
Proposition65Warning
Batteryposts,terminals,andrelated
accessoriescontainleadandleadcompounds,
chemicalsknowntotheStateofCalifornia
tocausecancerandreproductiveharm.
Washhandsafterhandling.
Note:Themachineisshippedwithalled,lead-acidbattery.
DANGER
Chargingorjumpstartingthebatterymayproduce
explosivegases.Batterygasescanexplodecausing
seriousinjury.
•Keepsparks,ames,orcigarettesawayfrom
battery.
•Ventilatewhenchargingorusingbatteryinan
enclosedspace.
•Makesurethattheventingpathofbatteryis
alwaysopenoncethebatteryislledwithacid.
•Alwaysshieldeyesandfacefrombattery.
DANGER
Batteryelectrolytecontainssulfuricacid,whichis
poisonousandcancausesevereburns.Swallowing
electrolytecanbefatalorifittouchesskincan
causesevereburns.
•Wearsafetyglassestoshieldyoureyesand
rubberglovestoprotectyourskinandclothing
whenhandlingelectrolyte.
•Donotswallowelectrolyte.
•Intheeventofanaccident,ushwithwaterand
calladoctorimmediately.
11
1.TurnthekeyintheignitionswitchtotheOFFposition
andremovethekey.
2.Measurethevoltageofthebatterywithavoltmeter.
3.Usethetablebelowtolocatethechargestateorthe
battery,andifneeded,thebattery-chargersettingand
chargingintervalrecommendedtochargethebattery
to12.6Vorgreater.
Important:Makesurethatthenegativebattery
cableisdisconnectedandthebatterychargerused
forchargingthebatteryhasanoutputof16Vand
7Aorlesstoavoiddamagingthebattery(seechart
forrecommendedchargersettings).
BatteryChargeTable
Voltage
Reading
Percent
Charge
Maximum
Charger
Settings
Charging
Interval
12.6or
greater
100%16volts/
7amps
NoCharging
Required
12.4–12.675–100%16volts/
7amps
30Minutes
12.2–12.450–75%16volts/
7amps
1Hour
12.0–12.225–50%14.4volts/
4amps
2Hours
11.7–12.00–25%14.4volts/
4amps
3Hours
11.7orless0%14.4volts/
2amps
6Hoursor
More
CAUTION
IftheignitionisintheONpositionthere
ispotentialforsparksandengagementof
components.Sparkscouldcauseanexplosion
ormovingpartscouldaccidentallyengage
causingpersonalinjury.
BesureignitionswitchisintheOFFposition
beforechargingthebattery.
4.Ifthepositivecableisalsodisconnected,connectthe
positive(red)cabletothepositivebatteryterminal
andslipterminalcoveroverthepositiveterminal.
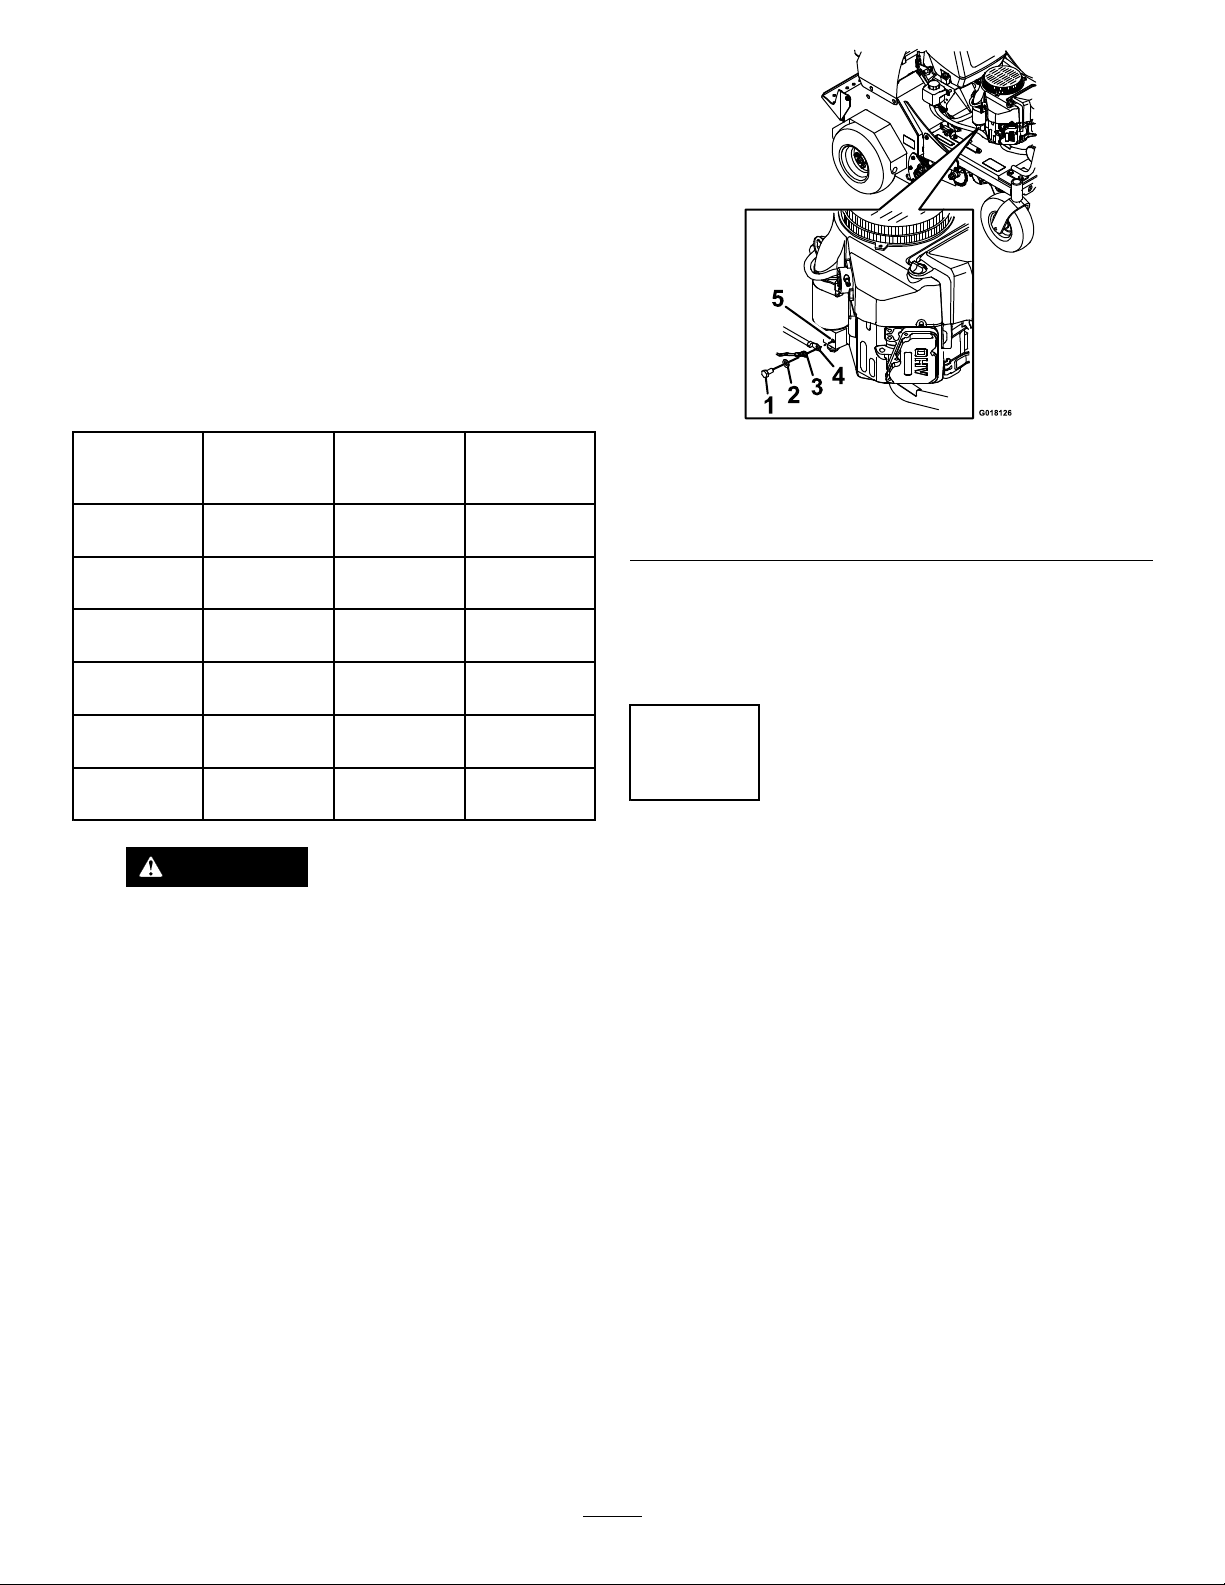
5.Removethescrew ,washer,andgroundcablefromthe
engine.Connectthenegativebatterycableasshown
inFigure4.
Figure4
1.Screw4.Negativebatterycable
2.Washer5.Engine
3.Groundwire
Note:Iftimedoesnotpermitchargingthebattery
orifchargingequipmentisnotavailable,connectthe
negativebatterycablesandrunthevehiclecontinuously
for20to30minutestochargethebattery.
3
CheckingFluidLevels
NoPartsRequired
Procedure
Checktheengine-oillevelbeforetheengineisrststarted;
refertoServicingtheEngineOil(page31).
Checkthetransmission-oillevelbeforetheengineisrst
started;refertoCheckingtheTransmission-OilLevel(page
46).
Checktheauxiliary-hydraulicuidlevelbeforetheengineis
rststarted;refertoCheckingtheAuxiliaryHydraulicFluid
Level(page44).
12

4
RemovingCylinderStop(for
Model33518)
NoPartsRequired
Procedure
Note:Thetinesmustbeintheraisedpositionbefore
removingthecylinderstop.Runningtheenginewillcharge
thehydraulicsystemandraisethetines.
1.Addasmallamountoffueltothefueltank;referto
AddingFuel(page17).
2.Openthefuel-shutoffvalvebyaligningtheleverforthe
fuel-shutoffvalvewiththefuelline;refertoOpening
theFuelShut-offValve(page22).
3.Movethetraction-controlleverstotheNEUTRAL
positionandsettheparkingbrake;referto
Traction-ControlLevers(page14).
4.PlacethethrottlemidwaybetweentheSLOWandFAST
positions;refertoThrottleLever(page14).
5.Pushforwardthechokelevertosetthechoketothe
ONposition;refertoChokeLever(page14).
6.TurnthekeyintheignitionswitchtotheSTART
position;refertoIgnitionSwitch(page15).
Note:Releasetheswitchassoonastheenginestarts.
Important:Donotcranktheenginecontinuously
formorethan10secondsatatime.Iftheengine
doesnotstart,allowa60secondcool-downperiod
betweenstartingattempts.Failuretofollowthese
guidelinescanburnoutthestartermotor.
7.Graduallymovetheleverforthechokelevertothe
OFFpositionastheenginewarmsup.
Note:Allowtheenginetorunanadditional30
seconds
8.TurnthekeyintheignitionswitchtotheOFFposition
tostoptheengine.
9.Removethekeyandpullthewiresoffthesparkplugs.
Note:Pushthewiresasidesotheydonotaccidentally
contactthesparkplugs.
10.Removeandretainthehairpin,clevispin,andcylinder
stop(Figure5).
Figure5
1.Hairpin3.Cylinderstop
2.Clevispin4.Cylinder
11.Replacethespark-plugwires.
13

ProductOverview
Figure6
1.Platform4.Enginecontrols
2.Parking-brakeknob5.Fuelcap
3.Traction-controllevers
Controls
Traction-ControlLevers
Thetraction-controlleversarelocatedoneachsideofthe
topconsole,andcontroltheforwardandreversemotionof
themachine.
Movetheleversforwardorbackwardtocontrolthedrive
wheelonthesamesideforwardorreverserespectively.The
wheelspeedisproportionaltotheamounttheleverismoved.
Important:Thetinesrotatewhenthetraction-control
leversaremovedoutoftheNeutralposition.
Figure7
1.Lefttraction-controllever5.Reverse
2.Righttraction-controllever6.Frontofthemachine
3.Frontreferencebar7.Neutral
4.Forward
Tine-PressureControl
Thetine-pressurecontrolislocatedontheleftsideofthe
controlconsole(Figure8).
Usethetine-pressurecontroltoadjustthedownward
pressureonthetinesandcoredepth.Rotatethecontrol
counterclockwisetodecreasethepressureandthelengthof
theaerationplug;rotateclockwisetoincreasepressureand
increasethelengthoftheaerationplug.
Figure8
1.Tinedownpressuregauge7.Choke
2.Tinedownpressure
control
8.RHMotioncontrollever
3.On/Off-Tineground
engagementfootswitch
9.Hourmeter
4.LHMotioncontrollever10.Parkbrake
5.Frontreferencebar11.Ignitionswitch
6.Throttle12.Tinegroundengagement
footswitch
ThrottleLever
Thethrottlelever(Figure8)islocatedonthecontrolconsole
(redlever).
Toincreaseenginespeed,movethethrottleleverforward.To
decreaseenginespeed,movethethrottleleverbackward.
Note:Movethethrottleleverforwardintothedetentfor
fullthrottle.
ChokeLever
Thechokelever(Figure8)islocatedonthecontrolconsole
(blacklever).
Usethechokeleverisusedtoaidinstartingacoldengine.
TosetthechoketotheONposition,movethechoke
14

leverforward.Toreducethechoke,movethechokelever
backward.
Note:Pullthechokeleverbackintothedetenttosetthe
choketotheOFFposition.
Note:DonotrunawarmenginewithchokeintheON
position.
Parking-BrakeHandle
Theparking-brakehandleislocatedonthecontrolconsole,
totherightoftheignitionswitch(Figure8).
Note:Thebrakehandlesetsaparkingbrakeineachofthe
transmissions.
Tosetthebrake,pullhandleoutandslideitbackward.To
release,pushthehandleforwardintothedetent.
Whenparkingonasteepslope,thewheelsmustbechocked
orblockedinadditiontothebrakebeingset.Themachine
mustbetieddownandbrakesetwhentransporting.
HourMeter
Thehourmeterislocatedabovetheignitionswitch(Figure8).
Thehourmeterdisplaysthetotalnumberofhoursthatyou
haverunthemachine.
IgnitionSwitch
Theignitionswitchislocatedontherightsideofthecontrol
console(Figure8).
Theswitchhas3positions:OFF,ON,andSTART(Figure9).
Figure9
1.Off3.Start
2.On
On/OffTineGroundEngagementFoot
Switch
Locatedabovethetinedownpressurecontrolonthecontrol
console.
Toenablethetinesgroundengagement,pushdownonthe
topoftheswitch.Todisablethetinesgroundengagement,
pushdownontherearoftheswitch.
Tine-PressureGauge
Thetine-pressuregaugeislocatedinthemiddleofthecontrol
console(Figure8).
Thetine-pressuregaugetoindicatesthedownwardpressure
themachineexertsonthetineswhenaerating.
Tines-ElevationSwitch
Keephandsandfeetawayfromthetines.Makesurethe
tinesareaisclearofanyobstructionsbeforeloweringit.
Thetine-elevationswitchislocatedontheoperatorplatform
(Figure8).
Tolowerthetinesintotheground,standonthetine-elevation
switch.Toraisethetines,removeyourfootfromtheswitch.
FuelShut-OffValve
Thefuelshut-offvalveislocatedbehindtheengineandunder
thefueltank(Figure10).
Usethefuel-shutoffvalvetoshutoffthefuelwhenthe
machinewillnotbeusedforafewdays,whentransporting
themachinetoandfromthejobsite,orwhenthemachineis
parkedinsideabuilding.
Toopenforfuelshut-offvalve,rotatethehandleofthefuel
shut-offvalveuntilitisalignedwiththefuelline.Toclosethe
fuelshut-offvalve,rotatethehandle90°tothefuelline.
Figure10
1.Offposition2.Onposition
15

DriveWheelReleaseValves
Thedrivewheelreleasevalvesarelocatedontheleftandright
sidesunderneaththefrontoftheunit.
Note:Duringnormaloperatingconditions,thewasheron
theleverispositionedinsidetheslots.
Ifyouneedtopushthemachinebyhand,makesurethatthe
valvesareinthe“released”position(Figure11).
Figure11
1.Leverpositiontopushthe
machine
3.Leverpositionfor
operatingthemachine
2.Washeroutsideofslot4.Washerinsideslot
Toreleasethedrivewheels,movethelevertothelarger
openingoftheslot,pullitoutuntilthewasherisoutsidethe
frame,thenmovetheleverbacktothenarrowportionofthe
slot.Repeatthisoneachsideofthemachine.
Releasetheparkingbraketoallowyoutopushthemachine
byhand.
Important:Donottowthemachine.
Toresetthedrivesystembacktotheoperatingposition,move
thelevertothelargeropeningoftheslot,pushinwarduntil
thewasherisinsidetheframe,thenmovetheleverbackto
thenarrowportionoftheslot.Repeatthisoneachsideof
themachine.
Specications
Height132cm(52inches)
Length162cm(64inches)
Width121cm(48inches)
AerationWidth76cm(30inches)
Coringrange5to13cm(2to5inches)
Weight460kg(1,015lb)
Operation
Note:Determinetheleftandrightsidesofthemachine
fromthenormaloperatingposition.
CheckingtheEngine-OilLevel
ServiceInterval:Beforeeachuseordaily
OilType:Detergentoil(APIserviceSJorhigher)
Oilviscosity:Refertothetablebelow.
Figure12
Important:Donotoperatetheenginewiththeoillevel
belowtheLow(orAdd)markonthedipstick,orover
theFullmark.
1.TurnthekeyintheignitionswitchtotheOFFposition,
removethekey,andwaitforallmovingpartstostop
beforeleavingtheoperatingposition
2.Allowtheenginetocool.
3.Checktheengine-oillevelasshowninFigure13.
16

Figure13
4.Iftheoillevelislow ,wipeofftheareaaroundtheoil
llcap,removecapandaddthespeciedoiluntilthe
oillevelisattheFullmarkonthedipstick.
Note:Donotoverlltheenginewithoil.
AddingFuel
Fueltankcapacity:18.9L(5USGallons)
•Forbestresults,useonlyclean,fresh(lessthan30days
old),unleadedgasolinewithanoctaneratingof87or
higher((R+M)/2ratingmethod).
•ETHANOL:Gasolinewithupto10%ethanol(gasohol)
or15%MTBE(methyltertiarybutylether)byvolume
isacceptable.EthanolandMTBEarenotthesame.
Gasolinewith15%ethanol(E15)byvolumeisnot
approvedforuse.Neverusegasolinethatcontainsmore
than10%ethanolbyvolume,suchasE15(contains15%
ethanol),E20(contains20%ethanol),orE85(contains
upto85%ethanol).Usingunapprovedgasolinemay
causeperformanceproblemsand/orenginedamage
whichmaynotbecoveredunderwarranty.
•Donotusegasolinecontainingmethanol.
•Donotstorefueleitherinthefueltankorfuelcontainers
overthewinterunlessafuelstabilizerisused.
•Donotaddoiltogasoline
DANGER
Incertainconditions,gasolineisextremely
ammableandhighlyexplosive.Areorexplosion
fromgasolinecanburnyouandothersandcan
damageproperty.
•Fillthefueltankoutdoors,inanopenarea,and
whentheengineiscold.Wipeupanygasoline
thatspills.
•Donotllthefueltankcompletelyfull.Add
gasolinetothefueltankuntilthelevelis6to13
mm(1/4to1/2inch)belowthebottomofthe
llerneck.Thisemptyspaceinthetankallows
thegasolinetoexpand.
•Neversmokewhenhandlinggasoline,andstay
awayfromanopenameorwhereasparkmay
ignitethegasolinefumes.
•Storegasolineinanapprovedfuelcontainerand
keepitoutofthereachofchildren.
•Neverbuymorethana30-daysupplyof
gasoline.
17

DANGER
Incertainconditionsduringfueling,static
electricitycanbereleasedcausingasparkwhich
canignitethegasolinevapors.Areorexplosion
fromgasolinecanburnyouandothersandcan
damageproperty.
•Alwaysplacegasolinecontainersontheground
awayfromyourvehiclebeforelling.
•Donotllgasolinecontainersinsideavehicleor
onatruckortrailerbedbecauseinteriorcarpets
orplastictruckbedlinersmayinsulatethe
containerandslowthelossofanystaticcharge.
•Whenpractical,removegas-poweredequipment
fromthetruckortrailerandrefueltheequipment
withitswheelsontheground.
•Ifthisisnotpossible,thenrefuelsuchequipment
onatruckortrailerfromaportablecontainer,
ratherthanfromafuel-dispensernozzle.
•Ifafuel-dispensernozzlemustbeused,keepthe
nozzleincontactwiththerimofthefueltank
orcontaineropeningatalltimesuntilfuelingis
complete.
WARNING
Gasolineisharmfulorfatalifswallowed.Long-term
exposuretovaporscancauseseriousinjuryand
illness.
•Avoidprolongedbreathingofvapors.
•Keepfaceawayfromnozzleandgastankor
conditionerbottleopening.
•Avoidcontactwithskin;washoffspillagewith
soapandwater.
UsingStabilizer/Conditioner
Useafuelstabilizer/conditionerinthemachinetoprovide
thefollowingbenets:
•Keepsgasolinefreshduringstorageof90daysorless.
Forlongerstorageitisrecommendedthatthefueltank
bedrained.
•Cleanstheenginewhileitruns
•Eliminatesgum-likevarnishbuildupinthefuelsystem,
whichcauseshardstarting
Important:Donotusefueladditivescontaining
methanolorethanol.
Addthecorrectamountofgasstabilizer/conditionerto
thegas.
Note:Afuelstabilizer/conditionerismosteffective
whenmixedwithfreshgasoline.Tominimizethechance
ofvarnishdepositsinthefuelsystem,usefuelstabilizer
atalltimes.
FuelingtheMachine
1.Cleanaroundthefuel-tankcap.
2.Removethecapfromthetank.
3.Fillthefueltankwithunleadedgasolinetowithin6to
13mm(1/4to1/2inch)fromthetopofthetank.Do
notllintothellerneck.
Important:Donotllthetankmorethan6mm
(1/4inch)fromthetopofthetankbecausethe
gasolinemusthaveroomtoexpand.
4.Installthefuel-tankcapandwipeupanyspilled
gasoline.
LubricatingtheChains
CheckingtheConditionofthe
Sprockets
ServiceInterval:Beforeeachuseordaily
1.TurnthekeyintheignitionswitchtotheOFFposition,
settheparkingbrake,waitforallmovingpartstostop,
andremovekey.
2.Inspectsprocketsforwearandreplaceasrequired
(Figure14).
18

Figure14
1.Sprockets2.Chains
CheckingtheConditionoftheChains
ServiceInterval:Beforeeachuseordaily
1.TurnthekeyintheignitionswitchtotheOFFposition,
settheparkingbrake,waitforallmovingpartstostop,
andremovekey.
2.Checkthechaintension(Figure14)atbothsidesof
themachine.
Note:Thechainsshouldmoveupanddown6to12
mm(1/4to1/2inch).
3.Ifchainspoporsnap;refertoAdjustingtheJackshaft
DriveChainTension(page39),AdjustingtheTension
ontheDrive-WheelChain(page40),orAdjustingthe
Tine-DriveChain(page48).
LubricatingtheChains
ServiceInterval:Beforeeachuseordaily
Important:Donotlubricatechainswithpenetratingoil
orsolvents.Useoilorchainlubricant.
1.TurnthekeyintheignitionswitchtotheOFFposition,
settheparkingbrake,waitforallmovingpartstostop,
andremovekey.
2.Raisethemachineandsupportitwithjackstandswith
a460kg(1,015lb)capacity.
CAUTION
Raisingthemachineforserviceor
maintenancerelyingsolelyonmechanical
orhydraulicjackscouldbedangerous.The
mechanicalorhydraulicjacksmaynotbe
enoughsupportormaymalfunctionallowing
themachinetofall,whichcouldcauseinjury.
Donotrelysolelyonmechanicalorhydraulic
jacksforsupport.Useadequatejackstands
orequivalentsupport.
3.TurnthekeyintheignitionswitchtotheONposition,
andmovethrottlelevelaheadto1/2throttleposition.
WARNING
Enginemustberunninganddrivewheels
mustbeturningsoadjustmentscanbe
performed.Contactwithmovingpartsorhot
surfacesmaycausepersonalinjury.
Keepngers,hands,andclothingclearof
rotatingcomponentsandhotsurfaces.
4.Releasetheparkingbrake.
5.Withtheenginerunning,slowlymovethe
traction-controlleversforwardandlubricateall6
chains(Figure14).
6.Checktheconditionandtensionofthechains;referto
CheckingtheConditionoftheChains(page19).
CheckingtheSafety-Interlock
System
ServiceInterval:Beforeeachuseordaily
CAUTION
Ifsafetyinterlockswitchesaredisconnectedor
damagedthemachinecouldoperateunexpectedly
causingpersonalinjury.
•Donottamperwiththeinterlockswitches.
•Checktheoperationoftheinterlockswitches
dailyandreplaceanydamagedswitchesbefore
operatingthemachine.
UnderstandingtheSafety-InterlockSystem
Thesafetyinterlocksystemisdesignedtopreventtheengine
fromstartingunlessthetraction-controlleversareinthe
neutralposition.
CheckingtheSafety-InterlockSystem
19

1.Disconnectthespark-plugwires;refertoCheckingthe
SparkPlugs(page34).
2.Whileonlevelground,blockthewheelsofthemachine
topreventunintendedmovement.
3.Disengagetheparkingbrake;refertoParking-Brake
Handle(page15).
4.Withthetraction-controlleversintheneutralposition
turnthekeytothestartposition—thestartermust
notcrank;refertoTraction-ControlLevers(page14)
andIgnitionSwitch(page15).
Note:Ifthemachinedoesnotpassthistest,donotoperate.
ContactyourauthorizedToroServiceDealer.
Important:Itisessentialthattheoperatorsafety
mechanismsbeconnectedandinproperoperating
conditionpriortouseforaerating.
CheckingforLooseHardware
ServiceInterval:Beforeeachuseordaily
1.TurnthekeyintheignitionswitchtotheOFFposition,
settheparkingbrake,waitforallmovingpartstostop,
andremovekey.
2.Visuallyinspectmachineforanyloosehardwareorany
otherpossibleproblem.
Note:Tightenallloosehardwareorrepairthe
problembeforeoperatingthemachine.
OperatingtheMachine
OpeningtheFuel-ShutoffValve
Rotatetheleverofthefuel-shutoffvalvetoalignthelever
withthefuelline.
Figure15
1.Offposition2.Onposition
StartingtheEngine
1.Movethetraction-controlleverstotheNEUTRAL
positionandsettheparkingbrake;referto
Traction-ControlLevers(page14)andParking-Brake
Handle(page15).
Note:Tostarttheengine,theparkingbrakemustbe
engaged.(Itisnotnecessaryfortheoperatortobe
ontheplatform.)
2.PlacethethrottlelevermidwaybetweentheSLOWand
FASTpositions;refertoThrottleLever(page14).
3.Iftheengineiscold,pushthechokeleverforwardto
theONposition;refertoChokeLever(page14).
Note:Iftheengineiswarm,pullthechokeleverto
theOFFposition.
4.TurnthekeyintheignitionswitchtotheSTART
position;refertoIgnitionSwitch(page15).
Note:Releasethekeyintheignitionswitchassoon
astheenginestarts.
Important:Donotcranktheenginecontinuously
formorethantensecondsatatime.Iftheengine
doesnotstart,allowa60secondcool-downperiod
betweenstartingattempts.Failuretofollowthese
guidelinescanburnoutthestartermotor
5.IfthechokeleverisintheONposition,graduallymove
thelevertowardtheOFFpositionastheenginewarms
up.
LoweringtheTines
1.SetthrottlelevertotheMIDWAYposition;referto
ThrottleLever(page14).
2.Steponthetine-elevationswitchtolowerthetines
(Figure16).
Figure16
1.Tine-elevationswitch
3.Standontheswitchandmovethetraction-control
leversforwardtoaerate(Figure16);referto
Traction-ControlLevers(page14).
20
Other manuals for 23518
2
This manual suits for next models
1
Table of contents
Other Toro Tiller manuals

Toro
Toro 29518 User manual

Toro
Toro 9801 User manual

Toro
Toro GREENS AERATOR 09120 User manual

Toro
Toro 58603 User manual

Toro
Toro 22445 User manual

Toro
Toro 23515 User manual

Toro
Toro 9200 User manual

Toro
Toro 09850 User manual

Toro
Toro 09802 HydroJect 3010 User manual

Toro
Toro 09802 HydroJect 3010 User manual


Popular Tiller manuals by other brands
 Operator's manual")
EarthQuake
EarthQuake 14318 (CE) Operator's manual

BE Ag & Industrial
BE Ag & Industrial BE-MTR2 Operations & parts manual

Craftsman
Craftsman 917.299010 owner's manual

Mower Land
Mower Land MLTILL5 Operator's manual

Powermate
Powermate PFTT140BE Operator's manual

Troy-Bilt
Troy-Bilt TUFFY 630CN Operator's manual


