Tower Hobbies RSM16 Operator's manual

T132002BLG
RSM16 Multifunction
16-in-1 Steam Mop
SAFETY AND INSTRUCTION MANUAL
PLEASE READ CAREFULLY
*Subject to registering your Extended Guarantee online at www.towerhousewares.co.uk.

2
GREAT BRITISH DESIGN, INNOVATION
AND EXCELLENCE SINCE 1912
Since the turn of the 20th century, Tower has been designing,
developing and manufacturing housewares and small
appliances used by millions of households throughout the
UK and beyond. During the 1960s, the rise in popularity
of pressure cooking saw Tower become the UK’s largest
producer of pressure cookers, right through into the late
1980s. In recent years the Tower brand has been reborn with
an exciting and varied range of housewares and electrical
appliances that have quickly reinstated the brand’s richly
deserved status as a household name.
Visit
www.towerhousewares.co.uk
for more fantastic products.

3
Contents:
Thank you for purchasing this appliance from the
Tower range.
Please read this manual carefully BEFORE using the
appliance for your own safety.
It has been designed to provide many years of
trouble-free use.
There are many benets to using a Tower Steam
Mop:
• Multi-function steam mop complete with a range
of accessories for thorough and versatile cleaning
• Powerful 1500W let you quickly and easily work
through a variety of cleaning tasks
• •400ml water tank with large viewing window
reduces the need for rells
• 30-second heat-up time provides quick and
efcient cleaning
• Triangle shaped swivel head provides added
convenience when cleaning.
1. Specications
Components and
structure
2. Technical Data
3. Important Safety
Information
4. Before First Use
5. Assembly of Your
Appliance
6. Using your Appliance
7. Accessory Fitting
& Usage Guide
8. Recycling
9. Cleaning & Care
10. Wiring Safety
11. Warranty Information
See back page for Customer
Service Information.

4
This box contains:
Instruction Manual
Steam Mop
1. Handle
2. Cord hooks
3. Power switch
4. Water tank cover
5. Variable steam control
6. Triangle mop head
7. Cup
8. Funnel
9. Carpet Glider
10. Microbre Cloth x2
11. Metal Brush
12. Nylon Brush
13. Scraper
14. Angled nozzle
15. Brush Tool
16. Microber Cloth For
Fabric Steamer
17. Steamer Shelf
18. Squeegee Attachment
19. Cone Steam Nozzle
20. Blind Cleaning Tool
21. Microber Coral Cloth
For Blind Cleaning Tool
1 - Specications:
Structure of
your appliance:
7
8
9
10
11
12
13
14
15
16
19
1
2
3
4
5
6
17
18
20
21

5
Description: RSM16 Multifunction 16-in-1 Steam Mop
Model: T132002BLG
Rated Voltage: 220V-240V ~50/60Hz
Power Consumption: 1500 Watts
Water Capacity: 400ml
Waterproof Level: IPX4
Documentation
We declare that this product conforms to the following product legislation in
accordance with the following directive(s):
2014/30/EU Electromagnetic Compatibility Directive.
2014/35/EU Low Voltage Directive.
2011/65/EU Restriction of Hazardous Substances Directive.
2009/125/EC Eco-Design of Energy Related Products.
RK Wholesale LTD Quality Assurance, United Kingdom.
2 - Technical Data:
Should you encounter problems or require a replacement part, contact the Tower
Customer Support Team: +44 (0) 333 220 6066.
Some spare parts may be ordered from the Tower website.
Your warranty becomes void should you decide to use non Tower spare parts.
Spare parts can be purchased from www.towerhousewares.co.uk
Guarantee for spare parts:
The spares and accessories are guaranteed for 1 year from date of purchase.
The main body and housing are guaranteed for the extended free warranty subject
to registration.
If any defect arises due to faulty materials of workmanship, the faulty products must
be returned to the place of purchase within 12 months from the date of purchase.
Refund or replacement is at the discretion of the retailer.

6
Please read these notes carefully BEFORE using your
Tower appliance
3 - Important Safety Information:
• Check that the voltage
of the main circuit
corresponds with the
rating of the appliance
before operating.
• Please ensure that the
appliance is used on a
stable, level, and heat
resistant surface.
• DO NOT immerse
cords, plugs or any
part of the appliance
in water or any other
liquid.
• DO NOT leave the
appliance unattended
while it is operating.
• Close supervision is
necessary when any
appliance is used by or
near children or pets.
• This appliance can
be used by children
aged from 8 years and
above and persons
with reduced physical,
sensory or mental
capabilities or lack
of experience and
knowledge if they have
been given supervision
or instruction
concerning use of the
appliance in a safe way
and understand the
hazards involved.
• Children shall not play
with the appliance.
• Cleaning and user
maintenance shall not
be made by children
without supervision.
• Switch off at the wall
socket then remove the
plug from the socket
when not in use or
before cleaning.
• If the supply cord or
appliance is damaged,
stop using the
appliance immediately
and seek advice from
the manufacturer or
its service agent or
a similarly qualied
person.
• DO NOT let the cord
hang over the edge of a
table or counter or let it
come into contact with
any hot surfaces.
• The use of accessory
attachments is not
recommended
by the appliance
manufacturer apart
from those supplied
with this product. DO
NOT use extension
cords with the
appliance.
HIGH VOLTAGE HOT SURFACE

7
• DO NOT pull the plug
out by the cord as this
may damage the plug
and/or the cable.
• DO NOT use this
product for anything
other than its intended
use.
• This appliance is for
household use only.
• DO NOT carry the
appliance by the power
cord.
• DO NOT use the
appliance outdoors.
• Never direct steam
towards people,
animals or plants.
• DO NOT handle the
plug or the steam mop
with wet hands or
operate without shoes.
• DO NOT insert any
objects into openings
in the unit and DO NOT
use with any opening
blocked including the
steam output.
• DO NOT use the mop
head without oor
cloth or without water
in the water tank.
• Use extra caution when
using on stairs as the
cable can become a
trip hazard.
• DO NOT use hot water
or chemicals in the
water tank.
• The liquid or steam
should not be directed
towards electrical
equipment.
• Stop using the steam
mop if water leakage is
observed, and contact
a qualied electrician
to test and repair the
unit.
• DO NOT use the steam
mop in enclosed
spaces that are lled
with ammable, or
explosive or toxic
vapours.
• DO NOT use on heat
sensitive materials
e.g., leather or waxed
ooring.
• DO NOT use for space
heating purposes.
• DO NOT touch hot
surfaces with the
cable or the product
and allow to cool
before assembly or
disassembly occurs.
• In the unlikely event
the appliance develops
a fault, stop using
it immediately and
seek advice from the
Customer Support
Team:
+44 (0) 333 220 6066

8
Read all instructions and safety information carefully before rst use. Please retain
this information for future reference.
1. Remove the parts from the packaging.
2. Assemble as instructed in the assembly page.
3. Your appliance is now ready for normal use.
4. Dispose of the packaging in a responsible manner.
4 - Before First Use
Handle sections assembly:
1. Push the tube into the body ensuring the locking spring assembly has locked.
2. To disassemble: Push the button and pull the tube out rmly. (See below)
Pad assembly:
1. Fit the pad onto the base and pull the draw string to secure. (See below)
Carpet glider assembly:
2. Place the carpet glider part onto the base with its pad covering it. Then let the
retaining clips x it into position. To remove pull gently on the outer rim of the
glider until it is free. (See below)
5 - Assembly of Your Appliance

9
Filling the water tank:
IMPORTANT: Always ensure that the unit is disconnected from the wall socket prior
to initial lling and before tting the bottom of the mop head.
Never use the steam mop without the microbre cleaning pad securely in place.
1. Turn the cap anti-clockwise and then lift up to remove from the water tank.
(See below).
2. Using the lling cup and funnel, pour one cup of water into the water tank. Do
not overll the tank. (400ml) (See below).
3. Replace the cap onto the water tank.
4. After lling up the water tank, turn the power button on. The light on the
button will show red indicating that the boiler is beginning to heat the water,
the pump will also engage and steam will be produced from the base.
5. To switch off the steam mop set the power switch to the off position then
unplug from the main supply and allow to cool.
To attach the Jet Nozzle:
IMPORTANT: Never use the steam mop without the microbre cleaning pad
attached to the mop head or without water in the water tank.
Note: It’s better to sweep or vacuum oors before using the steam mop.
1. Twist the quick release cord holder to unwrap the power cord completely.
2. To turn on your steam mop, plug it in and the steam mop will power on
automatically.
3. Turn on the steam switch and steam will wet the microbre cloth. It is normal
for the pump to make a little noise and shake when begins working.
4. Adjust the steam output according to your preference.
5. When the water tank is empty, a noise will come from the pump and it will
shake. Switch off the appliance immediately and rell the water tank following
the instructions under the ‘Filling Your Appliance’ section.
6. When you have nished using the steam mop, unplug the unit from the
electrical outlet and carefully remove.
6 - Using Your Appliance

10
7. Never leave the microbre cleaning pad on the steam mop head when you
have nished using the steam mop, as the dirt deposits and other foreign
objects may cause unpleasant odours and in some cases may damage the
surface it is resting on.
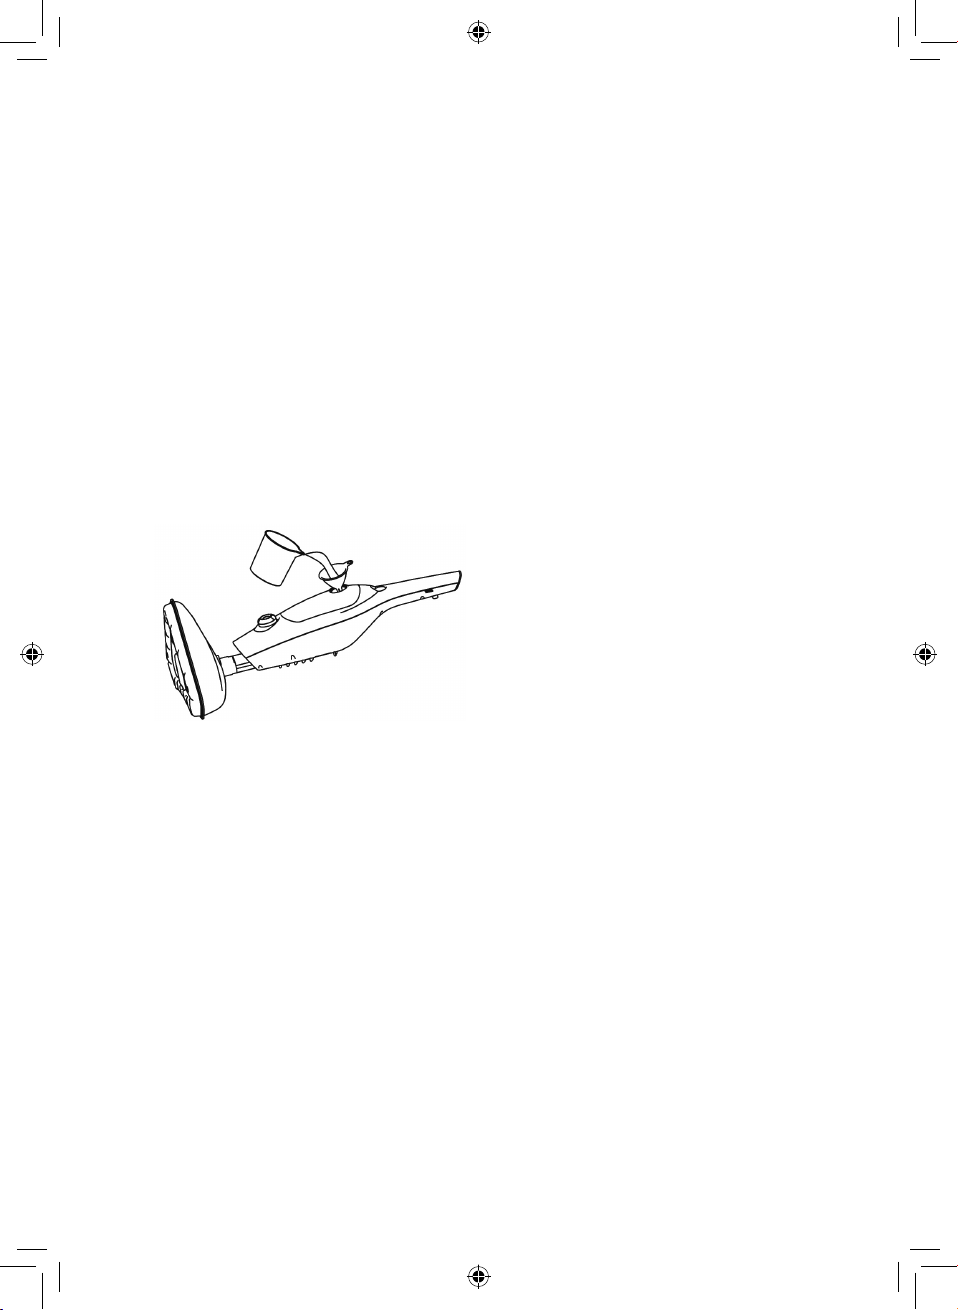
8. For best results wash the pads after each use (additional pads may be
purchased online from www.towerhousewares.co.uk)
The benets of using a Tower Steam Mop are as follows:
• It will remove stubborn stains and sanitise your work surfaces or oors more
efciently than conventional cleaning methods.
• The steam cleaner can be assembled and disassembled easily from a long
mop type steamer to a hand held steamer.
• It can be used as a hand held steamer for those awkward places where the
portability of the product allows you to achieve the extra cleaning protection
that conventional methods or products just do not achieve.
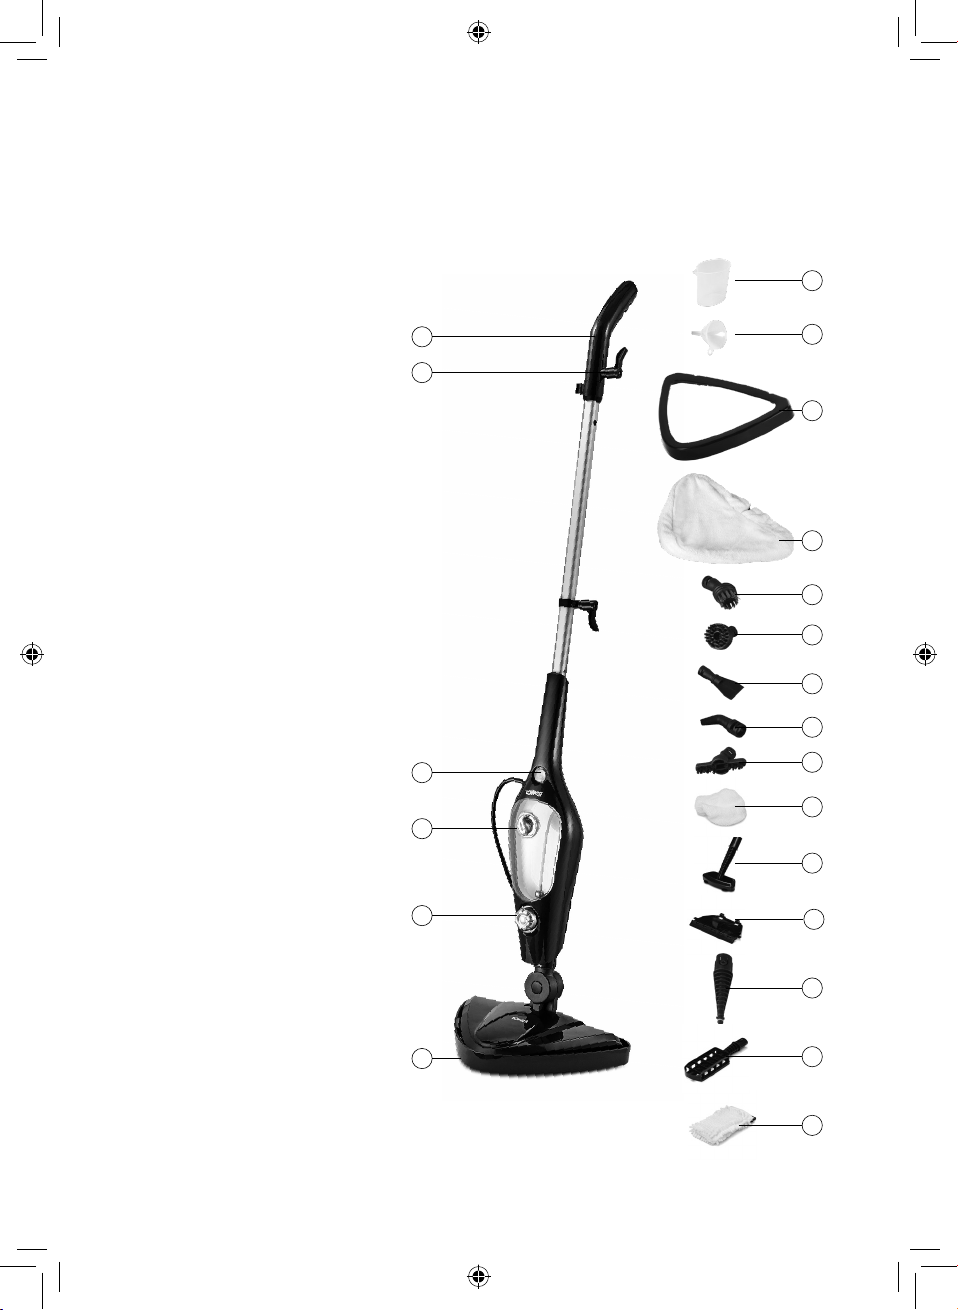
Hand-held steamer:
The hand held steamer is an ideal portable cleaner for use on
work surfaces, counter tops, sinks, windows, mirrors, tiles and
spot cleaning on oors, carpets and rugs. Use it with the jet
nozzle, brass brush or nylon brush attachments to spray away
dirt, grease, mould and more.
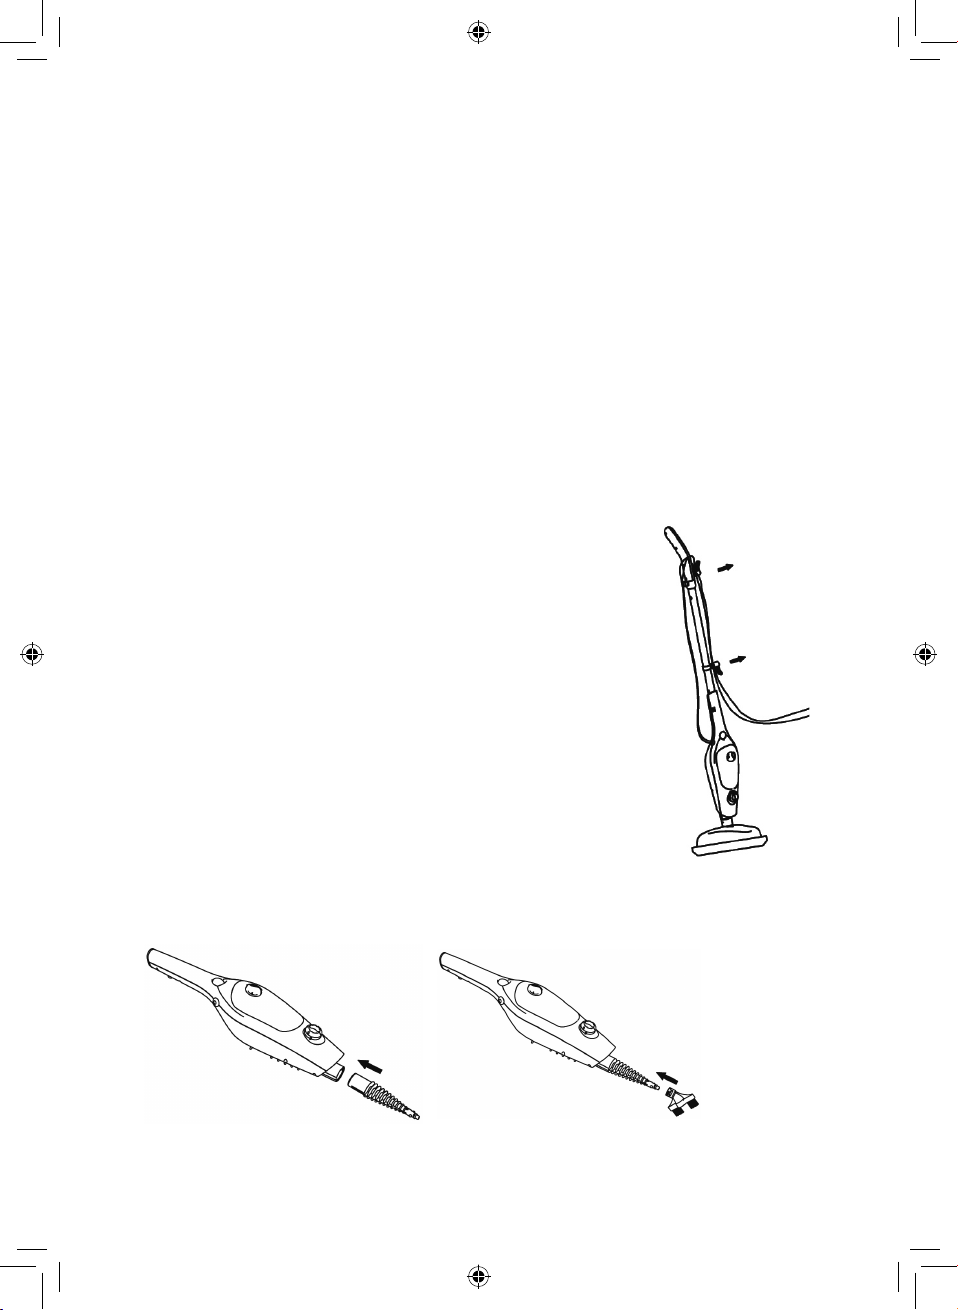
• Remove the power supply cord from the upper cord wrap
and cord holder. Turn the lower cord wrap to release the
cord and remove the power supply cord from its channel
as illustrated (See illustration).
• Press the extension handle lock button and remove the
extension handle and the curved handle from the main
body.
• Press the lock button on the main body and remove the
mop head.
To attach the Jet Nozzle:
Insert the Jet Nozzle into the designated hole in the Main Body until it locks in
place with the Lock Button on the Main Body (You will hear a clicking sound), as
illustrated. (See below).

11
To t all accessories:
All accessories that attach to the jet nozzle end x by clicking in place and turning
slightly clockwise to secure in position.
They can be used with soap or detergent to clean dirty areas.
WARNING! Never use the round brass brush on soft surfaces such as plastic or soft
metals as they are prone to scratching.
When changing any of the attachments it is recommended the appliance is
switched off and allowed to cool before changing or adding the attachments.
Window cleaning/garment cleaning:
• This attachment is used to clean windows and at glass products such as
mirrors as well as garments.
• To t the squeegee attachment, clip it onto the steamer shelf.
• To clean clothing, attach the steamer cloth.
• To t the cover, pull the elasticated steamer cloth (attachment 16) over the
steamer shelf (attachment 17).
• The unit comes complete with a squeegee blade for use on windows and
mirrors (Attachment 18).
WARNING! Do not use on frozen windows, as the thermal shock may cause the
glass to crack or shatter. When cleaning fabrics where possible it is recommended
that you check the fabric label to ensure that the fabric will withstand the
temperatures generated by the steam. For large items or items that are not
labelled use a test area that will not be visible. It is always best to have the material
hanging as this will aid with the eradication of creases on the fabric item or
clothing.
Fabric will be hot after the steam has been applied.
Always test on a small piece of fabric before use.

12
7 - Accessory Fitting & Usage Guide
Accessory Image Use Connect To
Triangle
mop head
Flooring (please use
the Carpet Glider
when using on
carpets or rugs)
Steamer
shelf &
Blind
attachment
Work surfaces,
counter tops, sinks,
windows, mirrors,
tiles and spot
cleaning on oors,
carpets and
rugs, blinds and
garments
Squeegee
attachment
Windows, mirrors
and tiles.
Attach the steamer
shelf to the
squeegee tool to
use as a window
steamer
Cone Steam
Nozzle
To connect smaller
accessories to the
steam unit
Metal &
Large Nylon
Brush
Ovens, Hobs,
Showers, Bath
Tubs, Tiles, Toys,
Refrigerators etc
Angled
Nozzle
Stove Tops, Taps,
Sinks, Hard to reach
areas
Brush Tool Cleaning grout
lines, sanded or non
sanded
Scraper Tool
Scraping baked
on foods, grime &
grease.
Removing residue
or other substances
from surfaces such
as hobs and ovens

13
Limescale:
If you live in a particularly hard water area, we recommend using bottled or distilled
water. Warning: never pour vinegar or other liquid cleaners for eliminating calcium
into water tank.
After using the steam mop:
Disconnect the steam mop from the power supply, allow it to cool completely and
empty any water left in the water tank. Clean the unit with a damp cloth or a non-
abrasive (liquid) cleaner.
9 - Cleaning & Care
DISPOSAL OF THE UNIT
Appliances bearing the symbol shown here may not be disposed of in domestic
rubbish. You are required to dispose of old electrical and electronic appliances like
this separately.
Please visit www.recycle-more.co.uk or www.recyclenow.co.uk for access to
information about the recycling of electrical items.
Please visit www.weeeireland.ie for access to information about the recycling of
electrical items purchased in Ireland.
The WEEE directive, introduced in August 2006, states that all electrical items must
be recycled, rather than taken to landll.
Please arrange to take this appliance to your local Civic Amenity site
for recycling, once it has reached the end of its life.
8 - Recycling
Accessory Image Use Connect To
Triangle
mop head
Flooring (please use
the Carpet Glider
when using on
carpets or rugs)
Steamer
shelf &
Blind
attachment
Work surfaces,
counter tops, sinks,
windows, mirrors,
tiles and spot
cleaning on oors,
carpets and
rugs, blinds and
garments
Squeegee
attachment
Windows, mirrors
and tiles.
Attach the steamer
shelf to the
squeegee tool to
use as a window
steamer
Cone Steam
Nozzle
To connect smaller
accessories to the
steam unit
Metal &
Large Nylon
Brush
Ovens, Hobs,
Showers, Bath
Tubs, Tiles, Toys,
Refrigerators etc
Angled
Nozzle
Stove Tops, Taps,
Sinks, Hard to reach
areas
Brush Tool Cleaning grout
lines, sanded or non
sanded
Scraper Tool
Scraping baked
on foods, grime &
grease.
Removing residue
or other substances
from surfaces such
as hobs and ovens

14
10 - Wiring Safety for UK Use Only
IMPORTANT
As the colours in the mains lead of this
appliance may not correspond with the
coloured markings identifying the terminals
in your plug, please proceed as follows:
The wires in the mains lead are labelled in
accordance with the following code:
Blue neutral [N] Brown live [L]
Green/Yellow [EARTH]
Plug Fitting Details (Where Applicable).
The wire labelled blue is the neutral and
must be connected to the terminal marked
[N].
The wire labelled brown is the live wire and
must be connected to the terminal marked
[L].
The wire labelled green/yellow must be
connected to the terminal marked with the
letter [E].
On no account must either the brown or
the blue wire be connected to the [EARTH]
terminal.
Always ensure that the cord grip is fastened
correctly.
The plug must be tted with a fuse of the
same rating already tted and conforming to
BS 1362 and be ASTA approved.
If in doubt consult a qualied electrician who
will be pleased to do this for you.
Non-Rewireable Mains Plug
If your appliance is supplied with a non-
rewireable plug tted to the mains lead and
should the fuse need replacing, you must
use an ASTA approved one (conforming to
BS 1362 of the same rating).
If in doubt, consult a qualied electrician
who will be pleased to do this for you.
If you need to remove the plug - disconnect
it from the mains - then cut it off of the mains
lead and immediately dispose of it in a safe
manner. Never attempt to reuse the plug
or insert it into a socket outlet as there is a
danger of an electric shock.
FUSE
Earth
(Green/Yellow)
Fuse
Neutral
(Blue)
Live
(Brown)
WARNING:
This appliance MUST be earthed!

15
This product is guaranteed for 12 months
from the date of original purchase.
If any defect arises due to faulty materials
of workmanship, the faulty products must
be returned to the place of purchase.
Refund or replacement is at the discretion
of the retailer.
The Following Conditions Apply:
• The product must be returned to the
retailer with proof of purchase or a
receipt.
• The product must be installed and
used in accordance with the
instructions contained in this
instruction guide.
• It must be used only for domestic
purposes.
• It does not cover wear and tear,
damage, misuse or consumable parts.
• Tower has limited liability for incidental
or consequential loss or damage.
This guarantee is valid in the UK and Eire
only.
The standard one year guarantee is only
extended to the maximum available for
each particular product upon registration
of the product within 28 days of purchase.
If you do not register the product with us
within the 28 day period, your product is
guaranteed for 1 year only.
To validate your extended warranty, please
visit www.towerhousewares.co.uk and
register with us online.
Please note that length of extended
warranty offered is dependent on product
type and that each qualifying product
needs to be registered individually in order
to extend its warranty past the standard
1 year.
Extended warranty is only valid with proof
of purchase or receipt.
As a thank you for purchasing
one of our fantastic products,
we are offering you an extra
2 years peace of mind in
addition to your 1 year
guarantee.
To receive your extra 2 year
guarantee, register your
appliance online within 28
days of purchase by visiting
www.towerhousewares.co.uk
11 - Warranty

thank you!
We hope you enjoy your appliance for many years. As a thank you for
purchasing one of our fantastic products, we are offering you an extra
2 years peace of mind.
*To receive your extra 2 years guarantee, register your appliance online
within 28 days of purchase by visiting:
www.towerhousewares.co.uk
Should you have a problem with your appliance, or need any spare parts,
please call our Customer Support Team on:
+44 (0) 333 220 6066
1119.V2
Your warranty becomes void should you
decide to use non Tower spare parts.
Spare parts can be purchased from
www.towerhousewares.co.uk
This manual suits for next models
1
Table of contents
Other Tower Hobbies Steam Cleaner manuals

Tower Hobbies
Tower Hobbies CeraGlide T22014RGB Operator's manual

Tower Hobbies
Tower Hobbies RHS10 Operator's manual

Tower Hobbies
Tower Hobbies CeraGlide T22014 User manual

Tower Hobbies
Tower Hobbies THS10 Installation manual

Tower Hobbies
Tower Hobbies TSM10 User manual

Tower Hobbies
Tower Hobbies ZT16 User manual

Tower Hobbies
Tower Hobbies THS10 Operator's manual

Tower Hobbies
Tower Hobbies TSM16 Operator's manual