Tractel Tirak X Series User manual

1
tirak™
Scaffolding Hoist
Instruction Manual
tirak™hoists
with blocstop™
BS/BSO on
2 wire rope
system
TE 1020 P
with blocstop™BSO
XE 301 P
with
blocstop™BSO
XE 500 P
XE 501 P
XE 501 PA
XE 600 P
XE 700 P
XE 701 P
XE 720 P
XE 721 P
XE 1020 P
XE 1030 P
with blocstop™BSO
Griphoist
®
Division
www.tractel.com

2
INTRODUCTION
.........................................................................3
1. GENERAL WARNING
....................................................4
2. DESCRIPTION
2.1 Motor and Primary Brake .......................................6
2.2 Gear Reducer ........................................................6
2.3 Secondary Brake ...................................................6
2.4 Emergency Descent without power ........................6
2.5 Wire Rope Driving Mechanism ..............................6
2.6 Wire Rope .............................................................6
2.7 Technical Data .......................................................7
3. RIGGING INSTRUCTIONS
3.1 General
3.1.1 Scope ..........................................................8
3.1.2 Checks before rigging..................................8
3.2 Power Supply and Hoist Control
3.2.1 General........................................................9
3.2.2 Fuses / Circuit breakers ........................................9
3.2.3 Power Cords and Grounding ......................9
3.2.4 Hoist Control ...............................................9
3.3 Hoist Mounting
3.3.1 tirak™X-Series ..........................................10
3.3.2 tirak™T-Series ..........................................10
4. WIRE ROPE
4.1 Wire Rope Specification ......................................11
4.2 Wire Rope Rigging Instructions ............................ 11
4.3 Wire Rope Reeving ..............................................13
4.4 De-rigging.............................................................14
5. OPERATING INSTRUCTIONS
5.1 General.................................................................... 14
5.2 Normal Operation ................................................... 15
5.3 Emergency Descent ............................................... 16
5.4 BSO Secondary Brake Action ................................ 16
6. TROUBLE SHOOTING
6.1 Wire Rope Driving Mechanism ............................... 16
6.2 Motor ..................................................................... 17
6.3 Primary Brake.......................................................... 17
6.4 BSO Secondary Brake ........................................... 18
7. INSPECTIONS and MAINTENANCE
7.1 Inspections
7.1.1 Daily Inspections ......................................... 18
7.1.2 Monthly Inspections ..................................... 19
7.1.3 1/2-Year Inspection ...................................... 19
7.2 Maintenance
7.2.1 tirak™Hoist .................................................. 20
7.2.2 Wire Ropes .................................................. 20
7.2.3 blocstop™BSO Secondary Brake ................ 20
ADDITIONAL INSTRUCTIONS
for tirak™with blocstop™BS/BSO
................ 21 to 34
8. NAMEPLATES & LABELS
................................. 35
9. WARRANTY INFORMATION
......................................37
10. ADDITIONAL SOURCES AND TRAINING
.....37
SCAFFOLD SAFE PRACTICE GUIDELINES
..... 38
TABLE OF CONTENTS
Safety advice
Symbol Code word Meaning Possible consequence of non-compliance
IMMEDIATE or
WARNING possibly imminant Fatal or serious injuries!
danger:
CAUTION possibly dangerous Injuries to persons
situation: or damage to property
Other advice
NOTE possibly dangerous Damage to equipment
situation: or its surroundings
Instruction to execution/
(none) documentation in writing (none)
(i.e. record keeping)
Explanation of Symbols used in this manual

3
INTRODUCTION
Based on an original design, tirak™wire rope scaf-
fold hoists are specially manufactured for lifting
personnel in a suspended platform system.
For that purpose they are UL classified.
tirak™hoists are composed of the following main assem-
blies (Fig. 1):
A Wire rope driving mechanism
B Gearbox
C Electric motor with primary brake and e l e c -
tric controls
D blocstop™BSO secondary brake,
or
E blocstop™BS/BSO secondary brake
The main advantages of tirak™hoists are:
– PowerfuI, fast, and lightweight.
– Simple, rugged, and reliable.
– Unlimited lifting height.
– Constant speed on any height.
– Gentle for its wire rope.
– Emergency descent with a
mechanical emergency descent device.
The secondary brake (D) or (E), marked blocstop™
BSO or BS/BSO MUST ALWAYS BE ATTACHED AND
USED.
The original design requires, for safety and efficiency,
that it be used with a special tirak™wire rope specified
by the manufacturer1).
tirak™hoists are intended to be used for work going
up and down a vertical hanging wire rope.
tirak™hoists are designed to be rigged to a compatible
platform, workcage or bosun’s chair.
This manual gives the required information for rigging,
operating and maintaining the tirak™hoists. Responsibil-
ity for the complete suspended platform system lies upon
the rigger of that system.
“Manufacturer” definition:
TRACTEL Greifzug GmbH
Postfach 20 04 40
51434 Bergisch Gladbach
GERMANY
Fig. 1
TE 1020 P
A
tirak™hoists
with blocstop™
BS/BSO on
2 wire rope
system
D
C
A
B
D
B
C
A
D
C
B
E
XE 501 P
XE 501 PA
XE 500 P
XE 600 P
XE 701 P
XE 700 P
XE 720 P
XE 721 P
XE 1020 P
XE 1030 P
XE 301 P
Specification of “manufacturer” and “supplier” referred to in this manual:
TRACTEL Inc. Griphoist
®
Division
110 Shawmut Road, Suite 2
CANTON, MA. 02021
Tel.: (800) 421-0246 • Fax: (781) 828-3642
Email: [email protected]
TRACTEL Ltd. Griphoist®Division
11020, rue Mirabeau
Anjou, QUEBEC, HIJ 2S3, Canada
Tél.: (514) 493-3332
Fax: (514) 493-3342
“Supplier” definition regarding contact advice in this manual:

4
1. GENERAL WARNING
READ THIS GENERAL WARNING FIRST
IN SUSPENDED SCAFFOLD OPERATIONS, SAFETY IS A MATTER OF LIFE OR DEATH
FOR RIGGERS, OPERATORS AND BY-STANDERS.
THIS WARNING IS YOUR SHARE OF DUTIES FOR ACHIEVING SAFETY.
YOUR DUTY TO UNDERSTAND AND COMPLY
1. It is the rigger’s and the operator’s responsibility, and
their employer’s responsibility, if they operate under
an employer’s control, to strictly conform to the fol-
lowing warnings.
2. It is imperative for safety and efficiency of the
operations that this manual be read and fully
understood by the rigger and the operator before
rigging or operating the tirak
™
. ALL instructions
contained herein must be carefully and strictly
followed, including applicable S.I.A. guidelines for
safe practice (see pages 38 and 39).
3. Should you hand over a tirak
™
, under whatever con-
ditions, to any party operating out of your control,
you must join a clean copy of this manual and draw
other party’s attention that strictly following all the
instructions therein is a matter of life or death.
4. Before rigging and operating this tirak
™
hoist,
the rigger and the operator must become aware
of all the requirements of federal, state, provincial
and local safety regulations not only applicable to the
tirak
™
hoist but also to the entire suspended scaffold
system and any component of it.
5. Never use the tirak
™
hoist for any job other than lift-
ing personnel on suspended scaffold according to
the instructions of this manual
6. Never load the tirak
™
hoist above its rated load.
7. Keep this manual available at all times for easy refer-
ence whenever required. Extra copies are available
from the supplier.
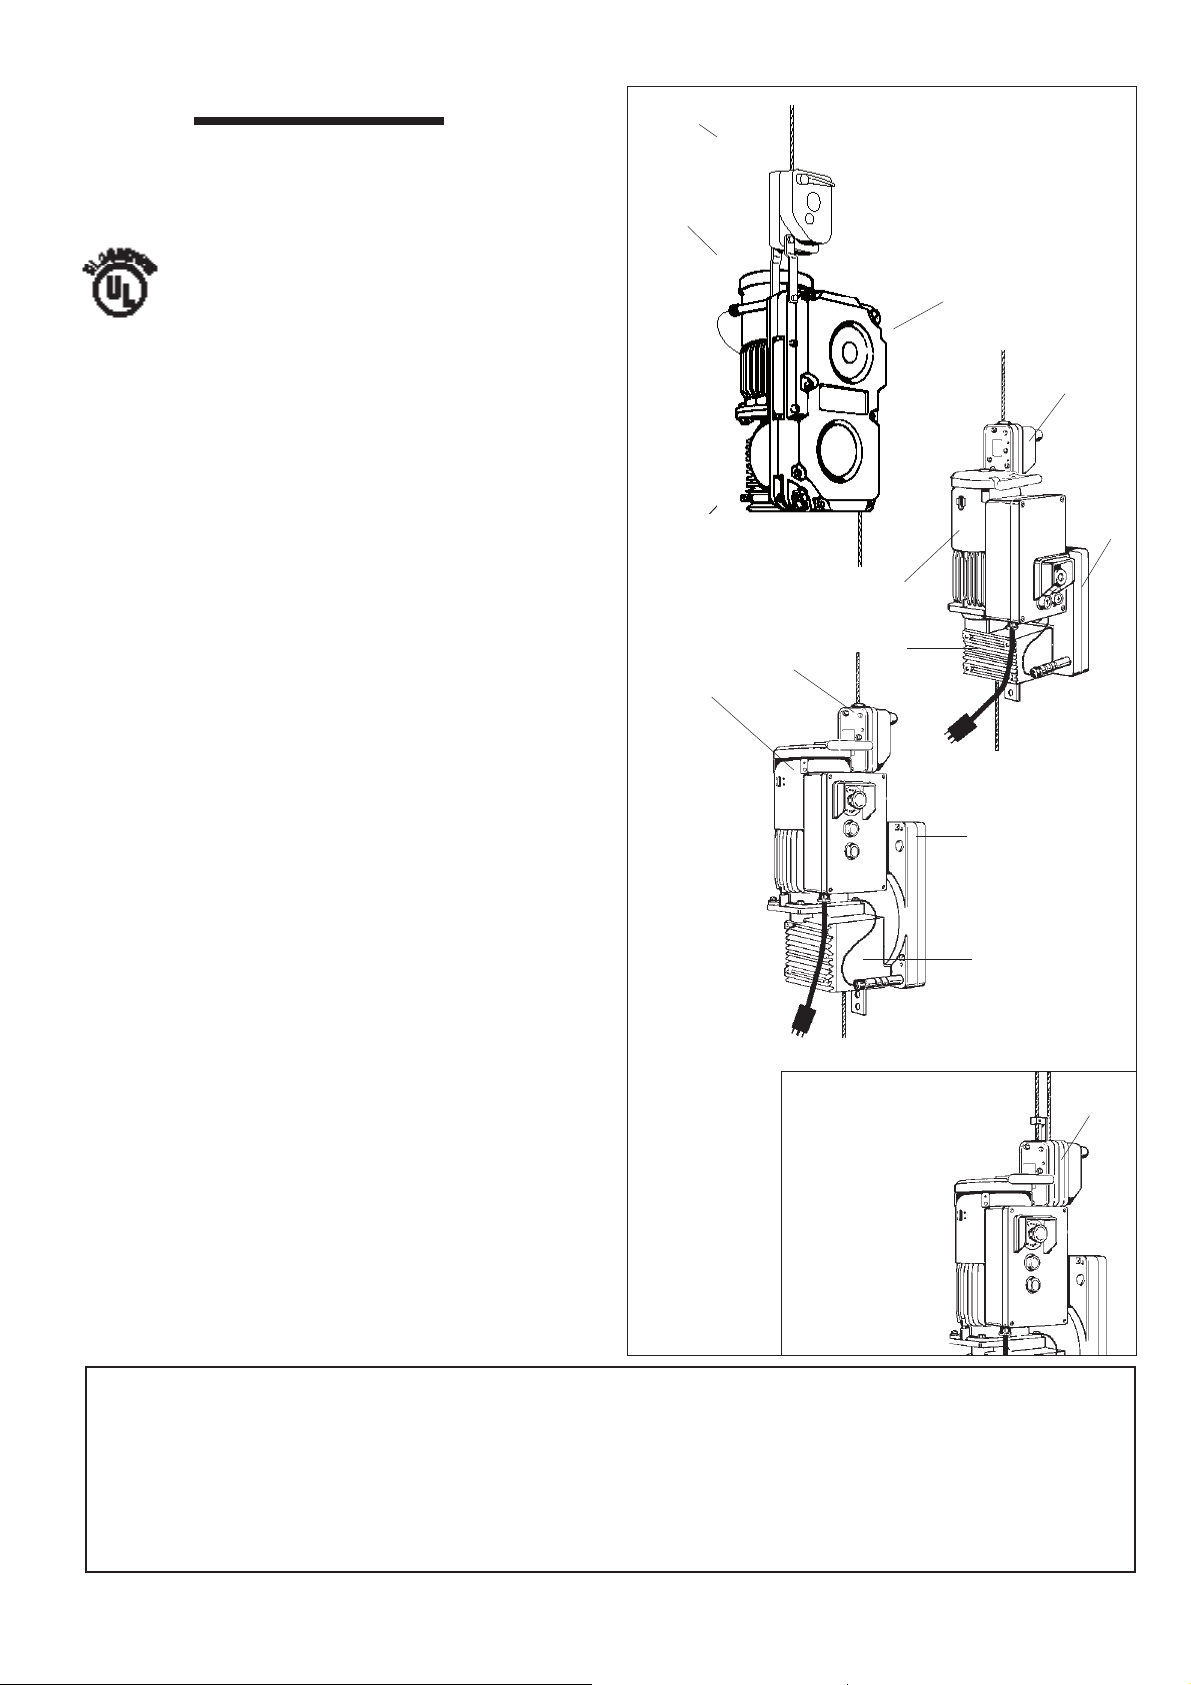
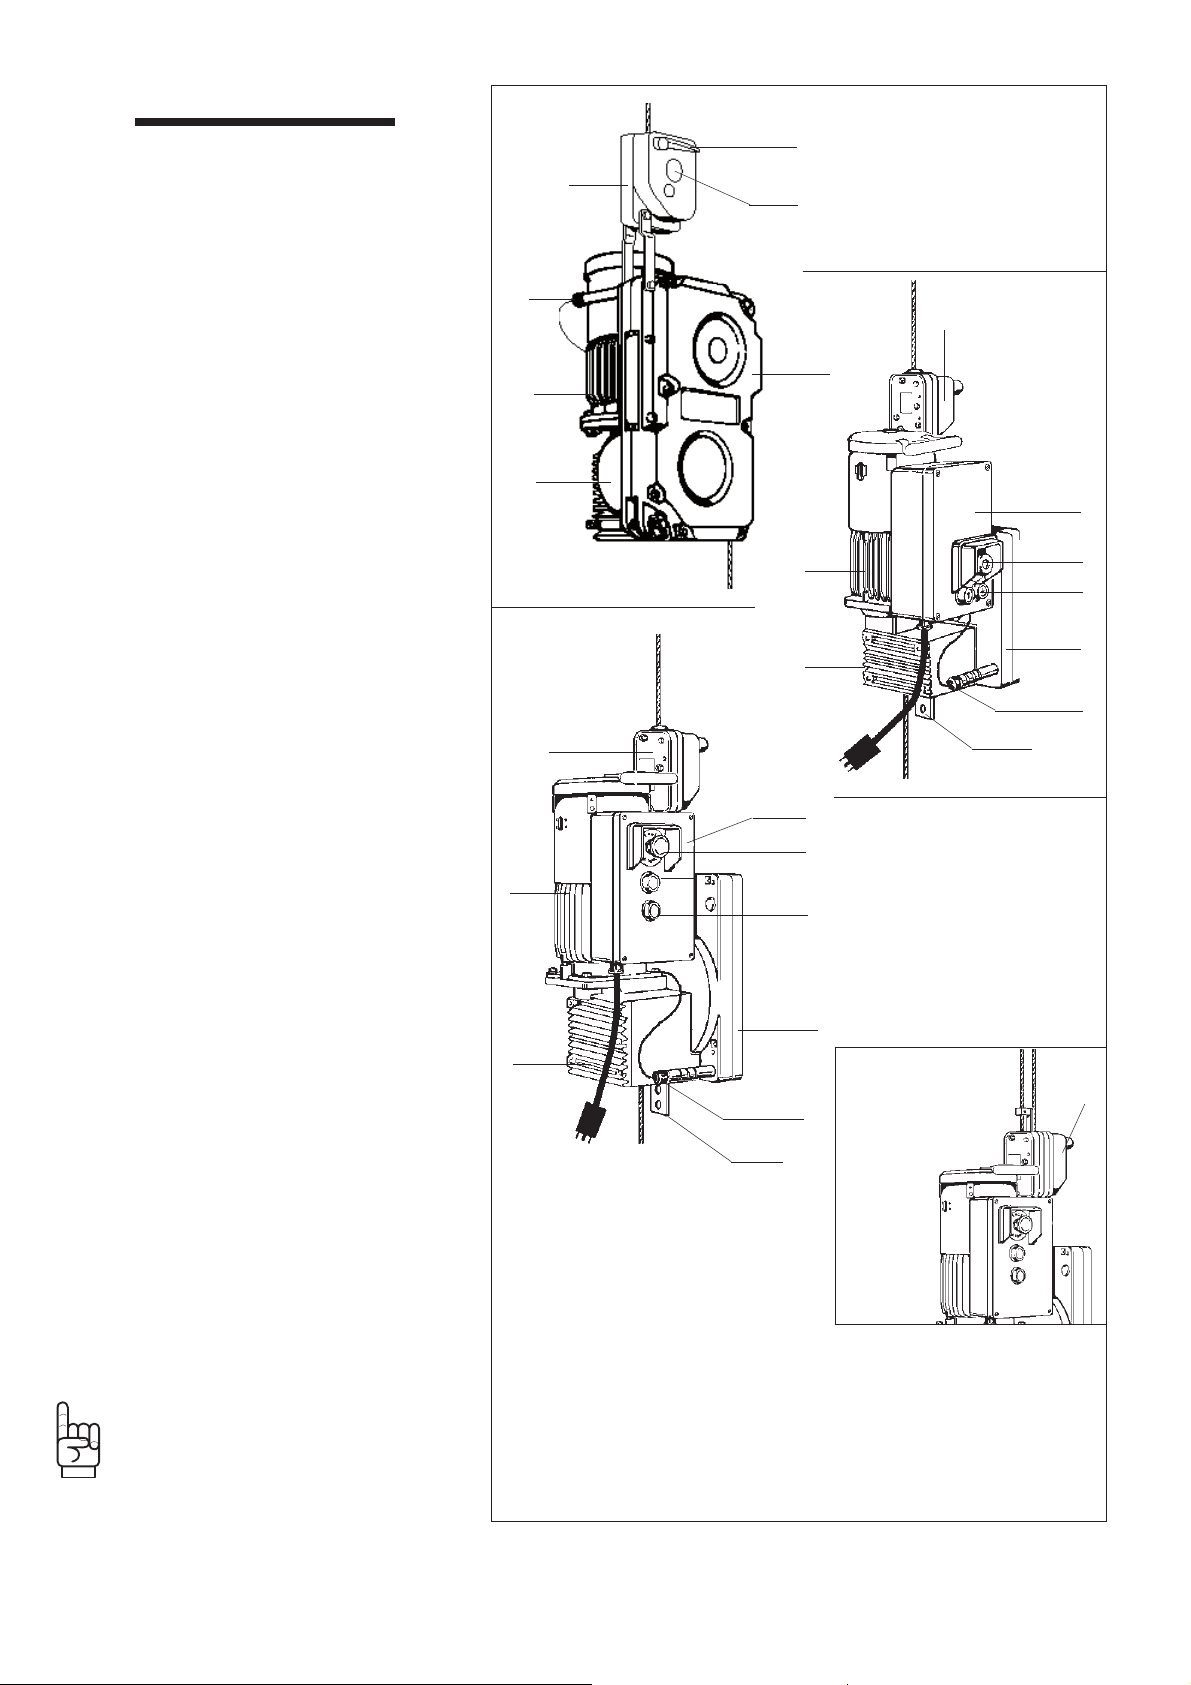
8. Carefully take notice of all the labels affixed to the
tirak
™
. Never rig or operate the hoist if any label,
normally fixed on the hoist is obscured or missing
(see page 35 and 36). The supplier will supply extra
labels on customer’s request.
9. Every time the hoist is to be rigged or used, check
that the hoist, wire rope and other components of
the suspended scaffold system are complete and in
good working condition, prior to proceeding.
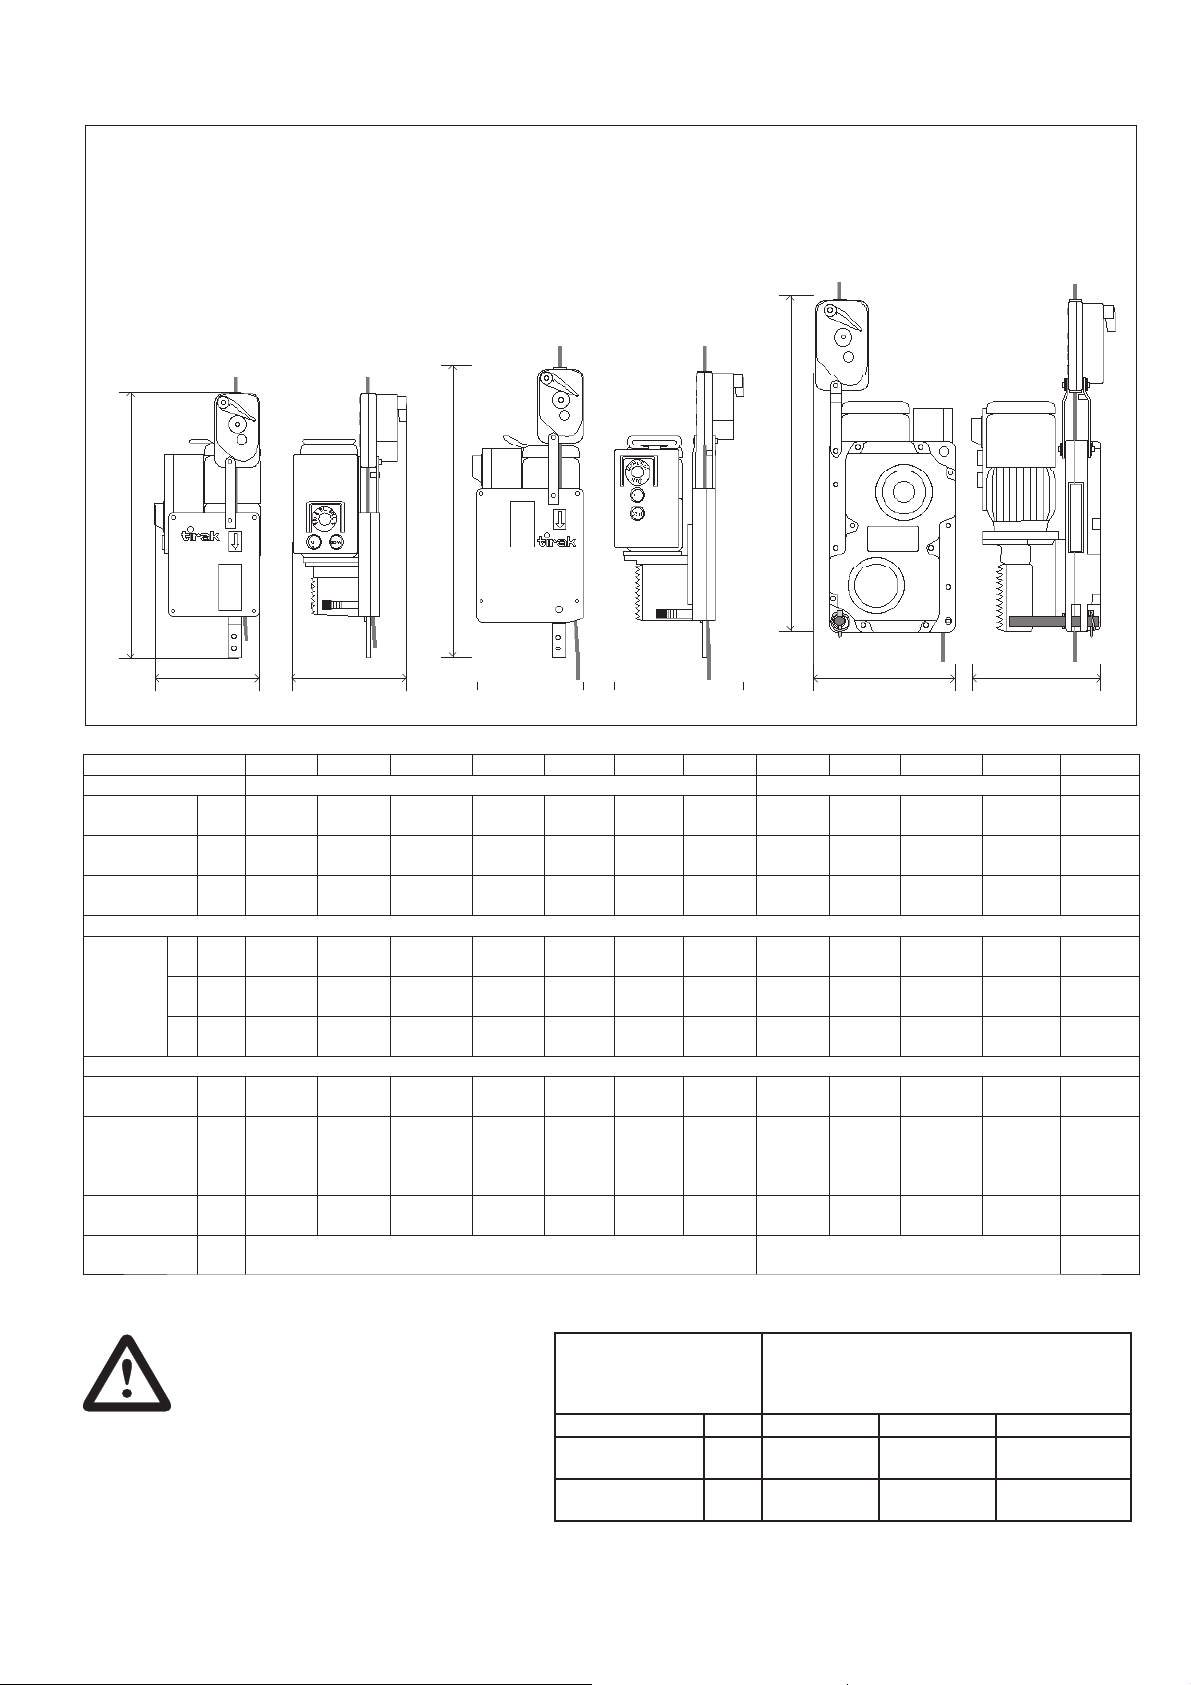
10. A careful and regular inspection of the tirak
™
hoist,
its wire rope and other components of the installation
is part of the safety requirements. If you have any
questions, call the supplier.
11. After each de-rigging and before re-rigging, the tirak
™
must be inspected by a competent person familiar
with the tirak
™
hoist and professionally trained for
the purpose.
YOUR DUTY TO INSPECT AND MAINTAIN
12. An operator must not be assigned to a suspended
job or to rigging for a suspended job, or to de-rigging
after the job, if that person is not:
a) mentally and physically fit for the purpose, spe-
cially at heights,
b) competent for the job to be performed,
c) familiar with all applicable safety rules and require-
ments,
d) familiar with the scaffold equipment as rigged,
e) provisionally trained for working under the above
requirements.
13. Never disassemble the tirak
™
by yourself or by your
staff. People’s life may be at risk.
Except for the operations described in this manual,
the maintenance of the tirak™hoists, as well as
disassembly and repair, must be exclusively done
by qualified repairers authorized in writing by the
supplier. tirak
™
spare parts in accordance with the
serial number of each machine must be exclusively
utilized. No substitutions are allowed.
14. Never let the tirak
™
hoist and other equipment of a
suspended scaffold system be managed or operated
by a person other than authorized and assigned to the
job. Keep the equipment, either rigged or unrigged,
out of reach of unauthorized persons, while out of
operation.
YOUR DUTY TO TRAIN AND CONTROL PEOPLE

5
23. The blocstop™BSO or BS/BSO secondary brake lo-
cated at the upper part of the unit is an integral piece
of the tirak
™
hoist. It is strictly forbidden to detach it
from the main body of the hoist for whatever reason.
Doing so would be a misuse creating an extreme
hazard and placing operators and by-standers in
danger of death resulting from the possible fall of the
suspended equipment: scaffold, workcage, bosun’s
chair or any other items or components.
24. Once the suspended scaffold, work-cage or bosun’s
chair has been lifted off its initial support (ground
or any other level), it is imperative not to release,
remove, alter or obstruct any part of the equipment
under load.
25. NEVER allow any condition which would result in a
suspension wire rope becoming SLACK during the
operation, unless …:
YOUR DUTY TO AVOID TAKING CHANCES
a) … the suspended scaffold, work-cage or bosun’s
chair is supported on a safe surface giving a safe
access to the operator in compliance with safety
regulations, or unless …
b) … another suspension wire rope has been safely
rigged to the suspended scaffold, workcage or
bosun’s chair.
26. Never operate the tirak
™
hoist and its accessories,
especially electric ones, in a potentially explosive
atmosphere.
27. For any job to be performed on the suspended
equipment, consider and control the specific risks
related to the nature of the job.
28. Should you decide that the tirak
™
hoist is no longer
to be used, take precautions in disposing of it so that
it cannot be used any more.
AN ULTIMATE RECOMMENDATION
Never neglect means to improve safety. Due to the risks inherent in the use of suspended scaffold systems,
the supplier strongly recommends that every installation be equipped with secondary wire rope(s) fitted with a
separate fall arrest system. Details about tirak
™
with blocstop
™
BS/BSO secondary brake on 2 wire rope sys-
tems at pages 21 to 34.
This manual is neither a regulations compliance manual nor a general training guide on suspended scaffold
operations. You must refer to proper instructions delivered by manufacturers of the other pieces of equipment
included in your suspended scaffold installation. Whenever calculations and specific rigging and handling are
involved, the operator should be professionally trained to that end and secure relevant information prior to com-
mencing such work.
15. Training operators and riggers includes setting up
rescue procedure should a scaffold be brought to a
standstill during a job. Such procedure must be set up
by a competent person of the user, or of its technical
consultant, according to the working conditions, prior
to putting the equipment into operation.
16. Every suspended job must be placed under the
control of a person having the required competence
and the authority for checking that all the instructions
prescribed by this manual be regularly and efficiently
carried out.
YOUR DUTY OF SAFETY BEYOND THE TIRAK
As being only one piece of the scaffold system, the tirak
™
hoist can contribute to the required safety only, if …:
21. … all the requirements in strength and resistance
are obtained with the necessary safety factor (see
regulations and professional standards);
22. … all the calculations, design and subsequent work
necessary to the above requirements have been
made by a competent person on the basis of proper
technical information regarding the site.
17. … it is fitted on compatible scaffold equipment, includ-
ing the wire rope used in the tirak
™
hoist.
18. … other components meet the requirements of the
applicable safety regulations and are of the proper
quality, and assembled to form a safe suspended
scaffold system.
19. … every upper support of the scaffold is stable, suf-
ficiently strong and properly tied back to the structure,
according to the load either static or dynamic.
20. … supporting structure and tie-back provide the
requested resistance to every load to be applied,
either static or dynamic, during rigging or operating
the scaffold equipment;

6
2. DESCRIPTION
2.1 Motor and Primary Brake
tirak™hoists are driven by a single phase or a
three phase motor, totally enclosed fan cooled
(TEFC) type with an electromagnetic brake.
Pneumatic tirak™hoists are available also.
2.2 Gear Reducer
The gear reducer consists of a worm gear drive
a1
c4
A
c2
c3
c1
C
TE 1020 P
with blocstop™
BSO
tirak™hoists
with blocstop™
BS/BSO on
2 wire rope
system
E
D
XE 301 P
with blocstop™
BSO
B
C
A
B
c4
a1
c2
c3
c1
D
C
Dd2
d1
A
B
c4
XE 501 P
XE 501 PA
XE 500 P
XE 600 P
XE 701 P
XE 700 P
XE 721 P
XE 720 P
XE 1020 P
XE 1030 P
with blocstop™BSO
AWire rope driving mechanism
a1 Stirrup adapter (X-Series)
BGearbox
CMotor with brake
c1 Electric control box
c2 Push button control1)
c3 Electric EMERGENCY STOP
c4 Emergency descent brake
release lever (stored position)
Dblocstop BSO
secondary brake
d1 Control lever
d2 EMERGENCY STOP
on the blocstop
E blocstop™BS/BSO
secondary brake
Figure 2
in connection with a spur gear, oil bath lubri-
cated in a sealed aluminum casing.
2.3 Secondary Brakes
The blocstop™BSO overspeed locking device
(D) – hereafter called BSO secondary brake
– stops the descent immediately in case of
accelerating overspeed.
The blocstop™BS/BSO overspeed and slack
wire rope locking device (E) – here-after
called BS/BSO secondary brake – additionally
provides protection against slack wire rope or
primary wire rope failure, when using second-
ary wire ropes.
SECONDARY BRAKES MUST ALWAYS BE
ATTACHED AND USED.
2.4 Emergency Descent
without power
tirak™hoists are equipped with a mechanical
centrifugal braking system, permitting a descent
at moderate speed in case of emergency. No
handcranking is needed.
2.5 Wire Rope Driving Mechanism
The wire rope enters the hoist from the top,
is led through by the patented driving system,
and exits opposite its entry. As the wire rope is
not stored inside the hoist, its length (i. e. the
possible rope travel) is unlimited on principle.
The driving system is independent of the load
applied to the wire rope. The whole mechanism
is housed in an aluminum casing.
2.6 Wire Rope
tirak™hoists use a Special tirak
™
Wire Rope
(see chapter 4). Unless specificly specified in
writing by the manufacturer, only this special
tirak
™
Wire Rope may be used.
NOTE: The manufacturer declines all re-
sponsibility for machines used with
a wire rope other than specified by
them in writing.
1) For all hoists pendant control and pushbutton control are available
on request.

7
2.7 Technical Data
Figure 3 Dimensions
XE 301 P
with blocstop™BSO
TE 1020 P
with blocstop™BSO
bc
a
bc
a
a
bc
XE 500 P
XE 501 P
XE 501 PA
XE 600 P
XE 700 P
XE 701 P
XE 720 P
XE 721 P
XE 1020 P
XE 1030 P
with blocstop™BSO
CAUTION:
Correct wire rope diameter is very impor-
tant for the tirak
™
function!
An oversized wire rope may cause
a wire rope jam inside the hoist
and/or the BSO or BS/BSO second-
ary brake to malfunction.
Hoist Model XE 301 P XE 501 P XE 501 PA XE 500 P XE 600 P XE 701 P XE 700 P XE 721 P XE 720 P XE 1020 P TE 1020 P XE 1030 P
with blocstop model BSO 500 BSO 1020 BSO 1030
Rated load lbs
kg
700
315
1000
450
1000
450
1000
450
1200
544
1500
680
1500
680
1500
680
1500
680
2200
1000
2000
1000
2200
1000
Lifting speed ft/min
m/min
33
10
35
11
35
11
35
11
35
11
35
11
35
11
35
11
35
11
35
11
35
11
35
11
Weight (with
BSO)
lbs
kg
82
37
123
56
121
55
106
48
112
51
123
56
112
51
126
57
115
52
120
54
178
81
120
54
Dimensions over all
ain.
mm
28.9
735
31.8
808
31.8
808
31.8
808
31.8
808
31.8
808
31.8
808
33.3
845
33.3
845
33.3
845
34.6
879
33.3
845
bin.
mm
11.2
286
12.9
328
12.5
318
12.1
308
12.5
318
13.2
336
12.5
318
13.2
336
12.5
318
12.5
318
14.8
375
12.5
318
cin.
mm
12.5
314
15.8
402
14.1
357
14.1
357
14.1
357
14.9
379
14.1
357
14.9
379
14.1
357
14.1
357
14.6
371
14.1
357
Motor specifications
3-phase
220V/60 cycles
kW
A
–
–
–
–
–
–
1.1
4.5
1.5
6.1
–
–
1.5
6.1
–
–
1.5
6.1
2.4
9.6
2.2
9.5
2.4
9.6
single phase:
110 (or 220V)/
60 cycles
kW
A
0.55
10.0
1.1
19.0/(8.5)
–
–
–
–
–
–
–
–
–
–
–
–
–
–
–
–
–
–
–
–
220 V / 60
cycles
kW
A
0.55
4.8
–
–
1.1
8.5
–
–
–
–
1.5
12.0
–
–
1.5
12.0
–
–
–
–
–
–
–
–
wire rope dia-
meter
in.
mm
5/16
8.4
3/8
9.5
13/32
10.2
wire rope
classification/
construction
5 x 19, 4 x 26, or 5 x 26, with fiber core,
or 6 x 19 (min. 17 wires per strand),
galvanized or black, lubricated,
nominal diameter in./mm 5/16 in./ 8.4 mm 3/8 in. / 9.5 mm 13/32 in. / 10.2 mm
maximum allowed
diameter tolerances
in.
mm
0.319 to 0.331
8.1 to 8.4
0.362 to 0.374
9.2 to 9.5
0.390 to 0.400
9.9 to 10.2
minimun actual
breaking strenght
lbs
kN
10,000
44.5
15,000
66.8
18,660
83.0

8
3. RIGGING INSTRUCTIONS
3.1 GENERAL
3.1.1 Scope
Instructions and advice in this manual exclusively refer
to the following items (see Fig. 4):
– TIRAK scaffold hoist
with blocstop
™
BSO secondary brake
or BS/BSO1) secondary brake;
– Special TIRAK wire rope;
– Power supply cord.
1) Instructions and advice for tirak™
with blocstop™BS/BSO
secondary brake
see seperate instructions
on pages 21 to 34.
Fig. 4 Relevant Items (principle sketch)
Lifeline
Tie-back
Support equip-
ment
Special
tirak
™
wire rope
tirak
™
with
blocstop
™
BSO
Suspended
platform
system
Power
supply
cord
Barricade
Power
supply cord
Special
tirak
™
wire rope
Fig. 5 Typical suspended scaffold installation
Fixing the
wire rope to the
support equipment
Connecting
tirak
™
and
platform system
tirak
™
with
blocstop
™
BSO
secondary brake
3.1.2 Checks before rigging
It is a qualified person’s responsibility to check the whole
installation to meet all safety requirements of:
– OSHA regulations and federal, state, provincial or
local safety regulations,
– the proper instructions delivered by the manufactur-
ers of the other pieces of equipment included in your
suspended scaffold installation.
Some pieces are:
– Support equipment including tie-back;
– platform system, work-cage, or bosun’s chair;
– safety equipments (personal fall arrest system);
– barricade below the drop of the platform/work-
cage/bosun’s chair.
NOTE: This information is NOT to be considered as
a complete checklist for your specific installation. It
is only a sample list of some general components,
which make part of a typical suspended scaffold
installation (Fig. 5).
Personal
Fall Arrest
System

9
(2) In some cases, a booster transformer will be needed
to compensate for power cord losses or low-source
voltage. If a booster transformer is needed, call sup-
plier.
(3) CAUTION: DO NOT OPERATE THE MOTOR
FOR ANY REASONS, IF THE MEAS-
URED RUN VOLTAGE IS LESS THAN
THE MOTOR NAMEPLATE RATING!
(4) Always secure the power cord to the platform with
Fig. 7 Typical Hoist Control
3.2 Power Supply and Hoist Control
3.2.1 General
(1) Check if voltage indicated on the hoist nameplate
corresponds to the power supply rating.
(2) Single phase motors are factory connected for
either 220 VAC or 110 VAC.
On dual voltage machines change plug and wiring
according to drawing inside control box.
Three phase machines are factory connected for
220 VAC, 3 Ø.
(3) It is important to note that SINGLE-PHASE motors
are more sensitive to overloading and voltage drop
than three phase motors.
Therefore never exceed maximum rated load, and
see to it that the 110/220 VAC power supply is always
available.
In case of difficulties have an electrician or qualified
person read voltage at motor terminal during lifting
operation. Especially for high lifting operations, which
require long cords, it is essential to use power cords
of sufficient size (see par. 3.2.3) to avoid excessive
voltage drop.
(4) WARNING: NEVER OPERATE THE HOIST
OR ANY OTHER ELECTRIC EQUIP-
MENT IN A POTENTIALLY EXPLOSIVE
ATMOSPHERE: around distilleries,
refineries, chemical plants, ship or
silo interiors.
Always obtain official approval before
commencing operations at these or similar loca-
tions.
3.2.3 Power Cords and Grounding
(1) To prevent voltage drop exceeding the allowable 10%
we recommend to use at least #10, STO type power
cords, 600 VAC rating.
To minimize voltage drop due to power cord length
on high lifts, select an outlet at the halfway point to
reduce the total power cord length on the job.
a strain relief fitting and
shackle (Fig. 7), so the
cord weight will be off the
connector.
(5) When finished for the day,
make certain the power
cord is disconnected at the
hoist pigtail as well as at the
main outlet.
(6) Be sure to ground all
electric equipment.
Do not use wire rope as
a ground!
Fig. 6 Strain Relief
Fitting
3.2.4 Hoist Control
Control (Fig. 7) is by
– push-buttons, which automatically return into
STOP-position, when not activated, and an
– EMERGENCY STOP button.
DO NOT fix push-buttons in run position.
Other possible control: pendant control (available on
request)
3.2.2 Fuses / Circuit breakers
If connected to a circuit protected by a fuse, use Time-
Delay-Fuse.
Check if specification of fuses, which pro-
tect electrical equipment, corresponds to the
amperage indicated on the machine nameplate. The
recommended service requirements per hoist are:
Single phase Three phase amps.
110 V 220 V 30
220 V – 20

10
Figure 8
Hoist mounting
tirak
™
X-series
Figure 9
Hoist mounting
tirak
™
T-series
90°
Anchor
pin
Figure 11 Dimensions of connecting parts
tirak
™
T-series
Stirrup
90°
Stirrup
adapter
NOTE: Any rigging ar-
rangement other
than described
in this manual is
entirely under the
rigger’s respon-
sibility.
For special projects like
shown in this figure contact
the supplier for additional
information.
Figure 12Special rigging arrangement
a
bb
Ø d
e
f
a1a3
Ø d
b
e
f
a3
a2
XE 301 P Anchor pin Ø:
0.63 in. / 16 mm
Anchor hole Ø:
0.65 in. / 16.5 mm
a = 1.1 in. / 28 mm
b = 0.55 in. / 14 mm
c = 0.47 in. / 12 mm
d = 0.51 in. / 13 mm
e = 1.36 in. / 32 mm
f = 1.02 in. / 26 mm
a1= 4.41 in. / 112 mm
a2= 3.94 in. / 100 mm
a3= 3.86 in. / 98 mm
b = 1.58 in. / 40 mm
c
c
b
XE 500/600/700/1000
series
3.3 Hoist Mounting
3.3.1 tirak™X-series
Bolt the hoist to platform stirrup using
stirrup adapter, which also holds
the hoist in its upright position (see
Figs. 8 and 10).
Use two 1/2 inch diameter grade 5 or
better bolts with locking nuts.
WARNING:
HOIST CONNECTION
BOLTS MUST NOT
BEAR ON THREADS.
3.3.2 tirak™T-series
Fix the hoist using its anchor pin
(see Fig. 9 and 11). Make sure that
the hoist is held in its upright position
by means of an appropriate support.
The anchoring device must attach to
the pin between the 2 cast ears “b”
of Fig. 11.
Figure 10Dimensions of connecting parts (stirrup adapter)
tirak
™
X-series
WARNING:
THE HOIST MUST BE MOUNTED SUCH
THAT THE WIRE ROPE PERPENDICU-
LARLY ENTERS THE HOIST.
(Figs. 8 and 9)
90°
XE 301 P

11
4. Wire Rope
4.1 Wire rope specification
Use only wire ropes specified by the manufacturer:
(1) Classification/Construction:
5x19, 4x26, or 5x26, with fiber core, or 6x19,
(min. 17 wires/strand), galvanized or black,
lubricated, preformed IPS or XIPS.
(2) Diameter:
4.2 Wire rope rigging instructions
WARNING:
Be sure to use a wire rope with the diam-
eter marked on the tirak™nameplate.
(1) RIG FROM TOP.
You should have enough wire rope to reach to the
ground or other safe level with about five feet (1.5 m)
extra for ensuring safety.
CAUTION:
Always unreel and reel the wire rope in a
straight line (Fig. 14) to prevent kinks,
which make it unusable for the hoist.
Figure 13 Checking Wire Rope Diameter “d”
Incorrect
CORRECT
Figure 14 Wire Rope Handling
d
Table 3: Wire rope diameter and min. breaking strength
wire
rope
diameter1)
min. actual
breaking
strength
for tirak™hoists
with
rated load up to
5/16 in.
8.4 mm
10,000 lbs
44.5 kN
1,500 lbs
680 kg
3/8 in.
9.5 mm
15,000 lbs
66.8 kN
2,200 lbs
1,000 kg
13/32 in.
10.2 mm
18,660 lbs
83.0 kN
1,850 lbs
840 kg
1) Maximum allowed tolerances of NEW wire rope diameter:
5/16 in. (8.4 mm) = 0.319 to 0.331 in. (8.1 to 8.4 mm)
3/8 in. (9.5 mm) = 0.362 to 0.374 in. (9.2 to 9.5 mm)
13/32 in. (10.2 mm) = 0.390 to 0.400 in. (9.9 to 10.2 mm)
CAUTION:
Correct wire rope diameter is very im-
portant for the tirak
™
function!
An oversized wire rope may cause a wire
rope jam inside the hoist and/or the BSO
or BS/BSO secondary brake to malfunc-
tion.
NOTE: How to measure wire rope diameter:
The correct diameter of the wire rope is the
largest cross-sectional measurement across
the strands (and not the valleys).
The measurement should be made carefully
with calipers as shown in Fig. 13.

12
4.2 Wire rope rigging instructions
(continued)
(2) If the wire rope is not equipped with a swaged fitting
as shown in Fig. 15, proceed as follows:
– Install heavy duty thimble with a minimum of three
(3) J-Type (Fist Grip) Clamps (Fig. 16).
– Apply first clamp approximately 7“ (18 cm) from thim-
ble. Tighten nuts moderately.
– Attach second clamp as close to thimble as possible.
Leave nuts loose.
– Attach the third clamp half-way between first and
second clamp, leaving the nuts loose. Take up wire
rope slack.
– Tighten nuts evenly on all clamps (approx. 30 ft-lbs.
torque) as specified by the clamp manufacturer.
WARNINGS
:
a) Retighten after the wire rope is
loaded for the first time
b) Inspect fastening periodically.
In use, wire ropes will stretch and reduce in
diameter.
Retighten all “Fist Grip” nuts periodically.
(3) Anchor the wire rope end to a rigging device, which
complies with all relevant safety requirements.
Be sure to use compatible connecting devices, e.
g. a 1/2 in. anchor shackle or similar with adequate
strength and safety factor. Secure it.
(4) Insure that the anchor points of the wire rope are
directly above the position of the hoists (Fig. 17).
max.
11/2dia.
dia.
4 in. (10 cm) Straight
Figure 18 Wire Rope Tip
Figure 17 Suspension Distance
Figure 16
Wire Rope Termination
by Fist Grip Clamps
Figure 15
Wire Rope Termination
by Swaged Fitting
Fist Grip Clamp
Heavy duty
thimble
Heavy duty thimble
Ferrule
(Sleeve)
a) Prepare ends by brazing or welding – make
sure all end wires are captured.
b) Grind end to approximately 1/4“ diameter.
DO NOT grind end flat or to a cone shape.
End must be rounded (Fig. 18).
c) The last 4 in. (10 cm) of wire rope must be
straight for proper reeving.
WARNING
:
Improper spacing is dangerous
and could cause failure
of the support system.
(5) Check that wire rope tip is welded round
(Fig. 18). IF NOT:
Same distance
X
Platform
Support
system
Hoist
X

13
tirak
™
tirak
™
X-series T-series
4.3 Wire rope reeving
(1) Open the BSO secondary brake by pushing down the
control lever (d1) until it locks (Fig. 19).
(2) Push the rope through the BSO secondary brake at
(A) into the hoist rope inlet (B).
Push it inside, and press UP-button, until the wire
rope reeves itself automatically and exits at (C) on
the other side (Fig. 20).
CAUTION:
Check that wire rope exit (C) is not blocked
in any manner.
Never load the wire rope exiting from (C).
Figure 21 Loop at Free Wire Rope End
Figure 20 Wire Rope Reeving
(A)
(B)
(C)
Entrance wire rope
Exit wire rope
Must not be loaded!
(B)
(C)
(A)
Figure 19 Opening of BSO Secondary Brake
Fist
Grip
Clamp
Bottom free end
of wire rope
(d1) OPEN
(d1) Closed
(C)
(A)
(C)
(B)
(3) After reeving through the hoist, be sure to loop
and clamp the free end of the wire rope, to prevent
the rope from inadvertently unreeving through the
hoist.
Always tie this loop, using a fist grip clamp, when
the platform is at ground level or other safe surface
(Fig. 21).
WARNING:
AT EVERY SET-UP OR RERIGGING check
the wire rope length to ensure that it
reaches the ground or other safe level
with about five feet (1.5 m) extra for
safety.

14
4.4 De-Rigging
(1) Before de-rigging each tirak™hoist must be
unloaded by bringing down the platform to a safe and
stable support.
(2) Remove the loop at the free wire rope end.
(3) Press DOWN button to let the wire rope run out.
(4) With gloved hands slowly pull the wire rope through
BSO secondary brake.
(5) Clean the wire rope, reel it (Fig. 22), and store it in
a clean and dry place.
Figure 22 Wire Rope Handling
5. Operating Instructions
Figure 23
BSO Secondary Brake
Check I
Wire rope loop
(d1) OPEN
(d1) Closed
Reset (d1) to the open position.
III During operation regularly check through the win-
dow (d3) that the centrifugal weights are rotating
(Fig. 24).
WARNING:
IF DURING ONE OF THE CHECKS THE
BSO SECONDARY BRAKE MALFUNC-
TIONS, IT MUST BE REPLACED.
EMERGENCY
STOP (d2)
Figure 24
BSO Secondary Brake
Checks II + III
EMERGENCY
STOP (d2)
(d1) Open
(d1) CLOSED
(d3) Window
5.1 GENERAL
(1) BE FAMILIAR with the equipment and its proper
care.
DO NOT operate hoist, if adjustment or repairs are
necessary, if any warning, operating or capacity
label normally attached to the hoist is obscured, dam-
aged, or missing. (See labels’ list on page 35).
REPORT same promptly to your supervisor and
also notify next operator, when changing shifts.
(2) WARNING: SAFETY DEMANDS
THAT YOU TEST THE SYSTEM
BEFORE GOING ALOFT:
a) CHECK PLATFORM fully rigged and loaded by
cycling UP and DOWN several times near ground
level or safe surface.
b) CHECK PRIMARY BRAKE for mechanical func-
tion: When stopping the hoist the load must be
held immediately.
c) CHECK BSO SECONDARY BRAKE:
IAt ground level first close the BSO secondary
brake by pushing EMERGENCY STOP button
(d2). Then push control lever (d1) in DOWN-
position and make the wire rope form a loop
between tirak™casing and BSO secondary brake
(Fig. 23). Open BSO secondary brake by pulling
down control lever (d1) until it locks in the open
position.
With gloved hands sharply pull wire rope in arrow
direction (Fig. 23) – the BSO secondary brake
should close immediately (Fig. 24). Reset BSO
secondary brake by pushing down control lever
(d1) until it locks in the open position.
II Lift platform 3 ft. (1 m) above ground or safe sur-
face, and push EMERGENCY STOP button (d2)
of the BSO secondary brake (Fig. 24).
Lower the platform to check that the BSO second-
ary brake holds the load. A loop should form as
shown in Fig. 23, which means the BSO secondary
brake is supporting the load.
Raise platform until the hoist supports the load.

15
Fig. 25 Typical Hoist Control
d) Ceck EMERGENCY STOP button and pushbut-ton
control (Fig. 25)
i) Check that the UP and DOWN pushbuttons
return to their normal open position when
released. They should move freely without
sticking.
ii) Push the red EMERGENCY STOP button.
It should lock and remain depressed. Now
try pushing the UP or DOWN pushbut-
ton – the motor should not turn.
Twist the EMERGENCY STOP button in the
arrow direction to disengage it – it should
pop out, and the hoist should now operate
normally.
Repeat this check a few times to check function
of pushbuttons and the EMERGENCY STOP.
The same procedure applies to hoists with pen-
dant control.
WARNING:
If the pushbuttons or EMERGENCY
STOP button do not function properly,
remove hoist from service until re-
paired by a qualified person.
5.2 Normal operation
(1) For UP and DOWNWARD MOTION of the platform
just press the corresponding button.
(2) When operating platform, take care to operate hoists
so that the platform stays level without tilting one end
more than the other.
(3) WARNINGS
a) DO NOT fix push-buttons in run position.
b) DO NOT operate the hoist, if it is function-
ing improperly, or damage is noted.
c) NEVER pick up a load beyond the rated
capacity appearing on the hoist.
d) STOP OPERATIONS IMMEDIATE-
LY, if at any time, when the hoist op-
erates, the wire rope does not move
(i.e. no UP or DOWN travel).
It is likely that damaged wire rope is jamming
the hoist. Continued operation might cause
wire rope failure or damage to the hoist.
CONTACT the SUPPLIER!
e) IN CASE OF AN INCIDENT involv-
ing injury, or property damage, con-
tact the supplier immediately.
DO NOT disturb, alter, or move any equip-
ment at the scene of the incident.
f) OPERATING IN EXPLOSIVE ATMOSPHERE:
Never operate hoist or any other electric
equipment in a potentially explosive at-
mosphere – such as around distilleries,
refineries, chemical plants, ship or silo
interiors. Always obtain official ap-
proval before commencing operations at
these or similar locations.
(4) Special Operating Notes for Welding or
Arc scarfing
– ALWAYS PROTECT your equipment and yourself
from the danger of arcing.
– BE SURE supporting equipment is grounded to
prevent arcing across wire rope to the structure.
– DO NOT use wire rope as a ground for welding.
– DO NOT allow your welding gun to contact wire
rope, hoist, or any other metal equipment or struc-
ture.
– PROTECT work area above and be-
low hoist with insulation.
Split a section of air rubber hose, and wrap around
wire ropes.
– Use an insulated thimble assembly to attach all
wire rope(s) to the suspension system.
e) CONTINUOUSLY CHECK rigging, lines, clear-
ances, and all other elements throughout the entire
time on the job.

16
A
Figure 26Brake Release
WARNING:
DURING USE OF THE HOIST NEVER
DETACH BSO SECONDARY BRAKE!
Figure 27 BSO Secondary Brake
(d1) Closed
(d1) OPEN
EMERGENCY
STOP (d2)
5.3 Emergency Descent
In case of emergency you can descend with the platform
without power proceeding as follows:
(1) Take the brake release lever (A) from the carrying
handle, and insert it through the motor fan cover
hole into the brake release bow. Lift in arrow direc-
tion (Fig. 26). The hoist begins to lower at moderate
speed, which is regulated by a mechanical centrifugal
brake.
(2) To STOP just release the lever.
(3) After use: restore brake release lever (A) into its
storage position.
CAUTION:
DO NOT USE EMERGENCY DESCENT
AS REGULAR TECHNIQUE TO LOW-
ER.
5.4 BSO Secondary Brake Action
(1) EMERGENCY STOP
Push EMERGENCY STOP button of the BSO Sec-
ondary brake, if – for whatever reason – you want
to absolutely stop downward travel of the platform.
(2) To reset BSO secondary brake:
Raise the platform until the hoist supports the
load.
Push the control lever in the OPEN position (d1) (Fig.
27). DO NOT force it open.
(3) If the BSO secondary brake has automatically
closed:
WARNING: STOP DOWNWARD TRAVEL!
YOU MAY HAVE RUN OFF THE WIRE
ROPE CAUSING OVERSPEED. WITH
EXTREME CAUTION TRY TO GO UP.
IF YOU CANNOT GO UP, A RESCUE IS RE-
QUIRED.
When the hoist supports the load, reset the BSO
secondary brake as described above.
CAUTION:
If the BSO secondary brake repeatedly
stops downward travel, contact the
supplier for advice. Check wire rope
diameter (see page 11).
NOTE: If during emergency descent the BSO
Secondary brake closes, you have to
wait for elctric power to go up.
The hoist must move up to get the BSO free.
Reset BSO by pushing down control lever (d1)
in open position (see Fig. 27).
DO NOT force it open!
If electric power is not available you have to
require help or a rescue!
WARNING:
If the BSO secondary brake stops down-
ward travel during emergency descent,
DO NOT DETACH BSO secondary
brake FROM HOIST!

17
6. TROUBLE SHOOTING
WARNINGS!
Avoid injuries:
1. Checks and repair of the electric equipment
must only be carried out by QUALIFIED
ELECTRICIANS!
Wiring diagrams are found in the control
box of the motor.
2. DO NOT OPEN ANY CONTROL BOX OR PEN-
DANT CONTROL WITH POWER SUPPLY TO
HOIST!
3. Any other repair should only be carried out by
the supplier (TRACTEL Group Company) or
by a qualified person, and only original spare
parts shall be used.
6.1 Wire Rope Drive Mechanism Troubles
Problem Cause Remedy
Wire rope does not move It is likely that damaged wire rope
through, i. e. no UP nor is jamming the hoist.
DOWN movement.
WARNING: STOP
OPERATIONS
IMMEDIATELY!
Continued operation might cause
wire rope failure.
Contact the supplier.
6.2 Motor Troubles
Problem Cause Remedy
1. Motor does not run a) Power failure a) Check fuses, power cords, connec-
at all. tions,and starting capacitor.
b) Incorrect wiring b) Compare wiring with wiring diagram.
c) On 3 phase motor: stop by the c) Check wiring.
phase control relay
2. Motor does not start a) Overload a) Check load and reduce, if necessary.
with a load.
b) Brake not released b) Check motor with brake released by hand.
Check brake according to para. 5.1 (2), page 14.
c) Voltage too low c) Check voltage when running the motor.
Use power cord(s) with higher cross section.
d) Incorrect wiring d) Compare wiring with wiring diagram.
3. Motor stalls Low voltage Check voltage when running the motor.
under load. Use power cord(s) with higher cross sections.
4. Overheating a) Insufficient cooling a) Clean motor fan cover.
when running
without load b) Incorrect wiring b) Compare wiring with wiring diagram.
c) Voltage too high c) Check voltage and no-load current.
d) Short circuit in the coil d) Contact the supplier.
5. Overheating a) Overload a) Check load and reduce if necessary.
b) High or low voltage b) Check current consumption, and´compare with motor
label specifications. Check current and voltage.
Check power cords
c) Starting capacitor c) Check current at the auxiliary winding in the control box,
still activated. when running the motor.
Centrifugal switch defect. For centrifugal switch repair contact the supplier.
d) Crooked motor shaft. d) Contact the supplier.
e) Brake not (correctly) released. e) Check brake according para. 6.3.
6. Abnormal motor noise a) Electric parts a) Causes/remedies see above 1. to 5.
(noise disappearing immediately, when stopping motor)
b) Mechanical parts b) Contact the supplier.
(noise continuous until hoist stands still)
6.3 Primary Brake Troubles
Problem Cause Remedy
Brake does not open a) Defective supply conductor, a) Have supply conductor, current passage in brake coil,
(lack of “click” switch noise, brake coil, rectifier. rectifier checked by an electrician or qualified person.
when starting/stopping the
hoist) b) Worn brake rotor b) Contact the supplier.

18
6.4 BSO Secondary Brake Troubles
If you cannot find a trouble’s cause, contact the supplier.
Problem Cause Remedy
1. Hoist goes up BSO secondary brake is closed:
WARNING: STOP DOWNWARD TRAVEL!
but not down. Primary wire rope has run out Proceed according para. 5.4, (3), page 16.
or has failed.
2. BSO secondary brake a) Mechanical defect. a) Contact the supplier.
automatically closes
without apparent reason. b) Oversized or damaged wire rope b) Check wire rope and replace, if necessary.
3. Secondary brake will not Frozen parts DO NOT USE the unit until the brake has thawed,
actuate manually. dried and is in proper condition. Thawing may be
accomplished by blowing ducted dry heat
(200 degrees F. max.) on the brake area.
DO NOT USE OPEN FLAME!
4. Centrifugal weights do not Dirty, corroded, or worn parts. Check operation through the sightglass. Do not use
turn or do not turn smoothly if operating improperly. Return unit to TRACTEL.
during operation.
7. INSPECTIONS and MAINTENANCE
NOTE: A maintenance program should start for
each hoist immediately after it is entered into
service.
This maintenance program should comply
with recommendations in the applicable parts and
Instruction Manual, and all pertinant Federal, State,
Provincial and Local regulations.
Regular inspections should be followed for
the life of the hoist and written inspection
records kept as specified.
7.1 Inspections
7.1.1 DAILY INSPECTIONS
EACH DAY PRIOR TO USE AND DURING OPERATION
CHECK:
(1) Primary brake function: “click” noise, when starting/
stopping the hoist.
(2) blocstop BSO secondary brake function.
IAt ground level first close the BSO secondary
brake by pushing EMERGENCY STOP button
(d2). Then push Control lever (d1) in DOWN-
position and make the wire rope form a loop
between tirak™ casing and BSO secondary brake
(Fig. 28). Open BSO secondary brake by pulling
down control lever (d1) until it locks in the open
position.
With gloved hands sharply pull wire rope in ar-
row direction (Fig. 28) – the BSO secondary
brake should close immediately (Fig. 29).
Reset BSO secondary brake by pushing
down control lever (d1) until it locks in the open
position.
Figure 28
BSO Secondary Brake
Check I
Wire rope loop
(d1) Closed
(d1) OPEN
EMERGENCY
STOP (d2)

19
II Lift platform 3 ft. (1 m) above ground or safe
surface, and push EMERGENCY STOP but-
ton (d2) of the BSO secondary brake (Fig.
29). Lower the platform to check that
the BSO secondary brake holds the load.
Raise platform until the hoist supports the load.
Reset (d1) to the open position.
III During operation regularly check through the win-
dow (d3) that the centrifugal weights are rotating
(Fig. 29).
(3) Wire rope: free of kinks, cuts, broken wires, bird-
cages, heat damage, contamination etc.
(4) Wire rope corrosion due to acid or caustics. Replace
wire rope if exposed to these contaminants.
(5) Wire rope lubrication: The wire rope has to be clean
and lightly lubricated.
(6) Rigging
Wire rope termination, connection to the suspension
system. It must be aligned and secure.
(7) Check for parts damage.
WARNING: If there is any:
STOP working, unless the damaged
part(s) is (are) replaced.
(8) Safety harness(es), lifeline(s), fall arrester(s)
and lanyard(s) must be used at all times in accord-
ance with the requirements of OSHA regulations and
state, provincial or local codes.
Figure 29
BSO Secondary Brake
Check II + III
(d1) Open
EMERGENCY
STOP (d2)
(d1) CLOSED
(d3) Window
7.1.2 MONTHLY INSPECTIONS
(1) All items under daily inspection.
(2) Wire Rope Inspection
All wire rope should be inspected once a month, and a
signed and dated inspection record maintained.
The inspection check list at back of this manual can be
used to record these inspections.
WIRE ROPE SHOULD BE REPLACED, IF ANY OF THE
FOLLOWING CONDITIONS ARE NOTED:
Conditions for replacing wire rope:
– Broken wires or strands.
– Excessive corrosion.
– Heat damage, evident through discolored wires.
– Reduction from nominal diameter of more than
5 %.
– Kinking, crushing, birdcaging, or any other distortion
of the wire rope structure (Fig. 30).
NOTE: How to measure wire rope diameter:
The correct diameter of the wire rope is the
largest cross-sectional measurement across the
strands (and not the valleys).
The measurement should be made carefully
with calipers as shown in Fig. 31.
Figure 30Examples of wire rope damage
WARNING: REPLACEMENT WIRE ROPE MUST BE
SAME SIZE, GRADE, AND CONSTRUC-
TION AS THE WIRE ROPE SPECIFIED
BY THE SUPPLIER! (See pages 7, 11)
THE SUPPLIER DECLINES ALL RESPONSIBILITY FOR
MACHINES USED WITH A WIRE ROPE OTHER THAN
SPECIFIED BY HIM.
Birdcaged wire rope
Crushed wire rope
Wire rope
bent over sharp edge
causing a kink
Loop formation on wire rope
d
“Pig-tail” curl in wire rope
Figure 31Checking Wire Rope Diameter “d”

20
7.1.3 Inspection, Maintenance & Testing
tirak™ hoists and blocstop™ BSO secondary brake shall
be returned to an Authorized Tractel Repair Center for
periodic maintenance after every job and at least after
250 hours of operation.
In any case, periodic maintenance must occur every 12
months/1 year from date of being put into service or 12
months/1 year from the date of the prior inspection.
tirak™ hoists and blocstop™ BSO secondary brake must
be inspected more frequently and at least every 6 months
if subjected to harsh or dirty environments or freezing
conditions, or immediately if they fail any operation or
inspection on job site.
In the event of an overspeed triggering of the blocstop™
BSO secondary brake during operation, damages to an-
choring devices, wire rope and blocstop™ BSO secondary
Continue with chapters
8. NAMEPLATE & LABELS
and
9. WARRANTY INFORMATION
10. ADDITIONAL SOURCES AND
TRAINING
on pages 34 to 36
brake are possible, and the blocstop™ BSO secondary
brake must be immediately inspected by an Authorized
Repair Center.
A signed and dated inspection record should
be maintained for each tirak™ hoist and each
blocstop™ BSO secondary brake device.
If a gearbox oil change is necessary, take one of the
below specified oils according to the temperature range,
the hoist usually will be used in.
Quantities required:
XE 300 P-Series: 1.4 litres
XE 500/600/700/1020/1030 P-Series: 2.0 litres
TE 1020 P-Series: 2.0 litres
7.2 Maintenance
7.2.1 tirak™ Hoist
(1) Daily check the primary and BSO secondary brake.
(2) Daily check for visible part damage.
(3) Keep wire ropes clean and lightly lubricated to prevent
abnormal wear of the wire rope driving mechanism.
7.2.2 Wire Ropes
(1) Use only wire ropes, which meet the manufacturers
specifications. For details see pages 7 and 11.
This will ensure the reliable function of the hoist.
(2) To warrant maximum lifetime we recommend:
– The wire rope must be unreeled and reeled in a
straight line.
– Keep wire ropes clean.
– Lubricate wire ropes regularly with a rag soaked
with oil.
– Never let the wire ropes rub against sharp edg-
es.
– Always see that the wire rope outlet is not
obstructed.
– Let the free wire rope end untwist to prevent
wire rope from making loops.
– If the wire rope changes direction, it should be
guided by sheaves or rollers to avoid damage.
7.2.3 blocstop™BSO Secondary Brake
Besides the daily checks, keep all wire ropes clean
and lightly lubricated.
Temperature 14 to 122 degF -5 to 176 degF -31 to 104 degF
range -10 to +50 °C -15 to +80 °C -35 to +40 °C
Mineral oils
3) Synthetic oils
3)
API Specification SAE85W-140 GL5 1) CLPPG or PGLP ISO VG 460 2) CLPPG or PGLP ISO VG 100
Sample oils BP Hypogear EP 90 Klübersynth GH6 460 Klübersynth GH6 100
SHELL Spirax HD 90
TEXACO Multigear EP6 S80 W90
1) Standard charge for XE 300/500/700 P and TE 1020 P series
(Marking: Socket head cap oil drain screw, Fig. 32)
2) Standard charge for XE 1020 P
(Marking: Yellow hexagon oil drain screw, Fig. 32)
3) Changing between mineral and synthetic oils requires
complete cleaning of the gearbox parts.
Oil drain screw as oil specification indicator
Mineral oil
Synthetc oil
Figure 32
NOTE: DO NOT use other oils
without written authorization
from the manufacturer or the supplier.
This manual suits for next models
11
Table of contents
Other Tractel Industrial Equipment manuals
Popular Industrial Equipment manuals by other brands

Sumitomo Drive Technologies
Sumitomo Drive Technologies PARAMAX SFC operating manual

Stahls
Stahls Thermo-GRIP Instructions for using

SCHUNK
SCHUNK LPE 100 Assembly and operating manual

Johnson Controls
Johnson Controls S300 Series Hardware installation manual

SAF
SAF BUFFALO 400 DC Safety instruction for use and maintenance

Hyden
Hyden ENVIROSPRAY manual