OM 3530 RC DIGITAL CLOCK
IMPOSTAZIONE ALLARMI
Questo apparecchio è in grado di gestire due allarmi contem-
poraneamente.
1. Premere il tasto ALM(15) per entrare in modalità Allarme 1.
Sul display apparirà la scritta “A1”;
2. Tenere premuto per 3 secondi il tasto ALM(15) per impostare
l’allarme;
3. Premere i tasti UP(17) o DOWN(16) per impostare l’ora;
4. Premere il tasto ALM(15) per passare alla regolazione dei
minuti, utilizzare i tasti UP(17) o DOWN(16) per impostarli;
5. Premere il tasto ALM(15) per passare alla regolazione dello
Snooze, utilizzare i tasti UP(17) o DOWN(16) per impostare
dopo quanti minuti l’allarme deve riattivarsi (1-59 minuti);
6. Premere il tasto ALM(15) per terminare l’impostazione e
attivare l’allarme.
- Per impostare l’Allarme 2, premere due volte il tasto ALM(15)
e seguire i punti da 2 a 6.
ATTIVAZIONE/DISATTIVAZIONE ALLARME
ATTIVAZIONE
• Nella normale visualizzazione, premere una volta il tasto
MODE/SET(18) per attivare l’Allarme 1, l’icona
4. Press the MODE button to exit, or wait 20 seconds without pressing buttons to return to the
normal time display.
Re: 8 languages of weekday: ENG> RUS> DAM> ESP> NET>ITA >FRA> GER. Spanish
>Danish>Russian.
SUN MON TUE WED THU FRI SAT
German,
SON MON DIE MIT DON FRE SAM
French,
DIM LUN MAR MER JEU VEN SAM
DOM LUN MAR MIE JUE VIE SAB
Danish,
SON MAN TIR ONS TOR FRE LOR
Russian,
BCK NHA BTP CPA YTB NTH CBT
Press the MODE button to exit, or wait 20 seconds without pressing buttons to return to the
normal time display.
FAHRENHEIT/CELSIUS
Press the DOWN button once to select Fahrenheit or Celsius temperature readings.
ACTIVATE/DEACTIVATE TIME ALARM
Press the MODE button to turn on, turn off and select alarm time.
Once on, the bell icon appears. Once off, the bell icon will disappear.
ALARM AND SNOOZE SET
Press the ALM button once to enter Alarm Mode, and select needed set alarm. Then the
bell icon will show in the display.
1. Hold the ALM button for 3 seconds to enter alarm time set mode.
2. Press the DOWN/UP buttons to adjust values.
3. Press the ALM button to confirm and move to SNOOZE mode.
4. The Snooze time can be set from 1 minute to 60 minutes, the default time is 5 minutes.
Alarm Time setting order: 1. Hours, 2. Minutes, 3. Snooze
SNOOZE (SILENCES ALARM TEMPORARILY)
appare
sul display.
• Nella normale visualizzazione, premere due volte il tasto
MODE/SET(18) per attivare l’Allarme 2, l’icona
4. Press the MODE button to exit, or wait 20 seconds without pressing buttons to return to the
normal time display.
Re: 8 languages of weekday: ENG> RUS> DAM> ESP> NET>ITA >FRA> GER. Spanish
>Danish>Russian.
SUN MON TUE WED THU FRI SAT
German,
SON MON DIE MIT DON FRE SAM
French,
DIM LUN MAR MER JEU VEN SAM
DOM LUN MAR MIE JUE VIE SAB
Danish,
SON MAN TIR ONS TOR FRE LOR
Russian,
BCK NHA BTP CPA YTB NTH CBT
Press the MODE button to exit, or wait 20 seconds without pressing buttons to return to the
normal time display.
FAHRENHEIT/CELSIUS
Press the DOWN button once to select Fahrenheit or Celsius temperature readings.
ACTIVATE/DEACTIVATE TIME ALARM
Press the MODE button to turn on, turn off and select alarm time.
Once on, the bell icon appears. Once off, the bell icon will disappear.
ALARM AND SNOOZE SET
Press the ALM button once to enter Alarm Mode, and select needed set alarm. Then the
bell icon will show in the display.
1. Hold the ALM button for 3 seconds to enter alarm time set mode.
2. Press the DOWN/UP buttons to adjust values.
3. Press the ALM button to confirm and move to SNOOZE mode.
4. The Snooze time can be set from 1 minute to 60 minutes, the default time is 5 minutes.
Alarm Time setting order: 1. Hours, 2. Minutes, 3. Snooze
SNOOZE (SILENCES ALARM TEMPORARILY)
appare
sul display.
• Nellanormalevisualizzazione, premere tre volteil tasto MODE/
SET(18) per attivare entrambi gli Allarmi 1 e 2, le icone
4. Press the MODE button to exit, or wait 20 seconds without pressing buttons to return to the
normal time display.
Re: 8 languages of weekday: ENG> RUS> DAM> ESP> NET>ITA >FRA> GER. Spanish
>Danish>Russian.
SUN MON TUE WED THU FRI SAT
German,
SON MON DIE MIT DON FRE SAM
French,
DIM LUN MAR MER JEU VEN SAM
DOM LUN MAR MIE JUE VIE SAB
Danish,
SON MAN TIR ONS TOR FRE LOR
Russian,
BCK NHA BTP CPA YTB NTH CBT
Press the MODE button to exit, or wait 20 seconds without pressing buttons to return to the
normal time display.
FAHRENHEIT/CELSIUS
Press the DOWN button once to select Fahrenheit or Celsius temperature readings.
ACTIVATE/DEACTIVATE TIME ALARM
Press the MODE button to turn on, turn off and select alarm time.
Once on, the bell icon appears. Once off, the bell icon will disappear.
ALARM AND SNOOZE SET
Press the ALM button once to enter Alarm Mode, and select needed set alarm. Then the
bell icon will show in the display.
1. Hold the ALM button for 3 seconds to enter alarm time set mode.
2. Press the DOWN/UP buttons to adjust values.
3. Press the ALM button to confirm and move to SNOOZE mode.
4. The Snooze time can be set from 1 minute to 60 minutes, the default time is 5 minutes.
Alarm Time setting order: 1. Hours, 2. Minutes, 3. Snooze
SNOOZE (SILENCES ALARM TEMPORARILY)
e
4. Press the MODE button to exit, or wait 20 seconds without pressing buttons to return to the
normal time display.
Re: 8 languages of weekday: ENG> RUS> DAM> ESP> NET>ITA >FRA> GER. Spanish
>Danish>Russian.
SUN MON TUE WED THU FRI SAT
German,
SON MON DIE MIT DON FRE SAM
French,
DIM LUN MAR MER JEU VEN SAM
DOM LUN MAR MIE JUE VIE SAB
Danish,
SON MAN TIR ONS TOR FRE LOR
Russian,
BCK NHA BTP CPA YTB NTH CBT
Press the MODE button to exit, or wait 20 seconds without pressing buttons to return to the
normal time display.
FAHRENHEIT/CELSIUS
Press the DOWN button once to select Fahrenheit or Celsius temperature readings.
ACTIVATE/DEACTIVATE TIME ALARM
Press the MODE button to turn on, turn off and select alarm time.
Once on, the bell icon appears. Once off, the bell icon will disappear.
ALARM AND SNOOZE SET
Press the ALM button once to enter Alarm Mode, and select needed set alarm. Then the
bell icon will show in the display.
1. Hold the ALM button for 3 seconds to enter alarm time set mode.
2. Press the DOWN/UP buttons to adjust values.
3. Press the ALM button to confirm and move to SNOOZE mode.
4. The Snooze time can be set from 1 minute to 60 minutes, the default time is 5 minutes.
Alarm Time setting order: 1. Hours, 2. Minutes, 3. Snooze
SNOOZE (SILENCES ALARM TEMPORARILY)
appaiono sul display.
DISATTIVAZIONE
• Nella normale visualizzazione, premere quattro volte il tasto
MODE/SET(18) per disattivare tutti gli allarmi, le icone
4. Press the MODE button to exit, or wait 20 seconds without pressing buttons to return to the
normal time display.
Re: 8 languages of weekday: ENG> RUS> DAM> ESP> NET>ITA >FRA> GER. Spanish
>Danish>Russian.
SUN MON TUE WED THU FRI SAT
German,
SON MON DIE MIT DON FRE SAM
French,
DIM LUN MAR MER JEU VEN SAM
DOM LUN MAR MIE JUE VIE SAB
Danish,
SON MAN TIR ONS TOR FRE LOR
Russian,
BCK NHA BTP CPA YTB NTH CBT
Press the MODE button to exit, or wait 20 seconds without pressing buttons to return to the
normal time display.
FAHRENHEIT/CELSIUS
Press the DOWN button once to select Fahrenheit or Celsius temperature readings.
ACTIVATE/DEACTIVATE TIME ALARM
Press the MODE button to turn on, turn off and select alarm time.
Once on, the bell icon appears. Once off, the bell icon will disappear.
ALARM AND SNOOZE SET
Press the ALM button once to enter Alarm Mode, and select needed set alarm. Then the
bell icon will show in the display.
1. Hold the ALM button for 3 seconds to enter alarm time set mode.
2. Press the DOWN/UP buttons to adjust values.
3. Press the ALM button to confirm and move to SNOOZE mode.
4. The Snooze time can be set from 1 minute to 60 minutes, the default time is 5 minutes.
Alarm Time setting order: 1. Hours, 2. Minutes, 3. Snooze
SNOOZE (SILENCES ALARM TEMPORARILY)
e
4. Press the MODE button to exit, or wait 20 seconds without pressing buttons to return to the
normal time display.
Re: 8 languages of weekday: ENG> RUS> DAM> ESP> NET>ITA >FRA> GER. Spanish
>Danish>Russian.
SUN MON TUE WED THU FRI SAT
German,
SON MON DIE MIT DON FRE SAM
French,
DIM LUN MAR MER JEU VEN SAM
DOM LUN MAR MIE JUE VIE SAB
Danish,
SON MAN TIR ONS TOR FRE LOR
Russian,
BCK NHA BTP CPA YTB NTH CBT
Press the MODE button to exit, or wait 20 seconds without pressing buttons to return to the
normal time display.
FAHRENHEIT/CELSIUS
Press the DOWN button once to select Fahrenheit or Celsius temperature readings.
ACTIVATE/DEACTIVATE TIME ALARM
Press the MODE button to turn on, turn off and select alarm time.
Once on, the bell icon appears. Once off, the bell icon will disappear.
ALARM AND SNOOZE SET
Press the ALM button once to enter Alarm Mode, and select needed set alarm. Then the
bell icon will show in the display.
1. Hold the ALM button for 3 seconds to enter alarm time set mode.
2. Press the DOWN/UP buttons to adjust values.
3. Press the ALM button to confirm and move to SNOOZE mode.
4. The Snooze time can be set from 1 minute to 60 minutes, the default time is 5 minutes.
Alarm Time setting order: 1. Hours, 2. Minutes, 3. Snooze
SNOOZE (SILENCES ALARM TEMPORARILY)
non saranno più presenti sul display.
FUNZIONE SNOOZE (ARRESTO TEMPORANEO
ALLARME)
• Èpossibileimpostarel’intervallodiripetizioneda1a59minuti.
• Quando l’allarme suona e l’icona
4. Press the MODE button to exit, or wait 20 seconds without pressing buttons to return to the
normal time display.
Re: 8 languages of weekday: ENG> RUS> DAM> ESP> NET>ITA >FRA> GER. Spanish
>Danish>Russian.
SUN MON TUE WED THU FRI SAT
German,
SON MON DIE MIT DON FRE SAM
French,
DIM LUN MAR MER JEU VEN SAM
DOM LUN MAR MIE JUE VIE SAB
Danish,
SON MAN TIR ONS TOR FRE LOR
Russian,
BCK NHA BTP CPA YTB NTH CBT
Press the MODE button to exit, or wait 20 seconds without pressing buttons to return to the
normal time display.
FAHRENHEIT/CELSIUS
Press the DOWN button once to select Fahrenheit or Celsius temperature readings.
ACTIVATE/DEACTIVATE TIME ALARM
Press the MODE button to turn on, turn off and select alarm time.
Once on, the bell icon appears. Once off, the bell icon will disappear.
ALARM AND SNOOZE SET
Press the ALM button once to enter Alarm Mode, and select needed set alarm. Then the
bell icon will show in the display.
1. Hold the ALM button for 3 seconds to enter alarm time set mode.
2. Press the DOWN/UP buttons to adjust values.
3. Press the ALM button to confirm and move to SNOOZE mode.
4. The Snooze time can be set from 1 minute to 60 minutes, the default time is 5 minutes.
Alarm Time setting order: 1. Hours, 2. Minutes, 3. Snooze
SNOOZE (SILENCES ALARM TEMPORARILY)
o
4. Press the MODE button to exit, or wait 20 seconds without pressing buttons to return to the
normal time display.
Re: 8 languages of weekday: ENG> RUS> DAM> ESP> NET>ITA >FRA> GER. Spanish
>Danish>Russian.
SUN MON TUE WED THU FRI SAT
German,
SON MON DIE MIT DON FRE SAM
French,
DIM LUN MAR MER JEU VEN SAM
DOM LUN MAR MIE JUE VIE SAB
Danish,
SON MAN TIR ONS TOR FRE LOR
Russian,
BCK NHA BTP CPA YTB NTH CBT
Press the MODE button to exit, or wait 20 seconds without pressing buttons to return to the
normal time display.
FAHRENHEIT/CELSIUS
Press the DOWN button once to select Fahrenheit or Celsius temperature readings.
ACTIVATE/DEACTIVATE TIME ALARM
Press the MODE button to turn on, turn off and select alarm time.
Once on, the bell icon appears. Once off, the bell icon will disappear.
ALARM AND SNOOZE SET
Press the ALM button once to enter Alarm Mode, and select needed set alarm. Then the
bell icon will show in the display.
1. Hold the ALM button for 3 seconds to enter alarm time set mode.
2. Press the DOWN/UP buttons to adjust values.
3. Press the ALM button to confirm and move to SNOOZE mode.
4. The Snooze time can be set from 1 minute to 60 minutes, the default time is 5 minutes.
Alarm Time setting order: 1. Hours, 2. Minutes, 3. Snooze
SNOOZE (SILENCES ALARM TEMPORARILY)
lampeggia,
premere il tasto SNOOZE(14) per attivare la modalità Snooze.
L’icona
•When alarm sounds, press the SNOOZE button to silence the alarm for 5 minutes.
The alarm icon will flash.
•In snooze mode, press any button to stop alarm for one day.
Note: The alarm will sound for 2 minutes and then shut off completely.
LOW BATTERY ICONS
When the letters is unclearly displayed, replace batteries in the clock.
RECEPTION CHECK
The Temperature Station will receive the temperature data within 15 minutes. If the temperature
data is not being received 15 minutes after setting up (the display shows “- - -”), then please
check the following points:
1. The distance of the Temperature Station or transmitter should be at least 1.5 to 2 meters away
from any interfering sources such as computer monitors or TV sets.
3. Avoid placing the receiver onto or in the immediate proximity of metal window frames.
4. Using other electrical products such as headphones or speakers operating on the same signal
frequency 433 MHz may prevent correct signal transmission and reception.
5. Neighbors using electrical devices operating on the 433MHz signal frequency can also cause
interference.
Note: When the 433.92MHz signal is received correctly, do not re-open the battery cover of
either the transmitter or Temperature Station, as the batteries may spring free from the
contacts and force a false reset. Should this happen accidentally then reset all units
(see Setting up above) otherwise transmission problems may occur.
The transmission range is around 25-30m from the transmitter to the Temperature station (in
open space). However, this depends on the surrounding environment and interference levels. If
no reception is possible despite the observation of these factors, all system units have to be
reset.
Temperature Transmitter
The temperature is measured and transmitted to the Temperature Station approximately every 50
seconds.
The range of the Temperature Transmitter may be affected by the temperature. At cold
temperatures the transmitting distance may be decreased. Please bear this in mind when
positioning the transmitter. Also the batteries may be reduced in power.
Maximum transmit power 10dBm
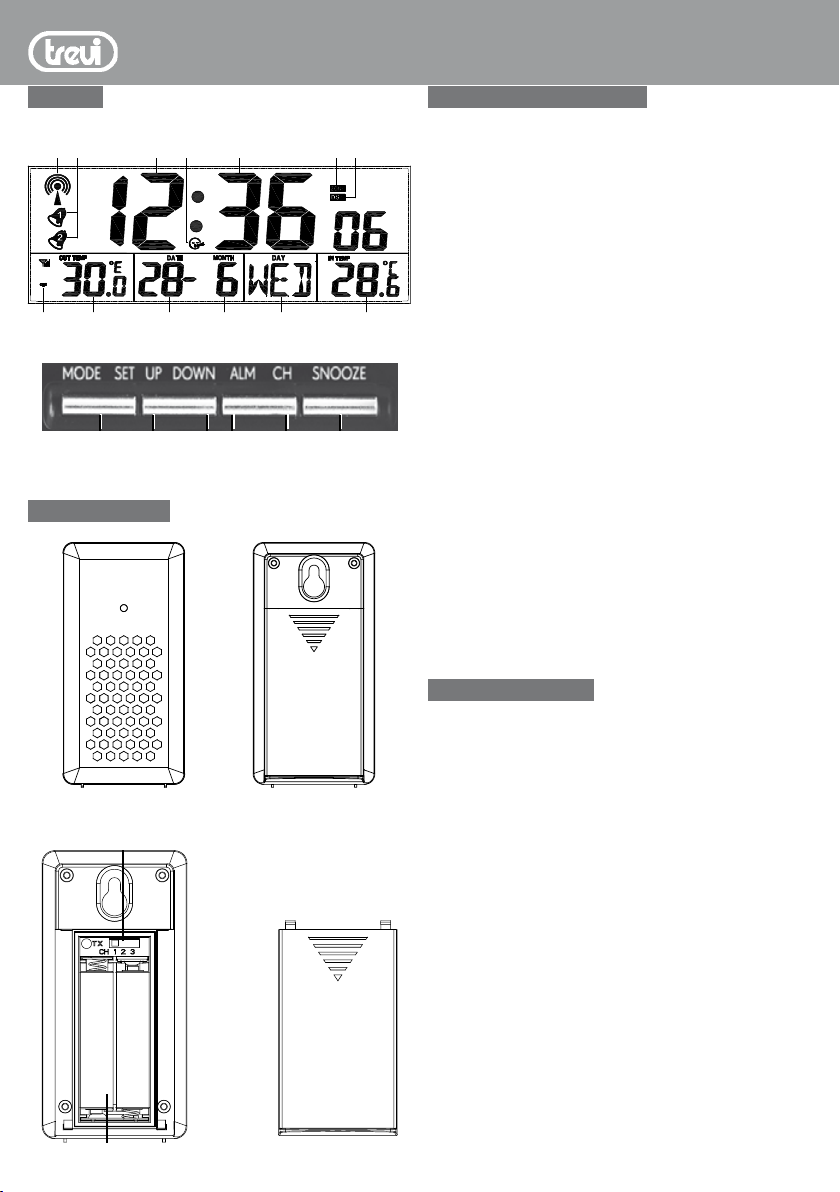
Positioning the outdoor Temperature Transmitter
The Temperature Transmitter is supplied with a holder that may be attached to a wall.
It also could be placed on the table. To attach to the wall, please follow the steps
below:
Mark the wall using a pen through the holes in the holder to obtain the exact drilling
position. Drill holes in the wall at the points marked.
Screw holder onto wall.
The mounting surface can, however, affect the transmission range. If for example the
unit is attached to a piece of metal, it may then either reduce or increase the transmitting range.
For this reason, we recommend not placing the unit on any metal surfaces or in any position
where a large metal or highly polished surface is in the immediate proximity (garage doors,
double glazing, etc.). Before securing in place, please ensure that the Temperature Station can
receive the 433 MHz signal from the Temperature Transmitter at the positions that you wish to
situate them. The Temperature Transmitter simply clicks in or out of the holder. When inserting or
removing the Temperature Transmitter to or from the wall holder please hold both units securely.
RED STATEMENT
(4)appariràlampeggiantesuldisplay. L’allarme
riprenderà a suonare in base ai minuti d’intervallo impostati.
- Se non viene premuto nessun tasto, l’allarme suonerà per
1 minuto.
• In modalità Snooze, premere un tasto qualsiasi per interrom-
pere l’allarme per l’intero giorno. Riprenderà a suonare all’ora
impostata.
CARATTERISTICHE TECNICHE
Alimentazione: ....................................................
batterie 3x“AAA”, 1,5V per l’unità principale
batterie 2x“AAA”, 1,5V per sensore esterno
Range temperatura interna: .................................
0°C ~ +50°C (+32°F~+122°F)
Range temperatura sensore esterno: ...................
-20°C ~ +70°C (-4°F~+158°F)
Canali: ................................................................
max. 3 sensori remoti
Trasmissione: .....................................................
fino a 30m all’aperto, RF 433 MHz
Dimensioni:.........................................................
370x 160x 23mm
INFORMAZIONI AGLI UTENTI ai sensi del Decreto
Legislativo N° 49 del 14 Marzo 2014 “Attuazione della Diret-
tiva 2012/19/UE sui rifiuti di apparecchiature elettriche ed
elettroniche (RAEE)”
Il simbolo del cassonetto barrato riportato sull’apparecchiatura
indica che il prodotto alla fine della propria vita utile deve essere
raccolto separatamente dagli altri rifiuti. L’utente dovrà, pertanto,
conferire l’apparecchiatura integra dei componenti essenziali
giunta a fine vita agli idonei centri di raccolta differenziata dei
rifiuti elettronici ed elettrotecnici, oppure riconsegnarla al riven-
ditore al momento dell’acquisto di nuova apparecchiatura di
tipo equivalente, in ragione di uno a uno, oppure 1 a zero per le
apparecchiatureaventilatomaggioreinferiorea25cm.L’adeguata
raccolta differenziata per l’avvio successivo dell’apparecchiatura
dimessa al riciclaggio, al trattamento e allo smaltimento ambien-
tale compatibile contribuisce ad evitare possibili effetti negativi
sull’ambiente e sulla salute e favorisce il riciclo dei materiali
di cui è composta l’apparecchiatura. Lo smaltimento abusivo
del prodotto da parte dell’utente comporta l’applicazione delle
sanzioni amministrative di cui al D.Lgs n. Decreto Legislativo N°
49 del 14 Marzo 2014.
ITALIANO