Trevi OM 3340 D User manual

1
OM 3340 D DIGITAL WALL CLOCK
1. Tasto HR / MONTH
2. Tasto MIN / DATE
3. Tasto 12/24HR / YEAR
4. Tasto °C / °F
5. Selettore LOCK / TIME SET / CALENDAR
6. Tasto RESET, ripristino delle condizioni iniziali
7. Tasto WAVE, avvio ricezione radio controllo
8. Vano batterie
9. Piedistallo
10.Foroperafssioneamuro
11. Indicazione WAVE OK, aggancio segnale radio controllo
12.Simboloradiocontrollo
ALIMENTAZIONE
1. Aprireilvanobatterie(8)postosulretro.
2. Inserire3batterieformato“C”rispettandolepolaritàindicate.
Nota: Rimuovere le batterie se non utilizzate l’apparecchio per un lungo
periodo di tempo. Sostituire le batterie quando i numeri del display
diventano meno leggibili.
VISUALIZZAZIONE ORARIO TRAMITE RADIO
CONTROLLO
Questoapparecchioèdotatodiunricevitoreingradodiricevereil
segnaleorariodelPhysikalischTechnischeBundesanstaltBraun-
schweig(Germaniacentrale)ricevibileinunraggiodi1500Km.
All’inserimentodellebatteriesiattiveràautomaticamentelaricezio-
nedelsegnale,ilsimbolodelradiocontrollo(12)lampeggeràed
entro24oreverràvisualizzatoilsegnaleorariodelradiocontrollo
el’indicazioneWAVEOK(11)suldisplay.
Nelcasosiabbialanecessitàdiriavviarelaricezionedelsegnale,
premereiltastoWAVE(7).
REGOLAZIONE MANUALE DELL’OROLOGIO
1. PortareilselettoreLOCK/TIMESET/CALENDAR(5)sulla
posizione TIME SET.
2. PremereiltastoHR(1)perimpostarel’ora.
3. PremereiltastoMIN(2)perimpostareiminuti.
4. Premereiltasto12/24HR(3)perimpostarelavisualizzazione
nelformato12o24ore.
5. PortareilselettoreLOCK/TIMESET/CALENDAR(5)sulla
posizione LOCK.
REGOLAZIONE MANUALE DEL CALENDARIO
1. PortareilselettoreLOCK/TIMESET/CALENDAR(5)sulla
posizione CALENDAR.
2. PremereiltastoMONTH(1)perimpostareilmese.
3. PremereiltastoDATE(2)perimpostareilgiorno.
4. PremereiltastoYEAR(3)perimpostarel’anno.
5. PortareilselettoreLOCK/TIMESET/CALENDAR(5)sulla
posizione LOCK.
SELEZIONE GRADI CELSIUS - FAHRENHEIT
1. Premereripetutamenteiltasto°C/°F(4)pervisualizzarela
temperaturaingradiCelsius(°C)oFahrenheit(°F).
INSTALLAZIONE A MURO
Questoorologioèprogettatoperessereappesoamuro(10).
Per ottenere la massima leggibilità del display appendetelo
almenoa2metridialtezzainmododaformareunangolodi
circa70°conl’occhio.
CARATTERISTICHE TECNICHE
Alimentazione: ...................3batterieformato“C”
Dimensioni:........................420x270x45mm
GARANZIA
1. L’apparecchioègarantitoper24mesidalladatadifabbricazione
indicatasull’etichettaapplicatasulprodotto.
2. Lagaranziasiapplicasoloadapparecchi,nonmanomessi,
riparati da centri assistenza TREVI, essa comprende la
riparazionedeicomponentiperdifettidifabbricazionecon
l’esclusionedietichette,manopoleepartiasportabili.
3. TREVI non risponde di danni direttio indiretti a cose o/e persone
causatidall’usoosospensioned’usodell’apparecchio.
Avvertenze per il corretto smaltimento del prodotto.
Ilsimboloriportatosull’apparecchiaturaindicacheilriutodeve
essereoggettodi“raccoltaseparata”pertantoilprodottonon
deveesseresmaltitoinsiemeairiutiurbani.
L’utentedovràconsegnareilprodottopressogliappositi“centri
di raccolta differenziata” predisposti dalle amministrazioni
comunali,oppureconsegnarloalrivenditorecontroacquistodi
unnuovoprodotto.
Laraccoltadifferenziatadelriutoelesuccessiveoperazionidi
trattamento,recuperoesmaltimentofavorisconolaproduzione
di apparecchiature con materiali riciclati e limitano gli effetti
negativi sull’ambiente e sulla salute causati da una gestione
impropriadelriuto.
Losmaltimentoabusivodelprodottocomportal’applicazionedi
sanzioniamministrative.
ITALIANO
1.
.9
2.
3.
6.
.8
.7
.5
.4
.10
.11
.12

OM 3340 D DIGITAL WALL CLOCK
2
1.
.9
2.
3.
6.
.8
.7
.5
.4
.10
.11
.12
ENGLISH
1. KeyHR/MONTH
2. KeyMIN/DATE
3. Key12/24HR/YEAR
4. Key°C/°F
5. Selector LOCK / TIME SET / CALENDAR
6. KeyRESET,restoreinitialconditions
7. KeyWAVE,radiocontrolLauncher
8. Batterycompartment
9. Pedestal
10.Holeforwalldisplay
11.WAVEOKdisplay,linktosignalofradiocontrol
12.Radiocontrolsymbol
POWER SUPPLY
1. Openthebatterycompartment(8)ontheback.
2. Insert3“C”sizebatteriesrespectingthepolarities.
Note: remove the batteries if you do not use the appliance for an extended
period of time. Replace the batteries when the display numbers become
less readable.
TIME DISPLAY VIA RADIO CONTROL
Thisapplianceisequippedwithareceivercapableofreceiving
thetimesignalofthePhysikalischTechnischeBundesanstalt
Braunschweig(centralGermany)admissiblewithina1500Km.
Wheninsertingthebatterieswillautomaticallysignalreception,
theradiocontrolsymbol(12)willblinkandwithin24hoursyou
willreceivethetimesignaloftheradiocontrolandWAVEOK
(11)willbeonthedisplay.
Incaseofneedingtorestartsignalreception,presstheWAVE(7).
MANUAL CLOCK ADJUSTMENT
1. SettheselectorswitchLOCK/TIMESET/CALENDAR(5)in
TIME SET position.
2. PresstheHRbutton(1)tosetthehour.
3. PresstheMINbutton(2)tosettheminutes.
4. Pressthe12/24HRbutton(3)tosetthedisplayin12or24
hourformat.
5. SettheselectorswitchLOCK/TIMESET/CALENDAR(5)in
LOCK position.
MANUAL CALENDAR ADJUSTMENT
1. SettheselectorswitchLOCK/TIMESET/CALENDAR(5)in
CALENDAR position.
2. PresstheMONTHbutton(1)tosetthemonth.
3. PresstheDATEbutton(2)tosettheday.
4. PresstheYEARbutton(3)tosettheyear.
5. SettheselectorswitchLOCK/TIMESET/CALENDAR(5)in
LOCK position.
SELECT DEGREES CELSIUS-FAHRENHEIT
1. Pressthe°C/°Fbutton(4)todisplaythetemperaturein
degreesCelsius(°C)orFahrenheit(°F).
WALL INSTALLATION
Thisclockisdesignedtobehungonthewall(10).
Formaximumlegibilityofdisplayhangitatleastto2metersin
heighttoformanangleofabout70°withtheeye.
TECHNICAL SPECIFICATION
PowerSupply:....................3“C”sizebatteries
Dimensions:.......................420x270x45mm
WARRANTY
1. Thisunitisguaranteedforaperiodof24monthsfromthe
dateofproductionprintedontheproductitselforonlabelon
product.
2. Thewarrantyisvalidonlyiftheunithasnotbeentampered
with.ThewarrantyisvalidonlyatauthorizedTREVIassistance
centres, that will repair manufacturing defects, excluded
replacementoflabelsandremovableparts.
3. TREVIisnotliablefordamagetopeopleorthingscaused
bytheuseofthisunitorbytheinterruptionintheuseofthis
unit.
Precautions for correct disposal of the product.
Thesymbolshownontheequipmentindicatesthatwastemust
bedisposedofin“separatecollection”andsotheproductmust
notbedisposedoftogetherwithurbanwaste.
The user must take the product to special “separate waste
collectioncentres”providedbylocalgovernment,ordeliveritto
theretaileragainstthepurchaseofanewproduct.
Separatecollectionofwasteandsubsequenttreatment,recycling
anddisposaloperationspromotestheproductionofequipmentwith
recycledmaterialsandlimitsnegativeeffectsontheenvironment
andonhealthcausedbyimproperhandlingofwaste.
Illegaldisposaloftheproductleadstotheenforcementofad-
ministrativepenalties.

3
OM 3340 D DIGITAL WALL CLOCK
1.
.9
2.
3.
6.
.8
.7
.5
.4
.10
.11
.12
FRANÇAISE
1. BoutonHR/MONTH
2. BoutonMIN/DATE
3. Bouton12/24HR/YEAR
4. Bouton°C/°F
5. SélecteurLOCK/TIMESET/CALENDAR
6. BoutonRESET,restaurerlesconditionsinitiales
7. BoutonWAVE,radiocommandeLauncher
8. Compartimentàpiles
9. Piédestal
10.Troupourafchagemural
11.AfchageWAVEOK,lienverslesignaldecommanderadio
12.Symboledecontrôleradio
ALIMENTATION
1. Ouvrezlecompartimentàpiles(8)surledos.
2. Insérer 3 « C » piles en respectant les polarités.
Remarque : Retirez les piles si vous n’utilisez pas l’appareil pendant une
période prolongée de temps. Remplacer les piles lorsque les chiffres de
l’afchage devient moins lisibles.
AFFICHAGE DE L’HEURE VIA LA RADIOCOMMANDE
Cetappareilestéquipéd’unrécepteurcapablederecevoirlesignal
horairedelaPhysikalischTechnischeBundesanstaltBraunschweig
(Centredel’Allemagne)admissibledansun1500km.
Lorsdel’insertiondespilessignaleraautomatiquementlarécep-
tion,lesymboledecontrôleradio(12)semetàclignoteretdans
les24heures,vousrecevrezlesignalhorairedelaradiocommande
etWAVEOK(11)seramissurl’afchage.
Danslecasd’avoirbesoinderedémarrerlaréceptiondusignal,
appuyezsurleWAVE(7).
RÉGLAGE MANUELLE DE L’HORLOGE
1. RéglerlesélecteursélecteurLOCK/TIMESET/CALENDAR
(5) en position de TIME SET.
2. AppuyezsurleboutonHR(1)pourréglerl’heure.
3. AppuyezsurlaboutonMIN(2)pourréglerlesminutes.
4. Appuyezsurlabouton12/24HR(3)pourdénirl’afchage
enformat12ou24heures.
5. RéglerlesélecteursélecteurLOCK/TIMESET/CALENDAR
(5) en position de LOCK.
RÉGLAGE MANUEL DU CALENDRIER
1. RéglerlesélecteursélecteurLOCK/TIMESET/CALENDAR
(5) en position de CALENDAR.
2. AppuyezsurlaboutonMONTH(1)pourréglerlemois.
3. AppuyezsurlaboutonDATE(2)pourréglerlejour.
4. AppuyezsurleboutonYEAR(3)pourréglerl’année.
5. RéglerlesélecteursélecteurLOCK/TIMESET/CALENDAR
(5) en position de LOCK.
SÉLECTIONNEZ DEGRÉS CELSIUS-FAHRENHEIT
1. Appuyezsurlatouche°C/°F(4)pourafcherlatempérature
endegrésCelsius(°C)ouFahrenheit(°F).
INSTALLATION MURALE
Cettehorlogeestconçuepourêtreaccrochéaumur(10).
Pourunelisibilitémaximaled’afchageAccrochez-leaumoinsà2
mètresdehauteurpourformerunangled’environ70°avecleœil.
SPÉCIFICATION TECHNIQUE
Blocd’alimentation:............3 piles « C »
Dimensions:.......................420x270x45mm
GARANTIE
1. L’appareilestgarantipendantunepériodede24moisdela
datedefabricationindiquéesurl’étiquettesetrouvantsurle
produit.
2. Lagarantien’estappliquéequesurlesappareilsnonaltérés,
ayantétéréparéschezunServiceAprès-VenteTREVI.Elle
comprendlaréparationdescomposantesàlasuitededéfauts
defabrication,àl’exclusiond’étiquettes,boutonsderéglage
etpartiesamovibles.
3. TREVInerépondpasdesdommagesdirectsouindirectsaux
choseset/ouauxpersonnesentraînéspendantl’usageoula
suspensiond’usagedel’appareil.
Recommandations pour l’élimination correcte du produit.
Lesymbolegurantsurl’appareilindiquequeleproduitfaitl’objet
d’une“collecteséparée“.C’estpourquoi,leproduitnedoitpas
êtreéliminéaveclesdéchetsurbains.
L’utilisateur doit remettre le produit auprès de “ décharges
spécialisées de collecte séparée “ prévues par les autorités
locales,oubienlerendreaurevendeurquandilachèteraun
nouvelappareiléquivalent.
Lacollecteséparéeduproduitetlesopérationssuccessives
detraitement,recyclageetéliminationfavorisentlaproduction
d’appareils composés par des matériaux recyclés ainsi que
permettentd’éviterdeseffetsnégatifssurl’environnementetsur
lasantédespersonnessuiteàunegestionimpropredudéchet.
Toute élimination abusive du produit entraîne l’application de
sanctionsadministratives.

OM 3340 D DIGITAL WALL CLOCK
4
1.
.9
2.
3.
6.
.8
.7
.5
.4
.10
.11
.12
DEUTSCH
1. Taste HR / MONTH
2. Taste MIN / DATE
3. Taste 12/24HR / YEAR
4. Taste °C / °F
5. SelektorLOCK/TIMESET/CALENDAR
6. TasteRESET,WiederherstellenderAnfangsbedingungen
7. TasteWAVE,FunkfernsteuerungLauncher
8. Batteriefach
9. Sockel
10.LochfürWand-display
11.WAVEOK-Display,LinkzumsignalisierenderFunkfernsteue-
rung
12.Radio-Steuerelement-symbol
NETZTEIL
1. ÖffnenSiedasBatteriefach(8)aufderRückseite.
2. LegenSie3“C”BatterienunterBeachtungderPolaritäten.
Hinweis: Entfernen Sie die Batterien, wenn Sie das Gerät längere Zeit
nicht verwenden. Ersetzen Sie die Batterien, wenn die Anzeige zahlen
weniger lesbar werden.
ZEITANZEIGE ÜBER FUNKFERNSTEUERUNG
DiesesGerätverfügtübereinenReceiverempfangendasZeitsignal
vonderPhysikalischTechnischenBundesanstaltBraunschweig
(Mitteldeutschland)innerhalbeiner1500kmzulässig.
BeimEinlegenderBatterienautomatischEmpfangsignalwird,
blinktdasRadio-Steuerelement-Symbol(12)undinnerhalbvon
24StundenerhaltenSiedasZeitsignaldesRadio-Steuerelements
undWAVEOK(11)werdenaufdemDisplay.
ImFallebenötigen,Signalempfangneuzustarten,drückenSie
die WAVE (7).
MANUELLE ZEITGEBERJUSTIERUNG
1. SatzderSelectorswitchLOCK/TIMESET/CALENDAR(5)
TIME SET-Position.
2. DrückenSiedieTasteHR(1)umdieStundeeinzustellen.
3. DrückenSiedieTasteMIN(2),umdieMinuteneinzustellen.
4. DrückenSiedieTaste12/24HR(3)legendieim12-oder
24-Stunden-Format.
5. SatzderSelectorswitchLOCK/TIMESET/CALENDAR(5)
LOCK-Position.
MANUELLE EINSTELLUNG DES KALENDERS
1. SatzderSelectorswitchLOCK/TIMESET/CALENDAR(5)
CALENDAR-Position.
2. DrückenSiedieTasteMONTH(1)Monatsfestgelegt.
3. DrückenSiedieTasteDATE(2)denTagein.
4. DrückenSiedieTasteYEAR(3)umdasJahreinzustelle.
5. SatzderSelectorswitchLOCK/TIMESET/CALENDAR(5)
LOCK-Position.
WÄHLEN SIE GRAD CELSIUS-FAHRENHEI
1. DrückenSiedieTaste°C/°F(4),umdieTemperaturinGrad
Celsius(°C)oderFahrenheit(°F)angezeigt.
WANDMONTAGE
DieseUhrsollanderWand(10)aufgehängtwerden.
FürmaximaleLesbarkeitdesDisplayhängenSieesmindestensauf
2MeterHöheaufeinenWinkelvonetwa70°mitdemAugebilden.
TECHNISCHE SPEZIFIKATION
Netzteil:..............................3“C”Batterien
Abmessungen:................... 420x270x45mm
GARANTIEBESTIMMUNGEN
1. DasGeräthateineGarantievon24MonatenabdemHerstel-
lungsdatum.DasHerstellungsdatumistaufderamProdukt
angebrachtenEtiketteangegeben.
2. Die Garantie gilt nur für Geräte, an denen nicht selbst
ausgeführteReparaturenerfolgtsind,sonderndievonTREVI-
Kundendienststellendurchgeführtwurden.DieGarantieumfaßt
dieReparaturvonBauteilen,wenndieseaufHerstellungsfehler
zurückzuführen sind. Die Garantie gilt hingegen nicht für
Etiketten,Drucktasten,KnöpfeundentfernbareTeile.
3. TREVIhaftetnichtfürdirekteoderindirekteSach-und/oder
Personenschäden,dievomGebrauchdesGerätesverursacht
wordensind.
Hinweise zur ordnungsgemäßen Entsorgung des Produkts.
DasaufdemGerätangebrachteSymbolweistdaraufhin,dass
dasAltgerät“getrenntzusammeln”istunddasProduktdaher
nichtzusammenmitdemGemeindeabfallentsorgtwerdendarf.
DerBenutzermussdasProduktzudenentsprechenden,vonder
Gemeindeverwaltung eingerichteten “Wertstoffsammelstellen”
bringen oder dem Händler beim Kauf eines neuen Produkts
übergeben.
DiegetrennteMüllsammlungundanschließendeAufbereitung,
WiederverwertungundEntsorgungförderndieHerstellungvon
GerätenunterVerwendungwiederverwerteterMaterialien und
vermindern die negativen Auswirkungen auf die Umwelt und
GesundheitinFolgeeinerfalschenMüllverwaltung.
DiewiderrechtlicheEntsorgungdesProduktsführtzurAuferlegung
vonVerwaltungsstrafen.

5
OM 3340 D DIGITAL WALL CLOCK
1.
.9
2.
3.
6.
.8
.7
.5
.4
.10
.11
.12
ESPAÑOL
1. BotónHR/MONTH
2. BotónMIN/DATE
3. Botón12/24HR/YEAR
4. Botón°C/°F
5. Selector LOCK / TIME SET / CALENDAR
6. BotónRESET,restablecerlascondicionesiniciales
7. BotónWAVE,Lanzadorderadiocontrol
8. Compartimentodelabatería
9. Pedestal
10.Agujeroparalaexhibicióndepared
11.ExhibicióndeWAVEOK,enlacealaseñalderadiocontrol
12.Símbolodelcontrolderadio
ALIMENTACIÓN
1. Abraelcompartimentodelabatería(8)enlaparteposterior.
2. Inserte3“C”pilasrespetandolaspolaridades.
Nota: Extraiga las pilas Si no usa el aparato por un período prolongado
de tiempo. Reemplace las pilas cuando los números de la pantalla se
convierten menos legibles.
VISUALIZACIÓN DE LA HORA MEDIANTE RADIO
CONTROL
Esteaparatoestáequipadoconunreceptorcapazderecibirla
señaldelPhysikalischTechnischeBundesanstaltBraunschweig
(Alemaniacentral)admisiblesdentrodeun1500Km.
Al colocar las pilas automáticamente señalará la recepción,
empezaráaparpadearelsímbolodecontrolderadio(12)yen
24horasrecibirálaseñaldecontrolporradioyWAVEOK(11)
estará en la pantalla.
Encasodenecesitarreiniciarlarecepcióndelaseñal,presione
el WAVE (7).
AJUSTE MANUAL DEL RELOJ
1. ColoqueelselectorselectorLOCK/TIMESET/CALENDAR
(5)enposicióndeTIMESET.
2. PresioneelbotónHR(1)paraajustarlahora.
3. PresioneelbotónMIN(2)paraajustarlosminutos.
4. Presioneelbotón12/24HR(3)paraajustarlavisualización
enformatode12ó24horas.
5. ColoqueelselectorselectorLOCK/TIMESET/CALENDAR
(5)enposicióndeLOCK.
AJUSTE MANUAL DEL CALENDARIO
1. ColoqueelselectorselectorLOCK/TIMESET/CALENDAR
(5)enposicióndeCALENDAR.
2. PresioneelbotónMONTH(1)paraestablecerelmes.
3. PresioneelbotónDATE(2)paraprogramareldía.
4. PresioneelbotónYEAR(3)paraajustarelaño.
5. ColoqueelselectorselectorLOCK/TIMESET/CALENDAR
(5)enposicióndeLOCK.
SELECCIONE GRADOS CENTÍGRADOS A FAHRENHEIT
1. Presioneelbotón°C/°F(4)paraindicarlatemperaturaen
gradosCelsius(°C)oFahrenheit(°F).
INSTALACIÓN DE PARED
Esterelojestádiseñadoparasercolgadoenlapared(10).
Paralalegibilidaddepantallacolgaralmenosa2metrosde
alturaparaformarunángulodeaproximadamente70°conelojo.
ESPECIFICACIÓN TÉCNICA
Fuentedealimen:...............3pilastamaño“C”
Dimensiones:.....................420x270x45mm
GARANTIA
1. Elaparatotieneunagarantíade24mesesapartirdelafecha
defabricaciónindicadaenlatarjetasobreelproducto.
2. La garantía está aplicada solamente a los productos no
desarreglados y reparados por los centros de asistencia
TREVI. Además, la garantía incluye la reparación de los
componentesacausade defectos de fabricación, con la
exclusióndeetiquetas,botonesypartesremovibles.
3. TREVInoesresponsablepordañosdirectosoindirectosa
cosasy/opersonascausadosporelusoosuspensióndel
usodelaparato.
Advertencias para la correcta eliminación del producto.
Elsímboloqueapareceenelaparatoindicaqueelresiduodebe
serobjetode“recogidaselectiva”portantoelproductonose
debeeliminarjuntoconresiduosurbanos.
Elusuariodeberáentregarelproductoalos“centrosderecogida
selectiva”creadosporlasadministracionesmunicipalesobien
aldistribuidorcuandoadquieraunnuevoproducto.
Larecogidaselectivadelresiduoylassucesivasoperacionesde
tratamiento,recuperaciónyeliminaciónfavorecenlafabricación
de aparatos con materiales reciclados y limitan los efectos
negativosenelmedioambienteylasaludcausadosporuna
gestiónincorrectadelresiduo.
Laeliminaciónabusivadelproductodalugaralaaplicaciónde
sancionesadministrativas.

OM 3340 D DIGITAL WALL CLOCK
6
PORTUGUÊSE
1. BotãoHR/MONTH
2. BotãoMIN/DATE
3. Botão12/24HR/YEAR
4. Botão°C/°F
5. Seletor LOCK / TIME SET / CALENDAR
6. BotãoRESET,restaurarascondiçõesiniciais
7. BotãoWAVE,controlederádioLauncher
8. Compartimentodaspilhas
9. Pedestal
10.Furoparaodisplaydeparede
11.ExposiçãodeWAVEOK,linkparaosinaldecontrolederádio
12.Símbolodocontrolederádio
ALIMENTAÇÃO
1. Abraocompartimentodaspilhas(8)napartedetrás.
2. Pilhas3“C”tamanhorespeitandoaspolaridades.
Nota: Remova as pilhas se você não usar o aparelho por um período
prolongado de tempo. Substitua as pilhas quando os exibir números
tornam-se menos legíveis.
EXIBIÇÃO DE TEMPO ATRAVÉS DO CONTROLE DE
RÁDIO
Esteaparelhoestáequipadocomumreceptorcapazdereceber
o sinal do tempo do Physikalisch Technische Bundesanstalt
Braunschweig(Alemanha)admissíveisdentroum1500Km.
Aoinserirasbateriasautomaticamenteseráosinalderecepção,
osímbolodocontrolederádio(12)piscaráedentrode24horas
vocêreceberáosinaldetempodocontrolederádioeWAVE
OK (11) no visor.
Em caso de necessidade de reiniciar a recepção do sinal,
pressione o WAVE (7).
AJUSTE MANUAL DO RELÓGIO
1. ConjuntooseletorswitchLOCK/TIMESET/CALENDAR(5)
naposiçãodeTIMESET.
2. PressioneobotãodeHR(1)paraajustarahora.
3. PressioneobotãoMIN(2)paraajustarlosminutos.
4. Pressioneobotão12/24HR(3)paraconguraravisualização
noformatode12ou24horas.
5. ConjuntooseletorswitchLOCK/TIMESET/CALENDAR(5)
naposiçãodeTIMESET.
AJUSTE MANUAL DO CALENDÁRIO
1. ConjuntooseletorswitchLOCK/TIMESET/CALENDAR(5)
naposiçãodeCALENDAR.
2. PressioneobotãoMONTH(1)paraajustaromês.
3. PressioneobotãoDATE(2)paraajustarodia.
4. PressioneobotãoYEAR(3)paradeniroano.
5. ConjuntooseletorswitchLOCK/TIMESET/CALENDAR(5)
naposiçãodeLOCK.
SELECIONE GRAUS CELSIUS-FAHRENHEIT
1. Pressioneobotão°C/°F(4)paraexibiratemperaturaem
grausCelsius(°C)ouFahrenheit(°F).
INSTALAÇÃO DE PAREDE
Esterelógiofoiprojetadoparaserpenduradonaparede(10).
Paramáximalegibilidadedaexposiçãopendurá-lopelomenos
a2metrosdealturaparaformarumângulodecercade70°
comoolho.
ESPECIFICAÇÃO TÉCNICA
Fontedealimentação: ........3pilhasdetamanho“C”
Dimensões:........................420x270x45mm
GARANTIA
1. Oaparelhotemumagarantiade24mesesapartirdadata
defabricaçãoindicadanaetiquetaqueconstanoproduto.
2. Somente aparelhos não violados, e que foram reparados
peloCentrodeAssistênciaTREVIincluem-senestagarantia.
Estacompreendeareparaçãodoscomponentesemcasode
defeitosdefabricaçãocomaexclusãodeetiquetas,botões
epartesquepodemserextraídas.
3. ATREVInãoconsidera-seresponsávelpordanosdirectos
ouindirectos,causadospelousooususpensãodousodo
aparelho,àobjectose/oupessoas.
Advertências para a correcta demolição do produto.
Osímboloindicadonaaparelhagemindicaqueoresíduodeve
serobjectode“recolhaseparada”portantooprodutonãodeve
serdesmanteladojuntodosresíduosurbanos.
Outilizadordeveráentregaroprodutonosapropriados“centros
de recolha diferenciada” predispostos pelas administrações
comunais,ouentregá-loaorevendedoremtrocadeumacompra
deumnovoproduto.
Arecolhadiferenciadadoresíduoeassucessivasoperações
de tratamento, recuperação e desmantelamento favorecem a
produçãodeaparelhagenscommateriaisrecicladoselimitam
osefeitosnegativosnoambienteenasaúdecausadosporuma
gestãoimprópriadoresíduo.
Odesmantelamentoabusivodoprodutocomportaaaplicação
desançõesadministrativas.
1.
.9
2.
3.
6.
.8
.7
.5
.4
.10
.11
.12

7
OM 3340 D DIGITAL WALL CLOCK ΕΛΛΗΝΙΚΆ
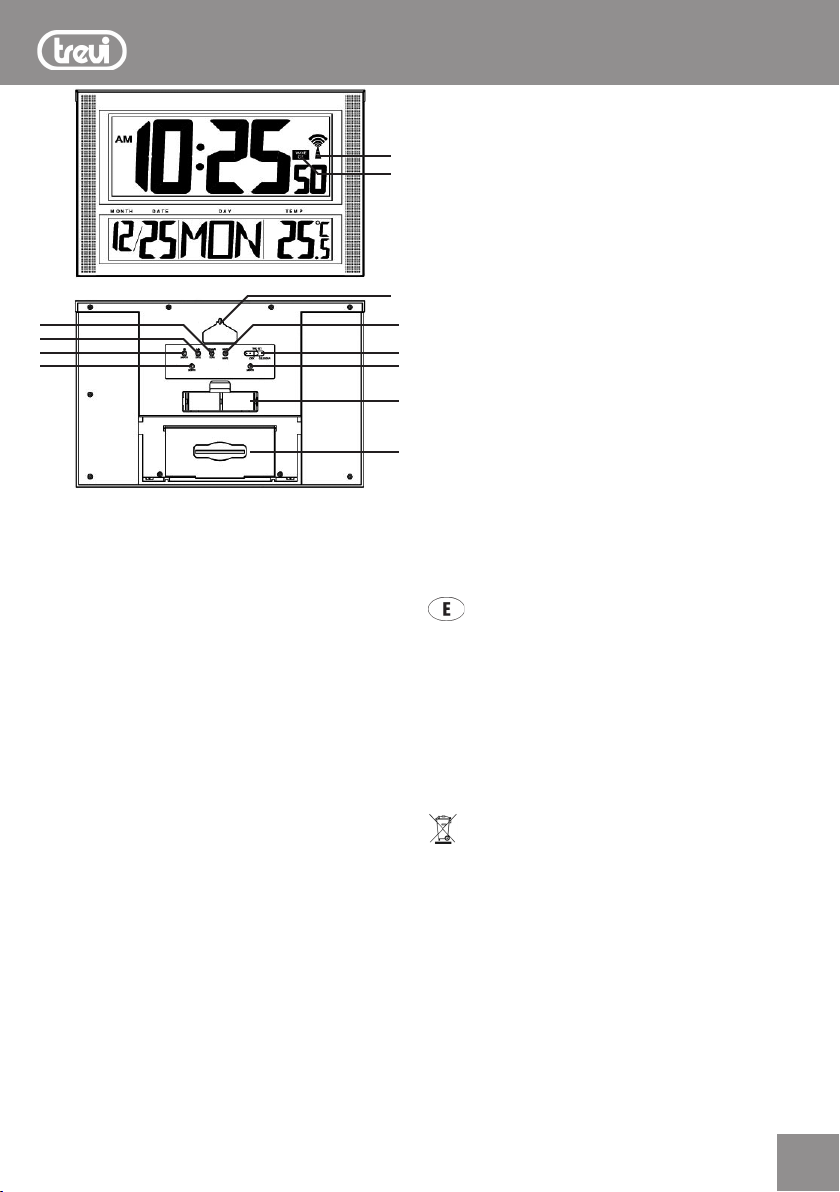
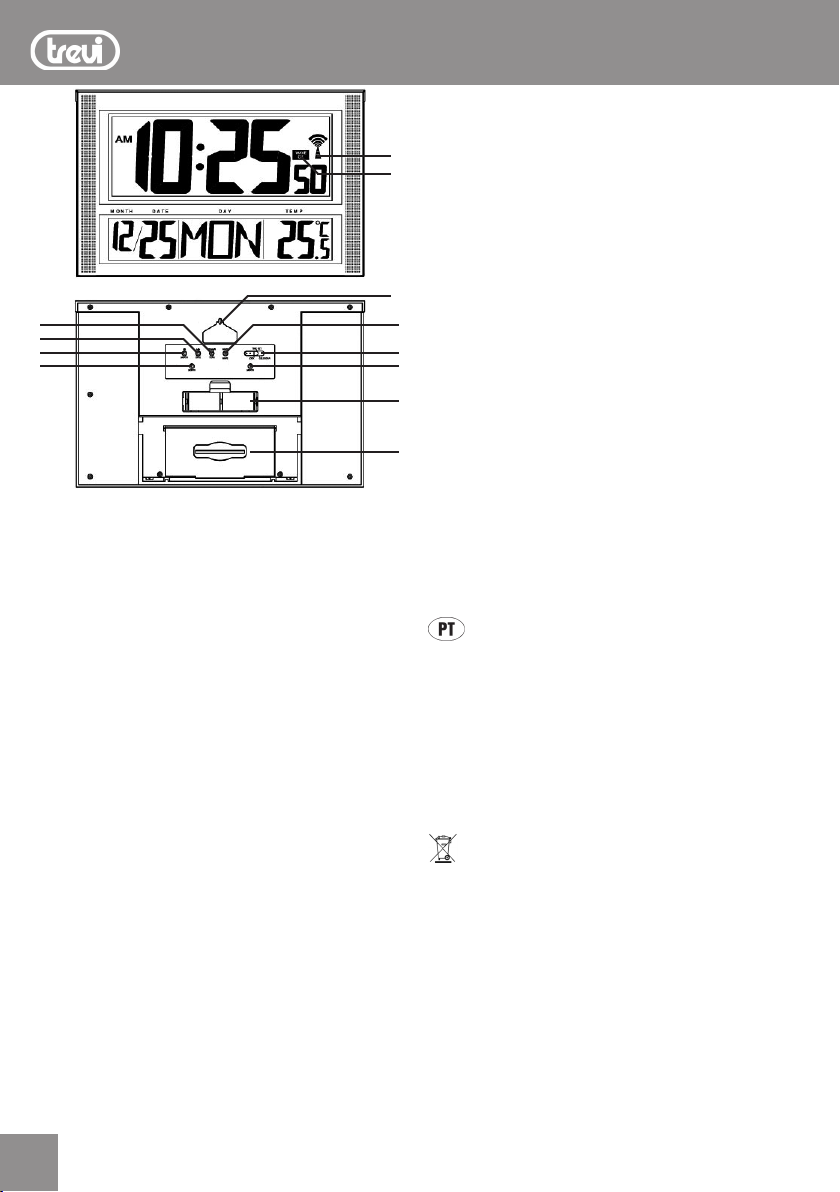
1. ΚλειδίHR/MONTH
2. ΚλειδίMIN/DATE
3. Κλειδί12/24HR/YEAR
4. Κλειδί°C/°F
5. ΕπιλογέαςLOCK/TIMESET/CALENDAR
6. ΚλειδίRESET,επαναφέρετετιςαρχικέςσυνθήκες
7. ΚλειδίWAVE,τηλεκατευθύνσειςεκτοξευτή
8. ΜΠαταριών
9. Βάθρο
10.Τρύπαγιαεπίδειξηςτοίχων
11.WAVE OK οθόνη, σύνδεση με το σήμα ελέγχου
ραδιόφωνο
12.Σύμβολοελέγχουραδιόφωνο
ΠΑΡΟΧΉ ΗΛΕΚΤΡΙΚΟΎ ΡΕΎΜΑΤΟΣ
1. Τηθήκημπαταριών(8)στοπίσωμέρος.
2. Εισάγετε 3 “C” μπαταρίες μεγέθους που σέβεται την
πόλωση.
Σημείωση:αφαιρέστετιςμπαταρίεςεάνδενχρησιμοποιείτετη
συσκευήγιαέναμεγάλοχρονικόδιάστημα.Αντικαταστήστετις
μπαταρίεςότανοιαριθμοίοθόνηγίνονταιλιγότεροευανάγνωστο.
ΕΜΦΆΝΙΣΗ ΏΡΑΣ ΜΈΣΩ ΤΗΛΕΚΑΤΕΥΘΎΝΣΕΙΣ
Αυτήησυσκευήείναιεξοπλισμένημεέναδέκτηπουείναι
σεθέσηναλαμβάνειτοσήματουχρόνουτουτοPhysika-
lisch Technische Bundesanstalt Braunschweig (κεντρική
Γερμανία)παραδεκτήκατάένα1500km.
Όταντηντοποθέτησητωνµπαταριώνθασηματοδοτήσει
αυτόματατηνυποδοχή,τοσύμβολοελέγχουραδιόφωνο
(12)θααναβοσβήνεικαιεντός24ωρώνθαλάβετετοχρόνο
μετοσήματουστοιχείουελέγχουραδιόφωνοκαιWAVEOK
(11)θαείναιστηνοθόνη.
Στην περίπτωση της χρειάζονται επανεκκίνηση λήψη
σημάτων,πατήστεWAVE(7).
ΠΡΟΣΑΡΜΟΓΉ ΡΟΛΌΙ ΕΓΧΕΙΡΊΔΙΟ
1. Σύνολο τον επιλογέα διακόπτη LOCK / TIME SET /
CALENDAR(5)σεθέσηTIMESET.
2. ΠατήστετοκουμπίHR(1),ναρυθμίσετετηνώρα.
3. Πατήστε το κουμπί MIN (2), ώστε να τα συνοπτικά
πρακτικά.
4. Πατήστετοκουμπί12/24HR(3)γιαναρυθμίσετετην
εμφάνισησε12ή24ωρημορφή.
5. Σύνολο τον επιλογέα διακόπτη LOCK / TIME SET /
CALENDAR(5)σεθέσηLOCK.
ΧΕΙΡΟΚΊΝΗΤΗ ΡΎΘΜΙΣΗ ΤΟΥ ΗΜΕΡΟΛΟΓΊΟΥ
1. Σύνολο τον επιλογέα διακόπτη LOCK / TIME SET /
CALENDAR(5)σεθέσηCALENDAR.
2. ΠιέστετοπλήκτροΜONTH(1)γιαναορίσετετομήνα.
3. ΠιέστετοπλήκτροDATE(2)γιαναορίσετετηνημέρα.
4. ΠιέστετοκουμπίYEAR(3)γιαναορίσετετοέτος.
5. Σύνολο τον επιλογέα διακόπτη LOCK / TIME SET /
CALENDAR(5)σεθέσηLOCK.
ΕΠΙΛΈΞΤΕ ΒΑΘΜΟΎΣ ΚΕΛΣΊΟΥ ΦΑΡΕΝΆΙΤ
1. Πατήστε το κουμπί °C / °F (4) για να εμφανίσετε τη
θερμοκρασία σε βαθμούς Κελσίου (°C) ή Fahrenheit
(°F).
ΕΓΚΑΤΆΣΤΑΣΗ ΤΟΊΧΟ
Αυτότορολόιέχεισχεδιαστείγιανακρεμαστείστοντοίχο(10).
Γιαμέγιστηευανάγνωστηοθόνηκρεμάστετουλάχιστονσε2
μέτρασεύψος,νασχηματίζειγωνίαπερίπου70°μετομάτι.
ΤΕΧΝΙΚΉ ΠΡΟΔΙΑΓΡΑΦΉ
Παροχήηλεκτρικούρεύματος: 3“C”μπαταρίεςμεγέθους
Διαστάσεις: ..................... 420x270x45mm
ΕΓΓΎΗΣΗ
1. Η συσκευή είναι εγγυημένη για 24 μήνες από την
ημερομηνίακατασκευήςπουαναγράφεταιστηνετικέτα
προσαρτάταιστοπροϊόν.
2. Ηεγγύησηισχύειμόνογιαεξοπλισμού,δενανακατεύτηκα,
επισκευαστείαπόκέντραβοήθειαςTREVI,περιλαμβάνει
την επισκευή εξαρτημάτων για κατασκευαστικά
ελαττώματα,εκτόςαπόετικέτες,λαβέςκαιαποσπώμενα
μέρη.
3. Φοντάναντιδενείναιυπεύθυνηγιατηνάμεσηήέμμεση
ζημίαναπράγματαή/καιπροσώπωνπουπροκαλούνται
απότηχρήσηήτηναναστολήτηςχρήσηςτηςσυσκευής.
Οδηγίες για τη σωστή απόρριψη του προϊόντος.
Το σύμβολο που εκτίθεται στον εξοπλισμό δηλώνει ότι
πρέπειναδοθείηάρνηση«χωριστήσυλλογή»σημαίνειότι
τοπροϊόνδενπρέπειναδιατίθεταιμεοικιακάαπορρίμματα.
Πρέπει να παραδώσει το προϊόν στην ειδική «κέντρα
ξεχωριστήσυλλογήτωναποβλήτων»πουπαρέχεταιαπό
τουςδήμους,ήνατοπαραδώσειστολιανοπωλητήκατά
τηναγοράενόςνέουπροϊόντος.
Χωριστή συλλογή απόρριψη και επόμενη επεξεργασία,
ανάκτησηκαιδιάθεσηεξοπλισμόμεανακυκλωμέναυλικά
καιναπεριορίσουντιςαρνητικέςεπιπτώσειςστοπεριβάλλον
καιτηνυγείαπουπροκαλούνταιαπόακατάλληληδιαχείριση
τωναποβλήτων.
Καταχρηστική διάθεση του προϊόντος περιλαμβάνει την
εφαρμογήδιοικητικώνκυρώσεων.
1.
.9
2.
3.
6.
.8
.7
.5
.4
.10
.11
.12

MADE IN CHINA
Trevi S.p.A. - Strada Consolare Rimini-San Marino, 62
47924 Rimini (Rn) Italy
Tel. 0541/756420 - Fax 0541/756430
Table of contents
Languages:
Other Trevi Clock manuals

Trevi
Trevi SLD 3865 User manual

Trevi
Trevi SL 3P27 User manual

Trevi
Trevi EC 884 PJ User manual

Trevi
Trevi OM 3530 RC User manual

Trevi
Trevi SL 3045 User manual

Trevi
Trevi OM 3528 D User manual

Trevi
Trevi OM 3520 D User manual

Trevi
Trevi SLD 3075 F User manual

Trevi
Trevi PJ 3028 User manual

Trevi
Trevi SL 3054 User manual
Popular Clock manuals by other brands

Radio Shack
Radio Shack project-board Series manual

La Crosse Technology
La Crosse Technology WS-8115U quick start guide

Amano
Amano PIX-3000x Series Operation manual

Oregon Scientific
Oregon Scientific JMR868 user manual

Frederique Constant
Frederique Constant FC-270 operating instructions

La Crosse Technology
La Crosse Technology 404-3451 quick start guide