Trevi OM 3520 D User manual

1
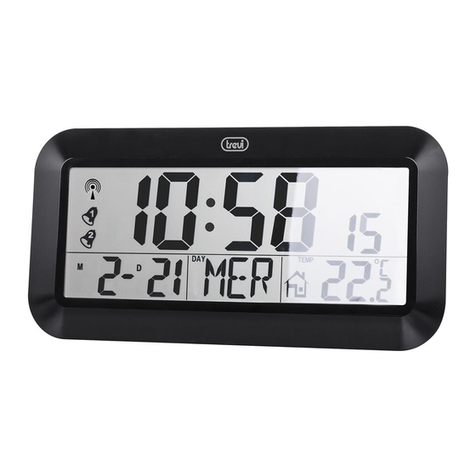
OM 3520 D DIGITAL WALL CLOCK
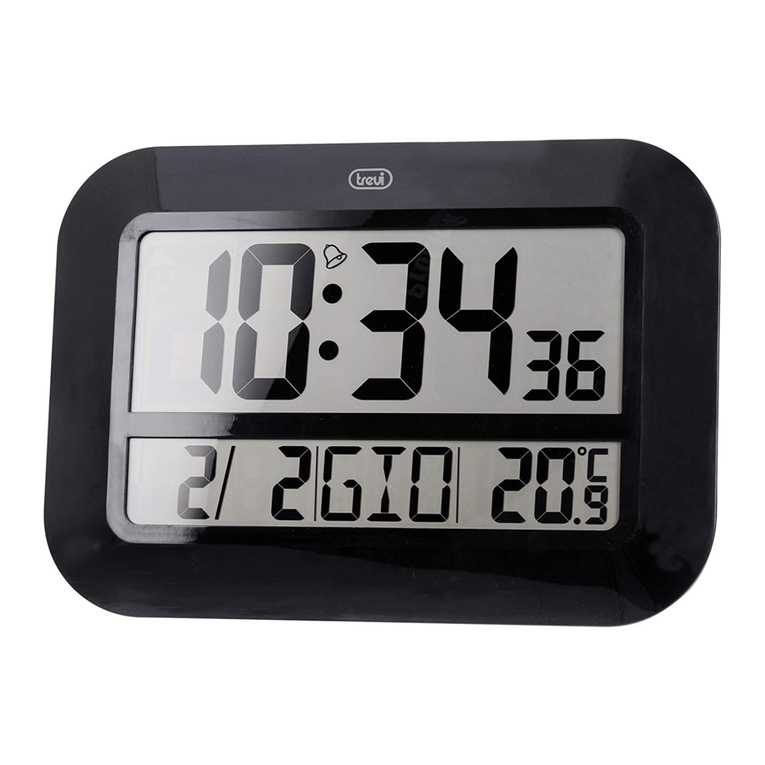
DESCRIZIONE COMANDI
1. Orario
2. Temperatura
3. Data
4. Giorno della settimana
5. Umidità
6. Tasto SET, regolazione orario 12/24Hr, ore/minuti, anno,
mese/giorno, lingua
7. Tasto ALARM, regolazione allarme
8. Tasto p, regolazione impostazioni
9. Tasto q, regolazione impostazioni
10. Tasto °C/°F, selezione gradi Celsius o Fahrenheit
11. Tasto SNOOZE, arresto momentaneo dell’allarme
12. Vano batterie
13. Piedistallo
ALIMENTAZIONE
1. Inserire 2 batterie formato “AA” nel vano batterie (12) sul retro
dell’apparecchio, rispettando le polarità indicate.
Rimuovere le batterie se non utilizzate l’apparecchio per un lungo
periododitempo.Sostituire lebatterie quandoi numeridel display
diventano meno leggibili.
REGOLAZIONE OROLOGIO/DATA/LINGUA
1. Tenere premuto il tasto SET (6).
2. Premere i tasti p(8) o q(9) per selezionare il formato orario
in 12 o 24 ore. Premere il tasto SET (6) per confermare.
3. Premere i tasti p(8) o q(9) per regolare l’ora. Premere il
tasto SET (6) per confermare.
4. Premere i tasti p(8) o q(9) per regolare i minuti. Premere
il tasto SET (6) per confermare.
5. Premere i tasti p(8) o q(9) per regolare l’anno. Premere il
tasto SET (6) per confermare.
6. Premere i tasti p(8) o q(9) per regolare il mese. Premere
il tasto SET (6) per confermare.
7. Premere i tasti p(8) o q(9) per regolare il giorno. Premere
il tasto SET (6) per confermare.
8. Premere i tasti p(8) o q(9) per regolare la lingua. Premere
il tasto SET (6) per confermare.
REGOLAZIONE ALLARME
1. Tenere premuto il tasto ALARM (7).
2. Premere i tasti p(8) o q(9) per regolare l’ora. Premere il
tasto ALARM (7) per confermare.
3. Premere i tasti p(8) o q(9) per regolare i minuti. Premere
il tasto ALARM (7) per confermare.
ATTIVAZIONE/DISATTIVAZIONE ALLARME
1. Per attivare l’allarme, premere il tasto ALARM (7) e poi il tasto
p(8). Sul display comparirà il simbolo di una campana.
2. All’ora impostata l’allarme si attiva. È possibile spegnere
momentaneamente l’allarme più volte tramite il tasto SNOOZE
(11). Dopo 5 minuti l’allarme riprende a suonare.
3. Per disattivare l’allarme, premere il tasto ALARM (7) e poi il
tasto p(8). Sul display scomparirà il simbolo della campana.
SELEZIONE GRADI CELSIUS - FAHRENHEIT
1. Premere il tasto °C/°F (10) per visualizzare la temperatura in
gradi Celsius o Fahrenheit.
INSTALLAZIONE A MURO
Questo apparecchio è progettato per essere appeso ad un muro.
Per ottenere la massima leggibilità del display appenderlo almeno
a 2 metri di altezza in modo da formare un angolo di circa 70°
con la visuale.
CARATTERISTICHE TECNICHE
Alimentazione: ...................2 batterie formato “AA”
Dimensioni:........................270x235x30mm
TREVI persegue una politica di continua ricerca e sviluppo.
Pertanto i prodotti possono presentare caratteristiche diverse
da quelle descritte.
INFORMAZIONI AGLI UTENTI ai sensi del Decreto Legi-
slativo N° 49 del 14 Marzo 2014
“Attuazione della Direttiva 2012/19/UE sui riuti di apparecchiature
elettriche ed elettroniche (RAEE)”
Il simbolo del cassonetto barrato riportato sull’apparecchiatura
indica che il prodotto alla ne della propria vita utile deve essere
raccolto separatamente dagli altri riuti. L’utente dovrà, pertanto,
conferire l’apparecchiatura integra dei componenti essenziali
giunta a ne vita agli idonei centri di raccolta differenziata dei
riuti elettronici ed elettrotecnici, oppure riconsegnarla al riven-
ditore al momento dell’acquisto di nuova apparecchiatura di
tipo equivalente, in ragione di uno a uno, oppure 1 a zero per le
apparecchiatureaventilatomaggioreinferiorea 25cm. L’adeguata
raccolta differenziata per l’avvio successivo dell’apparecchiatura
dimessa al riciclaggio, al trattamento e allo smaltimento ambien-
tale compatibile contribuisce ad evitare possibili effetti negativi
sull’ambiente e sulla salute e favorisce il riciclo dei materiali
di cui è composta l’apparecchiatura. Lo smaltimento abusivo
del prodotto da parte dell’utente comporta l’applicazione delle
sanzioni amministrative di cui al D.Lgs n. Decreto Legislativo N°
49 del 14 Marzo 2014.
ITALIANO
1.
2. 3. 4. 5.
6.7.8.9.
10.
11.
12. 13.
OM 3520 D DIGITAL WALL CLOCK
2
CLOCK COMMANDS
1. Time
2. Temperature
3. Date
4. Day of the week
5. Humidity
6. Button SET, time setting 12/24 HR, hour/minute, year,
month/day, language
7. Button ALARM, alarm setting
8. Button p, adjusting settings
9. Button q, adjusting settings
10. Button °C/°F, select Celsius or Fahrenheit
11. Button SNOOZE, momentary alarm stop
12. Battery compartment
13. Pedestal
POWER SUPPLY
1. Insert 2 “AA” size batteries into the battery compartment (12)
on the back of the unit, respecting the polarity indicated.
Remove the batteries if you do not use the appliance for a long
period of time. Replace the batteries when the display numbers
become less readable.
ADJUSTING CLOCK/DATE/LANGUAGE
1. Press and hold button SET (6).
2. Press the buttons p(8) o q(9) to select the time format in
12 or 24 hours. Press button SET (6) to conrm.
3. Press the buttons p(8) o q(9) to set the hour. Press button
SET (6) to conrm.
4. Press the buttons p(8) o q(9) to set the minutes. Press
button SET (6) to conrm.
5. Press the buttons p(8) o q(9) to set the year. Press button
SET (6) to conrm.
6. Press the buttons p(8) o q(9) to set the month. Press
button SET (6) to conrm.
7. Press the buttons p(8) o q(9) to set the day. Press button
SET (6) to conrm.
8. Press the buttons p(8) o q(9) to set the language. Press
button SET (6) to conrm.
ADJUSTING ALARM
1. Press and hold button ALARM (7).
2. Press the buttons p(8) o q(9) to set the hour. Press button
ALARM (7) to conrm.
3. Press the buttons p(8) o q(9) to set the minutes. Press
button ALARM (7) to conrm.
TURN ON / OFF ALARM
1. To activate the alarm, press the button ALARM (7) and then
the button p(8). A symbol of a bell appears on the display.
2. At the set time the alarm will activate. You can temporarily turn
off the alarm several times with the button SNOOZE (11). After
5 minutes the alarm will resume playing.
3. To deactivate the alarm, press the button ALARM (7) and
then the button p(8). The bell symbol will disappear from
the display.
SELECT DEGREES CELSIUS-FAHRENHEIT
1. Press button °C/°F (10) to display the temperature in Celsius
or Fahrenheit.
WALL MOUNTING
Thisunitisdesignedtobe hungonawall.Formaximumreadability
of the display hang it at least to 2 meters in height, forming an
angle of about 70° with the visual.
TECHNICAL CHARACTERISTICS
Power Supply:....................2 batterie formato “AA”
Dimensions:.......................270x235x30mm
Precautions for correct disposal of the product.
The symbol shown on the equipment indicates that waste
must be disposed of in “separate collection” and so the
product must not be disposed of together with urban waste.
The user must take the product to special “separate waste
collection centres” provided by local government, or deliver it
to the retailer against the purchase of a new product.
Separate collection of waste and subsequent treatment,
recycling and disposal operations promotes the production of
equipment with recycled materials and limits negative effects
of waste.
Illegal disposal of the product leads to the enforcement of
administrative penalties.
ENGLISH
1.
2. 3. 4. 5.
6.7.8.9.
10.
11.
12. 13.
3
OM 3520 D DIGITAL WALL CLOCK
COMMANDES DE L’HORLOGE
1. Heure et minutes
2. Température
3. Date
4. Jour de la semaine
5. Humidité
6. Bouton SET, temps de réglage 12/24 h, heure/minutes, année,
mois/jour, langue
7. Bouton ALARM, réglage de l’alarme
8. Bouton p, réglage des paramètres
9. Bouton q, réglage des paramètres
10. Bouton °C/°F, sélectionnez degrés Celsius ou Fahrenheit
11. Bouton SNOOZE, arrêt momentané alarme
12. Compartiment à piles
13. Piédestal
ALIMENTATION
1. Introduisez 2 piles de format « AA » dans le logement (12)
situé au dos de l’appareil en respectant la polarité indiquée.
Enlevez les piles si l’appareil n’est pas utilisé pendant une longue
période. Remplacez les piles lorsque les chiffres de l’afcheur ne
sont pas bien lisibles.
RÉGLAGE HORLOGE/DATE/LANGUE
1. Appuyez et maintenez le bouton SET (6).
2. Appuyez sur les boutons p(8) ou q(9) pour sélectionner le
format de l’heure en 12 ou 24 heures. Appuyez sur le bouton
SET (6) pour conrmer.
3. Appuyez sur les boutons p(8) ou q(9) pour régler l’heure.
Appuyez sur le bouton SET (6) pour conrmer.
4. Appuyez sur les boutons p(8) ou q(9) pour régler les
minutes. Appuyez sur le bouton SET (6) pour conrmer.
5. Appuyez sur les boutons p(8) ou q(9) pour régler l’année.
Appuyez sur le bouton SET (6) pour conrmer.
6. Appuyez sur les boutons p(8) ou q(9) pour régler le mois.
Appuyez sur le bouton SET (6) pour conrmer.
7. Appuyez sur les boutons p(8) ou q(9) pour régler le jour.
Appuyez sur le bouton SET (6) pour conrmer.
8. Appuyezsur lesboutonsp(8) ouq(9) pourrégler lalangue.
Appuyez sur le bouton SET (6) pour conrmer.
RÉGLAGE ALARME
1. Appuyez et maintenez le bouton ALARM (7).
2. Appuyez sur les boutons p(8) ou q(9) pour régler l’heure.
Appuyez sur le bouton ALARM (7) pour conrmer.
3. Appuyez sur les boutons p(8) ou q(9) pour régler les
minutes. Appuyez sur le bouton ALARM (7) pour conrmer.
ALLUMER / ÉTEINDRE L’ALARME
1. Pour activer l’alarme, appuyez sur le bouton ALARM (7), puis
sur le bouton p (8). L’écran afche un symbole d’une cloche.
2. Àl’heureréglée,l’alarmes’active.Vouspouveztemporairement
désactiverl’alarmeà plusieursreprises avecleboutonSNOOZE
(11). Après 5 minutes, l’alarme va reprendre jouante.
3. Pour désactiver l’alarme, appuyez sur le bouton ALARM (7),
puis sur le bouton p(8). Le symbole de la cloche disparaît
de l’écran.
SÉLECTIONNEZ DEGRÉS CELSIUS-FAHRENHEIT
1. Appuyez sur le bouton °C/°F (10) pour afcher la température
en degrés Celsius ou Fahrenheit.
MONTAGE MURAL
Cet appareil est conçu pour être accroché à un mur. Pour une
lisibilité maximale de l’écran l’accrocher au moins à 2 mètres de
hauteur, formant un angle d’environ 70° avec le visuel.
CARACTÉRISTIQUES TECHNIQUES
Bloc d’alimentation:.....................2 piles de format « AA »
Dimensions:................................270x235x30mm
Recommandationspour l’éliminationcorrecteduproduit.
Le symbole gurant sur l’appareil indique que le produit fait l’objet
d’une “ collecte séparée “. C’est pourquoi, le produit ne doit pas
être éliminé avec les déchets urbains.
L’utilisateur doit remettre le produit auprès de “ décharges spécia-
lisées de collecte séparée “ prévues par les autorités locales, ou
bien le rendre au revendeur quand il achètera un nouvel appareil
équivalent.
La collecte séparée du produit et les opérations successives
de traitement, recyclage et élimination favorisent la production
d’appareils composés par des matériaux recyclés ainsi que
permettent d’éviter des effets négatifs sur l’environnement et sur
la santé des personnes suite à une gestion impropre du déchet.
Toute élimination abusive du produit entraîne l’application de
sanctions administratives.
FRANÇAIS
1.
2. 3. 4. 5.
6.7.8.9.
10.
11.
12. 13.
OM 3520 D DIGITAL WALL CLOCK
4
CLOCK BEFEHLE
1. Stunde und Minuten
2. Temperatur
3. Datum
4. Tag der Woche
5. Luftfeuchtigkeit
6. Taste SET, Zeiteinstellung 12/24 h, Stunde/Minute, Jahr,
Monat/Tag, Sprache
7. Taste ALARM, Alarmeinstellung
8. Taste p, Anpassung der Einstellungen
9. Taste q, Anpassung der Einstellungen
10. Taste °C/°F, Wählen Sie Celsius oder Fahrenheit
11. Taste SNOOZE, momentane Alarm stop
12. Batteriefach
13. Sockel
STROMVERSORGUNG
1. Auf der Geräterückwand 2 Batterien des Typs „AA“ pola-
ritätsrichtig in das Batteriefach (12) einlegen.
SolltedasGerätfüreinenlängerenZeitraumnichtbetriebenwerden,
sosinddieBatterienherauszunehmen.Die Batterienaustauschen,
wenn die Ziffern auf dem Display nicht mehr lesbar sind.
UHR/DATUM/SPRACHE EINSTELLEN
1. Drücken Sie und halten Sie die SET-Taste (6).
2. DrückenSiedieTasten p(8)oderq(9)umdasUhrzeitformat
auszuwählen in 12 oder 24 Stunden. Zum bestätigen drücken
Sie SET-Taste (6).
3. Drücken Sie die Tasten p(8) oder q(9) um die Stunde
einzustellen. Zum bestätigen drücken Sie SET-Taste (6).
4. Drücken Sie die Tasten p(8) oder q(9) um die Minuten
einzustellen. Zum bestätigen drücken Sie SET-Taste (6).
5. Drücken Sie die Tasten p(8) oder q(9) um das Jahr ein-
zustellen. Zum bestätigen drücken Sie SET-Taste (6).
6. Drücken Sie die Tasten p(8) oder q(9) um den Monat. Zum
bestätigen drücken Sie SET-Taste (6).
7. DrückenSie dieTasten p(8)oder q(9)Einstellen desTages.
Zum bestätigen drücken Sie SET-Taste (6).
8. Drücken Sie die Tasten p(8) oder q(9) Stellen Sie die
Sprache. Zum bestätigen drücken Sie SET-Taste (6).
EINSTELLEN ALARM
1. Drücken Sie und halten Sie die ALARM-Taste (7).
2. Drücken Sie die Tasten p(8) oder q(9) um die Stunde
einzustellen. Zum bestätigen drücken Sie ALARM-Taste (7).
3. Drücken Sie die Tasten p(8) oder q(9) um die Minuten
einzustellen. Zum bestätigen drücken Sie ALARM-Taste (7).
EIN- / AUSSCHALTEN DES ALARMS
1. Um den Alarm zu aktivieren, drücken Sie die ALARM-Taste
(7) und dann die Taste p(8). Auf dem Display erscheint ein
Symbol einer Glocke.
2. Zur eingestellten Zeit wird der Alarm aktiviert. Sie können den
Alarm mehrmals mit der SNOOZE-Taste (11) vorübergehend
deaktivieren. Der Alarm wird nach 5 Minuten Wiedergabe
fortzufahren.
3. Um den Alarm zu deaktivieren, drücken Sie die ALARM-Taste
(7)unddanndieTastep(8).DasGlockensymbolverschwindet
aus dem display.
WÄHLEN SIE GRAD CELSIUS-FAHRENHEIT
1. Drücken Sie die °C/°F-Taste (10) die Temperatur in Celsius
oder Fahrenheit angezeigt.
BEFESTIGUNG AN DER WAND
Dieses Gerät soll an eine Wand gehängt werden. Für maximale
Lesbarkeit des Displays hängen Sie es mindestens zu 2 Meter
hoch, bilden einen Winkel von etwa 70° mit der visuellen.
TECHNISCHE MERKMALE
Netzteil:.......................................2 „AA“ Batterien
Abmessungen:............................270x235x30mm
HinweisezurordnungsgemäßenEntsorgungdesProdukts.
Das auf dem Gerät angebrachte Symbol weist darauf hin, dass
das Altgerät “getrennt zu sammeln” ist und das Produkt daher
nicht zusammen mit dem Gemeindeabfall entsorgt werden darf.
Der Benutzer muss das Produkt zu den entsprechenden, von der
Gemeindeverwaltung eingerichteten “Wertstoffsammelstellen”
bringen oder dem Händler beim Kauf eines neuen Produkts
übergeben.
Die getrennte Müllsammlung und anschließende Aufbereitung,
Wiederverwertung und Entsorgung fördern die Herstellung von
Geräten unter Verwendung wiederverwerteter Materialien und
vermindern die negativen Auswirkungen auf die Umwelt und
Gesundheit in Folge einer falschen Müllverwaltung.
DiewiderrechtlicheEntsorgungdes ProduktsführtzurAuferlegung
von Verwaltungsstrafen.
DEUTSCH
1.
2. 3. 4. 5.
6.7.8.9.
10.
11.
12. 13.
5
OM 3520 D DIGITAL WALL CLOCK
COMANDOS DE RELOJ
1. Hora y minutos
2. Temperatura
3. Fecha
4. Día de la semana
5. Humedad
6. Botón SET, tiempo de ajuste de 12 ó 24 horas, hora/minuto,
año, mes día, lengua
7. Botón ALARM, ajuste de la alarma
8. Botón p, ajustar de los parámetros
9. Botón q, ajustar de los parámetros
10. Botón °C/°F, elija Celsius o Fahrenheit
11. Botón SNOOZE, parada de alarma momentánea
12. Compartimiento de la batería
13. Pedestal
ALIMENTACIÓN
1. Introduza 2 baterias formato “AA” no compartimento (12) na
partetraseiradoaparelhorespeitandoaspolaridadesindicadas.
Remova as baterias se pretende não utilizar o aparelho por um
longoperíododetempo.Substitua asbaterias quandoos números
do visor tornarem-se menos legíveis.
AJUSTE RELOJ/FECHA/IDIOMA
1. Pulse y mantenga pulsado el botón SET (6).
2. Pulse los botones p(8) o q(9) para seleccionar el formato
de 12 o 24 horas. Pulsa el botón SET (6) para conrmar.
3. Pulse los botones p(8) o q(9) para ajustar la hora. Pulsa
el botón SET (6) para conrmar.
4. Pulse los botones p(8) o q(9) para ajustar los minutos.
Pulsa el botón SET (6) para conrmar.
5. Pulse los botones p(8) o q(9) para ajustar el año. Pulsa
el botón SET (6) para conrmar.
6. Pulse los botones p(8) o q(9) para ajustar el mes. Pulsa
el botón SET (6) para conrmar.
7. Pulse los botones p(8) o q(9) para ajustar el día. Pulsa el
botón SET (6) para conrmar.
8. Pulse los botones p(8) o q(9) para ajustar el idioma. Pulsa
el botón SET (6) para conrmar.
AJUSTE DE LA ALARMA
1. Pulse y mantenga pulsado el botón ALARM (7).
2. Pulse los botones p(8) o q(9) para ajustar la hora. Pulsa
el botón ALARM (7) para conrmar.
3. Pulse los botones p(8) o q(9) para ajustar los minutos.
Pulsa el botón ALARM (7) para conrmar.
ACTIVAR / DESACTIVAR LA ALARMA
1. Para activar la alarma, pulse el botón ALARM (7) y luego
el botón p(8). En la pantalla aparece un símbolo de una
campana.
2. Alahoraprogramadaseactivarálaalarma.Ustedpuedeapagar
temporalmente la alarma varias veces con el botón SNOOZE
(11). Después de 5 minutos la alarma volverá a jugar.
3. Para desactivar la alarma, pulse el botón ALARM (7) y luego
el botón p(8). El símbolo de la campana va a desaparecer
de la pantalla.
SELECCIONE GRADOS CELSIUS-FAHRENHEIT
1. Pulsaelbotón °C/°F(10)paraindicarla temperaturaenCelsius
o Fahrenheit.
MONTAJE EN LA PARED
Estaunidad estádiseñadapara sercolgadoen unapared. Máxima
legibilidad de la pantalla cuelgue al menos a 2 metros de altura,
formando un ángulo de aproximadamente 70° con la visual.
CARACTERÍSTICAS TÉCNICAS
Fuente de alimentación:...............2 baterias formato “AA”
Dimensiones:..............................270x235x30mm
Advertencias para la correcta eliminación del producto.
El símbolo que aparece en el aparato indica que el residuo debe
ser objeto de “recogida selectiva” por tanto el producto no se
debe eliminar junto con residuos urbanos.
El usuario deberá entregar el producto a los “centros de recogida
selectiva” creados por las administraciones municipales o bien
al distribuidor cuando adquiera un nuevo producto.
La recogida selectiva del residuo y las sucesivas operaciones de
tratamiento, recuperación y eliminación favorecen la fabricación
de aparatos con materiales reciclados y limitan los efectos nega-
tivos en el medio ambiente y la salud causados por una gestión
incorrecta del residuo.
La eliminación abusiva del producto da lugar a la aplicación de
sanciones administrativas.
ESPAÑOL
1.
2. 3. 4. 5.
6.7.8.9.
10.
11.
12. 13.
OM 3520 D DIGITAL WALL CLOCK
6
COMANDOS DO RELÓGIO
1. Hora e minutos
2. Temperatura
3. Data
4. Dia da semana
5. Umidade
6. Botão SET, tempo de conguração de 12/24 horas,
hora/minuto, ano, mês/dia, língua
7. Botão ALARM, conguração de alarme
8. Botão p, ajustando as congurações
9. Botão q, ajustando as congurações
10. Botão °C/°F, selecione Celsius ou Fahrenheit
11. Botão SNOOZE, parada momentânea de alarme
12. Compartimento das pilhas
13. Pedestal
ALIMENTAÇÃO
1. Introduza 2 baterias formato “AA” no compartimento (12) na
partetraseiradoaparelhorespeitandoaspolaridadesindicadas.
Remova as baterias se pretende não utilizar o aparelho por um
longoperíododetempo.Substitua asbaterias quandoos números
do visor tornarem-se menos legíveis.
AJUSTE DE RELÓGIO/DATA/LANGUAGE
1. Pressione e segure o botão SET (6).
2. Pressione os botões p(8)ouq(9)paraselecionaro formato
de hora em 12 ou 24 horas. Pressione o botão SET (6) para
conrmar.
3. Pressione os botões p(8) ou q(9) para ajustar a hora.
Pressione o botão SET (6) para conrmar.
4. Pressione os botões p(8) ou q(9) para ajustar os minutos.
Pressione o botão SET (6) para conrmar.
5. Pressione os botões p(8) ou q(9) para ajustar o ano.
Pressione o botão SET (6) para conrmar.
6. Pressione os botões p(8) ou q(9) para ajustar o mês.
Pressione o botão SET (6) para conrmar.
7. Pressione os botões p(8) ou q(9) para ajustar o dia.
Pressione o botão SET (6) para conrmar.
8. Pressione os botões p(8) ou q(9) para ajustar o idioma.
Pressione o botão SET (6) para conrmar.
PORTUGUÊS
1.
2. 3. 4. 5.
6.7.8.9.
10.
11.
12. 13.
AJUSTE DO ALARME
1. Pressione e segure o botão ALARM (7).
2. Pressione os botões p(8) ou q(9) para ajustar a hora.
Pressione o botão ALARM (7) para conrmar.
3. Pressione os botões p(8) ou q(9) para ajustar os minutos.
Pressione o botão ALARM (7) para conrmar.
LIGAR / DESLIGAR O ALARME
1. Para ativar o alarme, pressione o botão ALARM (7) e, em
seguida, o botão p(8). No display aparece um símbolo de
um sino.
2. Àhoraprogramada,oalarmeseráativado.Vocêpodedesativar
temporariamente o alarme várias vezes com o botão SNOOZE
(11). Após 5 minutos o alarme irá retomar a reprodução.
3. Para desactivaro alarme, pressione o botão ALARM (7) e, em
seguida, o botão p(8). O símbolo do sino irão desaparecer
do visor.
SELECIONE GRAUS CELSIUS-FAHRENHEIT
1. Pressione o botão °C/°F (10) para exibir a temperatura em
graus Celsius ou Fahrenheit.
MONTAGEM NA PAREDE
Esta unidade foi projetada para ser pendurada em uma parede.
Para facilitar a leitura máxima do display pendurá-lo pelo menos
a 2 metros de altura, formando um ângulo de cerca de 70° com
o visual.
CARACTERÍSTICAS TÉCNICAS
Fonte de alimentação: .................2 baterias formato “AA”
Dimensões:.................................270x235x30mm
Advertências para a correcta demolição do produto.
O símbolo indicado na aparelhagem indica que o resíduo deve
ser objecto de “recolha separada” portanto o produto não deve
ser desmantelado junto dos resíduos urbanos.
O utilizador deverá entregar o produto nos apropriados “centros
de recolha diferenciada” predispostos pelas administrações
comunais, ou entregá-lo ao revendedor em troca de uma compra
de um novo produto.
A recolha diferenciada do resíduo e as sucessivas operações
de tratamento, recuperação e desmantelamento favorecem a
produção de aparelhagens com materiais reciclados e limitam
os efeitos negativos no ambiente e na saúde causados por uma
gestão imprópria do resíduo.
O desmantelamento abusivo do produto comporta a aplicação
de sanções administrativas.

7
OM 3520 D DIGITAL WALL CLOCK
ΕΝΤΟΛΈΣ ΡΟΛΌΙ
1. Ώρεςκαιλεπτά
2. Θερμοκρασία
3. Ημερομηνία
4. Ημέρατηςεβδομάδας
5. Υγρασία
6. ΚουμπίSET,ώραρύθμιση12/24HR,ώραανάλεπτό,
έτος,μήνας/ημέρα,γλώσσα
7. ΚουμπίALARM,Ρύθμισηαφύπνισης
8. Κουμπίp,Προσαρμογήρυθμίσεων
9. Κουμπίq,Προσαρμογήρυθμίσεων
10.Κουμπί°C/°F,ΕπιλέξετεΚελσίουήΦαρενάιτ
11.ΚουμπίSNOOZE,σταματήσειστιγμιαίασυναγερμού
12.Θήκημπαταριών
13.Βάθρο
ΠΑΡΟΧΉ ΗΛΕΚΤΡΙΚΟΎ ΡΕΎΜΑΤΟΣ
1. ΠιέστεκαικρατήστεπατημένοτοκουμπίSET(6).
2. Πιέστετακουμπιάp(8)ήq(9) γιανα επιλέξετετη
μορφήώραςσε12ή24ώρες.ΠιέστετοκουμπίSET
(6)γιαναεπιβεβαιώσετε.
3. Πιέστετακουμπιάp(8)ήq(9)γιαναρυθμίσετετην
ώρα.ΠιέστετοκουμπίSET(6)γιαναεπιβεβαιώσετε.
4. Πιέστετακουμπιάp(8)ήq(9)γιαναορίσετεταλεπτά.
ΠιέστετοκουμπίSET(6)γιαναεπιβεβαιώσετε.
5. Πιέστετακουμπιάp(8)ήq(9)γιαναορίσετετοχρόνο.
ΠιέστετοκουμπίSET(6)γιαναεπιβεβαιώσετε.
6. Πιέστετακουμπιάp(8)ήq(9)γιαναρυθμίσετετο
μήνα.ΠιέστετοκουμπίSET(6)γιαναεπιβεβαιώσετε.
7. Πιέστε τα κουμπιά p (8) ή q (9) για να ορίσετε την
ημέρα.ΠιέστετοκουμπίSET(6)γιαναεπιβεβαιώσετε.
8. Πιέστε τα κουμπιά p (8) ή q (9) για να ορίσετε τη
γλώσσα.ΠιέστετοκουμπίSET(6)γιαναεπιβεβαιώσετε.
ΡΎΘΜΙΣΗΣ ΣΥΝΑΓΕΡΜΟΎ
1. ΠιέστεκαικρατήστεπατημένοτοκουμπίALARM(7).
2. Πιέστετακουμπιάp(8)ήq(9)γιαναρυθμίσετετην
ώρα.ΠιέστετοκουμπίALARM(7)γιαναεπιβεβαιώσετε.
3. Πιέστετακουμπιάp(8)ήq(9)γιαναορίσετεταλεπτά.
ΠιέστετοκουμπίALARM(7)γιαναεπιβεβαιώσετε.
ΕΝΕΡΓΟΠΟΙΉΣΤΕ / ΑΠΕΝΕΡΓΟΠΟΊΗΣΗ ΤΟΥ
ΣΥΝΑΓΕΡΜΟΎ
1. Γιαναενεργοποιηθείοσυναγερμός,πιέστετοκουμπί
ALARM (7), και στη συνέχεια το κουμπί p (8). Στην
οθόνηεμφανίζεταιένασύμβολοτηςένακουδούνι.
2. Τηνκαθορισμένηώραθαενεργοποιηθείοσυναγερμός.
Μπορείτενααπενεργοποιήσετεπροσωρινάτονκώδωνα
του κινδύνου πολλές φορές με το κουμπί SNOOZE
(11). Μετάαπό 5λεπτάο συναγερμόςθα συνεχίσετε
ναπαίζετε.
3. Για να απενεργοποιήσετε την αφύπνιση, πατήστε το
κουμπίALARM(7),καιστησυνέχειατοκουμπίp(8).
Τοσύμβολοκουδούνιθαεξαφανιστούναπότηνοθόνη.
ΕΠΙΛΈΞΤΕ ΒΑΘΜΟΎΣ ΚΕΛΣΊΟΥ-ΦΑΡΕΝΆΙΤ
1. Πιέστε το κουμπί °C/°F (10) για να εμφανίσετε τη
θερμοκρασίασεβαθμούςΚελσίουήΦαρενάιτ.
ΤΟΠΟΘΈΤΗΣΗ ΣΕ ΤΟΊΧΟ
Αυτήη μονάδαέχεισχεδιαστεί γιανακρεμαστεί σεέναν
τοίχο.Γιαμέγιστηαναγνωσιμότητατηςοθόνηςκρεμάσετε
τουλάχιστονσε2μέτρασεύψος,σχηματίζονταςμιαγωνία
περίπου70°μετοοπτικό.
ΤΕΧΝΙΚΆ ΧΑΡΑΚΤΗΡΙΣΤΙΚΆ
Παροχήηλεκτρικούρεύματος:.2μπαταρίεςτύπου“AA”
Διαστάσεις:..............................270x235x30mm
Προειδοποιήσεις για τη σωστή διάθεση του
προϊόντος.
Το σύμβολο που απεικονίζεται επάνω στη συσκευή
υποδεικνύει ότι το απόβλητο πρέπει να αποτελέσει
αντικείμενο“χωριστήςσυλλογής”ωςεκτούτουτοπροϊόν
δενπρέπειναδιατίθεταιμαζίμετααστικάαπόβλητα.
Οχρήστηςθαπρέπειναπαραδώσειτοπροϊόνσταειδικά
“κέντραδιαφοροποιημένηςσυλλογής”πουέχουνδιευθετηθεί
από τις δημοτικές διοικήσεις, ή να το παραδώσει στο
κατάστημαπώλησηςμετηναγοράενόςνέουπροϊόντος.
Ηδιαφοροποιημένησυλλογήτουαποβλήτουκαιοιακόλουθες
επεμβάσειςεπεξεργασίας,ανάκτησηςκαιδιάθεσηςβοηθούν
την παραγωγή συσκευών με ανακυκλωμένα υλικά και
περιορίζουντιςαρνητικέςεπιπτώσειςγιατοπεριβάλλονκαι
τηνυγείαπουπροκαλούνταιαπότηνακατάλληληδιαχείριση
τουαποβλήτου.
Η αυθαίρετη διάθεση του προϊόντος συνεπάγεται την
εφαρμογήδιοικητικώνκυρώσεων.
ΕΛΛΗΝΙΚΆ
1.
2. 3. 4. 5.
6.7.8.9.
10.
11.
12. 13.
MADE IN CHINA
Trevi S.p.A. - Strada Consolare Rimini-San Marino, 62
47924 Rimini (Rn) Italy
Tel. 0541/756420 - Fax 0541/756430
Table of contents
Languages:
Other Trevi Clock manuals

Trevi
Trevi SL 3054 User manual

Trevi
Trevi OM 3530 RC User manual

Trevi
Trevi SLD 3075 F User manual

Trevi
Trevi EC 884 PJ User manual

Trevi
Trevi SL 3045 User manual

Trevi
Trevi PJ 3028 User manual

Trevi
Trevi SLD 3865 User manual

Trevi
Trevi OM 3528 D User manual

Trevi
Trevi OM 3540 D User manual

Trevi
Trevi SL 3P27 User manual