Tru-Test S1 User manual

S1 S-Cell Weigh System Quickstart Guide
1
This quickstart guide provides basic instructions for setting up and using the
S1 S-Cell (Suspension Cell) Weigh System. For further information, visit
www.tru-test.com.
Contents
Unpacking the box................................................................. 1
Installing the S1 S-Cell Weigh System..................................... 2
Installation tips ...................................................................... 7
Maintenance and care............................................................ 7
Warranty and servicing........................................................... 8
Compliance............................................................................ 8
1Unpacking the box
Check that you have all of these items. If anything is missing, contact your
supplier.
QUICKSTART GUIDE
S1 S-Cell Weigh System Quickstart Guide
2
2Installing the S1 S-Cell Weigh System
Before you start:
Fully charge the indicator
overnight.
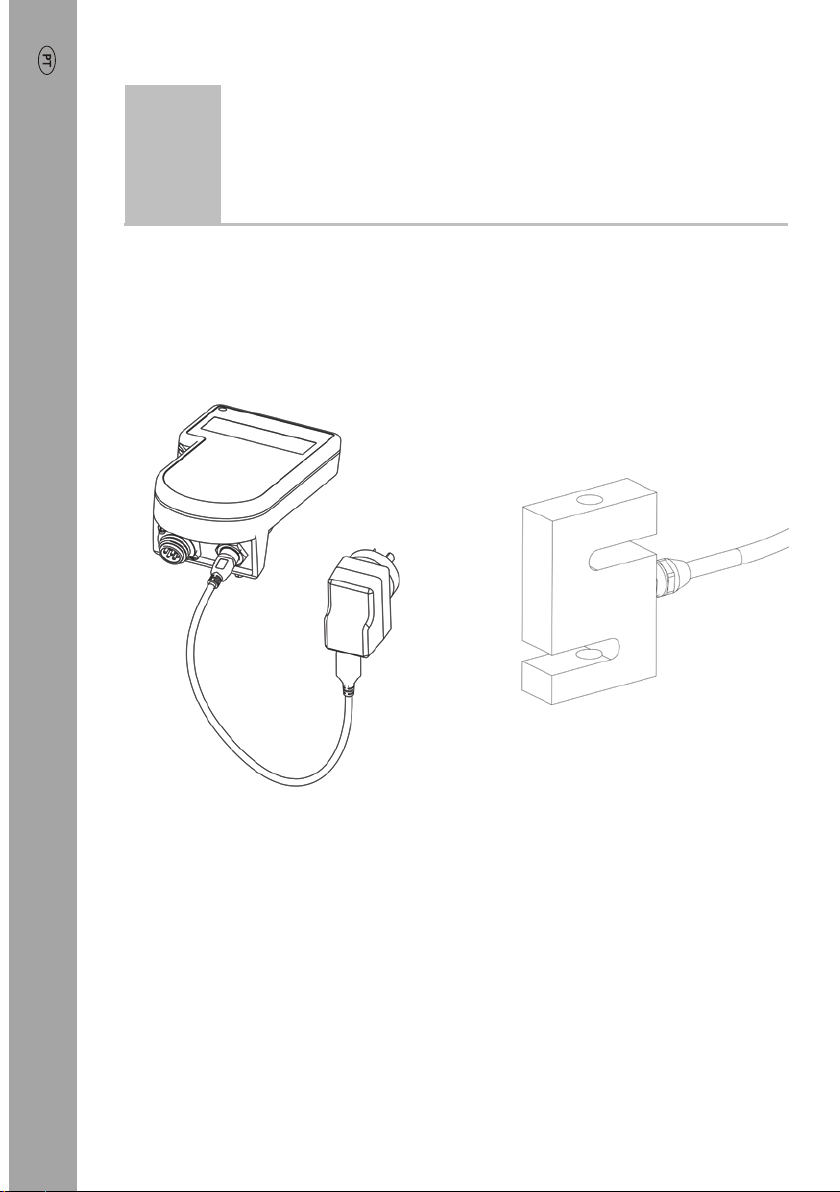
Step 1:
Install the S-Cell as required for your
specific weighing solution. See
Section 3 - Installation tips
for areas
to pay attention to.

S1 S-Cell Weigh System Quickstart Guide
3
Step 2:
Mount the indicator bracket onto an
appropriate location with the
supplied bolts and screws, and within
reach of the S-Cell cable. Slide the
indicator onto the bracket.
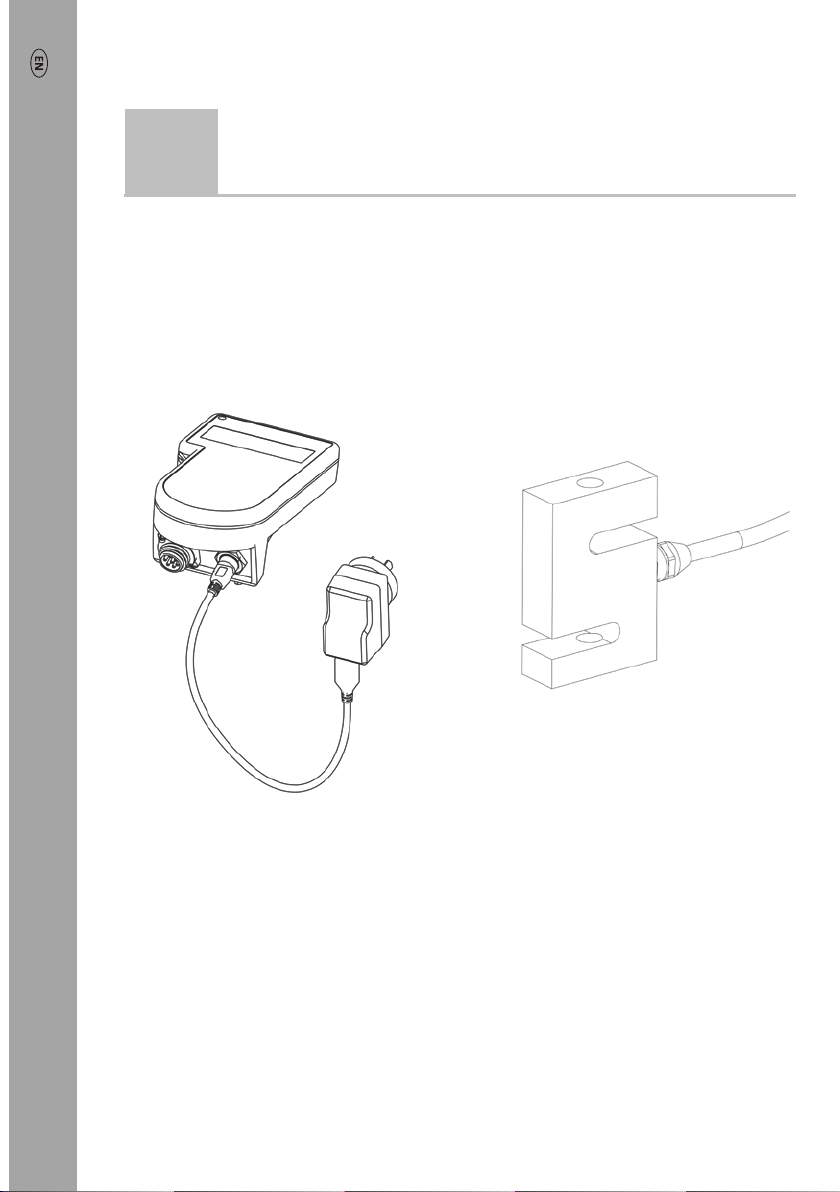
Step 3:
Plug the indicator connector into
the indicator and tighten up.
S1 S-Cell Weigh System Quickstart Guide
4
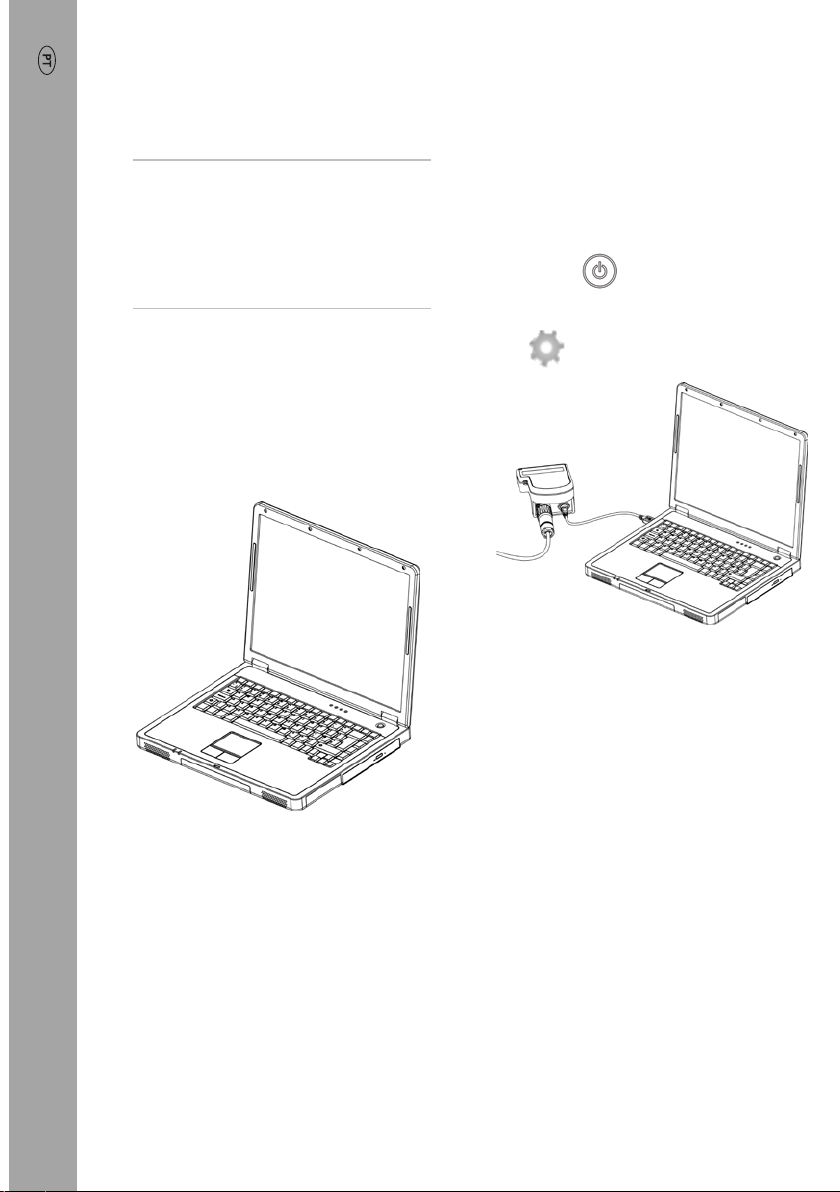
Step 4:
Note:
Only do Steps 4-10 if
converting a mechanical crate to
electronic weighing. Otherwise go
straight to Step 11.
If converting to electronic
weighing, perform a span
calibration on the S-Cell.
Download Data Link PC Software
from
livestock.tru-test.com/applications/
datalink
.
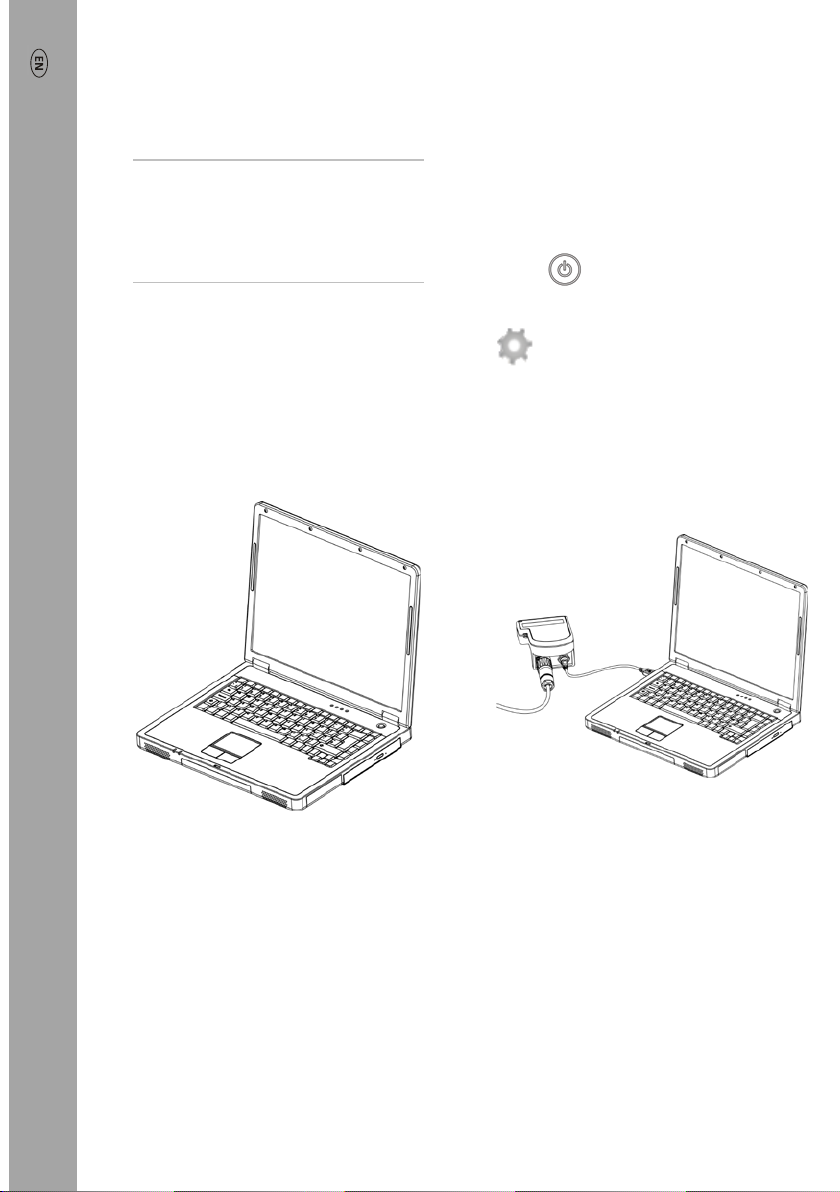
Step 5:
Plug the indicator into your laptop
using the USB cable. Plug the S-Cell
into the indicator.
Press to power on the indicator.
Launch Data Link on your PC and click
, Span Calibration.
S1 S-Cell Weigh System Quickstart Guide
5
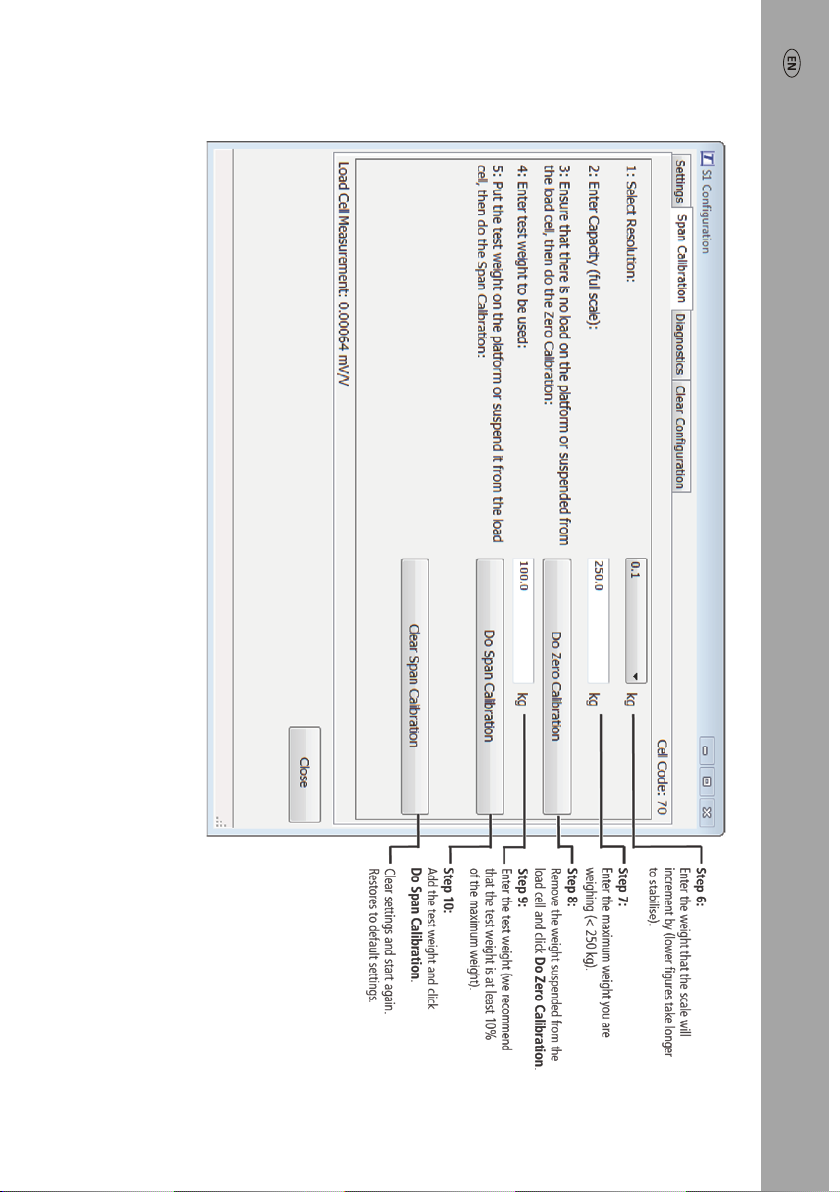
Steps 6-10

S1 S-Cell Weigh System Quickstart Guide
6
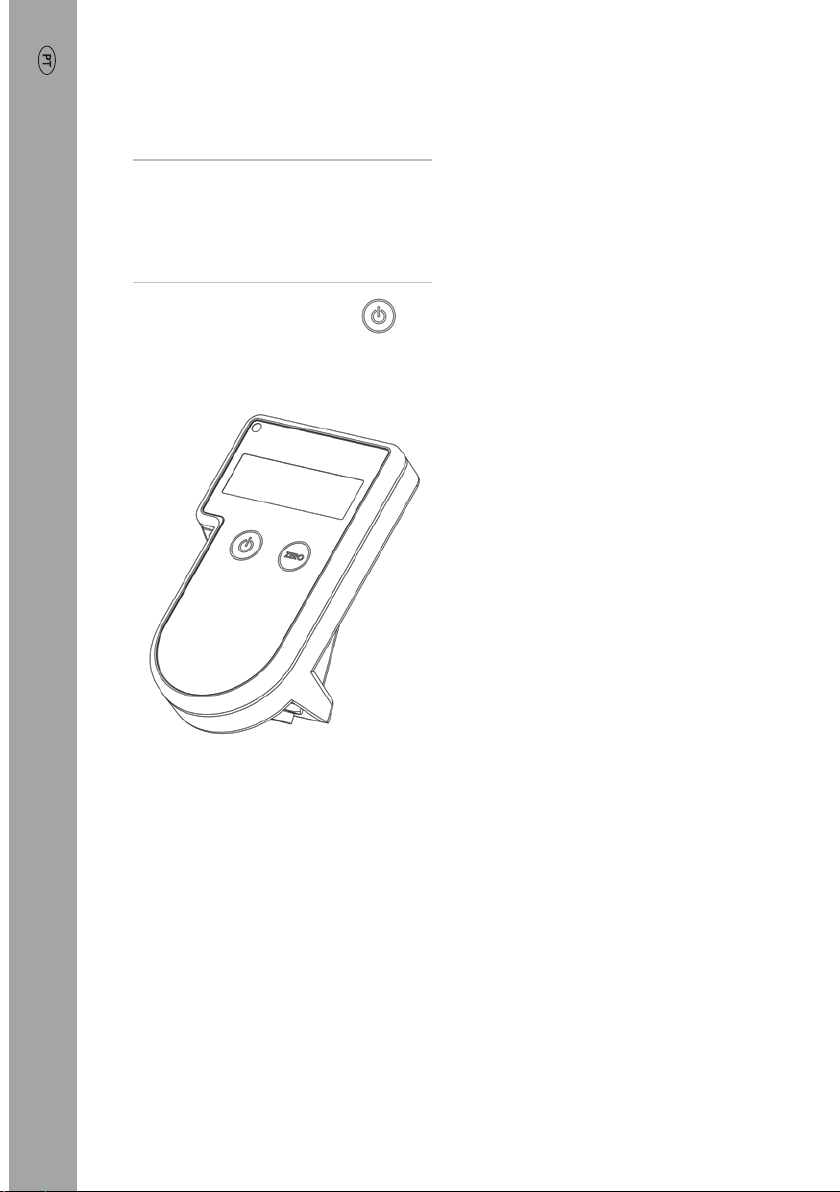
Step 11:
Note:
If you have completed Steps
4-10, disconnect the indicator from
your laptop, and place it on the
mounting bracket again.
If necessary, press to power
on the indicator.
You are now ready to start
weighing.

S1 S-Cell Weigh System Quickstart Guide
7
3Installation tips
•Ensure that the supporting structure for the S-Cell is sufficiently rigid to
prevent vibration or mechanical failure. If the system is allowed to
vibrate, longer settling times and unstable readings may result.
•Suspend the S-Cell, avoiding any tension in the S-Cell cable.
•Keep the body of the S-Cell level during weighing to ensure that the
weight readings remain accurate.
4Maintenance and care
•Do not leave the indicator or indicator connector immersed in water.
•Cables should be tidied away to prevent obstruction and damage to the
cables.
•When not in use, always replace the dust cap on the indicator
connector.
•Remove dust and moisture from the plugs and dust cap using
methylated spirits, ethyl alcohol, or a suitable electrical contact cleaner.
Stronger spirits must not be used, as they may react with the plastic.
•Wipe the indicator using a damp cloth, warm water and soap. Other
cleaners may damage the case.

S1 S-Cell Weigh System Quickstart Guide
8
5Warranty and servicing
For service and warranty information, see www.tru-test.com.
6Compliance
FCC notice
This device complies with part 15 of the FCC Rules. Operation is subject to the following two conditions:
(1) This device may not cause harmful interference, and (2) this device must accept any interference
received, including interference that may cause undesired operation.
This equipment has been tested and found to comply with the limits for a Class B digital device, pursuant
to part 15 of the FCC Rules. These limits are designed to provide reasonable protection against harmful
interference in a residential installation.
This equipment generates, uses and can radiate radio frequency energy and, if not installed and used in
accordance with the instructions, may cause harmful interference to radio communications. However,
there is no guarantee that interference will not occur in a particular installation. If this equipment does
cause harmful interference to radio or television reception, which can be determined by turning the
equipment off and on, the user is encouraged to try to correct the interference by one or more of the
following measures:
- Reorient or relocate the receiving antenna.
- Increase the separation between the equipment and receiver.
- Connect the equipment into an outlet on a circuit different from that to which the receiver is connected.
- Consult the dealer or an experienced radio/ TV technician for help.
All trademarks with an * are not owned by Tru-Test Limited and belong to their respective owners.
Guia Rápido para o sistema de células-S de pesagem
9
GUIA DE INÍCIO RÁPIDO DO
Este guia rápido fornece as instruções básicas para a configuração e o uso do
sistema de pesagem de célula-S (célula de suspensão) S1. Para mais
informações, visite a www.tru-test.com.
Conteúdo
Desembalar a caixa................................................................ 9
Instalar o sistema de células de pesagem-S S1...................... 10
Dicas de instalação .............................................................. 15
Manutenção e cuidados....................................................... 15
Garantia e assistência .......................................................... 15
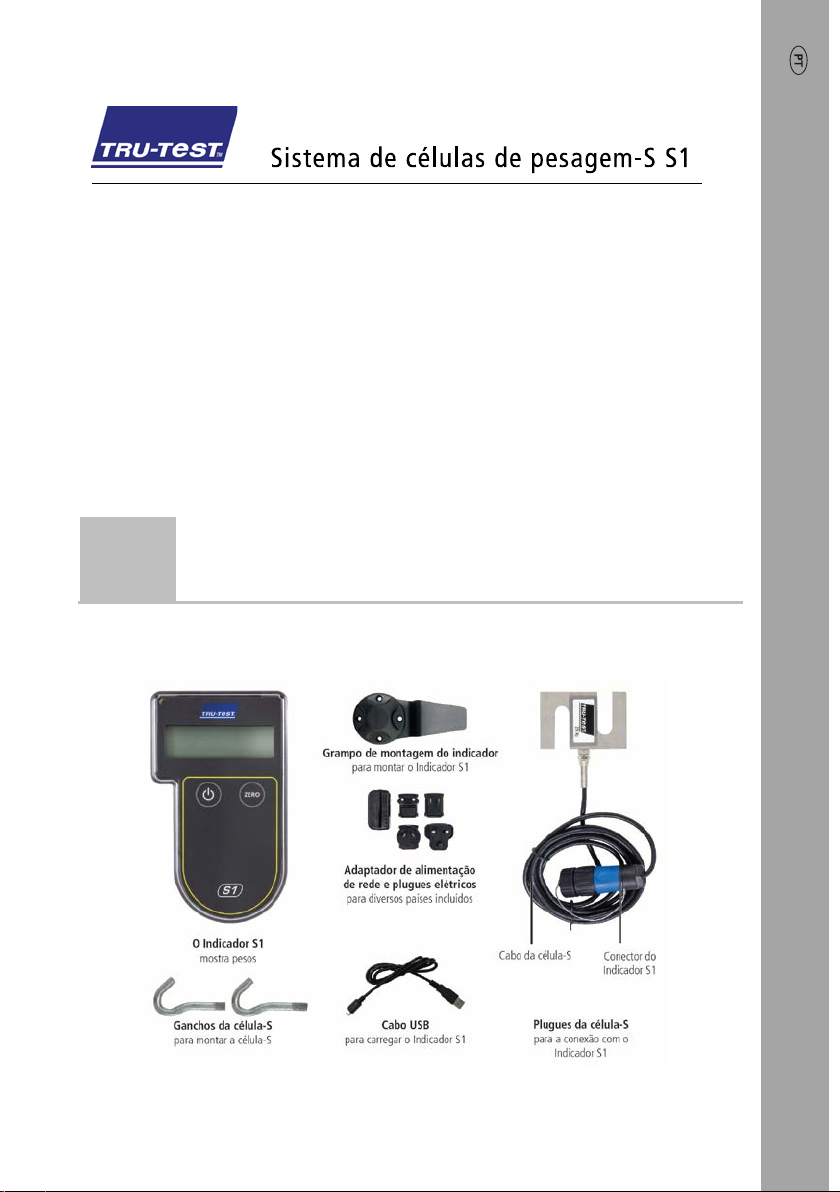
1Desembalar a caixa
Verifique que haja todos os seguintes itens. Se algo estiver faltando, contate o
seu fornecedor.
Guia Rápido para o sistema de células-S de pesagem
10
2Instalar o sistema de células de
pesagem-S S1
Antes de começar:
Carregue o indicador
completamente durante a noite.
Passo 1:
Instale a célula-S como requerido
para o seu sistema de pesagem
específico. Veja
Seção 3 - Dicas de
instalação
para as coisas que devem
ser observadas.

Guia Rápido para o sistema de células-S de pesagem
11
Passo 2:
Monte o grampo do indicador em um
local apropriado com as cavilhas e os
parafusos fornecidos e dentro do
alcance do cabo da célula-S. Fixe o
indicador no grampo.
Passo 3:
Insira o conector do indicador no
indicador e fixe-o.
Guia Rápido para o sistema de células-S de pesagem
12
Passo 4:
Nota:
Só execute os passos 4 a 10,
se estiver convertendo uma caixa
mecânica para a pesagem
eletrônica. Caso contrário, vá
diretamente ao Passo 11.
Se estiver convertendo para a
pesagem eletrônica, faça uma
calibração span na célula-S.
Baixe o software Data Link PC de
livestock.tru-test.com/applications/
datalink.
Passo 5:
Conecte o indicador ao seu laptop,
usando o cabo USB. Insira o plugue da
célula-S no indicador.
Pressione para ligar o indicador.
Inicialize o Data Link no seu PC e clique
em , Calibração Span.

Guia Rápido para o sistema de células-S de pesagem
13
Passos 6 a 10
Guia Rápido para o sistema de células-S de pesagem
14
Passo 11:
Nota:
Concluídos os passos 4 a 10,
desconecte o indicador do seu laptop
e posicione-
o novamente no grampo
de montagem.
Caso necessário, pressione
para ligar o indicador. Agora, você
pode começar a pesar.

Guia Rápido para o sistema de células-S de pesagem
15
3Dicas de instalação
•Assegure-se de que a estrutura de suporte para a célula-S seja
suficientemente rígida para evitar vibrações ou falhas mecânicas. Se for
possível que o sistema vibre, tempos de estabilização mais longos e
leituras instáveis poderão resultar.
•Suspenda a célula-S, evitando tensões no cabo da célula-S.
•Mantenha o corpo da célula-S nivelado durante a pesagem para
assegurar que as leituras de pesagem seja exatas.
4Manutenção e cuidados
•Não deixe o indicador ou o conector do indicador na água.
•Os cabos devem ser arrumados para evitar que sejam obstruídos ou
danificados.
•Quando não usado, sempre coloque o tampão protetor no conector do
indicador.
•Remova o pó e a umidade dos conectores e do tampão usando álcool
desnaturado, álcool etílico ou um agente de limpeza para contatos
elétricos apropriado. Álcool mais forte não deve ser usado, pois ele pode
reagir com o plástico.
•Limpe o indicador com um pano umedecido, água morna e sabão. Outros
detergentes podem danificar a caixa.
5Garantia e assistência
Para informações de assistência e garantia, veja www.tru-test.com.
Todas as marcas registradas com um * não pertencem à Tru-Test Limited, mas aos seus proprietários
correspondentes.

Guía de inicio rápido del Sistema de pesaje de celda S S1
16
GUÍA DE INICIO RÁPIDO
Esta guía de inicio rápido ofrece instrucciones básicas para configurar y usar el
Sistema de pesaje de celda S S1 (celda de suspensión de carga). Para mayor
información visite www.tru-test.com.
Índice
Instrucciones de desempacado..............................16
Instalación del Sistema de pesaje de celda S S1.....17
Consejos de instalación ........................................22
Mantenimiento y cuidados....................................22
Garantía y servicio................................................22
1Instrucciones de desempacado
Revise que cuente con todos estos artículos. Si falta algo, póngase en
contacto con su proveedor.

Guía de inicio rápido del Sistema de pesaje de celda S S1
17
2Instalación del Sistema de
pesaje de celda S S1
Antes de comenzar:
Cargue completamente el indicador
durante toda la noche.
Paso 1:
Instale la celda S según lo requiera su
solución de pesaje específica.
Consulte la
Sección 3 - Consejos de
instalación
para conocer las áreas
que debe prestar atención.
Guía de inicio rápido del Sistema de pesaje de celda S S1
18
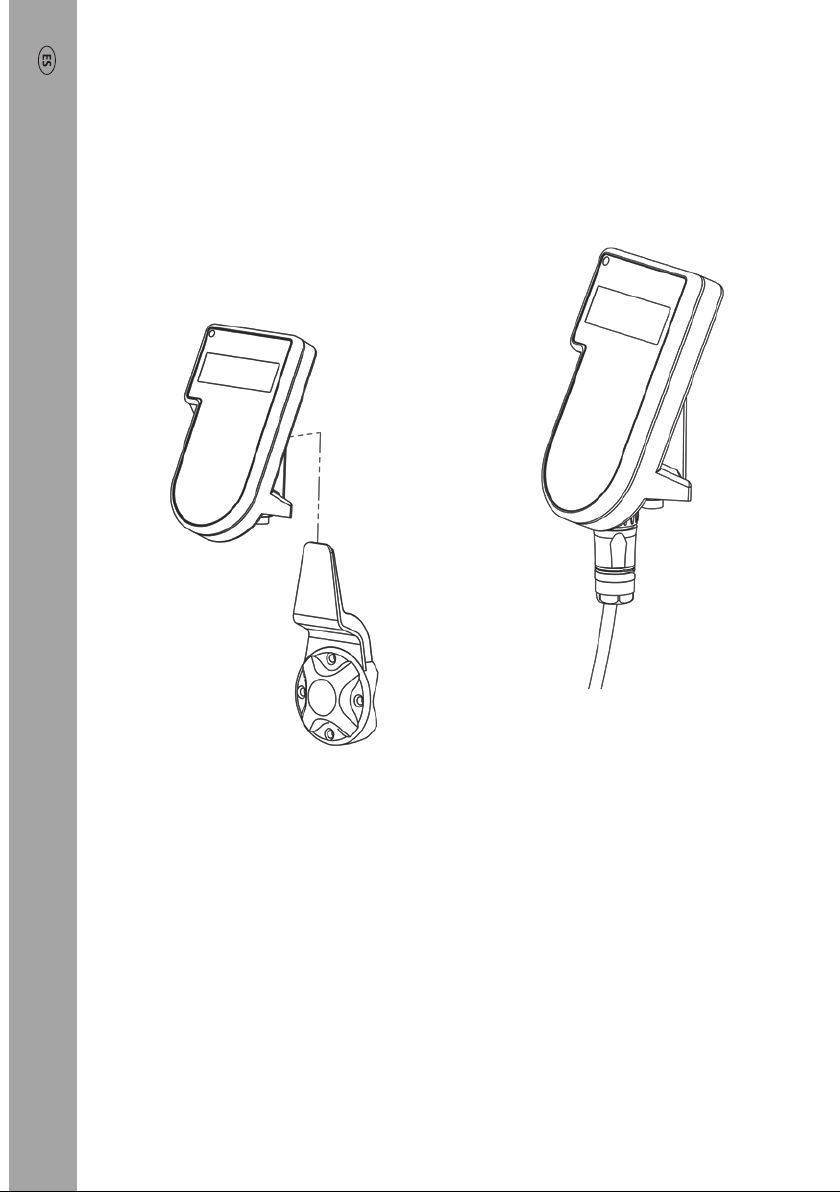
Paso 2:
Coloque el soporte del indicador en un
lugar adecuado y al alcance del cable
de la celda S, usando los tornillos y
tuercas incluidos. Deslice el
indicador en el soporte.
Paso 3:
Enchufe el conector del indicador
al indicador y ajústelo.

Guía de inicio rápido del Sistema de pesaje de celda S S1
19
Paso 4:
Nota:
Siga los pasos 4-10 solo si
desea pasar de pesaje mecánico a
electrónico. De lo contrario, pase
directamente al paso 11.
Si realiza la conversión a pesaje
electrónico, realice la calibración
span en la celda S.
Descargue el software Data Link
para PC de
livestock.tru-test.com/applications/
datalink.
Paso 5:
Conecte el indicador a su PC portátil
usando el cable USB. Enchufe la
celda S al indicador.
Pulse para encender el
indicador.
Abra la aplicación Data Link en su
PC y haga clic en ,
Calibración span.

Guía de inicio rápido del Sistema de pesaje de celda S S1
20
Pasos 6-10
Other manuals for S1
2
Table of contents
Languages:
Other Tru-Test Accessories manuals

Tru-Test
Tru-Test MP600 User manual

Tru-Test
Tru-Test WOW2 User manual

Tru-Test
Tru-Test S2 User manual

Tru-Test
Tru-Test EziWeigh7i User manual

Tru-Test
Tru-Test EziWeigh5i User manual

Tru-Test
Tru-Test S1 User manual

Tru-Test
Tru-Test 5000 Series User manual

Tru-Test
Tru-Test 2000 Series User manual

Tru-Test
Tru-Test EziWeigh5i User manual

Tru-Test
Tru-Test ID5000 User manual


