twin busch TW 115 User manual


TWIN BUSCH GmbH
Printing errors, mistakes and technical changes reserved
©by TwinBusch Germany
2

TWIN BUSCH GmbH
Printing errors, mistakes and technical changes reserved
©by TwinBusch Germany
3
INDEX
1. Important note
5
1.1 Important note
1.2 Specialist
1.3 safety instructions
2. Over view of the wheel alignment device
6-7
2.1 general descriptions
2.2 Function
2.3 Specification
2.4 Requirements for the environment
3. Components of the wheel alignment
8-12
3.1 Overview
3.2 Operator panel
3.3 Computer system
3.4 Printer (not included)
3.5 Bluetooth communication
3.6 Wheel clamp
3.6.1 Hot to mount the wheel clamp
3.7 Steering holder
3.8 Brake holder
3.9 Mechanical turntable (optional)
3.10 Measuring head
3.10.1 Function of the measuring head
3.10.2 Explanation of the sensor head and the control panel
3.10.3
Measuring head setting screen
4. Set up and connect
13
4.1 Set up the wheel aligner
4.2 Connect the wheel aligner
4.3 check the connection
5. Basic steps with the wheel alignment
14-40
5.1 Preparation for the survey
5.2 Program
5.3 (F5) Systems
5.3.1 (F2) Workshop info
5.3.2 (F3) myinformation
5.3.3 (F4) Standard data
5.3.4 (F5) Configuration System
5.3.5 (F6) Sensor information
5.3.6 (F7) Lifting platform calibration
5.3.7 (F8) Sensor calibration
5.3.8 (F9) Errors
5.4 (F6) Customer management
5.5 (F4) Measuring
5.5.1 Set the vehicle
5.5.2 Run out compensation

TWIN BUSCH GmbH
Printing errors, mistakes and technical changes reserved
©by TwinBusch Germany
4
5.5.3 King pin measuring and set up
5.5. Rear axle measuring and set up
5.5.5 Front axle measuring and set up
5.5.5.1 Set up with a Lifter
5.5.5.2 Toe Curve Change Measurement and set up
5.5.6 Extension Measurement
5.5.7 Steering angle measuring
5.5.8 Print Report
5.6 Quick measuring
5.7 Preliminary inspection
6. Maintenance
41
6.1 Computer
6.2 wheel clamp and measuring head
6.3 Printer
7 . A n nex
42-47
7.1 Fundamental terms
7.2 General measuring
7.2.1 T o e
7.2.1.1 Function
7.2.1.2 Assessment of the symptoms
7.2.1.2 Positive Toe Too Large
7.2.1.4 Negative Toe Too Large
7.2.2 Camper
7.2.2.1 Function
7.2.2.2 Assessment of the symptoms
7.2.2.3 Example
7.2.2.4 Caster adjustment
7.2.3 Wheelbase difference
7.2.3.1 Reasons for the emergence of wheelbase difference
7.2.3.2 Assessment of the symptoms
7.2.4 Caster
7.2.4.1 Function
7.2.4.2 Assessment of the symptoms
7.2.4.3 Example
7.2.4.4 Caster adjustment
7.2.5 Inclination
7.2.6 Thrust angle
7.2.7 T o e -out when cornering
7.2.8 Thrust angle
7.2.8.1 The Reasons Thrust Angle Creates
7.2.8.2
Affection Caused by Thrust Angle
7.2.8.3 Correction Method for Thrust Angle

TWIN BUSCH GmbH
Printing errors, mistakes and technical changes reserved
©by TwinBusch Germany
5
1. Important safety instructions
1.1 Important note
Read this manual before using the wheel aligner.
1.2 Professionals
1.2.1 Only trained personnel should operate the wheel alignment.
1.2.2 Electrical connections must be made by an electrician.
1.2.3 Uninvolved persons are not allowed in the vicinity of the wheel alignment.
1.3 Safety note
1.3.1 The operator must know the computer program and have basic knowledge of wheel alignment.
1.3.2 The vehicle lift used must be suitable for wheel alignment and regularly for flawless
and secure function are checked.
Hold the area around the lift clean and free from some other parts.
1.3.3 The wheel alignment device works with image acquisition. Do not interrupt the light beam between the sensors. Avoid
reflections from the ground or direct light on the sensor bars during testing.
1.3.4 Do not place the wheel aligner on vibrating or sloping surfaces.
Avoid direct sunlight and humidity.
1.3.5 The measuring heads are precision parts of the wheel aligner. Do not plug in or unplug the power cord while the units
are turned on, otherwise the built-in sensor maybe goes damaged. Pay particular attention during the mounting of the
probes to avoid damaging the casings and internal parts.
1.3.6 Avoid splashing water on the wheel aligner the system could be completely damaged.
1.3.7 Cables inside the housing and the measuring heads are firmly connected. Any modification can damage the sensor
caused by improper separation is not covered by the warranty.
1.3.8 Check the wheel aligner regularly for accurate measurements.

TWIN BUSCH GmbH
Printing errors, mistakes and technical changes reserved
©by TwinBusch Germany
6
2. Overview about the wheel aligner
2.1 General
The wheel aligner was designed to measure the axle geometry and compare it with the default values of the vehicle
manufacturers. It also gives the user instructions on how to make appropriate adjustments for best steer ability and lowest tire
w e a r .
2.2 Function and properties
•Complete test: The Wheel Aligner can be used to measure the most wheel alignment
Parameters, such as front wheel toe-in, front wheel camber, caster, Kingpin inclination,
Rear wheel toe-in, rear wheel camber, thrust angle, wheelbase difference, tread
Difference, axle offset, front wheel setback and rear wheel setback, etc.
•Complete databank: wheel alignment data of over 20,000 vehicle models is stored in the system. User can also add
new data to the databank.
•Adopts the charge coupled device (CCD) with high resolution, infrared 8-beam and full
Loop measurement, accurate and stable, Bluetooth wireless communication mode, no
Data transmission influence.
•Based on the thrust line to realize the real alignment measurement.
•Front alignment test function: user can select the alignment mode flexibly. Only two
Probe rods are mounted can the emergency alignment measurement for the front wheels are performed.
•The sensor heads are individually interchangeable. After changing one of the sensor
Heads, the other three needs not to recalibrate, which makes the after-sales service
more convenient.
•Fully intelligence. The system can automatically recognize the vehicle with super-low
Chassis to perform the alignment test for this kind of vehicle and the vehicle with
enclosed housing. Aiming to the vehicle model, the system can automatically turn on the corresponding
functions of height measurement and counterweight, etc.
•The demonstration version can run all test flow, which makes user’s training more
Convenient and quick.
•Perform the special alignment test for Mercedes-Benz, BMW, Audi and Passat vehicles,
Etc.
•The units of the alignment parameters can be represented with Degree/Minute,
percentage degree, mm and Inch.
•The voice prompt function is provided during measurement, very easy to understand.
•Automatic check function for incorrect calibration is provided, which can prompt the
user to recalibrate in time.
•Client prompting function can make the client return visit in time.

TWIN BUSCH GmbH
Printing errors, mistakes and technical changes reserved
©by TwinBusch Germany
7
2.3 Specification
description
accuracy
measuring range
Total toe
±1,2′(±0.02º)
±4º
Individual toe
±0,6′(±0.01º)
±2º
Camber
±1,8′(±0.03º)
±4º
Castor
±6′(±0.1º)
±18º
SAI / KPI
±6′(±0.1º)
±18º
Setback
±1,8′(±0.03º)
±2º
Thrust angle
±1,8′(±0.03º)
±2º
NOTE:
The measuring accuracy refers to measured values within the measuring range.
Outside the measuring range, the values are larger.
The above accuracy can only be achieved if the user follows the listed versions.
2.4 Environmental Requirements
Description
Specification
ambient temperature
-20~+50℃
humidity
≤90%

TWIN BUSCH GmbH
Printing errors, mistakes and technical changes reserved
©by TwinBusch Germany
8
3. The components of the wheel alignment
3.1 Overview
The wheel aligner consists essentially of the control panel, the measuring heads, the wheel clamps,
the steering wheel holder and the brake pedal pusher etc.
3.2 Operation panel
The control panel of the wheel aligner mainly consists of the housing (with recordings for the wheel clamps, main switch,
power line, power supply and charging cable), computer and Bluetooth data transfer.
Computer parts are in compartments in the housing. For printing the measurement results a printer is needed
preferably an inkjet printer (not included).
For a comfortable operation it is recommended to use the measuring heads # 1 and # 3 on the left side of the carrier and
Place the measuring heads # 2 and # 4 on the right side of the carrier.
Note: If the wheel aligner is not used, they should be placed correctly on both sides of the carrier and it should be
ensured that they are charged.
Do not place the control panel or probes in places with heavy spray or dust. Make sure the back of the control panel is well
ventilated and that the back of the computer is not blocked or the fan is stopped.
3.3 Computer system
The computer system of the wheel aligner consists of computer, monitor, keyboard and mouse.
The Windows operating system and the program of the wheel alignment device are preinstalled on the computer.
To ensure the safety of the system and for the best performance of the device should be on the computer system
never install other programs ore change some settings.
3.4 Printer (not included)
It is possible to set a printer. You can connect the printer directly to the computer ore connect it via wifi.
3.5 Bluetooth connector
The aligner is equipped with a Bluetooth communication device, as shown in the following figure.
Before use, insert the RS232 plug and USB port on the computer.
USB
RS232
Bluetooth communication unit

TWIN BUSCH GmbH
Printing errors, mistakes and technical changes reserved
©by TwinBusch Germany
9
3.6 Wheel clamp
The wheel aligner has four wheel clamps. Turn the dial so that the distance is large enough to put the clamp on the rim
if necessary, insert the pins in reverse and / or into other insertion holes. Then attach the pins first to the rim flange and then to
the top of the rim flange. Turn the dial clockwise and tighten the wheel clamp. Make sure that the pins are even and clean.
After attaching, check tightness by pulling on the wheel clamp.
Note: applicable wheel sizes
10“-22“.
3.6.1 Use the wheel clamp
Wheel clamp
Adjustment / Knob
Rim
Pin

TWIN BUSCH GmbH
Printing errors, mistakes and technical changes reserved
©by TwinBusch Germany
10
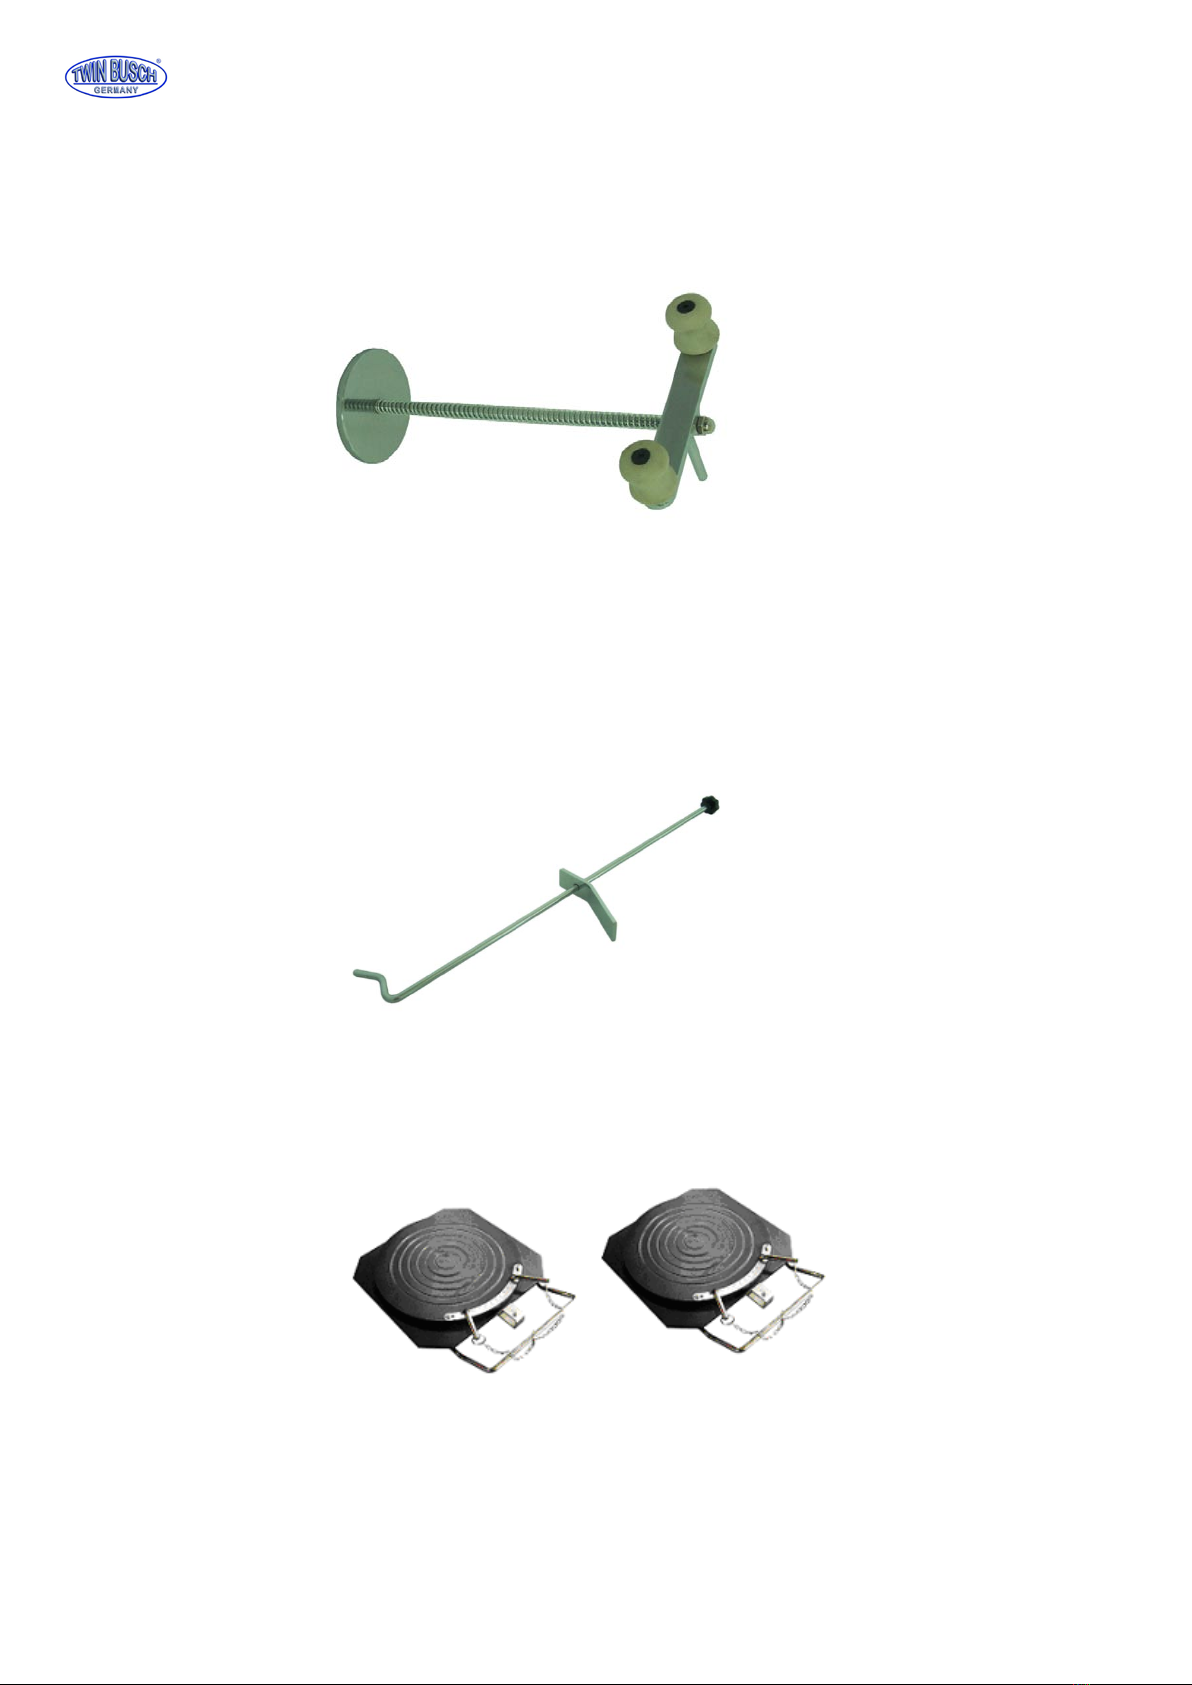
3.7 Steering holder
The wheel aligner has a steering wheel holder as shown in the following picture.
The steering wheel holder is used to fix the steering wheel against rotation during measuring operations.
3.8 Brake holder
The wheel aligner has a brake pedal pusher as shown in the picture below.
It is used to depress the brake pedal to prevent the vehicle from moving
of the measuring process rolls away.
3.9 Mechanical turntable (optional)

TWIN BUSCH GmbH
Printing errors, mistakes and technical changes reserved
©by TwinBusch Germany
1 1
3.10 Measuring head
The wheel aligner is equipped with four measuring heads, which are mounted on the corresponding wheel clamps.
Before attaching the measuring heads, first attach the wheel clamps to the wheels, then insert the axle pin of the
corresponding measuring head into the hole of the central carr i e r .
After aligning the measuring head horizontally, tighten the adjustment knob on the wheel clamp.
3.10.1 Function of the measuring head
3.10.2 Explanation of the sensor head and the control panel
Control panel:
1. Run out compensation button
2. Reverse button
3. Forward button
4. Enter button
Note: To switch on the measuring head, press any button on the control panel.
A
Battery
B
center-CCD
C
Operation panel
D
Charging socket
E
Front-CCD
1
Measuring head front left
2
Measuring head front right
3
Measuring head rear left
4
Measuring head rear right

TWIN BUSCH GmbH
Printing errors, mistakes and technical changes reserved
©by TwinBusch Germany
12
Display:
A/B run out compensation display
After calling the rim override function, the display A flashes after the first press of the button, display B flashes after
the second press of the button, displays A and B go out, the third time the button is pressed.
C Battery
When the battery voltage is low, the indicator is red. If the battery voltage is normal, the indicator is green.
D Connection status
If the connection is normal, the indicator lights up. If the connection is not correct, the display goes off.
E LCD Display
Control panel LCD screen Explanation of the display (as shown in the picture)
A Camber, the currently measured value of the camber of the wheel to which the meter is attached.
B Toe, the currently measured value of the single track of the wheel to which the meter is attached.
C Number of the Measuring head 1#, 2#, 3# and 4#.
D Battery capacity in percent indicates the remaining energy of the battery in the measuring head.
E Alignment status indicator indicates the orientation of the measuring head. The measuring head is aligned when
the position mark 0 matches the mark *.
3.10.3 Measuring display
A Toe indicator, the middle green indicator lights up when the toe is within normal limits,
the outer red indicator lights up when the toe is larger than the standard values, the inner red indicator lights up,
if the toe is smaller than the standard values.
B Camber adjustment indicator, the middle green indicator lights when the camber is within normal limits,
the upper red indicator lights when the fall is larger than the standard values, the lower red indicator lights up,
if the fall is smaller than the standard values.
A
B D
C
E

TWIN BUSCH GmbH
Printing errors, mistakes and technical changes reserved
©by TwinBusch Germany
13
4. Set up and connect
4.1 Set up the device
•
Place the control panel in a suitable place, with sufficient space for the equipment. Manual, packing list, etc., keep
these documents well.
•
Unpack the monitor, place the supplied material, set it up and connect it.
•
Plug the power cord through the hole on the back of the control panel and into the power strip in the bottom
compartment. Also run the monitor cable through the hole and connect to the computer.
•
Unpack the printer (not included), store, place, and connect the supplied material. Connect the USB printer cable to
the computer plug the power cable into the extended-voltage socket in the lower compartment of the control panel.
Insert ink cartridges.
4.2 Connect the device
•Connect the power cable.
•Push the ON button on the computer
•Push the ON button on the monitor
•Push the ON button on the printer
•The unit is correctly connect when all systems are working fine
4.3 Check the connection
•
Drive a vehicle on the vehicle lift or over the pit so that the front wheels are centered on the turntables, apply the
handbrake. To protect the turntables from twisting, remove the pins on the turntables only after starting the vehicle.
•
Attach the wheel clamp to the wheels and tighten with the knob. The pins of the wheel clamps should sit on the outer
or inner edge of the rim flange, depending on the rim type.
Make sure the height of each clamp is the same and avoid mounting on deformed areas.
•
Install the measuring head on the correct wheel brackets according to the defined positions.
See the following picture:
•Adjust the measuring heads.
•Restart the computer and run the axis measurement program. On the main screen, press the [System] button (F5),
then press the [Sensor Information] button (F6).
Check the connection between the computer and the measuring heads is normal and the indicator for the
Measuring heads is normal.
The connection check succeeds if all the above steps are normal.

TWIN BUSCH GmbH
Printing errors, mistakes and technical changes reserved
©by TwinBusch Germany
14
5. Basic work steps with the wheel alignment device
The basic steps with the wheel aligner are the following:
Vehicle information procure → road test → Carry out testing prior test (each chassis part and tire wear carefully check) →
measuring and adjusting → test result print → back road test perform to confirm the results of the wheel alignment.
The order, the settings, the axle geometry for normal vehicles is:
Rear camber, track back, trailing forward, fall forward, front track.
The order of the axle geometry settings for multi-link axles (such as the VW Passat B5,AudiA4 /A6 /A8, etc.) is:
Rear camber → Rear track → Front camber → Front toe-in measurement → Front toe-in.
Ask the vehicle owner for drivability issues, as well as find out about past symptoms and wheel measurements, and brand,
model and year information.
Check each chassis part carefully, including dust sleeves, guides, handlebars, suspension ball joints, shock absorbers, tie rod
joint and steering mechanism in play and / or wear.
Then check the air pressure and compare if the tire wear is the same on both sides.
Do not perform the survey until the initial conditions are known.
If the measured values deviate from the given values, the wheel position must be corrected.
After completing the wheel alignment, check the vehicle to see if the deviating conditions have been eliminated.
If necessary, carry out the wheel measurement again.
5.1 Prepare for the measuring
1. driving a vehicle on the car lift or over the pit, so that the front wheels are on the center of the turntable, apply the hand
brake. To protect the turntables from twisting, remove the pins on the turntables only after starting the vehicle.
2. Attach the wheel clamps to the wheels and tighten with the knob. The pins of the wheel clamps should sit on the outer or
inner edge of the rim flange, depending on the rim type. Make sure the height of each clamp is the same and avoid
mounting on deformed areas.
3. Install the measuring heads on the correct wheel clamp according to the defined positions.
4. Adjust the measuring heads.
5. Mount the steering holder on the steering and fix this.
6. Mount the brake holder between the brake and the driver seat.
7. Start the alignment system with the power button.

TWIN BUSCH GmbH
Printing errors, mistakes and technical changes reserved
©by TwinBusch Germany
15
5.2 application interface
The display shows the application interface.
F2 Info-button shows information about the wheel etc.
F3 Quick measurement button provides a working surface for quick measurement in which toe-in and Camber
the front and rear wheels are simultaneously measured and displayed.
F4 Measurement button, for carrying out the measurement and adjustment of the survey geometry of the vehicle.
F5 System button, to enter or set the status of the program, such as workshop info, own data, sensor information, etc.
F6 Customer management button to create, modify or delete customer maintenance records and
Print the test report form.
Esc Exit button, to exit the system and goes back to windows.

TWIN BUSCH GmbH
Printing errors, mistakes and technical changes reserved
©by TwinBusch Germany
16
5.3 (F5) System settings
If you click on the button (F5), System, the screen shows a user interface as shown in the following picture:
F2 Workshop info, for the input of workshop data, such as name, address, telephone and fax etc.
F3 Own files, for entering your own vehicle survey data and for importing
Standard data by the operator.
F4 Standard data, for access, to the vehicle measurement data of the manufacturer, by the operator.
F5 Configuration system, to set the operating parameters (such as units of measurement and language versions)
of the wheel alignment program.
F6 Sensor information, for the display of the status, of the sensor in the measuring head.
F7 Lifting platform calibration, to calibrate the platforms of the lift.
F8 Calibrate the measuring heads.
F9 Errors, show the error logs.

TWIN BUSCH GmbH
Printing errors, mistakes and technical changes reserved
©by TwinBusch Germany
17
5.3.1 (F2) Workshop information
If you click the button (F2) Workshop Info, the screen shows a user interface, as shown in the following picture:
It is necessary to create your own workshop information before the first use.
The entered information appears in the printout of the survey report.

TWIN BUSCH GmbH
Printing errors, mistakes and technical changes reserved
©by TwinBusch Germany
18
5.3.2 (F3) my documents
If you click the button (F3) My Documents, the screen shows a user interface, as shown in the following picture:
On this page, the user can create self-defined survey data
(Button F6 ), or import standard data, as well as modify
and delete this data. Standard data can be accessed by F8 be selected and imported. With the button F2
the self-defined data for the measurement are taken over.

TWIN BUSCH GmbH
Printing errors, mistakes and technical changes reserved
©by TwinBusch Germany
19
5.3.3 (F4) Standard data
If you click the button (F4) Standard data, the screen shows a user interface, as in the following picture:
On the Default Data page, the user can query original vehicle survey data.

TWIN BUSCH GmbH
Printing errors, mistakes and technical changes reserved
©by TwinBusch Germany
20
5.3.4 (F5) Configuration System
If you click the button (F5) configuration system, the screen shows a user interface, as in the following picture:
A Select Version: here you can choose between the normal and the demo version.
If you do a survey, you have to choose the normal version.
The demo version is for demonstration purposes only and for practicing on the wheel measurement.
B Select wheel alignment mode: here you can choose between the two wheel alignment modes, 4-wheel measurement
(normal case) or front axle measurement.
C Select of angel unit: here you can set the unit of the angles.
D Set the language.
E Select of the print form: here you can choose between two types of report form, formal or graphical.
F Unit selection for the toe: degree, millimeters, degrees / minutes, and inches.
A
B
C
D
E
F
Table of contents
Other twin busch Wheel Balancer manuals
Popular Wheel Balancer manuals by other brands

Hoffman
Hoffman geodyna 6300-2 manual

HENNESSY INDUSTRIES
HENNESSY INDUSTRIES coats 1000 installation instructions

Rotary
Rotary R544PLUS Instruction, use and maintenance manual

ATH-Heinl
ATH-Heinl ATH W22 operating instructions

John Bean
John Bean VPI System IV Operation instructions

Hofmann
Hofmann Megaspin 800 Operating instructions manual