manuals.online logo
Brands
  1. Home
  2. •
  3. Brands
  4. •
  5. Tyco Electronics
  6. •
  7. Crimping Tools
  8. •
  9. Tyco Electronics 69067 User manual

Tyco Electronics 69067 User manual

Instruction Sheet
408-2454
LOC B
1
of 4
E
2008 Tyco Electronics Corporation, Harrisburg, PA
All International ights eserved
TE logo and Tyco Electronics are trademarks.
*Trademark. Other products, logos, and company names used are the property of their respective owners.
TOOLING ASSISTANCE CENTE 1-800-722-1111
P ODUCT INFO MATION 1-800-522-6752 This controlled document is subject to change.
For latest revision and egional Customer Service,
visit our website at
www.tycoelectronics.com
25 AUG 08 ev B
Hy raulic Crimping Hea 69067
Figure 1
Pivot Pin
Yoke
Latch Pin
DYNA-C IMP*
Hydraulic Crimping
Head 69067
Quick-Disconnect Coupler,
Cylinder Half (Mates With
Coupler on Hose or Handle
Control)
Dust
Cap
1. INTRODUCTION
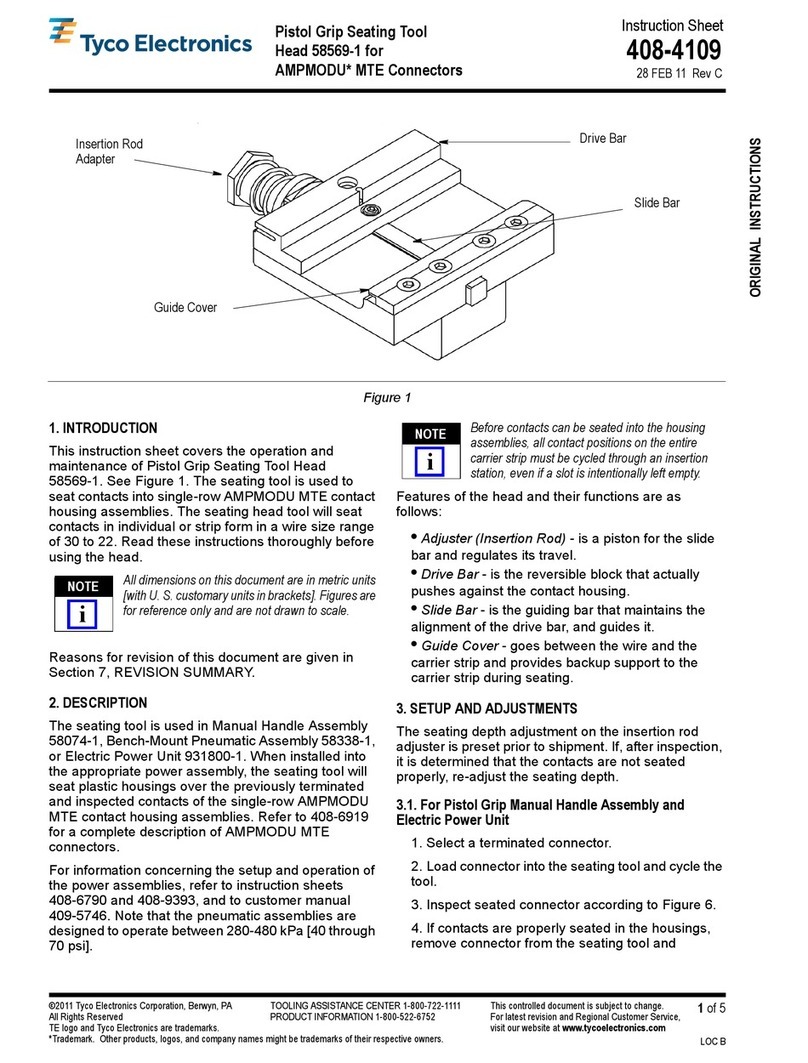
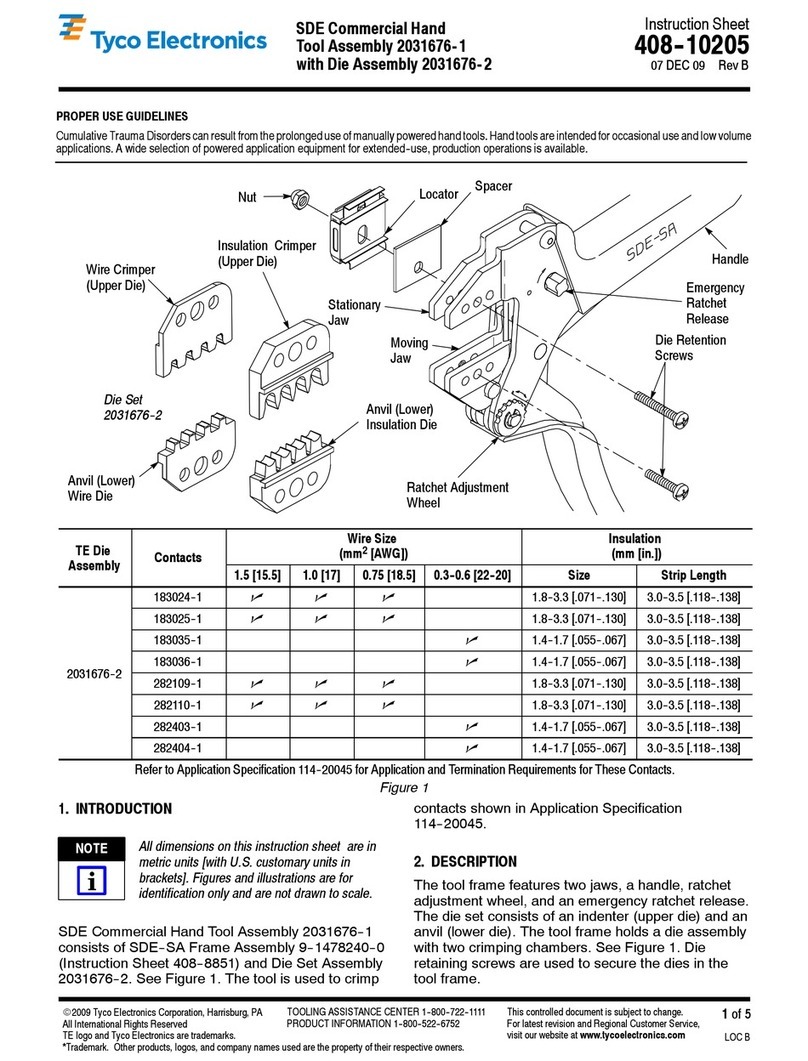
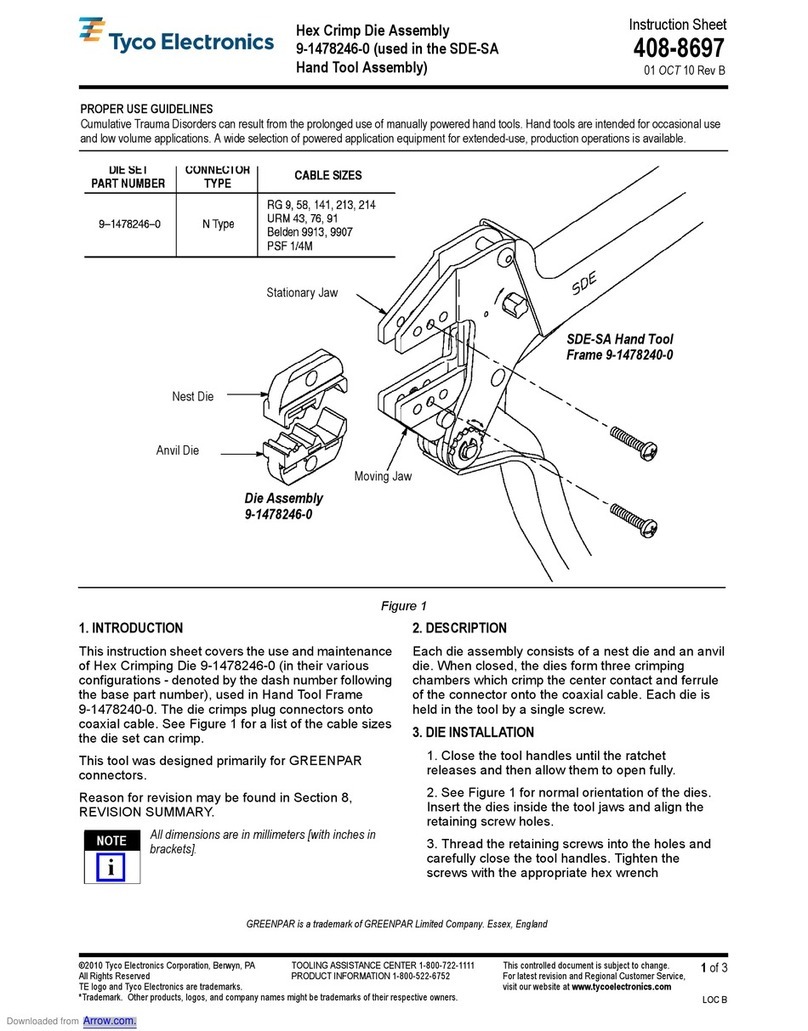
This instruction sheet provides application and
maintenance and Inspection Procedures for
DYNA–CRIMP Crimping Head 69067. The tool is
used to crimp SOLISTRAND* Terminals, Flag
Terminals, and Splices onto 8–4/0 AWG wire. See
Instruction Sheet 408–9785.
The crimping head is designed for DYNA–CRIMP
tools:
S
Hydraulic Power Unit 69120–[ ] (409–1950)
S
Hydraulic Hand Pump 314979–1 (409–5860)
Read these instructions, and all applicable
references, before inserting any die assemblies and
crimping any terminals or splices.
All dimensions on this document are in metric
units [with inches in brackets]. Figures and
illustrations are for reference only and are not
drawn to scale.
Reasons for reissue are provided in Section 8,
REVISION SUMMARY.
2. DESCRIPTION
(Figures 1 and 4)
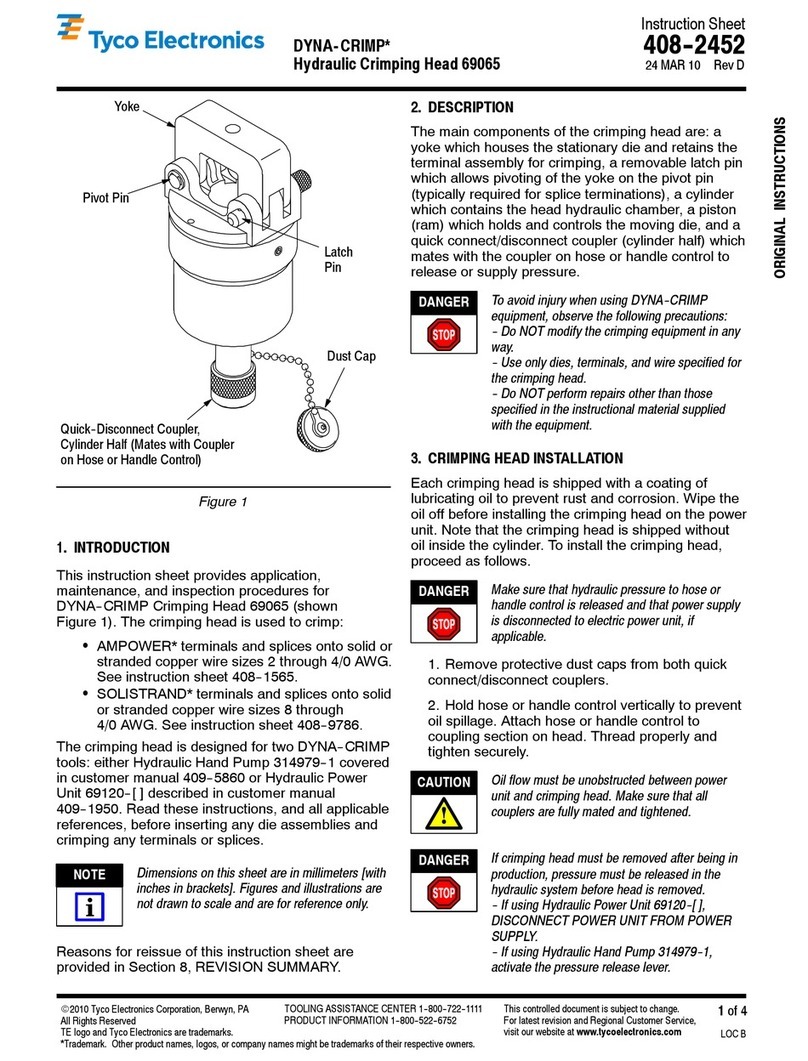
The main components of the crimping head include: a
yoke, which houses the stationary die and retains the
terminal assembly for crimping; a removable latch pin,
which allows pivoting of the yoke on the pivot pin
(typically required for splice terminations); a cylinder
which contains the head’s hydraulic chamber; a piston
(ram) which holds and controls the moving die; and a
quick–connect/disconnect coupler (cylinder half),
which mates with the coupler on the hose or handle
control to release or supply pressure.
To avoid personal injury when using
D NA-CRIMP equipment, observe the following
precautions:
D
Do NOT modify the crimping equipment in any
way.
D
Use only dies, terminals, and wire specified for
the head.
3. CRIMPING HEAD INSTALLATION
Each crimping head is shipped with a coating of
lubricating oil to prevent rust and corrosion. Wipe the
oil off before installing the crimping head on the power
unit. Note that the crimping head is shipped without
oil inside the cylinder. To install crimping head,
proceed as follows:
MAKE SURE that hydraulic pressure to hose or
handle control is released and that power supply
is disconnected from electric unit, if applicable.
1. Remove protective dust caps from both
quick–connect/disconnect couplers.
2. Hold hose or handle control in vertical position
to prevent oil spillage. Attach hose or handle
control to coupling section on head. THREAD
PROPERLY AND TIGHTEN SECURELY.
Oil flow must be unobstructed between power
unit and crimping head. Make sure that all
couplers are fully mated and tightened.
If crimping head must be removed after being in
production, pressure must be released in the
hydraulic system before head is moved.
D
If using Hydraulic Power Unit 69120-[ ],
DISCONNECT POWER UNIT FROM POWER
SUPPL .
D
If using Hydraulic Hand Pump 314979-1,
depress pressure release lever.
NOTE
i
DANGER
DANGER
CAUTION
!
NOTE
i
408-2454
Hydrauli Crimping Head 69067
Rev
B2
of 4 Tyco Elec ronics Corpora ion
Figure 2
Push Nes in o
Yoke Well
Push Inden er
in o Ram Well
La ch Pin
Removed
Ram Advanced
Yoke
Place Screwdriver
Here o Remove Dies
4. DIE INSERTION AND REMOVAL
To avoid p rsonal injury, x rcis caution wh n
using pow r unit to avoid accid ntly d pr ssing
th foot p dal or th handl control wh n
installing or changing di s.
4.1. Die Insertion
1. Remove latch pin and open yoke on crimping
head.
2. Insert stationary die (upper) into yoke by
pushing die until the “ball seat” snaps into position.
See Figure 2.
3. Advance ram slightly before inserting the
indenter (moving die, lower), making sure that
moving die is properly oriented to mate with
stationary die. See Figure 2.
4. Close yoke and secure with latch pin.
5. Complete the cycle and return the ram to the
“DOWN” position.
Ensur that th latch pin is fully ins rt d or
damag may occur to th yok , di s, or latch pin.
4.2. Die Removal
1. Remove latch pin and open yoke.
2. Insert screwdriver under stationary die and pry
die out of yoke. See Figure 2.
3. Raise ram to full “UP” position.
4. Insert screwdriver under moving die and pry out
of ram.
A latch pin kit (part numb r 69709-4) is availabl
as an acc ssory it m. Th latch pin is attach d to
th pivot pin by a chain to avoid misplacing th
latch pin.
5. CRIMPING PROCEDURE
To avoid p rsonal injury wh n op rating th
pow r unit, b sur to x rcis caution whil
holding th t rminals, splic s, or wir n ar th
crimping ar a.
The following crimping procedure provides general
information. Refer to instructions packaged with
individual die sets for specific products, wire sizes,
strip dimensions, positioning of terminals and splices
in the dies, and crimping procedures.
K p th pow r unit in th upright position. N v r
op rat th unit without having a crimping h ad
attach d to th handl control or crimping h ad
coupling.
1. Insert terminal or splice in the stationary (upper)
die according to instructions with the dies. MAKE
SURE THE LATCH PIN IS SECURE before
activating the power unit.
2. To advance ram when using handle control,
depress RESET switch, then depress RUN switch.
See note below. When using foot control, depress
and release RESET pedal, then depress RUN
pedal.
Activat th control with short, quick strok s until
th di s hold th t rminal or splic . Th ram will
not r turn until th crimping cycl is compl t ,
xc pt by th following m thods:
D
D pr ss th pr ssur r l as button locat d on
th l ctrical control box.
D
Wh n using pow r unit 69120-[ ] d pr ss
DUMP switch or p dal.
3. Insert the stripped wire into the terminal or
splice.
4. Depress RUN switch or pedal until power unit
completes crimping cycle and ram returns to
neutral position.
If th t rminal or splic sticks in th di aft r
crimping, apply a rocking action to r mov it from
th di .
DANGER
CAUTION
!
NOTE
i
DANGER
NOTE
i
NOTE
i
NOTE
i
408-2454
Hydraulic Crimping Head 69067
3
of 4Rev
B
Tyco Electronics Corporation
Operating Procedure for Hydraulic Foot Pump 69325-3
Hydraulic Ha d Pump 69325-3 was superceded
by Hydraulic Ha d Pump 314979-1.
Keep the foot pump i a vertical positio . Never
operate the u it without havi g a crimpi g head
attached to the crimpi g head coupli g.
1. Insert the terminal or splice in the stationary die
according to the instruction sheet for the dies being
used. MAKE SURE THE LATCH PIN IS SECURE
before activating the power unit.
2. Pump the upper foot pedal to activate the unit.
Continue pumping until the movable die contact the
terminal or splice and holds it firmly in place. A
sudden decrease in effort required to push the
pedal down will be observed during the initial
build–up of pressure.
3. Insert the stripped wire.
4. Continue pumping until the pressure relief valve
is activated. A slight decrease in effort required to
push the pedal down, accompanied by a snapping
sound, indicates maximum required crimping
pressure has been reached.
5. Press and hold the return pedal until the ram
withdraws from the closed position just enough to
remove the crimped terminal or splice.
If a termi al or splice sticks i the die after
crimpi g, apply a rocki g actio to remove it from
the die.
6. INSPECTION/MAINTENANCE
To avoid perso al i jury, be sure hydraulic
pressure is released a d power supply is
disco ected before followi g i spectio a d
mai te a ce procedures, u less otherwise
specified i the procedure.
Each crimping head is assembled and inspected
before shipment. Tyco Electronics recommends that
the crimping head be inspected immediately upon
arrival, and at regularly scheduled intervals, to ensure
that the crimping head has not been damaged during
handling and use. Frequency of inspection depends
upon the following: care, amount of use, and handling
of the head; type and size of products crimped;
degree of operator skill; and environmental
conditions.
6.1. Cleaning
Remove accumulations of dirt and grease on the
crimping head, especially in areas where dies are
installed and terminals are crimped. Clean the entire
head frequently with a clean, lint–free cloth.
6.2. isual Inspection
Refer to Figure 3 and proceed as follows:
1. With hydraulic pressure released, inspect the
assembled head for nicks, scratches, and cracks.
Inspect for cracks especially at the corners of the
yoke and around the top of the cylinder.
Figure 3
Check These Areas
for Cracks
Check for Excessive
Wear at Pivot Pin
and Latch Pin
Check Die
Areas for
Damage
2. Inspect pivot pin holes and latch pin holes for
wear. Replace parts as needed.
3. Activate power unit. Raise ram to “UP” position.
Inspect flat and round surfaces of ram for galling
(fretting or wear by friction), cracks, or oil leakage.
Release pressure and make sure that ram retracts
smoothly.
4. If head shows evidence of galling, cracks, oil
leakage, or rough cycling, return the crimping head
to Tyco Electronics for repairs. (Refer to Section 7,
REPLACEMENT PARTS AND REPAIR).
6.3. Crimping Head Inspection Procedure
A. With Hydraulic Power Unit 69120-[ ]
If the ram fails to return to the “DOWN” position after
completion of a crimping cycle, the cause may be in
the crimping head. To determine whether or not the
trouble is in the crimping head, press the pressure
release button on the electrical control box or, if the
NOTE
i
NOTE
i
NOTE
i
DANGER
408-2454
Hydraulic Crimping Head 69067
Rev
B4
of 4 Tyco Electronics Corporation
unit has the dump feature, move the trigger to the
dump position and hold it for several seconds. This
will release any pressure in the hydraulic system. If
the ram returns, the trouble is not in the crimping
head. If it does not return, return the crimping head
for repairs.
B. ith Hydraulic Foot Pump 69325-3
Hydraulic Foot Pump 69325-3 was superceded
by Hydraulic Hand Pump 314979-1.
If the ram fails to return after the return pedal is
pressed, refer to the crimping head disassembly
procedure, beginning with Step 2.
7. REPLACEMENT PARTS AND REPAIR
The parts listed in Figure 4 are customer–
replaceable. A complete inventory can be stocked
and controlled to prevent lost time when replacement
of parts is necessary. Order replacement parts
through your Tyco Electronics Representative, or call
1 800 526–5142, or send a facsimile of your purchase
order to 1 717 986–7605, or write to:
CUSTOMER SERVICE (38–35)
TYCO ELECTRONICS CORPORATION
P. O. BOX 3608
HARRISBURG, PA 17105–3608
Tools may be returned to Tyco Electronics for
evaluation and repair. For tool repair service, contact
a Tyco Electronics Representative at
1–800–526–5136.
8. REVISION SUMMARY
The following changes were made since the previous
release of this sheet:
S
Updated document to corporate requirements
S
Deleted text in Section 1, Paragraph
3.2.NOTE, Section 6, and Paragraph 6.3.A
S
Changed Foot Pump 314979–1 to Hand Pump
314979–1 in all instances
S
Deleted Paragraph 6.4
S
Deleted parts information in Figure 4
1
12
13
9
9a
9b
9c
9c
9e
9e
9d
9f
ITEM NUMBER PART NUMBER DESCRIPTION QTY PER HEAD
1 311471-1 COUPLER, Quick-Disconnect, Cylinder Half 1
9a 306209-2 PIN, Latch 1
9b 301516 PIN, Pivot 2
9c 21045-9 RING, Retaining 2
9d 301556 SPRING 2
9e 301555 SPACER 2
9f 23057-6 BALL PLUNGER 1
12 1-22667-4 SETSCRE , Socket, Self-locking, 1/4-20 x .250 in. Lg. 1
13 23057-4 BALL PLUNGER 1
Figure 4
NOTE
i

Other Tyco Electronics Crimping Tools manuals

Tyco Electronics ERGOCRIMP 6-1579001-5 User manual

Tyco Electronics

Tyco Electronics ERGOCRIMP 6-1579001-5 User manual

Tyco Electronics 58571-1 User manual

Tyco Electronics

Tyco Electronics 58571-1 User manual

Tyco Electronics PRO-CRIMPER III User manual
Tyco Electronics

Tyco Electronics PRO-CRIMPER III User manual

Tyco Electronics PRO-CRIMPER III User manual

Tyco Electronics

Tyco Electronics PRO-CRIMPER III User manual
Tyco Electronics 9-1478246-0 User manual

Tyco Electronics

Tyco Electronics 9-1478246-0 User manual

Tyco Electronics 1490748-1 User manual

Tyco Electronics

Tyco Electronics 1490748-1 User manual

Tyco Electronics 69156-1 User manual

Tyco Electronics

Tyco Electronics 69156-1 User manual

Tyco Electronics PRO-CRIMPER III User manual
Tyco Electronics

Tyco Electronics PRO-CRIMPER III User manual

Tyco Electronics 603995 Series User manual

Tyco Electronics

Tyco Electronics 603995 Series User manual

Tyco Electronics 58443-1 User manual

Tyco Electronics

Tyco Electronics 58443-1 User manual

Tyco Electronics PRO-CRIMPER III User manual

Tyco Electronics

Tyco Electronics PRO-CRIMPER III User manual

Tyco Electronics PRO-CRIMPER III User manual

Tyco Electronics

Tyco Electronics PRO-CRIMPER III User manual

Tyco Electronics 1804834-1 User manual

Tyco Electronics

Tyco Electronics 1804834-1 User manual

Tyco Electronics 58605-1 User manual

Tyco Electronics

Tyco Electronics 58605-1 User manual

Tyco Electronics PRO-CRIMPER III User manual

Tyco Electronics

Tyco Electronics PRO-CRIMPER III User manual

Tyco Electronics 2-1579004-9 User manual

Tyco Electronics

Tyco Electronics 2-1579004-9 User manual

Tyco Electronics PRO-CRIMPER III User manual

Tyco Electronics

Tyco Electronics PRO-CRIMPER III User manual

Tyco Electronics 408-10050 User manual

Tyco Electronics

Tyco Electronics 408-10050 User manual

Tyco Electronics DYNA-CRIMP 69065 User manual

Tyco Electronics

Tyco Electronics DYNA-CRIMP 69065 User manual

Tyco Electronics PRO-CRIMPER III User manual

Tyco Electronics

Tyco Electronics PRO-CRIMPER III User manual

Tyco Electronics 90301-2 User manual

Tyco Electronics

Tyco Electronics 90301-2 User manual

Tyco Electronics 1752787-1 User manual

Tyco Electronics

Tyco Electronics 1752787-1 User manual

Tyco Electronics PRO-CRIMPER III User manual

Tyco Electronics

Tyco Electronics PRO-CRIMPER III User manual

Tyco Electronics 1490749-1 User manual

Tyco Electronics

Tyco Electronics 1490749-1 User manual

Popular Crimping Tools manuals by other brands

Panduit BlackFin CT-2980/ST instruction manual

Panduit

Panduit BlackFin CT-2980/ST instruction manual

molex CR5905 Operating Instruction and Specifications Sheet

molex

molex CR5905 Operating Instruction and Specifications Sheet

ODU 080.000.064.000.000 instruction manual

ODU

ODU 080.000.064.000.000 instruction manual

molex 207129 Series Specification sheet

molex

molex 207129 Series Specification sheet

molex 63825-2600 Specification sheet

molex

molex 63825-2600 Specification sheet

TE Connectivity ERGOCRIMP 1-1579001-3 instruction sheet

TE Connectivity

TE Connectivity ERGOCRIMP 1-1579001-3 instruction sheet

Bollhoff RIVCLINCH 0201 FS user manual

Bollhoff

Bollhoff RIVCLINCH 0201 FS user manual

Hasco Z 865 Series operating instructions

Hasco

Hasco Z 865 Series operating instructions

TE Connectivity PDT-48-00 instruction sheet

TE Connectivity

TE Connectivity PDT-48-00 instruction sheet

molex 63823-7570 Specification sheet

molex

molex 63823-7570 Specification sheet

Klauke TEXTRON K05 instruction manual

Klauke

Klauke TEXTRON K05 instruction manual

molex 63825-1900 Specification sheet

molex

molex 63825-1900 Specification sheet

Burndy PATRIOT 444S Series SAFETY OPERATING & MAINTENANCE INSTRUCTIONS

Burndy

Burndy PATRIOT 444S Series SAFETY OPERATING & MAINTENANCE INSTRUCTIONS

TE Connectivity 2386892-1 instruction sheet

TE Connectivity

TE Connectivity 2386892-1 instruction sheet

molex 35745 Series Specification sheet

molex

molex 35745 Series Specification sheet

Temper Koban KCM-400 instruction manual

Temper

Temper Koban KCM-400 instruction manual

Aalberts industries Apollo PEX 69PTKH00143 instruction sheet

Aalberts industries

Aalberts industries Apollo PEX 69PTKH00143 instruction sheet

HYDROSCAND H24DC user manual

HYDROSCAND

HYDROSCAND H24DC user manual

manuals.online logo
manuals.online logoBrands
  • About & Mission
  • Contact us
  • Privacy Policy
  • Terms and Conditions

Copyright 2025 Manuals.Online. All Rights Reserved.