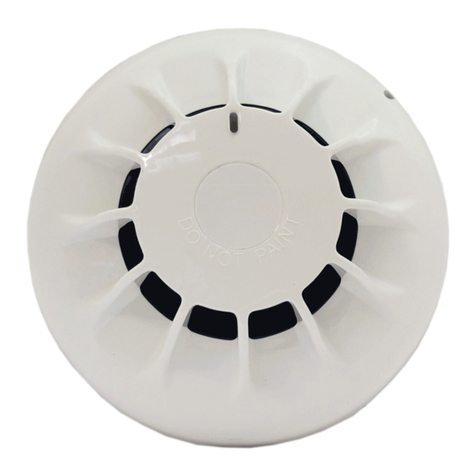
Tyco PowerG PG9936H User manual

PG9936H Wireless Heat Detector
Installation and Operating Instructions
Read this instruction sheet thoroughly before installation and use of the PG9936H
Introduction
The PG9936H is a wireless heat detector with a fixed temperature and rate of rise heat sensor
and an internal piezoelectric alarm.
The following versions are available:
Frequency (MHz) Version Region
915 PG9936H Middle East
Compatible Devices
This detector is compatible with UL Listed IQPanel2 Wireless Control Panels using PowerG
Technology.
HUSH/TEST BUTTON
For UL installations use this device only in conjunction with
compatible IQPanel2 wireless receivers. Transmissions occur
at approximately 915 MHz (912MHz to 919 MHz).
Operation
During normal operation, the green LED flashes every 60 seconds.
The detector goes into alarm when the heat level exceeds 135 ºF / 58 ºC and automatically
restores when the heat level falls below the threshold. The detector also goes into alarm when
the temperature rapidly increases over a short period of time. During an alarm, the LED flashes
once per second and the sounder emits the fire evacuation temporal 3 pattern.
Detector Trouble
If the detector has a general fault, the yellow LED blinks once every four seconds and emits a
chirp every 48 seconds. After four hours, the panel displays a fire trouble message.
Detector and Status Indication
Status LEDs Sounder
Normal Double Green flash every 60 seconds Off
Heat Alarm Red flash every 1 second ANSI S3.41 temporal 3
Heat Test Red flash every 1 second ANSI S3.41 temporal 3
Test Alarm
(button
press)
Red flash every 1 second ANSI S3.41 temporal 3
Detector
Trouble Yellow flash every 4 seconds One chirp every 48 seconds
Low Battery Yellow flash every 12 seconds One chirp every 48 seconds
(press button to hush for 12 hours)
Power-up Red, yellow, green, flash sequence One chirp at the end of the power-up
sequence
Tamper Red, yellow, green flash sequence every
12 seconds Off
Tamper
Removing the detector from the mounting plate initiates a “tamper” transmission. The tamper
condition is restored after the detector is mounted on the plate.
Wireless Transmissions
A supervisory message is transmitted at 128 second intervals. If the signal is not received, the
control panel determines that the detector is missing.
The detector transmits the following:
lAlarm / Alarm Restore -Transmitted at time of occurrence.
NOTE: During an alarm condition, the detector sends an alarm event to the control panel.
When the condition is restored, the detector sends an alarm restore event to the
panel and sets the alarm restore indicator. The red LED blinks once every four

seconds until the Alarm in memory is cleared. You can clear the alarm restore indic-
ator from the control panel or press and hold the test button for five seconds.
lTamper / Tamper Restore - (tamper switch activated) ten- second maximum delay on
restore before transmission.
lLow Battery - (battery voltage falls below threshold). Battery voltage is tested & transmitted
at the time of a supervisory or other transmissions.
lTrouble - (detector fault limit reached). Troubles are transmitted at the time of occurrence
(one trouble per supervisory interval).
Batteries
The wireless heat alarm is powered by three AAA Duracell Procell PC2400 or three AAA Ener-
gizer E92 batteries (included). The detector regularly checks for a low battery. If a low battery is
detected, the transmitter sends a message to the control panel, which displays the detector's ID
at low battery. In addition, the yellow LED of the detector blinks every twelve seconds. The
detector's sounder chirps every 48 seconds and the yellow LED continues to blink until the bat-
teries are replaced. Pressing the hush button silences the chirps for twelve hours if no other
trouble conditions exist. The batteries should be replaced with new batteries when the chirps
begin.
At low battery, the test button is disabled.
NOTE: If the alarm does not sound, contact the installer or dealer for service.
Battery Installation and Replacement
CAUTION: Risk of explosion if battery is replaced by an incorrect type. Dispose of used bat-
tery according to the manufacturer's instructions.
To replace batteries, complete the following steps:
1. Remove the detector from its mounting base by twisting the detector counterclockwise.
Carefully remove batteries by lifting from the “+” end using a flathead screwdriver and dis-
pose of them according to local regulations.
2. To ensure a proper power-down sequence, wait a minimum of 30 seconds before
installing new batteries.
3. Install three new AAA batteries, available from a local Duracell or Energizer dealer, in the
battery compartment. Install the batteries by inserting the “-” end first, then pushing the “+”
end down. If the batteries are incorrectly inserted, carefully remove and correctly re-insert-
ing them following the procedure described in step 1.
BATTERY COMPARTMENT
+++
4. Re-install the detector on its mounting base by turning the detector clockwise until the mat-
ing marks align.
5. After the power-up sequence, the green LED blinks twice every 60 seconds to indicate
normal operation. If the batteries are not installed correctly, the detector will not operate
and the batteries may be damaged. If the detector does not power up, check that the bat-
teries are installed correctly and fully charged.
6. Test the detector as described in this document.
CONSTANT EXPOSURES TO HIGH OR LOW TEMPERATURES OR HIGH HUMIDITY MAY
REDUCE BATTERY LIFE.
Installation Instructions
The PG9936H wireless heat detector shall be installed and used within an environment that
provides the pollution degree max 2 and over voltages category II in non-hazardous locations,
indoor only. The equipment is designed to be installed by SERVICE PERSONS only;
(SERVICE PERSON is defined as a person having the appropriate technical training and exper-
ience necessary to be aware of hazards to which that person may be exposed in performing a
task and of measures to minimize the risks to that person or other persons).
2. Mount Detector Backplate
NOTE: The alarm device should only be installed by a competent engineer or technician.
Once a suitable location is found, mount the detector backplate. Install the mounting base on
the ceiling or on the wall (if local ordinances permit) using screw locations as required. Use the
two screws and anchors provided. Maneuver the base so the screws are at the elbow of the
screw slots and secure.

100 mm (4 in.) minimum
100 mm (4 in.)
minimum
3. Mounting
Fit the detector inside the base by aligning it over the base. The detector's alignment notch
should be slightly offset from the mounting base tamper release tab. Turn the detector clockwise
until it clicks into place.
To activate the built-in anti-tamper lock, carefully remove the breakaway tab on the backplace as
shown in the following figure.
Breakaway tab
4. Device Enrollment
The 7-digit serial number located on the back of the detector housing must be enrolled on the
alarm system control panel. See the Receiver Installation Manual and follow the enrollment pro-
cedure. For placement tests, remove the detector from its backplate for one second (tamper)
and then reattach. Wait at least 30 seconds for the test result before activating again.
A general description of the procedure is provided in the following flow chart:
Procedure - Auto Learn (preferred method)
1. Access the security device Auto Learn page: Settings > Advanced Settings > Installation >
Devices > Security Sensors > Auto Learn Sensor.
2. Power up the device by installing the battery. A two-minute enrollment window begins and
enrollment instructions are displayed on the IQPanel2 screen.
3. Click OK, then customize device settings as required.
4. Click Add New to complete enrollment.
Procedure - Manual Enrollment
1. Access the Add Security Device page: Settings > Advanced Settings > Installation >
Devices > Security Sensors > Add Sensor.
2. Enter the Device ID then customize device settings as requred.
3. Select Add New.
4. Power up the device (insert battery) to start the PowerG association process.
5. Test Unit
NOTE: The central monitoring station, if used, should be notified prior to the test being gen-
erated. This prevents a false alarm and an unnecessary response from the central mon-
itoring station.
To test the detector only, press and hold the Test button for less than five seconds. The sounder
chirps to indicate that the unit is functioning properly. When the button is released, the chirping
ceases. To test the detector and the alarm panel together, press and hold the Test button for
more that five seconds. An alarm signal is sent to the control panel.
NOTE: Allow a minimum of 20 seconds after power up and after test, alarm or tamper restore
activations.
NOTE: The detector will not enter an alarm state when in one of the following states:
lCompensation Trouble
lOther internal faults that could prevent an alarm
Owner's Instructions
Testing Your Detector
Follow the test procedure described here or contact your dealer or installer for testing
instructions. It is recommended to test the entire alarm system at least once a week to
verify the operation of all system functions.

Detector Unit Test
To test the detector only, press and hold the Test button for less than five seconds. The sounder
chirps to indicate that the unit is functioning properly. When the button is released, the chirping
ceases. If this does not occur, ensure batteries are the correct type, in good condition and are
installed correctly. To test the detector and the alarm panel together, press and hold the Test
button for more than five seconds. An alarm signal is sent to the control panel.
Detector Test
Before you test, complete the following steps:
1. Insert the battery and then mount the detector on the backplate.
2. After the battery is inserted, wait two minutes before testing. The detector enters into Local
Diagnostic Test mode for 15 minutes.
3. It is recommended to perform the Periodic Test and use either the Installer code (Installer
Diagnostic mode) or the User code (User Diagnostic mode) to test.
CAUTION: The diagnostic test cannot be performed when the tamper is open.
To perform a detector test, press and hold the Test button for two seconds. When the button is
released, the Red LED flashes, followed by two loud alarm beeps.
In test mode, the detector tests heat and battery functions.
If the detector is in diagnostic mode, the detector performs the diagnostic test as described
below.
Diagnostic Test
The following sequence of events occur during a diagnostic test:
A. The detector performs a link quality test.
Note: The detector must be in local or diagnostic mode to perform the link quality test.
In diagnostic mode, if you press the Test button for more than six seconds, an alarm mes-
sage is sent to the panel and a Temporal-3 alarm signal is sounded. After this sequence
is completed, the panel responds by sending an “Alarm in Memory” message to the
device.
B. At the end of the diagnostic test the LED blinks three times. The following table indicates
the received signal strength.
LED
Response
Green LED
blinks
Orange LED
blinks
Red LED
blinks No blinks
Reception Strong Good Poor Paired, no
communication
IMPORTANT! Reliable reception must be confirmed. Therefore, "poor" signal strength is not
acceptable. If you receive a "poor" signal from the device, re-locate it and re-test until a "good"
or "strong" signal strength is received. For UL installations, the test results must be "strong." See
the alarm systems installation guide for detailed diagnostic tests.
Owner’s Maintenance
This detector is designed to require minimum maintenance. If the case is greasy, wipe gently
with a soft cloth slightly dampened with soapy water.
Never disassemble the detector; there are no user serviceable parts inside the unit. You
may only remove the backplate to replace batteries if not serviced by an installer. When
replacing the batteries, follow the instructions specified in the Installation Instructions.
Never paint the unit. Paint may interfere with the proper operation of the unit. If you are
planning renovations or repainting, take precautions to avoid dust, paint or chemical con-
tamination to the detector.
Specifications
lRegulatory Listings: UL521, FCC
lDiameter: 5 in (125 mm)
lHeight: 2.5 in (63 mm)
lWeight (including battery): 8.75 oz (243 g)
lColor: White
lAudible Signal (ANSI Temporal 3): 85 dBA minimum in alarm
lHeat Alarm Threshold: 135 ºF (57 ºC);
lHumidity: 15 % - 90 % RH, non-condensing
lApproved Batteries: 3 AAA Energizer E92 or Duracell Procell PC2400
lSupervisory Transmission Frequency: 128 second intervals
lLow Battery Detection: Low battery 14 days remaining
Limited Warranty
Digital Security Controls warrants that for a period of twelve months from the date of purchase, the product shall be free of
defects in materials and workmanship under normal use and that in fulfillment of any breach of such warranty, Digital Security
Controls shall, at its option, repair or replace the defective equipment upon return of the equipment to its repair depot. This
warranty applies only to defects in parts and workmanship and not to damage incurred in shipping or handling, or damage
due to causes beyond the control of Digital Security Controls such as lightning, excessive voltage, mechanical shock, water
damage, or damage arising out of abuse, alteration or improper application of the equipment.
The foregoing warranty shall apply only to the original buyer, and is and shall be in lieu of any and all other warranties,
whether expressed or implied and of all other obligations or liabilities on the part of Digital Security Controls. Digital Security
Controls neither assumes responsibility nor authorizes any other person purporting to act on its behalf to modify or to change
this warranty, nor to assume for it any other warranty or liability concerning this product.
In no event shall Digital Security Controls be liable for any direct, indirect or consequential damages, loss of anticipated profits,
loss of time or any other losses incurred by the buyer in connection with the purchase, installation or operation or failure of
this product.

Heat Detectors: Heat detectors that are a part of this system may not properly alert occupants of a fire for a number of reas-
ons, some of which follow. The Heat detectors may have been improperly installed or positioned. Heat may not be able to
reach the heat detectors, such as when the fire is in a chimney, walls or roofs, or on the other side of closed doors. Heat
detectors may not detect heat from fires on another level of the residence or building.
Every fire is different in the amount of heat produced and the rate of burning. Heat detectors cannot sense all types of fires
equally well. Heat detectors may not provide timely warning of fires caused by carelessness or safety hazards such as smoking
in bed, violent explosions, escaping gas, improper storage of flammable materials, overloaded electrical circuits, children play-
ing with matches or arson.
Even if the Heat detector operates as intended, there may be circumstances when there is insufficient warning to allow all
occupants to escape in time to avoid injury or death.
Warning: Digital Security Controls recommends that the entire system be completely tested on a regular basis. However, des-
pite frequent testing, and due to, but not limited to, criminal tampering or electrical disruption, it is possible for this product to
fail to perform as expected.
Important Information: Changes or modifications not expressly approved by Digital Security Controls could void the user’s
authority to operate this equipment.
EULA
IMPORTANT - READ CAREFULLY: DSC Software purchased with or without Products and Components is copy-
righted and is purchased under the following license terms:
This End-User License Agreement (“EULA”) is a legal agreement between You (the company, individual or entity who
acquired the Software and any related Hardware) and Digital Security Controls, a division of Tyco Safety Products Canada
Ltd. (“DSC”), the manufacturer of the integrated security systems and the developer of the software and any related
products or components (“HARDWARE”) which You acquired. If the DSC software product (“SOFTWARE PRODUCT” or
“SOFTWARE”) is intended to be accompanied by HARDWARE, and is NOT accompanied by new HARDWARE, You may not
use, copy or install the SOFTWARE PRODUCT. The SOFTWARE PRODUCT includes computer software, and may include
associated media, printed materials, and “online” or electronic documentation. Any software provided along with the
SOFTWARE PRODUCT that is associated with a separate end-user license agreement is licensed to You under the terms of
that license agreement. By installing, copying, downloading, storing, accessing or otherwise using the SOFTWARE
PRODUCT, You agree unconditionally to be bound by the terms of this EULA, even if this EULA is deemed to be a modi-
fication of any previous arrangement or contract. If You do not agree to the terms of this EULA, DSC is unwilling to license
the SOFTWARE PRODUCT to You, and You have no right to use it.
SOFTWARE PRODUCT LICENSE
The SOFTWARE PRODUCT is protected by copyright laws and international copyright treaties, as well as other intellectual
property laws and treaties. The SOFTWARE PRODUCT is licensed, not sold.
GRANT OF LICENSE This EULA grants You the following rights:
Software Installation and Use - For each license You acquire, You may have only one copy of the SOFTWARE PRODUCT
installed.
Storage/Network Use - The SOFTWARE PRODUCT may not be installed, accessed, displayed, run, shared or used con-
currently on or from different computers, including a workstation, terminal or other digital electronic device (“Device”). In other
words, if You have several workstations, You will have to acquire a license for each workstation where the SOFTWARE will be
used.
Backup Copy - You may make back-up copies of the SOFTWARE PRODUCT, but You may only have one copy per license
installed at any given time. You may use the back-up copy solely for archival purposes. Except as expressly provided in this
EULA, You may not otherwise make copies of the SOFTWARE PRODUCT, including the printed materials accompanying the
SOFTWARE.
DESCRIPTION OF OTHER RIGHTS AND LIMITATIONS
Limitations on Reverse Engineering, Decompilation and Disassembly - You may not reverse engineer, decompile, or
disassemble the SOFTWARE PRODUCT, except and only to the extent that such activity is expressly permitted by applicable
law notwithstanding this limitation. You may not make any changes or modifications to the Software, without the written per-
mission of an officer of DSC. You may not remove any proprietary notices, marks or labels from the Software Product. You
shall institute reasonable measures to ensure compliance with the terms and conditions of this EULA.
Separation of Components - The SOFTWARE PRODUCT is licensed as a single product. Its component parts may not be
separated for use on more than one HARDWARE unit.
Single INTEGRATED PRODUCT - If You acquired this SOFTWARE with HARDWARE, then the SOFTWARE PRODUCT is
licensed with the HARDWARE as a single integrated product. In this case, the SOFTWARE PRODUCT may only be used with
the HARDWARE as set forth in this EULA.
Rental - You may not rent, lease or lend the SOFTWARE PRODUCT. You may not make it available to others or post it on a
server or web site.
Software Product Transfer - You may transfer all of Your rights under this EULA only as part of a permanent sale or trans-
fer of the HARDWARE, provided You retain no copies, You transfer all of the SOFTWARE PRODUCT (including all com-
ponent parts, the media and printed materials, any upgrades and this EULA), and provided the recipient agrees to the terms
of this EULA. If the SOFTWARE PRODUCT is an upgrade, any transfer must also include all prior versions of the SOFTWARE
PRODUCT.
Termination - Without prejudice to any other rights, DSC may terminate this EULA if You fail to comply with the terms and
conditions of this EULA. In such event, You must destroy all copies of the SOFTWARE PRODUCT and all of its component
parts.
Trademarks - This EULA does not grant You any rights in connection with any trademarks or service marks of DSC or its sup-
pliers.
COPYRIGHT - All title and intellectual property rights in and to the SOFTWARE PRODUCT (including but not limited to any
images, photographs, and text incorporated into the SOFTWARE PRODUCT), the accompanying printed materials, and any
copies of the SOFTWARE PRODUCT, are owned by DSC or its suppliers. You may not copy the printed materials accom-
panying the SOFTWARE PRODUCT. All title and intellectual property rights in and to the content which may be accessed
through use of the SOFTWARE PRODUCT are the property of the respective content owner and may be protected by applic-
able copyright or other intellectual property laws and treaties. This EULA grants You no rights to use such content. All rights
not expressly granted under this EULA are reserved by DSC and its suppliers.
EXPORT RESTRICTIONS - You agree that You will not export or re-export the SOFTWARE PRODUCT to any country, per-
son, or entity subject to Canadian export restrictions.
CHOICE OF LAW - This Software License Agreement is governed by the laws of the Province of Ontario, Canada.
ARBITRATION - All disputes arising in connection with this Agreement shall be determined by final and binding arbitration in
accordance with the Arbitration Act, and the parties agree to be bound by the arbitrator’s decision. The place of arbitration
shall be Toronto, Canada, and the language of the arbitration shall be English.
LIMITED WARRANTY
NO WARRANTY - DSC PROVIDES THE SOFTWARE “AS IS” WITHOUT WARRANTY. DSC DOES NOT WARRANT THAT
THE SOFTWARE WILL MEET YOUR REQUIREMENTS OR THAT OPERATION OF THE SOFTWARE WILL BE
UNINTERRUPTED OR ERROR-FREE.
CHANGES IN OPERATING ENVIRONMENT - DSC shall not be responsible for problems caused by changes in the oper-
ating characteristics of the HARDWARE, or for problems in the interaction of the SOFTWARE PRODUCT with non-DSC-
SOFTWARE or HARDWARE PRODUCTS.
LIMITATION OF LIABILITY; WARRANTY REFLECTS ALLOCATION OF RISK - IN ANY EVENT, IF ANY STATUTE
IMPLIES WARRANTIES OR CONDITIONS NOT STATED IN THIS LICENSE AGREEMENT, DSC’S ENTIRE LIABILITY UNDER
ANY PROVISION OF THIS LICENSE AGREEMENT SHALL BE LIMITED TO THE GREATER OF THE AMOUNT ACTUALLY
PAID BY YOU TO LICENSE THE SOFTWARE PRODUCT AND FIVE CANADIAN DOLLARS (CAD$5.00). BECAUSE SOME
JURISDICTIONS DO NOT ALLOW THE EXCLUSION OR LIMITATION OF LIABILITY FOR CONSEQUENTIAL OR
INCIDENTAL DAMAGES, THE ABOVE LIMITATION MAY NOT APPLY TO YOU.
DISCLAIMER OF WARRANTIES - THIS WARRANTY CONTAINS THE ENTIRE WARRANTY AND SHALL BE IN LIEU OF
ANY AND ALL OTHER WARRANTIES, WHETHER EXPRESSED OR IMPLIED (INCLUDING ALL IMPLIED WARRANTIES OF
MERCHANTABILITY OR FITNESS FOR A PARTICULAR PURPOSE) AND OF ALL OTHER OBLIGATIONS OR LIABILITIES ON
THE PART OF DSC. DSC MAKES NO OTHER WARRANTIES. DSC NEITHER ASSUMES NOR AUTHORIZES ANY OTHER
PERSON PURPORTING TO ACT ON ITS BEHALF TO MODIFY OR TO CHANGE THIS WARRANTY, NOR TO ASSUME FOR
IT ANY OTHER WARRANTY OR LIABILITY CONCERNING THIS SOFTWARE PRODUCT.
EXCLUSIVE REMEDY AND LIMITATION OF WARRANTY - UNDER NO CIRCUMSTANCES SHALL DSC BE LIABLE FOR
ANY SPECIAL, INCIDENTAL, CONSEQUENTIAL OR INDIRECT DAMAGES BASED UPON BREACH OF WARRANTY,
BREACH OF CONTRACT, NEGLIGENCE, STRICT LIABILITY, OR ANY OTHER LEGAL THEORY. SUCH DAMAGES
INCLUDE, BUT ARE NOT LIMITED TO, LOSS OF PROFITS, LOSS OF THE SOFTWARE PRODUCT OR ANY ASSOCIATED
EQUIPMENT, COST OF CAPITAL, COST OF SUBSTITUTE OR REPLACEMENT EQUIPMENT, FACILITIES OR SERVICES,
DOWN TIME, PURCHASERS TIME, THE CLAIMS OF THIRD PARTIES, INCLUDING CUSTOMERS, AND INJURY TO
PROPERTY.
DSC recommends that the entire system be completely tested on a regular basis. However, despite frequent testing, and
due to, but not limited to, criminal tampering or electrical disruption, it is possible for this SOFTWARE PRODUCT to fail to per-
form as expected.
Regulatory Information
This detector has a recommended service life of 10 years under normal conditions of use. Please refer to the label applied to
the device indicating the recommended replacement year. For servicing the unit or replacement batteries please call the install-
ation company that provided you with the alarm system.
This manual shall be used in conjunction with the Installation Manual of the alarm control panel. All the instructions specified
within that manual must be observed.
FCC Compliance Statement
This device complies with FCC Rules Part 15 licence-exempt standard(s). Operation is subject to the following two conditions:
(1) this device may not cause interference, and (2) this device must accept any interference, including interference that may
cause undesired operation of the device.
WARNING! To comply with FCC RF exposure compliance requirements, the device should be located at a distance of at least
20 cm from all persons during normal operation. The antennas used for this product must not be co-located in conjunction
with any other antenna or transmitter.
CAUTION: Changes or modifications not expressly approved by Digital Security Controls could void your authority to use this
equipment.
This equipment has been tested and found to comply with the limits for a Class B digital device, pursuant to Part 15 of the
FCC Rules. These limits are designed to provide reasonable protection against harmful interference in a residential install-
ation. This equipment generates, uses and can radiate radio frequency energy and, if not installed and used in accordance
with the instructions, may cause harmful interference to radio communications. However, there is no guarantee that inter-
ference will not occur in a particular installation. If this equipment does cause harmful interference to radio or television recep-
tion, which can be deter-mined by turning the equipment off and on, the user is encouraged to try to correct the interference
by one or more of the following measures:
lRe-orient the receiving antenna.
lIncrease the separation between the equipment and receiver.
lConnect the equipment into an outlet on a circuit different from that to which the receiver is connected.
lConsult the dealer or an experienced radio/television technician for help.
The user may find the following booklet prepared by the FCC useful: "How to Identify and Resolve Radio/Television Inter-
ference Problems". This booklet is available from the U.S. Government Printing Office, Washington D.C. 20402, Stock # 004-
000-00345-4.
© 2019 Johnson Controls. All rights reserved. JOHNSON CONTROLS, TYCO and DSC are trademarks and/or registered
trademarks. Unauthorized use is strictly prohibited.
Tech Support: 1-800-387-3630 (Canada & U.S.)
or 905-760-3000 • www.dsc.com APD0749 B200211
Table of contents
Other Tyco Security Sensor manuals

Tyco
Tyco 614 Series Manual

Tyco
Tyco WS4933 Series User manual

Tyco
Tyco BLAZEMASTER CPVC User manual

Tyco
Tyco WS4933 Series User manual

Tyco
Tyco DSC WS8904P User manual

Tyco
Tyco Visonic TOWER-30AMPG2 User manual

Tyco
Tyco FC410DIM User manual

Tyco
Tyco DSC PowerSeries PC1616 Manual

Tyco
Tyco Visonic TOWER-20 PG2 User manual

Tyco
Tyco Visonic PowerG NEXT CAM PG2 User manual
Popular Security Sensor manuals by other brands

ealloora
ealloora Volt quick start guide

MDT Technologies
MDT Technologies BE-TA5502.01 operating instructions

Pittway
Pittway System Sensor WFDT Installation and maintenance instructions

ELREHA
ELREHA EGS 101 quick start guide

ACQUITY
ACQUITY WKB230245 How to Clean

SECO-LARM
SECO-LARM SLI Enforcer SS-040Q manual