manuals.online logo
Brands
  1. Home
  2. •
  3. Brands
  4. •
  5. Tynetec
  6. •
  7. Security Sensor
  8. •
  9. Tynetec ZXT483 User manual

Tynetec ZXT483 User manual

DocNo.FM0669issueGPage1
169MHzTelecareDevices
HeatDetector
__________________________________________________________________________________________________________

CompatiblewithReachat‐homealarms,Adventxtwardencall,
AltecResponseandTouchsafeProNursecallsystems
Alarmtemperature:54oto62oC(58oCtypical)
85dB@3msounder&redoperatinglight
LonglifeLithiumbattery
Lowbatterywarning
Testbutton
ComplieswithBS5446‐2:2003
Dimensions:115mmx55mm
Weight:200grams
ProductCode:ZXT483

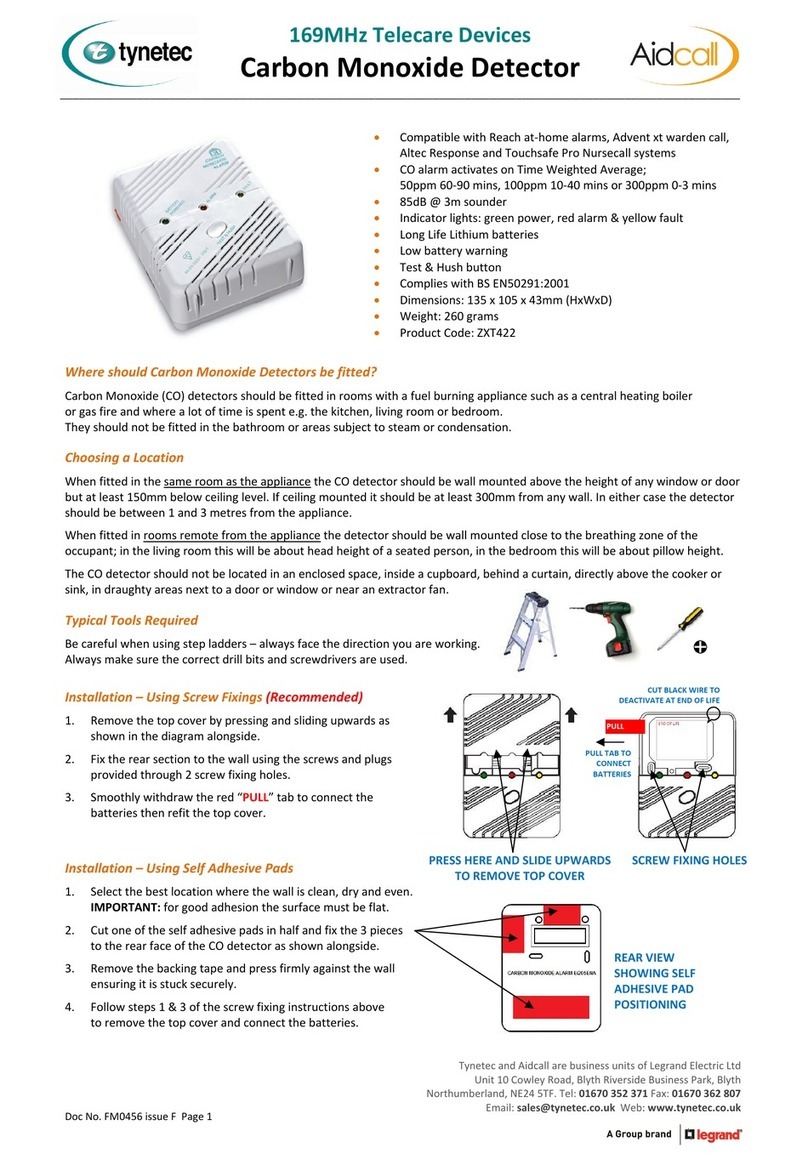
WhereshouldHeatDetectorsbefitted?

Heatdetectorsaresuitableforfittinginareaswithhighlevelsoffumesorsmoke,i.e.thekitchen.
Donotfitinthebathroomorareassubjecttosteamorcondensation.
Ideallytheheatdetectorshouldbeceilingmountednearthecentreoftheroom,atleast300mmfromanylightfittingand
300mmawayfromanywallorcorner.
TryandavoidareasoutofreachwhereitwillbedifficulttopresstheTESTbutton.

TypicalToolsRequired

Becarefulwhenusingstepladders–alwaysfacethedirectionyouareworking.
Alwaysmakesurethecorrectdrillbitsandscrewdriversareused.
Adrillandscrewdriverarenotrequirediftheselfadhesivepadsareused.

InstallationusingScrewFixings(Recommended)

1. Locatethebestpositionandfixthebaseplatetotheceiling
usingthescrews&plugsprovided.

2. Alignthedetectorbodyandbaseplateandtwistclockwise
toclipintoplace.Thisactionalsoconnectsthebattery.

3. Theredlightwillblinkonceevery40secondswhenthe
detectorisfittedcorrectly.

InstallationusingSelfAdhesivePads

1. Removetheroundfoamdiskofftherearfaceofthebase
platetoensuregoodadhesionofselfadhesivepads.

2. Locatethebestpositionandfixthebaseplatetotheceiling
usingthe2adhesivepadsprovided.Pressfirmlytoensure
itisstucksecurely.

3. Alignthedetectorbodyandbaseplateandtwistclockwise
toclipintoplace.Thisactionalsoconnectsthebattery.

4. Theredlightwillblinkonceevery40secondswhenthe
detectorisfittedcorrectly.

RemovingtheHeatDetector

1. Useasmallflatbladedscrewdrivertopush‐uponthe
safetylockingcatch.

2. Twistthebodyofthedetectoranti‐clockwiseto
removefromthebaseplate.






Tynetec andAidcallare businessunitsofLegrandElectricLtd
Unit10CowleyRoad,BlythRiversideBusinessPark,Blyth
Northumberland,NE245TF.Tel:01670352371Fax:01670362807
Email:[email protected]Web:www.tynetec.co.uk
PUSH THE LOCKING CATCH AND TWIST
ANTI-CLOCKWISE TO REMOVE THE
DETECTOR FROM THE BASE PLATE
IMPORTANT

REMOVETHEFOAMDISK
FROMTHEREARFACEOFTHE
BASEPLATEWHENFIXING
WITHSELFADHESIVEPADS
DocNo.FM0669issueGPage2
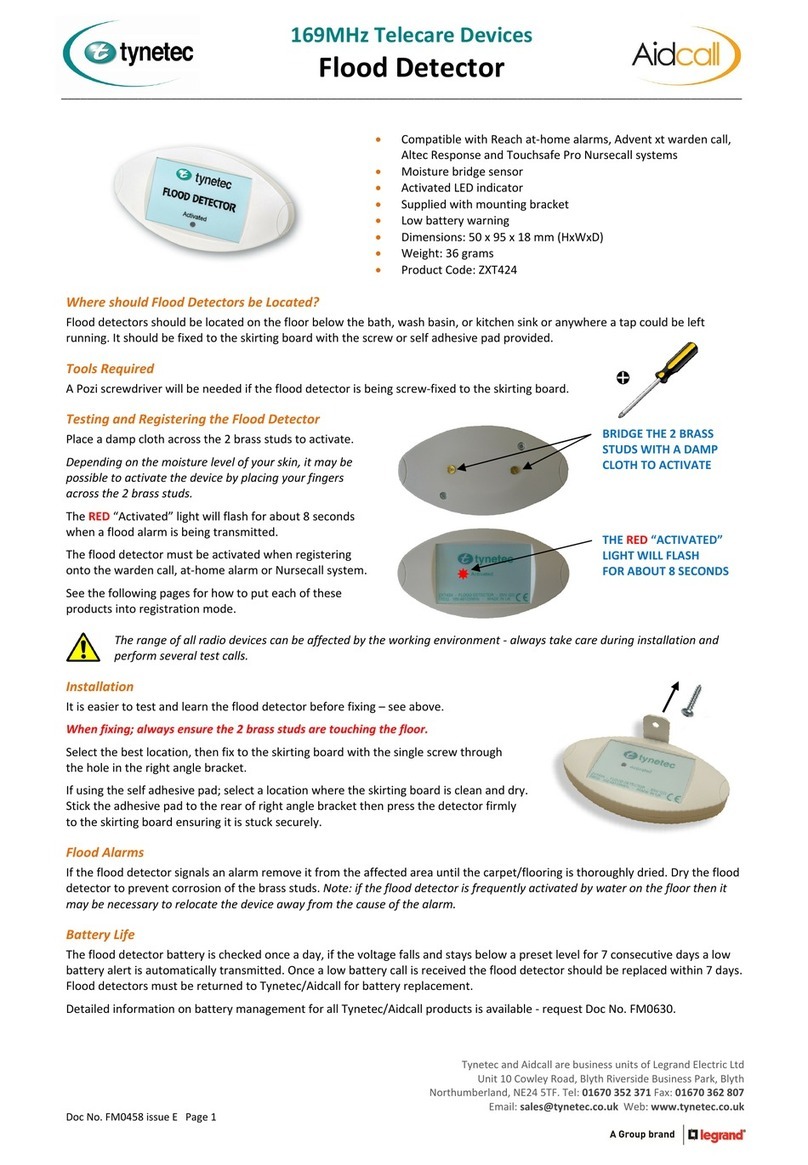
Testing&RegisteringtheHeatDetector

TheTESTbuttonisusedduringinstallationtoregistertheheat
detectorontothewardencallsystem,at‐homealarmorNursecallsystem.

Seethefollowingpagesforhowtoputeachoftheseproductsintoregistrationmode.

PressandholdtheTESTbutton;thehornwillsoundrapidbeeps,theREDlight
willflashandafterabout5secondsanalarmcallwillbetransmitted.  


Therangeofallradiodevicescanbeaffectedbytheworkingenvironment,
alwaystakecareduringinstallationandperformseveraltestcalls.


CleaningtheHeatDetector

Heatdetectorsarenotassusceptibletodustandcontaminationassmokedetectorsbutitisstill
recommendedtocleanthemperiodically.
Usethenozzleattachmentonavacuumcleanertoremovedust,insectsandcobwebsfromthecoverslots.
Thedetectorcanbewipedcleanwithadampcloth,neverusedetergentsorpolishetc.



ImportantInformationwhenDecorating


Neverpainttheheatdetectoritself.
Unlikesmokedetectors,theyarenotsusceptibletocontamination
frompaintfumesthereforenospecialprecautionsneedtobetaken.



HeatDetectorBatteryLife

Ifthealarmbeginstochirpandflashtheredlightevery40secondstheheatdetector
batterypowerisrunninglow.
Push‐upthecatchwithasmallscrewdriverandtwistthedetectoranti‐clockwiseto
removefromitsbaseplateandisolatethebattery.
Thecompletedetectormustbereplacedwhenthebatteryisexhausted.


TransmitterBatteryLife

Thetransmitterbatteryischeckedonceaday,ifthevoltagefallsandstaysbelowapresetlevelfor7consecutivedaysalow
batteryalertisautomaticallytransmitted.Oncealowbatterycallisreceivedtheheatdetectorshouldbereplacedwithin7days.
TransmittermodulesmustbereturnedtoTynetec/Aidcallforbatteryreplacement.

DetailedinformationonbatterymanagementforallTynetec/Aidcallproductsisavailable‐requestDocNo.FM0630.

























PUSH‐UPCATCHAND
TWISTANTI‐CLOCKWISE
TOREMOVEDETECTOR
RED
LIGHT
TEST
BUTTON

DocNo.FM0669issueGPage3
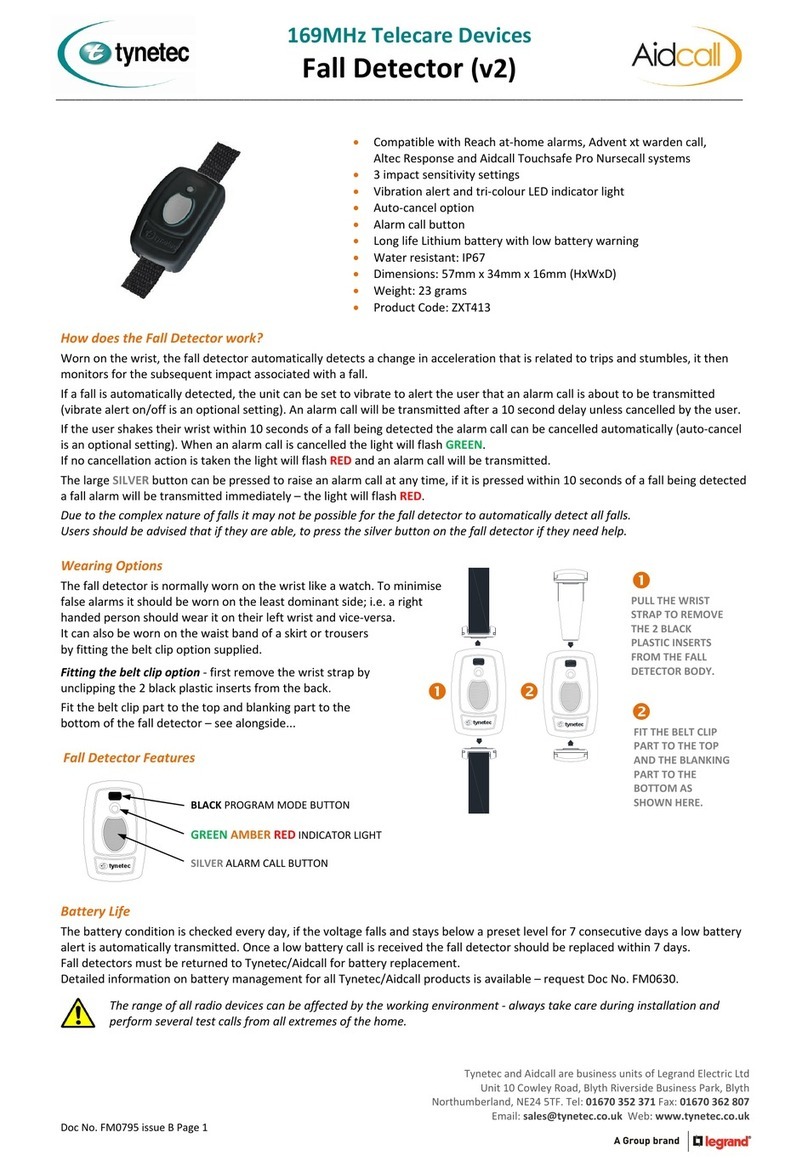
RegisteringaHeatDetectorontoaReachat‐homealarmunit

1.PuttheReachunitintoradiodevicelearnmode…

     









2.Activatetheheatdetector…


  








3.Exitradiodevicelearnmode…


     










4.CheckwiththeControlCentrethatitisconvenienttoperformatestcall,activatetheheatdetectorandconfirmtheyreceivea
heatalarmcall.


DeletingaHeatDetectorfromaReachat‐homealarmunit

Enter1670usingthekeypadontherearoftheReachunit–thefrontlightwillFLASHFASTGREENandtheunitwillannounce
“ProgramMode‐Ready”.
Enter#041andtheReachwillannounce“DeleteRadioDevice”followedbya“Beep”.
Enterthe8digitheatalarmIDtobedeleted;afterthe“Beep”press#toexit.
PressthekeytoexitProgramMode;theunitwillsounda“Double‐Beep”andthefrontlightwillreturntoSTEADYGREEN.


The8digitIDcanbefoundonalabelonthebackoftheheatdetector–itwillalwaysstartwith48xxxxxx





TheinstructionsgivenaboveforthestandardReachproductalsoappliestotheReachPlus,ReachPlusGSM
andReachUltramodels.Refertotheinstructionbookletsprovidedwiththeseproductsformoreinformation
onprogrammingandtestingradiodevices.













“Trigger
Radio
Device”
PressandHOLDtheGREENbuttonontheReachunit.

WhenthefrontlightFLASHESFASTGREENreleasethe
buttonandtheReachwillannounce“TriggerRadioDevice”.

Younowhave1minutetoactivatetheheatdetector.

PresstheGREENbuttonontheReachunit.

ThefrontlightwillreturntoSTEADYGREENandtheReach
isbackinnormaloperatingmode.

PressandholdtheTESTbutton,thehornwillsoundandthelightwillflash
REDontheheatdetector.AftertheTESTbuttonhasbeenheldforabout5
secondstheReachwillannounce“Heat”.


DocNo.FM0669issueGPage4
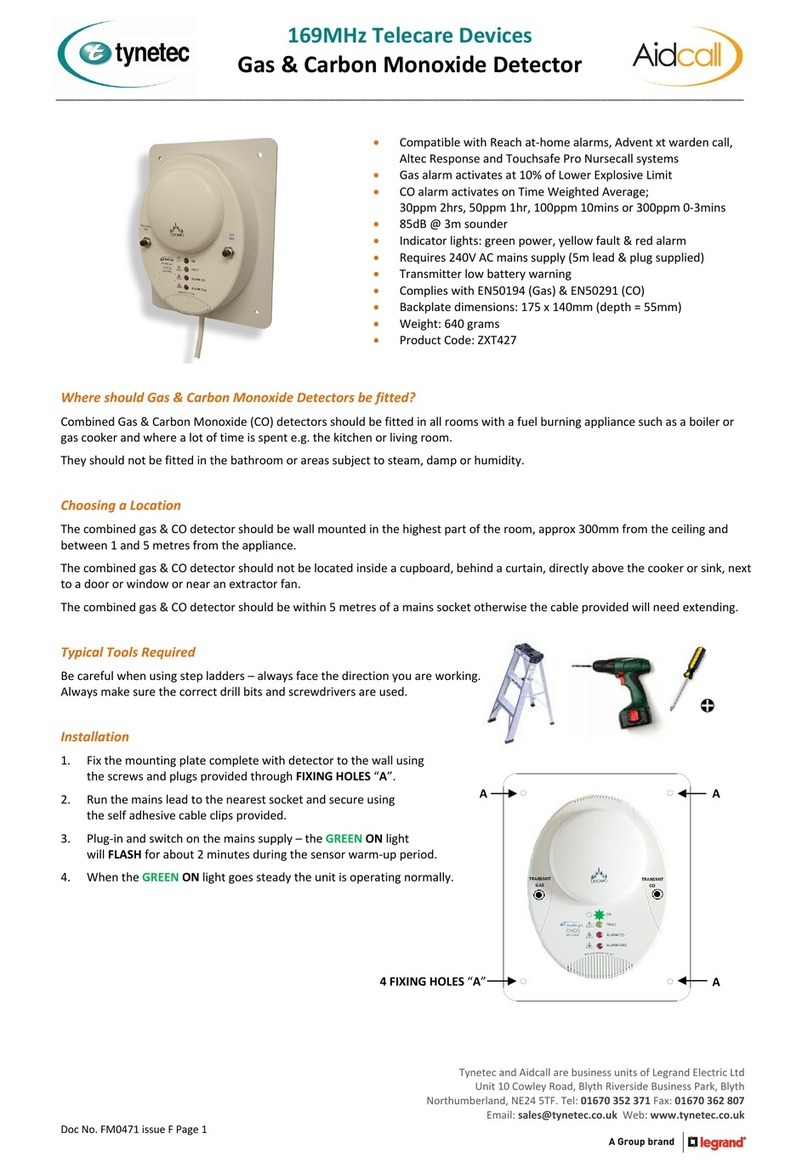
RegisteringaHeatDetectorontoanAdventxtwardencallsystem

1.PuttheAdventxtsystemintoradiodevicelearnmode…
 
     
 












2.Activatetheheatdetector…


  









3.ExittheAdventxtsystemradiodevicelearnmode…















4.Activatetheheatdetectorandcheckaheatalarmcallisreportedonthewardencallsystem.


DeletingaHeatDetectorfromanAdventxtwardencallsystem

PresstheLINEkeyandwaitforthe“Ready”prompt.
Enter5001followedbythekey.
Entertheflatnumbertheheatdetectorisbeingdeletedfromfollowedbythekey.
Activatetheheatdetectortobedeleted.
Waitforthe“PendantDisabled–EnterFlat”prompt.
Pressthe#keyandwaitforthe“Ready”prompt,thenpresstheLINEkeytocleartheconnection.






RefertotheAdventxtoperatorsmanual(DocNo.FM0420)providedwiththewardencallsystemformore
informationonprogrammingandtestingradiodevices.









UsingtheManager’sDECTtelephone;

PresstheLINEkeyandwaitforthe“Ready”prompt.

Enter5000followedbythekey.

Entertheflatnumbertheheatdetectorisbeinginstalledin
followedbythekey.

Younowhave1minutetoactivatetheheatdetector.

“Ready”
UsingtheManager’sDECTtelephone;

Pressthe#keyandwaitforthe“Ready”prompt.

PresstheLINEkeytocleartheconnectionandthewardencallsystemis
nowbackinnormaloperatingmode.

PressandholdtheTESTbutton,thehornwillsoundandthelightwillflashRED
ontheheatdetector.

AftertheTESTbuttonhasbeenheldforabout5secondsyouwillhearthe
“EnterLocationCode”prompt,thenpress0(nolocation)followedbythekey.

Waitforthe“PendantEnabled–EnterFlat”prompt.

“Ready”

DocNo.FM0669issueGPage5
RegisteringaHeatDetectorontoanAltecResponselocalcareralarmunit

1.PuttheAltecResponseunitintoradiodevicelearnmode…


     
 











2.Activatetheheatdetector…


  








 




3.ExittheAltecResponseradiodevicelearnmode…
















4.ActivatetheheatdetectorandcheckaheatalarmcallisdisplayedontheAltecResponseunit.


DeletingaHeatDetectorfromanAltecResponselocalcareralarmunit

PressENTERtoactivatethewake‐updisplaythenENTERagaintodisplaythemainmenu
PressENTERtoselectRadioDevices
PressthekeytoselectDeleteDevicethenpressENTER
Thedisplaywillpromptyouto“TriggertheSensor”
Activatetheheatdetectortobedeleted‐thedisplaywillshowthedevicetypeandits8digitIDnumber
IfthisisthedeviceyouactivatedpressthekeytoselectDeletethenpressENTER
Ifit’sNOTthedeviceyouactivatedpresstheENTERkeytoselectRejectthentryagain
ToexitthemodeselectExitthenpresstheENTERkey.





RefertotheAltecResponseinstallationguide(DocNo.FM0548)providedwiththeportablealarmunitfor
moreinformationonprogrammingandtestingradiodevices.




PressandholdtheTESTbutton,thehornwillsoundandthelightwillflashRED.

AftertheTESTbuttonhasbeenheldforabout5secondsthedisplaywillshow
HeatAlarmandtheheatdetector8digitIDnumber.
ChecktheIDiscorrect,pressthekeytoselectAcceptthenpressENTER.
Note:ifanotherdevicehasbeenpicked‐uppressENTERtoRejectandtryagain.
ThedisplaywillshowFlat,usethe&keystochoosethedwellingtype.
PressthekeytoselectNo:000000thenpresstheENTERkey.
Usethe&keystoselecteachdigitoftheflatnumberandthe&keys
tomovebetweendigitsthenpresstheENTERkey.
PresskeyseveraltimestoselectExitthenpresstheENTERkey.
Thedisplaywillpromptyouto“TriggertheSensor”again.
PressENTERtoactivatethewake‐updisplaythenENTERagaintodisplay
themainmenu.

PressENTERtoselectRadioDevices

PressENTERtoselectLearnDevice

Thedisplaywillpromptyouto“TriggertheSensor”.

Younowhave20secondstoactivatetheheatdetector.
FromtheLearnDevicemenuselectExitthenpressENTER.

FromtheRadioDevicesmenuselectExitthenpressENTER.

Thedisplaywillreturntothewake‐upscreenandgoblankafter10seconds.

TheAltecResponseisnowbackinnormaloperatingmode.

tynetec
tynetec

DocNo.FM0669issueGPage6
RegisteringaHeatDetectorontoaTouchsafeProNursecallsystem

1.PuttheTouchsafeProMasterPanelintoTelecareregistrationmode;touchthescreenandLogonasanEngineeroraManager
(passwordrequired),thenfromthemainmenupagetouchtheTelecarebuttontoopenthescreenshownbelow…























2.EntertheheatdetectorID…









3.PresstheClosebuttontoexitTelecaremodeandtheNursecallpanelisnowbackinnormaloperatingmode.

4.ActivatetheheatdetectorandcheckthecallisdisplayedontheNursecallpanellikethis…






Thescreenbannerisredforaheatalarmcall(Touchthebannertodisplaynotes).
Aheatalarmcallcannotbeacceptedorsilencedfromthescreen.
YoumustvisittheappropriateNursecallCallPointtocancelthecall.



DeletingaHeatDetectorfromaTouchsafeProNursecallsystem

SelecttheheatdetectorIDtobedeletedfromtheDeleteTelecareDevicepull‐downlistbox(prefixedwitha“T48”).
DetailsoftheheatdetectorselectedwillbedisplayedintheRoom,HouseCodeandIDboxesbelow.
IfthedetailsshownarecorrectpresstheDeletebutton.
PresstheClosebuttontoexit.





RefertotheTouchsafeProDisplayPaneluserguide(DocNo.FM5505)providedwiththeNursecallsystemfor
moreinformation.




TynetecandAidcalloperateapolicyofcontinuousimprovementandreservetherighttochangeproductspecificationswithoutnotice.
IfanyvariationtothedetailscontainedinthisdocumentaresuspectedpleasecontactTynetec’scustomersupportdepton01670352371.


The8digitIDisprintedonalabelontherearoftheheatdetector.
Note:thisIDwillalwaysstartwith48xxxxxx.

TouchtheAddTelecareDeviceboxthenusetheon‐screenkeypadtoentertheID.

Hint:enterazoneintheFilterboxtonarrowthesearchfortheroom(seebelow).

SelecttheusersCallPointIDfromtheRoompull‐downlistboxthenpressSave.
Note:thisistheroomunitthatwillbewillbeusedtocancelthecall.
Usekeypadtoenter
8digitIDhere
Selecttherelevant
CallPointIDhere
Savewhendone
Closetoexitmode
On‐screenkeypad
CALLING
CANCEL
HC345ID001
PresstheLIGHTGREY
buttontocancelthecall
ZXT483W65792
Ser:10157915
ID:48046561
EE0741V1.00A
MC


Other Tynetec Security Sensor manuals

Tynetec ZXT427 User manual

Tynetec

Tynetec ZXT427 User manual

Tynetec ZXT475 User manual

Tynetec

Tynetec ZXT475 User manual

Tynetec ZXT413 User manual

Tynetec

Tynetec ZXT413 User manual

Tynetec ZXT422 User manual

Tynetec

Tynetec ZXT422 User manual

Tynetec ZXT475 User manual

Tynetec

Tynetec ZXT475 User manual

Tynetec ZXT424 User manual

Tynetec

Tynetec ZXT424 User manual

Popular Security Sensor manuals by other brands

Jung FMDW360WW operating instructions

Jung

Jung FMDW360WW operating instructions

Visonic DISCOVERY PIR MCW - INSTALLER GUIDE installation instructions

Visonic

Visonic DISCOVERY PIR MCW - INSTALLER GUIDE installation instructions

Buckingham K9RETRO Attachment instructions

Buckingham

Buckingham K9RETRO Attachment instructions

Safe Signal WFDTNRN Installation and maintenance instructions

Safe Signal

Safe Signal WFDTNRN Installation and maintenance instructions

Abus FUMK50030W quick guide

Abus

Abus FUMK50030W quick guide

Green Brook Orion Range OD101 manual

Green Brook

Green Brook Orion Range OD101 manual

Thermo Scientific Surveyor PDA Plus Hardware manual

Thermo Scientific

Thermo Scientific Surveyor PDA Plus Hardware manual

Global Fire ZEOS-AD-S instructions

Global Fire

Global Fire ZEOS-AD-S instructions

Agilent Technologies G8610 Series Field installation instructions

Agilent Technologies

Agilent Technologies G8610 Series Field installation instructions

Nortech PD130 user manual

Nortech

Nortech PD130 user manual

bolid S2000-IK Rev.03 instruction manual

bolid

bolid S2000-IK Rev.03 instruction manual

DITECH LS quick start guide

DITECH

DITECH LS quick start guide

Profort luxSpot manual

Profort

Profort luxSpot manual

Pyronix BREAKGLASS 2000 quick guide

Pyronix

Pyronix BREAKGLASS 2000 quick guide

Optex HX-40RAM installation instructions

Optex

Optex HX-40RAM installation instructions

PCB Piezotronics M354C03 Installation and operating manual

PCB Piezotronics

PCB Piezotronics M354C03 Installation and operating manual

Dermalog FLC1 user guide

Dermalog

Dermalog FLC1 user guide

PCB Piezotronics ICP 109B01 Installation and operating manual

PCB Piezotronics

PCB Piezotronics ICP 109B01 Installation and operating manual

manuals.online logo
manuals.online logoBrands
  • About & Mission
  • Contact us
  • Privacy Policy
  • Terms and Conditions

Copyright 2025 Manuals.Online. All Rights Reserved.