manuals.online logo
Brands
  1. Home
  2. •
  3. Brands
  4. •
  5. Unibright
  6. •
  7. Lighting Equipment
  8. •
  9. Unibright Ascot 12W User manual

Unibright Ascot 12W User manual

• Uitsluitend voor gebruik binnenshuis.
Installeer het armatuur enkel in ruimten waar direct contact met water onmogelijk is.
• Seulement pour utilisation en intérieur.
Cet êquipement doit être installé dans des pièces hors de toute projection d’eau.
• For indoor use only.
This tting should only be installed in rooms where direct contact with water is impossible.
• Nur für den Innenbereich. Diese Leuchte darf nur in Räumen verwendet werden, in denen ein direkter Kontakt
mit Wasser nicht möglich ist.
• Beschermd tegen indringen van vaste voorwerpen groter dan 12,5 mm. Geen bescherming tegen vocht.
• Protégé contre les corps solides supérieurs à 12,5 mm. Aucune protection contre humidité.
• Protected against objects ≥ 12,5 mm. Not protected against water.
• Geschützt gegen feste Fremdkörper mit Durchmesser ab 12,5 mm. Kein Schutz gegen wasser
• Correcte verwijdering van dit product (elektrische en elektronische afval)
• Élimination correcte de ce produit (déchet d’équipements électriques et électroniques)
• Correct disposal of this product (electrical & electronical equipment waste)
• Korrekte Entsorgung dieses Produkts (elektromüll)
• Dit product bevat een lichtbron met energie-efciëntieklasse <F>
• Ce produit contient une source lumineuse de classe d’efcacité énergétique <F>
• This product contains a light source of energy efciency class <F>
• Dieses Produkt enthält eine Lichtquelle der Energieefzienzklasse <F>
UNI-BRIGHT nv
Belcrownlaan 13-Q - 2100 Antwerpen Belgium - T+32(0)3 6416140 - www.unibright.be
GEBRUIKSAANWIJZING
MODE D’EMPLOI
MONTAGEANLEITUNG
INSTALLATION MANUAL Ascot 12W
Veiligheid - Sécurité - Sicherheit - Safety
IP20
4 1
ErPRoHS IP20
LVRA1227W Á84 mm white 2700K 1250 lm CRI >90 Beam 34°
LVRA1230W Á84 mm white 3000K 1250 lm CRI >90 Beam 34°
LVRA1227B Á84 mm black 2700K 1050 lm CRI >90 Beam 34°
LVRA1230B Á84 mm black 3000K 1050 lm CRI >90 Beam 34°
Driver excluded
350 mA
• Toestel niet geschikt om te worden afgedekt met thermische isolatie.
• Luminaires non appropriées pour recouvrement d’un matériau isolant thermique.
• Luminaire not suitable for covering with insulating material.
• Das Gerät/ Die Leuchte darf nicht abgedeckt werden mit thermischer Isolation.
Installatie - Instructions d’installation - Installation - Montage Installatie - Instructions d’installation - Installation - Montage
32
UNI-BRIGHT nv
Belcrownlaan 13-Q - 2100 Antwerpen Belgium - T+32(0)3 6416140 - www.unibright.be
• De elektrische installatie mag alleen door bevoegd personeel worden uitgevoerd volgens de voorschriften
voor elektrische en mechanische veiligheid in uw land. Onjuiste plaatsing kan ernstige letsels en/of schade
veroorzaken.
• L’installation électrique ne doit être effectuée que par du personnel qualié, selon les règlements de sécurité
électrique et mécanique dans votre pays. Une mauvaise installation peut entraîner des blessures graves et/ou
des dommages matériels.
• The electrical installation should be carried out by qualied personal only, according to the regulations for
electrical and mechanical safety in your country. Improper installation can result in serious injuries and/or
damage to property.
• Die elektrische Installation sollte nur von qualiziertem Personal nach den Vorschriften für elektrische und
mechanische Sicherheit in Ihrem Land durchgeführt werden. Unsachgemäße Montage kann zu schweren
Verletzungen und/oder Sachschäden führen.
• Om veiligheidsredenen en garantie is het verboden om wijzigingen aan het apparaat aan te brengen.
• Pour des raisons de sécurité et garantie, il est interdit d’apporter des modications à l’appareil.
• For safety and guarantee reasons it is prohibited to make any modications to the unit.
• Aus Sicherheitsgründen und für den Erhalt der Garantie ist es nicht erlaubt Änderungen an dem Gerät durch-
zuführen.
Waarschuwing – Avertissement - Warnhinweise - Warning
• WAARSCHUWING !
Om elektrische schokken te voorkomen - Schakel altijd de elektriciteitsvoorziening uit vóór de installatie en het
onderhoud.
• ATTENTION !
Pour éviter un choc électrique - Coupez toujours l’alimentation électrique avant l’installation et la maintenance.
• WARNING !
To prevent electrical shock - Always switch off electricity supply before installation and maintenance.
• WARNUNG !
Um einen Stromschlag zu verhindern.- Schalten Sie die Stromversorgung vor der Installation und Wartung ab.
Installatie
Volg de volgorde van de installatie stap voor stap:
• Schakel de elektriciteit vóór de aanvang van de installatie uit
• Maak de juiste zaagopening in het plafond
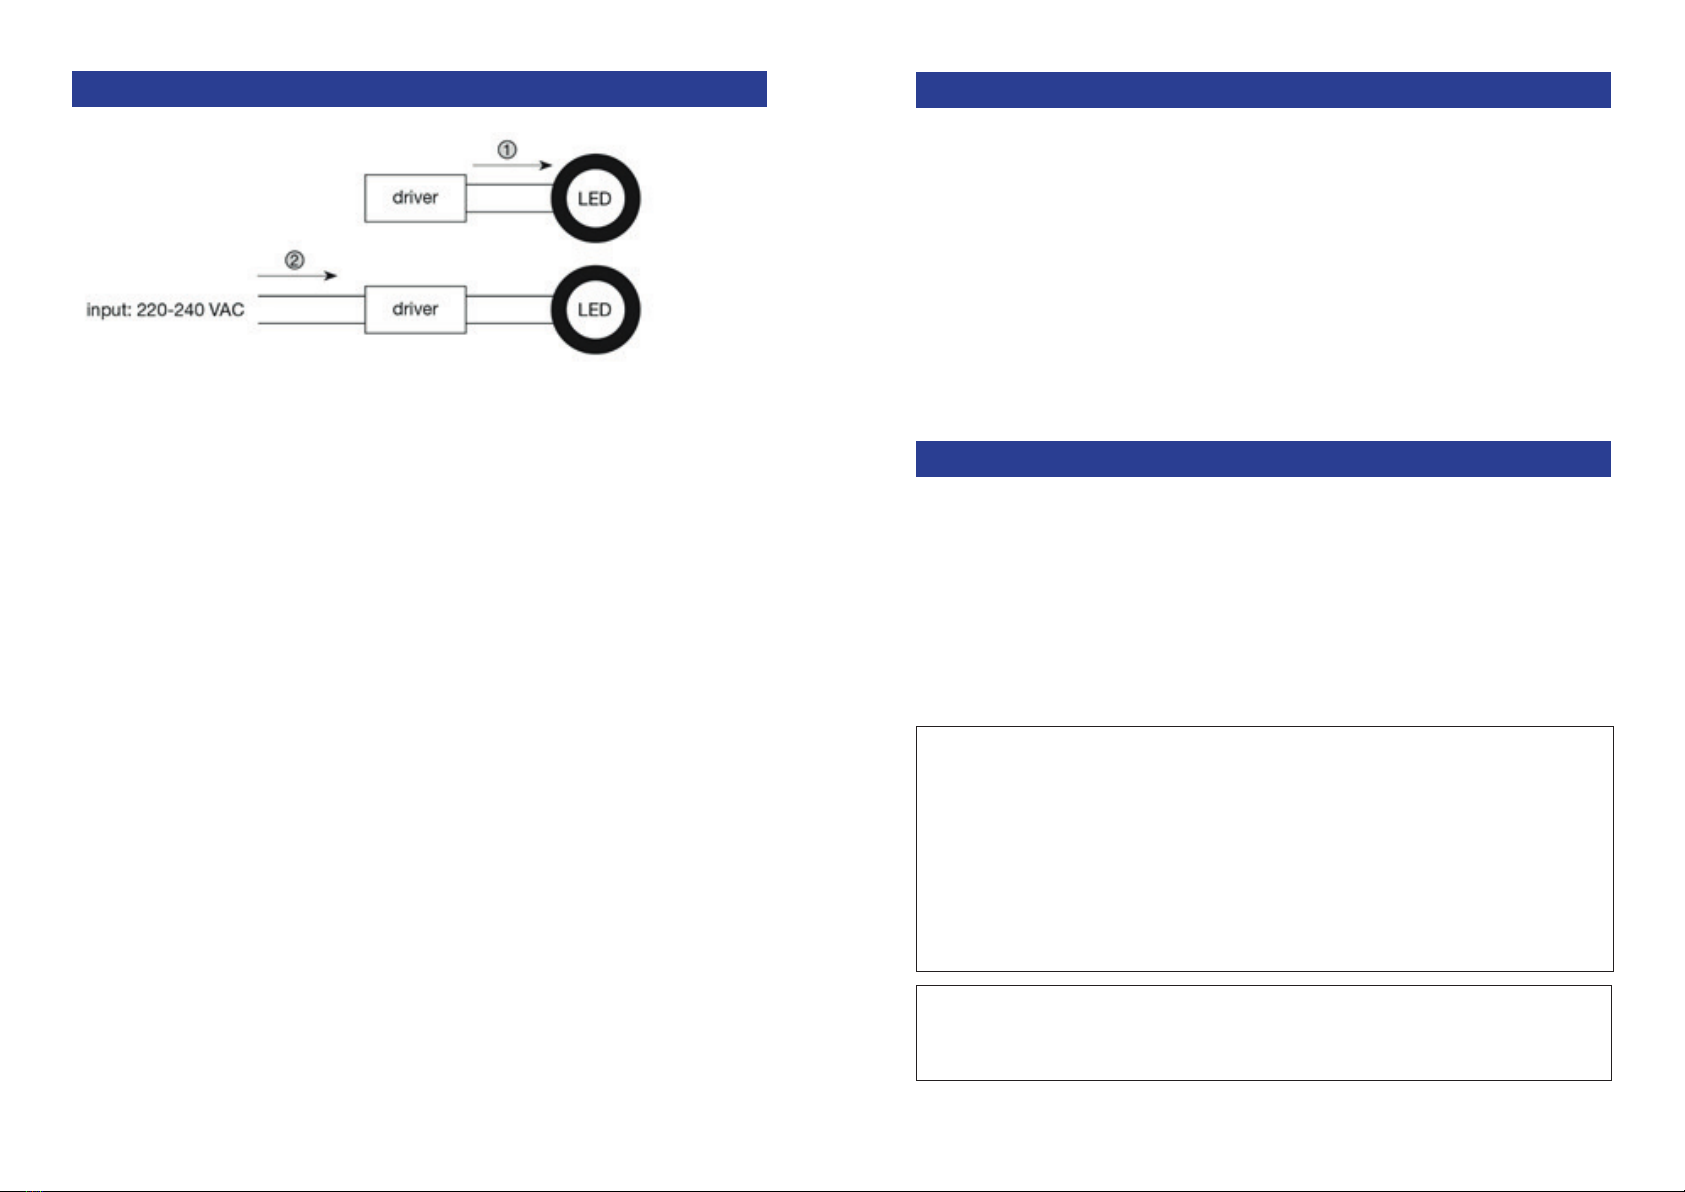
• EERST: Het armatuur aansluiten aan de voeding 
• VERVOLGENS: Verbind de primaire zijde van de driver met de stroom (230 V) 
• Plaats de voeding in de zaagopening van het plafond
• Druk beide veren van het armatuur naar boven en plaats in de zaagopening
Instructions d’installation
Suivre la séquence de l’installation, étape par étape:
• Veillez à ce que l’alimentation soit coupée au niveau du disjoncteur général.
• Découpez un trou de perçage à l’endroit souhaité pour l’installation
• D’ABORD: Connectez l’appareil à l’alimentation avant de raccorder au réseau électrique 
• ENSUITE: Connectez le côté primaire de l’alimentation avec le courant 
• Placez l’alimentation dans le trou de perçage
• Appuyez sur les deux ressorts de xation de manière à pouvoir insérer le spot dans le trou prédécoupé
Installation
Please follow the sequence of installation step by step:
• Switch off the electricity before commencing installation or lamp change
• Cut the correct sized hole in the ceiling in the required location
• FIRST: The luminaire MUST be connected to a driver and not directly to the mains electricity supply 
• SECOND: Connect primary side of driver to power supply (230 V) 
• Put the driver in the recess hole
• Press both springs of the luminaire upwards and place it into the cut-out
Montage
Beachten Sie vor inbetriebnahme unbedingt die Reihenfölge der installationsschritte:
• Schalten Sie vor Beginn der Arbeiten an der Leuchte die Stromzufuhr ab
• Schneiden Sie den richtig dimensionierten Loch in der Decke in den gewünschten Ort
• ERSTE: Die Leuchte muss mit einem Treiber verbunden werden und nicht direkt an die Netzstromversorgung 
• Verbinden Sie ANSCHLIESSEND die primäre Seite des Triebers mit dem Stromkreis (230 V) 
• Legen Sie die Trieber in den Ausschnitt
• Drücken Sie beide Federn der Leuchte nach oben und legen Sie sie in den Ausschnitt

This manual suits for next models

4

Other Unibright Lighting Equipment manuals

Unibright Reflex LED 2 User manual

Unibright

Unibright Reflex LED 2 User manual

Unibright Nova50 User manual

Unibright

Unibright Nova50 User manual

Unibright Nova User manual

Unibright

Unibright Nova User manual

Unibright LaVilla48 LVTPSBW User manual

Unibright

Unibright LaVilla48 LVTPSBW User manual

Unibright LVST3000W User manual

Unibright

Unibright LVST3000W User manual

Popular Lighting Equipment manuals by other brands

LIGMAN TANGO 30 installation manual

LIGMAN

LIGMAN TANGO 30 installation manual

AWH DN10 operating instructions

AWH

AWH DN10 operating instructions

EuroLite 51915381 user manual

EuroLite

EuroLite 51915381 user manual

ML Accessories AX CCT Installation & maintenance manual

ML Accessories

ML Accessories AX CCT Installation & maintenance manual

Bresser MM-05 instruction manual

Bresser

Bresser MM-05 instruction manual

Blizzard Lighting Puck Pro Zoom EXA user guide

Blizzard Lighting

Blizzard Lighting Puck Pro Zoom EXA user guide

Walter Walu Cool instructions

Walter

Walter Walu Cool instructions

Laserworld BLUE-300-473 user manual

Laserworld

Laserworld BLUE-300-473 user manual

Emos CLASSIC quick guide

Emos

Emos CLASSIC quick guide

LIGMAN Harrier 2 installation manual

LIGMAN

LIGMAN Harrier 2 installation manual

HYBRYD SPARK SGN Installation and maintenance manual

HYBRYD

HYBRYD SPARK SGN Installation and maintenance manual

ThePondguy 160326 instruction manual

ThePondguy

ThePondguy 160326 instruction manual

Heath Zenith DualBrite 4298 Installation and operating instructions

Heath Zenith

Heath Zenith DualBrite 4298 Installation and operating instructions

Kendal Lighting AC-8354 Installation instuctions

Kendal Lighting

Kendal Lighting AC-8354 Installation instuctions

BITEHARDER SHSL12V instructions

BITEHARDER

BITEHARDER SHSL12V instructions

Conrad 77 72 24 operating instructions

Conrad

Conrad 77 72 24 operating instructions

Valoya RX400 installation guide

Valoya

Valoya RX400 installation guide

Raytec SPARTAN HP series installation guide

Raytec

Raytec SPARTAN HP series installation guide

manuals.online logo
manuals.online logoBrands
  • About & Mission
  • Contact us
  • Privacy Policy
  • Terms and Conditions

Copyright 2025 Manuals.Online. All Rights Reserved.