Uniden Handheld UHF Transceiver UH076SX User manual

OWNER’S MANUAL
UH076SX
Handheld UHF Transceiver

WARNING!
i
WATERPROOF: JIS7
Uniden's UH076SX radio is designed to meet the water proofing
standard of JIS7.
This Means:
Being defined as having no ingress of water when immersed at 1
metre for 30 minutes.
The UH076SX will only meet this rating if fully assembled and all
rubber seals and bungs are well maintained and correctly fitted.
This means that the speaker microphone bung is inserted, and
the battery pack and antenna are attached and securely
fastened.
LITHIUM ION BATTERY PACK WARNING
MThis equipment contains a Lithium Ion Battery Pack.
MThe Lithium Ion Battery Pack contained in this equipment may
explode if disposed of in a fire.
MDo not short-circuit the Battery Pack.
MDo not charge the Lithium Ion Battery Pack used in this
equipment in any charger other than the one designed to
charge this Battery Pack. Using another charger may damage
the Battery Pack or cause the Battery Pack to explode.
MLithium Ion batteries must be disposed of properly.
USER LICENSE INFORMATION
The citizen band radio service is licenced in Australia by
ACMA Radio-communications (Citizen Band Radio
Stations) Class Licence and in New Zealand by MED
General User Licence for Citizen Band Radio and
operation is subject to conditions contained in those
licenses.

CONTENTS
1
Introduction
Features ..................................................................................................2
Included in your Package ........................................................................3
Optional Accessories ............................. .................................................3
Getting Started
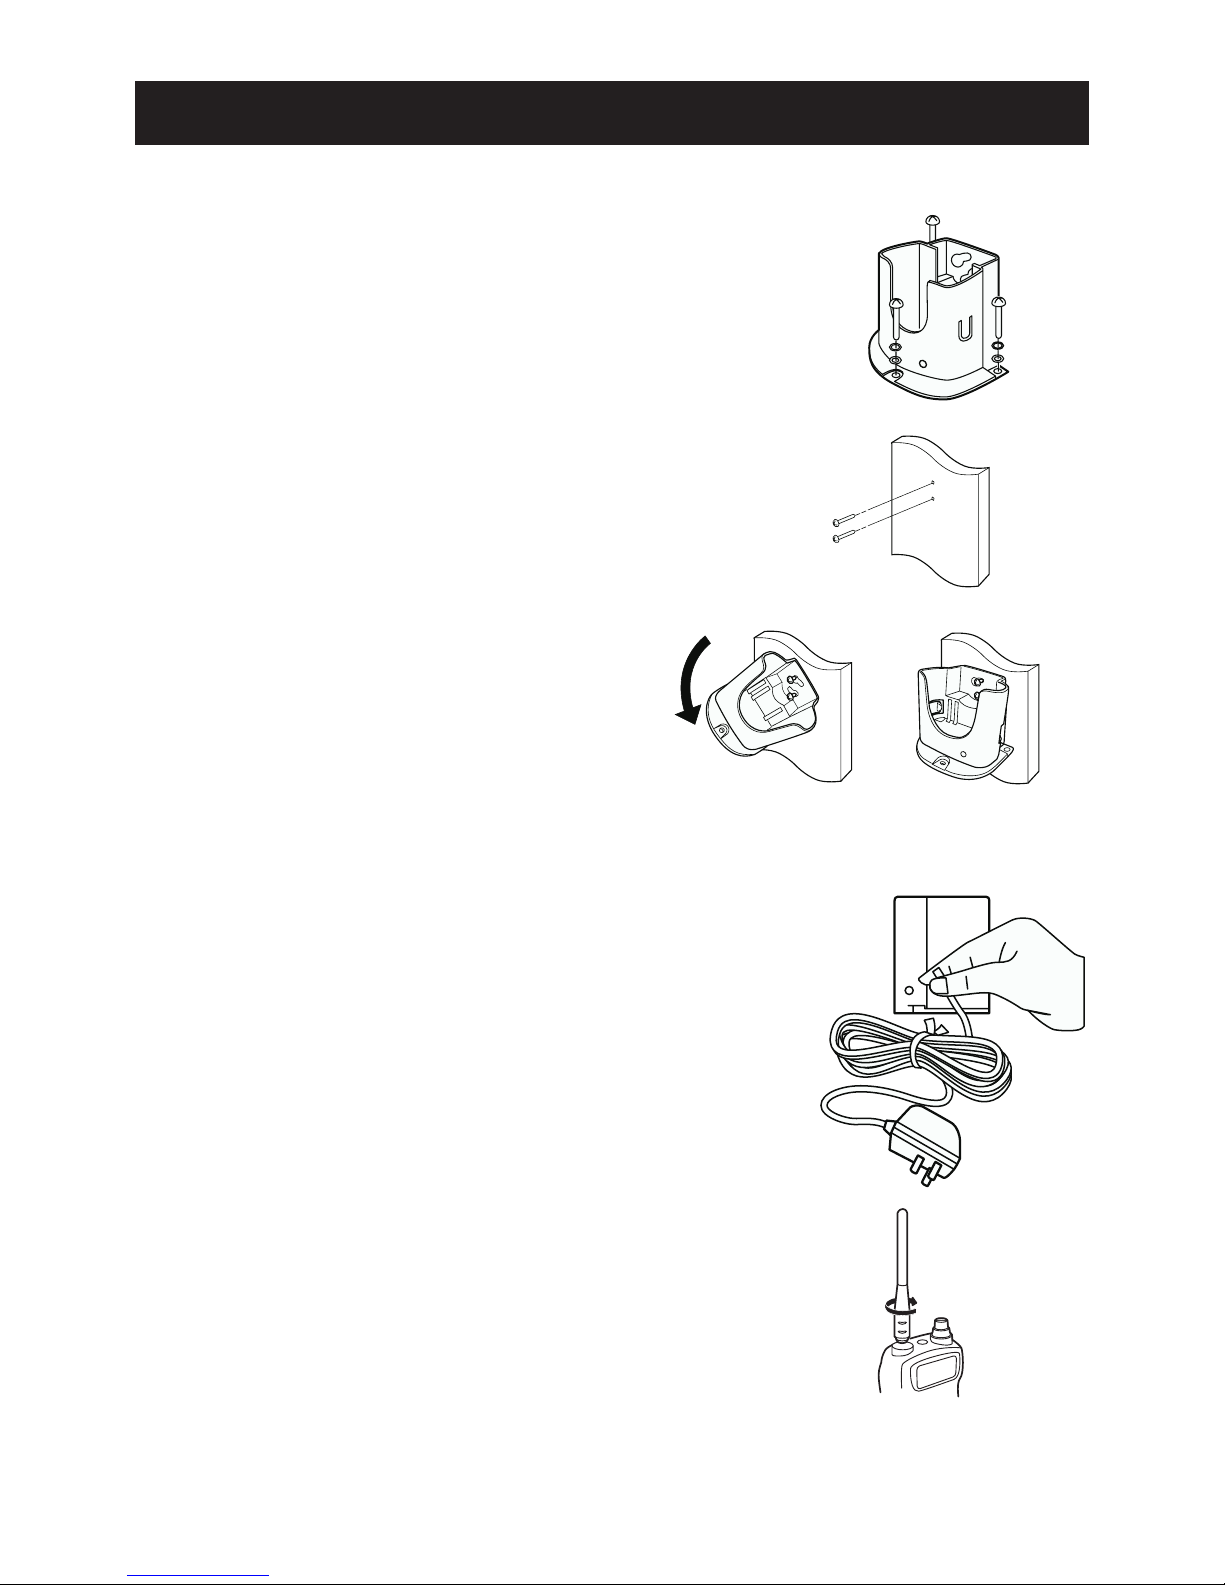
Mounting the Drop-in Charger ................................................................4
Attaching the Antenna .............................................................................4
Attaching the Battery Pack ......................................................................5
Attaching the Beltclip ...............................................................................5
Charging the Battery Pack.......................................................................6
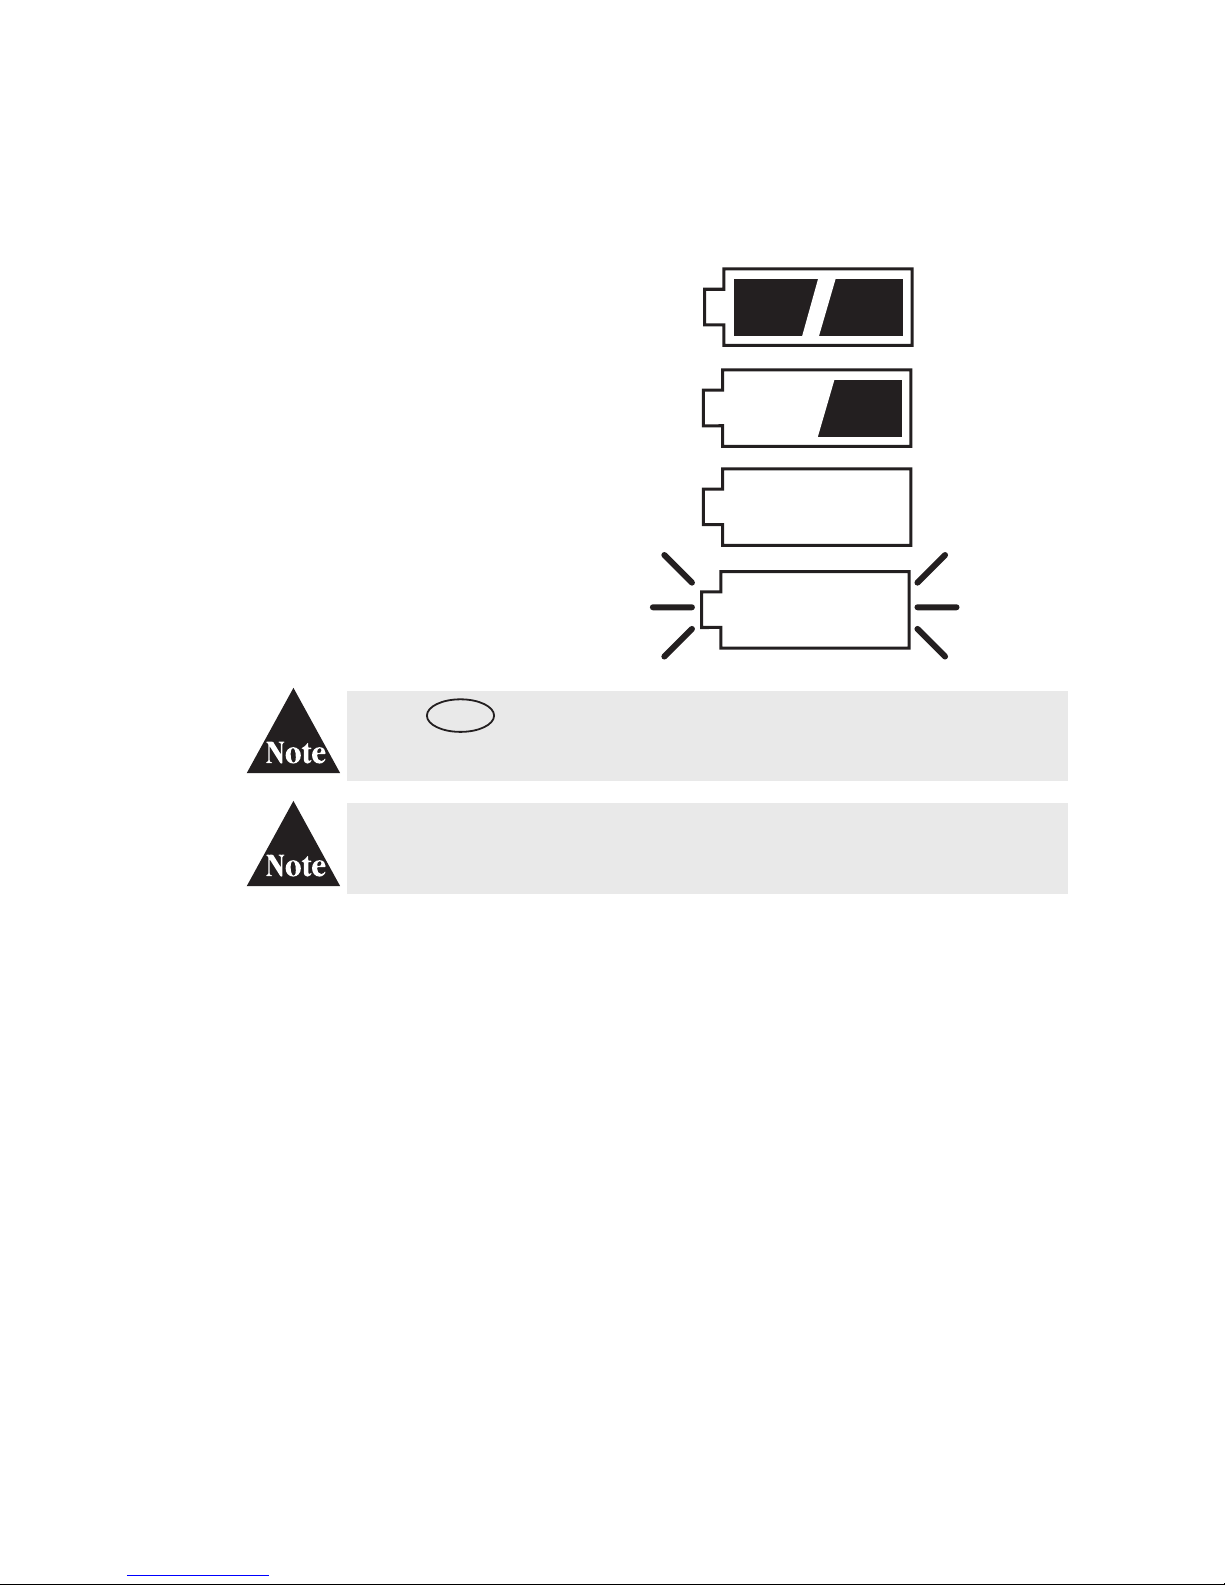
Battery Level Display...............................................................................7
SPKR/MIC Jack Cap ...............................................................................7
Connecting the SPKR/MIC ......................................................................7
Operation
Power On/Off...........................................................................................8
Volume.....................................................................................................8
Adjusting the Key Beeps .........................................................................8
Roger Beep .............................................................................................9
Selecting Channel ...................................................................................9
Squelch..................................................................................................10
To Transmit and Receive ......................................................................11
Using a Repeater Channel ....................................................................12
To Operate UH076SX in Duplex Mode..................................................13
Scanning................................................................................................13
Open Scan (OS) Mode.....................................................................13
Group Scan (GS) Mode....................................................................14
Programming Scan Channels ..........................................................15
Priority Channel .....................................................................................15
Choosing a Priority Channel.............................................................15
Drop-Out Delay......................................................................................15
Advanced Features ...............................................................................16
CTCSS ............................................................................................16
VOX .................................................................................................16
Power Save ...........................................................................................18
Back Lighting .........................................................................................18
Keypad Lock .........................................................................................18
Busy Channel Lock-out (BCL) ...............................................................19
Monitor ..................................................................................................19
UHF Channel and Frequencies.................................................................20
CTCSS Codes and Frequencies ..............................................................21
Warranty .....................................................................................................22
Controls and Indicators ...........................................................................23

2
INTRODUCTION
The UH076SX is a JIS7 Waterproof, portable two-way UHF-CB
radio. It is compact, rugged and fits easily in your hand. This hand
held UHF radio will give you consistent, outstanding performance in
virtually all conditions and situations. To ensure that you get the
most from the UH076SX features, please read this operating guide
carefully before using the unit.
FEATURES
!40 UHF CB Channels
!5W Max TX Power
!1W/5W Switchable TX Power
!Waterproof (meets JIS7 waterproof specifications)*
!Rubber Grips/Seal
!38 Built-in CTCSS codes
!Backlit Keypad & LCD Display
!Duplex Mode
!Open and Group Scan
!Busy Channel Lockout Function
!VOX Function
!Headset Jack
!Keypad Lock
!Battery Type: Lithium-lon Rechargeable
!Low Battery Alert
!Battery strength Indicator
!Auto Battery Save
!Battery Cover with charge contacts
!Roger Beep
* The UH076SX radio meets waterproof (JIS7) specifications only
when the battery, the antenna and speaker MIC jack cap are
correctly installed. The UH076SX will retain its JIS7 rating when the
accessory Speaker MIC is connected correctly but the Speaker MIC
itself is not splash or waterproof.

3
INCLUDED IN YOUR PACKAGE
Drop-in Charger
(DT076)
Beltclip
Wrist Strap and
Lithium Battery
(BP075)
AC Adapter
(AAD-075S(M))
UH076SX Antenna
Printed Material Mounting Screws
If any of these items are missing from the box, contact your
place of purchase, immediately.
OPTIONAL ACCESSORIES
MVOX Headset
6
UH07 SX
5
Speaker Mic
(SM078)
MHeavy Duty Speaker Mic

4
GETTING STARTED
Attaching the Antenna
Attach the antenna to the UH076SX.
Be sure the antenna is firmly seated.
Mounting the Drop-in Charger
1. Mount the drop-in charger to either a table or wall.
Table:
Attach the drop-in charger using the mounting
screws and washers.
Wall:
Insert the two mounting screws into the wall
keeping the same space as the holes on the
charger.
Place the charger with the screws
through the larger holes then turn the
charger.
2. Plug one end of the AC adapter into the wall outlet
and the other end into the drop-in charger.
When you mount the drop-in charger in a mobile
vehicle, use the optional cigarette lead instead.

5
Attaching the Battery Pack
1. Place the battery pack onto the back of the
radio. It will only fit in one way.
2. Snap the battery release clip until it clicks.
Be sure the battery pack fits tightly against
the UH076SX body.
Attaching the Beltclip
1. Hold the beltclip in the direction.
2. Apply it to the hanger piece on the back of
the radio. Then slide it up.
3. You will hear a click. The beltclip is firmly
attached.
Contacts
Avoid exposing the Lithium Ion battery, attached or unattached to
the radio, in direct sunshine, heated cars, or in areas with
temperatures below –20°C (–4°F) or above +60°C (+140°F).
Exposing the chemicals contained within the battery pack to
temperatures above +60 °C (+140°F) may cause the battery to
rupture, fail or reduce performance.
In case of exposure to cell contents, wash the affected area
thoroughly, and seek medical attention.
Additional battery cautions should be applied as described on page
i of your Owner ’s Manual.
CAUTION!

6
!The charger won’t overcharge the battery pack. When charging is
completed, the charge LED is no longer illuminated.
!Do not transmit when the UH076SX is in the drop-in charger!
!You can monitor incoming calls while the UH076SX is in the
drop-in charger.
4. To take the beltclip off the radio, turn it
and slid it up.
Charging the Battery Pack
Your radio is powered by a specially designed Lithium Ion battery pack.
! Before operating the UH076SX, charge the Lithium Ion battery pack for 5
hours without interruption in the drop-in charger.
1. Place the UH076SX in the drop-in charger.
2. The red LED illuminates and stays ON, until fully
charged.
UHO76SX
UHO76SX

7
Battery Level Display
The BATTERY icon in the top right hand corner of the screen indicates the
UH076SX current battery voltage level at all times. The battery level is displayed in
4 levels.
LEVEL 4
Battery 100% full
LEVEL 3
Battery approx. 40% capacity
LEVEL 2
Low Battery
LEVEL 1 (flashing)
Empty Battery
When is pressed at Level Empty, battery icon and
channel number will flash, transmission is disabled.
Recharge the battery at any time. From empty the battery
will take up to 5 hours to fully charge.
Battery Life : 12 Hours (Typical)
This is based on the following Duty Cycle:
Transmit (Low Power) 5%
Receive 5%
Stand-by 90%
PTT
SPKR/MIC Jack Cap
Make sure the SPKR/MIC jack cap is firmly pushed in to maintain submersible
rating.
Connecting the SPKR/MIC
Release the SPKR/MIC jack cap to plug in the SPKR/MIC. Secure the
SPKR/MIC plug by tightening the plug collar clockwise.

8
OPERATION
POWER ON/OFF
To turn the unit ON, rotate the [ON/OFF VOL]
clockwise. A channel number and battery level
should appear on the display.
To turn the unit OFF, rotate the [ON/OFF VOL]
knob counter-clockwise. The display will disappear.
ADJUSTING THE KEY BEEPS
Your radio emits a beep each time-one of the keys (except for the PTT or mon)
are pressed.
VOLUME
Rotate the [ON/OFF VOL] knob clockwise or counter-clockwise to adjust
speaker volume to desired listening level.
See the Controls and Indicators page at the back of this operating guide for
button and key operations.
To turn OFF this beep: Press and hold while turning on the radio.
To turn ON this beep: Press and hold while turning on the radio.
UH076SX
dup
dup

9
ROGER BEEP
Roger Beep is a BEEP that is sent to notify the end of transmission (both PTT
and VOX transmission.) Roger Beep can be heard through the speaker when
Key Beep is on. Roger Beep is transmitted even if key beep is turned off.
However Roger Beep will not be heard from the speaker.
To turn OFF Roger Beep: Press and hold while turning on the radio.
To turn ON Roger Beep: Press and hold while turning on the radio.
SELECTING CHANNEL
Press or to select the desired channel.
If you press and hold the or ,
channel number will scroll rapidly.

10
SQUELCH
The squelch is used to eliminate any annoying background noise when there
are no signals present.
Think of squelch as a gate. Turn [SQ] fully
clockwise. This raises the "Squelch Gate" so high
that only the very strong signals can get through.
Turn [SQ]
fully counter clockwise until you hear a
hiss. This opens the "Squelch Gate" so that
everything gets through noise, weak signal, and
strong signals.
To set the "Squelch Gate" to the desired level, turn
[SQ] counter-clockwise until you hear noise. Then
turn the [SQ] clockwise just until the noise
stopped. Now only the desired signal can get
through.
If an incoming signal is very weak there is a
possibility that you will have a choppy or broken
reception, due to the sensitivity of the squelch.
In this case, simply rotate the [SQ] clockwise
until the weak signal is heard clearly.
Noise
Weak Signals
Medium Signals
Strong Signals
Make sure to first select a channel not in use before setting the
squelch in your UH076SX UHF-CB radio.
UH076SX

11
TO TRANSMIT AND RECEIVE
The UH076SX uses the 40 UHF-CB Channels. For your reference a list of the
available channels and corresponding frequencies is printed on page 20.
1. The maximum RF transmit power of UH076SX is 5 Watts.
2. Before you transmit, listen for activity on the
selected channel.
3. When the channel is clear, press and hold the
to transmit. TX appears on the LCD.
4. When you have finished speaking, release the
and listen for a response. TX indicator
then disappears on the LCD.
The display shows BUSY when a transmission
is being received by your radio.
Hold the radio with microphone approximately
five cms in front of your mouth with the
antenna at approximately 45* angle away from
your head. Speak in a clear, normal
conversational voice.
To switch to low power, press . LOW
appears on the LCD.
To switch back to higher power, press
again. LOW indicator disappears from the LCD.
PTT
PTT
1/5w
1/5w

12
USING A REPEATER CHANNEL
UHF CB Repeaters are used to retransmit or relay your signal. Repeaters will
extend the range of your radio and overcome the shielding effect caused by
solid obstructions.
In normal Simplex operation, your radio transmits on one particular frequency
and receives on that same frequency. If there is a barrier (i.e. a Tall Building)
that partially blocks your transmitted signal, the possibility of the other radio
receiving the signal is very slim. Valleys, metallic structures, etc., tend to act as a
screen between radios.
With Duplex operation, the signal coming from your radio is received by the
Repeater station and then re-transmitted at the same time on another channel.
Your UH076SX is designed with duplex capability on Channels 1 to 8. When any
of these channels are set to operate in duplex mode during transmission, the
UH076SX automatically sends the signal at a frequency 30 channels above the
original in order to access the repeater station. After transmitting, the radio
reverts back to its original operating frequency.
For example:
1. CH01 is on Duplex Mode
- will receive on CH01 but Transmit on CH31
2. CH02 is on Duplex Mode
- will Receive on CH02 but Transmit on CH32, etc….
Refer to UHF Channel & Frequencies table on page 20.
Standard Operation without the aid of a Repeater Station
Operation with the aid of a Repeater

13
TO OPERATE UH076SX IN DUPLEX MODE
Eg. CH01 is being used in your area for repeater use.
SCANNING
The UH076SX has two types of scanning; Open Scanning (OS) and Group
Scanning (GS).
Scanning allows you to search for active channels
programmed in the OS or GS memory.
To initiate scanning;
1. Assuming the unit is on CH17 when switched on.
2. Press and scanning starts. SCAN icon flashes during scanning.
Open Scan (OS) Mode (the absence of GS icon indicates that the unit is on
OS mode)
Allows continuous scanning of channels stored in the Open Scan (OS) memory.
If an active channel is found, scanning will stop on that channel.
The factory has preprogrammed all the 40 UHF channels into the
Open Scan channel memory. However, you can change or
customize the channels by following the steps on programming
Scan Channels on page 15.
Example: CH40 becomes active
If the received signal cease, the unit will wait for at least 3 seconds for the
signal to return, otherwise scanning resumes.
To skip the active channel, press momentarily. Scanning resumes.
To deactivate SCAN, press or .
Check with your local retailer for available repeaters.
Press momentarily. The DUP icon appears.
Press again to deactivate the duplex operation.
UH076SX will return to simplex operation.
PTT
dup
dup
scan
scan
mem

14
Group Scan (GS) Mode
Allows you to monitor a Priority Channel while scanning.
To use GS Mode Scanning, press the key. .
GS icon appears on the
display.
GS Scanning checks the Priority channel activity regularly.
If SCAN is deactivated while in an active channel, the UH076SX will
stay on that active channel. If no other channels are active, the
UH076SX will reinstate the starting channel.
If SCAN is deactivated while it is turned to an active channel, the
UH076SX will stay on that active channel. If none of the channels are
active, the UH076SX will reinstate the Priority channel.
If GS Scanning is initiated when there are no channels
programmed in GS memory, an error tone will be heard and
scanning will not start.
If the Priority channel becomes active the radio will stay on that channel for as
long as the signal is present. If the received signal ceases, Priority scanning
continues after 3 seconds.
If scanning stops on a channel which is not a Priority Channel the
UH076SX will continue monitoring the Priority Channel for activity
while listening to the active one.
To deactivate SCAN, press the or .
PTT
os/gs
scan

15
Programming Scan Channels
1. Select which Scanning Mode you wish to use OS or GS Mode.
OS is indicated by the absence of the GS icon.
2. Select the channel you want to store by pressing or .
3. Press and hold for 1.5 secs. to store. MEM icon appears and two
short tone beeps are heard.
4. To remove the channels from Memory, press and hold for 1.5 secs.
once more. Two short tone beeps are heard and the MEM icon disappears.
PRIORITY CHANNEL
The Priority Channel feature allows user to monitor one of 40 channels in the
UH076SX, monitoring it every 1.5 secs. during Group Scanning.
Choosing a Priority Channel
DROP-OUT DELAY
While scanning, the UH076SX stops at a busy channel and receives a
transmission. When the received signal is over, the unit will wait for 3 seconds
for the return of the signal, otherwise, the radio resumes scanning.
The starting channel, when Group Scanning is
initiated, is always the Priority Channel. To change
the priority channel setting while scanning, (eg. PRI
Channel is CH17 (476.825 MHz ));
a. press , to select a higher channel (scanning
pauses).
or
b. press , to select a lower channel.
mem
mem

16
ADVANCED FEATURES
VOX
MBuilt-in Voice Activated Circuit (VOX) feature enables the user to
transmit automatically by speaking on the microphone of the VOX headset
(not supplied) without pressing the PTT switch.
CTCSS (Continuous Tone Coded Squelch System)
CTCSS is a feature that allows a group to talk to each other without hearing
other users on the same channel.
Programming CTCSS Code
1. Select a desired channel to be used with CTCSS.
2. Press and hold for 1.5 secs. CTCSS icon blinks.
3. Press or to select the desired CTCSS code.
4. Press to save the selected code. CTCSS icon stops blinking.
The UH076SX will return to standby mode after 10 secs. of no
activity. CTCSS code can be programmed on every channel. There
are 38 available CTCSS tone per channel.
CTCSS Scan Operation
1. Press to start scanning (GS or OS) mode.
2. Press and hold to change to CTCSS scan mode.
3. When a signal is sensed on a CTCSS CH, the UH076SX stops for about
400 msecs (decode time) to decode the CTCSS code. If there is no code or the
receive code does not match the one programmed on the unit, the unit
resumes scanning.
Channels 5 and 35 are used for emergency channels. CTCSS will
not operate on these channels.
ctcss
ctcss
ctcss
scan

17
VOX feature will not work without the Vox Headset Microphone.
The built in mic of UH076SX is temporarily disabled, however
accidental pressing of will cause the unit to transmit briefly.
Changing the VOX sensitivity setting to oF without removing the
microphone will cause the unit to transmit continuously.
To activate VOX
1. Press and hold for 1.5 secs. VOX icon blinks.
2. Press either or within 10 secs to select the desired
VOX sensitivity level (9 with the lowest sensitivity to 1 with the
highest sensitivity).
3. Press to save the selected level. VOX icon stops blinking.
4. Install VOX Headset (not supplied) to UH076SX.
To De-activate VOX
1. Remove VOX Headset from UH076SX.
2. Press and hold for 1.5 secs. until VOX blinks.
3. Press repeatedly and until oF is displayed.
4. Press to save the setting. VOX icon disappears.
PTT
vox
vox
vox
vox

18
POWER SAVE
Battery Save feature extends the battery life by switching the receiver circuit
power ON and OFF. This feature automatically activates during standby mode
(RX mode without signal).
BACK LIGHTING
The Liquid Crystal Display (LCD) and function keys are backlit for easy
viewing at night or in low light situations. The back lighting automatically
switches ON every time a key (except PTT) is pressed. It turns OFF 5 secs
after the last key is pressed.
KEYPAD LOCK
To prevent accidental entries, you can lock the keypad.
Press and hold the button until it beeps to activate Key Lock.
icon appears.
To unlock the keypad, press and hold the button again. icon
disappears.
When the Key Lock is active, a warning beep will be heard if you
attempt to press keys. (except for the PTT button)
lock
lock
Table of contents
Other Uniden Transceiver manuals

Uniden
Uniden UH6000 User manual

Uniden
Uniden UH078SX-NB User manual

Uniden
Uniden UH950S User manual

Uniden
Uniden UH043SX-2NB User manual

Uniden
Uniden UH076DLX User manual

Uniden
Uniden UH036SX-2NB User manual

Uniden
Uniden Benjamin User manual

Uniden
Uniden HH955 User manual

Uniden
Uniden GPS105 User manual

Uniden
Uniden SPH 51DT User manual

Uniden
Uniden SEA-WASP MC-4300 User manual

Uniden
Uniden SUNDOWNER UH-011 User manual

Uniden
Uniden UH8010S+ANT User manual

Uniden
Uniden XTRAK40 User manual

Uniden
Uniden UH8060NB User manual

Uniden
Uniden UH5060 User manual

Uniden
Uniden sundowner UH-088 User manual

Uniden
Uniden UH305SX-2NB User manual

Uniden
Uniden UH8050S User manual

Uniden
Uniden SMU250KTS User manual