8
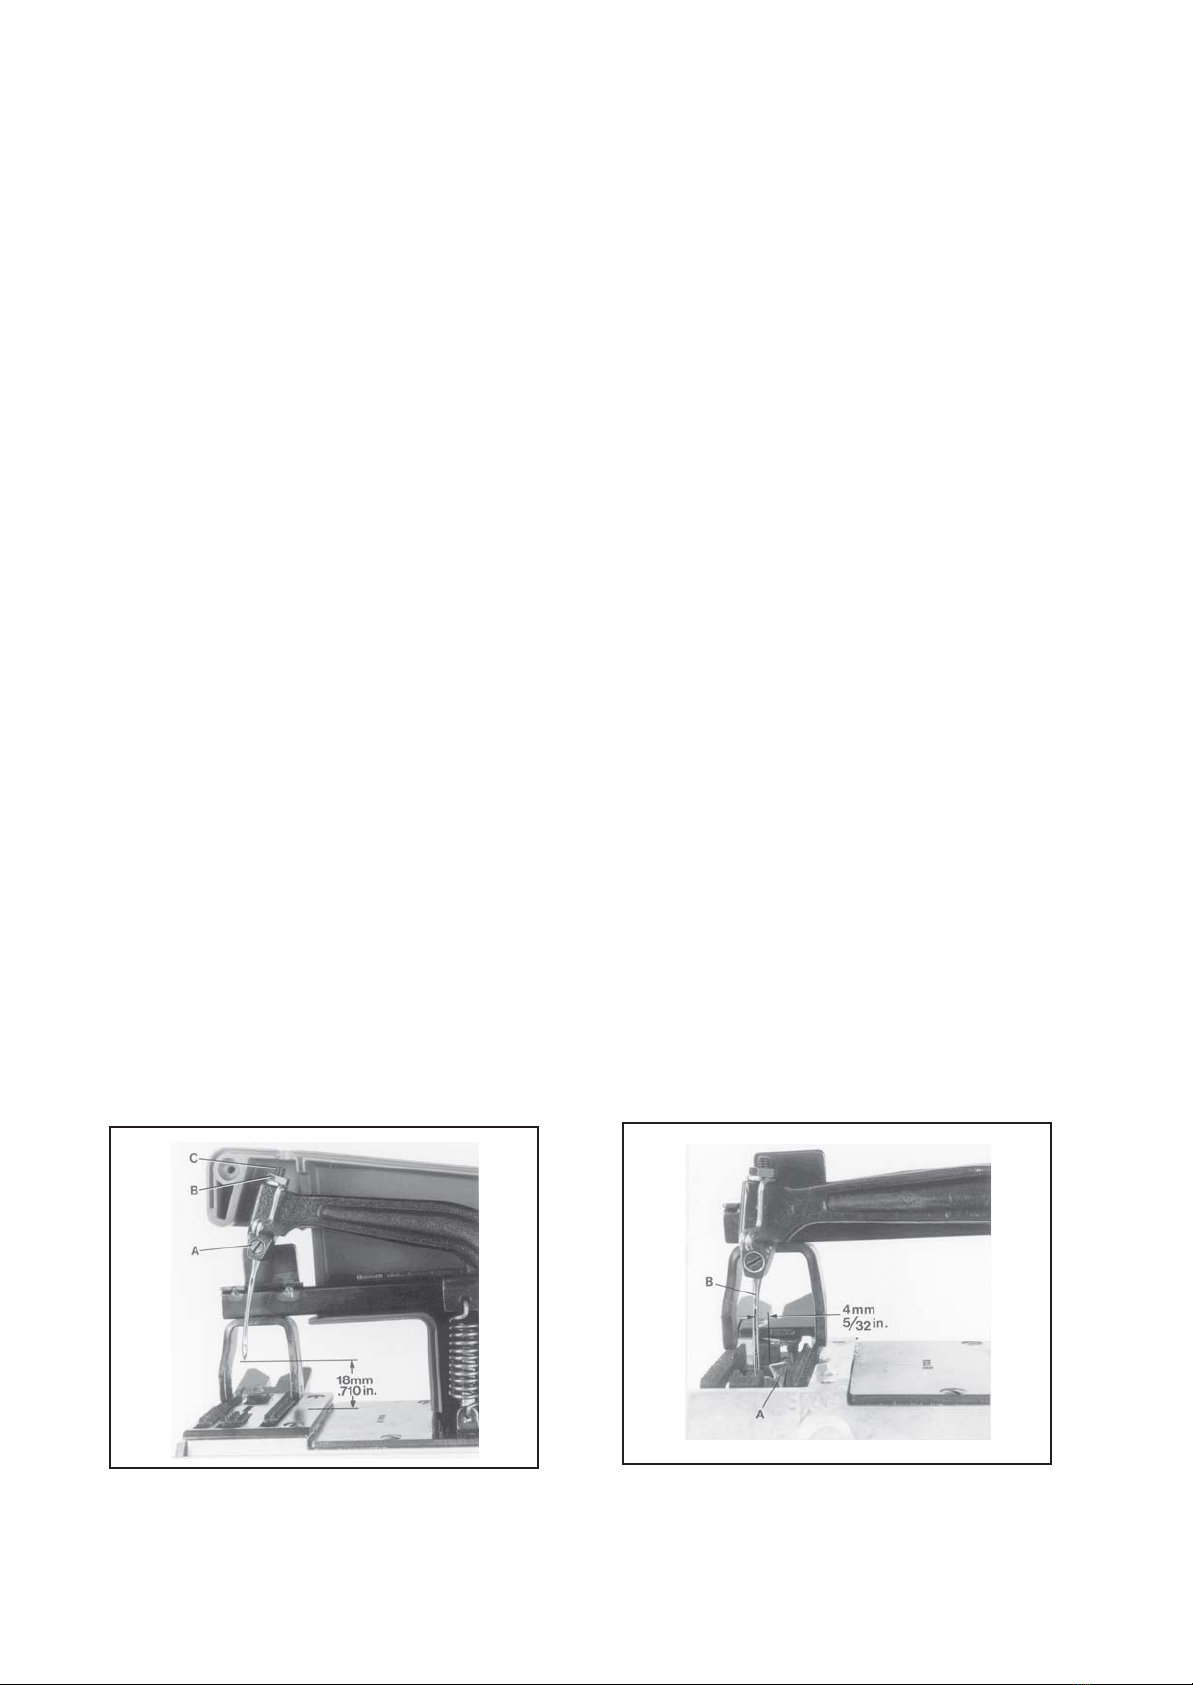
LubricationLubrication
LubricationLubrication
Lubrication
The machines are lubricated with a special grease. A 25
gram (approx. 1 oz.) tube of this grease can be ordered
from UNION SPECIAL under part No. 999-253. To keep
the machine ready for work, a few drops of oil should be
applied from time to time to the lubricating points indi-
cated on the oiling diagram on page 19.
Operating the MachineOperating the Machine
Operating the MachineOperating the Machine
Operating the Machine
Insert the plug of the power cable into the wall socket.
Start stitching on a piece of bag material (jute, paper,
polypropylene etc.) by pressing the thumb switch.
Continue stitching as the bag material leaves the
machine. This will produce a thread chain, which when
guided into the V-cut out of the throat plate, is
automatically cut by the thread chain cutting knives.
Release the switch, the machine stops.
NOTE: The knives function only when the machine is
operating, otherwise the thread chain will break when
pulled and could cause damage to the needle and
looper.
Closing the bagClosing the bag
Closing the bagClosing the bag
Closing the bag
For a neat, presentable closure the filled bag has to be
prepared as follows:
Paper,heavy gaugeplastic,coatedpolypropylene bags:Paper,heavy gaugeplastic,coatedpolypropylene bags:
Paper,heavy gaugeplastic,coatedpolypropylene bags:Paper,heavy gaugeplastic,coatedpolypropylene bags:
Paper,heavy gaugeplastic,coatedpolypropylene bags:
Insert both hands into the opening of the filled bag and
spread apart. Then grip both outer edges of the bag
and fold with a sharp movement the bag top forward
and over to expel the air. Bring back the bag top to the
upright position so that is is flat and vertical. Bring the
machine to the right hand side of the bag, approx. 25 to
40 mm (1 - 1 1/2 in.) from the top. Enter the leading edge
of the bag between presser foot and throat plate.
Keep a security distance of approx.
100 mm (4 in.) between hand and
sewing needle!
Press the thumb switch. The machine sews across the
bag, requiring the operator only to keep pace by
moving the hand in conjunction with the sewing speed
of the machine.
As the machine comes off the bag, guide the thread
chain with a slight twist of the wrist into the knives
simultaneously release the switch. The machine stops.
this results in a short, neat thread chain at the beginning
and end of the bag.
Hessian, jute, woven polypropylene, cotton and netHessian, jute, woven polypropylene, cotton and net
Hessian, jute, woven polypropylene, cotton and netHessian, jute, woven polypropylene, cotton and net
Hessian, jute, woven polypropylene, cotton and net
bags:bags:
bags:bags:
bags:
These bag materials are not stiff enough, therefore the
right leading edge of the bag has to be entered with the
left hand into the machine.
Keep a security distance of approx.
100 mm (4 in.) between hand and
sewing needle!
While sewing the operator should move the left hand to
the left side of the bag, maintaining a slight tension
across the top of the bag.
SchmierungSchmierung
SchmierungSchmierung
Schmierung
Die Maschinen sind mit einem Spezialfett geschmiert. Eine
25 g Tube dieses Fettes kann unter der Teil-Nr. 999-253 von
UNION SPECIAL bezogen werden. Um die Maschine
betriebsbereit zu halten, müssen von Zeit zu Zeit einige Tropfen
Öl an die in der Schmieranleitung auf Seite 19 bezeichneten
Schmierstellen gebracht werden.
Einschalten der MaschineEinschalten der Maschine
Einschalten der MaschineEinschalten der Maschine
Einschalten der Maschine
Stecken Sie den Stecker des Anschlußkabels in die Steckdose
ein. Beginnen Sie auf einem Stück Sackmaterial (Jute, Papier,
Polypropylen usw.) zu nähen, indem Sie den
Druckknopfschalter betätigen. Nähen Sie weiter, nachdem
dieMaschinedasSackmaterialverlassenhat.Dabeiwirdeine
Fadenkettegebildet,die,wennsieindenV-förmigenAusschnitt
der Stichplatte geführt wird, automatisch von den
Fadenkettenabschneidmessern abgeschnitten wird. Lassen
Sie den Schalter los, die Maschine stoppt.
BEACHTEN SIE: Die Messer arbeiten nur, wenn die Maschine
läuft, sonst reißt die Fadenkette, wenn gezogen wird; dabei
können die Nadel und der Greifer beschädigt werden.
Verschließen des SackesVerschließen des Sackes
Verschließen des SackesVerschließen des Sackes
Verschließen des Sackes
Für einen sauberen, vorzeigbaren Verschluß muss der gefüllte
Sack wie folgt vorbereitet werden:
Papier-, schwere Kunststofffoliensäcke, beschichtetePapier-, schwere Kunststofffoliensäcke, beschichtete
Papier-, schwere Kunststofffoliensäcke, beschichtetePapier-, schwere Kunststofffoliensäcke, beschichtete
Papier-, schwere Kunststofffoliensäcke, beschichtete
Polypropylensäcke:Polypropylensäcke:
Polypropylensäcke:Polypropylensäcke:
Polypropylensäcke:
Stecken Sie beide Hände in die Öffnung des gefüllten Sackes
undspreizenSiedieseauseinander.Greifensienundiebeiden
Außenkanten des Sackes und falten Sie die Sackoberseite mit
einer schnellen Bewegung nach vorne über, damit die Luft
entweicht. Richten Sie die Sackoberseite wieder auf, so dass
sie flach und senkrecht ist. Bringen Sie die Maschine an die
rechteSeitedesSackesetwa25bis40mmvonderOberkante.
Führen Sie die Sackvorderkante zwischen Drückerfuß und
Stichplatte.
Betätigen Sie den Druckknopfschalter. Die Maschine
näht quer über den Sack. Dabei braucht die
Bedienungsperson ihre Handbewegung nur an die
Nähgeschwindigkeit der Maschine anzupassen.
Wenn die Maschine den Sack verlässt, führen Sie mit
einerleichten Drehungdes Handgelenks dieFadenkette
in die Messer und lassen gleichzeitig den Schalter los. Die
Maschine stoppt. Dies ergibt eine kurze, saubere
Fadenkette am Anfang und Ende des Sackes.
Säcke aus Sackleinwand, Jute, Polypropylengewebe,Säcke aus Sackleinwand, Jute, Polypropylengewebe,
Säcke aus Sackleinwand, Jute, Polypropylengewebe,Säcke aus Sackleinwand, Jute, Polypropylengewebe,
Säcke aus Sackleinwand, Jute, Polypropylengewebe,
Baumwolleund Netzgewebe:Baumwolleund Netzgewebe:
Baumwolleund Netzgewebe:Baumwolleund Netzgewebe:
Baumwolleund Netzgewebe:
DieseSackmaterialen sindnichtsteif genug, deshalbmuss die
rechte Sackvorderkante mit der linken Hand in die Maschine
geführt werden.
Halten Sie einen Sicherheitsabstand von
ca. 100 mm zwischen Hand und
Nähnadel ein!
Während des Nähens soll die Bedienungsperson mit ihrer
linken Hand die linke Seite des Sackes führen und eine leichte
Spannung auf die Sackoberkante ausüben.
Halten Sie einen Sicherheitsabstand von
ca. 100 mm zwischen Hand und
Nähnadel ein!
From the library of Superior Sewing Machine & Supply LLC - www.supsew.com