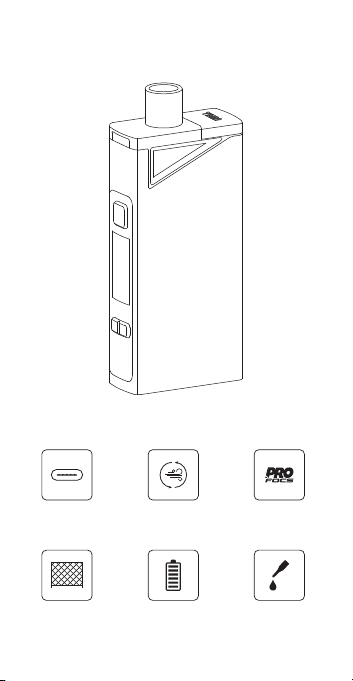
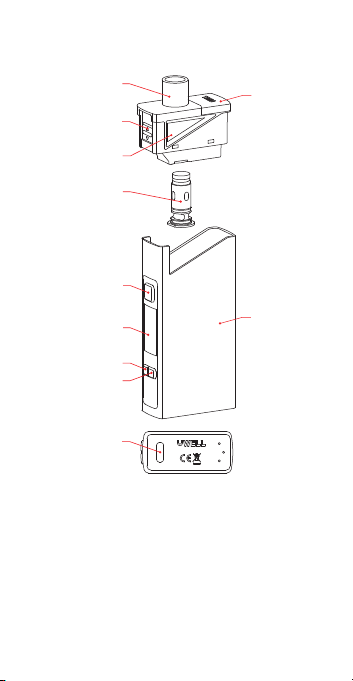
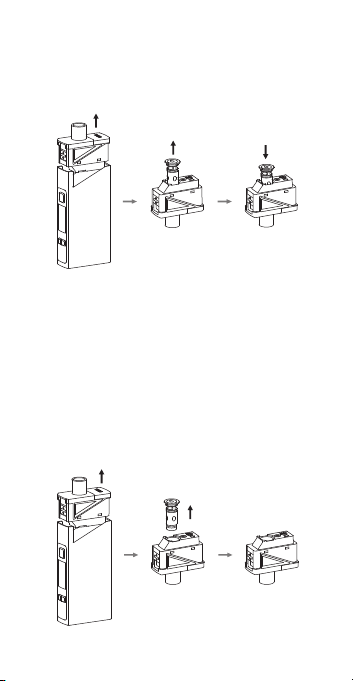
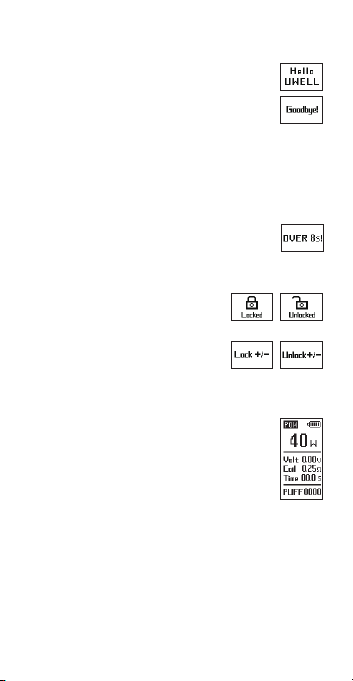
UWELL HAVOK V1 User manual

www.myuwell.com
Manufactured by SHENZHEN UWELL TECHNOLOGY CO., LTD.
©2021 By SHENZHEN UWELL TECHNOLOGY CO., LTD., All Rights Reserved.
Designed by UWELL Made in china
Uwell
Uwelltech Uwelltech Uwelltech Uwelltech

HAVOK V1 Pod Mod
User Manual

Type-C port Pro-FOCS flavor
testing technology
Adjustable
airflow
Removable coil 1800 mAh Refillable


- 1 -
Specification
● Material: PCTG, Aluminum Alloy
● Size: 100 mm × 42.9 mm × 19.2 mm
● Net Weight: 101 g
● E-Liquid Capacity: 4 ml
● Wattage Range: 5 - 65 W
● Battery Capacity: 1800 mAh
● Coil Specification:
FeCrAl UN2 Meshed-H 0.25Ω HAVOK V1 Coil: 40W-45W
FeCrAl UN2 Meshed-H 0.6Ω HAVOK V1 Coil: 20W-25W
The Packaging Includes
● 1 × HAVOK V1 Pod Mod
● 1 × UN2 Meshed-H 0.25Ω HAVOK V1 Coil (Pre-installed) (DTL)
● 1 × UN2 Meshed-H 0.6Ω HAVOK V1 Coil (MTL/RDL)
● 1 × Pack of O-rings
● 1 × User’s manual
Features
1. 1800 mAh internal battery, 5V/2A fast charging.
2. 0.96-inch OLED screen, clearly display all data.
3. Quickly click the fire button 5 times to turn on/off the device,
safe and reliable.
4. Refillable pod with top filling, cost-effective to use.
5. The coil can be replaced for more prolonged use and lower
cost.
6. The wattage and airflow can be adjusted as you want to explore
your ideal vape experience.
7. The Pro-FOCS flavor testing technology gives you an excellent
vape experience.
8. The chip has multiple circuit protection functions to supply
stable, safe, and reliable performance.
9. A new coil can be installed with self-adaptive power, to prevent
it from burning.
10. Puff counter records your daily usage.

- 2 -
Type-C port
Please read the following information before use:
1. Install the coil into the pod to ensure that the bottom of the
coil is flush with the bottom of the pod.
2. Connect the pod to the body and slide the sliding top cap off.
3. After adding e-liquid from the filling hole, close the sliding top
cap and let it stand for 10 minutes.
4. Press the fire button 5 times to turn it on, hold the fire button
to vape.
Illustration
Drip tip
Airflow valve
Coil
Fire button
OLED Screen
“-” button
“+” button
Mod
E-liquid level window
Sliding top cap

- 3 -
Instructions
1. How to fill the pod
a. Install the coil into the pod.
b. Connect the pod to the body. Slide the sliding top cap off.
c. Add e-liquid.
d. Close the sliding top cap.
2. Vaping
Please adjust the airflow valve to your desired airflow at first.
When the device is on, hold the button to vape, the screen will
stay on.
Attention:
a. Please make sure the bottom of the coil is flush with the bottom
of the pod when installing the coil.
b. Please insert the nib of the E-liquid bottle into the pod to
refill it.
c. Do not open the sliding top cap for an extended period. Close
the sliding top cap securely after refilling to prevent leakage.
d. When filling a new pod, please let the pod sit for 10 minutes
to avoid coil burning.
e. Please add e-liquid when the e-liquid level is at the “MIN”
line.

- 4 -
3. Changing the coil
a. Remove the pod from the device.
b. Remove the used coil from the pod.
c. Install a new coil.
4. How to clean the pod
a. Remove the pod from the body.
b. Remove the coil from the pod. Do not clean the coil.
c. Clean the pod with clean water and dry it before use.
* Please have a check if the O-rings on the coil are intact when
installing to avoid leakage.
Attention:
1. Please let it sit for 10 minutes after the first filling to avoid
burning the coil.
2. Please have a check if the O-rings on the coil are intact when
installing to avoid leakage.

- 5 -
Mod instructions
1. Power on/off
Click the fire button 5 times within 2 seconds to
turn on/off the mod. It will display “Hello UWELL”
when it’s on and display “Goodbye!” when it’s off.
2. Standby
When there is no operation in 8 seconds, the screen will turn
off and will be in stand by.
3. Vaping
While the device is on, hold the fire button to vape;
it will display “OVER 8S” and automatically stop
firing when the button is held for longer than 8s.
4. How to lock your device
a. When the device is on, hold the fire
button and “-” button for 1 second to
lock/unlock the device.
b. When the device is on, hold the fire
button and “+” button for 1 second to
lock/unlock the “+/-” buttons.
5. Wattage setting
a. When the device is in standby, press the “+/-”
to adjust the wattage or hold the button to scroll
through them faster. When it reaches to the
end of the range, it will round robin.
b. The wattage range for the 0.25-ohm coil is
40-45W; the wattage range for the 0.6-ohm
coil is 20-25W
Attention
The output voltage will decrease gradually during vaping. When
the output wattage can not reach the set wattage, the device will
lower the wattage automatically, and then the screen will display
the output voltage after automatically adjusting the wattage.

- 6 -
6. Puff counter
For every vape lasting longer than 1 second would be counted
as 1 puff. The vape shorter than 1 second won’t be counted. The
maximum record is 9,999 puffs. Hold the "+" and "-" buttons for 2
seconds until "PUFF CLEAR" is displayed. After
releasing the buttons, the number of puffs is cleared.
7. Resistance detection
Resistance detection shall be done automatically. Resistance
range is 0.2 - 3Ω;
a. If there is no pod or the resistance of the coil
is too high, press the fire button the screen
will indicate open circuit.
b. If the resistance of the coil is too low, press the
fire button the screen will indicate short circuit.
8. Low power indication
When the voltage is too low, press the fire button
the screen will indicate low battery.
9. Temperature protection
The output will be cut off if the PCBA temperature increase to
80°C during vaping, the screen will display “Too Hot! Please
Wait”; 10 seconds later the temperature will
stop and you are free to vape again.
10. Charging
Charge battery with Type-C of 5V/2A, the screen
will indicate charging.
11. Factory reset
Hold the fire button, “+” and “-” button for 3 seconds the screen
will display “Factory Reset”, release the buttons the screen will
exit to the defaulted wattage, and the puff
counter would be cleared.

- 7 -
Attention
1. Please charge with certified high-quality adaptor from a
reputable company and a Type-C cable with the charging
current of 5V/2A.
2. The device and adaptor may warm up when charging, keep
away from flammable and explosive goods.
3. Please use a dry and soft cloth to clean the device. Keep away
from water or any liquids.
4. Please remove the pod cartridge and store it separately when
you are on a plane to avoid leakage due to pressure changes.
5. Please do not put the device in your pocket with other hard
objects to avoid damages.
6. Please turn off the device when it is not in use.
7. Please charge the device at least once a month.
8. Don’t disassemble the device.
9. Avoid high temperature, low temperature and humidity during
use or storage to avoid damage to the equipment.
10. The product parameters or pictures in this manual are for
illustration purpose only, please refer to the actual product.
Safety Instruction
Please read the following safety instructions carefully before
using the product.
1. This product is only available to people who have reached
the legal age of smoking. It is strictly forbidden for young
children, pregnant women and women during breastfeeding
or for patients with heart disease, high blood pressure, diabetes,
depression and asthma.
2. Please put the product out of reach of children and pets to
avoid injury.
3. When using this product, please keep away from inflammable
and explosive materials to avoid injury.
4. The company does not assume any responsibility for any
equipment damage or personal injury caused by user misuse.

- 8 -
Warranty Details
Please keep the anti-counterfeit code and proof of purchase after
purchasing the product. The warranty period is 180 days from
the date of purchase. Our company provides warranty service
(Device and atomizer only, exclude coil head and pod cartridge).
Please note that any of the following conditions are not covered
by the warranty:
1. Exceeding the warranty period.
2. Damage caused by the use, maintenance, and storage that
is not in accordance with the requirements as instructed.
3. Damage caused by unauthorized repair.
4. Damage caused by the usage of non-UWELL components.
5. Damage caused by force majeure.
Verification
1. Visit the UWELL official website www.myuwell.com through
a smartphone or PC.
2. Please enter the 16 digits authentic code, and the result will
be displayed in a few seconds.
3. Please feel free to contact UWELL via e-mail, phone or
website for more help.
Customer Service
We pride ourselves on manufacturing quality products and
providing excellent customer service. For any issues, please
* UWELL reserves the right of final interpretation in the user
manual.
* It is hereby stated that the markable area on the product is
not enough to mark the CE and WEEE as the standard
dimensions.
Table of contents
Other UWELL Electronic Cigarette manuals

UWELL
UWELL CALIBURN A2 User manual

UWELL
UWELL Hypercar User manual

UWELL
UWELL TRIPOD PCC Kit User manual

UWELL
UWELL CALIBURN A2S Pod System User manual

UWELL
UWELL CROWN 2 User manual

UWELL
UWELL CALIBURN A2S User manual

UWELL
UWELL VALYRAN User manual

UWELL
UWELL CROWN B User manual

UWELL
UWELL Whirl T1 User manual

UWELL
UWELL Nunchaku User manual