manuals.online logo
Brands
  1. Home
  2. •
  3. Brands
  4. •
  5. Vacron
  6. •
  7. Dashcam
  8. •
  9. Vacron SuperCapacitor User manual

Vacron SuperCapacitor User manual

SuperCapacitor Vehicle Video Recorder
Please contact your local dealer if you have any question on this product.
Installation Guide
(1) This device should be installed in the area where
the windshield will be able to be cleaned.
(2) Formatting SD card on the device before beginning
to use.
(3) Set time zone and timing on OSD, or
auto-calibrating by GPS.
(4) NTSC or PAL setting through OSD.
(5) Electricity consumption: 500mA. If power supplied
by PC, please use Y Type USB Cable.
3. Adjust the view angle
properly.
4. Plug in the DC5V
power supply.
5. Plug in the cigarette
charger.
6. VVR Installation.
Best location
Cigar lighter
3M sticker
1. Power on / Record
Turn on device and wait for around 20 sec ready
for recorded.
2. Power off / Stop record
After power off, wait for superconductor’s supply
is off, when the power are all off. Take out SD card
for backup or format.
Remote Controller
Check the mercury cell is installed in
correct direction. (Check the pole)
Check if the cell power is exhaust.
Check if the sensor is covered.
Check if it nears by Fluorescent Lamp.
How to check if the remote
controller is workable?




Emergency
REC
Play
Menu
Navigator
Enter
Stop
VACRON Player
OSD
screen
on / off
Please go to VACRON Website to
download vacron viewer
*Reminder- DirectX 9.0 is required.
Recording & Stop Recording
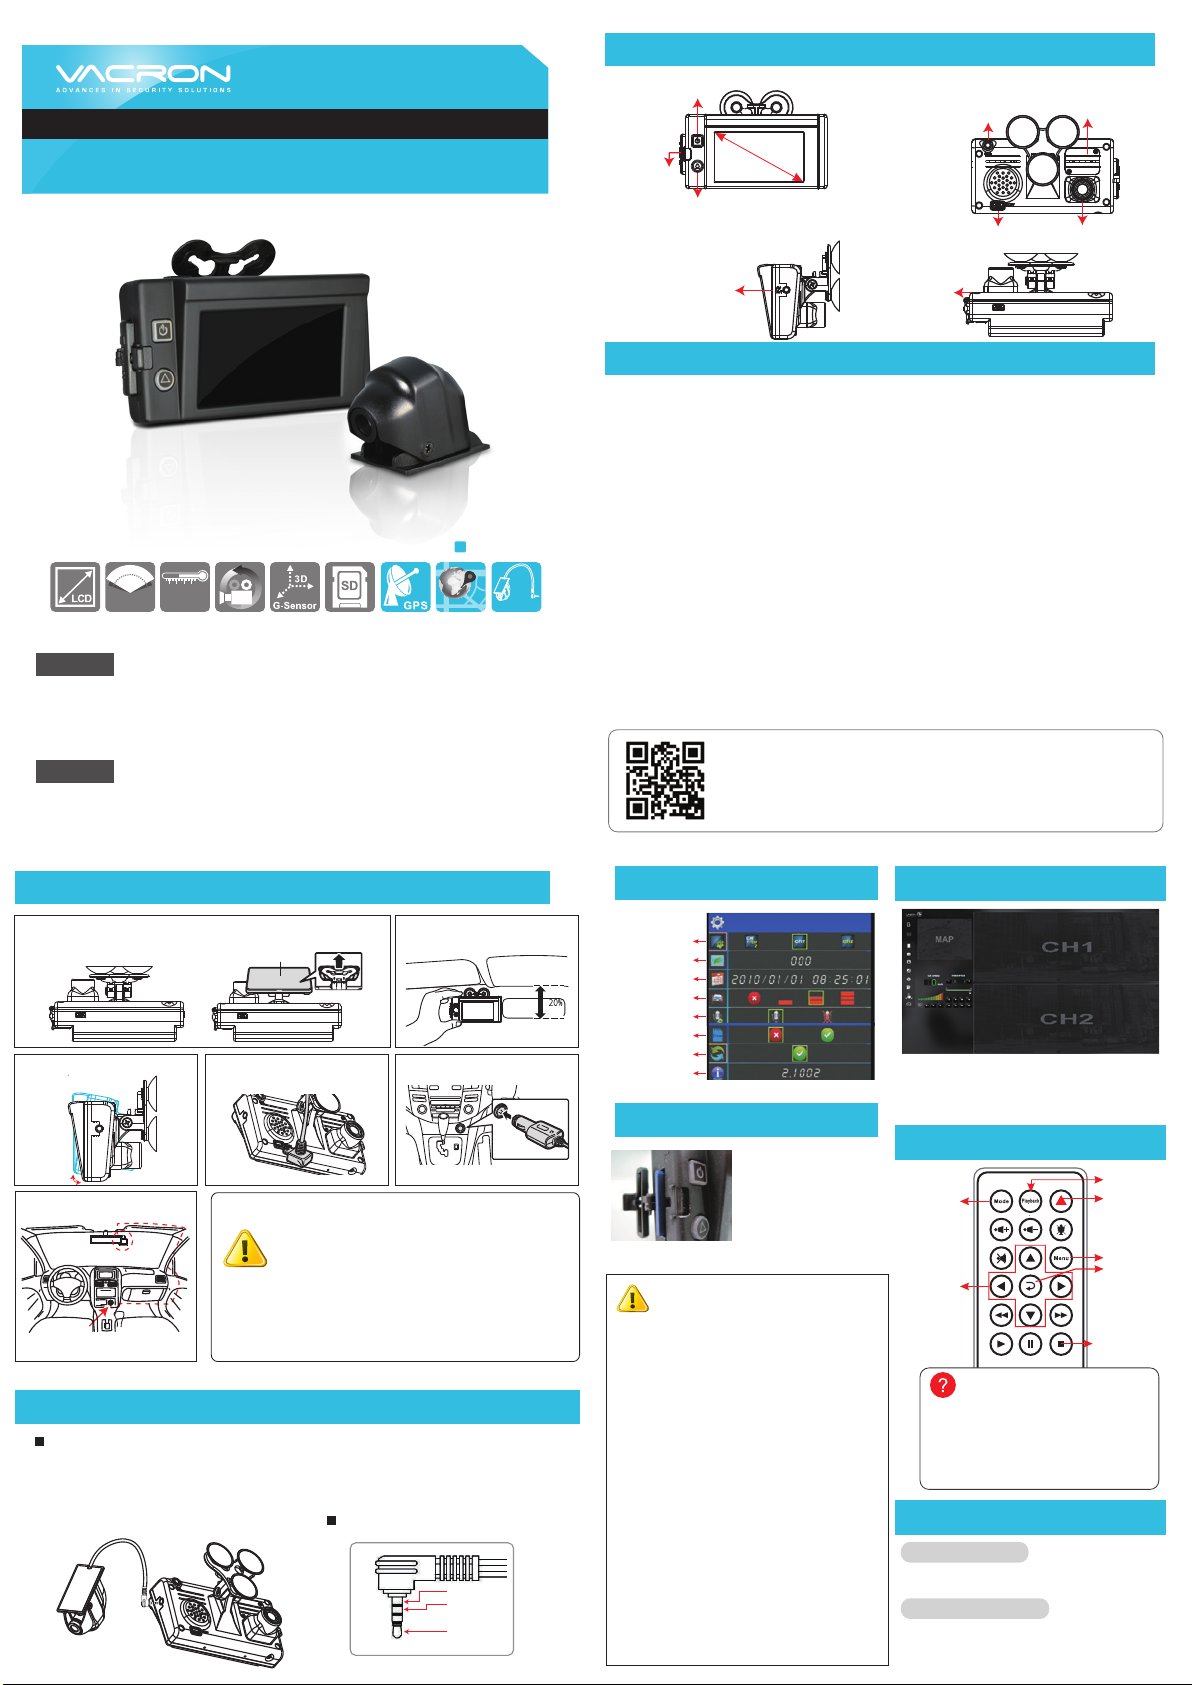
Product Diagram
Safety Precautions
Please Take and review some testing videos initially to make sure the images were recorded correctly.
Please note that manufacturer, its subsidiaries and affiliates, and its distributors are not liable for
consequential damages arising from any malfunction of main device accessory, including memory
device that results in the failure of an image to be recorded or to be recorded in a way that is machine
readable.
Before using the product, please ensure that you read the safety precautions described below. Always
ensure that the product is used correctly.
• Use only recommended power sources.
• Do not attempt to disassemble, alter or apply heat to the product.
• DO not apply multi cigarette lighter adapters-Applying such devices will cause
unstable power input to damage the vehicle video recorder.
• Please always make sure all power connectors are fully secured.
• Avoid dropping or subjecting the product to severe impacts.
• To avoid the risk of injury, do not touch the interior of the product if it has been
dropped or otherwise damaged.
• Stop using the product immediately if it emits smoke, a strange smell, or otherwise
behaves abnormally.
• Do not use organic solvents such as alcohol, benzene, or thinner to clean the product.
• Do not let the product come into contact with water (e.g. sea water) or other liquids.
• Do not allow liquids or foreign objects to enter the VVR.
• Do not place the VVR near or in direct flame.
• Do not handle the power cord with wet hands.
• Do not use the equipment in a manner that exceeds the rated capacity of the
electrical outlet or wiring accessories.
• Do not use if the power cord or plug are damaged, or not fully plugged into the outlet.
• Do not allow dirt or metal objects (such as pins or keys) to contact the terminals or plug.
• Avoid using, placing or storing the product in the humid or dusty areas.
For More Information
Please check VACRON Website
http://www.vacron.com
Made in Taiwan
Copyright@ FUHO Technology CO., LTD.
2017 MAY. V1.0
H11A0N3700
3"
-10℃~45℃
120º
100º
CH1 / 1080P
Google Map
CH2
OPTIONAL
External Camera (optional)
Installation diagram
To stall External Camera with 4P Phone Jack Connect (1 Vp-p Composite
Video Output) in front or rear of the car.
Definition of 4P Phone Jack connect
Negative
Signals
Positive
Note: To avoid camera damage, please power
off the vehicle video recorder before plug the
camera in.
1. Select suction-cups or stick-holder type bracket.
Notice
2. Find the optimal position
of device on the
windshield.
SD Card Installation
OSD Menu
Notice
Screen Spilt
Sleep mode
Time Setup
G-sensor
MIC ON/OFF
Format SD card
Restore
Version
1.Open SD card cover
on the device to insert
of remove SD card.
2.When not using SD
card, please close the
cover to avoid dust or
other items get into
device.
(1). Recommend Memory Card class 10
or above (Minimum of 8GB)
(2). If SD card did not format by Player
before using, device will delete all
data inside and format it automatically (take
1~5mins). After it’s done will start to record.
(3). Please do not convert Micro SD to SD card to
begin recording, to avoid the damage during
recording.
(4). Since memory cards have the writing
endurance situation, we recommend to
inspect the memory card and use pc for
playback regularly, to ensure that the memory
card can read and write.
(5). Some brand of SD card might not suit for
device, if it is not working please change other
brand SD card or Class.
(6). If SD card did not format by player, device will
delete all data and setup atomically. Some
devices will not able to recorded if SD card is
not format.
(7). SD card 8G、16G、32G、64G or 128G, after
format by Player. The space will only show up
for 80MB rest of memory space will be
displayed by Player only.
(8). Please backup data from SD card regularly.
Avoid losing data.
(9). When event happened, please take SD card
out and lock it. To avoid overwrite.
3.SD card Format / SD card Restore.
1. 5V cigarette Power adapter (miniUSB 3.5M)
2. PHONE JACK 4 ports 90 deg turn to micro din with extra wire 2.5M
3. Remote controller 4. Product Disc
5. Suction cup bracket 6. Bracket holder
7. Quick user guide
Standard
Optional 1. 8G/16G/32G/64G/128G _Class 10 SD card
2. External GPS Mouse(4P Phone Jack Connect)
3. External 720P (AHD Interface)
4. Extra wire for MIC(4P Phone Jack Connect)
External Camera (optional)
TYPE A : Built-in GPS
TYPE B : External GPS (optional for G-mouse)
TYPE C : W/O GPS
CH2 External
camera plug
Monitor On/Off
GPS positioning
Green light: power
Red light: recording
Red light(fast flashing):Enforced recording
LCD 3"16:9
SD card Slot
CH1 1080P Lens
RTC battery cover
DC5V power input
Mini USB
FOR PC
AV output/
GPS Mouse extra slot(optional)/
Extra wire for MIC(optional )
2017 MAY. V1.0
H11A0N3700
更多產品資訊,請上VACRON官網
http://www.vacron.com.tw
製造產地: 台灣
馥鴻科技股份有限公司
使用之前,請先查看包裝內所提供的下列物品。如您發現物品不齊全,
請聯絡您購買的經銷商。
金電容 行車影音記錄器
可外接1CH分離式車用攝影機
1. 開機/錄影
電源啟動,並等待約20秒鐘後,
即開機完成,即表示開始錄影。
2. 關機/停止錄影
電源關閉,待金電容延遲斷電後即停止錄影,此
時可取下記憶卡讀取所攝錄之檔案。
錄影及停止錄影
記憶卡
OSD 選單 VACRON 播放器
請至VACRON官網下載最新播放器。
*要執行此軟體須安裝 DirectX 9.0 以上。
支援作業系統:WINDOWS XP、
VISTA、7、8、10,不支援MAC OS.
建議的硬體需求: i5以上等級 3.1GHZ,
RAM:4G以上、有獨立顯示卡更佳
請先試錄影片,然後播放,以確定機器操作正常。請注意,如因本機配件,包括記憶卡的故障,
導致不能拍攝影像或不能讀取影像格式而引起的任何損失,本公司、其附屬機構及經銷商皆不負
賠償責任。
使用本產品之前,請確定您已閱讀下列的安全注意事項。並請確定您操作產品的方法是正確的。
• 請存放本器材於兒童與嬰兒無法觸碰的地方。
• 請只使用建議的電源。
• 請勿使用外接式(多孔)點菸器,避免因點菸器電壓不穩導致產品當機、失去電力而無法錄影。
• 點菸頭電源與本產品電源頭,請"務必"密合緊實。
• 請勿嘗試將產品拆開、改裝或加熱。
• 避免使產品丟落地上或受猛烈撞擊。
• 要避免受傷,請勿在產品跌下後或損毀時觸碰產品的內部。
• 如產品冒煙、發出異味或有其他異常,請立刻停止操作產品。
• 請勿使用有機溶劑,如酒精、苯或油漆稀釋劑清潔產品。
• 請勿讓產品接觸到水(如海水)或其他液體。
• 請勿讓任何液體或異物進入機器。
• 請避免端子或插頭接觸到金屬物件(如針或鑰匙)或污漬。
• 請避免在潮濕或多塵的地方使用、放置或存放產品。
安全注意事項
產品外觀
汽車安裝步驟示意圖
外接式攝影機安裝示意圖 (選配)
1. 使用 「吸盤式」或「貼架式」連結主機至汽車前擋風玻璃上。 2. 安裝主機於最適位置
3. 調整錄影視野角度於最佳
位置
5. 將變壓器插入點菸器位置
4. 將電源插入DC5V連接孔
注意事項
注意事項
6. 行車記錄器連結示意圖
最佳安裝位置
連結車充
(1)機器安裝時,需安裝在雨刷可以清洗到的區域。
(2)第一次在本機端使用的記憶卡時,請先在本機端
格式化。
(3)時間設定請在OSD設定頁調整時間,或是由
PLAYER設定時區後由GPS校正時間,影像檔案才
可以顯示正常時間。
(4)機器本身有區分NTSC機種或PAL機種。
(5)機器耗電流超過標準USB單孔輸出500mA,因此
連接電腦供電時,需確認電腦USB輸出有5V/1A。
*記憶卡並不隨機提供,
請另外購買。
3"
-10℃~45℃
120º
100º
CH1 / 1080P
Google Map
CH2
選配
1. 點菸頭變壓器轉5V (miniUSB 線材3.5米)
2. PHONE JACK公頭4極 90度 轉寶馬頭公 延長線 2.5M
3. 遙控器 4. 產品光碟 5. 支架吸盤
6. 支架固定架 7. 簡易說明書
標配
選配 1. 8G/16G/32G/64G/128G _Class 10 SD卡
2. 外接式GPS Mouse(4接點耳機座4P Phone Jack Connect)
3. 外接式車用攝影機720P (AHD Interface)
4. 外接延長MIC(4接點耳機座4P Phone Jack Connect)
外接式攝影機安裝示意圖
可選用PHOME JACK-4P 3.5mm 外接攝影機(1 Vp-p Composite Video Output)
安裝於車前或車後。
4P Phone Jack攝影機接點定義
負電
信號
正電
備註:安裝時請務必將電源供電關閉,
以免造成攝影機損壞。
分割畫面
螢幕節能
時間設定
G-sensor
麥克風開關
格式化磁碟
還原預設值
版本
1. 將記憶卡防塵護蓋往
下滑開,即可安裝/取
下記憶卡。
2. 未使用記憶卡時,請
將防塵護蓋關上,可
隔絕異物灰塵或是其他
可能造成SD記憶卡異常
之產生。
3. 格式化記憶卡 / 還原記憶卡,請參考說明書。
(1). 記憶卡建議使用class 10以上
SDHC card(需使用8G以上,
非轉接卡)。
(2). 記憶卡若未先使用專用播放軟
體進行格式化,則機器會將整張
遙控器
強制錄影鍵
回放模式
選單
停止錄音
上/下
左/右
單畫面/
2分割畫面
切換
確定
停止播放
遙控器異常檢查
檢查電池的正負極性
檢查電池電量是否用完
檢查遙控感測器是否被遮住
檢查附近是否有螢光燈正在使用




記憶卡資料強制清除後(時間與容量有關約1~5
分鐘不等),再以機器預設值開始錄影。
(3). 請勿使用MicroSD卡轉SD卡進行錄影,以免因
震動導致轉接卡接觸不良而產生錄影異常。
(4). 記憶卡有讀寫次數與壽命問題,建議定期檢查
與使用電腦播放影像,確保記憶卡仍可正常讀寫
(5). 記憶卡可能因為廠商製程改變或調整,而出現相
容性問題,本設備無法保證可以相容所有市售記
憶卡。若有記憶卡相容性問題建議更換型號或廠
牌。
(6). 記憶卡若未先使用專用播放軟體進行格式化,則
機器會將整張記憶卡內資料強制清除後,再以機
器預設值開始錄影。特定機型未格式化可能不允
許錄影。
(7). SD卡無論8G、16G、32G、64G或128G,經過
本機或播放器格式化後,於電腦所看到的儲存空
間只有80MB,其餘為暗檔格式,必須透過播放
器才能看到檔案。
(8). 於撞擊及與高振動時,有可能會導致記憶卡磁區
物理性損毀,導致播放斷斷續續或無法撥放問題
,建議定期檢查與備份重要料。
(9). 當發生事故時,請將記憶卡取出並設定為防寫
狀態,避免資料被修改或被覆寫。
TYPE A:內建GPS
TYPE B:外接GPS (GPS另選購)
TYPE C:無GPS功能
吸盤式 貼架式
背膠黏接處
CH2外接鏡頭插座
螢幕開關
GPS定位燈
綠燈:電源燈
紅燈:錄影燈
紅燈(快速閃爍):強制錄影
LCD 3吋16:9
GPS定位燈僅供GPS機型
SD卡插槽
RTC電池孔蓋
AV端子影像輸出/
GPS Mouse 擴充外接孔(選配)/
外接延長麥克風(選配)
DC 5V電源輸入 CH1 1080P鏡頭
迷你USB FOR 韌體更新

This manual suits for next models

1

Other Vacron Dashcam manuals

Vacron VVG-CBE57 User manual

Vacron

Vacron VVG-CBE57 User manual

Vacron VVG-CBE57 User manual

Vacron

Vacron VVG-CBE57 User manual

Vacron VVG-CBE27A User manual

Vacron

Vacron VVG-CBE27A User manual

Vacron CDR-E07D User manual

Vacron

Vacron CDR-E07D User manual

Vacron VG01 User manual

Vacron

Vacron VG01 User manual

Vacron CDR-E07 Use and care manual

Vacron

Vacron CDR-E07 Use and care manual

Vacron Vehicle Video Recorder User manual

Vacron

Vacron Vehicle Video Recorder User manual

Vacron VVG-CBN13 (G) User manual

Vacron

Vacron VVG-CBN13 (G) User manual

Vacron CDR-E06 User manual

Vacron

Vacron CDR-E06 User manual

Vacron CDR-E07D User manual

Vacron

Vacron CDR-E07D User manual

Vacron VVH-MDE31D User manual

Vacron

Vacron VVH-MDE31D User manual

Vacron VVG-CBN39 User manual

Vacron

Vacron VVG-CBN39 User manual

Vacron VVG-CBN12 User manual

Vacron

Vacron VVG-CBN12 User manual

Vacron CDR-E07 User manual

Vacron

Vacron CDR-E07 User manual

Vacron VVG-CBN33B User manual

Vacron

Vacron VVG-CBN33B User manual

Vacron FULL HD Vehicle Video Recorder User manual

Vacron

Vacron FULL HD Vehicle Video Recorder User manual

Vacron Vehicle Video Recorder User manual

Vacron

Vacron Vehicle Video Recorder User manual

Vacron VVG-CBN05A User manual

Vacron

Vacron VVG-CBN05A User manual

Vacron EN-CDR-E05 User manual

Vacron

Vacron EN-CDR-E05 User manual

Vacron VVG-CBN33B User manual

Vacron

Vacron VVG-CBN33B User manual

Vacron MDE16 User manual

Vacron

Vacron MDE16 User manual

Vacron VVH-MDE31B User manual

Vacron

Vacron VVH-MDE31B User manual

Vacron Vehicle Video Recorder User manual

Vacron

Vacron Vehicle Video Recorder User manual

Vacron VVG-CBN39 User manual

Vacron

Vacron VVG-CBN39 User manual

Popular Dashcam manuals by other brands

Connects2 CAM-SK2-AD manual

Connects2

Connects2 CAM-SK2-AD manual

Targa CR 1.0 A1 User manual and service manual

Targa

Targa CR 1.0 A1 User manual and service manual

Ecellence DR-SEOC-1TWJ instruction manual

Ecellence

Ecellence DR-SEOC-1TWJ instruction manual

Xiaomi 70mai Dash Cam Lite user manual

Xiaomi

Xiaomi 70mai Dash Cam Lite user manual

Magellan Wireless Backup Camera installation instructions

Magellan

Magellan Wireless Backup Camera installation instructions

Navitel R2 user manual

Navitel

Navitel R2 user manual

Vantrue OnDash R3 user manual

Vantrue

Vantrue OnDash R3 user manual

Osram ROADsight 30 manual

Osram

Osram ROADsight 30 manual

D-Teg Smarty HD BX1500 Plus user guide

D-Teg

D-Teg Smarty HD BX1500 Plus user guide

JOBO CARcam instruction manual

JOBO

JOBO CARcam instruction manual

QQ LINX Hit&Record A60 user manual

QQ LINX

QQ LINX Hit&Record A60 user manual

Audioxtra Axis JS5001K instruction manual

Audioxtra

Audioxtra Axis JS5001K instruction manual

HP f800g quick start guide

HP

HP f800g quick start guide

RSC tonto user manual

RSC

RSC tonto user manual

Xblitz Z9 user manual

Xblitz

Xblitz Z9 user manual

DOD GS300 user manual

DOD

DOD GS300 user manual

PNJcam SD19 MagiCam user manual

PNJcam

PNJcam SD19 MagiCam user manual

Prestigio ROADRUNNER 300I user manual

Prestigio

Prestigio ROADRUNNER 300I user manual

manuals.online logo
manuals.online logoBrands
  • About & Mission
  • Contact us
  • Privacy Policy
  • Terms and Conditions

Copyright 2025 Manuals.Online. All Rights Reserved.