manuals.online logo
Brands
  1. Home
  2. •
  3. Brands
  4. •
  5. Valeo
  6. •
  7. Automobile Accessories
  8. •
  9. Valeo 850912 User manual

Valeo 850912 User manual

www.valeoservice.com
Valeo Service
70, rue Pleyel - 93285 Saint-Denis cedex - France
Tél. : +33 (0)1 49 45 32 32
Valeo ref. 850912 - 850913
Original window regulator
Lève-vitre d'origine / Original-Fensterheber
Alzacristalli originale / Elevalunas original
Replacement window regulator
Lève-vitre de remplacement / Ersatz-Fensterheber
Alzacristalli di ricambio / Elevalunas de recambio
Kit content
Moteur cable / Motorkabel
Cavo motore / Cable del motor
FOR / POUR / FÜR / PER / PARA
Renault TWINGO II (CN0_) (2007>2014)
Recommended tools Outils recommandés / Empfohlenes Werkzeug / Attrezzi raccomandati / Herramientas recomendadas
Important notice Note importante / Wichtiger Hinweis / Avviso importante / Nota importante
EN This fitting instruction is designed for professional mechanics only. If you need to repair your own vehicle, Valeo recommends to look for a professional. Valeo is not contractually bound by any
information provided in this fitting instruction.
FR Les présentes instructions de montage ne sont destinées qu'aux mécaniciens professionnels. Si votre véhicule nécessite une réparation, Valeo recommande de recourir à un professionnel. Valeo ne
saurait être engagé contractuellement par quoi que ce soit dans ces instructions de montage.
DE Diese Montageanweisung ist ausschließlich für qualifizierte Mechaniker bestimmt. Wenn ihr Fahrzeug repariert werden muss, empfiehlt Ihnen Valeo, sich an Fachleute zu wenden. Valeo geht für die
Informationen, die in dieser Montageanweisung enthalten sind, keine vertragliche Verpflichtung ein.
IT Queste istruzioni di montaggio sono destinate esclusivamente a meccanici professionali. Se il vostro veicolo richiede riparazioni, Valeo vi raccomanda di rivolgervi a uno specialista. Valeo non è
contrattualmente vincolato dalle informazioni fornite in queste istruzioni di montaggio.
ES Las presentes instrucciones de montaje están destinadas exclusivamente a los mecánicos profesionales. Si su vehículo necesita ser reparado, Valeo recomienda recurrir a un profesional. Valeo no
tiene ninguna responsabilidad contractual derivada de la información contenida en estas instrucciones.
Window regulator fitting instructions
Istruzioni di montaggio degli alzacristalli elettrici / Instrucciones de montaje elevalunas
Instructions de montage des lève-vitres / Montageanleitung Fensterheber
Safety glasses
FR Lunettes de securite
DE Sicherheitsbrille
IT Occhiali di sicurezza
ES Gafas de seguridad
Plastic pry tool
FR Levier en plastique
DE Kunststoff-Hebelwerkzeug
IT Strumento di leva in plastica
ES Palanca de plástico tool
Flat screwdriver
FR Tournevis plat
DE Flacher Schraubendreher
IT Cacciavite a taglio
ES Destornillador plano
Phillips screwdriver
FR Tournevis cruciforme
DE Phillips-Schraubendreher
IT Cacciavite a croce
ES Destornillador Phillips
Safety gloves
FR Gants de sécurité
DE Sicherheitshandschuhe
IT Guanti di sicurezza
ES Guantes de seguridad
White lithium grease
FR Graisse blanche au lithium
DE Weißes Lithiumfett
IT Grasso bianco al litio
ES Grasa blanca de litio
Drilling tool and drills
FR Perceuse et forets
DE Bohrmaschine und Bohrer
IT Trapano e punte
ES Taladradora y brocas
U shaped screwdriver
FR Tournevis à pointe en U
DE U Schraubendreher
IT Cacciavite a forcella
ES Destornillador en U
Silicone spray
FR Bombe de silicone
DE Silikonspray
IT Spray al silicone
ES Aerosol de silicona
Socket wrench and sockets
FR Clé à douille et douilles
DE Steckschlüssel und Einsätze
IT Trapano e punte
ES Llave tubular y boquillas
Razor knife
FR Cutter
DE Teppichmesser
IT Coltello a rasoio
ES Cúter
Magnet
FR Aimant
DE Magnet
IT Magnete
ES Imán
Tape
FR Ruban de masquage pour peinture
DE Maler-Klebeband
IT Nastro da carrozziere
ES Cinta de pintar
Hex key
FR Clé Allen
DE Inbusschlüssel
IT Chiave esagonale
ES Llave hexagonal
Step-by-step fitting instructions
Instructions de montage pas à pas / Schritt-für-Schritt-Montageanweisung / Istruzioni di montaggio passo per passo / Instrucciones de montaje paso a paso
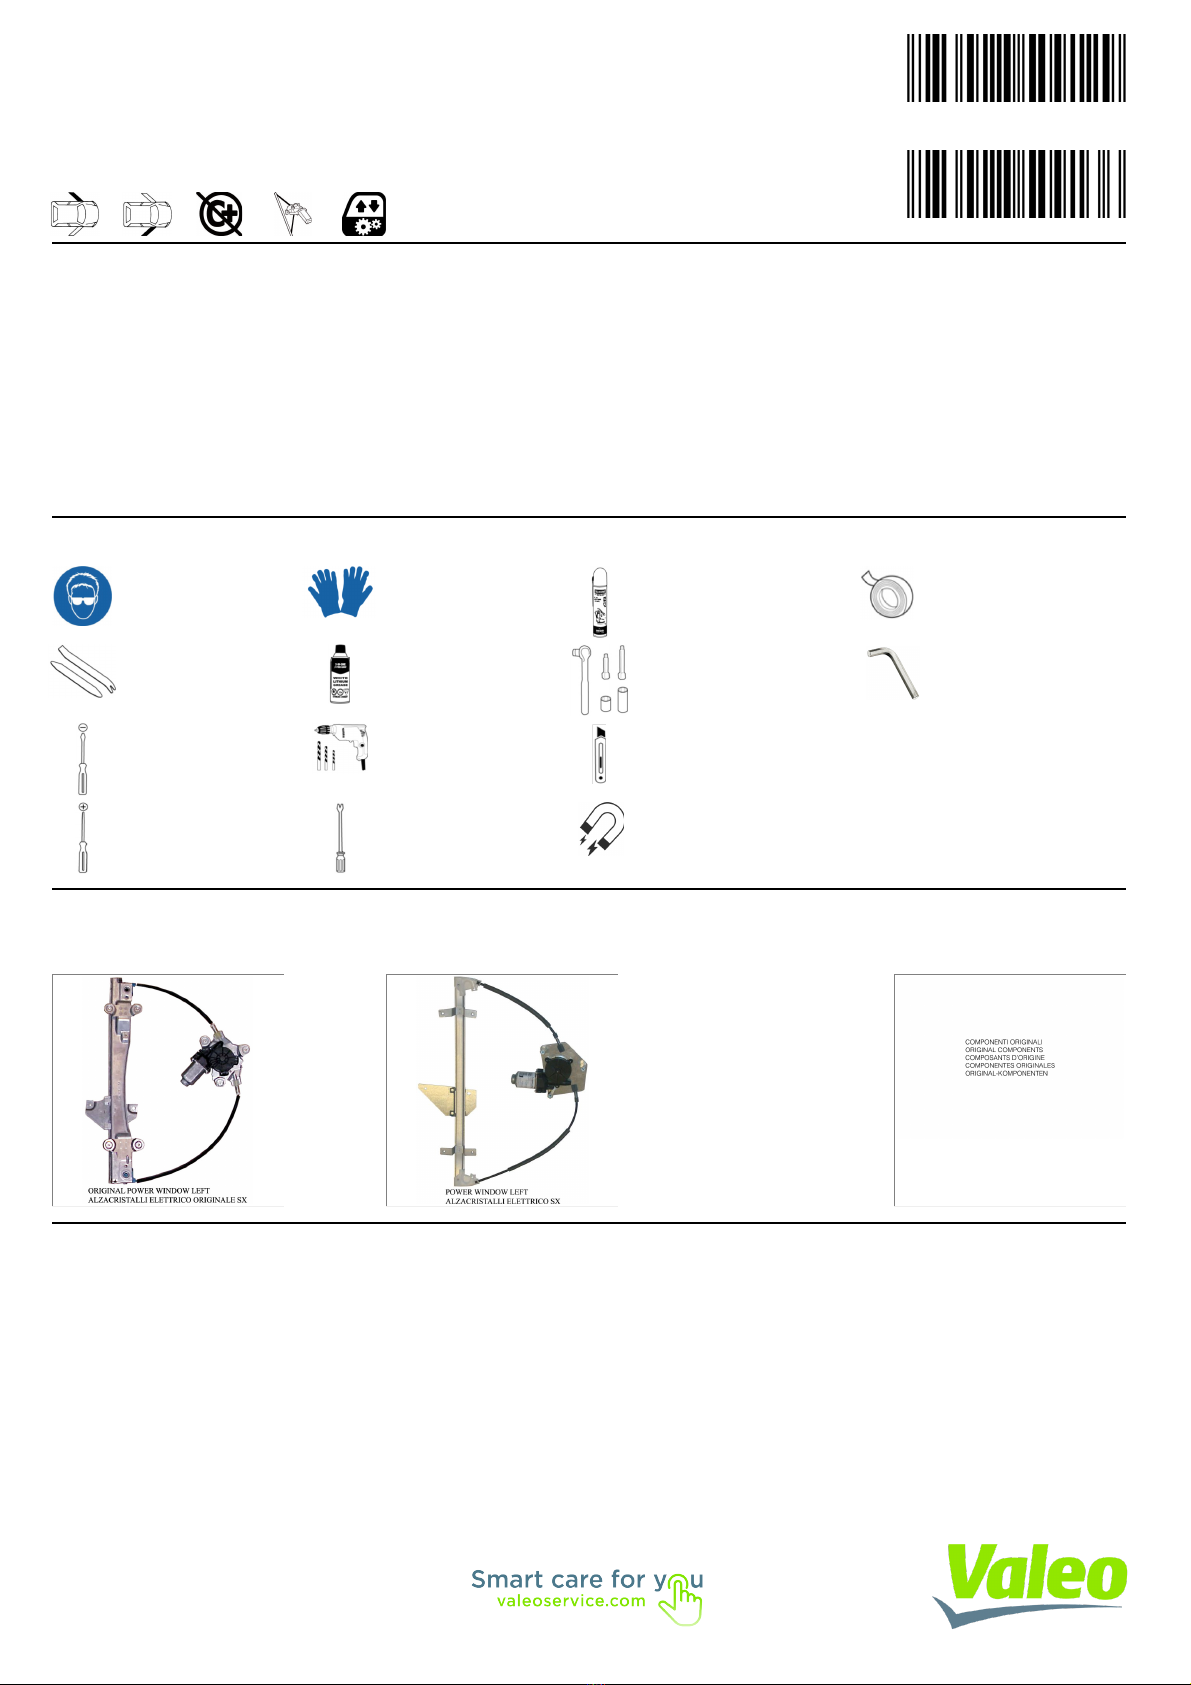
General indications
Recommandations générales / Allgemeine Empfehlungen
Raccomandazioni generali / Recomendaciones generales
EN Use a plastic pry tool rather than a screwdriver to remove the door panel. •Use a magnetic wrench and
screwdriver to loosen or tighten the screws, nuts or bolts. •Use painter's tape to secure the window. It can be
removed easily without leaving any residue or damaging the surface. •If there is insufficient grease on the slide area
of the replacement window regulator, lubricate it with white lithium grease. •Use a silicone spray to clean the
window run channels before installation
FR Utiliser un levier en plastique plutôt qu'un tournevis pour déposer le panneau de porte. •Utiliser une clé et un
tournevis magnétiques pour serrer ou desserrer les vis et écrous. •Utiliser du ruban de masquage de peinture pour
maintenir la vitre. Il se retire facilement sans laisser de trace ni endommager les surfaces. •En cas de graissage
insuffisant des glissières du lève-vitre de remplacement, les lubrifier à la graisse blanche au lithium. •Utiliser une
bombe de silicone pour nettoyer les glissières de la vitre avant la pose.
DE Bitte anstatt eines Schraubendrehers vorzugsweise Kunststoff-Hebelwerkzeug zur Entfernung der
Türverkleidung verwenden. •Zum Lösen oder Festdrehen der Schrauben, Muttern oder Bolzen bitte Magnet-
Schraubenschlüssel und -dreher verwenden. •Zur Sicherung des Fensters Maler-Klebeband verwenden. Das
Klebeband lässt sich leicht entfernen, ohne Spuren zu hinterlassen und die Oberfläche zu beschädigen. •Ist die
Gleitfläche des Ersatz-Fensterhebers unzureichend gefettet, bitte mit weißem Lithiumfett einschmieren. •Die
Führungsschienen des Fensters vor der Montage mit Silikonspray säubern.
IT Utilizzare uno strumento di leva in plastica piuttosto che un cacciavite per rimuovere il pannello della portiera. •
Utilizzare chiave e cacciavite magnetici per allentare o serrare le viti, i dadi o i bulloni. •Utilizzare un nastro da
carrozziere per assicurare il vetro. Potrà essere rimosso facilmente senza danneggiare la superficie né lasciare
tracce. •Se la guida dell’alzacristalli di ricambio non è abbastanza ingrassata, lubrificarla con grasso bianco al litio. •
Utilizzare uno spray al silicone per pulire le guide del vetro prima del montaggio.
ES Usar una palanca de plástico y no un destornillador para retirar el panel de la puerta. •Usar una llave o un
destornillador magnéticos para ajustar tornillos, tuercas o pernos. •Usar cinta de pintar para asegurar la ventanilla,
pues se puede retirar sin dejar residuos o dañar la superficie. •Si no hay suficiente grasa en la parte deslizante del
nuevo elevalunas, lubricarla con grasa blanca de litio. •Usar un aerosol de silicona para limpiar las guías del
elevalunas antes de instalarlo.
Step 1
EN WARNING: DO NOT OPERATE THE WINDOW REGULATOR BEFORE IT IS COMPLETELY ASSEMBLY ON VEHICLE. Remove door trim and window regulator.
FR ATTENTION: NE PAS FAIRE FONCTIONNER LE LÈVE VITRE AVANT DE L'AVOIR COMPLÈTEMENT FIXÉ ET INSTALLÉ DANS LE VÉHICULE. Demonter le leve-
vitre.
DE ACHTUNG: FENSTERHEBER ERST DANN BEDIENEN, WENN ER KOMPLETT UND KORREKT IN DER TÜRVERKLEIDUNG MONTIERT IST. Demontieren Sie die
Türverkleidung und bauen Sie den Fensterhebermechanismus aus.
IT ATTENZIONE: NON METTERE IN FUNZIONE L'ALZACRISTALLI PRIMA CHE SIA MONTATO COMPLETAMENTE E CORRETTAMENTE SUL PANNELLO
PORTA. Smontare l'alzacristalli.
ES ATENCIÓN: NO PONER EN FUNCIONAMIENTO EL ALZACRISTAL SIN HABERLO MONTADO ANTES DE MANERA COMPLETA Y CORRECTA EN EL PANEL
DE LA PUERTA. Desmontar el elevalunas.
Step 2
EN Insert the electric window regulator into the door and secure it into holes at positions 1, 2, 3, 4, 5, 6 and 7.
FR Inserer le leve-vitre electrique et le fixer sur les points 1, 2, 3, 4, 5, 6 et 7.
DE Bauen Sie den elektrischen Fensterheber ein und befestigen Sie ihn an den Punkten 1, 2, 3, 4, 5, 6 und 7.
IT Introdurre l'alzacristalli elettrico in portiera e fissarlo nei punti n° 1, 2, 3, 4, 5, 6 e 7.
ES Introducir el elevalunas eléctrico y sujetarlo con los tornillos 1, 2, 3, 4, 5, 6 y 7.
Step 3
EN Secure the window at positions 8 and 9.
FR Fixer la vitre sur les points 8 et 9.
DE Befestigen Sie das Fenster an den Punkten 8 und 9.
IT Fissare il vetro nei punti n° 8 e 9.
ES Fijar el cristal en los puntos 8 y 9.
Step 4
EN Wire as per wiring diagram.
FR Effectuer les liaisons electriques.
DE Verlegen Sie die elektrische Verkabelung.
IT Eseguire i collegamenti elettrici.
ES Efectuar las conexiones eléctricas.
Step 5
EN Check correct window operation, adjust with the screws 8 and 9, if required, before re-fitting door trim.
FR Verifier le bon fonctionnement de la vitre en utilisant les vis 8 et 9.
DE Vor der endgültigen Fertigstellung überprüfen Sie die einwandfreie Funktion des elektrischen Fensterhebers. Justieren Sie bei Bedarf den Fensterheber mit den
Schrauben 8 und 9.
IT Controllare e regolare il funzionamento dei cristalli mediante le viti n° 8 e 9 prima di rimontare il pannello portiera.
ES Verificar y regular el funcionamiento del cristal mediante los tornillos 8 y 9 antes de volver a montar el panel de la puerta.

This manual suits for next models

1

Other Valeo Automobile Accessories manuals

Valeo beep & park User manual

Valeo

Valeo beep & park User manual

Valeo 850742 User manual

Valeo

Valeo 850742 User manual

Valeo BUS TOP PREMIUM Owner's manual

Valeo

Valeo BUS TOP PREMIUM Owner's manual

Valeo beep & park User manual

Valeo

Valeo beep & park User manual

Valeo Speed/Visio User manual

Valeo

Valeo Speed/Visio User manual

Valeo MBHL User manual

Valeo

Valeo MBHL User manual

Valeo Ultra i500 User manual

Valeo

Valeo Ultra i500 User manual

Valeo Guideo User manual

Valeo

Valeo Guideo User manual

Valeo KFML1 User manual

Valeo

Valeo KFML1 User manual

Valeo 850590 User manual

Valeo

Valeo 850590 User manual

Valeo First A1 User manual

Valeo

Valeo First A1 User manual

Valeo Eleon Series User manual

Valeo

Valeo Eleon Series User manual

Valeo beep&park/vision User manual

Valeo

Valeo beep&park/vision User manual

Popular Automobile Accessories manuals by other brands

STO N SHO SNS 56 Installation procedures

STO N SHO

STO N SHO SNS 56 Installation procedures

Fieryred K-WIN-RING100-S instruction manual

Fieryred

Fieryred K-WIN-RING100-S instruction manual

LIVOLTEK A0070230E11 user manual

LIVOLTEK

LIVOLTEK A0070230E11 user manual

Yutrax TX210 Operator's manual

Yutrax

Yutrax TX210 Operator's manual

Thule 1149 instructions

Thule

Thule 1149 instructions

Curt Group ARIES S224046 installation manual

Curt Group

Curt Group ARIES S224046 installation manual

Traxxas Pro Scale 8032 quick start guide

Traxxas

Traxxas Pro Scale 8032 quick start guide

ROADGEAR RGABM1 User Guide & Fitting Instructions

ROADGEAR

ROADGEAR RGABM1 User Guide & Fitting Instructions

STO N SHO SNS 322 Installation procedures

STO N SHO

STO N SHO SNS 322 Installation procedures

AlzaPower APW-CCWF420 user manual

AlzaPower

AlzaPower APW-CCWF420 user manual

Safe Fleet Prime Design HBR-E-FT33B Assembly instructions

Safe Fleet

Safe Fleet Prime Design HBR-E-FT33B Assembly instructions

Kenwood KCA-BT100 Service manual

Kenwood

Kenwood KCA-BT100 Service manual

Enelion Wallbox installation guide

Enelion

Enelion Wallbox installation guide

Hella Gutmann Radar Kit III operating instructions

Hella Gutmann

Hella Gutmann Radar Kit III operating instructions

Warn Ford Performance M-1821-SD Installation instruction

Warn

Warn Ford Performance M-1821-SD Installation instruction

SureCall Fusion2Go Max Quick setup guide

SureCall

SureCall Fusion2Go Max Quick setup guide

Thule 14 manual

Thule

Thule 14 manual

Scosche MOTORMOUTH III BTAXS2R user manual

Scosche

Scosche MOTORMOUTH III BTAXS2R user manual

manuals.online logo
manuals.online logoBrands
  • About & Mission
  • Contact us
  • Privacy Policy
  • Terms and Conditions

Copyright 2025 Manuals.Online. All Rights Reserved.