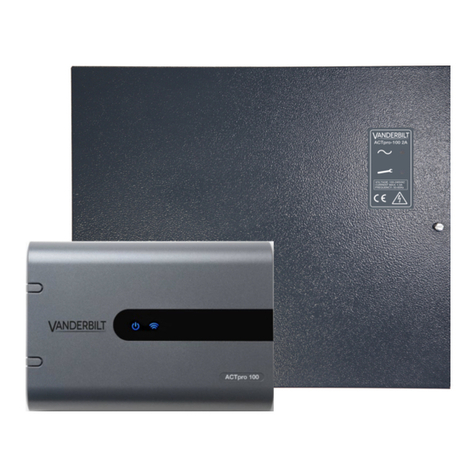
Vanderbilt ACTpro-1002A User manual

ACTpro-100 / ACTpro-1002A
Installation and Operating Instructions
Document ID: A-100542-b
Edition date: 15.03.2019

Data and design subject to change without notice. / Supply subject to availability.
© 2019 Copyright by Vanderbilt International Ltd.
We reserve all rights in this document and in the subject thereof. By acceptance of the document the recipient acknowledges these rights and
undertakes not to publish the document nor the subject thereof in full or in part, nor to make them available to any third party without our prior
express written authorization, nor to use it for any purpose other than for which it was delivered to him.
ACTpro-100
Hereby, Vanderbilt International (IRL) Ltd declares that this equipment type is in compliance with the following EU Directives for CE marking:
• Directive 2014/30/EU (Electromagnetic Compatibility Directive)
• Directive 2011/65/EU (Restriction of the use of certain hazardous substances Directive)
The full text of the EU declaration of conformity is available at: http://van.fyi?Link=DoC
ACTpro-1002A
Hereby, Vanderbilt International (IRL) Ltd declares that this equipment type is in compliance with the following EU Directives for CE marking:
• Directive 2014/30/EU (Electromagnetic Compatibility Directive)
• Directive 2014/35/EU (Low Voltage Directive)
• Directive 2011/65/EU (Restriction of the use of certain hazardous substances Directive)
The full text of the EU declaration of conformity is available at: http://van.fyi?Link=DoC
&
http://van.fyi?Link=ACTpro100

Table of Contents
1 Overview 4
1.1 Technical specification 4
1.1.1 ACTpro-1002A electrical specification 4
1.1.2 Relay load 5
1.2 Ordering details 5
1.3 Monitoring 5
2 Installation 6
2.1 Wiring 6
2.1.1 DIP switch addressing 7
2.1.2 Wiring for Vanderbilt EM1030e Clock & Data or Wiegand Reader 8
2.1.3 Wiring exit readers 9
2.2 ACTpro-100 9
2.2.1 Mounting 9
2.2.2 Power supply 9
2.3 ACTpro-1002A 9
2.3.1 Mounting 10
2.3.2 Mains power up 10
2.3.3 Load Output 10
2.3.4 Standby Battery 11
2.3.5 Tamper 11
© Vanderbilt 2019 3 A-100542-b
15.03.2019

1 Overview
This guide describes the installation of the ACTpro-100 door stations, which are compatible with all
ACTpro controllers.
The ACTpro-100 is a single door station.
The ACTpro-1002A is a single door station with a 12V DC 2A PSU.
1.1 Technical specification
ACTpro-100 ACTpro-1002A
Input Voltage Range 12V DC 12V DC
Current Consumption 40–120 mA 40–120 mA
Operating Environment Surface mounting
Internal use only
Surface mounting
Internal use only
Operating Temperature -10 to +50° C -10 to +40° C
75% RH non-condensing
Dimensions (H x W x D mm) 165 x 235 x 55 275 x 330 x 80
Weight (kg) 0.4 2.2
Enclosure Material ABS 1.2mm steel grey powder coated
LED Status Indicators Yes Yes
PSU Fault Output n/a Yes
Lid Opening Tamper Detection (Front) Yes Yes
Rear Tamper Detection No Yes
1.1.1 ACTpro-1002A electrical specification
Battery charging Yes
Standby Battery 12V 7Ah Battery
Battery Deep Discharge
Protection
No
Input: Voltage Rated 100–240V AC
Input: Voltage Operating 90–264V AC
Input: Frequency 50–60Hz
Input: Max Current 1.0A (@ 90V AC)
Input: Mains input fuse T2.0A
Input: Max standby power 0.5W (no load and no battery connected)
© Vanderbilt 2019 4 A-100542-b
15.03.2019

Output: Voltage 13.4–14.2V DC (13.8V DC Nominal) on mains power
Output: Max load current 2.0A
Output: Ripple 150mA pk–pk max
Output: Load output fuse F2.0A
Output: Overload Electronic shutdown until overload or short circuit removed (Under mains
power only)
1.1.2 Relay load
When used with inductive loads (Maglock/Strike locks) the following ratings apply.
ACTpro-100 ACTpro-1002A
Main relay 1.5A @ 30VDC /
1.5A @ 50VAC
1.5A @ 30VDC /
1.5A @ 50VAC
Aux relay 400mA @ 30VDC 400mA @ 30VDC
1.2 Ordering details
ACTpro-100 V54502-C120-A100 Single door station
ACTpro-1002A V54502-C121-A100 Single door station with 12V DC 2A PSU
1.3 Monitoring
All faults including Mains Present and Tamper are reported on the ACT Enterprise software.
Mains present The PSU MAINS PRESENT output, when available, is pre-wired to the MAINS PRESENT
input.
Output Voltage The PSU output voltage level is reported to the ACT Enterprise software.
Tamper The enclosure lid is tamper monitored.
ACTpro-100 / ACTpro-1002A – Installation and Operating Instructions Overview
© Vanderbilt 2019 5 A-100542-b
15.03.2019

2 Installation
The ACTpro-100 door stations are for indoor installation only and must be installed as permanently
connected equipment.
Reset the ACTpro-100 door station to its factory default condition before installation. To do this, power the
unit up with ALL switches in the OFF position. The unit will beep after 3 seconds. The unit is now
defaulted. Set the DIP switches to the appropriate address.
If using the ACTpro-1002A, Vanderbilt recommend that an external mains disconnect device is fitted
before installation, and you should ensure that the mains supply to the controller is disconnected during
installation.
Mains power should be connected by a licensed electrician in accordance with local/national codes.
2.1 Wiring
ADoor contact FVanderbilt reader wire colour coding
BDoor push button G Important: Always place varistor across lock terminals.
CFrom previous door or controller HDouble pole Break Glass / Emergency Door Release
When the Break Glass is not activated the B/GL input pin is
held low at 0 volts. When the Break Glass device is
activated the B/GL input pin will lose the 0 volts (goes high)
and report a Break Glass event.
DTo next door JDIP switches for door station addressing. See DIP switch
addressing on the next page.
EBreak glass monitoring, normally closed
© Vanderbilt 2019 6 A-100542-b
15.03.2019

Notes:
lThis illustration shows wiring for a normally energised lock. If a normally deenergised lock is
required, use the N/O relay contacts.
lRS485 Network cable is single shielded twisted pair, Belden 9501 or equivalent. Total Length max
1.4km.
lIf the Mains Present, Door Contact or BreakGlass inputs are not used, they should be linked to 0V,
or the feature should be disabled in ACT Enterprise software.
lThe Blue Comms OK LED is on while ACTpro-100 is communicating with the controller.
lRed Fault LED illuminates on:
lTamper
lComms Offline
lBreakGlass
lVoltage Low
lCurrent Limiting Fuse (500mA)
2.1.1 DIP switch addressing
Door 1 is on the ACTpro-1500 controller (max. 31 doors).
Door 1 and 2 is on the ACTpro-4000 controller (max. 16 doors).
ACTpro-100 / ACTpro-1002A – Installation and Operating Instructions Installation
© Vanderbilt 2019 7 A-100542-b
15.03.2019

The following table shows how to set the door station DIP switch for each address (01–32).
2.1.2 Wiring for Vanderbilt EM1030e Clock & Data or Wiegand Reader
Wire Colour Terminal
White SENSE
Green CLOCK / DATA 1
Blue DATA / DATA 0
Red +12V
Black 0V
Brown RED
Yellow GREEN
ACTpro-100 / ACTpro-1002A – Installation and Operating Instructions Installation
© Vanderbilt 2019 8 A-100542-b
15.03.2019

Wire Colour Terminal
Orange (Buzzer Control)
2.1.3 Wiring exit readers
For Clock & Data readers, wire exit reader in parallel but leave the sense line unconnected.
For Wiegand readers, wire the DATA 0 of the exit reader to SENSE on the ACTpro-100.
Max length 30m with 5V DC
Max length 100m with 12V DC
Cable: 8 Core Screened Belden 9504 or equivalent
2.2 ACTpro-100
2.2.1 Mounting
Mount the ACTpro door station directly on to the wall with the supplied screws.
The keyed mounting hole should be screwed first to the wall to aid the mounting.
The unit should be installed in a ventilated area that allows for accessibility after installation.
2.2.2 Power supply
The ACTpro-100 requires an external 12V DC power supply. The supply should be connected to the +12V
DC and 0V/GND connections.
2.3 ACTpro-1002A
This unit is only suitable for installation as permanently connected equipment.
lThe PSU is not suitable for external installation.
lEquipment must be earthed.
Before installation, ensure that external disconnect device is OFF. The PSU should be installed via a 3A
fused spur according to all relevant safety regulations applicable to the application.
ACTpro-100 / ACTpro-1002A – Installation and Operating Instructions Installation
© Vanderbilt 2019 9 A-100542-b
15.03.2019

2.3.1 Mounting
1. Mount securely in correct orientation allowing minimum clearance – see diagram.
NNeutral MGreen Mains LED
EEarth FRed Fault LED
LLive
2. Route mains and low voltage output cables via different knockouts and/or cable entry holes.
3. Use bushes and cable glands rated to UL94 HB minimum.
2.3.2 Mains power up
1. Attach correctly rated mains cable (minimum 0.5mm2 [3A], 300/500V AC) and fasten using
cable ties.
Note: After you install the ACTpro-1002A, Vanderbilt recommend that you place the provided
ferrite bead (a noise-suppression device) around the power supply cable to attain a desired level
of electromagnetic compatibility (EMC). The ferrite bead is provided along with a screw kit in a
clear ziplock bag inside the unit enclosure.
2. Apply mains power and:
lCheck for 13.8V DC on load outputs.
lCheck the green Mains LED is on.
3. Disconnect mains power.
2.3.3 Load Output
1. Attach correctly rated load cable and fasten using cable ties. Note polarity.
2. Apply mains power and check the green Mains LED is on.
ACTpro-100 / ACTpro-1002A – Installation and Operating Instructions Installation
© Vanderbilt 2019 10 A-100542-b
15.03.2019

Note: The red Fault LED may be illuminated (dependent upon model) to indicate that no battery has
been connected. This is normal.
3. Verify load is operating correctly.
4. Disconnect mains power.
2.3.4 Standby Battery
Note: Ensure batteries being fitted to this unit are in good condition
1. Connect battery leads to battery, ensuring correct polarity of battery connections. Vanderbilt
recommend using a 7Ah battery.
2. Apply mains power and check that the green Mains LED is on.
3. Disconnect mains power.
4. Check that the batteries continue to supply voltage and current to the load.
The green Mains LED should be off.
Note: Batteries must have sufficient charge to supply the load.
5. Reconnect mains power.
The green Mains LED should be on.
6. Remove Load fuse and check that the red Fault LED is on (dependent on model).
2.3.5 Tamper
A tamper condition is reported in software.
1. Check that the tamper switch is reported in the software as:
lClosed when the enclosure is mounted on the wall, lid is closed, and the lid screw is fitted.
lOpen when the lid is open.
2. Close cover and secure using fastening screw(s) provided.
ACTpro-100 / ACTpro-1002A – Installation and Operating Instructions Installation
© Vanderbilt 2019 11 A-100542-b
15.03.2019

vanderbiltindustries.com
@VanderbiltInd Vanderbilt Industries
Issued by Vanderbilt International Ltd.
Clonshaugh Business and Technology Park
Clonshaugh, Dublin D17 KV 84, Ireland
vanderbiltindustries.com/contact
© Vanderbilt 2019
Data and design subject to change without notice.
Supply subject to availability.
Document ID: A-100542-b
Edition date: 15.03.2019
This manual suits for next models
2
Table of contents
Other Vanderbilt Controllers manuals

Vanderbilt
Vanderbilt ACT365 VCU User manual

Vanderbilt
Vanderbilt lite blue User manual

Vanderbilt
Vanderbilt ACTpro-100 User manual
Vanderbilt
Vanderbilt ACT365-ACU User manual

Vanderbilt
Vanderbilt ACTpro 1500e User manual

Vanderbilt
Vanderbilt ACT365 VCU User manual
Vanderbilt
Vanderbilt ACTpro-1500 User manual