Velleman CAMCOLVCN User manual

CAMCOLVCN
DIGITAL VIDEO CAPTURE COLOUR CAMERA WITH 256MB BUILT-IN MEMORY
DIGITALE KLEURENCAMERA MET 256MB GEÏNTEGREERD GEHEUGEN
CAMÉRA COULEUR NUMÉRIQUE AVEC 256MB DE MÉMOIRE INTEGRÉE
CÁMARA COLOR DIGITAL CON 256MB DE MEMORIA INCORPORADA
ÜBERWACHUNGSKAMERA MIT 256MB BILDSPEICHER
USER MANUAL
GEBRUIKERSHANDLEIDING
NOTICE D’EMPLOI
MANUAL DEL USUARIO
BEDIENUNGSANLEITUNG

CAMCOLVCN_v2 VELLEMAN
2

CAMCOLVCN_v2 VELLEMAN
3
CAMCOLVCN – DIGITAL VIDEO CAPTURECOLOUR CAMERA WITH 256MB BUILT-IN MEMORY
1. Introduction & Features
To all residents of the European Union
Important environmental information about this product
This symbol on the device or the package indicates that disposal of the device after its lifecycle could harm
the environment.
Do not dispose of the unit (or batteries) as unsorted municipal waste; it should be taken to a specialized
company for recycling.
This device should be returned to your distributor or to a local recycling service.
Respect the local environmental rules.
If in doubt, contact your local waste disposal authorities.
Thank you for buying the CAMCOLVCN! Please read the manual thoroughly before bringing this device into service. If
the device was damaged in transit, don't install or use it and contact your dealer. Unpack the product. The
CAMCOLVCN should include: 1 x camera body, 2 x video connection cable, 1 x power adapter, 1 x mounting bracket
and this manual.
2. Safety Instructions
•Damage caused by disregard of certain guidelines in this manual is not covered by the warranty and the dealer
will not accept responsibility for any ensuing defects or problems.
•A qualified technician should install and service this device.
•Do not constantly plug in or unplug the power cord. This might result in malfunction of the product.
•Do not switch the device on immediately after it has been exposed to changes in temperature. Protect the device
against damage by leaving it switched off until it has reached room temperature.
•Make sure that the available voltage does not exceed the voltage stated in the specifications of this manual.
•Do not crimp the power cord and protect it against damage. Have an authorised dealer replace it if necessary.
•Disconnect the device from the mains to clean it or when it is not in use. Handle the power cord by the plug only.
•Note that damage caused by user modifications to the device is not covered by the warranty.
•Keep the device away from children and unauthorised users.
3. General Guidelines
•Do not shake or drop the device. Avoid brute force when installing or operating the device.
•Select a location where the device is protected against extreme heat, dust and moisture.
•Keep the device out of direct sunlight.
•Do not spill liquid of any kind on the product. If the device gets wet, wipe off immediately. Alcohol or beverages
can contain minerals that corrode the electronic components.
•All modifications of the device are forbidden for safety reasons.
•Only use the device for its intended purpose. All other uses may lead to short circuits, burns, electroshocks, crash,
etc. Using the device in an unauthorised way will void the warranty.
Be very careful during the installation: touching live wires can cause life-threatening electroshocks.
Risk of electric shock! Do not open the housing.

CAMCOLVCN_v2 VELLEMAN
4
4. Installation
1. Install the bracket
2. Mount the camera on the bracket
3. Connect the adapter to the
power source jack or install
batteries
4. Connect the video output jack to the
monitor
5. Switch on the device
6. Point the camera at the target
5. Description (fig. 1)
1. Function switch
•NTSC / PAL
The two most common video standards used are NTSC and PAL. NTSC is the video system or standard used
in North America and most of South America. PAL is the predominant video system or standard mostly used
in Europe. Please select and switch to the system that suits your location.
•Full stop / Overwrite
To select whether to overwrite the recorded memories or to stop recording when memory is full. Selecting
“Overwrite” will overwrite the memory, starting with the oldest data first. Selecting “Full Stop” will cause the
RECORD MODE to stop. The REC LED will be unlit.
2. Video output jack
To enable monitoring functions, connect one terminal to the video output
jack and the other terminal to the TV or monitor.
3. Power switch
Select “ON” to switch on the device, select “OFF” to switch it off.
4. Power source jack
5. LED operation mode indicator
The LED light easily allows the user to distinguish the current system status.
6. Function button
Buttons commonly used are STOP and REC buttons.
7. LED power indicator
The LED lights up to indicate that the device is powered up. The LED goes out to indicate insufficient power or
that the device is switched off.
Camera

CAMCOLVCN_v2 VELLEMAN
5
Function Description Table
Button
Mode
Stop mode
Switch to
menu setup
mode
Switch to
record mode Switch to
playback
mode
Record mode Switch to
stop mode
Menu mode Refer to setup description
Playback mode
Freeze mode Switch to
stop mode Continuous
playback Step rewind Step forward
Continuous mode Switch to
stop mode Pause
playback Fast rewind Fast forward
6. Operation
a. Power-On
Immediately after the power has restored, the system proceeds with auto detection and warming-up function. The
system then enters the MONITORING MODE.
b. Monitoring Mode (fig. 2)
1. Time display: system date and time.
2. Record status display: manual recording parameters.
Resolution: refer to “7.4 Record Setup”.
Quality: refer to “7.4 Record Setup”.
3. System memory status:
Malfunction
File test
Functioning normally
Continuous recording
c. Record Mode
•Starting to record:
Manual recording: press REC / to enter the manual recording mode. Refer to “7.4 Record Setup”.
Motion detection recording: the motion detection triggers the scheduled recording only when the
variation exceeds the alarm limitation values. Refer to “7.4 Record Setup”.
Continuous recording: long-term continuous recording. Refer to “7.4 Record Setup”.
•Stopping the recording
Press REC / to stop the manual recording only. Press MENU or PLAY / to stop all recording
modes. To resume recording:
Manual recording: press REC / .
Scheduled and Motion detection recording: each time after exiting the menu or playback mode, the
system will check the recording setup.

CAMCOLVCN_v2 VELLEMAN
6
•Record display (fig. 3):
: recording is in progress
: manual recording
: scheduled recording
: motion recording
•Different recording modes have different setups. Basic setup: video size, recording frames, video quality
and recording quality. When different recording modes are programmed, the system starts recording
accordingly. This provides flexibility to ensure efficient recording time and quality. Example: scheduled
recording from 08:00 to 18:00: low video quality with less recording frames to extend recording time; motion
detection recording from 18:00 to 08:00: high-quality recording.
•Note that a power loss during recording will result in incomplete videos or errors.
d. Playback Mode
•Normal playback (fig. 4): press PLAY / to playback
normal playback. Press / to pause / resume
rewind / fast forward with 2x, 4x, 8x, 16x or
32x speed. Press / to resume normal playback.
pause. Press again to resume playback.
rewind or forward one frame at the time in
pause mode. Press / to resume playback.
/ stop playback and return to live mode.
•Search and playback (fig. 5): enter the menu and select SEARCH AND PLAY
1. File directory with date and amount of files. Press or
to move up or down.
2. Current page.
3. Each colour indicates a different recording event.
Press + or – to move right or left.
4. Time display highlighted by the bar.
5. Blue: manual recording; red: motion detection
recording; white: scheduled recording.
NOTE: Select the desired playback starting time, press MENU and + or -, select PLAY and press MENU
again to start playback.
Press REC / to stop the playback. The system will return to SEARCH AND PLAY mode.
Press + or -, select EXIT and press MENU again to return to the main menu.

CAMCOLVCN_v2 VELLEMAN
7
7. System Setup
1. Main Menu (fig. 6)
1. Subject
2. Menu layer: three possible menu layers
: first menu layer
: second menu layer
: third menu layer
3. Basic menu operations
Press or to move the highlight bar and the cursor ( )
Press MENU / ENTER to enter the submenu
Press STOP :
•in the second or third menu layer to return to the previous menu layer
•in the main menu to enter the live mode. Press or to decrease or to increase the highlighted
setting values.
NOTE: Underlined and bold words indicate a default value.
2. Date / Time Setup (fig. 7)
1. Date format in Y/M/D, M/D/Y or D/M/Y
2. Date and time setting
3. Motion Detection Setup (fig. 8)
REMARK: Changing the values may affect the recording
sensitivity of the motion detection.
1. Sensitivity bar: black: variable value; red: MD threshold
2. MD energy: current variation value
3. MD threshold: press – or + to modify the value
4. Manual Record and Scheduled Record Setup
a. Manual Record (fig. 9): press REC / to start recording
Video size: 640 x 480 (12 fps) or 320 x 240 (30 fps)
Image quality: HQ: high quality (more storage capacity
required)
MQ: medium quality
LQ: low quality (less storage capacity required)
b. Scheduled Record (Continuous / Motion Detection) (fig. 10)

CAMCOLVCN_v2 VELLEMAN
8
Record: enabling or disabling of the scheduled recording (on/off)
Schedule: Hh:Mm – Hh:Mm: 24-hour recording. Example: 00:00 – 00:01: recording of one minute
Duration: recording time from motion detection
5. SD Card Options (fig. 11)
1. Format the system memory: all stored data will be lost.
NOTE: when recording in continuous mode, old videos can be
overwritten. Confirm before setup. The recording time
depends on the capacity of the SD card, recording
mode and video settings.
6. System Status
Press any button to return to the main menu.
7. Default Settings
Press + to return to the default settings. All values except for the date and the time setup will be erased. Press
STOP / EXIT to exit the screen and to return to the main menu.
8. Technical Specifications
Pick-Up Element ¼” colour CMOS sensor
Lens f3.8mm / F2.0 cone lens
Effective Pixels VGA (640 x 480)
S/N Ratio 46dB
Auto Electronic Shutter (AES) 1/60s – 1/15 000s
Auto Gain Control (AGC), Auto White Balance (AWB)
Min. Illumination 2 lux / F2.0
Video Output Port 1Vp-p / 75Ω(RCA)
Video Output Format PAL or NTSC (switchable)
Recording Resolution VGA (640 x 480) / QVGA (320 x 240)
Compress Quality Level high / medium / low
Recording Mode continuous / motion detection
Recording Interval 2s, 3s, 5s, 10s, 1 fps / 2 fps / 4 fps / 6 fps / 8 fps / max
Storage Capacity built-in 256MB flash memory (max. 32 000 pictures in QVGA)
Memory Functions full stop / overwrite
Playback Mode forward / rewind / 1x / 2x / 4x / 8x / 16x / pause / step
Search Playback date and time
Motion Detection full screen / adjustable sensitivity rate (1 ~ 99)
On-Screen Display mode / date / time / status / setup menu
Power Supply 12VDC +/- 10% / 170mA (incl.) or 4 x AA batteries (not incl.)
Power Consumption max. 2.0W
Power Adapter 230VAC / 12VDC – 350mA (incl.)
Battery Life
Carbon-Zinc 1.5h
NiMH 4.5h
Alkaline 6h
Dimensions 100 x 70 x 35.7mm

CAMCOLVCN_v2 VELLEMAN
9
VELLEMAN cannot be held responsible in the event of damage to or loss of programmes, data or removable
media. VELLEMAN advises you to regularly make backups onto different storage media (disc, CD-ROM etc.)
of your documents, data, files or software installed onto our product.
The information in this manual is subject to change without prior notice.
CAMCOLVCN – DIGITALE KLEURENCAMERA MET 256MB GEÏNTEGREERD GEHEUGEN
1. Inleiding en kenmerken
Aan alle ingezetenen van de Europese Unie
Belangrijke milieu-informatie betreffende dit product
Dit symbool op het toestel of de verpakking geeft aan dat, als het na zijn levenscyclus wordt weggeworpen,
dit toestel schade kan toebrengen aan het milieu.
Gooi dit toestel (en eventuele batterijen) niet bij het gewone huishoudelijke afval; het moet bij een
gespecialiseerd bedrijf terechtkomen voor recyclage.
U moet dit toestel naar uw verdeler of naar een lokaal recyclagepunt brengen.
Respecteer de plaatselijke milieuwetgeving.
Hebt u vragen, contacteer dan de plaatselijke autoriteiten inzake verwijdering.
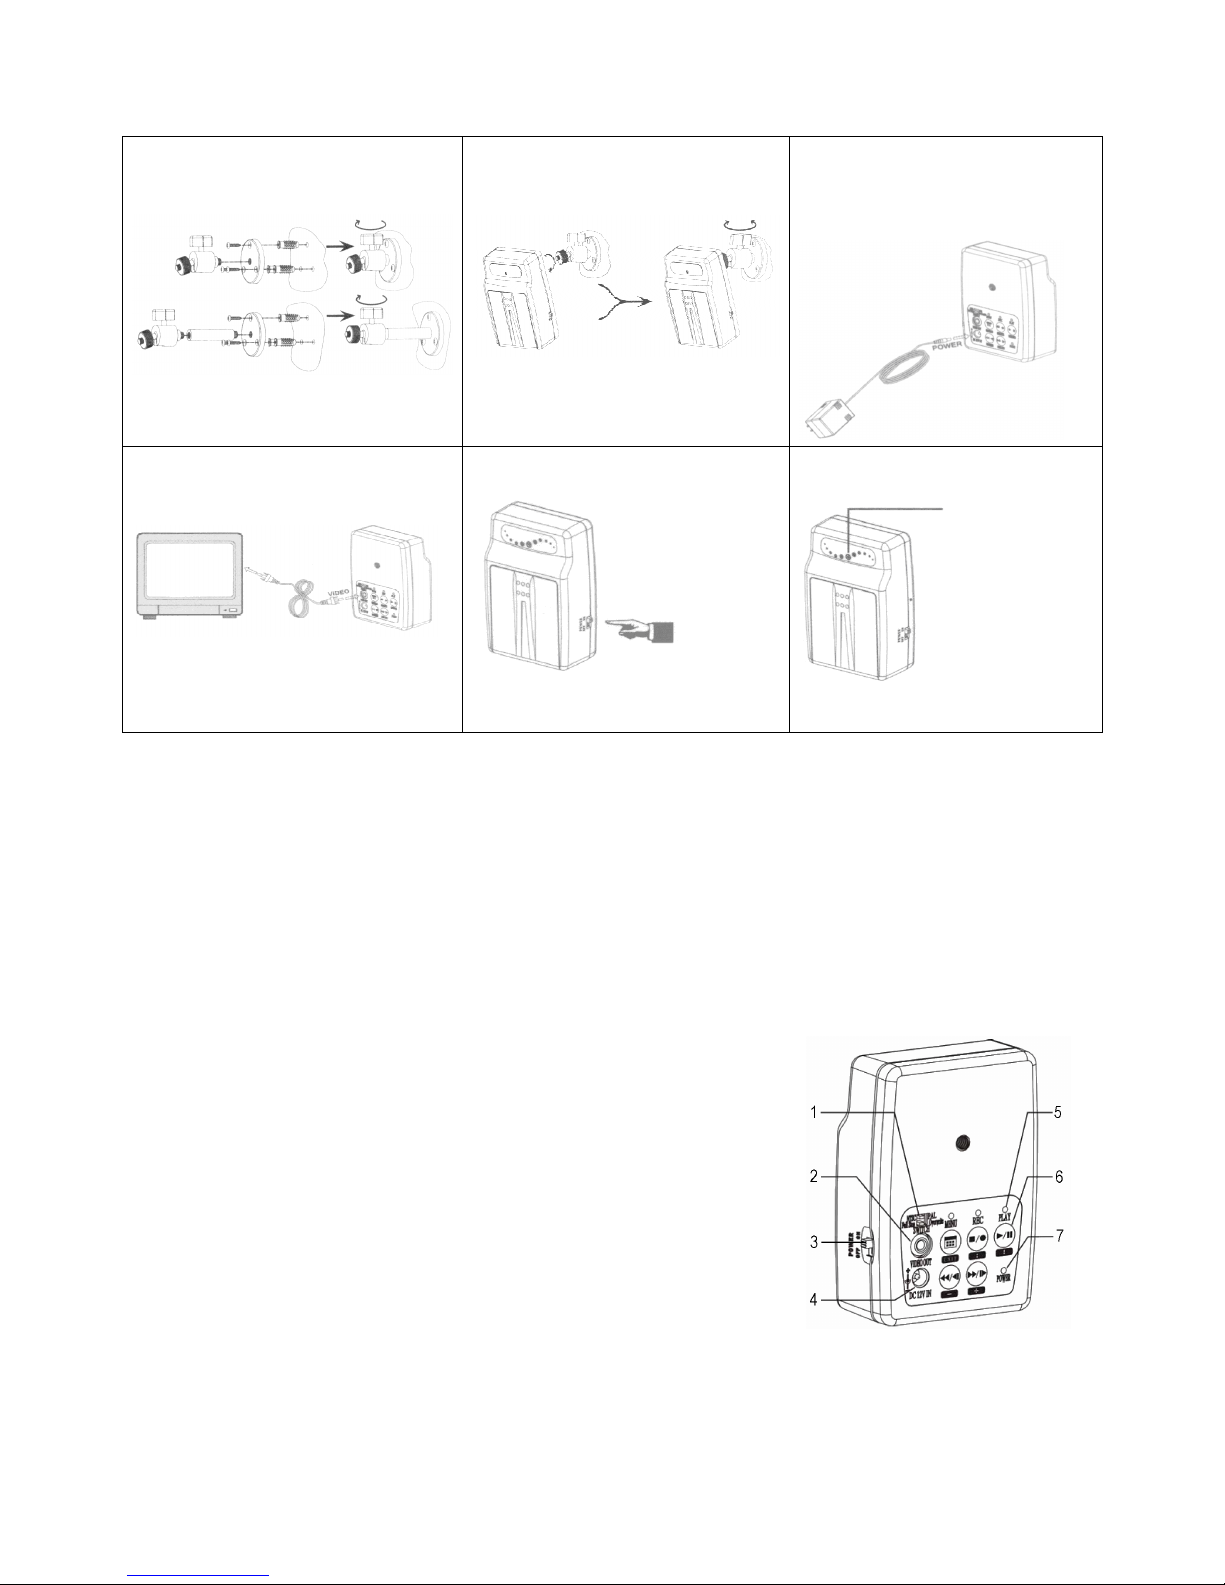
Dank u voor uw aankoop! Lees deze handleiding grondig voor u het toestel in gebruik neemt. Werd het toestel
beschadigd tijdens het transport, installeer het dan niet en raadpleeg uw dealer. Inhoud: 1 x camera, 2 x
aansluitingkabels video, 1 x voedingsadapter, 1 x montagebeugel en deze handleiding.
2. Veiligheidsinstructies
•De garantie geldt niet voor schade door het negeren van bepaalde richtlijnen in deze handleiding en uw dealer zal
de verantwoordelijkheid afwijzen voor defecten of problemen die hier rechtstreeks verband mee houden.
•Laat dit toestel installeren en onderhouden door een geschoolde technicus.
•Het voortdurend koppelen en ontkoppelen van het toestel kan leiden tot een slechte werking ervan.
•Om beschadiging te vermijden, zet u het toestel best niet aan onmiddellijk nadat het werd blootgesteld aan
temperatuurschommelingen. Wacht tot het toestel op kamertemperatuur gekomen is.
•De beschikbare netspanning mag niet hoger zijn dan de spanning in de specificaties achteraan de handleiding.
•De voedingskabel mag niet omgeplooid of beschadigd zijn. Laat uw dealer zo nodig een nieuwe kabel plaatsen.
•Trek de stekker uit het stopcontact (trek nooit aan de kabel!) voordat u het toestel reinigt en als u het niet gebruikt.
•Schade door wijzigingen die de gebruiker heeft aangebracht aan het toestel vallen niet onder de garantie.
•Hou dit toestel uit de buurt van kinderen en onbevoegden.
3. Algemene Richtlijnen
•Schud het toestel niet dooreen en laat het niet vallen. Vermijd brute kracht tijdens de installatie en de bediening
van dit toestel.
•Installeer het toestel weg van extreme temperaturen, vochtigheid en stof.
•Houd het toestel uit direct zonlicht.
•Zorg dat er geen drank in het toestel komt. Wordt het toestel vochtig, veeg het dan onmiddellijk af. Alcohol of
drank bevat mineralen die de elektrische componenten schade toebrengen.
•Om veiligheidsredenen mag de gebruiker geen wijzigingen aanbrengen aan het toestel.
•Gebruik het toestel enkel waarvoor het gemaakt is. Andere toepassingen kunnen leiden tot kortsluitingen,
brandwonden, elektrische schokken, enz. Bij onoordeelkundig gebruik vervalt de garantie.
Wees voorzichtig bij de installatie: raak geen kabels aan die onder stroom staan om
dodelijke elektroshocks
te vermijden.
Kans op elektrische schokken! Open de behuizing niet.

CAMCOLVCN_v2 VELLEMAN
10
4. Installatie
1. Installeer de montagebeugel
2. Plaats de camera op de
montagebeugel
3. Koppel de adapter aan de
voedingsingang of plaats batterijen
4. Koppel de video-uitgang aan de
monitor
5. Schakel het toestel in
6. Richt de camera
5. Omschrijving (zie fig. 1)
1. Functieschakelaar
•NTSC / PAL
De twee meest gebruikte videonormen zijn NTSC en PAL. NTSC wordt voornamelijk in Noord- en Zuid-
Amerika gebruikt. PAL is de Europese standaard. Kies het systeem dat het beste past.
•Full stop / Overwrite
Hiermee kunt u kiezen of de opgeslagen beelden al dan niet overschreven worden wanneer het geheugen vol
is. Kies “Overwrite” om over het geheugen te schrijven, te beginnen met de oudste beelden. Kies “Full Stop”
om de opname te stoppen. De REC LED zal niet branden.
2. Video-uitgang
Wenst u de opnames op een monitor te zien, koppel deze uitgang aan een ingang op een televisietoestel of
monitor.
3. Voedingsschakelaar
Schakel het toestel in door de schakelaar op “ON” te zetten, schakel het toestel uit door de schakelaar op “OFF”
te zetten.
4. Voedingsingang
5. LED indicator
De LED helpt u om de huidige toestand van het systeem te herkennen.
6. Functieknop
De meest gebruikte knoppen zijn de STOP- en de REC-knop.
7. LED voedingscontrolelampje
De LED licht op en geeft aan dat het toestel ingeschakeld is. Is de LED uitgedoofd, dan is er onvoldoende
voeding of is het toestel uitgeschakeld.
Camera

CAMCOLVCN_v2 VELLEMAN
11
Omschrijving van de functies
Toets
Modus
Geen beeld Menu Opname-
modus Weergave
Opname Geen beeld
Menu Zie configuratie
Weergave
Stilstaand beeld Geen beeld Continue
weergave Beeld terug Beeld vooruit
Continu Geen beeld Pauze Vooruit Terug
6. Gebruik
a. Inschakeling
Onmiddellijk na de inschakeling begint het toestel met de automatische herkenning en de opwarming. Het systeem
bevindt zich nu in de MONITORING MODE.
b. Monitoring (zie fig. 2)
1. Tijdsweergave: datum en tijd.
2. Weergave opnamestatus: configuratie manuele opname.
Resolutie: zie “7.4 Opname-instelling”.
Kwaliteit: zie “7.4 Opname-instelling”.
3. Geheugen:
Storing
Controle van het bestand
Normale werking
Continue opname
c. Opnamemodus
•Opname starten:
Manuele opname: druk op REC / om de manuele opnamemodus weer te geven. Zie “7.4 Opname-
instelling”.
Bewegingswaarneming: de bewegingswaarneming schakelt de geprogrammeerde opname in enkel
wanneer de ingestelde waarden worden overschreden. Zie “7.4 Opname-
instelling”.
Continue opname: langdurige opname. Zie “7.4 Opname-instelling”.
•Opname stoppen
Druk op REC / om de manuele opname te stoppen. Druk op MENU of PLAY / om alle
opnamemodi te stoppen. Om de opname te hervatten:
Manuele opname: druk op REC / .
Geprogrammeerde en opname door bewegingswaarneming: de instelling wordt gecontroleerd
wanneer u het menu of de weergave verlaat.

CAMCOLVCN_v2 VELLEMAN
12
•Opnameweergave (zie fig. 3):
: opname
: manuele opname
: geprogrammeerde opname
: opname door bewegingswaarneming
•Elke opnamemodus heeft een configuratie. Basisconfiguratie: videoformaat, aantal opgenomen beelden,
videokwaliteit en opnamekwaliteit. Hebt u verschillende opnamemodi ingesteld, dan zal de CAMCOLVCN
volgens die instellingen opnemen om de kwaliteit van de opname te garanderen. Voorbeeld:
geprogrammeerde opname van 08:00 tot 18:00: lage beeldkwaliteit en minder opgenomen beelden om de
opnametijd te verlengen; opname door bewegingswaarneming van 18:00 tot 08:00: opname van hoge
kwaliteit.
•Een stroomonderbreking tijdens een opname kan leiden tot fouten of onderbroken opnames.
d. Weergavemodus
•Normale weergave (zie fig. 4): druk op PLAY /
normale weergave. Druk op / om te pauzeren / te hervatten
terugspoelen / doorspoelen aan 2x, 4x, 8x, 16x of 32x snelheid. Druk op / om de normale
weergave te hervatten.
pauze. Druk opnieuw om te hervatten.
één beeld terug- of doorspoelen tijdens pauze. Druk op / om te hervatten.
/ weergave stoppen.
•Zoekfunctie (zie fig. 5): begeef u in het menu en selecteer SEARCH AND PLAY
1. Bestandslijst met datum en aantal bestanden. Druk op of om de cursor naar boven of naar beneden
te verplaatsen.
2. Huidige pagina.
3. Elke kleur geeft een verschillende opname weer. Druk op + of – om de cursor naar rechts of naar links
te verplaatsen.
4. Tijdsweergave volgens de tijdsbalk.
5. Blauw: manuele opname; rood: opname door bewegingswaarneming; wit: geprogrammeerde opname.
OPMERKING: Selecteer het startmoment van de weergave, druk op MENU en + of -, selecteer PLAY en
druk op MENU om de weergave te starten.
Druk op REC / om de weergave te stoppen. Het systeem keert terug naar de
zoekmodus.
Druk op + of -, selecteer EXIT en druk op MENU om naar het hoofdmenu terug te keren.
7. Systeeminstelling
1. Hoofdmenu (zie fig. 6)
1. Onderwerp
2. Niveau: drie mogelijkheden
: eerste niveau
: tweede niveau
: derde niveau

CAMCOLVCN_v2 VELLEMAN
13
3. Basismenu’s
Druk op of om de balk en de cursor ( ) te verplaatsen
Druk op MENU / ENTER om het submenu weer te geven
Druk op STOP :
•in het tweede of derde niveau om naar het vorige niveau terug te keren
•in het hoofdmenu om naar de livemodus terug te keren. Druk op of om de gemarkeerde
warden te wijzigen.
OPMERKING: onderstreepte woorden of woorden in vet zijn fabriekswaarden.
2. Instellen van datum / tijd (zie fig. 7)
1. Datum in J/M/D, M/D/J of D/M/J
2. Datum en tijd
3. Instellen van de opname door bewegingswaarneming (zie fig. 8)
OPMERKING: een wijziging van de waarden kan de gevoeligheid van de bewegingswaarneming beïnvloeden.
1. Gevoeligheid: zwart: variabele waarde; rood: drempel
2. MD energy: huidige waarde
3. MD threshold: druk op – of + om de waarde te wijzigen
4. Instellen manuele en geprogrammeerde opname
a. Manuele opname (zie fig. 9): druk op REC / om een opname te starten
Video size: 640 x 480 (12 fps) of 320 x 240 (30 fps)
Beeldkwaliteit: HQ: hoge kwaliteit (meer opslagcapaciteit vereist)
MQ: gemiddelde kwaliteit
LQ: lage kwaliteit (minder opslagcapaciteit vereist)
b. Geprogrammeerde opname (continue opname / opname door bewegingswaarneming) (zie fig. 10)
Record: in- of uitschakelen van de geprogrammeerde opname (on/off)
Schedule: Hh:Mm – Hh:Mm: 24-uur opname. Voorbeeld: 00:00 – 00:01: opname van 1 minuut
Duration: lengte van de opname
5. De SD-kaart (zie fig. 11)
1. Formatteren van het geheugen: alle gegevens worden gewist.
OPMERKING: oude videobeelden kunnen worden overschreven wanneer u in continue modus opneemt. De
lengte van de opname hangt af van de capaciteit van de kaart, de opnamemodus en de
instellingen.
6. Systeemstatus
Druk op een toets om naar het hoofdmenu terug te keren.
7. Fabrieksinstellingen
Druk op + om de fabrieksinstellingen opnieuw in te stellen. Alle waarden uitgenomen datum en tijd worden
gewist. Druk op STOP / EXIT om naar het hoofdmenu terug te keren.

CAMCOLVCN_v2 VELLEMAN
14
8. Technische specificaties
Opneemelement ¼” kleuren CMOS sensor
Lens f3.8mm / F2.0 conische lens
Pixels VGA (640 x 480)
S/R-verhouding 46dB
Auto Electronic Shutter (AES) 1/60s – 1/15 000s
Auto Gain Control (AGC), Auto White Balance (AWB)
Min. verlichting 2 lux / F2.0
Uitgangspoort video 1Vp-p / 75Ω(RCA)
Videoformaat PAL of NTSC (schakelbaar)
Beeldresolutie VGA (640 x 480) / QVGA (320 x 240)
Beeldkwaliteit hoog / medium / laag
Opnamemodus continu / bewegingswaarneming
Opname-interval 2s, 3s, 5s, 10s, 1 fps / 2 fps / 4 fps / 6 fps / 8 fps / max
Opslagcapaciteit 256MB intern flashgeheugen (max. 32 000 beelden in QVGA)
Functies bij vol geheugen full stop / overwrite
Weergavefunctie vooruit / terug / 1x / 2x / 4x / 8x / 16x / pauze / enkel beeld
Beeldzoekmodus datum en tijd
Bewegingswaarneming full screen / regelbare gevoeligheid voor waarneming (1 ~ 99)
Schermaanduiding modus / datum / tijd / status / instelmenu
Voeding 12VDC +/- 10% / 170mA (incl.) of 4 x AA batterijen (niet meegelev.)
Verbruik max. 2.0W
Voedingsadapter 230VAC / 12VDC – 350mA (meegelev.)
Levensduur batterij
Koolstof-zink 1.5h
NiMH 4.5h
Alkaline 6h
Afmetingen 100 x 70 x 35.7mm
VELLEMAN is niet aansprakelijk voor schade aan of verlies van programma’s, gegevens of verwisselbare
media. VELLEMAN raadt u aan regelmatig reservekopieën te maken op verschillende opslagmedia (diskette,
cd-rom enz.) van documenten, gegevens, bestanden of software die op ons product zijn geïnstalleerd.
De informatie in deze handleiding kan te allen tijde worden gewijzigd zonder voorafgaande kennisgeving.
CAMCOLVCN – CAMÉRA COULEUR NUMÉRIQUE AVEC 256MB DE MÉMOIRE INTEGRÉE
1. Introduction et caractéristiques
Aux résidents de l'Union européenne
Des informations environnementales importantes concernant ce produit
Ce symbole sur l'appareil ou l'emballage indique que l’élimination d’un appareil en fin de vie peut polluer
l'environnement.
Ne pas jeter un appareil électrique ou électronique (et des piles éventuelles) parmi les déchets municipaux
non sujets au tri sélectif ; une déchèterie traitera l’appareil en question.
Renvoyer les équipements usagés à votre fournisseur ou à un service de recyclage local.
Il convient de respecter la réglementation locale relative à la protection de l’environnement.
En cas de questions, contacter les autorités locales pour élimination.
Nous vous remercions de votre achat ! Lire la présente notice attentivement avant la mise en service de l’appareil. Si
l’appareil a été endommagé pendant le transport, ne pas l’installer et consulter votre revendeur. Déballer la
CAMCOLVCN. Contenu : 1 caméra, 2 câbles de connexion vidéo, 1 adaptateur secteur, 1 support de montage et cette
notice.

CAMCOLVCN_v2 VELLEMAN
15
2. Prescriptions de sécurité
•La garantie ne s'applique pas aux dommages survenus en négligeant certaines directives de cette notice et votre
revendeur déclinera toute responsabilité pour les problèmes et les défauts qui en résultent.
•Un technicien qualifié doit s'occuper de l'installation et de l’entretien.
•Brancher et débrancher l’appareil sans cesse peut dérégler l’appareil.
•Ne pas brancher l'appareil après exposition à des variations de température. Afin d’éviter des dommages,
attendre jusqu’à ce que l'appareil ait atteint la température ambiante avant de l'utiliser.
•La tension réseau ne peut pas dépasser la tension mentionnée dans les spécifications à la fin de cette notice.
•Le câble d'alimentation ne peut pas être replissé ou endommagé. Demander à votre revendeur de renouveler le
câble d'alimentation si nécessaire.
•Débrancher l’appareil s’il n’est pas utilisé ou pour le nettoyer. Tirer la fiche pour débrancher l'appareil; pas le câble.
•Les dommages occasionnés par des modifications à l'appareil par le client, ne tombent pas sous la garantie.
•Garder votre CAMCOLVCN hors de la portée de personnes non qualifiées et de jeunes enfants.
3. Directives générales
•Éviter de secouer l'appareil et ne le laissez pas tomber. Traiter l'appareil avec circonspection pendant l'installation
et l'opération.
•Choisir un endroit où l’appareil est protégé contre la poussière, l’humidité et des températures extrêmes.
•Tenir l’appareil à l’écart de la lumière directe du soleil.
•Éviter que des liquides pénètrent dans l’appareil. Si l’appareil est humide, nettoyez-le tout de suite. L’alcool ou les
boissons contiennent des minéraux qui peuvent nuire aux composants électroniques.
•Toute modification de l’appareil est interdite pour des raisons de sécurité.
•N’utiliser votre CAMCOLVCN qu’à sa fonction prévue. Tout autre usage peut causer des courts-circuits, des
brûlures, des électrochocs etc. Un usage impropre annule d'office la garantie.
4. Installation
1. Installation du support de montage
2. Placez la caméra sur le support
3. Reliez l’adaptateur à l’entrée
d’alimentation ou insérez des piles
4. Reliez la sortie vidéo à un moniteur
5. Allumer l’appareil
6. Dirigez la caméra
Soyez prudent lors de l'installation: toucher un câble sous tension peut causer des électrochocs mortels
Risque de chocs électriques! N’ouvrez pas le boîtier.
Caméra

CAMCOLVCN_v2 VELLEMAN
16
5. Description (voir ill. 1)
1. Interrupteur de fonction
•NTSC / PAL
Les deux standards vidéo les plus utilisés sont NTSC et PAL. Le standard NTSC est essentiellement utilisé en
Amérique du Nord et en Amérique du Sud. Le standard PAL est utilisé en Europe. Choisissez le standard qui
vous convient le mieux.
•Full stop / Overwrite
Choisissez si vous désirez écraser et effacer les images enregistrées en cas de mémoire pleine. Choisissez
“Overwrite” pour écraser et effacer les images, à commencer avec les images les plus anciennes. Choisissez
“Full Stop” pour arrêter l’enregistrement. La LED REC ne s’allumera pas.
2. Sortie vidéo
Reliez cette sortie à l’entrée d’un poste de télévision ou d’un moniteur si vous désirez visionner les images
enregistrées.
3. Interrupteur d’alimentation
Branchez l’appareil en plaçant l’interrupteur sur “ON”, débranchez-le en plaçant l’interrupteur sur “OFF”.
4. Entrée d’alimentation
5. Témoin LED
La LED vous indique le statu actuel du système.
6. Touche de fonction
Les touches les plus utilisées sont les touches STOP et REC.
7. Témoin LED pour l’alimentation
La LED s’allume et indique la mise en marche de l’appareil. La LED s’éteint en cas d’alimentation insuffisante ou
d’extinction de l’appareil.
Description des fonctions
Touche
Mode
Mode d’arrêt
Menu Mode
d’enregistre-
ment
Mode de
reproduction
Mode d’enregistrement
Mode d’arrêt
Menu Voir la configuration
Mode de reproduction
Mode image fixe Mode d’arrêt Reproduction
continue Reculer
image par
image
Avancer
image par
image
Mode continu Mode d’arrêt Pause Reculer Avancer
6. Emploi
a. Mise en marche de l’appareil
L’appareil entame la procédure de reconnaissance automatique et de chauffe immédiatement après la mise en
marche. Le système se trouve dans le MODE DE MONITORAGE.

CAMCOLVCN_v2 VELLEMAN
17
b. Mode de monitorage (voir ill. 2)
1. Affichage de la date et de l’heure.
2. Paramètres de l’enregistrement manuel :
Résolution : voir « 7.4 Configuration de l’enregistrement ».
Qualité : voir « 7.4 Configuration de l’enregistrement ».
3. Mémoire du système :
Fonctionnement défectueux
Test de fichier
Fonctionnement normal
Enregistrement continu
c. Mode d’enregistrement
•Démarrage de l’enregistrement :
Enregistrement manuel : enfoncer REC / pour accéder au mode. Voir « 7.4 Configuration de
l’enregistrement ».
Enregistrement par détection de mouvement : la détection de mouvement n’enclenche l’enregistrement
programmé que lorsque les valeurs sont violées. Voir « 7.4 Configuration de
l’enregistrement ».
Enregistrement continu : enregistrement continu prolongé. Voir « 7.4 Configuration de
l’enregistrement ».
•Arrêt de l’enregistrement
Enfoncer REC / pour n’arrêter que l’enregistrement manuel. Enfoncer MENU ou PLAY / pour
arrêter tout mode d’enregistrement. Pour reprendre l’enregistrement :
Enregistrement manuel : enfoncer REC / .
Enregistrements programmé et par détection de mouvement : le système exécute un contrôle des
paramètres après avoir quitté le menu ou le mode de reproduction.
•Affichage de l’enregistrement (voir ill. 3) :
: enregistrement en cours
: enregistrement manuel
: enregistrement programmé
: enregistrement par détection de mouvement
•Les différents modes d’enregistrement se configurent d manière différente. Configuration de base : taille du
fichier vidéo, nombre d’images, qualité de l’enregistrement et qualité de l’image. Le système enregistre
selon les modes d’enregistrement ce qui le rend flexible et permet d’obtenir une haute qualité d’image et un
enregistrement de longueur suffisante. Exemple : enregistrement programmé de 08:00 à 18:00 : qualité
d’image inférieure avec une longueur d’enregistrement supérieure ; enregistrement par détection de
mouvement de 18:00 à 08:00 : enregistrement de haute qualité.
•Une coupure de courant pendant l’enregistrement pourrait donner des images incomplètes ou des erreurs.
d. Mode de reproduction
•Mode de reproduction normale (voir ill. 4) : enfoncer PLAY /
reproduction normale. Enfoncer / pour interrompre / reprendre
reculer / avancer (vitesse 2x, 4x, 8x, 16x ou 32x). Enfoncer / pour reprendre la
reproduction normale.

CAMCOLVCN_v2 VELLEMAN
18
pause. Renfoncer pour reprendre la reproduction normale.
reculer ou avancer image par image. Enfoncer / pour reprendre la reproduction.
/ arrêt de la reproduction et retour vers le mode stop playback and return to live mode.
•Recherche (voir ill. 5) : accéder au menu et sélectionner SEARCH AND PLAY
1. Répertoire avec la date et le nombre de fichiers. Enfoncer ou pour déplacer le curseur.
2. Page actuelle.
3. Chaque couleur indique un événement différent. Enfoncer + ou – pour vous déplacer à droite ou à
gauche.
4. Affichage du temps.
5. Bleu : enregistrement manuel ; rouge : enregistrement par détection de mouvement ; blanc :
enregistrement programmé.
REMARQUE : Sélectionner le temps d’amorçage de la reproduction, enfoncer MENU et + ou -,
sélectionner PLAY et renfoncer MENU pour reprendre la reproduction.
Enfoncer REC / pour arrêter la reproduction et revenir au mode SEARCH AND PLAY.
Enfoncer + ou -, sélectionner EXIT et renfoncer MENU pour revenir au menu principal.
7. Réglage du système
1. Menu principal (voir ill. 6)
1. Sujet
2. Niveau : 3 niveaux possibles
: premier niveau
: deuxième niveau
: troisième niveau
3. Opérations de base
Enfoncer ou pour déplacer la barre de surlignage et le curseur ( )
Enfoncer MENU / ENTER pour accéder au sous-menu
Enfoncer STOP :
•dans le deuxième ou le troisième niveau pour revenir au niveau précédent
•dans le menu principal pour accéder au mode live. Enfoncer ou pour diminuer ou augmenter
les valeurs surlignées.
REMARQUE : Les caractères gras et soulignés indiquent une valeur par défaut.
2. Configuration de la date / de l’heure (voir ill. 7)
1. Date indiqué en A/M/J, M/J/A ou J/M/A
2. Date et heure
3. Configuration de l’enregistrement par détection (voir ill. 8)
REMARQUE : Une modification des valeurs peut entrainer une modification de la sensibilité de
l’enclenchement.
1. Barre de sensibilité : noir : valeur variable ; rouge : seuil
2. MD energy : valeur variable actuelle
3. MD threshold : enfoncer – ou + pour modifier la valeur

CAMCOLVCN_v2 VELLEMAN
19
4. Configuration de l’enregistrement manuel et programmé
a. Enregistrement manuel (voir ill. 9) : enfoncer REC / pour démarrer l’enregistrement
Taille de la vidéo : 640 x 480 (12 fps) ou 320 x 240 (30 fps)
Qualité d’image : HQ: haute qualité (nécessite plus de capacité de stockage)
MQ: qualité moyenne
LQ: faible qualité (nécessite moins de capacité de stockage)
b. Enregistrement programmé (continu / par détection de mouvement) (voir ill. 10)
Record : enclenchement ou désactivation de l’enregistrement programmé (on/off)
Schedule : Hh:Mm – Hh:Mm : enregistrement en format 24 heures. Exemple : 00:00 – 00:01 :
enregistrement d’une minute.
Duration : temps de l’enregistrement
5. Options de la carte SD (voir ill. 11)
1. Formatage de la mémoire : toutes les données seront effacées.
REMARQUE : lors d’un enregistrement en mode continu, les anciens fichiers vidéo seront écrasés. Le temps
d’enregistrement dépend de la capacité de la carte SD, le mode d’enregistrement et la
configuration générale.
6. L’état du système
Enfoncer une touche pour revenir au menu principal.
7. Configuration d’usine
Enfoncer + pour revenir au paramétrage d’usine. Toutes les valeurs seront effacées à l’exception de la date et
de l’heure. Enfoncer STOP / EXIT pour quitter et pour revenir au menu principal.
8. Spécifications techniques
Élément d’enregistrement capteur d’image CMOS couleur ¼”
Objectif objectif conique f3.7mm / F2.0
Pixels VGA (640 x 480)
Rapport S/B 46dB
Obturateur électronique automatique (AES) 1/60s – 1/15 000s
Auto Gain Control (AGC), Auto White Balance (AWB)
Illumination min. 2 lux / F2.0
Port de sortie vidéo 1Vp-p / 75 ohms (RCA)
Format vidéo PAL ou NTSC (commutable)
Résolution VGA (640 x 480) / QVGA (320 x 240)
Qualité de l’image haute / moyenne / basse
Mode d’enregistrement image continue / image animée
Intervalle d’enregistrement 10s / 5s / 3s / 2s / 1 fps / 2 fps / 4 fps / 6 fps / 8 fps / MAX
Capacité de stockage 64MB de mémoire flash intégrée (max. 32 000 images en QVGA)
Fonctions en cas de mémoire pleine full stop (arrêt d’enregistrement) / overwrite (images écrasées et
effacées)
Fonctions de reproductions avancer / reculer / x1 / x2 / x4 / x8 / x16 / pause / image individuelle
Recherche des images date & heure
Détecteur de mouvement écran plein / rapport de sensibilité de détection réglable (1 ~ 99)

CAMCOLVCN_v2 VELLEMAN
20
Affichage mode / date / heure / statu / menu de réglage
Alimentation 12VCC ±10% / 170mA (incl.) of 4 x piles type LR6 (non incl.)
Consommation max. 2.0W
Adaptateur secteur 230VCA / 12VCC – 350mA (incl.)
Durée de vie des piles
Zinc-carbone 1.5h
Ni-MH 4.5h
Alcaline 6h
Dimensions 100 x 70 x 35.7mm
VELLEMAN ne sera aucunement responsable de dommages survenues à ou la perte de logiciels, données
ou supports amovibles. VELLEMAN vous conseille de régulièrement effectuer des copies de sauvegarde sur
plusieurs supports de sauvegarde (disquette, CD-ROM etc.) de vos documents, données, fichiers ou
logiciels installés sur notre produit.
Toutes les informations présentées dans cette notice peuvent être modifiées sans notification préalable.
CAMCOLVCN – CÁMARA COLOR DIGITAL CON 256MB DE MEMORIA INCORPORADA
1. Introducción & Características
A los ciudadanos de la Unión Europea
Importantes informaciones sobre el medio ambiente concerniente a este producto
Este símbolo en este aparato o el embalaje indica que, si tira las muestras inservibles, podrían dañar el
medio ambiente.
No tire este aparato (ni las pilas, si las hubiera) en la basura doméstica; debe ir a una empresa
especializada en reciclaje. Devuelva este aparato a su distribuidor o a la unidad de reciclaje local.
Respete las leyes locales en relación con el medio ambiente.
Si tiene dudas, contacte con las autoridades locales para residuos.
¡Gracias por haber comprado la CAMCOLVCN! Lea atentamente las instrucciones del manual antes de usarla. Si el
aparato ha sufrido algún daño en el transporte no lo instale y póngase en contacto con su distribuidor. Desembale la
CAMCOLVCN. Incluye: 1 cámara, 2 cables de conexión de vídeo, 1 adaptador de red, 1 soporte de montaje y este
manual del usuario.
2. Instrucciones de seguridad
•Daños causados por descuido de las instrucciones de seguridad de este manual invalidarán su garantía y su
distribuidor no será responsable de ningún daño ni de otros problemas resultantes.
•La instalación y el mantenimiento deben ser realizados por personal especializado.
•Activar y desactivar el aparato sin parar podría desajustar el aparato.
•No conecte el aparato si ha estado expuesto a grandes cambios de temperatura. Espere hasta que el aparato
llegue a la temperatura ambiente.
•Asegúrese de que la tensión de red no sea mayor que la tensión indicada en las especificaciones.
•No pliegue ni dañe el cable de alimentación. Si es necesario, pida a su distribuidor reemplazar el cable de
alimentación.
•Desconecte siempre el aparato si no va a usarlo durante un largo periodo de tiempo o antes de limpiarlo. Tire
siempre del enchufe para desconectar el cable de red, nunca del propio cable.
•Los daños causados por modificaciones no autorizadas, no están cubiertos por la garantía.
•Mantenga la CAMCOLVCN lejos del alcance de personas no capacitadas y niños.
Cuidado durante la instalación: puede sufrir una peligrosa descarga
eléctrica al tocar los cables con un voltaje
peligroso.
¡Riesgo de descarga! No abra la caja.
Table of contents
Languages:
Other Velleman Camcorder manuals

Velleman
Velleman CAMCOLVC13 User manual

Velleman
Velleman CAMCOLMHA9 User manual

Velleman
Velleman CAMW7 User manual

Velleman
Velleman CAMSCC18 User manual

Velleman
Velleman CAMCOLVC6 User manual

Velleman
Velleman CAMCOLVC13 User manual

Velleman
Velleman CAMCOLVC16 User manual

Velleman
Velleman CAMCOLVC1GB User manual

Velleman
Velleman CAMCOLVC2 User manual

Velleman
Velleman CAMCOLVC17 User manual