Velleman CAMCOLVC18 User manual

CA
M
HIGH
D
CAMER
A
HD-KL
E
CAM
É
R
A
C
Á
MAR
A
HD-FA
R
USER M
A
GEBRUI
K
MODE D
’
MANUAL
BEDIEN
U
M
COL
V
D
EFINITION
A
A
E
URENCAMER
A
A
COULEUR
H
A
HD A COLO
R
BKAMERA
A
NUA
L
K
ERSHANDLEID
I
’
EMPLOI
DEL USUARIO
U
NGSANLEITUN
G
V
C18
A
CTION VIDE
O
A
H
D
R
4
I
NG 1
3
2
2
3
2
G
4
1
O
CAPTURE
C
4
3
2
2
1
C
OLOUR

CAMCOLVC18
V. 02 – 02/10/2012 2 ©Velleman nv

CAMCOLVC18
V. 02 – 02/10/2012 3 ©Velleman nv
A
B
C
D
E
F
G
H

V. 02 – 0
2
1. In
t
To all re
s
Importa
n
T
t
d
s
s
s
If in dou
Thank yo
u
bringing
t
install or
2. Sa
f
K
e
C
a
a
s
T
h
a
u
2
/10/2012
I
U
t
roduction
s
idents of the
E
n
t environmen
t
T
his symbol on t
t
he device after
i
d
ispose of the u
n
s
hould be taken
s
hould be return
s
ervice. Respect
bt, contact yo
u
u
for choosing V
e
t
his device into s
e
use it and conta
c
f
ety Instruc
t
e
ep this device a
a
ution: Do not
o
s
this may lead t
o
h
ere are no use
r
-
u
thorized dealer
CAMCOLV
C
4
U
SER MA
E
uropean Unio
n
t
al information
he device or the
i
ts lifecycle coul
d
n
it (or batteries)
to a specialized
c
ed to your distri
b
the local enviro
n
u
r local waste
d
e
lleman! Please
r
e
rvice. If the de
v
c
t your dealer.
t
ions
way from childr
e
o
perate buttons
o
o
hazardous situ
a
-
serviceable part
for service and/
o
C
18
J
NUAL
n
about this pro
d
package indicat
e
d
harm the envir
o
as unsorted mu
n
c
ompany for rec
y
b
utor or to a loc
a
n
mental rules.
d
isposal author
i
r
ead the manual
v
ice was damag
e
e
n and unauthori
z
o
r adjust setting
s
a
tions.
s inside the devi
c
o
r spare parts.
©Velleman
n
d
uct
e
s that disposal
o
o
nment. Do not
n
icipal waste; it
y
cling. This devi
c
a
l recycling
i
ties.
thoroughly befo
r
e
d in t
r
ansit, don
'
z
ed users.
s
while in motion
c
e. Refer to an
n
v
o
f
c
e
r
e
'
t

CAMCOLVC18
V. 02 – 02/10/2012 5 ©Velleman nv
3. General Guidelines
Refer to the Velleman® Service and Quality Warranty on the last pages
of this manual.
•Protect this device from heavy shocks and abuse. Avoid brute force
when operating the device.
•Protect the device against extreme heat and dust.
•Familiarise yourself with the functions of the device before actually
using it.
•All modifications of the device are forbidden for safety reasons.
•Only use the device for its intended purpose. Using the device in an
unauthorised way will void the warranty.
•Damage caused by disregard of certain guidelines in this manual is not
covered by the warranty and the dealer will not accept responsibility for
any ensuing defects or problems.
•Keep this manual for future reference.
4. Features
•portable action camera with different mounting brackets
•the video capture camera records images on SD card (not included)
•video recording quality: 720p HD video – 20 fps
•easy and user-friendly setup
•comes with USB cable, A/V cable, and brackets
•weatherproof design
•white LED backlight screen.
5. Overview
Refer to the illustrations on page 2of this manual.
1 cap 9 battery compartment
2 control buttons 10 microphone
2a menu button 11 camera base
2b record button 12 camera base handles
2c power button 13 handlebar bracket
3 display 14 screw and bolt
4 lens 15 helmet bracket
5 ring 16 hook-and-loop strap
6 mini-USB port 17 rubber strap
7 SD card slot 18 USB cable
8 video output 19 video cable

CAMCOLVC18
V. 02 – 02/10/2012 6 ©Velleman nv
6. Installation
6.1 Connecting the Base of the Camera
If it is not yet done, screw the base [11] on the bottom of the camera (see
illustration A). The base allows you to fix the camera:
•on the handlebar of your bicycle using the handlebar bracket
•on your helmet using the Velcro or rubber strap using the helmet
bracket
•or directly onto a tripod, using the screw hole in the base.
6.2 Mounting the Camera on a Handlebar
1. Slide the handlebar bracket [13] over the handlebar (see
illustration B).
Tip: If necessary, insert one or more rubber pads between bracket and
handlebar to ensure a tight grip.
2. Fix the bracket with the screw and bolt [14] (see illustration C).
3. Slide the camera base in the handlebar bracket until it clicks into place
(see illustration D).
4. Adjust the camera position: loosen the ring [5], adjust, then tighten
again to keep the camera firmly in place.
5. To adjust the bracket position: loosen the bolt [14], reposition the
bracket on the handlebar, then tighten the bolt again (see
illustration E).
6. To take the camera off the bracket again, squeeze the camera base
handles [12] together and slide the camera off the bracket.
6.3 Mounting the Camera on a Helmet Using the Rubber Strap
1. Thread the rubber strap [17] through the helmet bracket [15] (see
illustration F).
2. Fit the strap over the helmet with the bracket in the desired position
(see illustration G).
3. Make sure the strap fits tightly around the helmet.
4. Slide the camera into the bracket (see illustration H).
5. Adjust the camera position: loosen the ring [5], adjust, then tighten
again to keep the camera firmly in place.
6.4 Mounting the Camera on a Helmet Using the Hook-and-Loop
Strap
1. Thread the hook-and-loop strap [16] through the helmet bracket [15]
(see illustration F).
2. Place the bracket on the helmet in the desired position and thread the
strap through the helmet vents (see illustration I).
3. Tighten the strap and fix the ends together to keep the bracket in place.
4. Slide the camera into the bracket (see illustration J).

V. 02 – 0
2
5. Adju
s
agai
n
7. Op
e
7.1 Bat
t
D
o
e
x
(
a
K
e
Replace t
h
display.
W
and the c
a
Note: Al
w
1. Make
2. Unsc
r
3. Push
com
p
4. Inse
r
with
t
bran
d
5. Clos
e
6. Scre
w
7.2 Swi
To switch
2 second
s
The displ
a
minutes.
Note: If
t
camera,
t
To switch
2 second
s
off after
1
7.3 Me
m
Recomm
e
•Use
h
•Form
Insertin
g
1. Make
2. Unsc
r
2
/10/2012
s
t the camera po
n
to keep the ca
m
e
ration
t
eries
o
not puncture b
x
plode. Do not a
t
a
lkaline). Dispos
e
e
ep batteries aw
a
h
e batteries whe
W
hen the batteri
e
a
mera shuts off
a
w
ays replace all
b
sure the camer
a
r
ew the cap [1]
f
the battery com
p
artment.
r
t 2 new 1.5V AA
t
he polarity mar
k
d
.
e
the battery co
m
w
the cap [1] ba
tching On and
O
the camera on,
s
. You hear a be
e
a
y shows the re
m
t
he memory car
d
t
he display show
s
the camera off,
s
. The display sh
o
1
second.
m
ory Card
e
ndations:
h
igh-speed SD c
a
at the memory
c
g
a Memory Ca
r
sure the camer
a
r
ew the cap [1]
f
CAMCOLV
C
7
sition: loosen th
e
m
era firmly in pl
a
atteries or thro
w
t
tempt to rechar
g
e
of batteries in
a
a
y from children
.
n the low batter
y
e
s are completel
y
a
utomatically af
t
b
atteries at once
a
is switched off.
f
rom the back o
f
partment lid [9]
alkaline batteri
e
k
ings. Only use
b
m
partment.
ck onto the bac
k
O
ff
press and hold t
h
e
p and the displa
m
aining time for
v
d
is full, or if the
r
s
“FULL”.
press and hold t
o
ws “OFF” and y
o
a
rds for best per
f
c
ard before use.
r
d
a
is switched off.
f
rom the back o
f
C
18
e
ring [5], adjus
a
ce.
w
them in fire as
t
g
e non-recharge
a
a
ccordance with
l
.
y
indication
y
empty, you will
t
er 20 seconds.
.
f
the camera.
downwards to o
e
s (LR6, not incl.
)
b
atteries of the s
a
k
of the camera.
h
e power button
y lights up.
v
ideo recording i
r
e is no memory
he power button
o
u hear a beep.
T
f
ormance and qu
f
the camera.
©Velleman
n
t, then tighten
t
hey may
a
ble batteries
l
ocal regulations
.
appears on the
hear a long bee
pen the battery
)
in accordance
a
me type and
for about
n hours and
card in the
for about
T
he camera shu
t
ality.
n
v
.
p
t
s

CAMCOLVC18
V. 02 – 02/10/2012 8 ©Velleman nv
3. Insert an SD card (not included) in the card slot [7]. Push it in until it
clicks into place.
4. To remove the SD card again, push the card gently so that it pops out.
5. Screw the cap [1] back onto the back of the camera.
Formatting a Memory Card
Caution: Formatting erases all data from the card. If necessary, connect
the camera to a pc to back up the data before formatting.
1. Make sure the camera is switched off.
2. Insert the memory card in the card slot [7].
3. Switch the camera on.
4. Press the record button for about 5 seconds.
The display shows “FOR” ( for “formatting’).
5. Wait until the display shows the remaining recording time again.
The card is now empty and ready for use with the camera.
7.4 Configuration
Setting the Video Resolution
You can set the resolution of the recorded video to 720p (1280×720) or
VGA (640x480).
To set the resolution:
1. Switch the camera on.
2. Press and hold the menu button for 2 seconds.
The 720p icon blinks.
3. Press the record button once to switch to VGA. The VGA icon
blinks.
4. Press the menu button to confirm.
Note: The remaining recording time is adjusted to the resolution. You can
record longer in VGA mode (lower resolution) than in 720p mode.
Setting the Time and Date
1. Switch the camera on.
2. Press and hold the menu button for 2 seconds.
The 720p icon blinks.
3. Press the record button repeatedly until “ALL” appears on the display.
4. Press the menu button for 2 seconds.
“Y” (for “year”) and the third digit of the year blink on the display.
5. Press the record button repeatedly to set the digit. Then press the menu
button to confirm and move to the next digit.
6. Repeat for the last digit of the year, the month (“M”), day (“D”), hour
(“H”), and minutes (“M”).
The camera returns to video recording mode after you set all the digits.

CAMCOLVC18
V. 02 – 02/10/2012 9 ©Velleman nv
7.5 Recording Video
Normal Recording
1. Make sure there is a memory card installed in the camera.
2. Switch the camera on. The display shows the remaining recording time.
3. Press the record button to start recording.
The display backlight blinks. The display shows the recording time in
minutes and seconds. The camera saves a video file every 5 minutes.
4. Press the record button again to stop recording.
The display backlight stops blinking. The display shows the remaining
recording time.
Note: When the memory card is full, the display shows “FULL”. The camera
automatically stops recording.
Loop Recording
If you use the camera with a USB charger, you can record continuously. The
camera then saves a video file every 2 minutes. When the memory card is
full, it overwrites the oldest recordings.
Caution: Make sure that the charger matches the camera’s specifications
(3 VDC, 2.0 W).
There are two possibilities:
•Camera off, batteries installed: Plug the camera into a suitable USB
charger (3 VDC, 2.0 W). The camera switches on and starts loop
recording automatically. Press the record button to stop recording.
When you unplug the USB charger, the camera stops recording and
switches off after 2 seconds.
•Camera off, no batteries installed: Plug the camera into a suitable USB
charger (3 VDC, 2.0 W). The camera switches on after 6 seconds and
starts loop recording automatically. Press the record button to stop
recording. When you unplug the USB charger, the camera switches off
immediately.
7.6 Playing Video
Playing on TV
1. Switch the camera on.
2. Unscrew the cap [1] from the back of the camera.
3. Insert the black plug of the video cable (included) in the video output
[8] of the camera.
4. Insert the other end (yellow, red, white plugs) of the cable in the
corresponding RCA connectors on your TV.
The camera display shows “AU”.
5. Make sure the TV is set to the correct channel.
6. On the camera, press the menu button to select the video file you want
to play.
7. Press the record button to start playback.

CAMCOLVC18
V. 02 – 02/10/2012 10 ©Velleman nv
8. Press the record button to pause/continue.
9. Press the menu button to stop playback. You can now select a different
video file for playback.
Tip: During playback on TV, you can quickly delete the video file from the
memory card by pressing and holding the menu button. If there are no files
on the memory card, the TV displays “NO FILE”.
Playing on PC
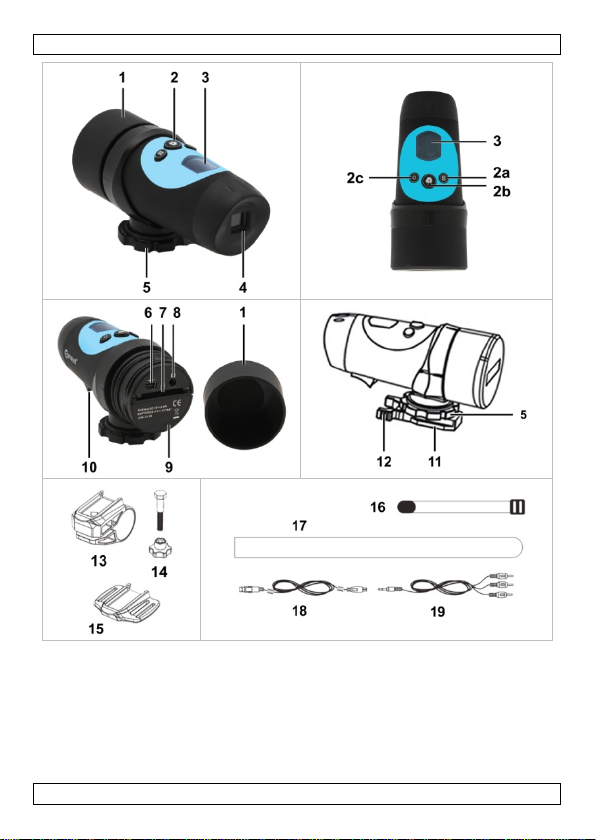
1. Unscrew the cap [1] from the back of the camera.
2. Insert one end of the USB cable (included) in the mini-USB port [6] of
the camera.
3. Insert the other end in a free USB port on your computer.
The camera display shows “PC”.
4. On the pc, open My Computer and look for the drive that represents
the camera.
You can copy, delete, or view the files from here.
Note: to disconnect the camera from the pc, use Windows’ Safely Remove
Hardware function to stop the device before you unplug the USB cable.
7.7 Deleting Video Files
Caution: Back up the video files to your pc first, if necessary.
1. Make sure that recording is stopped.
2. Press and hold the menu button for 2 seconds.
3. Press the record button repeatedly.
The display shows ”D” (for “delete”). On the display blinks, in sequence:
o“NO”: press the record button to go to the next option.
o“ONE”: press the menu button to delete the last recorded video file.
“ONE” stops blinking while the camera deletes the file. Wait until
“ONE” starts blinking again: then you can delete the next recorded
video file. Or, press the record button to exit.
o“ALL”: press the menu button to delete all recorded video files.
“ALL” stops blinking while the camera deletes the files. Wait until
“ALL” starts blinking again, then press the record button to exit.
7.8 Using as a Webcam
You can use the camera as a webcam if you install the included software.
1. Make sure the camera is not connected to your pc.
2. Insert the included CD in your computer's CD drive.
3. Locate and double-click the STK03N icon on the CD-ROM.
4. Follow the instructions of the installation wizard.
5. When the software is installed, make sure the camera is switched off.
6. Unscrew the cap [1] from the back of the camera.
7. Insert one end of the USB cable (included) in the mini-USB port [6] of
the camera.

CAMCOLVC18
V. 02 – 02/10/2012 11 ©Velleman nv
8. While you press and hold the menu button on the camera, plug the
camera in a free USB port on your computer.
9. Release the menu button only when you hear a beep and the camera
display lights. The camera display shows “PC”.
Windows® automatically recognises the device and installs the driver.
Depending on the settings, Windows may (not) display the message
“Your new hardware is installed and ready for use”.
The camera is now ready for use as a webcam.
8. Troubleshooting
There is nothing on the display
Make sure the batteries are installed correctly.
Replace empty batteries.
The camera shuts off automatically
The batteries are empty. Replace them immediately.
I cannot record video
Make sure there is sufficient free space on the memory card. The display
indicates how much time there is left for recording.
Make sure the memory card is not locked. Make sure the lock switch on the
side of the memory card is in the correct position.
The camera stops recording automatically
The memory card is full.
•Back up the files on the card to your pc, then delete files on the card to
create free space.
•Insert a new, empty card.
I connected the camera to my pc, but I cannot find it in My
Computer
Make sure that each end of the USB cable is properly connected.
Make sure the USB port on the pc is working properly. Try connecting
another USB device and see if it functions well. If no, the USB port may be
malfunctioning.
The video does not play on my TV
Make sure that each end of the video cable is properly connected.
Make sure that the camera is switched on.
The remaining recording time is not accurate
The remaining recording time is an estimate. It depends not only on the
time already recorded, but also on the conditions in which you have
recorded. Recording in high-contrast conditions, such as outdoors, requires
more memory space than recording in low-contrast conditions, such as
indoors.

CAMCOLVC18
V. 02 – 02/10/2012 12 ©Velleman nv
9. Cleaning and maintenance
•Wipe the exterior of the device with a moist, lint-free cloth. Do not use
alcohol or solvents.
•Use a lens blower to blow dust off the lens, then wipe gently with a soft,
lint-free cloth. Do not use household cleaning fluids to clean the lens.
•Remove the batteries from the device if it will not be used for a long
time. Old batteries can begin to leak and damage the device.
•Remove the memory card from the device if it will not be used for a
long time.
•Store the device in a dry, well-ventilated, and dust-free place at room
temperature. Do not leave the camera in places exposed to extremely
high temperatures, such as under direct sunlight, for extended periods
of time. This may affect the camera housing and internal components.
10. Technical Specifications
storage capacity max. 32 GB SD-HC card (not incl.)
pick-up element 1.3 Megapixel CMOS
viewing angle 54°
recording format MJPEG (audio PCM)
frame rate (fps) 20
video resolution 1280 x 720 pixels
recording capacity ± 150 MB/min
power supply 2 x 1.5V AA (LR6), not incl.
dimensions Ø 47 x 110 mm
weight 160 g
working temperature -10°C ~ 50°C
Use this device with original accessories only. Velleman nv cannot
be held responsible in the event of damage or injury resulting from
(incorrect) use of this device. For more info concerning this product
and the latest version of this manual, please visit our website
www.velleman.eu. The information in this manual is subject to
change without prior notice.
All registered trademarks and trade names are properties of their respective
owners and are used only for the clarification of the compatibility of our
products with the products of the different manufacturers. Windows,
Windows XP, Windows Vista, Windows 7, are registered trademarks of
Microsoft Corporation in the United States and other countries.
© COPYRIGHT NOTICE
The copyright to this manual is owned by Velleman nv. All worldwide
rights reserved. No part of this manual may be copied, reproduced, translated or
reduced to any electronic medium or otherwise without the prior written consent of
the copyright holder.

V. 02 – 0
2
1. Inl
e
Aan alle
Belangri
j
D
n
t
b
e
d
brengen.
Hebt u v
r
betreffe
n
Dank u v
o
in gebrui
k
installeer
2. Ve
i
H
o
W
b
e
E
r
t
o
3. Al
g
Raadplee
g
handleidi
n
•Besc
h
bedi
e
•Besc
h
•Leer
e
gebr
u
•Om
v
door
gara
n
•Gebr
u
gebr
u
•De g
a
richtl
2
/10/2012
GEBRU
I
e
iding
ingezetenen v
a
j
ke milieu-info
r
D
it symbool op
h
n
a zijn levenscy
c
t
oebrengen aan
h
b
atterijen) niet
b
e
en gespecialise
e
d
it toestel naar
u
Respecteer de p
l
r
agen, contact
e
n
d de verwijde
r
o
or uw aankoop!
k
neemt. Werd h
e
het dan niet en
r
i
ligheidsinst
r
o
ud buiten het b
e
W
aarschuwing:
S
e
nt om ongelukk
e
r
zijn geen door
d
o
estel. Voor ond
e
g
emene rich
t
g
de Velleman
®
n
g.
h
erm tegen zwa
r
e
ning.
h
erm tegen stof
e
e
erst de functie
s
u
iken.
v
eiligheidsredene
wijzigingen die
d
n
tie.
u
ik het toestel e
n
u
ik vervalt de ga
r
ar
antie geldt nie
t
ijnen in deze ha
n
CAMCOLV
C
13
I
KERSH
A
a
n de Europes
e
r
matie betreff
e
h
et toestel of de
v
c
lus wordt wegg
e
h
et milieu. Gooi
d
b
ij het gewone h
u
e
rd bedrijf terec
h
u
w verdeler of n
a
l
aatselijke milieu
e
er dan de pla
a
r
ing.
Lees deze handl
e
t toestel besch
a
r
aadpleeg uw de
r
ucties
e
reik van kinder
e
S
tel de videoca
m
e
n te voorkome
n
d
e gebruiker ver
v
e
rhoud of reserv
e
t
lijnen
®
service- en k
w
r
e schokken. Ver
m
e
n extreme tem
p
s
van het toestel
n mag u geen w
i
d
e gebruiker hee
f
n
kel waarvoor h
e
r
antie.
t
voor schade do
o
n
dleiding en uw
d
C
18
A
NDLEID
e
Unie
e
nde dit produc
t
v
erpakking geeft
e
worpen, dit toes
d
it toestel (en e
v
u
ishoudelijke afv
a
h
tkomen voor re
c
a
ar een lokaal re
c
wetgeving.
a
tselijke autori
t
eiding grondig v
o
a
digd tijdens het
aler.
e
n en onbevoeg
d
m
era niet in terwi
j
n
.
v
angbare onder
d
e
onderdelen, con
t
w
aliteitsgarant
i
m
ijd brute krach
t
p
eraturen.
kennen voor u h
i
jzigingen aanbr
e
f
t aangebracht v
a
e
t gemaakt is. Bi
j
o
r het negeren v
d
ealer zal de ver
a
©Velleman
n
ING
t
aan dat, als het
tel schade kan
v
entuele
a
l; het moet bij
c
yclage. U moet
c
yclagepunt
t
eiten
o
or u het toestel
transport,
d
en.
j
l u in beweging
d
elen in dit
t
acteer uw deal
e
i
eachteraan dez
t
tijdens de
et gaat
e
ngen. Schade
a
lt niet onder de
j
onoordeelkundi
an bepaalde
a
ntwoordelijkhei
d
n
v
e
r.
e
g
d

CAMCOLVC18
V. 02 – 02/10/2012 14 ©Velleman nv
afwijzen voor defecten of problemen die hier rechtstreeks verband mee
houden.
•Bewaar deze handleiding voor verdere raadpleging.
4. Eigenschappen
•draagbare camera geleverd met meerdere montagebeugels
•opname op SD-kaart (niet meegelev.)
•opnamekwaliteit: 720p HD-video – 20 fps
•gemakkelijke en gebruiksvriendelijke configuratie
•geleverd met USB-kabel, A/V-kabel en montagebeugels
•weerbestendige behuizing
•display met witte LED-achtergrondverlichting.
5. Omschrijving
Raadpleeg de afbeeldingen op pagina 2van deze handleiding.
1 kap 9 batterijvak
2 bedieningsknoppen 10 microfoon
2a menuknop 11 cameravoet
2b opnameknop 12 klem voor cameravoet
2c aan/uit-knop 13 stuurbeugel
3 display 14 schroef en bout
4 lens 15 helmbeugel
5 ring 16 klittenband
6 mini-USB-poort 17 rubberen band
7 slot voor SD-kaart 18 USB-kabel
8 video-uitgang 19 videokabel
6. Installatie
6.1 De cameravoet aansluiten
Indien de voet nog niet is aangesloten, draai de voet [11] in de onderkant
van de camera (zie afbeelding A). Met de voet kunt u de camera vastzetten:
•op het stuur van uw fiets met de stuurbeugel
•op uw helm met het klittenband, rubberen band of helmbeugel
•of rechtstreeks op een driepoot, via het schroefgat in de voet.
6.2 De camera monteren op een stuur
1. Schuif de stuurbeugel [13] op het stuur (zie afbeelding B).
Tip: Indien nodig, plaats één of meerdere rubberen plaatjes tussen de
beugel en het stuur voor een stevige greep.

V. 02 – 0
2
2. Beve
s
3. Schu
i
vast
k
4. Stel
d
daar
n
5. Om
d
beug
e
afbe
e
6. Om
d
van
d
6.3 De
c
1. Haal
afbe
e
2. Trek
afbe
e
3. Zorg
4. Schu
i
5. Stel
d
opni
e
6.4 De
c
1. Haal
2. Plaat
s
klitte
3. Trek
zijn
p
4. Schu
i
5. Stel
d
opni
e
7. Ge
b
7.1 Bat
t
U
g
e
m
Vervang
d
scherm.
W
en de ca
m
Opmerki
1. Zorg
2. Draai
2
/10/2012
s
tig de beugel m
i
f de cameravoe
t
k
likt (zie afbeeldi
n
d
e camerapositie
n
a opnieuw vast
d
e beugelpositie
t
e
l opnieuw op h
e
e
lding E).
d
e camera opnie
u
d
e cameravoet s
a
c
amera monte
r
de rubberen ban
e
lding F).
de band over de
e
lding G).
ervoor dat de b
a
i
f de camera in
d
d
e camerapositie
e
uw vast om de
c
c
amera monte
r
het klittenband
[
s
de beugel op d
nband door de v
e
het klittenband
s
p
laats te houden.
i
f de camera in
d
d
e camerapositie
e
uw vast om de
c
b
ruik
t
erijen
mag batterijen
n
e
en alkalinebatt
e
m
ilieuwetgeving.
H
d
e batterijen wa
n
W
anneer de batt
e
m
era schakelt au
t
ng: vervang alti
j
ervoor dat de c
a
de kap [1] los
v
CAMCOLV
C
15
et de schroef en
t
in de stuurbeug
n
g D).
in: draai de rin
g
om de camera g
o
t
e regelen: schr
o
e
t stuur, draai da
u
w van de beuge
a
men en schuif d
r
en op een hel
m
d [17] door de
h
helm met de be
a
nd stevig vastzi
t
d
e beugel (zie af
b
in: draai de rin
g
c
ame
r
a goed op
h
r
en op een hel
m
[
16] door de hel
e helm in de ge
w
e
ntilatieopening
e
s
trak en bevesti
g
d
e beugel (zie af
b
in: draai de rin
g
c
amera goed op
h
n
ooit doorboren
o
e
rijen. Gooi batte
H
oud batterijen
u
n
neer het lege b
a
e
rijen volledig le
e
t
omatisch uit na
j
d alle batterijen
a
mera uitgescha
k
v
an de achterka
n
C
18
bout [14] (zie
a
el totdat deze o
p
g
[5] los, stel de
o
ed op haar plaa
o
ef de bout [14]
arna de bout op
n
l te nemen, dru
k
e camera uit de
m
met de rubbe
h
elmbeugel [15
]
ugel in de gewe
n
t
rond de helm.
b
eelding H).
g
[5] los, stel in,
h
aar plaats te h
o
m
met klittenba
mbeugel [15] (
z
w
enste positie en
e
n van de helm (
g
de uiteinden o
m
b
eelding J).
g
[5] los, stel in,
h
aar plaats te h
o
o
f in het vuur go
o
rijen weg volge
n
u
it het bereik va
n
a
tterij-icoon
e
g zijn, hoort u
e
20 seconden.
tegelijk.
k
eld is.
n
t van de camer
a
©Velleman
n
a
fbeelding C).
p
haar plaats
positie in, draai
ts te houden.
los, plaats de
n
ieuw vast (zie
k
de klem [12]
beugel.
ren band
]
(zie
n
ste positie (zie
draai daarna
o
uden.
nd
z
ie afbeelding F).
haal het
zie afbeelding I)
m
de beugel op
draai daarna
o
uden.
o
ien. Herlaad
n
s de plaatselijke
n
kinderen.
verschijnt op he
e
en lange piepto
o
a
.
n
v
.
t
o
n

CAMCOLVC18
V. 02 – 02/10/2012 16 ©Velleman nv
3. Duw het klepje van het batterijvak [9] naar beneden om het batterijvak
te openen.
4. Plaats twee nieuwe alkalinebatterijen type AA van 1.5 V (LR6, niet
meegelev.) conform de polariteitsymbolen aangegeven binnenin het
batterijvak. Gebruik enkel batterijen van hetzelfde type en merk.
5. Sluit het batterijvak.
6. Draai de kap [1] opnieuw vast op de achterkant van de camera.
7.2 In –en uitschakelen
Om de camera in te schakelen, houd de aan/uit-knop 2 seconden
ingedrukt. U hoort een pieptoon en het scherm licht op.
Het scherm geeft de resterende opnametijd weer in uren en minuten.
Opmerking: Is de geheugenkaart vol, of is er geen geheugenkaart in de
camera, dan verschijnt er “FULL” op scherm.
Om de camera uit te schakelen, houd de aan/uit- knop 2 seconden
ingedrukt. Op het scherm verschijnt “OFF” en u hoort een pieptoon. De
camera schakelt uit na 1 seconde.
7.3 Geheugenkaart
Aanbevelingen:
•Gebruik snelle SD-kaarten voor het beste resultaat en kwaliteit.
•Formatteer de geheugenkaart voor gebruik.
Een geheugenkaart plaatsen
1. Zorg ervoor dat de camera uitgeschakeld is.
2. Draai de kap [1] los van de achterkant van de camera.
3. Plaats een SD-kaart (niet meegelev.) in het kaartslot [7]. Duw de kaart
naar binnen, totdat deze op zijn plaats vastklikt.
4. Om de SD-kaart opnieuw te verwijderen, duw voorzichtig tegen de
kaart tot deze uit de sleuf springt.
5. Draai de kap [1] opnieuw op de achterkant van de camera.
Een geheugenkaart formatteren
Opgelet: Formatteren wist alle gegevens op de geheugenkaart. Indien
nodig, sluit de camera aan op een pc om een back-up te nemen vóór het
formatteren.
1. Zorg ervoor dat de camera uitgeschakeld is.
2. Plaats de geheugenkaart in het kaartslot [7].
3. Schakel de camera in.
4. Houd de opnameknop 5 seconden ingedrukt.
Op het scherm verschijnt “FOR” ( voor “formatting’).
5. Wacht totdat het scherm de resterende opnametijd opnieuw weergeeft.
De geheugenkaart is nu leeg en gebruiksklaar.

CAMCOLVC18
V. 02 – 02/10/2012 17 ©Velleman nv
7.4 Configuratie
De videoresolutie instellen
U kunt de resolutie van de opgenomen video instellen op 720p (1280×720)
of VGA (640x480).
Om de resolutie in te stellen:
1. Schakel de camera in.
2. Houd de menuknop 2 seconden ingedrukt.
Het icoontje 720p knippert.
3. Druk eenmaal op de opnameknop om over te schakelen naar VGA-
modus. Het VGA-icoontje knippert.
4. Druk op de menuknop om te bevestigen.
Opmerking: De resterende opnametijd wordt aangepast aan de resolutie. U
kunt langer opnemen in VGA-modus (lagere resolutie) dan in 720p-modus.
Datum en tijd instellen
1. Schakel de camera in.
2. Houd de menuknop 2 seconden ingedrukt.
Het icoontje 720p knippert.
3. Druk herhaaldelijk op de opnameknop totdat het scherm “ALL”
weergeeft.
4. Houd de menuknop 2 seconden ingedrukt.
“Y” (voor “year”) en het derde cijfer van het jaartal knipperen op het
scherm.
5. Druk herhaaldelijk op de opnameknop om het cijfer in te stellen. Druk
daarna op de menuknop om te bevestigen en verder te gaan met het
volgend cijfer.
6. Herhaal deze stappen voor het instellen van het laatste cijfer van het
jaartal, maand (“M”), dag (“D”), uur (“H”), en minuten (“M”).
De camera keert terug naar de opnamemodus na het instellen van alle
cijfers.
7.5 Video-opname
Normale opname
1. Zorg ervoor dat er een geheugenkaart geplaatst is in de camera.
2. Schakel de camera in. De resterende opnametijd wordt op het scherm
weergegeven.
3. Druk op de opnameknop om met de opname te beginnen.
De achtergrondverlichting van het scherm knippert. De opnametijd
wordt rechtsonder op het scherm weergegeven in minuten en seconden.
Het videobestand wordt om de 5 minuten opgeslagen.

CAMCOLVC18
V. 02 – 02/10/2012 18 ©Velleman nv
4. Druk nogmaals op de opnameknop om de opname te stoppen.
De achtergrondverlichting van het scherm begint te knipperen. De
resterende opnametijd wordt op het scherm weergegeven.
Opmerking: Wanneer de geheugenkaart vol is, verschijnt er “FULL” op het
scherm en de camera stopt de opname.
Doorlopende lusopname
Als u de camera gebruikt met een USB-lader, dan kunt u doorlopend
opnemen. Het videobestand wordt om de 2 minuten opgeslagen. Wanneer
de geheugenkaart vol is, worden de oudste bestanden overschreven.
Opgelet: Zorg ervoor dat de lader voldoet aan de specificaties van de
camera (3 VDC, 2.0 W).
Er bestaan 2 mogelijkheden:
•Camera is uitgeschakeld, batterijen zijn geplaatst: Sluit de camera aan
op een geschikte USB-lader (3 VDC, 2.0 W). De camera schakelt in en
en start de doorlopende lusopname automatisch. Druk op de
opnameknop om de opname te stoppen. Wanneer u de USB-lader
loskoppelt, stopt de camera met de opname en schakelt uit na 2
seconden.
•Camera is uitgeschakeld, geen batterijen: Sluit de camera aan op een
geschikte USB-lader (3 VDC, 2.0 W). Na 6 seconden schakelt de camera
in en start de doorlopende lusopname automatisch. Druk op de
opnameknop om de opname te stoppen. Wanneer u de USB-lader
loskoppelt, schakelt de camera onmiddellijk uit.
7.6 Video afspelen
Afspelen op tv
1. Schakel de camera in.
2. Draai de kap [1] los van de achterkant van de camera.
3. Sluit de zwarte connector van de videokabel (meegeleverd) aan op de
video-uitgang [8] van de camera.
4. Verbind het andere uiteinde (gele, rode, witte connectoren) van de
kabel met de overeenstemmende RCA-aansluitingen van uw tv.
Het scherm geeft “AU” weer.
5. Zorg ervoor dat de tv is ingesteld op het juiste kanaal.
6. Op de camera, druk op de menuknop om het gewenste videobestand af
te spelen.
7. Druk op de opnameknop om het afspelen te starten.
8. Druk op de opnameknop om te onderbreken/verder te gaan.
9. Druk op de menuknop om het afspelen te stoppen. U kunt nu een ander
videobestand selecteren om af te spelen.
Tip: Tijdens het afspelen op tv, kunt u het videobestand snel wissen van de
geheugenkaart door de menuknop ingedrukt te houden. Staan er geen
bestanden op de geheugenkaart, dan verschijnt er “NO FILE” op het tv-
scherm.

CAMCOLVC18
V. 02 – 02/10/2012 19 ©Velleman nv
Afspelen op pc
1. Draai de kap [1] los van de achterkant van de camera.
2. Sluit één uiteinde van de USB-kabel (meegeleverd) aan op de mini
USB-poort [6] van de camera.
3. Sluit het andere uiteinde aan op een vrije USB-poort op uw computer.
Op het camerascherm verschijnt “PC”.
4. Op de pc, open My Computer en zoek naar de drive van de camera.
Van hieruit kunt u de bestanden kopiëren, verwijderen of bekijken.
Opmerking: om de camera los te koppelen van de pc, gebruik de Windows-
functie Safely Remove Hardware om het toestel te deactiveren voordat u
de USB-kabel loskoppelt.
7.7 Videobestanden wissen
Opgelet: Maak eerst een back-up van de videobestanden naar uw pc,
indien nodig.
1. Zorg ervoor dat de video-opname is stopgezet.
2. Houd de menuknop 2 seconden ingedrukt.
3. Druk herhaaldelijk op de opnameknop.
Op het scherm verschijnt ”D” (voor “delete”). Op het scherm knippert,
sequentieel:
o“NO”: druk op de opnameknop om naar de volgende optie te gaan.
o“ONE”: druk op de menuknop om het laatst opgenomen
videobestand te wissen. “ONE” stopt met knipperen tijdens het
wissen van het bestand. Wacht totdat “ONE” opnieuw knippert: dan
u kunt het volgende opgenomen videobestand wissen. Of, druk op
de opnameknop om het menu te verlaten.
o“ALL”: druk op de menuknop om alle opgeslagen videobestanden te
wissen. “ALL” stopt met knipperen tijdens het wissen van de
bestanden. Wacht totdat “ALL” opnieuw knippert, druk daarna op
de opnameknop om het menu te verlaten.
7.8 Als webcam gebruiken
U kunt de camera als webcam gebruiken als u de meegeleverde software
installeert.
1. Zorg ervoor dat de camera niet aangesloten is op uw pc.
2. Plaats de meegeleverde CD in het cd-romstation van uw computer.
3. Lokaliseer en dubbelklik op het STK03N-icoontje op de cd-rom.
4. Volg de instructies in de installatiewizard.
5. Schakel de camera uit, wanneer de software geïnstalleerd is.
6. Draai de kap [1] los van de achterkant van de camera.
7. Sluit één uiteinde van de USB-kabel (meegeleverd) aan op de mini
USB-poort [6] van de camera.

CAMCOLVC18
V. 02 – 02/10/2012 20 ©Velleman nv
8. Terwijl u de menuknop ingedrukt houdt, sluit de camera aan op een
vrije USB-poort op uw computer.
9. Laat de menuknop pas los wanneer u een pieptoon hoort en het
camerascherm oplicht. Op het scherm verschijnt “PC”.
Windows® herkent het toestel automatisch en installeert de driver.
Afhankelijk van de instellingen, geeft Windows het bericht (of niet)
“Your new hardware is installed and ready for use” ("Uw nieuwe
hardware is geïnstalleerd en is gebruiksklaar").
De camera kan nu gebruikt worden als webcam.
8. Problemen oplossen
Er verschijnt niets op het scherm
Zorg ervoor dat de batterijen correct geplaatst zijn.
Vervang lege batterijen.
De camera schakelt automatisch uit
De batterijen zijn leeg. Vervang deze onmiddellijk.
Ik kan geen video opnemen
Zorg ervoor dat er voldoende vrije ruimte is op de geheugenkaart. Het
scherm geeft de resterende opnametijd weer.
Verifieer of de geheugenkaart niet vergrendeld is. Zorg ervoor dat de
vergrendelschakelaar aan de zijkant van de geheugenkaart in de correcte
positie staat.
De camera stopt de opname automatisch
De geheugenkaart is vol.
•Maak een back-up van de bestanden op de kaart naar uw pc, wis
daarna de bestanden op de kaart om vrije ruimte te creëren.
•Plaats een nieuwe, lege kaart.
De camera is aangesloten op mijn pc, maar ik kan deze niet
terugvinden in My Computer
Zorg ervoor dat elk uiteinde van de USB-kabel goed aangesloten is. Verifieer
of de USB-poort op de pc correct werkt. Probeer om een ander USB-toestel
aan te sluiten en controleer of dit goed functioneert. Is dit niet het geval,
dan is het mogelijk dat de USB-poort slecht functioneert.
De video speelt niet af op mijn tv
Zorg ervoor dat elk uiteinde van de videokabel goed aangesloten is.
Verifieer of de camera ingeschakeld is.
De resterende opnametijd is onnauwkeurig
De resterende opnametijd is slechts een schatting. De opnametijd hangt niet
enkel af van de reeds opgenomen tijd, maar ook van de omstandigheden
van de opname. Een opname in omstandigheden met een hoog contrast,
Other manuals for CAMCOLVC18
1
Table of contents
Languages:
Other Velleman Camcorder manuals

Velleman
Velleman CAMCOLVC6 User manual

Velleman
Velleman CAMCOLVC2 User manual

Velleman
Velleman CAMCOLC User manual

Velleman
Velleman CAMW7 User manual

Velleman
Velleman CAMCOLVCN User manual

Velleman
Velleman CAMCOLVC13 User manual

Velleman
Velleman CAMTVI5 User manual

Velleman
Velleman CM1F005 (CAMCOLVC9) User manual

Velleman
Velleman CAMCOLVC1GB User manual

Velleman
Velleman CAMTVI16 User manual