manuals.online logo
Brands
  1. Home
  2. •
  3. Brands
  4. •
  5. VelLight
  6. •
  7. Lighting Equipment
  8. •
  9. VelLight LEDS12CWW User manual

VelLight LEDS12CWW User manual

Other VelLight Lighting Equipment manuals

VelLight XMPL9 User manual

VelLight

VelLight XMPL9 User manual

VelLight LEDA202 User manual

VelLight

VelLight LEDA202 User manual

VelLight LEDS06RGB User manual

VelLight

VelLight LEDS06RGB User manual

VelLight LEDA212NW User manual

VelLight

VelLight LEDA212NW User manual

VelLight LEDS09RGB User manual

VelLight

VelLight LEDS09RGB User manual

VelLight ERL45B User manual

VelLight

VelLight ERL45B User manual

VelLight LEDS15RGB User manual

VelLight

VelLight LEDS15RGB User manual

VelLight XML22 User manual

VelLight

VelLight XML22 User manual

VelLight LEDA204WW User manual

VelLight

VelLight LEDA204WW User manual

VelLight LEDA210NW User manual

VelLight

VelLight LEDA210NW User manual

VelLight LEDC16 User manual

VelLight

VelLight LEDC16 User manual

VelLight LEDA60RGB User manual

VelLight

VelLight LEDA60RGB User manual

VelLight LEDA60CW User manual

VelLight

VelLight LEDA60CW User manual

VelLight LEDA77NW User manual

VelLight

VelLight LEDA77NW User manual

Popular Lighting Equipment manuals by other brands

Life 39.9F70020C quick start guide

Life

Life 39.9F70020C quick start guide

EuroLite LED ML-20 user manual

EuroLite

EuroLite LED ML-20 user manual

LIGMAN OD-50141 installation manual

LIGMAN

LIGMAN OD-50141 installation manual

Home Accents Holiday 1002461144 instructions

Home Accents Holiday

Home Accents Holiday 1002461144 instructions

Experia IRiS Ripple Light instruction manual

Experia

Experia IRiS Ripple Light instruction manual

Erco Gecko Mounting instructions

Erco

Erco Gecko Mounting instructions

Inter-lux ZTA.100.Surface Installation and maintenance instructions

Inter-lux

Inter-lux ZTA.100.Surface Installation and maintenance instructions

Whelen Engineering Company TN Series installation guide

Whelen Engineering Company

Whelen Engineering Company TN Series installation guide

IKEA BJÖRKSPIREA manual

IKEA

IKEA BJÖRKSPIREA manual

Toolland PM 6640 instruction manual

Toolland

Toolland PM 6640 instruction manual

GTD GTD-LP200 user manual

GTD

GTD GTD-LP200 user manual

LIVARNO home 1105-W-UK manual

LIVARNO home

LIVARNO home 1105-W-UK manual

ProLights EclPar IPMFC user manual

ProLights

ProLights EclPar IPMFC user manual

Velvet EVO Series user manual

Velvet

Velvet EVO Series user manual

IDTOLIGHT GENT installation instructions

IDTOLIGHT

IDTOLIGHT GENT installation instructions

MAYTONI S35 installation manual

MAYTONI

MAYTONI S35 installation manual

MaxLite MLFP14DP4535 user manual

MaxLite

MaxLite MLFP14DP4535 user manual

SLV Elektronik 550621 instruction manual

SLV Elektronik

SLV Elektronik 550621 instruction manual

manuals.online logo
manuals.online logoBrands
  • About & Mission
  • Contact us
  • Privacy Policy
  • Terms and Conditions

Copyright 2025 Manuals.Online. All Rights Reserved.

LEDS12CWW
FLEXIBLE LED STRIP, CONTROLLER AND POWER SUPPLY
LEDSTRIP, CONTROLLER EN VOEDING
FLEXIBLE LED, CONTRÔLEUR ET ALIM
CINTA DE LEDs FLEXIBLE, CONTROLADOR Y ADAPTADOR
FLEXIBLER LED-LEISTE, CONTROLLER UND NETZTEIL
FAIXA LED FLEXÍVEL, CONTROLADOR E ALIMENTAÇÃO
USER MANUAL 4
GEBRUIKERSHANDLEIDING 9
MODE D'EMPLOI 14
MANUAL DEL USUARIO 19
BEDIENUNGSANLEITUNG 24
MANUAL DO UTILIZADOR 29
LEDS12CWW
V. 02 –22/10/2015 2 ©Velleman nv
A1
A2
A3
A4
LEDS12CWW
V. 02 –22/10/2015 3 ©Velleman nv
B1
B2
LEDS12CWW
V. 02 –22/10/2015 4 ©Velleman nv
USER MANUAL
1. Introduction
To all residents of the European Union
Important environmental information about this product
This symbol on the device or the package indicates that
disposal of the device after its lifecycle could harm the
environment. Do not dispose of the unit (or batteries) as
unsorted municipal waste; it should be taken to a
specialized company for recycling. This device should be
returned to your distributor or to a local recycling service. Respect
the local environmental rules.
If in doubt, contact your local waste disposal authorities.
Thank you for choosing Vellight! Please read the manual thoroughly
before bringing this device into service. If the device was damaged in
transit, do not install or use it and contact your dealer.
2. Safety Instructions
Keep this device away from children and unauthorized
users.
There are no user-serviceable parts inside the device. Refer
to an authorized dealer for service and/or spare parts.
Warning: Do not puncture the batteries or throw them in
fire as they may explode. Do not attempt to recharge non-
rechargeable (alkaline) batteries. Dispose of batteries in
accordance with local regulations. Keep batteries away from
children.
Indoor use only. Keep this device away from rain,
moisture, splashing and dripping liquids.
LEDS12CWW
V. 02 –22/10/2015 5 ©Velleman nv
Keep at a distance of at least 0,5 m from any illuminated
object.
This is a Safety Class 3 device.
3. General Guidelines
Refer to the Velleman®Service and Quality Warranty on the last
pages of this manual.
Keep away from dust and extreme temperatures.
Protect form shocks and abuse. Avoid brute force when operating.
Familiarise yourself with the functions of the device before actually
using it.
All modifications of the device are forbidden for safety reasons.
Damage caused by user modifications to the device is not covered
by the warranty.
Only use the device for its intended purpose. Using the device in
an unauthorised way will void the warranty.
Damage caused by disregard of certain guidelines in this manual
is not covered by the warranty and the dealer will not accept
responsibility for any ensuing defects or problems.
Keep this manual for future reference.
4. Features
flexible PCB (white)
contains 300 high brightness LEDs (type 3528)
controller with different programs:
ocold white and warm white mixing
oanimated programme
controlled through infrared remote (incl.)
can be cut every 6 LEDs (10 cm)
power supply included
for illuminated advertising and marking
self-adhesive
LEDS12CWW
V. 02 –22/10/2015 6 ©Velleman nv
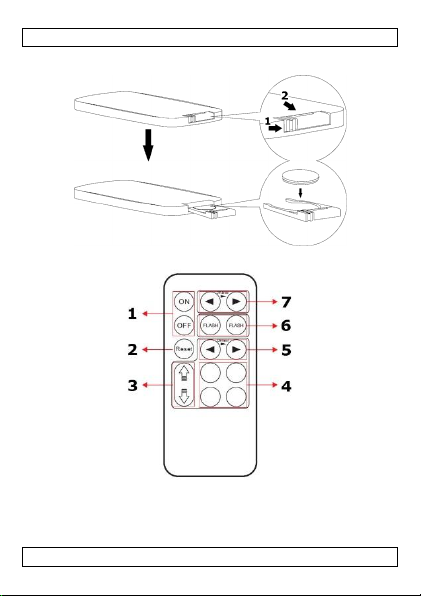
5. Remote Control Overview
Refer to illustration [B2] on page 3 of this manual.
1
on/off
2
reset cold and warm white to 100 % intensity
3
colour temperature adjustment
4
quick colour temperature adjustment
5
dimming
6
cold and warm white flash function
7
speed setting
6. Installation
Guidelines
Avoid installing the LED strips near heat sources such as ovens,
toasters, etc.
Never use the LED strip when it is coiled up as this can cause
overheating.
Before mounting, ensure the desired surface is flat and clean of
any grease, dirt or debris.
Avoid tight bends in the LED strip.
Observe the correct polarity when re-joining cable sections. The
polarity is marked at regular intervals along the LED strip.
Cut the strip using sharp scissors or a craft knife with a fresh
blade. Cut directly on the marked line. Never cut the LED strip
when it is pugged in.
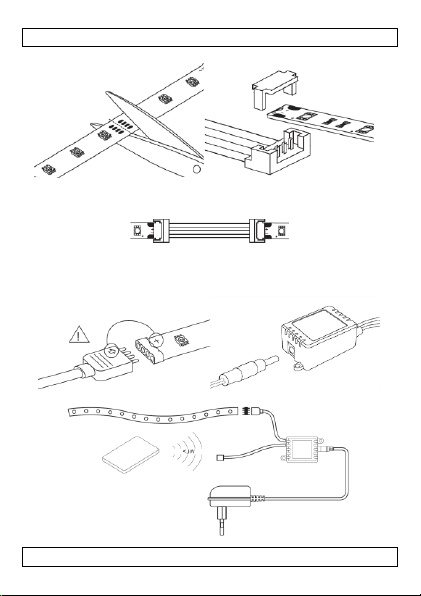
Installation
Refer to the illustrations on page 2 of this manual.
1. Mount the LED strip in the desired location. The LED strip can be
cut every 10 cm (see [A1]). Protect the cut ends to avoid short-
circuits.
2. Connect the LED strips to the controller (see [A2]). Make sure
to connect matching wire colours and do not short-circuit any
wires. Connecting tools are not included.
3. Connect the included power adapter to the controller (see
[A3]).
4. Plug the adapter into the mains. Refer to illustration [A4] for a
general connection scheme.
LEDS12CWW
V. 02 –22/10/2015 7 ©Velleman nv
7. Remote Control
Battery
Refer to illustration [B1] on page 3 of this manual.
The remote control uses 1 battery type 3 V lithium CR2025
(included). Remove the tag from the battery compartment before
use.
1. To (re)place a battery, press on the side of the battery cover
and pull to slide open.
2. Insert the battery with the correct polarity and close the battery
compartment by pushing back into the housing of the remote
control until it snaps into place.
Operation
1. Aim the remote control towards the IR LED of the controller to
control the output of the LED strip.
2. Switch on the LED strip with the ON button on the remote
control. To switch it off again, press the OFF button.
3. Refer to chapter 5. Overview for more information about
operating the remote control.
8. Technical Specifications
IP rating
IP61
coating
silicone
colour
warm white/cold white
viewing angle
120°
LED spacing
16,5 mm
power supply
12 VDC 24 W (adapter incl.)
dimensions
5 m x 8 mm
weight
420 g
Use this device with original accessories only. Velleman nv
cannot be held responsible in the event of damage or injury
resulting from (incorrect) use of this device. For more info
concerning this product and the latest version of this manual,
please visit our website www.velleman.eu. The information in
this manual is subject to change without prior notice.
LEDS12CWW
V. 02 –22/10/2015 8 ©Velleman nv
© COPYRIGHT NOTICE
The copyright to this manual is owned by Velleman nv. All
worldwide rights reserved. No part of this manual may be copied,
reproduced, translated or reduced to any electronic medium or
otherwise without the prior written consent of the copyright holder.
LEDS12CWW
V. 02 –22/10/2015 9 ©Velleman nv
GEBRUIKERSHANDLEIDING
1. Inleiding
Aan alle ingezetenen van de Europese Unie
Belangrijke milieu-informatie betreffende dit product
Dit symbool op het toestel of de verpakking geeft aan dat,
als het na zijn levenscyclus wordt weggeworpen, dit toestel
schade kan toebrengen aan het milieu. Gooi dit toestel (en
eventuele batterijen) niet bij het gewone huishoudelijke
afval; het moet bij een gespecialiseerd bedrijf
terechtkomen voor recyclage. U moet dit toestel naar uw verdeler of
naar een lokaal recyclagepunt brengen. Respecteer de plaatselijke
milieuwetgeving.
Hebt u vragen, contacteer dan de plaatselijke autoriteiten
betreffende de verwijdering.
Dank u voor uw aankoop! Lees deze handleiding grondig voor u het
toestel in gebruik neemt. Werd het toestel beschadigd tijdens het
transport, installeer het dan niet en raadpleeg uw dealer.
2. Veiligheidsinstructies
Houd dit toestel buiten het bereik van kinderen en
onbevoegden.
Er zijn geen onderdelen in het toestel die door de gebruiker
gerepareerd kunnen worden. Voor onderhoud of
reserveonderdelen, contacteer uw dealer.
Waarschuwing : U mag batterijen nooit doorboren of in het
vuur gooien (explosiegevaar). Herlaad geen
alkalinebatterijen. Gooi batterijen weg volgens de
plaatselijke milieuwetgeving. Houd batterijen buiten het
bereik van kinderen.
LEDS12CWW
V. 02 –22/10/2015 10 ©Velleman nv
Gebruik het toestel enkel binnenshuis. Bescherm
dit toestel tegen regen, vochtigheid en
opspattende vloeistoffen.
Houd op een afstand van minstens 0,5 m van het belichte
object.
Dit toestel valt onder beschermingsklasse 3.
3. Algemene richtlijnen
Raadpleeg de Velleman® service- en kwaliteitsgarantie
achteraan deze handleiding.
Bescherm tegen stof en extreme temperaturen.
Bescherm tegen schokken en voorkom misbruik. Vermijd brute
kracht tijdens de bediening.
Leer eerst de functies van het toestel kennen voor u het gaat
gebruiken.
Om veiligheidsredenen mag u geen wijzigingen aanbrengen aan
het toestel. Schade door wijzigingen die de gebruiker heeft
aangebracht aan het toestel, valt niet onder de garantie.
Gebruik het toestel enkel waarvoor het gemaakt is. De garantie
vervalt automatisch bij ongeoorloofd gebruik.
De garantie geldt niet voor schade door het negeren van bepaalde
richtlijnen in deze handleiding en uw dealer zal de
verantwoordelijkheid afwijzen voor defecten of problemen die hier
rechtstreeks verband mee houden.
Bewaar deze handleiding voor verdere raadpleging.
4. Eigenschappen
flexibele printplaat (wit)
300 zeer heldere leds (type 3528)