manuals.online logo
Brands
  1. Home
  2. •
  3. Brands
  4. •
  5. Velux
  6. •
  7. Household Appliance
  8. •
  9. Velux SKYMAX User manual

Velux SKYMAX User manual

1° - 85°
1/4:12 – 137:12
VELUX SKYMAX installation instructions
V4532-0618
Tools Needed
Herramientas necesarias
Installation instructions
Instrucciones de instalación
GSM
VELUX America LLC
85 Spencer Drive, Unit A • Wells, ME 04090
Tel 1-800-888-3589 • wascoskylights.com • veluxusa.com
V4532-0618
©2018 VELUX Group
®VELUX, VELUX logo are registered trademarks 2
Safety Considerations
While SkyMax skylights are designed to support the weight of snow, ice
and the force of normal winds, they are not designed to withstand the
weight of people. If human safety is a consideration, skylights should be
protected by railings, grids, or screens.
• Use suction cups when handling skylight.
• Heavy object: Team lift required
Every installation is unique and VELUX cannot control the conditions and
the quality of the work that is done. VELUX assumes no responsibility for
improper installation or noncompliance with all applicable building codes.
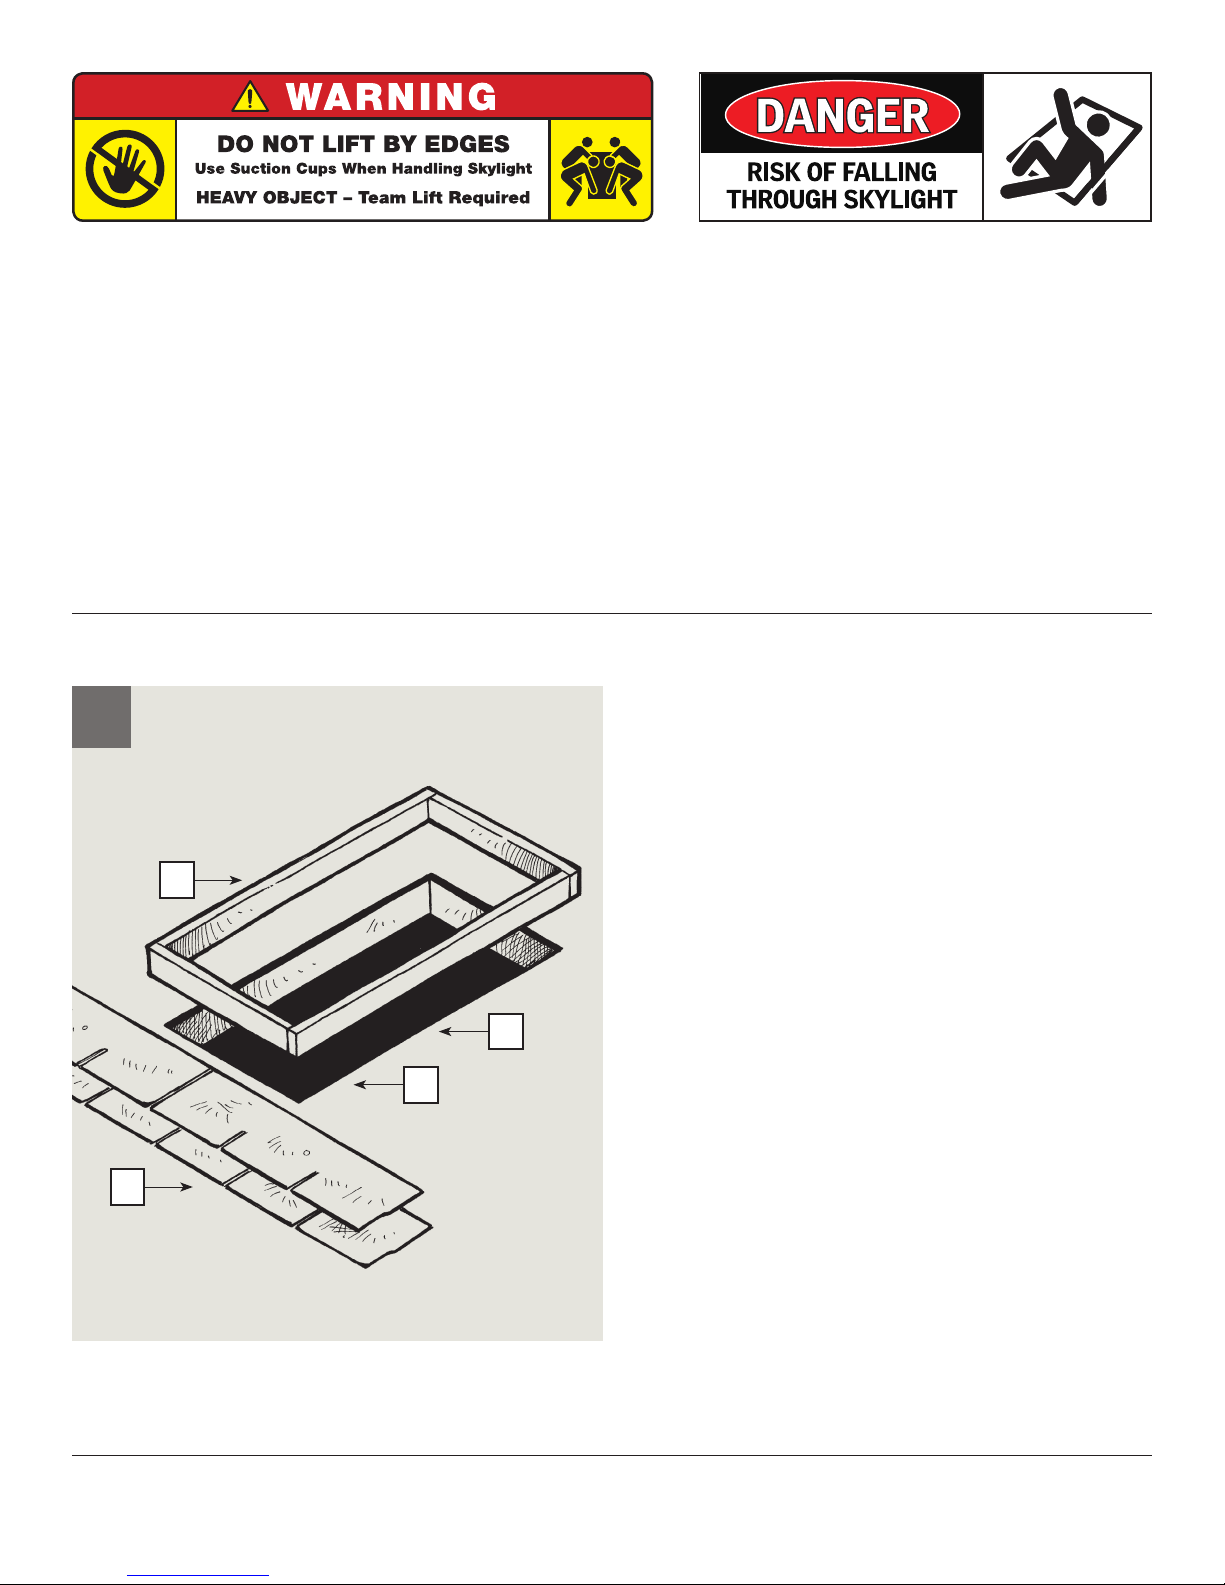
Curb construction details
a) Cut rough opening through roof deck.
b) Frame under opening to match inside of skylight curb. Use double
rafters and headers if necessary.
c) Build curb from 2x4, 2x6, etc. Nail to roof deck.
d) Shingle up to low side of curb.
Detalles de construcción del guardaguas
a) Corte una abertura no terminada a través del tejado.
b) Enmarque bajo la abertura para que coincida en el interior del borde del
tragaluz. Utilice cabezales y vigas dobles en caso necesario.
c) Cimiente el borde a partir de 2x4, 2x6, etc. Clávelo al tejado.
d) Cubra con tejas desde el lado superior al inferior del borde.
1
a
Aspectos de Seguridad
Aunque los tragaluces SkyMax han sido diseñados para soportar el peso de
la nieve y el hielo, así como la fuerza de vientos normales, no están diseñados
para soportar el peso de personas. Si la seguridad de las personas es motivo de
consideración, los tragaluces deberán estar protegidos por barandillas, rejillas o
mallas.
• Use ventosas cuando levante.
• Objeto pesado: se requiere elevación del equipo.
Cada instalación es diferente y VELUX no puede controlar las condiciones ni la
calidad del trabajo realizado. VELUX no asume ninguna responsabilidad por la
instalación incorrecta o el incumplimiento de los códigos de construcción vigentes.
b
c
d
VELUX America LLC
85 Spencer Drive, Unit A • Wells, ME 04090
Tel 1-800-888-3589 • wascoskylights.com • veluxusa.com
V4532-0618
©2018 VELUX Group
®VELUX, VELUX logo are registered trademarks 3
Important Notes
• Head flange width should be increased to
12" or more for roof pitches less than 5 in 12
• O.C. – Outside dimension of curb width
• C.H. – Curb height
• Dimensions are in inches
• All bends are 90°
Notas Importantes
• La anchura de la ceja de cabecera debe aumentar
a 12 o más si la pendiente del techo es menor que
5” (127 mm) por cada 12” (305 mm)
• O.C. = Dimensión exterior de la anchura del borde
• C.H. = Altura del borde
• Las dimensiones se presentan en pulgadas
• Todas las curvaturas son de 90°
Flashing Construction Details
Detalles de construcción del guardaguas
Flashing Materials Thickness
Copper 16 OZ
Aluminum 0.040"
Stainless Steel 26 GA
Galvanized Steel 24 GA
Materiales del
Guardaguas Grosor
Cobre 16 OZ
Aluminio 0.040"
Acero Inoxidable 26 GA
Acero Galvanizado 24 GA
Side Flashing Detail
Detalle del guardaguas lateral
Weld, braze or solder for a water-tight joint.
Suelde, cobresuelde o estañosuelde para obtener una
unión impermeable.
Weld, braze or solder for a water-tight joint.
Suelde, cobresuelde o estañosuelde para obtener una
unión impermeable.
1
3
2
Bend up | Curve hacia arriba
Bend down | Curve hacia abajo Cut in 1"Cut in 1"
7"
1
1"1"
7"
6" (12")
O.C.+ 16"
C.H.+ 1"
O.C.
O.C. + 2"
1
8"
8"
16" (20")
C.H.+ 1"
2 – Bend up
3 – Bend down
2
3
2– Curve hacia arriba
3– Curve hacia abajo
Head and sill detail
Detalle del cabezal y el alféizar
8"
12"
C.H.+ 1"
Bend | Curve
4
4
2
VELUX America LLC
85 Spencer Drive, Unit A • Wells, ME 04090
Tel 1-800-888-3589 • wascoskylights.com • veluxusa.com
V4532-0618
©2018 VELUX Group
®VELUX, VELUX logo are registered trademarks 4
Flashing the wood curb
a) Install sill piece over shingles at bottom. Trim corners and bend over
wooden curb.
b) One side piece installed with each course of shingles and nailed to
curb. Quantity varies with shingle exposure and length of unit. Bend
over curb when installed.
c) Step flash slides. Align flashing with bottom edge of shingle above it.
d) Install head flashing. Trim corners and bend over wood curb.
Guardaguas del borde de madera
a) Instale la pieza fija sobre las tejas de la parte inferior. Recorte las esquinas y
curve sobre el borde de madera.
b) Una pieza lateral instalada con cada hilera de tejas y clavada para que se
curve. La cantidad varía con la exposición de las tejas y la longitud de la unidad.
Cúrvelo sobre el borde una vez instalado.
c) El guardaguas por etapas se desliza. Alinee el guardaguas con el borde inferior
de la teja que se encuentra sobre el mismo.
d) Instale el guardaguas de la cabecera. Recorte las esquinas y cúrvelo sobre el
borde de madera.
Installing the unit
e) Apply a bead of sealant around the top of the curb.
f) Place unit on curb and attach with screws or nails using pre-drilled
mounting holes.
Instalación de la unidad
e) Aplique un reborde de sellador alrededor de la parte superior del borde.
f) Sitúe la unidad en el borde y únala con tornillos o clavos utilizando los orificios
de montaje ya taladrados.
2
3
a
b
c
d
e
f
e
f
Cross section
Sección transversal

Other Velux Household Appliance manuals

Velux KMG 100 User manual

Velux

Velux KMG 100 User manual

Velux VELUX INTEGRA Solar GGL User manual

Velux

Velux VELUX INTEGRA Solar GGL User manual

Velux INTEGRA V22 Guide

Velux

Velux INTEGRA V22 Guide

Velux FCM User manual

Velux

Velux FCM User manual

Velux VFE User manual

Velux

Velux VFE User manual

Velux ZTS 0101 User manual

Velux

Velux ZTS 0101 User manual

Velux DK-2950 User manual

Velux

Velux DK-2950 User manual

Popular Household Appliance manuals by other brands

Home Accents Holiday 24SV24386 Use and care guide

Home Accents Holiday

Home Accents Holiday 24SV24386 Use and care guide

Ednet 84292 Quick installation guide

Ednet

Ednet 84292 Quick installation guide

IDEAL ID1101 Operating	 instruction

IDEAL

IDEAL ID1101 Operating instruction

Samsung DF60 8 G Series user manual

Samsung

Samsung DF60 8 G Series user manual

GIESSE PROVENCE Fitting instructions

GIESSE

GIESSE PROVENCE Fitting instructions

Lindner NORTEC instructions

Lindner

Lindner NORTEC instructions

Melitta M600 operating instructions

Melitta

Melitta M600 operating instructions

Guardian Germ Guardian TS3000 Use & care instructions

Guardian

Guardian Germ Guardian TS3000 Use & care instructions

Eldom GDS2 manual

Eldom

Eldom GDS2 manual

Conrad 2388667 operating instructions

Conrad

Conrad 2388667 operating instructions

Orion OR-LR03 instruction manual

Orion

Orion OR-LR03 instruction manual

Adler Europe AD 9618 user manual

Adler Europe

Adler Europe AD 9618 user manual

CatGenie A.I. ACCLIMATION MANUAL

CatGenie

CatGenie A.I. ACCLIMATION MANUAL

Hills Rotary 400 Installer manual

Hills

Hills Rotary 400 Installer manual

HJH office CLEAN IV manual

HJH office

HJH office CLEAN IV manual

Samsung DF60 8 G Series user manual

Samsung

Samsung DF60 8 G Series user manual

DAYTEK M32 product manual

DAYTEK

DAYTEK M32 product manual

John Lewis Uprigh Airer instruction manual

John Lewis

John Lewis Uprigh Airer instruction manual

manuals.online logo
manuals.online logoBrands
  • About & Mission
  • Contact us
  • Privacy Policy
  • Terms and Conditions

Copyright 2025 Manuals.Online. All Rights Reserved.