Verykool SL6010 User manual

verykool SL6010
1
User Manual
----verykool SL6010

verykool SL6010
2
Contents
1.APPEARANCE AND KEYPAD OPERATIONS............................ 3
2.USING MEMORY CARD AS U DISK............................... 4/5
3.WIFI ..................................................... 6/7
4.BLUETOOTH .................................................. 8
5.MAIL ....................................................... 9
5.1 GMAIL ...................................................................................................................... 9
5.2 EMAIL .......................................................................................................................... 10
6.DIALLING ............................................. 11/12/13
7.MESSAGING ........................................... 14/15/16
8. CONTACTS ............................................ 17/19/21
9. INTENET EXPLOR ......................................... 22/23
10.RECORDER ................................................. 24
11.CLOCK .................................................... 24
12. CACULATOR ................................................ 25
13.CAMERA ............................................. 26/27/28
13.1 IMAGE MODE.................................................................................................................. 26
13.2 VIDEO MODE................................................................................................................. 27
14.IMAGES ............................................... 29/30
15.MUSIC ................................................. 31/32
16. CALENDER ................................................. 33
17. FM RADIO ................................................. 34
18. SETTINGS .............................................. 35/42
19. NOTICES FOR THE USE OF PHONE.............................. 42
20. FCC CAUTION .............................................. 43
21.SPECIFIC ABSORPTION RATE (SAR) INFORMATION................43
22. BODY-WORN OPERATION .......................................43

verykool SL6010
3
1 . Appearance and Keypad Operations
Functions Description
1. Menu Key
8. Power Key
2. Home Key
9. Volume Key
3. Back Key
10. Back Camera
4. Front Camera
11. Flashlight
5. Receiver
12. Mic
6. 3.5mm Headset Jack
13. Speaker
7. Micro USB Jack
14. SIM Slot

verykool SL6010
4
Keys
Functions
home
Press this button to return home from any application or interface.
Press it to open recently opened application window.
menu
Press it to start the menu,which allows you to perform actions in the current
interface or options’ menu.
back
Press it to return to the previous interface,or to close dialog box 、
options’ menu、notification panel or the keypad.
power
Press it to open the phone’s menu,then you could choose to lock the screen、
turn off the phone,or set it to the silent mode.
up
Press it to increase the volume
Press it to turn the phone to vibration mode from the silent mode.
down
Press it to decrease the volume.
P-Sensor
Cover it, and then the phone’s backlight will turn off
front camera
Entering the camera interface, switched to the front camera can photo yourself.
2. Using Memory Card as U Disk
If you want to send music, pictures or other files to the phone’s memory card from the computer,you should set memory card as u
disk first.
Setmemorycard as u disk
1) Connect the phone to the computer with USB cable. The notification icon will appear in the status box.
2) Use USB mobile transmission line will connected to the computer
3) In the notification panel, touch USB is connected ,then touch the USB connected as a media device

verykool SL6010
5
1: connected as a
media device
2: Charging info
3: Wi-Fi
network
available
4: USB debugging
connected
Specific shown in the following
figure (picture 1.2.3.4)

verykool SL6010
6
3:
4) Insert the SD Card.
Open USB connected.

verykool SL6010
7
2)After the connection, images captured on camera can be directly viewed on the PC。
Notice: To operate U disk normally, each PC operating system has different requirements.
1)WIN7 Can directly use
2)XP update windows media player to 11
3)Install wpdmtp.inf driver
4)Vista Unconfirmed
Notice: On the PC operation assistant tool, such as mobile phone, the USB debugging must be open.
3.WiFi
Wi-Fi provides as far as 300feet (100M) range of wireless network access. If you use cell phone to connect Wi-Fi, you should connect
to the wireless access point or 「hot spots」.
Notices:The availability and coverage of Wi-Fi signal depend on the number, infrastructure and other objects
penetrated by the signal.
Open Wi-Fi and to connect to the wireless network
1) Press home>menu,then touch settings>Wi-Fi and internet
2) Select the Wi-Fi box,to open Wi-Fi. Phone will automatically scan for available wireless networks.
3) Touch Wi-Fi settings. Then a list of Wi-Fi network will show the founded network name and security settings. (Open
network or WEP、WPA/WPA2 with password).If you enable the notification in Wi-Fi settings, the status box will show this
icon ( ) when open available wireless network are found.
4) Touch one of the Wi-Fi choices to connect the network. When you choose open network, phone will connect
to it automatically. If you choose WEP、WPA/WPA2 with password, you should type the password first, then
touch to connect it.

verykool SL6010
8
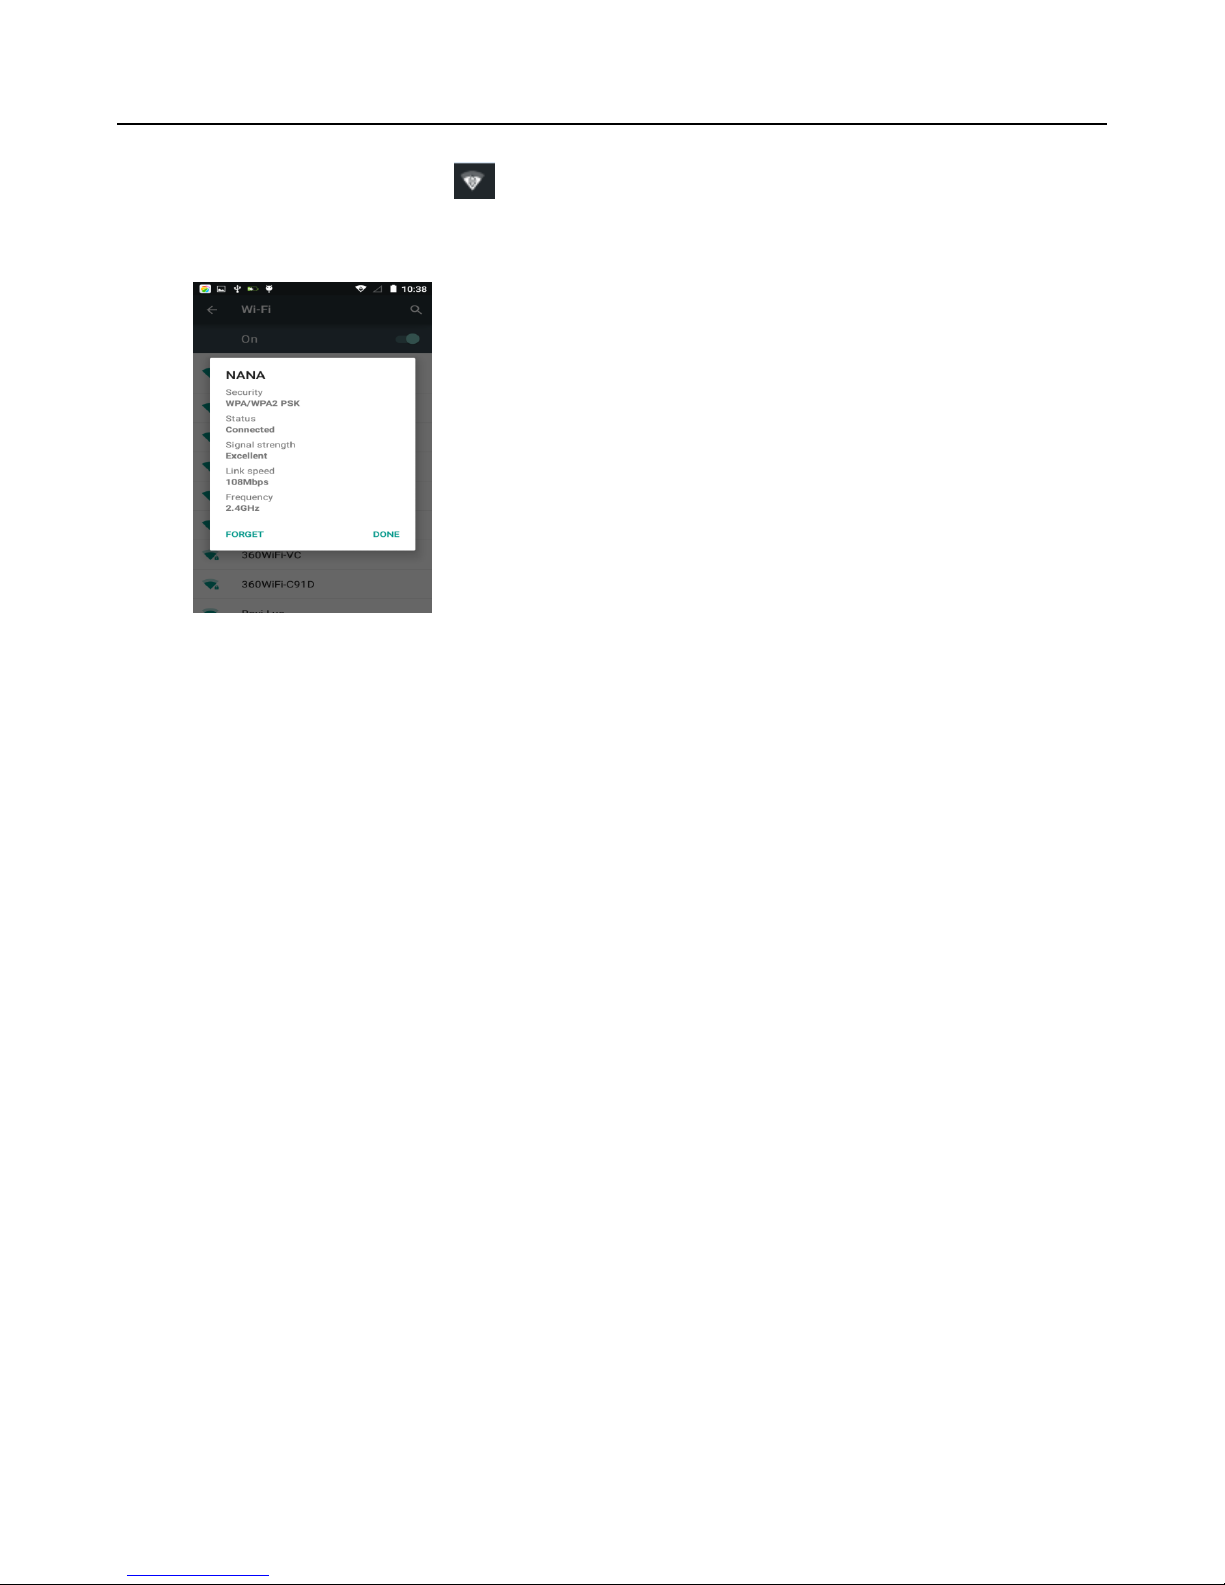
Notices:when the phone is connected to the wireless network,
The status box will show this Wi-Fi icon( ), and the approximate
signal strength (the number of lit bars).If you touch the connected network,it will display the name of Wi-Fi network, status, speed,
signal, strength, security, information and IP address.
If you want to delete the wireless settings, please touch “not reserve”
as in the picture.Ifyou want to connect to this network, you
should re-enter these settings.
Notices:
Unless you choose not to reserve the network, there is no need to re-enter the corresponding password when next time connecting
to the previously encrypted wireless network. Wi-Fi will search automatically, that is, phone won’t need to perform additional steps to
connect to the Wi-Fi networks.
Connect to other Wi-Fi networks
1) In the interface of wireless and network, touch Wi-Fi settings. The Wi-Fi networks found will show on the Wi-Fi network
list.
2) Touch other Wi-Fi networks, and then you can connect to this network.
Notices: in addition, mobile phone can also surf the Internet by GPRS. Our current SIM card GPRS will open after the default
boot. Users can manually choose to open data connection. When using a single card, use drop down menu on the status bar,
touch "data connection". When using two cards, go to "Settings > SIM card > cellular data > select SIM1 or SIM2", on the drop
down menu on the status bar touch "data connection", open the current selected SIM card data connection, and then touch
"data connection". Close this SIM card data connection.

User Manual for SL6010
9
4. Bluetooth
Turn on Bluetooth so the phone can be detected
1) Press home>menu, then touch settings.
2) Touch wireless and internet, then choose Bluetooth box to open the Bluetooth function. After Bluetooth is turned on, the
status box will show this icon ( ). Touch “scan for devices”to start scanning for all devices within range.
3) Touch Bluetooth settings, all the devices found will display in a list under the icon.
(When Bluetooth device is open and visible to nearby equipment, other equipment can search and find your device as
long as their Bluetooth is turned on. Other devices can be detected at the same time, you can search for other equipment
and connect.)
After a device is paired, the system will show the paired device and other equipment available
Pairing and connection of Bluetooth headset
1) Press home>menu, then touch settings.
2) Touch wireless and internet>Bluetooth settings, then select Bluetooth box. Your phone will scan for the
Bluetooth devices within range and show the found devices in a list under the icon.
Tips:
a. If the list can’t find your equipment, touch scanning equipment to re-scan it.
b. Make sure that the devices wanted are under the detected mode.
3) Touch headset in the equipment list to finish the connection.

User Manual for SL6010
10
Notices:generally Bluetooth devices need password to be paired, 「0000」is often used as the default password.
4) The pairing and connecting status will show under the headset in the Bluetooth devices list. When the headset is
connected to your phone, the status box will show this icon( )which means it is connected. Then you can use the
headset to make or receive calls.
Cut the connection to the Bluetooth
1) Press home>menu>settings>wireless and internet>Bluetooth settings.
2) In the list of Bluetooth equipment, touch and hold the connected hand-free headset.
3) Select “cancel the pairing”.
Bluetooth proximity sensor
After pairing the two devices, you can test out if the signal is strong or weak by the Bluetooth proximity sensor device
5.Mail
5.1 Gmail
Create an electronic mail account
Select mail> settings. You can activate or edit existing e-mail accounts as well as create a new e-mail account.
a. Select mail, Google account setting interface appears. Then touch‘next step’> create account>enter name,last
name and e-mail account.
b. Google servers determine whether the name can be used, if so, new interface appears prompting you to enter
password, then judge the password’ security, users who doesn’t meet the requirements need to re-enter the
password.
c. After successfully registering a new Gmail account, a message will be created automatically for testing.
Loading mail account

User Manual for SL6010
11
a. Open Gmail skip introduction screen>loading interface appears >select load
b. Enter name, password then load
E-mail account initialization, prompting “login successful” All Google accounts will be synchronized.
Creating and sending ,mails
When creating mails, select mail > creating mails. Enter the address (recipient), theme and contents. Press MENU to
‘append’、‘Add Cc/Bcc’, select send or discarded.
Receive mails
When you receive new mails, you will hear a tone and the status box will show this button .Press Menu >
‘refresh’to refresh and update the number of the unread mails in a proper way.
Delete mails
When loading a mail account,if you want to delete it,you need to restore factory settings. When loading a second
one,you could press the menu button to delete it.
Notices:many functions depend on Gmail Account,for example:Electronic Market、Google Talk、Sync Contact and
Calendar.
5.2 Email
Load Email.
c. Open network connection,
d. In setting the account interface, input the correct email address and password and click next. Mobile
phone will automatically complete the sending and receiving server Settings, Pop-up mail, find
frequency, and user Settings interface. Complete Settings, click next.
e. For account creation name, the editor of the law that email user name, and click next. Complete set,
synchronous mailbox.
Create and send Email
When creating mails, select mails > create mails. Enter the address (recipient), theme and contents.
Press MENU you could ‘append’、‘Add Cc/Bcc’, select send or discarded or save as draft.
Check the Email files
Click the inbox to the left of the small buttons, list all the folder options

User Manual for SL6010
12
6.Dialing
When the internet server icon appears on the screen, you could dial or receive call. The signal bar on the top right
corner shows the strength of network signal (The signal with the strongest signal).
Start dialing
Open application’s main menu>dial >Dial the keyboard. You could choose SIM1 or SIM2 to do the dialing.
Dialing
On the dialing Keboard ,enter the phone number,and then click the dial key. After that, choose one SIM card or

User Manual for SL6010
13
internet call. If you need to call an extension, you could click the “dial pad” in the bottom of the screen to open the
interface or press menu key to select “delay 2 seconds”,and then enter the number of the extension.
On the dialup keyboard input number, click Menu to IP dial-up or speed dial
Video call: video call usually refers to the Internet and mobile Internet (based on 3 G Internet) call through the
phone between the speech of the real-time transmission and image (photographs, items, etc.) as a way to
communicate. Only 3 G to support this function. Input a number, click video dial-up, after each other answers
the phone, you can start the video call.
Telephone calls in the call log
Every telephone number called and received in“SIM1、SIM2”will be reserved in the phone’s call log menu. Each call
recently recorded will show“SIM1 or SIM2”
All numbers in the call log can be dialed by clicking the button ”dial” on the right side of the screen.
When number list appears,click it to show details;long press to dial via “SIM1 or SIM 2.”You can also edit, delete,
save the number or do other operations.
Receive callings
When a call comes in(top left will show from which SIM card)press“Answer”and slide towards the right to receive
the call.
Refuse to answer the phone,
When a call comes in, hold down the "call" button sliding it to the left to decline a call.
When a call comes in, hold down the "call" button sliding it upwards to reject the call and select a
message. Choose message content, to send the caller the corresponding text messages.
Proximity sensor
The backlight will adjust automatically, according to the distance between phone and human body.
During the call if the phone is close to the ear, the backlight will turn off automatically,which could save battery
life and prevent inadvertently touching.
Two-way call/multiparty call(conference call)
Notices:this function requires that multiparty call feature be activated on the SIM card.
1) While on a call
2) Click“Add calls”, dial another call or receive another call. Phone should default to open "call
waiting”(settings–dialing settings–other dialing settings. After both are connected,you could view
the status of the call.

User Manual for SL6010
14

User Manual for SL6010
15
Telephone recording
During the call,more>start record,to record the dialog of the call.
1)settings>set other functions of the call in the dialing settings,for example:Call Transfer–after all the
settings finished and turned on,you could transfer the call to a certain number.
2)In settings>dialing settings >other dialing settings,open “call waiting”. After turned on,you can receive
another call while you are on an existing call. The answering and rejecting functions are just like the ordinary
phone.
Call settings
Voice Call
1)Voice Mail: The voice mailbox settings of the input voicemail number.
2) IP prefix number:Setting the different IP prefix numbers for each SIM card.
3)Call forwarding:Can set respectively to a SIM card when the line is busy and no one has to receive.
3) Call barring: Can set call restriction to each SIM card respectively.
4) Additional Settings:a.My phone number b.Call waiting.
Internet call
1) Account
2) Use Internet calling
Other Settings
1)Fixed Dialing Numbers
2)Minute Reminder:Turn on minute reminder at 50s of every minute.
3)Quick Response:Can edit the content of the text messages sent when a call is rejected.

User Manual for SL6010
16
7. Messaging
Important:the message title of this phone is the phone number,will be reserved in a similar way for of dialog,
instead of the usual folder structure. Messages with blue background are those received, and messages with
white background are those sent.
Send SMS to certain phone number
1) Press home>messaging,touch“new messages”.
2) In the interface of “edit”:
a. Click “recipient”box to start input method,you can also click“enter”box to start input method,and enter
characters.
b. Click the button of “send from SiM1 or SIM2”to start sending.
c. When the receiver and the input are not empty, click the send button to send the message.
Send MMS to certain phone number
When creating message,if it is defaulted to SMS,it will be turned to MMS when following operations are done. You
can send MMS via clicking “send” after editing.
1) In the "writing" screen, press the Menu button, click "add theme". It will automatically turn into MMS message.
2) Click on "write" interface then "plus" icon on the left to add an attachment. After adding the attachment the message
will be automatically converted into MMS.
Send messages to multiple numbers
Enter multiple numbers in the “receiver” box dividing each number by a comma.
Click on the plus icon on the right side to choose a contact group in the address book.
Notices:At present the phone can only support up to 100 recipients.
When the number of contacts added is more than 100, there will be a prompt telling you the "recipient" quantity is too
much, and the contacts will be added unsuccessfully. You must manually add again.

User Manual for SL6010
17
Notices:
a. If you want send MMS with many pages, you should
select “append PPT” in the “append” interface.
b. You can append 10 pictures, with the form of GIF, JPEG.
c. Click “adding themes”, the box of “theme” will appear
under the box of “recipient” and turn the message to
MMS automatically.
• Information edit Menu with Menu functions

User Manual for SL6010
18
1)When the message is sent successfully, SIM1 or SIM2 sends a message of the time it was sent and checkmark will show
next to it.
2)When message sending failed,a red triangle with exclamation will appear. When editing information, access other
functions from the Menu button.
3)Click on an option to can carry out selective operation
8. Contacts
Open the menu of applications>contacts
The mobile phone contacts and SIM card contacts by default will display in alphabetical order according to the
contact’s initials.

User Manual for SL6010
19
3) Click Search Icons,to enter the contact search interface.
Enter the list of Numbers or letters or part of the name that will be shown in search results.
If the search finds no matches, the contact interface will show that no contacts were found.
3)Click“Add Contact”Icons to create New Contacts
Select save contacts to phone or a SIM card in the contact editing interface.

User Manual for SL6010
20
You can edit contact head, name, telephone number, group, save to and more. Then click "finish".
4)In contact interface, click on the Menu button
a. Menu >Delete contacts
When “All”Icons are checked, click the delete button to delete all the contacts, including cell phone and SIM
card contacts.
You can check one or more contacts and click the delete to delete the selected contacts.
Table of contents
Other Verykool Cell Phone manuals

Verykool
Verykool S352 User manual

Verykool
Verykool W92159B3 User manual

Verykool
Verykool i315 User manual

Verykool
Verykool s5031 User manual

Verykool
Verykool s4006 User manual

Verykool
Verykool S5528 User manual

Verykool
Verykool 1211 User manual

Verykool
Verykool s3503 User manual

Verykool
Verykool Lotus User manual

Verykool
Verykool R620 User manual

Verykool
Verykool RS75 User manual

Verykool
Verykool I607A User manual

Verykool
Verykool i119 User manual

Verykool
Verykool S470 User manual

Verykool
Verykool i230 User manual

Verykool
Verykool s4002 User manual

Verykool
Verykool s4510 User manual

Verykool
Verykool i320 User manual

Verykool
Verykool SL5550 User manual

Verykool
Verykool S401 User manual