Vetus BOW6024D Specification sheet

NEDERLANDS 5
ENGLISH 11
DEUTSCH 17
FRANÇAIS 23
ESPAÑOL 29
ITALIANO 35
DANSK 41
SVENSKA 47
NORSK 53
SUOMEKSI 59
Copyright © 2014 Vetus b.v. Schiedam Holland
Bedieningshandleiding en
installatieinstructies
Operation manual and installation
instructions
Bedienungshandbuch und Einbauanleitung
Manuel d’utilisation et instructions
d’installation
Manual de manejo y instrucciones de
instalación
Manuale per l’uso e istruzioni per
l’installazione
Betjeningsvejledning og installations-
instruktioner
Bruksanvisning och
monteringsinstruktioner
Bruksanvisning og
installasjonsinstrukser
Käyttö- ja asennusohje
BOW6012D - BOW6024D
60 kgf - ø 185 mm
020547.04

2020547.04 vetus® Operation manual and installation instructions bow thrusters BOW6012D and BOW6024D
1 Inleiding . . . . . . . . . . . . . . . 5
2 Veiligheid . . . . . . . . . . . . . . 5
3 Gebruik . . . . . . . . . . . . . . . . 5
4 Inbouw . . . . . . . . . . . . . . . . 6
4.1 Voorbereiding . . . . . . . . . . . . 6
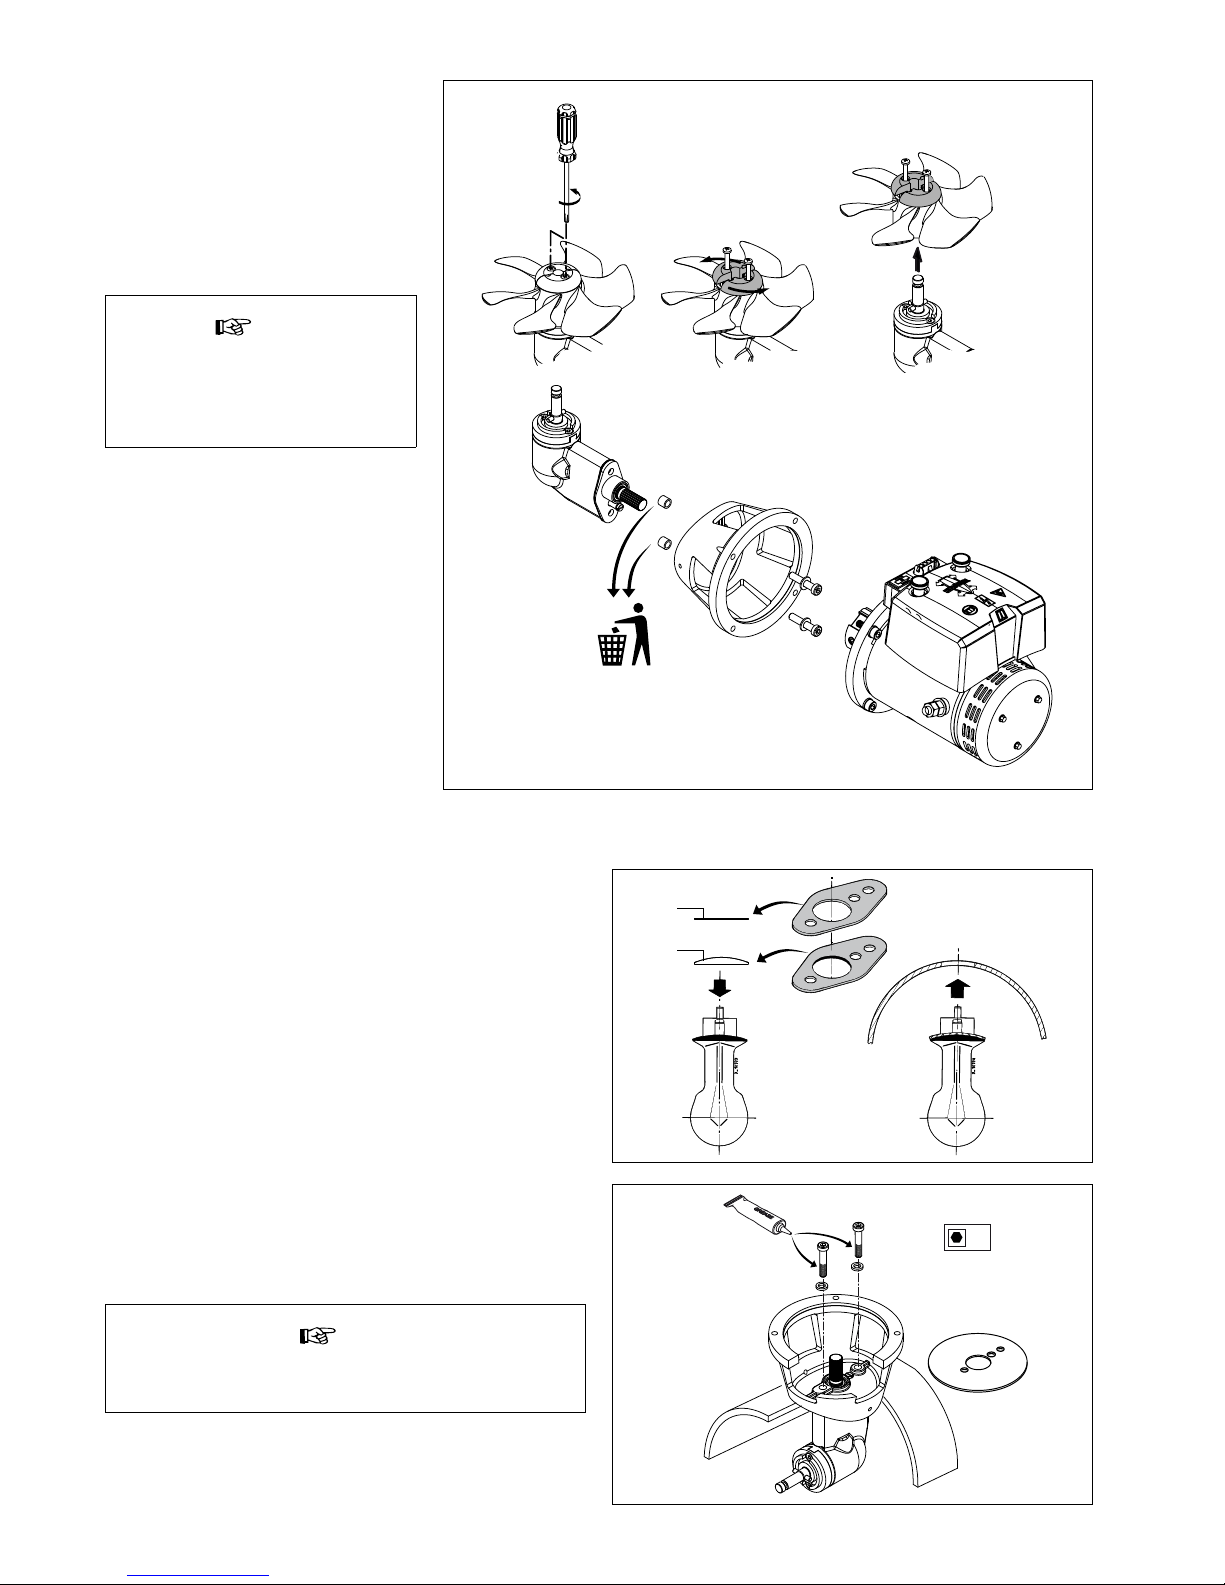
4.2 Montage staartstuk en tussen-
ens . . . . . . . . . . . . . . . . . . 6
4.3 Eindmontage . . . . . . . . . . . . 7
5 Elektrische installatie . . . . . . . 8
6 Onderhoud . . . . . . . . . . . . . 9
7 Storingen. . . . . . . . . . . . . . 10
8 Technische gegevens . . . . . . 10
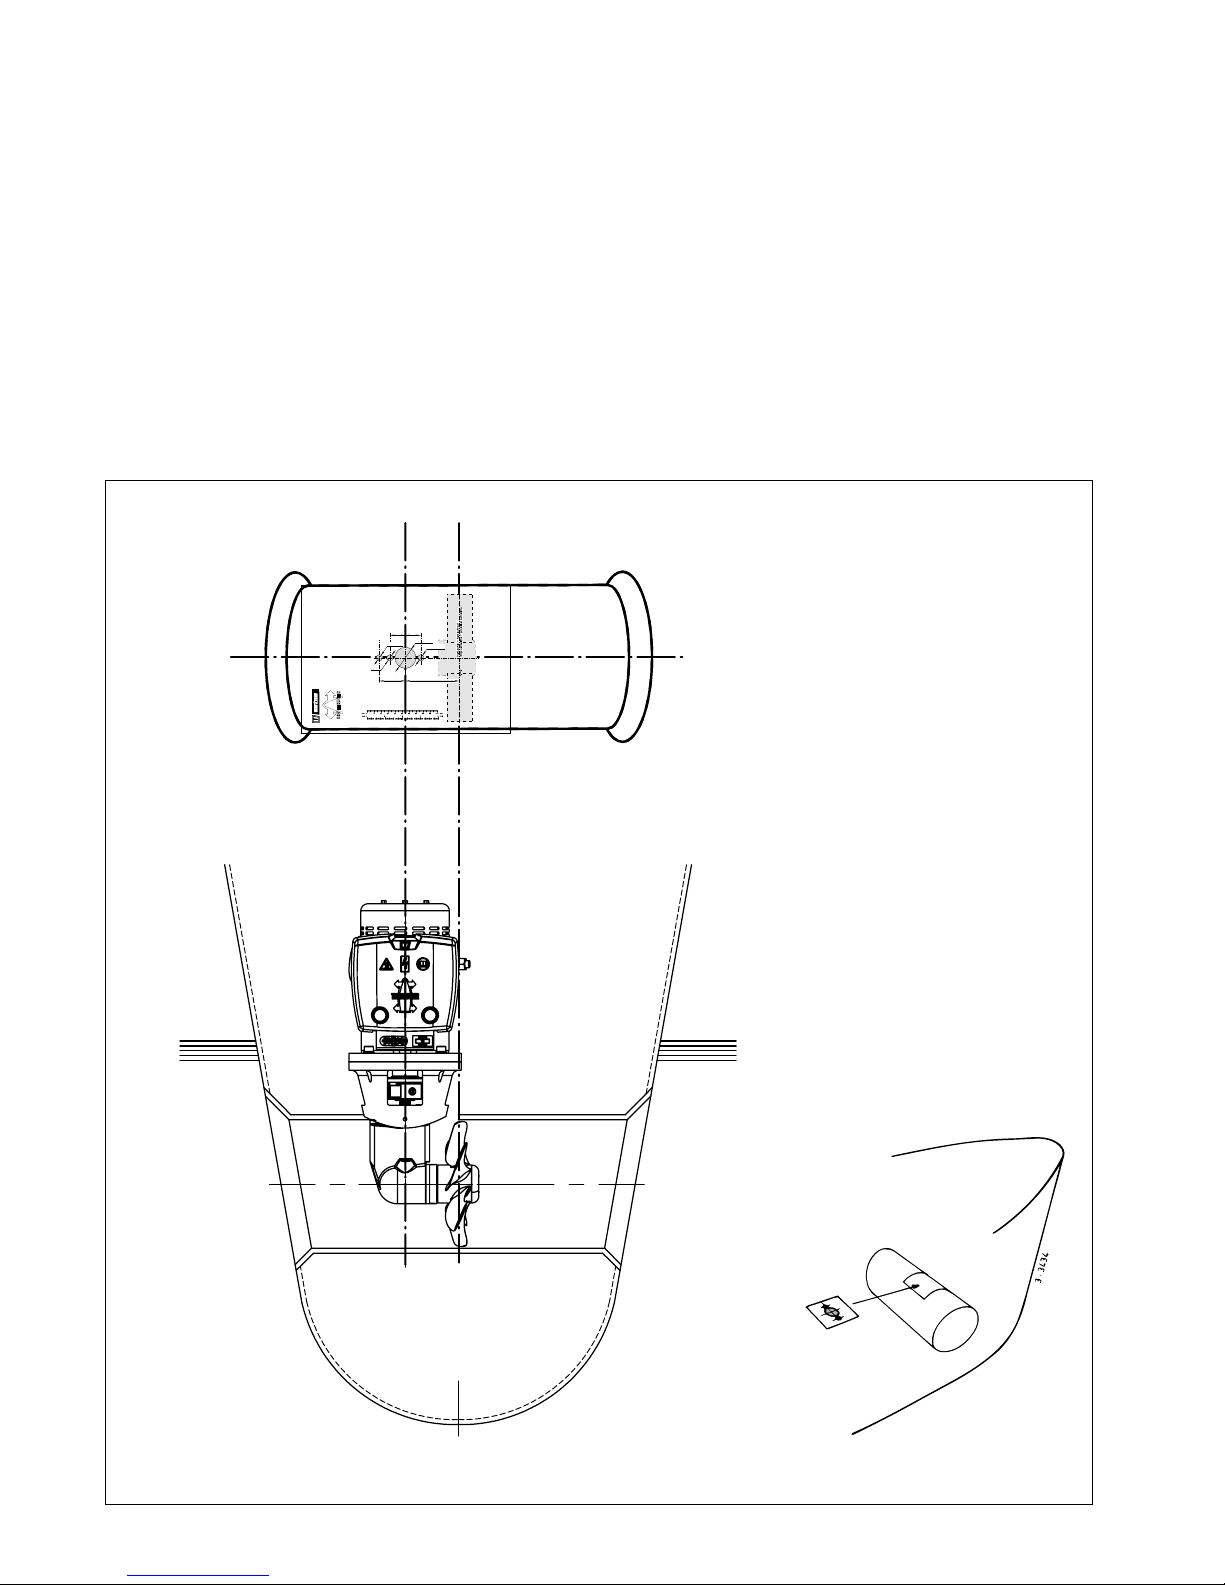
9 Hoofdafmetingen. . . . . . . . 65
10 Elektrisch schema. . . . . . . . 66
10.1 Gelijktijdige bediening van 2
boegschroeven met 1 paneel . 68
11 Accucapaciteit, accukabels . 69
Inhoud Content Inhalt
1 Introduction. . . . . . . . . . . . 11
2 Safety . . . . . . . . . . . . . . . . 11
3 Use . . . . . . . . . . . . . . . . . . 11
4 Installation. . . . . . . . . . . . . 12
4.1 Preparation. . . . . . . . . . . . . 12
4.2 Installation tailpiece and inter-
mediate ange . . . . . . . . . . 12
4.3 Final assembly . . . . . . . . . . . 13
5 Electrical installation . . . . . . 14
6 Maintenance . . . . . . . . . . . 15
7 Trouble shooting. . . . . . . . . 16
8 Technical data. . . . . . . . . . . 16
9 Principal dimensions. . . . . . 65
10 Wiring diagram . . . . . . . . . 66
10.1 Simultaneous operation of two
bow thrusters with one panel . 68
11 Battery capacity, battery
cables . . . . . . . . . . . . . . . 69
1 Einleitung . . . . . . . . . . . . . 17
2 Sicherheitsbestimmungen . . 17
3 Gebrauch. . . . . . . . . . . . . . 17
4 Einbau. . . . . . . . . . . . . . . . 18
4.1 Vorbereitung. . . . . . . . . . . . 18
4.2 Befestigung des Unterwasser-
teils und des Zwischenansches 18
4.3 Endmontage . . . . . . . . . . . . 19
5 Elektrische Installation . . . . . 20
6 Wartung . . . . . . . . . . . . . . 21
7 Störungen . . . . . . . . . . . . . 22
8 Technische daten . . . . . . . . 22
9 Hauptabmessungen . . . . . . 65
10 Schaltschema . . . . . . . . . . 66
10.1 Gleichzeitige Bedienung von
zwei Bugschrauben mit einem
Armaturenbrett . . . . . . . . . . 68
11 Akkukapazität, Akkukabel . . 69
1 Introduction. . . . . . . . . . . . 23
2 Sécurité . . . . . . . . . . . . . . 23
3 Emploi. . . . . . . . . . . . . . . . 23
4 Installation. . . . . . . . . . . . . 24
4.1 Préparatifs . . . . . . . . . . . . . 24
4.2 Montage de l’embase et de la
bride intermédiaire. . . . . . . . 24
4.3 Montage nal . . . . . . . . . . . 25
5 Installation électrique . . . . . 26
6 Entretien . . . . . . . . . . . . . . 27
7 Pannes . . . . . . . . . . . . . . . 28
8 Renseignements techniques . 28
9 Dimensions principales . . . . 65
10 Circuit electrique . . . . . . . . 66
10.1 Commande simultanée de 2
hélices d’étrave avec 1 pan-
neau . . . . . . . . . . . . . . . . . 68
11 Capacité de la batterie, câbles
de batterie . . . . . . . . . . . . 69
1 Introducción. . . . . . . . . . . . 29
2 Seguridad . . . . . . . . . . . . . 29
3 Uso . . . . . . . . . . . . . . . . . . 29
4 Incorporación . . . . . . . . . . . 30
4.1 Preparativos . . . . . . . . . . . . 30
4.2 Instalación de la parte poste-
rior y la brida intermedia . . . . 30
4.3 Montaje nal. . . . . . . . . . . . 31
5 Instalación eléctrica . . . . . . . 32
6 Mantenimiento . . . . . . . . . . 33
7 Fallos . . . . . . . . . . . . . . . . 34
8 Especicaciones técnicas . . . 34
9 Dimensiones principales . . . 65
10 Esquema eléctrico . . . . . . . 66
10.1 Manejo simultáneo de 2 tornil-
los de retención con 1 panel . . 68
11 Capacidad de las baterías,
cables de baterías. . . . . . . . 69
1 Introduzione . . . . . . . . . . . 35
2 Sicurezza . . . . . . . . . . . . . . 35
3 Funzionamento. . . . . . . . . . 35
4 Installazione. . . . . . . . . . . . 36
4.1 Operazioni preliminari. . . . . . 36
4.2 Montaggio del piedino e della
angia intermedia . . . . . . . . 36
4.3 Assemblaggio nale . . . . . . . 37
5 Collegamento elettrico. . . . . 38
6 Manutenzione . . . . . . . . . . 39
7 Guasti . . . . . . . . . . . . . . . . 40
8 Dati tecnici. . . . . . . . . . . . . 40
9 Dimensioni principali . . . . . 65
10 Schema elettrico . . . . . . . . 66
10.1 Comando contemporaneo di 2
eliche di prua mediante 1 solo
pannello. . . . . . . . . . . . . . . 68
11 Capacità della batteria e cavi
della batteria. . . . . . . . . . . 69
Sommaire Índice Indice

020547.04 11
vetus® Operation manual and installation instructions bow thrusters BOW6012D and BOW6024D
1 Introduction
These installation instructions give guidelines for tting the Vetus
bow thrusters‘BOW6012D’and‘BOW6024D’.
The quality of installation will determine how reliably the bow thrust-
er performs. Almost all faults can be traced back to errors or impreci-
sion during installation. It is therefore imperative that the steps given
in the installation instructions are followed in full during the installa-
tion process and checked afterwards.
Alterations made to the bow thruster by the user will void any li-
ability on the part of the manufacturer for any damages that may
result.
The thrust given by the bow thruster will vary from vessel to vessel
depending on the eect of the wind, the water displacement and the
shape of the underwater hull.
• The nominal thrust quoted can only be achieved under the most
favourable conditions:
• During the installation process the ‘Installation recommenda-
tions for bow thrusters’, must be followed, specically concern-
ing:
- Suciently large diameter of the battery cables so that voltage
drop is reduced to a minimum.
- The manner in which the tunnel has been connected to the
hull.
- Use of bars in the tunnel openings.
These bars should only be used where this is strictly necessary
(if sailing regularly in severely polluted water.)
- The bars must have been tted correctly.
Following the above recommendations will result in longer life and
better performance of your bow thruster.
• Carry out the recommended maintenance regularly.
• Never allow the bow thruster to operate for a long period; the
maximum length of usage is restricted because of heat release in
the electric motor. After use the motor must be allowed to cool
o.
note
The maximum continuous length of usage and the thrust as
specied in the technical details are based on the recommend-
ed battery capacities and battery cables.
If signicantly larger batteries in combination with very short
battery cables of signicantly larger diameter than recom-
mended are used then the thrust will increase. In such cases
the maximum length of usage must be reduced in order to
prevent damage to the motor.
2 Safety
Warning!
When using the bow thruster watch out for swimmers or light
boats which could be in the near vicinity of the bow thruster tun-
nel jet openings.
Pass on the safety instructions to others using the bow thruster.
General rules and laws with regard to safety and accident-prevention
also need to be applied.
• Never touch the moving ends of the bow thruster whilst in opera-
tion.
• Never touch hot parts of the bow thruster and never place am-
mable materials in the vicinity of the bow thruster.
• Always stop the bow thruster before checking components or ad-
justing the bow thruster.
• Always detach the battery poles during maintenance work.
• Ensure maintenance work is safe by only using tools suitable for
the purpose.
• Always deactivate the main switch when the bow thruster is not in
use for long periods.
3 Use
• Switch on the main switch.
• Consult the handbook supplied with the control panels for in-
structions on using the bow thruster.
Never switch in one movement from starboard to portside or
reverse, but wait until the propeller stands still, before giving
it a command to operate the electric motor in the opposite di-
rection.
care!
If 2 control panels are installed never operate the bow thruster
from both panels simultaneously.
• Switch o the main switch when leaving the ship.
Make sure that the user of the vessel is supplied with the owner’s manual.
ENGLISH

12 020547.04 vetus® Operation manual and installation instructions bow thrusters BOW6012D and BOW6024D
4 Installation
In order to install the tunnel, consult ‘Instal-
lation recommendations for bow thrusters’,
Vetus art. code 020571.03.
For overall dimensions see drawing, page
65.
note
The areas in which the electric motor
of the bow thruster and the battery are
positioned must be dry and well venti-
lated.
4.1 Preparation
The bow thruster will be delivered fully as-
sembled. Perform the following steps:
• Remove the propeller.
• Remove the motor from the intermediate
ange.
• Remove the intermediate ange from the
tail piece.
The 2 bushes are only required for trans-
port and are now no longer needed.
4.2 Installation tailpiece and intermediate ange
• Ensure that the plastic shim plate (1) has been positioned on the
tail piece.
• Place one packing (2) between the tail piece and the tunnel.
• Apply a sealant (e.g. polyurethane or silicone) between the tail
piece and packing, and between the packing and the tunnel wall.
• Place the tail piece in the hole in the tunnel.
Any extra packings used should be ones capable of justifying the
tail piece.
*) e.g. Sikaex®-292.
• Grease the hole of the intermediate ange and position this
ange.
• Grease the threads of the bolts with‘outboard gear grease’before
inserting and tightening them.
note
Check for possible leaks immediately the ship returns to wa-
ter.
1
2
M8
12 - 15 Nm
6
Outboard Gear
Grease (9 - 11 ft.lbf )
12 3

020547.04 13
vetus® Operation manual and installation instructions bow thrusters BOW6012D and BOW6024D
The propeller should run a minimum of 1.5 mm (1/16”) free of the
thrust tube wall, all round.
4.3 Final assembly
• Grease the propeller shaft with ‘outboard gear grease’ and install
the propeller.
• Slide the exible coupling onto the output spindle of the electric
motor as far as necessary to allow the end of the output spindle
(A) and the underside of the ange (B) to become aligned.
• Tighten the lock-screw (C).
• Grease the input shaft with an installation compound, like ‘Mo-
lykote® G-n plus’.
• Grease the threads of the fastenings bolts with ‘outboard gear
grease’and install the electric motor to the intermediate ange.
• For a rst check, turn the propeller by hand, it should turn easily,
whilst being connected to the output spindle of the electric mo-
tor.
M8
12 - 15 Nm
6
Molykote® G-n plus
Outboard Gear
Grease
(9 - 11 ft.lbf )
1 2 3 4 5
PH2
Outboard Gear
Grease
M5
3 Nm
2.5
(2.2 ft.lbf )
ENGLISH

14 020547.04 vetus® Operation manual and installation instructions bow thrusters BOW6012D and BOW6024D
5 Electrical installation
Consult the chapter ‘Electrical Management’ in ‘Installation recom-
mendations for bow thrusters’, Vetus art. code 020571.03.
• Connect the main power supply cables.
• Fit the control panel next to the steering position. There must be
at least 50 mm (2”) space behind the panel.
If 2 bow thrusters have to be operated simultaneously, for exam-
ple on a catamaran, consult the diagram on page 68.
• Fit the control cable between the bow thruster and the control
panel through the vessel and connect the jack connections to-
gether.
If it is necessary to cut the intermediate cable and reconnect it
take care to ensure the correct colours are connected together.
N.B: The colours of the wire cores in the intermediate cable may
dier from the wire core colours as used on the bow thruster mo-
tor and on the control panel!
If there are two steering positions, the second control panel can
be connected to the rst one.
9 - 11 Nm
17
1
2
2 x M10
(6.5 - 8 ft.lbf )
note
Be careful not to rotate the bolt and nut 1 while connecting the
cables.
To prevent this happening, keep an open-ended spanner on nut
1 while screwing on bolt 2, without rotating this spanner.
The torque for nut 2 is 9 - 11 Nm (6.5 - 8 ft.lbf).
Make sure that no other electrical parts come loose when con-
necting the electric cables.
Check all electrical connections after 14 days. Electrical parts
(such as bolts and nuts) may come loose as a result of uctua-
tions in temperature.
Check that the voltage, recorded on the motor type plate, is in agree-
ment with the vessel’s circuit voltage. Position the battery or batter-
ies as close as possible to the bow thruster; the main power supply
cables can then be short, which reduces the voltage drop as much
as possible.
See page 69 for the applicable battery capacity, the size of main pow-
er supply cables and fuse to use.

020547.04 15
vetus® Operation manual and installation instructions bow thrusters BOW6012D and BOW6024D
If it is found during test running that the thrust direction does not
correspond with the direction switch on the control panel then the
blue (no. 1) and the white (no. 4) wires on the relay must be inter-
changed.
Warning!
Do NOT test the bow thruster while the ship is out of water, un-
less you are certain that everyone is at a safe distance from the
thrust tube.
Never allow the bow thruster to run for longer than 5 seconds
with the ship out of water.
6 Maintenance
Check the carbon brushes for wear - in normal use once per year -
with very intensive use of the bow thruster, e.g. with hire vessels,
once every two months.
• Remove the Protective cover from the relay and then the Protec-
tive cover to the brushes.
• Clean the carbon brushes, the holders and the collector. (Blow
away the dust coming o the brushes.)
• Check the length of the carbon brushes and replace before the
minimum length (L min) is reached. Also check the collector for
excessive wear.
For minimum length and art. code, see page 70.
• The brushes can be taken out of the holders by releasing the re-
taining spring.
The bow thruster tailpiece has long-term lubrication.
14
1
4
Six weeks after installation and at least once annually thereafter,
be sure to check all of the electrical connections between the bat-
tery/batteries and the bow thruster, as well as the connections on
the motor relays.
If they have been loosened previously, prevent the nut and bolt from
turning while connecting the main power supply cables. This is also
why you should always use a second wrench when tightening bolts.
The instructions of the manufacturer should be followed for the
maintenance of the batteries. Vetus batteries are maintenance free.
The following maintenance should be carried out during a slipway
service:
• Check the cathodic Protection and if necessary renew the zinc
anode.
For the art. code for the zinc anode, see page 70.
• Provide the bolts with a screwlock (Loctite®).
• Clean the propeller shaft, grease with ‘outboard gear grease’ and
ret the propeller on the shaft.
M5
2 Nm
3
PH2
Outboard Gear
Grease
Loctite® 242
ENGLISH

16 020547.04 vetus® Operation manual and installation instructions bow thrusters BOW6012D and BOW6024D
7 Trouble shooting
Electric motor does not operate
- Check that the battery main switch is‘ON’.
- Check whether the control panel fuse has burnt out. [1]
- Check if the main fuse has burnt out. [2]
In all the above cases, the‘POWER’indicator LED is not lit.
- The electric motor has overheated and its thermal Protection has
broken the circuit of the control current.
The panel gives a warning signal three times ( . - . . - ) and the LED
will glow red.
As soon as the motor has cooled down enough, the LED will
resume glowing green and the bow thruster can be put back in
service.
Check if it is possible to turn the propeller. A piece of wood or similar
could have been caught between the propeller and the tunnel.
Electric motor turns slowly
- The battery is at.
- Bad electrical connection(s) due to e.g. corrosion.
- The carbon brushes are not making proper contact.
- The battery capacity is reduced because of very low tempera-
tures.
- Weed or shing line has become caught in the propeller.
Control panel fuse is burnt out [1]
- Short circuit in the operating circuit; check the wiring.
Electric motor turns (too) fast but there is no thrust
- The blades of the propeller have been damaged by a foreign ob-
ject having entered the propeller or tunnel.
- The drive pin on the propeller shaft has been broken by a foreign
object having entered the propeller or tunnel.
Replace the drive pin and check the propeller ange for any dam-
age.
[1] The control current fuse is in the bow thruster motor. A spare fuse
can be found in the relay cap, see p. 70.
[2] See table on page 69
8 Technical data
Type : BOW6012D BOW6024D
Electric motor
Type : reversible DC motor
Voltage : 12 V DC 24 V DC
Current : 300 A [3] 165 A [4]
Rated output : 3 kW
No. of revolutions : 3400 rpm
Rating : S2 - 4 min. [3] S2 - 4 min. [4]
Protection : IP20
Motors conform to CE (80/336/EEC, EMC - EN60945)
Transmission
Gears : Bevel gear helical teeth
Gear ratio : 1.7 : 1
Lubrication : oilbath, approx. 0.06 litre (2 .oz.)
outboard gear oil SAE80W or EP 90
Housing : bronze
Propeller
Diameter : 178 mm (7”)
No. of blades : 6
Prole : asymmetrical
Material : polyacetal (Delrin ®)
Rated thrust : 650 N
(65 kgf, 146 lbf)
700 N
(70 kgf, 157 lbf)
Control circuit
Fuse : Blade type fuse ‘ATO’ 5 A
Current solenoid switch : 2.8 A 1.4 A
Control circuit wires : 1.5 mm2(14 AWG)
Extension cable : 6, 10, 16, 18 or 20 m
(20’, 33', 52', 59', or 65')
Thrust-tunnel
Steel model
dimensions : O.D. 194 mm, wall thickness 5.6 mm
treatment :
blasted, coated with: SikaCor Steel
Protect. Suitable for all kinds of
protection systems.
Plastic model
dimensions : I.D. 185 mm, wall thickness 5 mm
material : glass bre reinforced polyester
Aluminium model
dimensions : I.D. 185 mm, wall thickness 5.5 mm
material : aluminium, 6061 or 6062
(AlMg1SiCu)
Weight
Excl. thrust-tunnel : 22 kg (49 lbs)
Length of usage:
[3] 4 min. continuously or max. 4 min. per hour at 300 A (12 Volt).
[4] 4 min. continuously or max. 4 min. per hour at 165 A (24 Volt).

020547.04 i
Let op
Het is zeer belangrijk dat het gatenpatroon exact op de hart-
lijn van de tunnelbuis ligt.
Gebruik de tussenens of een stuk hoekproel om te controle-
ren of de hartlijn van de boormal overeenkomt met de hartlijn
van de tunnelbuis.
note
It is very important that the pattern of holes is precisely
aligned with the centre line of the tunnel.
Use the intermediate ange or a length of angle prole to check
whether the centre line of the drilling template is aligned with
the centre line of the tunnel.
achtung!
Es ist extrem wichtig, dass das Lochmuster genau auf der
Mittellinie des Tunnelrohrs liegt.
Benutzen Sie den Zwischenansch oder ein Stück Winkeleisen,
um zu kontrollieren, ob die Mittellinie der Bohrschablone ge-
nau mit der Mittellinie des Tunnelrohrs übereinstimmt.
attention!
Il est très important que les trous soient placés exactement
sur la ligne médiane de la tuyère.
Utilisez la bride d’accouplement ou un morceau de diagonale
pour contrôler si la ligne médiane du gabarit de perçage cor-
respond au gabarit de perçage de la tuyère.
¡atención!
Es sumamente importante que el patrón de oricios quede
exactamente sobre el eje central del conducto de propul-
sión.
Utilice la brida intermedia o un perl angular para controlar si
el eje central de la plantilla de perforación se corresponde con
el eje central de la brida intermedia.
attenzione!
È molto importante che la disposizione dei fori si trovi esat-
tamente sulla linea mediana del tunnel dell’elica.
Utilizzare la angia intermedia o un pezzo angolare per con-
trollare che la linea mediana della maschera di foratura coinci-
da con la linea mediana del tunnel dell’elica.
obs!
Det er vigtigt at hullemønstret ligger nøjagtigt på tunnelrø-
rets centerlinje.
Anvend mellemangen eller et stykke vinkelprol til at kon-
trollere om boreskabelonens centerlinje stemmer overens
med tunnelrørets centerlinje.
obs!
Det är mycket viktigt att hålmönstret passar exakt på tun-
nelrörets centrumlinje.
Använd mellanänsen eller ett vinkeljärn för att kontrollera att
centrumlinjen i borrmallen överensstämmer med tunnelrörets
centrumlinje.
obs!
Det er svært viktig at hullemønsteret ligger nøyaktig på tun-
nelrørets senterlinje.
Bruk mellomensen eller et stykke vinkelprol for å kontrollere
om borejiggens senterlinje stemmer overens med tunnelrø-
rets senterlinje.
tärkeää!
On hyvin tärkeää, että reiät kohdistuvat täsmälleen tunnelin
keskikohdan kanssa.
Käytä välilaippaa tai diagonaalikappaletta tarkistaaksesi, että
porausmallin keskilinja on kohdakkain tunnelin keskiviivan
kanssa.
NEDERLANDSENGLISHDEUTSCHFRANÇAISESPAÑOL
ITALIANODANSKSVENSKANORSKSUOMEKSI

ii 020547.04
Boormal
Drill pattern
Bohrschablone
Gabarit
Plantilla de perforación
Sagoma di trapana natura
Skabelon
Borrjigg
Boresjablon
Poraussabluuna
020547.04 iii
FOKKERSTRAAT 571 - 3125 BD SCHIEDAM - HOLLAND - TEL.: +31 10 4377700
TELEFAX:+31 10 4372673 - 4621286 - E-MAIL: sales@vetus.n l - INTERNET:http://www.vetus.com
vetus b.v. Printed in the Netherlands
22 (7/8”) 22 (7/8”)
ø 9 (3/8”) ø 30 (1 3/16”)
37 (1 29/64”) 77 (3 1/32”)
ø 9 (3/8”)
ø 9
(3/8”)
Schaal 1:1
Scale 1:1
Maßstab 1:1
Echelle 1:1
Escala 1:1
Scala 1:1
Skala 1:1
Skala 1:1
Målestokk 1:1
Suhde 1:1
BOW6012D
BOW6024D
60 kgf
ø 185 mm
2014-01
BOW6012D
BOW6024D

020547.04 iii
FOKKERSTRAAT 571 - 3125 BD SCHIEDAM - HOLLAND - TEL.: +31 10 4377700
vetus b.v. Printed in the Netherlands
22 (7/8”) 22 (7/8”)
ø 9 (3/8”) ø 30 (1 3/16”)
37 (1 29/64”) 77 (3 1/32”)
ø 9 (3/8”)
ø 9
(3/8”)
Schaal 1:1
Scale 1:1
Maßstab 1:1
Echelle 1:1
Escala 1:1
Scala 1:1
Skala 1:1
Skala 1:1
Målestokk 1:1
Suhde 1:1
BOW6012D
BOW6024D
60 kgf
ø 185 mm
2014-01

020547.04 65
vetus® Operation manual and installation instructions bow thrusters BOW6012D and BOW6024D
9 Hoofdafmetingen
Principal dimensions
Hauptabmessungen
Dimensions principales
Dimensiones principales
Dimensioni principali
Mål
Huvudmått
Viktigste mål
Päämitat
143 (5 5/8“)
ø 130 (5 1/8“ DIA.)
397 (15 5/8“)
ø 185
(7 5/16 “ DIA.)
160 (6 5/16 “)
77
(3 1/16 “)
MIN. 185
(7 5/16 “)
1 : 10

66 020547.04 vetus® Operation manual and installation instructions bow thrusters BOW6012D and BOW6024D
7
12
5
A1
A2
D1
D2
k1
k2
4
55/60/75/95/125/160/220 kgf
(12 / 24 V)
1 Hoofdzekering Main fuse Hauptsicherung Fusible principal Fusible principal
1 Fusibile principale Hovedsikring Huvudsäkring Hovedsikring Päävirtasulake
2 Hoofdschakelaar Main switch Hauptschalter Interrupteur principal Interruptor principal
2 Interruttore principale Hovedafbryder Huvudströmbrytare Hovedbryter Päävirtakytkin
3 Stuurstroomzekering Control current fuse Steuerstromsicherung Fusible courant de com-
mande
Fusible de circuito de
control
3Fusibile del circuito di
comando Styrestrømssikring Styrströmsäkring Styrestrømsikring Ohjausvirtasulake
4 Magneetschakelaar Solenoid switch Relais Contacteur solénoïde Interruptor de solenoide
4 Interruttore solenoidale Magnetafbryder Kontaktor Magnetbryter Rele
5 Elektromotor Electromotor Elektromotor Moteur électrique Electromotor
5 Motore elettrico Elektromotor Elmotor Elektromotor Sähkömoottori
6 Bedieningspaneel Control panel Bedienungspaneel Panneau de commande Tablero de mandos
6 Panelo di comando Betjeningspanel Manöverpanel Kontrollpanel Ohjauspaneli
7Accu Battery Batterie Batterie Batería
7 Batteria Batteri Batteri Batteri Akku
8 Steker Plug Stecker Prise mâle Clavija macho
8 Spina maschio Stik Stickkontakt Støpsel Pikaliitin
9 Contrasteker Socket Kontrastecker Prise femelle Clavija hembra
9 Spina femmina Kontrastik Kontrastickkontakt Stikkontakt Pikaliitin
10 Verlengkabel Extension cable Zwischenkabel Câble de branchement Cable prolongador
10 Prolunga Forlængerledning Förlängningskabel Skjøtekabel Jatkokaapeli
11 Dynamo Alternator Lichtmaschine Générateur Generador
11 Dinamo Dynamo Generator Dynamo Generaattori
12 Thermische beveiliging Thermal Protection Thermosicherung Sécurité thermique Dispositivo térmico de
seguridad
12 Protezione termica Termisk beskyttelse Termiskt skydd Termisk sikring Lämpösuojain
Kleurcode bedrading: Wiring colour code: Farbkode für die Be-
drahtung:
Code de couleur des
câbles:
Código de color de los
cables:
Codice colori cavi: Farvekode til kabler: Färgkod kablage: Fargekode ledninger: Kaapeleiden värikoodit:
1 Blauw Blue Blau Bleu Azul
1 Blu Blå Blå Blå Sininen
2 Rood (+) Red (+) Rot (+) Rouge (+) Rojo (+)
2 Rosso (+) Rød (+) Röd (+) Rød (+) Punainen (+)
3 Zwart (-) Black (-) Schwarz (-) Noir (-) Negro (-)
3 Nero (-) Sort (-) Svart (-) Svart (-) Musta (-)
4Wit White Weiß Blanc Blanco
4 Bianco Hvid Vit Hvit Valkoinen
10 Elektrisch schema Schaltschema Esquema eléctrico
Schema elettrico Kopplingsschema Sähkökaavio
Wiring diagram Circuit electrique
Elektrisk skema Elektrisk skjema

020547.04 67
vetus® Operation manual and installation instructions bow thrusters BOW6012D and BOW6024D
4
3
2
1
4
3
2
1
1
2
3
4
1
2
3
4
1
2
3
4
12
A1
A2
D1 D2
1 Hoofdzekering Main fuse Hauptsicherung Fusible principal Fusible principal
1 Fusibile principale Hovedsikring Huvudsäkring Hovedsikring Päävirtasulake
2 Hoofdschakelaar Main switch Hauptschalter Interrupteur principal Interruptor principal
2 Interruttore principale Hovedafbryder Huvudströmbrytare Hovedbryter Päävirtakytkin
3 Stuurstroomzekering Control current fuse Steuerstromsicherung Fusible courant de com-
mande
Fusible de circuito de
control
3Fusibile del circuito di
comando Styrestrømssikring Styrströmsäkring Styrestrømsikring Ohjausvirtasulake
4 Magneetschakelaar Solenoid switch Relais Contacteur solénoïde Interruptor de solenoide
4 Interruttore solenoidale Magnetafbryder Kontaktor Magnetbryter Rele
5 Elektromotor Electromotor Elektromotor Moteur électrique Electromotor
5 Motore elettrico Elektromotor Elmotor Elektromotor Sähkömoottori
6 Bedieningspaneel Control panel Bedienungspaneel Panneau de commande Tablero de mandos
6 Panelo di comando Betjeningspanel Manöverpanel Kontrollpanel Ohjauspaneli
7Accu Battery Batterie Batterie Batería
7 Batteria Batteri Batteri Batteri Akku
8 Steker Plug Stecker Prise mâle Clavija macho
8 Spina maschio Stik Stickkontakt Støpsel Pikaliitin
9 Contrasteker Socket Kontrastecker Prise femelle Clavija hembra
9 Spina femmina Kontrastik Kontrastickkontakt Stikkontakt Pikaliitin
10 Verlengkabel Extension cable Zwischenkabel Câble de branchement Cable prolongador
10 Prolunga Forlængerledning Förlängningskabel Skjøtekabel Jatkokaapeli
11 Dynamo Alternator Lichtmaschine Générateur Generador
11 Dinamo Dynamo Generator Dynamo Generaattori
12 Thermische beveiliging Thermal Protection Thermosicherung Sécurité thermique Dispositivo térmico de
seguridad
12 Protezione termica Termisk beskyttelse Termiskt skydd Termisk sikring Lämpösuojain
Kleurcode bedrading: Wiring colour code: Farbkode für die Be-
drahtung:
Code de couleur des
câbles:
Código de color de los
cables:
Codice colori cavi: Farvekode til kabler: Färgkod kablage: Fargekode ledninger: Kaapeleiden värikoodit:
1 Blauw Blue Blau Bleu Azul
1 Blu Blå Blå Blå Sininen
2 Rood (+) Red (+) Rot (+) Rouge (+) Rojo (+)
2 Rosso (+) Rød (+) Röd (+) Rød (+) Punainen (+)
3 Zwart (-) Black (-) Schwarz (-) Noir (-) Negro (-)
3 Nero (-) Sort (-) Svart (-) Svart (-) Musta (-)
4Wit White Weiß Blanc Blanco
4 Bianco Hvid Vit Hvit Valkoinen
10 Elektrisch schema Schaltschema Esquema eléctrico
Schema elettrico Kopplingsschema Sähkökaavio
Wiring diagram Circuit electrique
Elektrisk skema Elektrisk skjema

68 020547.04 vetus® Operation manual and installation instructions bow thrusters BOW6012D and BOW6024D
7
12 12
7
5
A1
A2
D1
D2
k1
k2
4
5
A1
A2
D1
D2
k1
k2
4
(12 V
/ 24 V) (12 V
/ 24 V)
1 2
85
86 30
87a87
85
86 30
87a87
1 2
1
2
10.1 Gelijktijdige bediening van 2 boegschroeven met 1 paneel
Simultaneous operation of two bow thrusters with one
panel
Gleichzeitige Bedienung von zwei Bugschrauben mit
einem Armaturenbrett
Commande simultanée de 2 hélices d’étrave avec 1 pan-
neau
Manejo simultáneo de 2 tornillos de retención con 1 panel
Comando contemporaneo di 2 eliche di prua mediante 1
solo pannello
Samtidig betjening af 2 bovpropeller med 1 betjeningspa-
nel
Samtidig manövrering av 2 bogpropellrar med 1 panel
Samtidig betjening av 2 baugpropeller med 1 panel
Kahden keukapotkurin ohjaus samanaikaisesti yhdellä
panelilla.

020547.04 69
vetus® Operation manual and installation instructions bow thrusters BOW6012D and BOW6024D
Boegschroef
Toe te passen accu(’s) Totale lengte plus- en
minkabel
Draaddoor-
snede
Zekering
Minimaal Maximaal ‘traag’ Vetus art.
code
Bow thruster
Battery capacity required Total length of plus-
and minus cable
Cable cross-
section
Fuse
Minimum Maximum ‘slow blow’ Vetus art.
code
Bugschraube
Zu verwendende Akkus Gesamtlänge Plus-
und Minuskabel
Draht-
durchschnitt
Sicherung
Minimum Maximum ‘träge’ Artikelnum-
mer
Hélice
d'étrave
Batterie(s) à utiliser Longueur totale des
câbles plus et moins
Diamètre du
câble
Fusible
Minimum Maximum ‘lent’ code d'art.
Vetus
Hélice de proa
Batería(s) a aplicar Largo total cable
positivo y negativo
Diámetro de
hilo
Fusible
Mínimo Máximo ‘lento’ Código de art.
Vetus
Elica
Batteria(e) da usare Lunghezza totale
cavo positivo e ne-
gativo
Diametro
cavi
Fusibile
Minimo Massimo ‘a tempo’ Vetus codigo
art.
Bovpropel
Batterikapacitet Total længde af posi-
tiv og negativ batteri-
kabel tilsammen
Tråd-
diameter
Sikring
Min. Max. ‘træg’ Vetus artikeln
Bogpropeller Lämpligt batteri Total längd kabel till
plus- och minuspol
Kabelns
dimension
Säkring
Min. Max. ‘trög’ Vetus artikelnr
Baugpropell
Nødvendig batterikapasitet Total lengde pluss- og
minuskabel
Ledningt-
verrsnitt
Sikring
Min. Maks ‘treg’ Vetus art.
kode
Keulapotkuri Vaadittava akkukapasiteetti ‘Miinus’- ja‘plus”-
kaapeleiden koko-
naispituudet
Kaapelikoko Sulake
Minimi Maksimi hidas Vetus koodi
BOW6012D
60 kgf - 12 V 70 Ah - 12 V
BCI 91 - 650
CCA 650 - 12 V
145 Ah - 12 V
BCI 4D - 1000
CCA 1000 - 12 V 0 - 11 m
11 - 16 m
50 mm2
70 mm2
200 A ZE200
0 - 31 ft
31 - 40 ft
AWG 1
AWG 0
BOW6024D
60 kgf - 24 V 2 x 55 Ah - 12 V
2 x BCI 90 - 500
55 Ah-12 V
BCI 90 - 500 55 Ah-12 V
BCI 90 - 500
CCA 500 - 24 V
2 x 70 Ah - 12 V
2 x BCI 91 - 650
70 Ah-12 V
BCI 91 - 650 70 Ah-12 V
BCI 91 - 650
CCA 650 - 24 V 0 - 20 m 25 mm2
100 A ZE100
0 - 57 ft AWG 4
11 Accucapaciteit, accukabels
Battery capacity, battery cables
Akkukapazität, Akkukabel
Capacité de la batterie, câbles de bat-
terie
Capacidad de las baterías, cables de
baterías
Capacità della batteria e cavi della
batteria
Batteriets kapacitet, batterikabler
Batterikapacitet, batterikablar
Batterikapasitet, batterikabler
Akkukapasiteetti, akkukaapelit

70 020547.04 vetus® Operation manual and installation instructions bow thrusters BOW6012D and BOW6024D
7
8
10
11
12
9
13
5
6
4
21
3
14
15
BOW6012D
BOW6024D
Service onderdelen Service parts
pos. qty part benaming description
1 1 SET0060 Elektromotor 3 kW - 12 V voor BOW6012D compl.
met relais
Electromotor 3 kW - 12 V for BOW6012D c/w sole-
noid switches
1 SET0108 Elektromotor 3 kW - 24 V voor BOW6024D compl.
met relais
Electromotor 3 kW - 24 V for BOW6024D c/w sole-
noid switches
2 1 SET0015 Set relais 12 V voor BOW6012D Set of solenoid switches 12 V for BOW6012D
1 SET0020 Set relais 24 V voor BOW6024D Set of solenoid switches 24 V for BOW6024D
3 1 SET0126 Set van 8 stuks koolborstels voor BOW6012D Set of 8 pcs of carbon brushes for BOW6012D
1 SET0127 Set van 4 stuks koolborstels voor BOW6024D Set of 4 pcs of carbon brushes for BOW6024D
4 1 BPC00100 Relaiskap Relais cover
5 1 SET0006 Set van 2 stuks kartelmoeren Set of 2 pcs knurled nuts
6 1 BP1202 Koppeling Coupling
7 1 BP1302B Tussenflens Intermediate flange
8 1 SET0091 Staartstuk compl. Tailpiece compl.
9 1 SET0150 Zinkanode compl. met schroeven Zincanode c/w screws
10 1 SET0088 Schroef compl. met meeneempen en montageset Propeller c/w drive pin and mounting set
11 1 BP275S Meeneempennen, 5 stuks Propeller pins, 5 pcs
12 2 BP1020 Pakking 2 mm Gasket 2 mm
13 1 BP1021 Pakking 1 mm Gasket 1 mm
14 1 TS110 Thermische beveiliging Thermal Protection
15 1 BP256 Reserve zekering 5 A Spare fuse 5 A
28.5
25
11
L min.
14
[mm]
(4 x)
28.5
20
9
L min.
14
[mm]
(8 x)
12 V
EC3/2,4/33-02
EC3/1,2/29-02
24 V

020547.04 71
vetus® Operation manual and installation instructions bow thrusters BOW6012D and BOW6024D
EN 55011 EN 61000
2004/108/EEC 93/68/EEC
Schiedam, 20 01 2014
Ing. P.H. le Pair
Vetus B.V.
Fokkerstraat 571
3125 BD Schiedam
The Netherlands
Declaration of Conformity
BOW6012D, BOW6024D
Wij verklaren onder onze volledige verantwoordelijkheid dat dit pro-
duct voldoet aan, en in overeenstemming is met, de volgende nor-
men en richtlijnen:
We declare under our sole responsibility that this product is in con-
formity and accordance with the following standards and directives:
Wir übernehmen vollständige Verantwortung dafür, dass dieses Pro-
dukt den folgenden Normen und Richtlinien entspricht und deren
Anforderungen erfüllt:
Nous déclarons sous notre entière responsabilité que ce produit est
conforme aux normes et directives suivantes :
Declaramos bajo nuestra total responsabilidad que este producto es
conforme a las siguientes normas y directivas:
Dichiariamo sotto la nostra responsabilità che questo prodotto è
conforme e risponde alle seguenti norme e direttive:
Vi erklærer på vores fulde ansvar, at dette produkt opfylder og er i
overensstemmelse med følgende normer og direktiver:
Vi förklarar under vårt fullständiga ansvar att denna produkt uppfyl-
ler, och är i överensstämmelse med, följande normer och direktiv:
Vi erklærer under vårt fullstendige ansvar at dette produktet oppfyl-
ler og er i overensstemmelse medfølgende standarder og direktiver:
Vakuutamme täysin omalla vastuullamme, että tämä tuote täyttää
seuraavien normien ja direktiivien vaatimukset ja yhdenmukaisuu-
den:

vetus b.v.
FOKKERSTRAAT 571 - 3125 BD SCHIEDAM - HOLLAND - TEL.: +31 10 4377700
Printed in the Netherlands
020547.04 2014-01
This manual suits for next models
1
Table of contents
Other Vetus Marine Equipment manuals
Popular Marine Equipment manuals by other brands

Hawkeye Mfg
Hawkeye Mfg DF1000D Installation and operation manual

Global Fire Equipment
Global Fire Equipment VALKYRIE AS IP65 quick start guide

Dual
Dual AM505BT Installation & owner's manual

Honeywell
Honeywell Home SI800MS installation instructions

Kasco
Kasco Robust-Aire RA7 Installation & operation manual

Furuno
Furuno FICE-100 Operator's manual

Raymarine
Raymarine Axiom XL Supplementary information

Furuno
Furuno Color Video Sounder FCV-522 Operator's manual

Seawave
Seawave ST60 Wireless Owner's handbook

Muir
Muir VC-850 manual

INIM
INIM AIR2 Hedera Installation and programming manual

FUTURE OCEANS
FUTURE OCEANS Netguard Porpoise & Dolphin Pinger Attachment instructions