Step 1. Remove the plastic separator from the battery.
Step 2. Press to turn on the light.
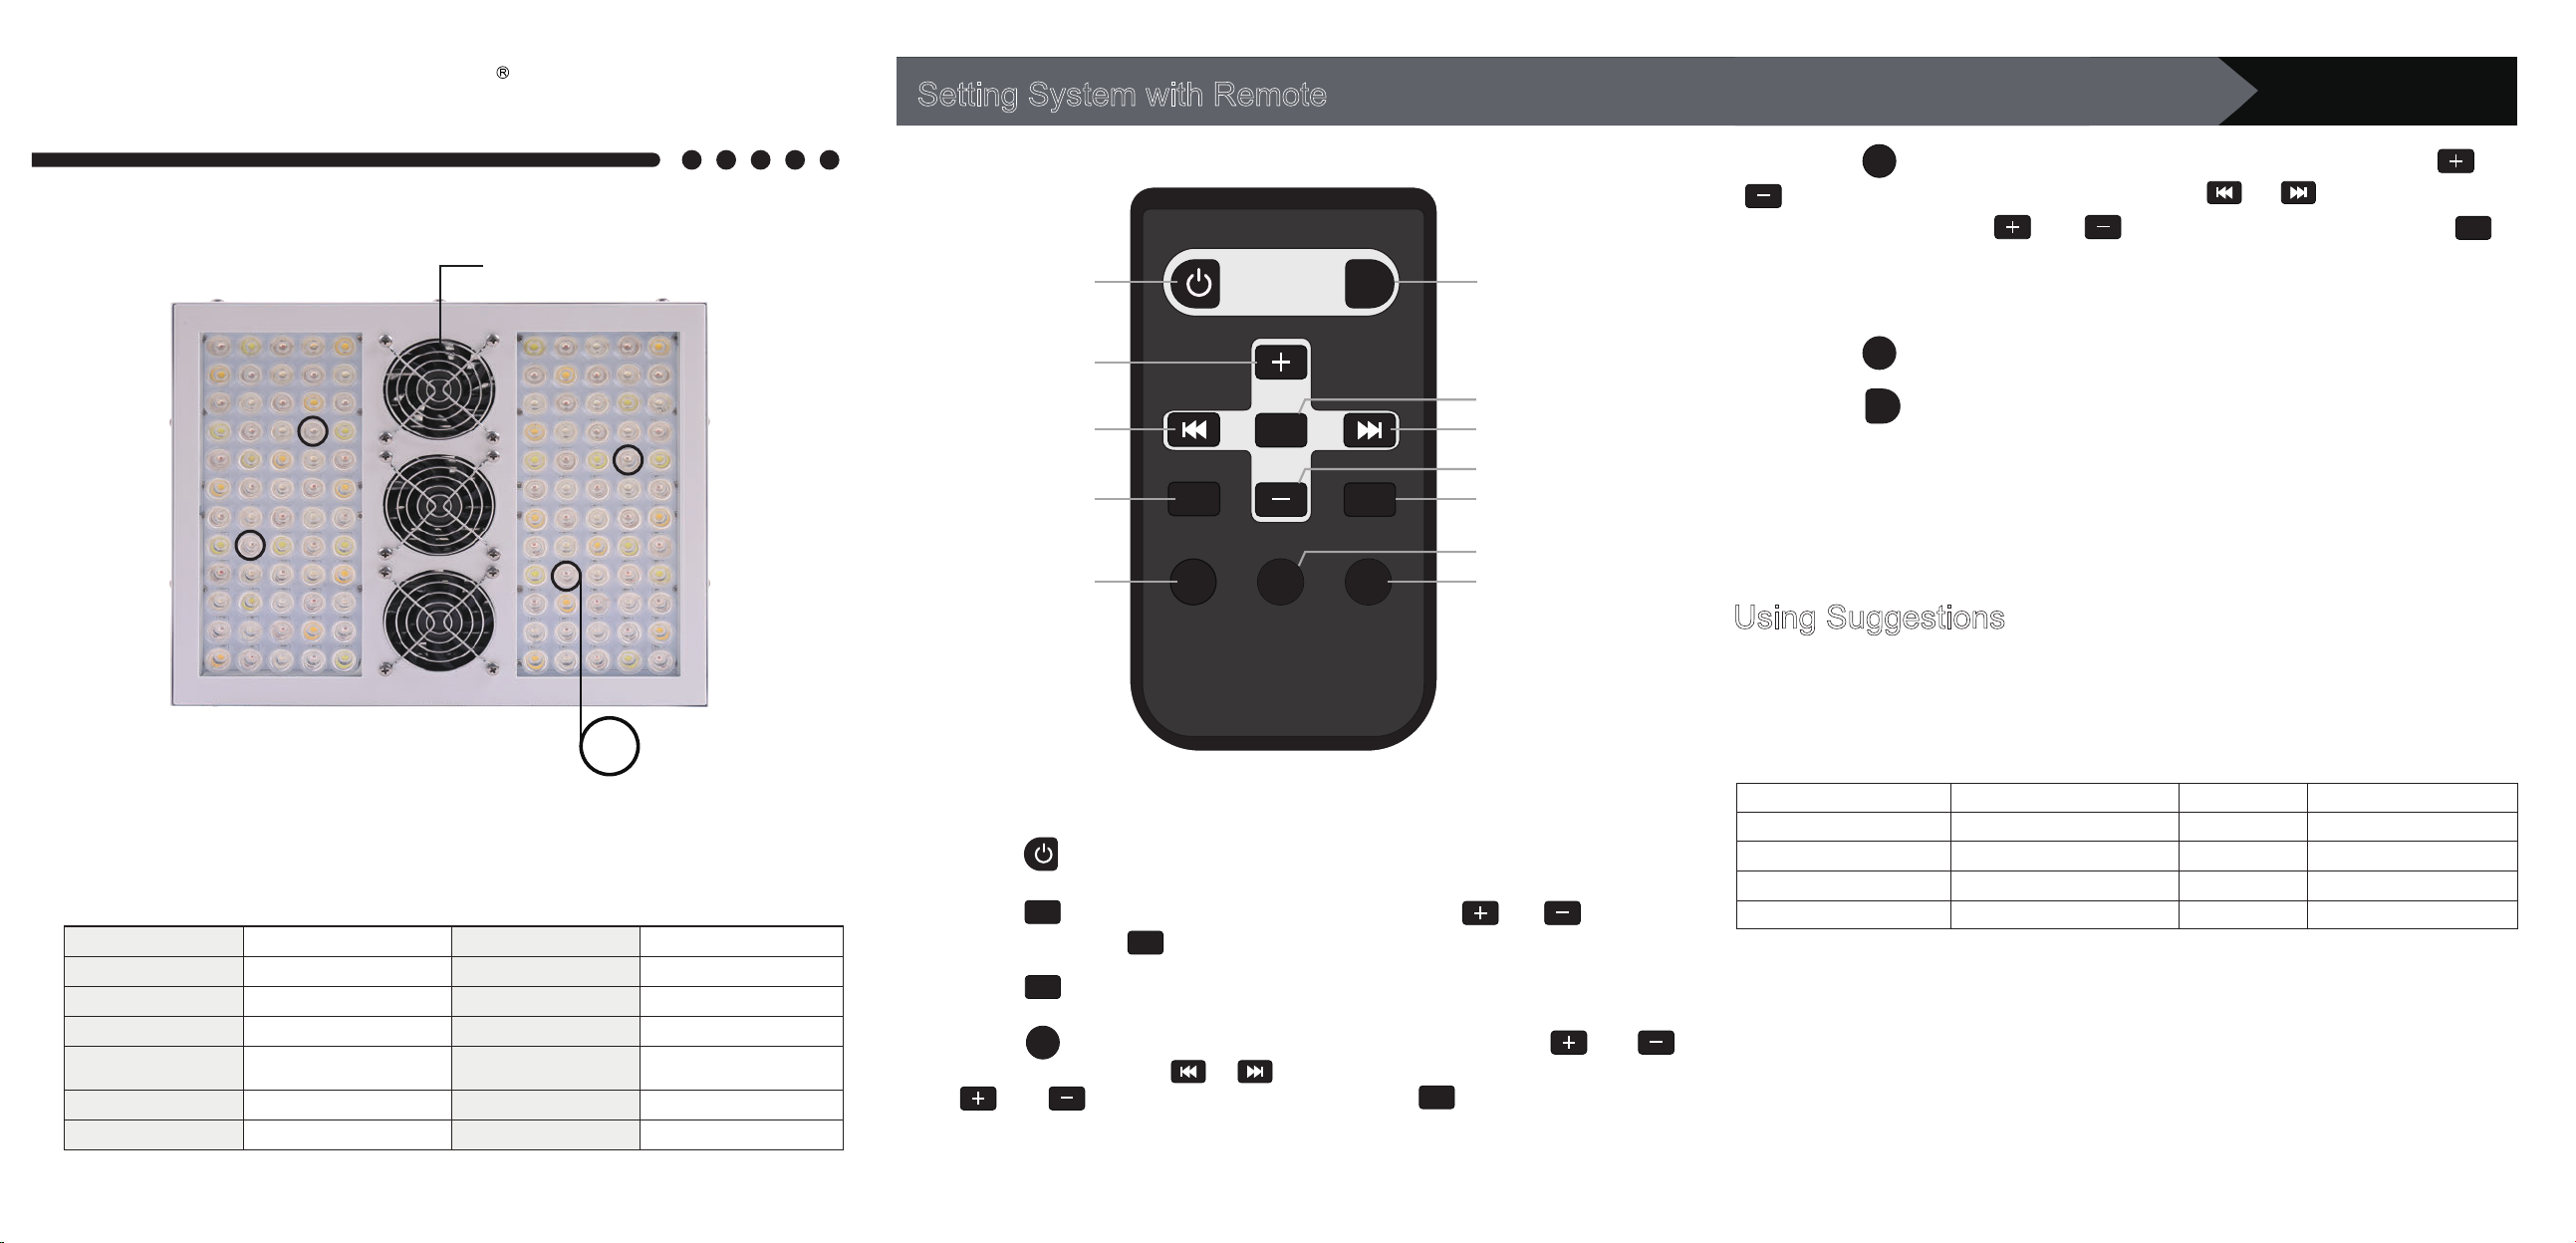
Step 3. Press to setup brightness for VEG channel. Using and , select the
desired brightness. Press to save settings.
Step 4. Press , repeat step 3 to setup brightness for BLOOM channel.
Step 5. Press to setup current time of day, the hour will flash. Using and ,
select the desired hour. Press or to save the hour and activate the minutes.
Using and , select the desired minutes. Press to save settings, or wait
about 3 seconds and the programmed time will be automatically saved.
OK
OK
VEG
BLOOM
CLOCK
02
Setting System with Remote
Step 6. Press to setup light's start-working time, the hour will flash. Using and
, select the desired start-working hour. Press or to save the hour and
activate the minutes. Using and , select the desired minutes. Pressto
save settings, or wait about 3 seconds and the programmed time will be automatically
saved.
Step 7. Press , repeat step 6 to setup light's off-working time.
Step 8. Press to confirm that the system has saved the desired start-working and
off-working time.
PREVIEW
ON
OFF
OK
Using Suggestions
Height (above plants' canopy) Using Hours Brightness (VEG/BLOOM)
10 on / 14 off 40% / 15%
60% / 30%
100% / 60%
100% / 100%
42" - 46"3-5 Days Acclimation Period
Vegetative Stage
Flowering Stage
38" - 42"
30" - 38"
22" - 30"
12 on / 12 off
12 on / 12 off
PAR600T
Seedlings/ Young Vegetative
MODEL: PAR600T
PAR Series
www.viparspectra.com
For flowering stage: use all channels with 100% brightness.
This light includes IR (Infrared) LEDs which look dim/invisible, they are not faulty LEDs.
Two fans will work while VEG channel on, the rest one fan will work while BLOOM channel on.
The digital display will be turned off so it will not illuminate/emit blue light during light off-working time.
PREVIEW
OK
VEG BLOOM
ON CLOCK OFF
VIPARSPECTRA
To setup brightness for
BLOOM channel.
To setup light's start-working
time.
To setup light's off-working
time.
To setup brightness for
VEG channel.
To setup current time of day.
To turn ON/OFF the light.
To increase value.
Switch to other setting.
To decrease value.
Switch to other setting.
To save settings.
To preview start-working
and off-working time.
Note: Timer controls both channels on/off together. Cannot turn VEG and BLOOM channel
on/off separately.
Adjust the height and brightness accordingly to desired coverage and how well each individual
plant responds as the brightness increases. The key is to always observe your plants and listen
to what they're telling you. If the leaves are pointing hard towards the light, they love it! Give
them more! If they shy away or appear limp and unhappy, while all other components and
environmental variables are correct, back off with the light! They'll let you know very quickly how
they feel. This is of course... the key to horticulture in general.
The following section will help guide you in the process of evaluating the best methods
for each stage of plant growth. Remember to properly adjust the height and brightness of
your light according to your plants desired level for optimal growth.
IR
4pcs look dim
3pcs cooling fans
Specifications:
Model:
LED Power:
Actual Power Draw:
LED Quantities:
Total Harmonic Distortion:
Input Voltage:
Frequency:
PAR600T
600W
110V: 272W±3%; 220V: 268W±3%
120pcs Epiled/Bridgelux 5W LEDs
AC100-240V
50-60Hz
HID Replacement:
Vegetative Coverage at 34":
Flowering Coverage at 26":
Use for:
Housing Dimensions:
Item Weight:
Lifespan:
400W HPS/MH
3x3ft
2.5x2.5ft
all stages grow and flowering
14.1 x 11.8 x 3.5 inches
35.8 x 30 x 8.9 cm
12.1 lbs (5.5 kgs)
≥100,000 hours
15%
<
Ⅲ
18 on / 6 off
USER
INSTRUCTIONS
VIPARSPECTRA


