manuals.online logo
Brands
  1. Home
  2. •
  3. Brands
  4. •
  5. viparspectra
  6. •
  7. Lighting Equipment
  8. •
  9. viparspectra Timer Control VT300 User manual

viparspectra Timer Control VT300 User manual

Step 1. Remove the plastic separator from the battery.
Step 2. Press to turn on the light.
Step 3. Press to setup brightness for VEG channel. Using and , select the
desired brightness. Press to save settings.
Step 4. Press , repeat step 3 to setup brightness for BLOOM channel.
Step 5. Press to setup current time of day, the hour will flash. Using and ,
select the desired hour. Press or to save the hour and activate the minutes.
Using and , select the desired minutes. Press to save settings, or wait
about 3 seconds and the programmed time will be automatically saved.
OK
OK
VEG
BLOOM
CLOCK
02
Setting system with Remote
Step 6. Press to setup light's start-working time, the hour will flash. Using and
, select the desired start-working hour. Press or to save the hour and
activate the minutes. Using and , select the desired minutes. Pressto
save settings, or wait about 3 seconds and the programmed time will be automatically
saved.
Step 7. Press , repeat step 6 to setup light's off-working time.
Step 8. Press to confirm that the system has saved the desired start-working and
off-working time.
PREVIEW
ON
OFF
OK
Using Suggestions
Height (above plants' canopy) Using Hours Brightness (VEG/BLOOM)
10 on / 14 off 40 / 15
60 / 30
100 / 60
100 / 100
30” - 34”3-5 days acclimation period
Vegetative Stage
Flowering Stage
26” - 30”
20” - 26”
16” - 20”
12 on / 12 off
12 on / 12 off
18 on / 6 off
VT300
Seedlings/ Young vegetative
Specifications:
Model:
LED Power:
Actual Power Draw:
LED Quantities:
Total Harmonic:
Input Voltage:
Frequency:
VT300
300W
134W±3%
60pcs Epiled/Bridgelux
LEDs
AC100-240V
50-60Hz
HID Replacement:
Vegetative Coverage at 24":
Flowering Coverage at 18":
Use for:
Housing Dimensions:
Item Weight:
Lifespan:
250W HPS/MH
2.5x2.5ft
2x2ft
all stages grow and flowering
15.7 x 8.3 x 2.6 inches
7.6 lbs
≥100,000 hours
15%
<
IR
2pcs look dim
MODEL: VT300
USER INSTRUCTIONS
Timer Control Series
www.viparspectra.com
For flowering stage: use all channels with 100% brightness.
This light includes IR (Infrared) LEDs which look dim/invisible, they are not faulty LEDs.
PREVIEW
OK
VEG BLOOM
ON CLOCK OFF
VIPARSPECTRA
To setup brightness for
BLOOM channel.
To setup light's start-working
time.
To setup light's off-working
time.
To setup brightness for
VEG channel.
To setup current time of day.
To turn ON/OFF the light.
To increase value.
Switch to other setting.
To decrease value.
Switch to other setting.
To save settings.
To preview start-working
and off-working time.
Note: Timer controls both channels on/off together. Cannot turn VEG and BLOOM channel
on/off separately.
Adjust the height and brightness accordingly to desired coverage and how well each individual
plants responds as the brightness increases. The key is to always observe your plants and listen
to what they're telling you. If the leaves are pointing hard towards the light, they love it! Give
them more! If they shy away or appear limp and unhappy, while all other components and
environmental variables are correct, back off with the light! They'll let you know very quickly how
they feel. This is of course... the key to horticulture in general.
The following section will help guide you in the process of evaluating the best methods
for each stage of plant growth. Like many other growers, you can use this light throughout
the seeding and flowering stages of your plants life. Remember to properly adjust the height
and brightness of your light according to your plants desired level for optimal growth.
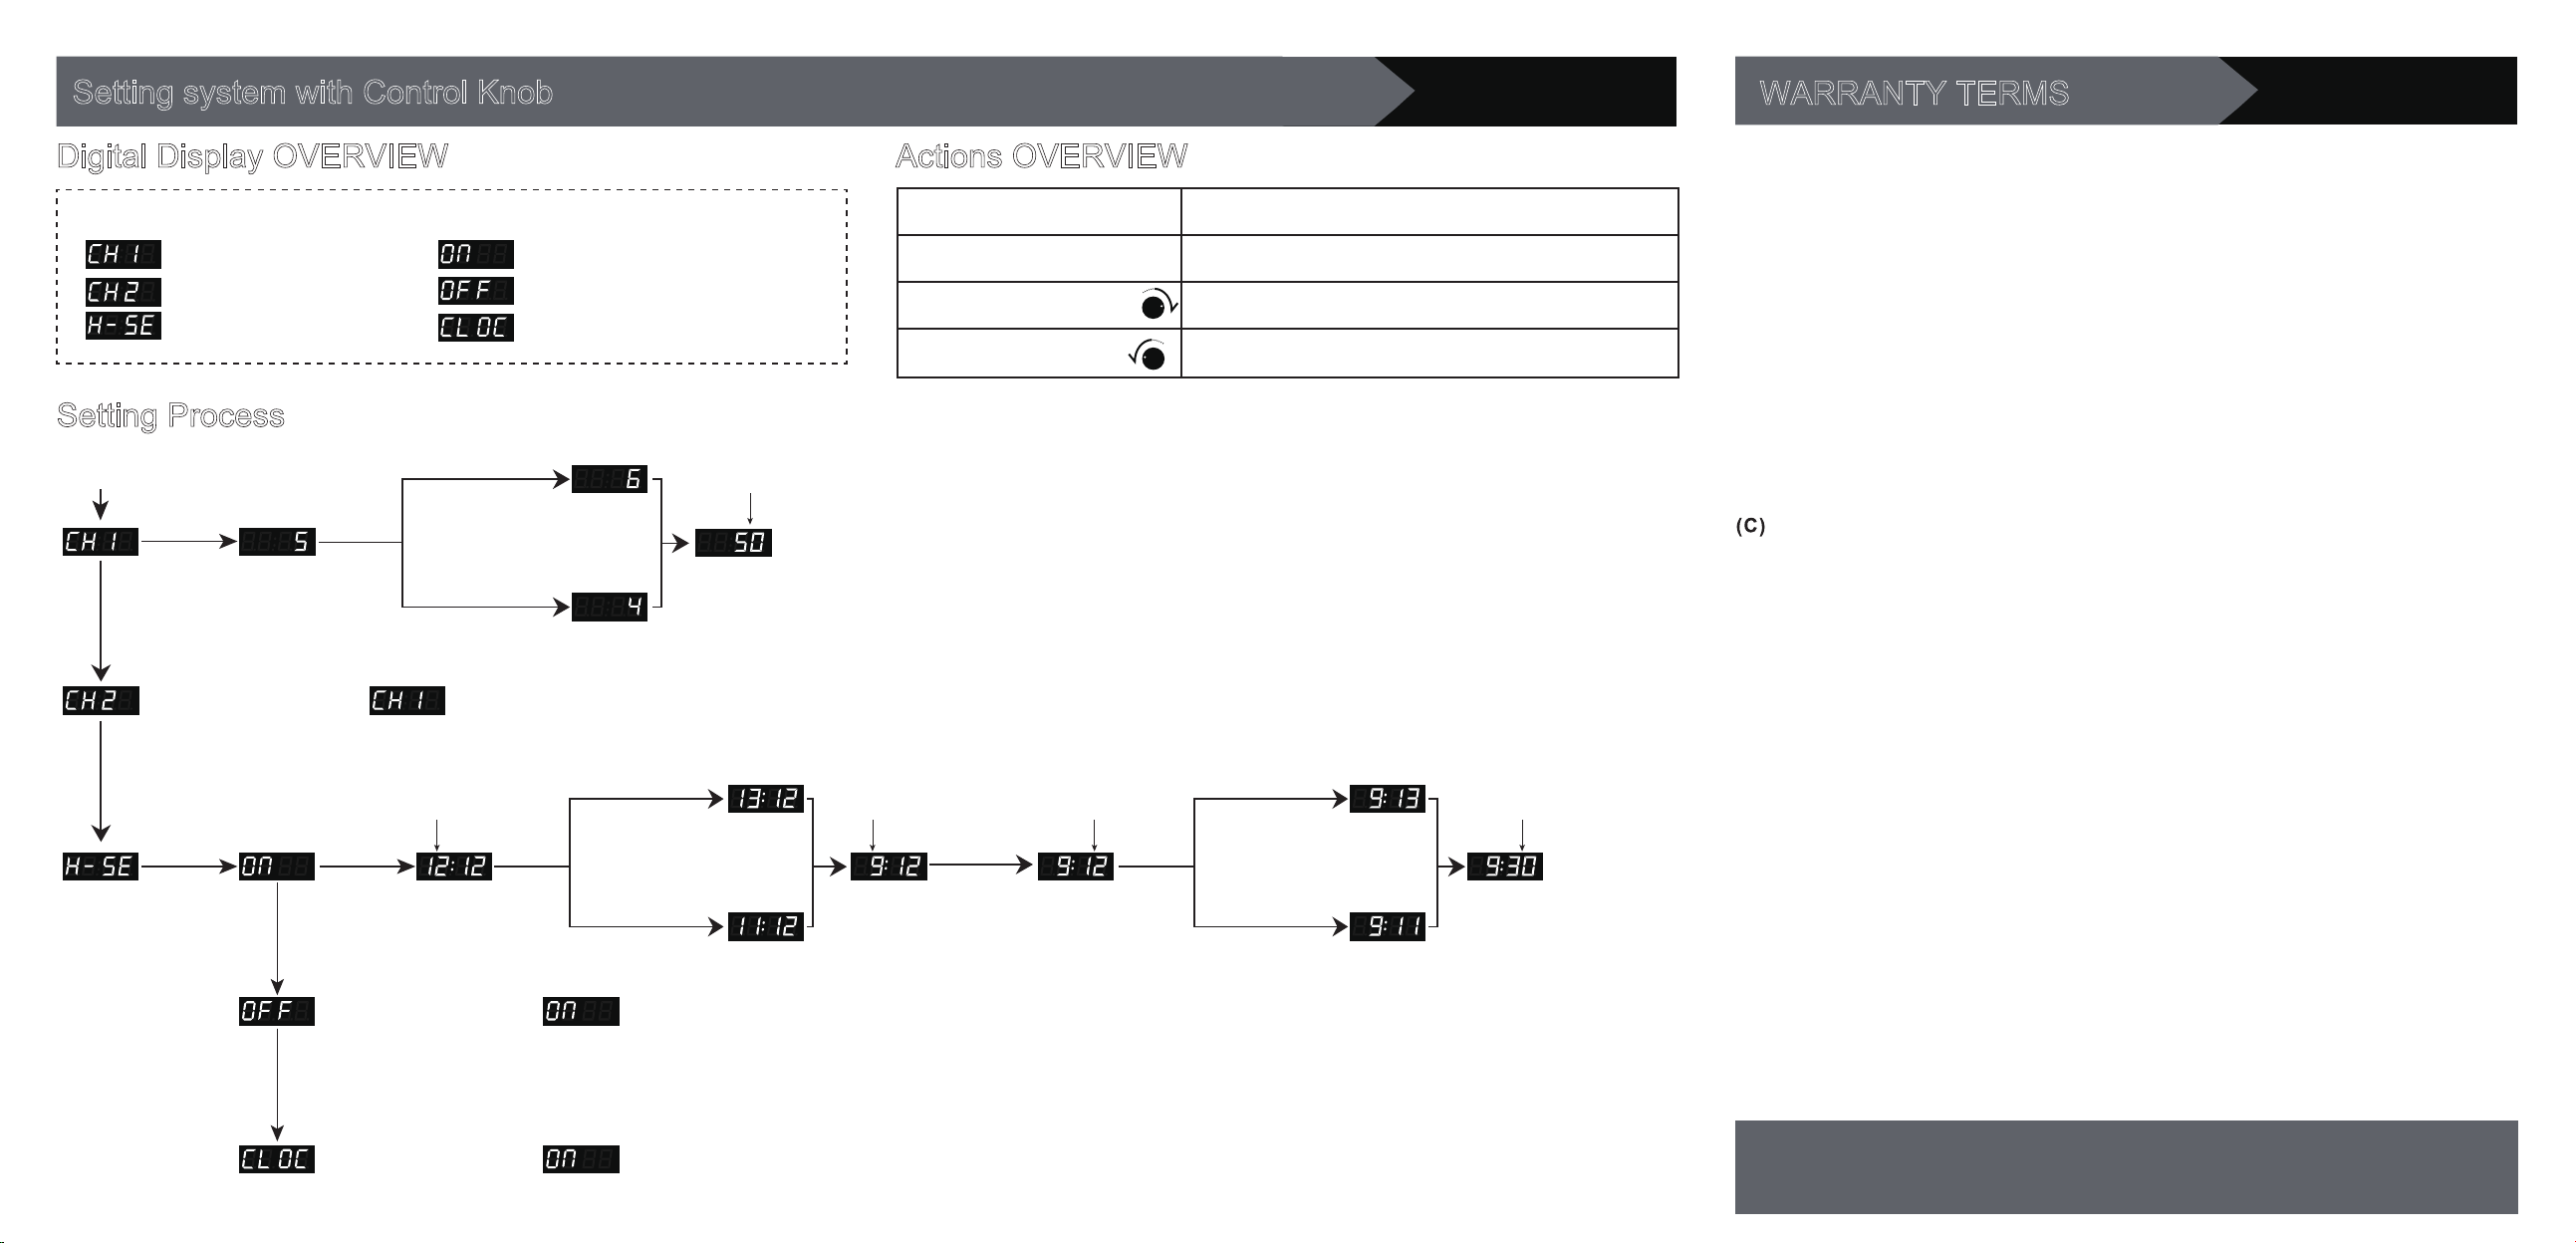
Setting system with Control Knob
flashing select desired hour
brightness
press the knob
press the knob
same method as setting
clockwise
clockwise
to increase value
to decrease value
counterclockwise
press the knob
press the knob
rotate
the knob
rotate
the knob
rotate
the knob
rotate
the knob
select desired minuteflashing
to decrease value
rotate
the knob
press
the knob
clockwise
to decrease value
rotate
the knob
same method as setting
Sub-menus of “H-SE”:Main menus:
: VEG channel
: BLOOM channel
: Timer setting
: Start-working time
: Off-working time
: Current time
Digital Display OVERVIEW
Setting Process
Press the knob to start
counterclockwise
to increase value to increase value
counterclockwise
Action Function
Press the knob
Rotate clockwise
Rotate counterclockwise
1. power on/off 2. change mode 3. save settings
1. enter mode 2. increase value (+1)
1. enter mode 2. decrease value (-1)
Actions OVERVIEW
wait about 3-5 seconds to
save desired start-working
time and go to next step
press the knob to save
desired brightness and
go to next step
select desired
brightness
NOTE:
1. Keep pressing the knob around 3 seconds can turn off the light.
2. System will save settings and back to superior menu if no action within 3-5 seconds.
3. Timer controls both channels on/off together. Cannot turn VEG and BLOOM channel
on/off separately.
Customer Service
Email: [email protected]
Phone: 1-844-504-3266(United States)
WARRANTY TERMS
1. We offer three years warranty for all of our products purchased against manufacturing
defects, from the date of purchase. If you need warranty assistance, please contact us as
soon as possible.
2. The warranty does not cover damage due to high moisture levels, water, power
surges, improper hanging/mounting, improper use, dust build-up or user modifications.
3. For USA buyers, if any lights stop working within 30 days, you can choose:
(A) Exchange. We will email you a pre-paid return label, please ship the light
back to our USA warranty center. A replacement will be sent to you for free as
soon as we received the defective light.
(B) Money back. We will email you a pre-paid return label, please ship the light
back to our USA warranty center. You will get your money back as soon as we
received the defective light.
Repairing. We can send parts free of charge immediately if you’d like to repair
simple defect. Or we will email you a pre-paid return label to bring light back, then ship
back to you after we repair it. All for free.
4. For buyers outside of the USA, if any lights stop working within 30 days, you can choose:
(A) Exchange. Please ship the light back to our warehouse, buyer pays return
shipping. A replacement will be sent to you for free as soon as we received the
defective light.
(B) Money back. Please ship the light back to our warehouse, buyer pays return
shipping. You will get your money back as soon as we received the defective light.
(C) Repairing. We can send parts free of charge immediately if you’d like to repair
simple defect.
5. To all customers: if any lights stop working over 30 days after delivery, please contact us
to get a satisfactory solution.
6. If a light is sent in with damage that is not covered under warranty, we may still
be able to perform warranty service, however that is at our discretion and repairs
may bear a cost which will be assessed prior to repairing the light.
7. Our company reserves the interpretation right of this warranty structure. If you
have any questions about our warranty policy, please contact us.

Other viparspectra Lighting Equipment manuals

viparspectra XS Series User manual

viparspectra

viparspectra XS Series User manual

viparspectra KS5000 User manual

viparspectra

viparspectra KS5000 User manual

viparspectra Timer Control TC1800 User manual

viparspectra

viparspectra Timer Control TC1800 User manual

viparspectra Reflector Series User manual

viparspectra

viparspectra Reflector Series User manual

viparspectra Timer Control TC600 User manual

viparspectra

viparspectra Timer Control TC600 User manual

viparspectra Dimmable Series User manual

viparspectra

viparspectra Dimmable Series User manual

viparspectra KS3000 User manual

viparspectra

viparspectra KS3000 User manual

viparspectra Dimmable Series User manual

viparspectra

viparspectra Dimmable Series User manual

viparspectra PAR III Series User manual

viparspectra

viparspectra PAR III Series User manual

viparspectra Timer Control Series User manual

viparspectra

viparspectra Timer Control Series User manual

viparspectra Timer Control TC600S User manual

viparspectra

viparspectra Timer Control TC600S User manual

viparspectra Timer Control TC450 User manual

viparspectra

viparspectra Timer Control TC450 User manual

viparspectra Timer Control TC1200 User manual

viparspectra

viparspectra Timer Control TC1200 User manual

viparspectra Timer Control Series User manual

viparspectra

viparspectra Timer Control Series User manual

viparspectra Reflector Series User manual

viparspectra

viparspectra Reflector Series User manual

viparspectra Timer Control TC900 User manual

viparspectra

viparspectra Timer Control TC900 User manual

Popular Lighting Equipment manuals by other brands

PR Lighting TANGO SPOT manual

PR Lighting

PR Lighting TANGO SPOT manual

LUMILEDS LUXEON HR30 Handling information

LUMILEDS

LUMILEDS LUXEON HR30 Handling information

LightAlarms LSCN Series quick start guide

LightAlarms

LightAlarms LSCN Series quick start guide

Sensio SE9080HD installation instructions

Sensio

Sensio SE9080HD installation instructions

Philips GreenUp Accent ST391T Mounting instructions

Philips

Philips GreenUp Accent ST391T Mounting instructions

ProLights DIAMOND19WH user manual

ProLights

ProLights DIAMOND19WH user manual

ADJ HYDRO SPOT 2 user manual

ADJ

ADJ HYDRO SPOT 2 user manual

Gainsborough H579 instructions

Gainsborough

Gainsborough H579 instructions

Jasco enbrighten quick start guide

Jasco

Jasco enbrighten quick start guide

Lonako LNK-ARL-W Additional Installation, Operation and Maintenance Instructions

Lonako

Lonako LNK-ARL-W Additional Installation, Operation and Maintenance Instructions

SOLAR VISION ZX Series manual

SOLAR VISION

SOLAR VISION ZX Series manual

Experia IRiS instruction manual

Experia

Experia IRiS instruction manual

Lampo SYDNEY Series instructions

Lampo

Lampo SYDNEY Series instructions

iGuzzini Whisper manual

iGuzzini

iGuzzini Whisper manual

MESTAR TINY installation manual

MESTAR

MESTAR TINY installation manual

Lightenjin LINNE E O Mounting instructions

Lightenjin

Lightenjin LINNE E O Mounting instructions

American DJ WIFLY BAR QA5 User instructions

American DJ

American DJ WIFLY BAR QA5 User instructions

Lite UNO ECLIPSE installation guide

Lite

Lite UNO ECLIPSE installation guide

manuals.online logo
manuals.online logoBrands
  • About & Mission
  • Contact us
  • Privacy Policy
  • Terms and Conditions

Copyright 2025 Manuals.Online. All Rights Reserved.