VISIOMED TensioFlash KD-595 User manual

Visiomed - KD-558 - Manuel d’utilisation - 032016 1
MANUEL D’UTILISATION
FR
KD-595
Distribué par / Distributed by
www.visiomed-lab.com
EC REP
Marché Européen / European Market
Visiomed Group SA
Service clients / Customers service
8, avenue Kléber
75116 Paris - France
Tel : +33 8 92 350 334
Fax : +33 1 44 17 93 10
Made in P. R. C.
NEXMED Technology Co., LTD.
2
nd
Floor of N°.1 building, Jia An
Technological Industrial Park
67 District, Bao An
518101 Shenzhen - China
0197

32 Visiomed - KD-595 - 032016
CONSIGNES DE SÉCURITÉ / SAFETY PRECAUTIONS
0197
Marquage CE /
93/42/EEC CE marking
Attention / Caution
Garder au sec / Keep dry
Voir le manuel d’instructions. / Refer to instruction manual.
Avis sur l’équipement “Suivre les instructions d’utilisation”. /
Note on the equipment“Follow instructions for use”.
Pièce appliquée de type BF / Type BF applied part
Le dispositif, ses accessoires et son emballage doivent être recy-
clés de la façon appropriée au terme de leur utilisation. Veuillez
respecter les règlements et règles locaux.
The device, accessories and the packaging have to be disposed
correctly at the end of the usage. Please follow local ordinances
or regulations for disposal.
EC REP Représentant agréé au sein de la Communauté européenne /
Authorized representative in the European community
Date de production / Date of manufacture
Fabricant / Manufacturer
SN Numéro de série / Serial number
A LIRE IMPÉRATIVEMENT AVANT UTILISATION
TABLE DES MATIÈRES
INTRODUCTION........................................................................................ 4
AVERTISSEMENT....................................................................................... 4
LA TENSION ARTÉRIELLE....................................................................... 5
PRÉCAUTION AVANT UTILISATION .................................................... 7
CARACTÉRISTIQUES DU TENSIOFLASH® KD-595.......................... 7
UNITÉ PRINCIPALE................................................................................... 8
CHANGEMENT DES PILES ..................................................................... 8
PARAMÈTRAGE DE LA DATE ET DE L’HEURE................................... 9
MODE VOCAL............................................................................................ 9
SUGGESTIONS AVANT MESURE........................................................10
UTILISATION DE LA BRASSIÈRE.........................................................10
MESURE DE LA TENSION ARTÉRIELLE.............................................11
MÉMORISATION DES DONNÉES .......................................................12
ENTRETIEN DE L’APPAREIL ..................................................................12
ÉVITER LES DYSFONCTIONNEMENTS .............................................13
SPÉCIFICATIONS TECHNIQUES.........................................................13
GUIDE DE DÉPANNAGE .......................................................................14
GARANTIE JOINTE À LA FIN DU MANUEL .................................. 165
Le fabricant se réserve le droit de modier sans aucun avis préalable
les caractéristiques techniques du produit
Visiomed - KD-595 - 032016
Year Month Day
Serial number of product
SN
SN :
Serial number

54 Visiomed - KD-595 - 032016
INTRODUCTION
Cher Client,
Vous venez d’acquérir cet autotensiomètre VISIOMED et nous
vous en remercions. Nous vous en souhaitons un excellent
usage et vous recommandons de lire attentivement cette notice
d’utilisation an de procéder en toute ecacité à la mesure de
votre tension artérielle.
La simplicité d’utilisation de cet appareil vous permet de
mesurer votre tension artérielle en tout lieu et à tout moment.
En quelques secondes, les tensions maximale et minimale, ainsi
que les pulsations cardiaques, sont mesurées et achées, selon
la méthode oscillométrique de mesure de la pression artérielle.
Pour toute information spécique concernant votre propre
tension artérielle, CONTACTEZ VOTRE MEDECIN.
Ce produit respecte les exigences de compatibilité
électromagnétique EN60601-1-2 et les normes de sécurité
60601-1 comme spécié dans la directive EEC 93/42/EEC.
Matériel répondant aux exigences de la norme européenne
concernant les tensiomètres non invasifs, partie 1 « Exigences
Générales» EN-1060-1 et partie 3 «Exigences Complémentaires»
pour les systèmes électromécaniques de mesure de pression
artérielle EN-1060-3, et partie 4 «Procédures pour déterminer la
précision de l’ensemble du système» EN1060-4.
AVERTISSEMENT
- Cet appareil sert uniquement à prendre la mesure de la pres-
sion artérielle. Ne pas l’utiliser pour tout autre application.
- Ne goner la brassière qu’autour du bras.
- Ne pas tirer sur le tube à air, utiliser l’embout plastique pour
retirer le brassard.
- N’utiliser que les accessoires et pièces détachées spéciés par le
fabricant ou vendus avec l’appareil.
- Un choc peut endommager cet appareil.
- Ne pas faire fonctionner l’appareil près d’un téléphone portable.
- Ne pas démonter l’appareil. Coner l’entretien de cet appareil à
un technicien qualié.
- Ne pas utiliser de pile autre que les piles citées, ne pas recharger
des piles non rechargeables, ne pas les jeter au feu.
- Retirer les piles en cas de non utilisation du tensiomètre durant
une longue période.
- Respecter la polarité des piles. Une erreur de polarité peut
provoquer l’endommagement et compromettre la garantie de
votre appareil.
LA TENSION ARTÉRIELLE
La tension artérielle est la pression qui règne à l’intérieur des
artères. Elle est exercée par le sang sur la paroi des artères, elle
est exprimée en millimètre de mercure
(mmHg).
Lors de la contraction du coeur (pression
systolique ou maximale): la pression aug-
mente brusquement dans les artères, c’est
le premier chire que le médecin annonce
lorsqu’il mesure votre tension.
Il est normalement inférieur à
15(150mmHg).
Lorsque le cœur se décontracte entre
deux battements, la pression diminue.
(Pression diastolique ou minimale): Cette
pression correspond au deuxième chire
que le médecin annonce lorsqu’il mesure
votre tension. Il est en général compris
entre 5 et 9 (50 et 90 mmHg).
Ces deux chires fournissent des informa-
tions importantes à propos de votre santé. Plus il est dicile
pour le sang de circuler dans les artères, plus ces deux chires
seront élevés. Si la pression artérielle est constamment au-des-
sus de la normale, il s’agit d’hypertension.
Le TensioFlash® mesure votre pression artérielle (systolique et
diastolique). Le résultat est aché clairement à l’écran.
La pression artérielle varie considérablement au cours de la
journée et ces variations sont encore plus signicatives chez
les sujets hypertendus. Elle est plus basse le matin et augmente
l’après-midi puis le soir. Durant le sommeil, elle diminue. La pres-
sion artérielle est plus basse en été qu’en hiver et s’élève sensi-
blement avec l’âge. La pression artérielle augmente aussi pen-
dant l’eort, les rapports sexuels, la grossesse, le stress...
Contraction du cœur
(augmentation de la pression)
Décontraction du cœur
(diminution de la pression)
Systolique (Nombre le plus élevé)
Diastolique (Nombre le plus bas)
Visiomed - KD-595 - 032016

76 Visiomed - KD-595 - 032016
Exemple de variation de la pression sanguine
chez un homme de 35 ans
Facteurs pouvant causer des variations de pression artérielle: Res-
piration, Exercice, Stress mental, Inquiétude, Changement de tem-
pérature et/ou d’environnement, Repas, Parler, Prendre un bain,
Fumer, Boire de l’alcool…
Note: Une ou deux prises de tension ne fourniront pas une indication
réelle de votre tension, il est important de la mesurer de façon quoti-
dienne et régulière pour obtenir des données précises. Communiquer
vos résultats à votre médecin pourra l’aider dans son diagnostic et
éviter d’éventuels problèmes de santé.
L’OMS (Organisation Mondiale de la Santé – WHO – World Health
Organisation) a développé la typologie de la pression artérielle
indiquée dans le tableau ci-après (1999 – révisé en 2003). Néan-
moins, cette typologie reste un guide général, la tension artérielle
variant d’une personne à une autre selon son âge, son poids et son
état de santé.
IL EST CONSEILLÉ DE CONSULTER VOTRE MÉDECIN AFIN DE
DÉTERMINER VOTRE TENSION ARTÉRIELLE NORMALE
Tableau de classication
des valeurs de la pression artérielle (en mmHg).
Intitulé
Pression
artérielle
Systolique
(maxi)
Pression
artérielle
Diastolique
(mini)
Indication
en couleur à
l’écran
Valeurs optimales inférieure à 120 inférieure à 80 vert ■
Normales inférieure à 130 inférieure à 85 vert ■
Normale haute entre 130 et 139 entre 85 et 89 vert ■
Hypertension légère
Grade I entre 140 et 159 entre 90 et 99 jaune ■
Hypertension
modérée Grade II entre 160 et 179 entre 100 et 109 orange ■
Hypertension sévère
Grade III supérieure à 180 supérieure à 110 rouge ■
Note: Il n’existe pas de norme universelle établie de l’hypotension
(pression sanguine faible), mais une pression systolique inférieure
à 99 mmHg est généralement considérée comme de l’hypotension.
PRÉCAUTION AVANT UTILISATION
-Ne pas confondre prise de tension personnelle et diagnostic
personnel. Les mesures de la pression artérielle ne doivent
être interprétées que par un professionnel de la santé, ayant
connaissance de votre état de santé. Les mesures ne remplacent
ni un traitement, ni un examen eectué régulièrement par
votre médecin.
- En cas de traitement médical, consultez votre médecin an de
connaître le meilleur moment pour prendre votre tension.
- Cet appareil ne doit pas inciter à l’automédication ou à
l’adaptation de votre traitement.
- Ne pas utiliser cet appareil sur des enfants et personnes âgées
sans avis médical.
- Les mesures peuvent être altérées en cas d’utilisation près d’un
téléviseur, d’un four à micro-ondes, d’un téléphone portable ou
tout autre appareil à champ électrique.
- Si la pression du brassard est trop importante ou que vous
vous sentez mal à l’aise, appuyez immédiatement sur la touche
POWER pour dégoner le brassard.
CARACTÉRISTIQUES DU TENSIOFLASH® KD-595
1. Mesure par technologie Fuzzy Logic
2. Indication vocale des mesures SYS, DIA, Pulsations/Min. et
classication du niveau WHO (standard international de clas-
sication du niveau de tension)
3. Indication vocale en 6 Langues: Français, Anglais, Espagnol,
Allemand, Arabe, Néerlandais
4. Détection d’arythmie cardiaque
5. Mémorisation des 60 dernières mesures
6. Facilité d’utilisation (une touche pour la prise de mesure)
7. Achage LCD large pour une lecture facile
8. Achage clair des mesures: Date/heure, pression systolique,
pression diastolique, pulsations
Visiomed - KD-595 - 032016

98 Visiomed - KD-595 - 032016
9. Achage de la dernière prise lors de la mise en marche de
l’appareil.
10. Gonage / Dégonage automatique par pompe électrique
11. Ajustement facile du brassard
12. Arrêt automatique
UNITÉ PRINCIPALE
Pulsations irrégulières
Batterie faible
Déflation
Inflation
Systolic
Dyastolic
Pulsations
Brassard
Prise du tube à air
Tube à air Indicateur de
Classification du
niveau de tension
MémoireMarche/Arrêt
Ecran LCD
CHANGEMENT DES PILES
Lorsque l’écran LCD ache
l’icône ‘pile’, les batteries
sont faibles ou déchargées.
1. Faites glisser le couvercle
dans le sens de la èche.
2. Remplacez les 4 piles alcalines AA usées en prenant
bien soin de respecter la polarité. Une erreur de polarité
peut provoquer l’endommagement et compromettre
la garantie de votre appareil. Ne jamais insérer de piles
rechargeables. Utilisez des piles à usage unique. Ne pas
mélanger de piles neuves avec des piles usagées.
3. Remettez le couvercle.
Ne pas jeter vos piles usagées avec vos déchets ménagers.
Apporter vos piles usagées à un organisme collecteur.
Durée de vie des piles: Environ 200 mesures à tempéra-
ture ambiante d’environ 22°C, à raison d’une ination journalière
aux alentours de 170mmHg. Les piles fournies peuvent avoir une
durée de vie inférieure à celle précisée ci-dessus.
En cas de non utilisation prolongée, veillez à retirer les piles de
l’appareil an d’éviter toute fuite de liquide pouvant endomma-
ger l’unité.
PARAMÈTRAGE DE LA DATE ET DE L’HEURE
1.
Appuyez sur la touche START et MEM
simultanément pour modier le para-
métrage de l’horloge. Le mois clignote.
2. Utilisez la touche MEM pour régler le
mois.
3. Appuyez sur la touche START pour
sauvegarder vos réglages et acher
le jour.
4. Utilisez la touche MEM pour régler le
jour.
5. Suivez les étapes pour régler l’heure
puis les minutes.
6. Validez en appuyant sur START.
Note: Veillez à vérier le paramétrage lors de l’insertion de nouvelles
piles / Changement d’horaires.
MODE VOCAL
En mode STOP (uniquement heure et date
achées à l’écran), appuyez sur la touche
MEM durant 3 secondes pour modier le
langage de la fonction vocale.
A l’écran s’ache la langue et le volume de
celle-ci (voir image ci-contre) :
Pour changer de langue, appuyez sur la
touche MEM (l’écran achera L2, puis L3
et prononcera le nom du langage sélec-
tionné).
6 langues sont disponibles: Français, Anglais,
Espagnol, Allemand, Arabe et Néerlandais
Pour modier le volume d’un langage, ap-
puyez sur la touche MEM jusqu’à obtention
du volume souhaité.
Visiomed - KD-595 - 032016

1110 Visiomed - KD-595 - 032016
SUGGESTIONS AVANT MESURE
1. Evitez de manger, fumer, faire de l’exercice 30 minutes avant
toute prise de mesure. Restez calme durant les 15 minutes pré-
cédent la prise de tension.
2. Le stress fait monter votre tension artérielle. Evitez la prise de
mesure en période de stress.
3. Il est préférable de prendre sa tension artérielle au bras gauche.
4. La prise de tension doit être eectuée dans un endroit calme,
vous devez être détendu et assis, le bras posé sur une table.
5. Restez immobile et ne parlez pas durant la prise de tension.
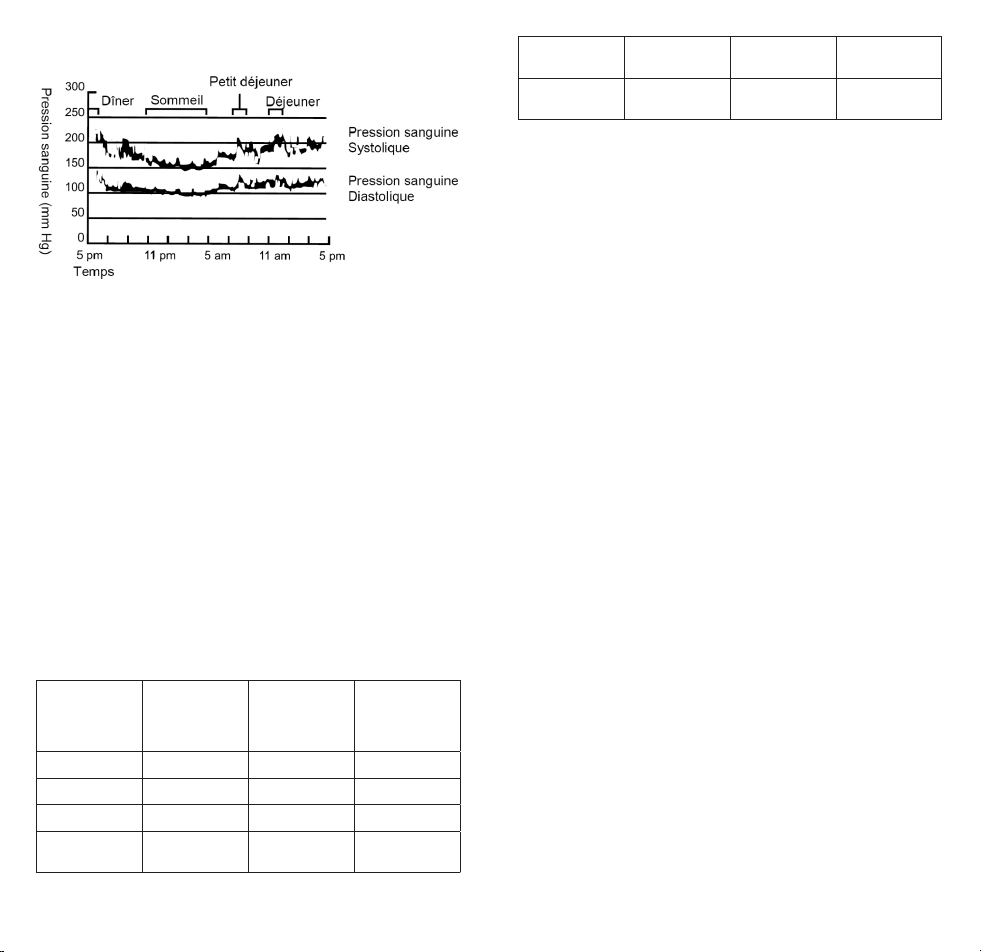
6. Notez sur le tableau de relevé de tension artérielle fourni, vos
résultats de pression sanguine et rythme de vos pulsations
an de les présenter à votre médecin. Une unique prise de
tension ne peut fournir une indication précise de votre réelle
pression sanguine. Vous devez veiller à prendre votre tension
artérielle de façon constante, au même moment de la journée.
Les mesures de pression sanguine varient constamment.
7. Attendez 5 à 10 minutes entre deux prises de tension succes-
sives. L’attente permet aux vaisseaux gorgés de sang de reve-
nir à la normale. Ce délai est fonction de votre propre condi-
tion physique.
UTILISATION DE LA BRASSIÈRE
1. Passez l’extrémité de la brassière dans
l’étrier métallique (scratch en velcro à
l’extérieur).
2. Faire pivoter la brassière autour du bras
an que le tube à air soit vers la paume
de la main.
3. Enler la brassière sur le bras comme
illustré ; assurez-vous qu’elle repose à
2-3cm du coude, tube à air vers l’inté-
rieur du bras. Assurez vous que la borne
de prise de mesure (au niveau du tube à
air – longue de 3cm environ) repose sur
l’artère interne du bras.
4. Serrez l’extrémité libre de la brassière et
refermez la avec le scratch.
5.
Ajustez la brassière sans trop serrer, de fa-
çon à ce qu’il n’y ait pas d’espace entre le
bras et la brassière. Cela pourrait fausser
les résultats. Ne pas prendre les mesures
par-dessus les vêtements.
6. Fixer la brassière avec le scratch de fa-
çon à la porter confortablement. Posez
le bras sur la table (paume en l’air), de
façon à ce que la brassière soit au niveau
du cœur.
7. Assurez-vous que le tube ne soit pas plié,
ni enroulé sur lui-même.
8. Restez assis calmement pendant deux
minutes avant la prise de tension.
Note:
Eectuez les mesures toujours au même bras
(normalement à gauche) pour une meilleure interprétation des
résultats. S’il ne vous est pas possible d’enler la brassière sur le bras
gauche, vous pouvez utiliser votre bras droit.
MESURE DE LA TENSION ARTÉRIELLE
1. Fixer la brassière comme expliqué au chapitre précédent.
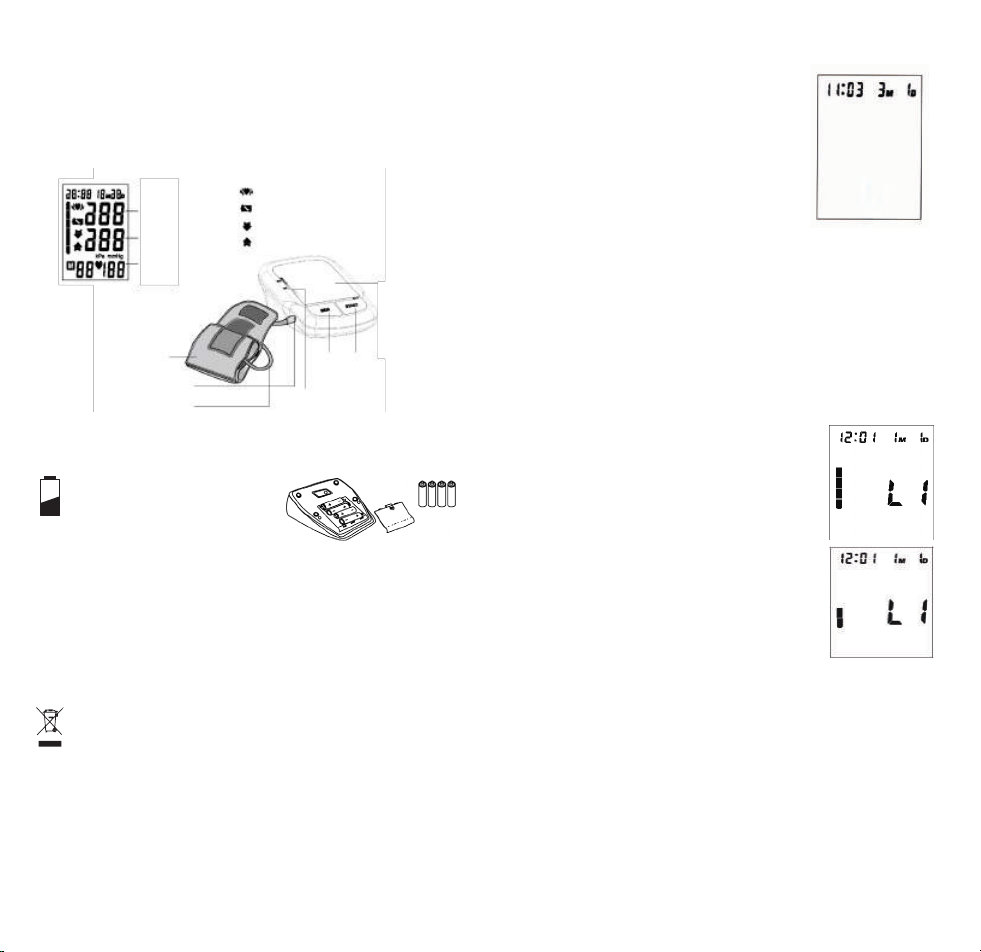
2. Appuyez sur la touche START. Toutes les
icônes s’achent durant deux secondes
à l’écran. La prise de tension précédente
s’achera à l’écran. Les explications sont
données dans la langue sélectionnée.
3. L’écran ache 0mmgH lorsque l’appareil
est prêt à prendre la mesure. La brassière
se gone automatiquement. Lorsque
l’écran ache la valeur maximale (jusqu’à
150-200 mmHg), la pression se relâche,
les battements de cœur sont captés, l’in-
dicateur HEART s’ache à l’écran. L’air est
automatiquement évacué de la brassière.
4. Une fois la mesure prise, l’écran ache les valeurs systolique,
diastolique et les pulsations/minute. Les résultats sont auto-
matiquement lus et commenté (indication de la classication
du niveau de tension – standard international WHO).
Les données sont mémorisées.
5. Appuyez de nouveau sur START pour éteindre l’unité. En cas
d’oubli, l’unité s’arrête automatiquement après environ 1 minute.
Note:
- La valeur mesurée sera trop faible si la brassière est maintenue au-
dessus du niveau du cœur, et trop élevée si elle est maintenue au-
dessous du niveau du coeur.
- L’appareil mémorise les 60 dernières prises de tension. Au-delà de
60 mesures, les données les plus anciennes seront eacées.
Visiomed - KD-595 - 032016

1312 Visiomed - KD-595 - 032016
- Evitez de parler et de bouger durant la prise de tension, cela aec-
terait les résultats.
- Si vous souhaitez stopper la mesure au cours d’une prise de ten-
sion, appuyez simplement sur la touche START pour arrêter auto-
matiquement l’appareil.
MÉMORISATION DES DONNÉES
1. Appuyez sur la touche MEM pour allumer l’unité.
2. L’écran ache la dernière mesure et lit les résultats (interpréta-
tion des résultats). Appuyez sur la touche MEM pour revoir les
données dans l’ordre croissant. L’heure et la date sont mémori-
sées pour chaque prise de tension.
3. Appuyez sur la touche MEM pour acher les données dans
l’ordre décroissant.
4. Pour eacer les données mémorisées, appuyez sur la touche
MEM jusqu’à ce que 0 soit aché à l’écran.
5. Appuyez sur la touche START pour arrêter l’appareil.
ENTRETIEN DE L’APPAREIL
1. Utiliser un chion doux et sec pour net-
toyer l’unité. Si nécessaire, utiliser un
chion légèrement humidié avec de
l’eau du robinet.
2. Ne pas utiliser d’alcool, de benzène, de
diluant ou autre produits chimiques,
pour nettoyer l’appareil ou la brassière.
3. Avant toute utilisation, veuillez vous
laver les mains. Ne pas laver ou mouil-
ler la brassière.
4. Evitez de placer l’unité en contact di-
rect avec les rayons de soleil, une humi-
dité importante, ou de la poussière.
Note: Si l’unité n’est pas utilisée durant une longue période, veillez à
retirer les piles (elles pourraient endommager l’appareil).
ÉVITER LES DYSFONCTIONNEMENTS
- Ne pas faire tomber l’appareil, éviter les secousses et les chocs.
- Ne rien insérer dans l’appareil
- Ne pas démonter l’unité.
- Ne pas écraser la poche à pression de la brassière.
- Si l’unité a été exposée à une température inférieure à 0°C, veil-
lez à la laisser 30 minutes à température ambiante avant utili-
sation. Sans cette attente, les résultats pourraient être faussés.
SPÉCIFICATIONS TECHNIQUES
Méthode de mesure Système Oscillométrique
Classication Class IIa
Indication Achage digital sur écran LCD
Plage de mesure Pressiondu brassard: 0~300 mmHg.
Systolique: 60~260 mmHg
Diastolique: 40~199 mmHg
Pulsations: 40~180 Battements/minutes
Précision Pression +/- 3 mmHg:
Pulsations +/- 5%
Gonage Gonage par pompe électrique
Dégonage Pression relâchée par valve
Mémoire Mémorisation des 60 dernières prises
Alimentation 4 piles alcalines 1,5V «AA»
Durée des piles 6 mois - Environ 180 mesures
Température et humidité à l’emploi 5~40°C (41~104°F). ≤90% RH
Température et humidité au repos -20~55°C (-4~131°F). ≤90% RH
Dimensions externes 153mm / 108mm / 60 mm (6 1/32”x 4 1/4”x 2 3/8”)
Poids Environ 290 grammes (Dispositif)
Accessoires Brassière (tour de bras 22~32 cm). Manuel
d’Instructions, housse de rangement, 4 Piles 1.5V AA
Voltage 6 Volts DC
Le fabricant se réserve le droit de modier sans aucun avis
préalable les caractéristiques techniques du produit
Visiomed - KD-595 - 032016

14
GUIDE DE DÉPANNAGE
Si l’un des problèmes suivant survient lors de l’utilisation de
votre TensioFlash®, reportez-vous à ce guide de dépannage. Si
le problème persiste, veuillez contacter notre support Clients au
0892350334.
Erreur à l’écran Cause(s) possible(s) Solution
Rien ne s’ache lorsque vous
appuyez sur la touche START
Aucune pile insérée Insérer des piles
Les piles sont usées Insérer de nouvelles piles
Les piles ne sont pas placées
dans le bon sens de polarité Vérier la polarité des piles
L’appareil se met en erreur,
(EE s’ache à l’écran)
Regarder dans la poche à air
s’il n’y a pas de fuite d’air. Remplacer l’ancienne
brassière par une nouvelle
La brassière n’est pas bien
xée ou placée, la main ou le
corps a bougé.
Ajuster la brassière et rester
immobile durant la prise
de tension. Renouveler
la mesure. Si le problème
persiste, veuillez contacter
votre revendeur
La brassière est trop serrée Ajuster la brassière et
renouveler la prise de
tension.
La brassière est trop lâche
L’icône des piles est allumé Alimentation des piles faible Changer les piles et
reprendre la tension
La valeur de la pression
systolique ou celle de la
pression diastolique est
trop élevée
La brassière est maintenue
en dessous du niveau
du cœur
Maintenir une position cor-
recte et reprendre la tension
avec des gestes mesurés
La brassière n’a pas été
attachée correctement.
Vous avez bougé ou parlé
durant la prise de tension.
La valeur de la pression
systolique ou celle de la
pression diastolique est
trop faible
La brassière est maintenue
en dessous du niveau
du cœur
Vous avez bougé ou parlé
durant la prise de tension.
Note: Détendez-vous pendant au moins 10 minutes puis reprenez
de nouveau votre tension.
Visiomed - KD-595 - 032016 Visiomed - KD-558 - Manuel d’utilisation - 032016 15
EN
USER MANUAL
KD-595
0197

Visiomed - KD-595 - 032016
16 17
Visiomed - KD-595 - 032016
PLEASE CAREFULLY READ THIS MANUAL
BEFORE OPERATING THIS UNIT
TABLES OF CONTENTS
INTRODUCTION......................................................................................17
SAFETY INSTRUCTION .........................................................................17
BLOOD PRESSURE..................................................................................18
PRECAUTIONS BEFORE USE...............................................................20
FEATURES OF THE TENSIOFLASH® KD-595 ...................................21
MAIN UNIT................................................................................................21
INSERT OR REPLACE BATTERIES .......................................................22
TIME AND DATE OF SYSTEM SETUP ................................................22
VOICE SETTING.......................................................................................23
A FEW SUGGESTIONS BEFORE MEASUREMENT .........................23
HOW TO USE THE UPPER ARM CUFF...............................................24
HOW TO MEASURE BLOOD PRESSURE...........................................25
RECALLING RECORD.............................................................................25
HOW TO MAINTAIN AND STORE THE UNIT...................................26
HOW TO PREVENT A MALFUNCTION..............................................27
SPECIFICATIONS.....................................................................................27
TROUBLESHOOTING.............................................................................28
WARRANTY .......................................................................................... 165
The manufacturer saves himself the right to modify without any
preliminary opinion technical specications of the product
INTRODUCTION
Thank you for purchasing the upper arm Automatic Blood
Pressure Monitor. This remarkable instrument is ideal for people
who frequently monitor their own blood pressure because it’s
easy to use. Simply push of a button the monitor measures your
blood pressure and pulse and displays the reading on a clear
digital panel. Perfect for quick, easy readings at home, at work,
almost anywhere!
The Monitor uses the oscillometric method of blood pressure
measurement. This means the monitor detects your blood’s
movement through the artery in your arm and converts the
movements into a digital reading. An oscillometric monitor
does not need a stethoscope so the monitor is simple to use and
measurements are easy to obtain.
Please read this instruction manual thoroughly before using
the upper arm Automatic Blood Pressure Monitor. For specic
information on your own blood pressure, CONTACT YOUR
PHYSICIAN.
The product complies with the electromagnetic compatibility
requirement of EN60601-1-2 and safety standards of 60601-1 as
specied in EEC directive 93/42/EEC.
Materialcomplieswiththe Europeannormconcerningnoninvasive
blood pressure monitors, part 1General Requirements In-1060-
1 and part 3 Additional Requirements for the electromechanical
measuring of blood pressure IN-1060-3.
SAFETY INSTRUCTION
- Follow the care instructions included in these instructions.
- Only use this device for its intended purpose, as described in
these instructions.
- This device can be used for personal use at home.
- Use this device within an ambient temperature range of
between 10 and 40°C.
- This device must always be placed in a clean and dry place.
- Do not expose this device to extreme temperature conditions
T°>50°C - T° < - 20°C.
- Do not use this device when relative humidity is greater than
85%.
- Do not expose this device to the sun, nor to water.
- Do not use this device outdoors.
- Do not expose this device to electric shocks.
- Never drop this device.
- Do not carry out maintenance on this device yourself. Do not
try to open this device. In case of problems, contact your dealer.

Visiomed - KD-595 - 03201618 19Visiomed - KD-595 - 032016
- Do not leave this device within reach of children.
- Measurement results are only indicative. In case of doubt
concerning your results, please contact your doctor.
- This device is not an encouragement to self-medication or to
make adjustments to your treatment.
- Stop using this device in the event of a fault or if it malfunctions.
- This electrical medical equipment requires specic precautions
concerning electromagnetic compatibility. It must be installed
and operated in accordance with the electro-magnetic infor-
mation supplied in the EMC Data table.
WARNING: You cannot dispose of this product in the same
way as your common waste. You are required to take it to a
collection point approved for the recycling of used electri-
cal and electronic equipment. For further information on collec-
tion facilities for used equipment, please contact your town hall
or your household waste processing service.
BLOOD PRESSURE
Blood pressure is the force exerted on the
walls of your blood vessels as blood ows
through them.
Your heart is like a pump. When it
contracts, or beats, it sends a surge of
blood through the blood vessels and
pressure increases. This is called your sys-
tolic pressure.
When your heart relaxes between beats,
your blood pressure decreases.This is cal-
led your diastolic pressure.
When a doctor takes your blood pressure,
he or she measures both your systolic and
diastolic pressures and records them as
numbers. For example, if your blood pres-
sure reading is 126/76 (126 over 76), your
systolic is 126 and your diastolic is 76.The
numbers are calculated in millimetres of
mercury and recorded as 126/76 mm Hg.
These two numbers provide important
information about your health. The more
dicult it is for your blood to ow through your blood ves-
sels, the higher both numbers will be. When blood pressure is
consistently above normal it is called hypertension (High blood
pressure).
The TensioFlash® automatically measures your systolic and dias-
tolic blood pressure for you, then displays the results on easy-to-
read digital panel.
People with a condition that causes circulatory problems (dia-
betes, kidney disease, arteriosclerosis, or poor peripheral circula-
tion) may get lower readings with upper arm type monitor than
with a blood pressure monitor that is used on the upper arm.
Please consult your doctor to determine if your upper arm blood
pressure accurately reects your actual blood pressure.
Your blood pressure changes constantly. Blood pressure uc-
tuates from day to day and minute to minute according to your
body’s needs. For example, when you are exercising or angry
your blood pressure increases, but when you are relaxing or slee-
ping your blood pressure decreases. These uctuations are com-
pletely normal. This portable upper arm blood pressure monitor
is especially helpful when tacking changes in your blood pres-
sure because it travels anywhere and takes just seconds to use.
Fluctuation within a Day (Example: 35-year old male)
Factors that may cause the blood pressure to uctuate: Breathing,
Exercise, Mental stress, Worries, Environmental and/or tempera-
ture change, Eating, Talking, Taking a bath, Drinking alcohol,
Smoking, etc…
Note: One or two readings will not provide a true indication of your nor-
mal blood pressure. It is very important to take regular, daily measure-
ments and to keep accurate records. In partnership with your doctor, an
accurate record of your blood pressure over a period of time can be a
valuable aid in diagnosing and preventing potential health problems.
The World Health Organisation (WHO) developed the following
Blood Pressure Classication. This classication, however, is only
a general guideline because blood pressure varies from person
to person according to age, weight, and health status.

Visiomed - KD-595 - 03201620 21Visiomed - KD-595 - 032016
CONSULT YOUR DOCTOR TO DETERMINE YOUR NORMAL
BLOOD PRESSURE.
Categories for Blood Pressure Levels in Adults
(In mmHg, millimeters of mercury)
Category Systolic
(Top number)
Diastolic
(Bottom
number)
Color
indication
Optimal Less than 120 Less than 80 Green ■
Normal 120-129 80-84 Green ■
Prehypertension 130-139 85-89 Green ■
Hypertension
stage 1 140-159 90-99 Yellow ■
Hypertension
stage 2 160-179 100-109 orange ■
Hypertension
stage 3 Higher than 180 Higher than 110 Red ■
For adults 18 and older who:
Are not on medicine for high blood pressure
Are not having a short-term serious illness
Do not have other conditions such as diabetes and kidney disease
Note: There is not an universally accepted denition of hypoten-
sion (low blood pressure), but a systolic pressure below 99 mmHg is
usually regarded as hypotension.
PRECAUTIONS BEFORE USE
-Do not confuse self-monitoring with self-diagnoses. Blood
pressure measurements should only be interpreted by a health
professional who is familiar with your medical history.
- If you are taking medication, consult with your physician to
determine the most appropriate time to measure your blood
pressure. NEVER change a prescribed medication without rst
consulting with your physician.
- For persons with irregular or unstable peripheral circulation
problems due to diabetes, liver disease, hardening of the
arteries, etc., there may be uctuation in blood pressure values
measured at the upper arm versus at the upper arm .
- This device is designed for adults to use if use this device on
a child patient, old people or toddlers, consult with your
physician or measure with relative aid.
- Measurements may be impaired if this device is use near
televisions, microwave ovens, X-ray mobile phone equipment
or other devices with strong electrical elds. To prevent such
interference, use the meter at a sucient distance from such
devices or turn them o.
- This device is not suitable for disease diagnoses, urgent
treatment, continuous monitoring during medical emergencies
or operations.
- Before using, should wash your hand.
- If there is overmuch pressure or you feel uncomfortable, please
press «POWER» button immediately for quick deation.
FEATURES OF THE TENSIOFLASH® KD-595
1. Using the fuzzy-logic measurement.
2. Detection irregular heartbeat IHB function
3. Memory can store 60 measurements.
4. Talking measurement in 6 languages: French, English, Spanish,
German, Arabic, Dutch
5. Easy to use buttons.
6. Large and clear display.
7. Upper arm cu is easy to wrap correctly.
8. Displays the last reading when the device is switched on.
9. Automatic Ination / Deation via an electric pump.
10. Desktop style for easy measurement.
11. Easy to use, Press a button to automatically measure, recor-
ding the measurement values and measurement time.
12. Only inate the armband on the arm.
13. Compact size and easy to carry.
14. Automatically power o (within 2.5 minutes) to save power.
MAIN UNIT
Irregular heartbeat symbol
Low battery
Deflate to measure (deflate air in cuff)
Inflate to measure
Systolic
Dyastolic
Pulse
Cuff
Cuff tube plug
Rubber tube Blood pressure level
classification indicator
Memory Start
LCD

Visiomed - KD-595 - 032016
22 23
Visiomed - KD-595 - 032016
INSERT OR REPLACE BATTERIES
During the battery symbol appears on the display or no-
thing is display while ination during measurement, you
should replace with new batteries.
1. Slide the battery cover in the direction of the arrow to
open.
2. Insert four alkaline AA
batteries in the correct
polarity direction.
3. Replace the battery
cover.
Disposal of empty battery to the authorized
Collecting party subject to the regulation of Each indivi-
dual territory.
With the use of four alkaline «AA» batteries, you can measure
approximately 250 times at room temperature of 72°F (22?) and
inating to around 170mmHg once a day. But the included bat-
teries only for test purpose may not last as specied long period.
When the battery icon displays on the LCD, please replace four
new alkaline «AA» batteries, please do not mix the new and old
battery together.
If the unit will not be used for a long period, please take out all
batteries to avoid liquid leakage damaging the unit.
TIME AND DATE OF SYSTEM SETUP
1. When the machine is turned o, press
the button START and MEMORY at
same time, the number of month will
glitter on LCD. Press button START
continuously, the numbers of month,
date, hour, and minute will glitter.
While the number is glittering, press
button MEMORY the corresponding
number will increase by 1. Hold on
pressuring the button MEMORY the
number will increase fast.
2. After pressuring START button the fth
time, numbers on LCD will not glit-
ter, then you exit the time adjusting
mode. See picture.
Noted: Please check and re-set Date/Time after replacing of new batteries.
VOICE SETTING
1. Voice language setting: In clock dis-
play mode, you can select the voice
language or without talking function
by keeping on press the button M.
You can select the wanted language
by releasing button Mwhen display
the corresponding language.
There are 6 languages: French, English,
Spanish, German, Arabic, Dutch
2
. Voice volume setting:You can select the
voice volume by pressing the button M
again and keeping after language set-
ting. Now the bars on the LCD change
and the number of the bars indicates
the volume. You can select the wanted
volume by releasing button Mwhen
display the corresponding bars.
3. Once you choose the language and the volume, the monitor
will speak out measurement results and tips with that lan-
guage during the measurement process. The voice setting
is kept until you reset it.
A FEW SUGGESTIONS BEFORE MEASUREMENT
1. Avoid eating, smoking, and exercising for at least 30 minutes
be fore taking a measurement. Also rest for at least 15 minutes
before taking a reading.
2. Stress raises blood pressure. Avoid taking measurements du-
ring stressful times.
3. You would better apply the cu on your left upper arm.
4. Measurement should be taken in a quiet place and you should
be relaxed, seated position. Rest your left arm on a table.
5. Remain still and do not talk during the measurement.
6. Keep a record of your blood pressure and pulse for your doctor.
Remember, a single measurement does not provide an accurate
indication of your true blood pressure. You need to take and
record several measurements over a period of time. Try to mea-
sure your blood pressure at the same time each day for consis-
tency. Blood pressure measurements uctuate considerably.
7. Wait 5-10 minutes between successive measurements. Waiting
allows the engorged blood vessels to return to normal. You
may require more rest time depending on your individual phy-
sical conditions.

Visiomed - KD-595 - 03201624 25Visiomed - KD-595 - 032016
HOW TO USE THE UPPER ARM CUFF
1.
Pass the end of the cu (with sewn-in rub-
ber stopper) through the metal stirrup so
that a loop is formed. The Velcro closer
must be facing outwards.(Ignore this step
if the cu has already been prepared.)
2. Push the cu over the left upper arm so
that the tube points in the direction of
the lower arm and palm.
3. Lay the cu on the arm as illustrated.
Make certain that the lower edge of
the cu lies approximately 2 to 3 cm
(3/4~1») above the elbow and that the
rubber tube leaves the cu on the inner
side of the arm.
Important: The mark (about 3 cm – 1.2in
long bar) must lie exactly over the artery
which runs down the inner side of the arm.
4. Tighten the free end of the cu and close
the cu with the closer.
5. There must be no free space between the
arm and the cu as this would inuence
the result. Clothing must not restrict the
arm. Any piece of clothing which does
(e.g. a pullover) must be taken o.
6. Secure the cu with the Velcro closer in
such a way that it lies comfortably and is
not too tight. Lay the arm on the table
(palm upwards) so that the cu is at the same height as the
heart. Make sure that the tube is not kinked.
7. Remain seated quietly for two minutes before you begin the
measurement.
COMMENT: If it is not possible to t the cu to the left arm, it can also
be placed on the right arm.
However all measurements should be made using the same arm for
better cross reference.
HOW TO MEASURE BLOOD PRESSURE
1. After your body is in a comfortable position, press the START
button. After a long “beep”, BPM will verify itself, and all LCD
will glimmer automatically. See picture.
2. If it already has memory, then LCD will
show the last result. If machine does not
have memory before, the LCD will show
of four“0”, while it verify itself.
3. If the voice function is on, the monitor
will speak out the measurement tips with
that language.
After two seconds (maybe longer because
of verifying itself), LCD shows one“0”. If the
voice function is on, the monitor will speak
“Now if you are ready, Let’s begin” then the
machine begin to pressurize automatically.
4. After measurement, the result of systolic, diastolic and pulse
rate will all display on LCD. And irregular heartbeat symbol and
blood pressure classication indicator will glimmer. The result
will be automatically memorized by itself.
If the voice function is on, for example, the monitor will speak
out “Your systolic pressure is 156 mmHg, your diastolic pressure
is 93 mmHg, the heart rate is 78 beat/minute, according to WHO
standard, your blood pressure level is Moderate Hypertension”.
5. Pressing START button after measuring, machine will be turned
o. It will be automatically power o after 1 minute of none use.
Note:
- The value measured will be too low if you hold your cu higher
than heart level, or will be too high if you hold your cu lower than
heart level.
- The unit may store 60 measurement values, If more than 60 re-
cords, it will delete the earliest data.
- During measurement do not speak or shake as which may aect
the accuracy of the result.
- If you want to stop the measurement during measurement pro-
cess, just press the POWER button to stop immediately.
RECALLING RECORD
1. Under the clock-displaying mode, press button Mand enter
the mode of reading results. LCD will show the how many re-
sults it has, then the last result will be displayed, which is 01 for
memory number, see picture 1. Continuously pressure the M
button, the memory number will increase by 1, see picture 2.

Visiomed - KD-595 - 032016
26 27
Visiomed - KD-595 - 032016
2. If the voice function is on, for example picture 8, the moni-
tor will speak out “Memory 01, your systolic pressure is 156
mmHg, your diastolic pressure is 93 mmHg, the heart rate is 78
beat/minute, according toWHO standard, your blood pressure
level is Moderate Hypertension.”
3. Keep on pressing Mbutton after the last memory of result, the
machine will power o. Under the memory-displaying mode,
it will be automatically power o after ten seconds of none
use. Or you can press START button to shut down the machine.
4. If it has no memory, then LCD will show “0” for systolic, diasto-
lic, and pulse rate, and show “00” for the number of memory.
While press the MEMORY or START, machine will power o.
5. Deletion of memories: Under the mode of reading memories,
holding on pressing MEMORY button for three seconds. All
memories will be deleted after three “beep”, then come to the
mode without memory.
6. Shut down: After measurement, press button START to turn o
the machine; the machine will be automatically power o after
1 minute of none use.
HOW TO MAINTAIN AND STORE THE UNIT
1. Use a dry soft cloth to clean the unit.
If necessary, use a cloth lightly dampe-
ned with tap water.
2. Do not use alcohol, benzene, thinner
or other harsh chemicals to clean the
device or cu.
3. Before using please wash your hand.
Do not wash or wet the cu.
4. Avoid placing the unit where direct
sunlight, high humidity or dust.
Note: When the unit will not be used for a long period, be sure to remove
the batteries. Otherwise, the batteries may leak and damage the unit.
HOW TO PREVENT A MALFUNCTION
- Do not drop the device and avoid sudden jars or shocks.
- Do not inset other objects into any holes.
- Do not attempt to disassemble the unit.
- Do not crush the pressure cu.
- If the unit has been stored at temperatures below 32°F (0°C),
leave it in a warm place for 30 minutes before using it, otherwise,
may get wrong measurement result.
SPECIFICATIONS
Classication Class IIa
Measuring Method: Oscillometric System
Indication: Digital LCD Display
Measuring Range: Cu pressure: 0~300 mmHg.
Systolic: 60~260 mmHg
Diastolic: 40~199 mmHg
Pulse: 40~180 Beat/min.
Accuracy: Pressure: +/- 3 mmHg;
Pulse +/- 5 %
Ination: Electric Pump Ination
Deation: Pressure ReleaseValue
Memory: 60 Memories
Power Source: 1.5V“AAA”x 4 Alkaline Battery
Battery Life: Approx. 6 month - 180 times
WorkingTemp. & Humidity: 41~104°F (5~40°C), ≤90RH
StorageTemp. & Humidity: -4~131°F (-20~55°C), ≤90RH
Outside Dimensions: 153mm x 108mm x 60mm - (6 1/32”x 4 1/4”x 2 3/8”)

Visiomed - KD-558 - Manuel d’utilisation - 032016 31
Weight: Approx. 290 g (Apparatus)
Accessories: Cu (t arm size 8.7~12.6in / 22~32cm), Instruction
Manual, 4 AA batteries
OperationVoltage 6V DC
*Specications may be changed without notice in the event
of Improvement being made.
TROUBLESHOOTING
If you have trouble while using the unit, please check the
following points rst.
ERROR DISPLAY POSSIBLE CAUSE HOW TO CORRECT
Nothing is displayed when
you push the POWER button
No battery installation Insert batteries
Battery worn out Replace new batteries
The polarities of batteries
placed wrongly Insert battery in the correct
polarities
Shows abnormal results -
LCD shows“EE”
Check your cu if any air
leakage Replace upper arm cu with
new one
Upper arm cu not properly
adjust or placement, hand or
body shaking.
Renew adjust upper arm
cu position and tightness,
and keep hand still.
Re-measurement or send
back dealer for re-calibrate
pressure
Cu too tight Readjust cu and measure
again
Cu too loose
Battery icon on Battery low power Replace battery, and
measure again
The systolic pressure
value or diastolic
pressure value too high
The hand with the cu was
held lower than your heart
Keeping correct position and
gesture to measure again
The cu was not attached
properly
You moved your body or
spoke during measurement
The systolic pressure
value or diastolic
pressure value too low
The hand with the cu was
held higher than your heart
You moved your body or
spoke during measurement.
Note: Relax for at least 10 minutes and then take another
measurement.
NL
GEBRUIKSAANWIJZING
KD-595
0197
Visiomed - KD-595 - 032016

Visiomed - KD-595 - 032016 Visiomed - KD-595 - 032016 33
32
VERPLICHT DOOR TE LEZEN VOOR GEBRUIK
INHOUDSTAFEL
INLEIDING.................................................................................................33
VEILIGHEIDSAANWIJZINGEN.............................................................33
DE ARTERIËLE BLOEDDRUK................................................................34
VOORZORGEN VOOR HET GEBRUIK................................................36
KENMERKEN VAN DE TENSIOFLASH® KD-595..............................37
HOOFDEENHEID ....................................................................................37
VERVANGEN VAN DE BATTERIJEN....................................................37
INSTELLEN VAN HET UUR EN DE DATUM ......................................38
VOCALE MODUS....................................................................................39
SUGGESTIES VOOR DE METING........................................................39
GEBRUIK VAN DE ARMBAND .............................................................40
METING VAN DE ARTERIËLE DRUK...................................................41
OPSLAG VAN DE GEGEVENS..............................................................41
ONDERHOUD VAN HET APPARAAT .................................................42
STORINGEN VERMIJDEN......................................................................42
TECHNISCHE KENMERKEN..................................................................43
GIDS VOOR HET VERHELPEN VAN STORINGEN ...........................44
GARANTIE.............................................................................................. 165
De fabrikant behoudt zich het recht voor om technische wijziggen
aan het product aan brengen zonder voorafgaande kennisgeving
INLEIDING
Beste klant,
U heeft zopas een automatische bloeddrukmeter VISOMED
gekocht en wij danken u daarvoor. Wij wensen u een excellent
gebruik toe en raden u aan om deze gebruiksaanwijzing
aandachtig door te lezen, zodat u uw arteriële bloeddrukmeter
daarna optimaal kunt gebruiken.
De gebruiksvriendelijkheid van dit apparaat biedt u de
mogelijkheid om uw arteriële bloeddruk overal en op gelijk welk
moment te meten. In enkele seconden wordt de boven- en de
onderdruk, alsook de hartkloppingen gemeten en weergegeven,
volgens de oscillometrische methode voor de meting van de
arteriële druk.
Voor alle specieke informatie betreende uw eigen arteriële
druk, moet u CONTACT OPNEMEN MET UW ARTS.
Dit product voldoet aan de vereisten inzake elektromagnetische
compatibiliteit volgens EN60601-1-2 en de veiligheidsnormen
60601-1 zoals gespeciceerd in de richtlijn EEC 93/42/EEG.
Het materiaal voldoet aan de vereisten van de Europese norm
betreende niet-invasieve bloeddrukmeters, deel 1 «Algemene
vereisten» EN-1060-1 en deel 3 «Bijkomende vereisten» voor de
elektromechanische systemen voor de meting van de arteriële
druk EN-1060-3, en deel 4 «Procedures voor het bepalen van de
nauwkeurigheid van het volledige systeem» EN1060-4.
VEILIGHEIDSAANWIJZINGEN
- Volg de onderhoudsaanwijzingen uit deze handleiding op.
- Gebruik dit apparaat uitsluitend voor het gebruik waar het voor
bestemd is zoals beschreven in deze handleiding.
- Dit apparaat is bedoeld voor privégebruik thuis.
- Gebruik dit apparaat bij een omgevingstemperatuur tussen 10
en 40 °C.
- Dit apparaat moet altijd op een schone en droge plek worden
geplaatst.
- Stel dit apparaat niet bloot aan extreme temperatuursomstan-
digheden T > 50°C, T < -20°C.
- Gebruik dit apparaat niet bij een relatieve luchtvochtigheid
hoger dan 85%.
- Stel dit apparaat niet bloot aan zonlicht of water.
- Gebruik dit apparaat niet buiten.
- Stel dit apparaat niet bloot aan elektrische schokken.
- Laat het apparaat niet vallen.
- Onderhoud dit apparaat niet zelf. Probeer het apparaat niet te
openen. Neem bij problemen contact op met de verkoper.

Visiomed - KD-595 - 032016 35
Visiomed - KD-595 - 032016
34
- Houd dit apparaat buiten bereik van kinderen.
- De meetresultaten worden ter indicatie gegeven. Neem bij twi-
jfels over de resultaten contact op met uw arts.
- Dit apparaat is niet bedoeld als aanleiding voor eigen medica-
tie of voor het aanpassen van uw behandeling.
- Gebruik het apparaat niet meer bij afwijkingen of storingen.
- Dit elektrische medische materiaal behoeft speciale voorzorgs-
maatregelen met betrekking tot elektromagnetische compa-
tibiliteit. Het moet worden geïnstalleerd en gebruikt in ove-
reenstemming met de elektromagnetische informatie uit de
tabel EMC-gegevens.
WAARSCHUWING: U mag dit product niet wegwerpen bij
uw normale huishoudelijke afval. U moet het inleveren bij
een goedgekeurd recyclepunt voor oude elektrische en
elektronische apparaten. Neem voor meer informatie over de
inzamelpunten voor oude apparaten contact op met uw ge-
meente of de afvaldienst.
DE ARTERIËLE BLOEDDRUK
De arteriële bloeddruk is de druk in de slagaders. Deze druk
wordt door het bloed uitgeoefend op de wand van de slagaders
en wordt uitgedrukt in millimeter kwik (mmHg).
Bij de samentrekking van het hart
(systolische druk of bovendruk): de
druk verhoogt bruusk in de slagaders,
dat is het eerste cijfer dat de arts mee-
deelt als hij uw bloeddruk meet.
Deze druk moet normaal lager zijn
dan 15 (150 mmHg).
Als het hart tussen twee hartslagen in
ontspant, vermindert de druk. (Diasto-
lische druk of onderdruk): Deze druk
komt overeen met het tweede cijfer
dat de arts meedeelt als hij uw bloed-
druk meet. In het algemeen ligt deze
tussen 5 en 9 (50 en 90 mmHg).
Deze twee cijfers leveren belangrijke
informatie over uw gezondheid. Hoe
moeilijker het voor het bloed is om in
de slagaders te circuleren, hoe hoger
deze twee cijfers zijn. Als de arteriële
druk continu boven de normale waarde blijft, spreekt men van
hypertensie.
De TensioFlash® meet uw arteriële bloeddruk (systolische en
diastolische). Het resultaat wordt duidelijk op het scherm weer-
gegeven.
De arteriële druk varieert aanzienlijk in de loop van de dag en
deze schommelingen zijn nog groter bij personen met een
hypertensie. De druk is ‘s morgens lager en verhoogt in de na-
middag en vervolgens naar de avond toe. Tijdens de slaap ver-
mindert de druk. De arteriële druk is lager in de zomer dan in
de winter en wordt gevoelig hoger naarmate men ouder wordt.
De arteriële druk verhoogt ook tijdens inspanningen, seksuele
betrekkingen, tijdens de zwangerschap, bij stress...
Voorbeeld van de schommeling in de bloedruk bij
een man van 35 jaar
AvondetenSlaap
Tijd
Ontbijt
Systolische
bloeddruk
Diastolische
bloeddruk
Lunch
B
l
o
e
d
d
r
u
k
m
m
H
g
Factoren die schommelingen van de arteriële druk kunnen ve-
roorzaken: Ademhaling, oefening, mentale stress, ongerustheid,
verandering van temperatuur en/of omgeving, maaltijden, spre-
ken, het nemen van een bad, roken, het drinken van alcohol…
Nota: Een of twee metingen van de bloeddruk leveren geen reële indi-
catie van uw bloeddruk. Het is belangrijk om deze druk dagelijks en
regelmatig te meten om nauwkeurige gegevens te verkrijgen. Deel uw
resultaten mee aan uw arts. Dit zal helpen bij zijn diagnostiek en kan
eventuele gezondheidsproblemen vermijden.
De WGO (Wereldgezondheidsorganisatie – WHO – World Health
Organisation) heeft de typologie voor de arteriële bloeddruk
ontwikkeld die opgenomen is in de onderstaande tabel (1999 –
gereviseerd in 2003. Niettemin blijft deze typologie een algemene
lidraad. De arteriële bloeddruk varieert van de ene persoon tot de
andere volgens de leeftijd, het gewicht en de gezondheidstoestand.
ER WORDT AANGERADEN OM UW ARTS TE RAAPLEGEN OM
UW NORMALE ARTERIËLE DRUK TE BEPALEN
Samentrekking van het hart
(verhoging van de druk)
Systolisch (hoogste waarde)
Dyastolisch (laagste waarde)
Ontspanning van het hart
(vermindering van de druk)

Visiomed - KD-595 - 032016
36 37
Visiomed - KD-595 - 032016
Classicatietabel van de waarden van de arteriële druk
(in mmHg).
Benaming
Arteriële sys-
tolische druk
(bovendruk)
Arteriële dias-
tolische druk
(onderdruk)
Aanduiding
in kleur op
het scherm
Optimale waarden lager dan 120 lager dan 80 Groen ■
Normaal Lager dan 130 Lager dan 85 Groen ■
Normaal hoog Tussen 130 en 139 Tussen 85 en 89 Groen ■
Lichte hypertensie
Graad I Tussen 140 en 159 Tussen 90 en 99 Geel ■
Gematigdehypertensie
Grade II Tussen 160 et 179 Tussen 100 en 109 Oranje ■
Ernstige hypertensie
Graad III Boven 180 Boven 110 Rood ■
Nota: Er bestaat geen universele norm voor hypotensie (lage bloed-
druk), maar een systolische druk van minder dan 99 mmHg wordt in
het algemeen als hypotensie beschouwd.
VOORZORGEN VOOR HET GEBRUIK
- Het persoonlijk meten van de bloeddruk en de persoonlijke
diagnostiek niet verwarren. De metingen van de arteriële druk
mogen enkel geïnterpreteerd worden door een professional
uit de gezondheidszorg die uw gezondheidstoestand kent.
De metingen vervangen geen behandeling of een regelmatig
onderzoek uitgevoerd door uw arts.
- Als u in medische behandeling bent, raadpleeg uw arts dan
om te weten wat het beste moment is voor het meten van uw
bloeddruk.
- Dit apparaat mag u niet aanzetten tot zelfmedicatie of tot het
aanpassen van uw behandeling.
- Gebruik dit apparaat niet bij kinderen en oudere personen
zonder medisch advies.
- De metingen kunnen schommelen als het apparaat gebruikt
wordt in de buurt van een televisie, magnetron, een draagbare
telefoon of gelijk welk apparaat met een elektrisch veld.
- Als de druk van de armband te groot is, of als u zich daar niet
goed bij voelt, druk dan onmiddellijk op de toets POWER om de
armband te lossen.
KENMERKEN VAN DE TENSIOFLASH® KD-595
1. Meting met de Fuzzy Logic technologie.
2. Vocale weergave van de metingen SYS, DIA, Hartslagen/Min.
en classicatie van het niveau WHO (internationale standaard
voor de classicatie van de bloeddruk)
3. Vocale weergave in 6 talen: Frans, Engels, Spaans, Duits, Ara-
bisch, Nederlands
4. Detectie van het hartritme
5. Memorisatie van de 60 laatste metingen
6. Gebruiksvriendelijk (een toets voor het meten)
7. Groot LCD-scherm voor een gemakkelijke aezing
8. Duidelijke weergave van de metingen: Datum/uur, systolische
druk, diastolische druk, hartslagen
9. Weergave van de laatste meting bij het aanzetten van het
apparaat
10. Automatisch oppompen/leegpompen door de elektrische
pomp
11. Gemakkelijke aanpassing van de armband
12. Pomp de band alleen op rond de arm
13. Compact formaat, gemakkelijk te vervoeren
14. Automatische stop
HOOFDEENHEID
Onregelmatige slag
Zwakke batterij
Lossen
Opblazen
Systolisch
Dyastolisch
Slagen
Armband
Aansluiting luchtleiding
Luchtleiding Indicactor van de
Classificatie voor
de bloeddrukmeting
Geheugen Aan/Uit
LCD scherm
VERVANGEN VAN DE BATTERIJEN
Als op het LCD het pictogram ‘batterij’ verschijnt, zijn de
batterijen zwak of leeg.
1. Schuif het batterijdeksel
in de richting van de pijl.

Visiomed - KD-595 - 032016
38 39
Visiomed - KD-595 - 032016
2. Vervang de 4 AA-alkalinebatterijen en let goed op de
richting van de polariteiten. Een polariteitsfout kan
het apparaat beschadigen en kan de garantie van uw
apparaat in gevaar brengen. Breng nooit herlaadbare
batterijen in het apparaat aan. Gebruik batterijen voor
eenmalig gebruik. Gebruik geen nieuwe en gebruikte
batterijen samen.
3. Breng het deksel terug aan.
Gooi gebruikte batterijen niet samen weg met het hui-
shoudelijk afval.
Breng uw gebruikte batterijen naar een verzamelpunt.
Levensduur van de batterijen: ongeveer 200 metingen bij een
omgevingstemperatuur van ongeveer 22°C, a rato van een ina-
tie per dag rond 170mmHg. De meegeleverde batterijen kunnen
een kortere levensduur hebben dan hierboven vermeld.
Als het apparaat gedurende langere tijd niet gebruikt zal wor-
den, haal de batterijen dan uit het apparaat om te vermijden
dat de batterijen zouden gaan lekken, want dat kan de eenheid
beschadigen.
INSTELLEN VAN HET UUR EN DE DATUM
1. Druk gelijktijdig op de toets START en
MEM om de parameters van het horloge
in te stellen. De maand knippert.
2. Gebruik de toets MEM om de maand te
regelen.
3. Druk op de toets START om uw regelin-
gen te bewaren en om de dag weer te
geven.
4. Gebruik de toets MEM om de dag te
regelen.
5. Volg de stappen om het uur en vervol-
gens de minuten te regelen.
6. Bevestigen door op START te drukken.
Nota : Gelieve de parameterinstelling te controleren bij het aan-
brengen van nieuwe batterijen / Uurwijzigingen.
VOCALE MODUS
In de STOP-modus (alleen het uur en de
datum worden op het scherm weerge-
geven), drukt u gedurende 3 seconden
op de toets MEM om de taal van de vo-
cale functie te wijzigen.
Op het scherm verschijnt de taal en het
volume (zie afbeelding hiernaast):
Om van taal te veranderen, kort op de
toets MEM drukken (op het scherm ver-
schijnt L2, vervolgens L3 en zal de naam
van de geselecteerde taal uitspreken).
Er zijn 6 talen beschikbaar:
Frans, Engels, Spaans, Duits, Arabisch en
Nederlands
Om het volume van een taal te wij-
zigen, drukt u op de toets MEM tot u het
gewenste volume verkregen heeft.
SUGGESTIES VOOR DE METING
1. Vermijd om te eten, te roken en om oefeningen te doen 30
minuten voor de meting. Houd u kalm gedurende de 15 minu-
ten voordat u uw bloeddruk gaat meten.
2. Stress doet uw arteriële bloeddruk stijgen. Vermijd om uw
bloeddruk te meten in een stressperiode.
3. Het is wenselijk om uw arteriële druk aan uw linkerarm te
meten.
4. Meet uw bloeddruk op een kalme plaats. U moet ontspannen
zijn en rechtop zitten, met uw arm op een tafel.
5. Blijf onbeweeglijk en praat niet terwijl u uw bloeddruk meet.
6. Noteer in de meegeleverde tabel voor het bloeddrukover-
zicht uw resultaten voor de bloeddruk en uw hartslagrimte
om deze later aan uw arts te kunnen voorleggen. Een enkele
meting van uw bloeddruk geeft geen nauwkeurige informatie
over uw reële bloeddruk. Let erop dat u uw bloeddruk altijd op
hetzelfde moment van de dag meet. De bloeddrukmetingen
variëren voortdurend.
7. Wacht 5 tot 10 minuten tussen twee opeenvolgende metin-
gen. Deze wachttijd geeft de met bloed gevulde vaten de tijd
om terug te normaliseren. Deze termijn hangt af van uw eigen
lichamelijke conditie.

Visiomed - KD-595 - 032016
40 41
Visiomed - KD-595 - 032016
GEBRUIK VAN DE ARMBAND
1. Steek het uiteinde van de armband in
de metalenbeugel (lip in velcro aan
de buitenkant)
2. Draai de armband rond uw ar zodat
de luchtbuis naar uw handpalm ge-
richt is.
3.
Wikkel de armband rond uw arm zoals
afgebeeld; zorg ervoor dat hij op 2-3
cm van de elleboog rust en dat de
luchtbuis naar de binnenkant van
uw arm gericht is. Zorgt ervoor dat
het meetcontact (ter hoogte van de
luchtbuis - ongeveer 3 cm lang) op de
binnenste slagader van d arm gericht is.
4. Trek het vrije uiteinde van de arm-
band aan en sluit deze met de velcro-
band.
5. Pas de armband aan zonder dat hij te-
veel spant, maar zodat er geen ruimte
meer vrij is tussen de arm en de arm-
band. Dit zou vertekende resultaten
kunnen geven. Voer geen metingen
uit over uw kleding.
6. Bevestig de armband met de scratch
zodat hij comfortabel zit. Leg uw arm
op tafel (met uw handpalm naar bo-
ven), zodat de armband zich ter hoog-
te van uw hart bevindt. Controleer of
de luchtbuis niet geplooid is en niet
opgewikkeld is rond zichzelf.
7. Blijf kalm zitten gedurende twee mi-
nuten voordat u uw bloeddruk meet.
Nota:
Voer de metingen altijd op dezelfde arm uit (normaal links) met het
oog op een betere interpretatie van de resultaten. Als u de armband
niet aan uw linkerarm kunt bevestigen, kunt u ook uw rechterarm
gebruiken.
METING VAN DE ARTERIËLE DRUK
1. Bevestig de armband zoals uitgelegd werd in het vorige hoofdstuk.
2. Druk op de toets START. Alle pictogram-
men worden gedurende twee seconden
op het scherm weergegeven. De vorige
drukmeting wordt op het scherm weer-
gegeven. De uitleg wordt in de geselec-
teerde taal gegeven
3. Op het scherm verschijnt 0mmgH als het
apparaat klaar is voor de meting. De arm-
band wordt automatisch opgeblazen. Als
het scherm de maximale waarde weer-
geeft (tot 150-200 mmHg), vermindert
de druk, de hartslagen worden gere-
gistreerd, de indicator HEART verschijnt
op het scherm. De lucht wordt automa-
tisch uit de armband geëvacueerd.
4. Zodra de meting ten einde is, verschijnen de systolische en
diastolische waarden en de hartslagen/minuut op het scherm.
De resultaten worden automatisch gelezen en becommen-
tarieerd (indicatie van de classicatie op het niveau van de
bloeddruk - internationale standaard WHO). De gegevens
worden in het geheugen opgeslagen.
5. Druk opnieuw op de toets START om de eenheid uit te scha-
kelen. Als u dit vergeet, zal de eenheid na ongeveer 1 minuut
automatisch uitschakelen.
Nota:
- De gemeten waarde is te laag als de armband boven het niveau
van het hart gehouden wordt en is te hoog als ze onder het niveau
van het hart gehouden wordt.
- Het apparaat slaat de 60 laatste bloeddrukmetingen op. Na die 60
metingen, worden de oudste gegevens gewist.
- Vermijd om te praten en te bewegen tijdens het meten van de bloe-
druk. Dit zal een invloed hebben op de resultaten.
- Als u wilt stoppen met het meten van uw bloeddruk, druk dan
gewoon op de toets START om het apparaat automatisch te
stoppen.
OPSLAG VAN DE GEGEVENS
1. Druk op de toets MEM om de eenheid in te schakelen.
2. Het scherm geeft de laatste meting weer en leest de resultaten
(interpretatie van de resultaten). Druk op de toets MEM om de
gegevens in opklimmende volgorde opnieuw te bekijken. Het
Other manuals for TensioFlash KD-595
1
Table of contents
Languages:
Other VISIOMED Blood Pressure Monitor manuals

VISIOMED
VISIOMED TensioFlash KD-795 User manual

VISIOMED
VISIOMED TensioFlash KD-595 User manual

VISIOMED
VISIOMED TensioFlash KD-795 User manual

VISIOMED
VISIOMED KD-735 User manual

VISIOMED
VISIOMED TensioFlash KD-798 User manual

VISIOMED
VISIOMED bewell connect MyTensio BW-BA1 User manual

VISIOMED
VISIOMED Bewell Connect MyOxy BW-OX1 User manual

VISIOMED
VISIOMED TensioFlash KD-558 User manual