8
• Bewahren Sie das Gerät in einem für Kinder
oder behinderte Personen unzugänglichem
Ort auf. Lassen Sie das eingeschaltete Gerät
nie unbeaufsichtigt.
• Dieses Gerät darf von Kindern und behinder-
ten Personen nicht genutzt werden, es sei
denn ihnen eine angemessene und verständ-
liche Anweisung über die sichere Nutzung des
Geräts und die Gefahren seiner falschen Nut-
zung durch die Person, die für ihre Sicherheit
verantwortlich ist.
• Bewahren Sie das Gerät in einem kühlen, tro-
ckenen und für Kinder unzugänglichem Ort
auf.
• Das Reisebügeleisen hilft Ihnen Ihre Sachen
während der Urlaubs oder Dienstreise in
Ordnung schnell zu bringen, kann jedoch das
normale Bügeleisen nicht ersetzen.
BÜGELN OHNE BÜGELBRETT
Während der Reisen ist das Bügelbrett nicht im-
mer verfügbar, in solchen Fällen genügt es, wenn
Sie ein zweimal gefaltetes Frottierhandtuch auf
die gerade Oberfläche legen. Vergewissern Sie
sich vorher, dass die Oberfläche hitze und was-
serbeständig ist. Es ist nicht gestattet, Glas und
Plastikoberflächen fürs Bügeln zu nutzen.
VOR DER ERSTNUTZUNG DES GERÄTS
• Nehmen Sie das Bügeleisen aus der Verpa-
ckung heraus und falls notwendig, entfernen
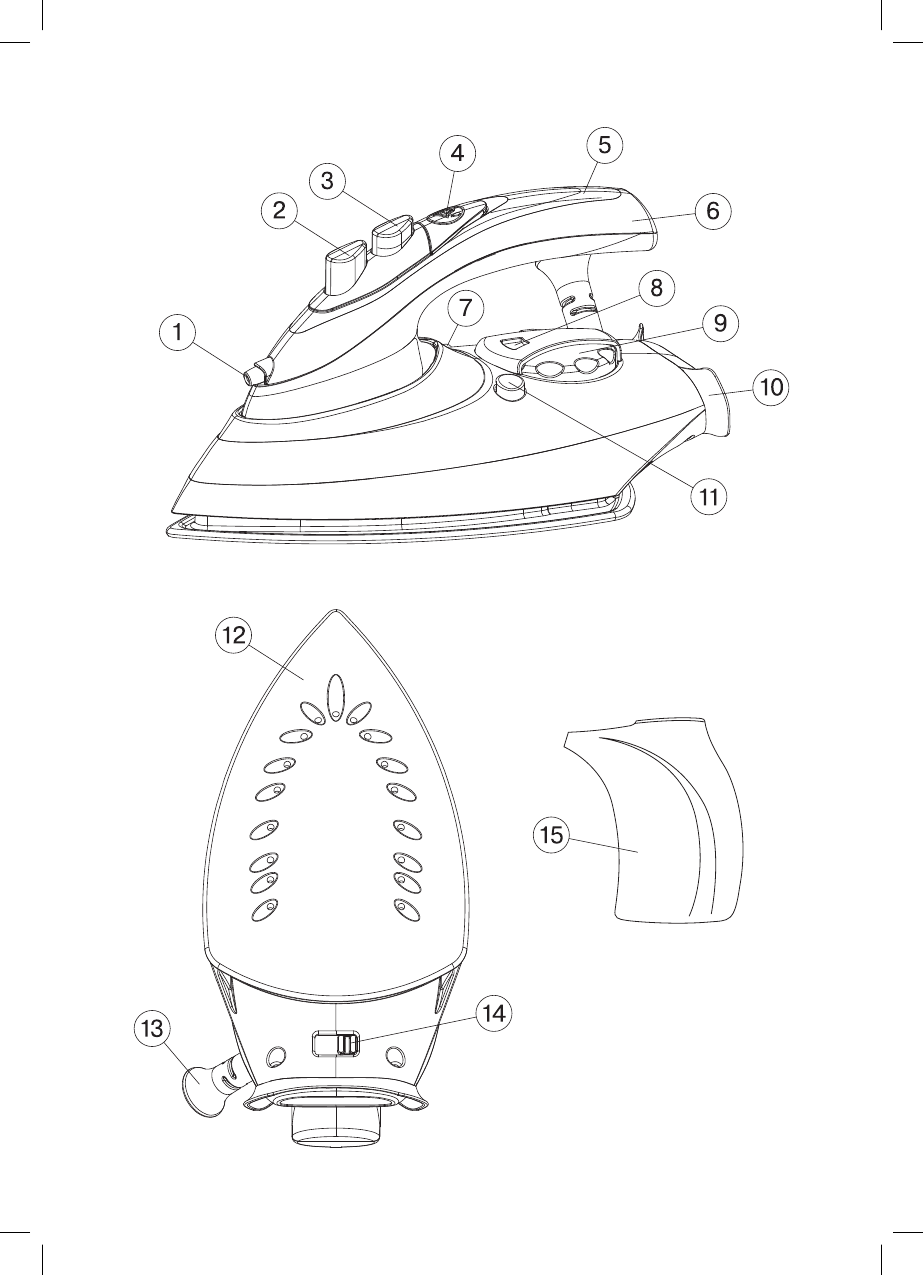
Sie das Schutzmaterial von der Gleitsohle (12).
• Wischen Sie die Gleitsohle des Geräts mit
einem trockenen Tuch ab.
• Vor der ersten Inbetriebnahme des Bügelei-
sens vergewissern Sie sich, dass die Span-
nung des Geräts mit der Netzspannung (14)
übereinstimmt. Nach der Nutzung des Geräts
mit der Spannung 120V schalten Sie immer
den Spannungsschalter (14) in die Position
240V, dadurch wird der Ausfall des Geräts
beim Einschalten des Geräts ins Netz mit der
höheren Spannung vermieden.
AUFFÜLLEN DES WASSERBEHÄLTERS
Vergewissern Sie sich vor dem Auffüllen des Bü-
geleisens mit Wasser, dass es vom Stromnetz
abgeschaltet ist.
• Heben Sie den Handel (6) und er wird fixiert,
um den Handel (6) herunterzuklappen, drü-
cken Sie die Taste (11) und danach klappen
Sie den Handel herunter.
• Bringen Sie den Temperaturregler (9) in die
«min»-Position und den Knopf der gleichblei-
benden Dampflieferung (2) in die untere Posi-
tion (Dampflieferung ist abgeschaltet).
• Öffnen Sie den Deckel der Wassereinfüllöff-
nung (4).
• Es ist nicht gestattet, am Deckel zu stark zu
ziehen, es genügt eine leichte Anstrengung.
• Gießen Sie Wasser ein, nutzen Sie dabei den
Wasserbehälter (15), danach schließen Sie
den Deckel (4) dicht zu.
Anmerkung:
Die Dampfzufuhr erfolgt nicht, wenn der Was-
serbehälter leer ist.
• Wenn sie Wasser während des Bügelns nach-
gießen müssen, schalten Sie das Bügeleisen
aus und ziehen Sie den Netzstecker aus der
Steckdose.
• Es ist nicht gestattet, Aromaflüssigkeiten,
Essig, Stärkelösung, Reagenzien für die Ent-
fernung von Kalkstein, chemische Lösungen
usw. ins Wasserbehälter einzugießen.
• Schalten Sie das Gerät nach dem Bügeln aus,
lassen Sie es abkühlen, danach öffnen Sie
den Deckel der Einfüllöffnung (4), drehen Sie
das Bügeleisen um und gießen Sie Restwas-
ser aus.
TEMPERATUR BEIM BÜGELN
Vor der Inbetriebnahme prüfen Sie das auf-
geheizte Bügeleisen auf einem Tuch, ob die
Gleitsohle (12) und der Wasserbehälter (5) sau-
ber sind.
• Vor dem Bügeln sollen Sie die Überschriften
auf dem Etikett der Kleidung beachten, wor-
auf die empfohlene Temperatur angegeben
ist.
• Wenn das Etikett mit den Hinweisen nach dem
Bügeln fehlt, kennen Sie aber den Stofftyp, so
können Sie die Temperaturangaben fürs Bü-
geln der folgenden Tabelle entnehmen:
Bezeichnungen Stofftyp (Temperatur)
•Synthesefaser, Nylon, Acryl,
Polyester (niedrige Temperatur)
•• Seide/Wolle (mittlere Temperatur)
•••
(max)
Baumwolle/Leinen (hohe
Temperatur)
• Die Tabelle ist nur für das Bügeln von glatten
Stoffen verwendbar. Wenn Sie den Stoff eines
anderen Typs verwenden (gaufriert, geriffelt
DEUTSCH
1227_new+.indd 81227_new+.indd 8 01.06.2011 19:22:0401.06.2011 19:22:04