VPro DN Series User manual

OSPDN225-EN
1/8
Instruction manual
Pneumatic Actuated Butterfly Valve DN
SP-1474
Please read this manual before installation and use.
GENERAL
It composed of wafer type butterfly valve and pneumatic actuator.
Actuator
Double-acting type
TAD
Single-acting type
TAO (Airless SHUT)
TAC (Airless OPEN)
Valve
DN type Double centering structure.
PRODUCT CODE
D N 9 1 T T F - - -
(1) (2) (3) (4) (5) (6) (7) (8) (9) (10) (11)
(1) Actuator
TAD
TAO
TAC
(2)
Valve
DN
(3)
Voltage
9 : Air
(4) Sizing code
0 : Standard
1 : Light
2 : Heavy
(5) Connection
1 : JIS 5K / 10K
(6) Body material
T : SCS13A
(7) Disc material
T : SCS13A
(8) Seat material
F : F-PTFE
(9) Size [mm]
ex. 80 A ® 080
(10) Option
FR : Filter Regulator Unit
LB : Limit Switch Box
EP : Positioner
ES : Smart Positioner
ER : Smart Positioner
(11) Positioner control pattern (TAD)
A : SHUT by 4 mA « OPEN by 20 mA
B : SHUT by 20 mA « OPEN by 4 mA
(11) Positioner control pattern (TAO)
C : OPEN by 20 mA « SHUT by 4 mA (Airless SHUT)
D : OPEN by 4 mA « SHUT by 20 mA (Airless SHUT)
(11) Positioner control pattern (TAC)
E : SHUT by 4 mA « OPEN by 20 mA (Airless OPEN)
T : SHUT by 20 mA « OPEN by 4 mA (Airless OPEN)
DN

OSPDN225-EN
2/8
VALVES SPECIFICATIONS
Water Oil Air, Gas Steam Chemicals Sea water Slurry Negative pressure
Valve type DN
Design Wafer type
Connection JIS Flanges 5K / 10K
Fluid
Max pressure 1 MPa
Size [mm] 080 to 300
Material Body SCS13A
Disc SCS13A
Seat F-PTFE
Stem seal Packing PTFE
PRESSURE & TEMPERATURE RATING
INHERENT FLOW CHARACTERISTIC
Cv
value
(%)
Valve opening
(%)
Range ability 50:1
Max

OSPDN225-EN
3/8
PNEUMATIC ACTUATOR SPECIFICATIONS
TAD type
Classification Double-acting type
Actuator type TAD-040 TAD-050 TAD-063 TAD-080 TAD-100 TAD-125 TAD-160
Weight [kg] 0.9 1.3 2.1 3.4 6.1 9.8 18.2
Air consumption []
(round-trip) 0.11 0.18 0.34 0.66 1.36 2.72 5.56
Operation SHUT by air to port A. « OPEN by air to port B.
Air pressure 0.4 to 0.7 MPa
Piping connection Rc 1/8 Rc 1/4
Method of operation Rack-and-pinion Scotch yoke
Housing material Aluminum alloy
Ambient temperature -10 to 50 °C (Please be careful when you use in 5 °C or less, so that there no freeze.)
Manual operation Operates the upper shaft of the actuator directly.
TAO TAC type
Classification Single-acting type (Spring-return)
Actuator type TAO
-
040
TAC
-
040
TAO-050
TAC-050
TAO-063
TAC-063
TAO-080
TAC-080
TAO-100
TAC-100
TAO-125
TAC-125
TAO-160
TAC-160
Weight [kg] 2.3 3 4.9 8.5 16.4 27.6 51.2
Air consumption []
(round-trip) 0.23 0.34 0.67 1.26 2.62 4.44 8.77
Operation TAO : OPEN by air to intake port. « SHUT by spring-return. (Airless SHUT)
TAC : SHUT by air to intake port. « OPEN by spring-return. (Airless OPEN)
Air pressure 0.4 to 0.7 MPa
Piping connection Rc 1/4
Method of operation Rack-and-pinion Scotch yoke
Housing material Aluminum alloy
Ambient temperature -10 to 50 °C (Please be careful when you use in 5 °C or less, so that there no freeze.)
Manual operation No manual operation. Option: MT (Manual handle unit)

OSPDN225-EN
4/8
PNEUMATIC ACTUATOR SPECIFICATIONS
OPTIONAL PARTS
Classification Code TAD TAO TAC
Speed Controller with bypass valve (Housing material: PPS) BS
FR Unit (Regulator with Filter) TA2-FR (KONAN) FR
Limit Switch Box (Standard load signal) LB
Explosion Proof Limit Switch / VCX7001
(azbil) Ex d e II C T6 LR
Speed Controller (with One-touch Fitting) One set SE
Speed Controller (with One-touch Fitting) Two sets SS
Speed Controller (with One-touch Fitting) Dual Speed Controller SF
Manual handle unit (for TAO-050 to 160 / TAC-050 to 160) MT
Sealing the spring unit. (Oil-free) 92
Explosion Proof Electro-Pneumatic Positioner Ex dmb II B T5 (TIIS) EP
Smart positioner ES
ER
Smart positioner (with 4 to 20mA output) ET
EU
SHUT by 4 mA. « OPEN by 20 mA. A
SHUT by 20 mA. « OPEN by 4 mA. B
OPEN by 20 mA. « SHUT by 4 mA. / spring-return. (Airless SHUT) C
OPEN by 4 mA. « SHUT by 20 mA. / spring-return. (Airless SHUT) D
SHUT by 4 mA. « OPEN by 20 mA. / spring-return. (Airless OPEN) E
SHUT by 20 mA. « OPEN by 4 mA. / spring-return. (Airless OPEN) T
SHUT by 4 mA. « OPEN by 20 mA. A
SHUTby 20 mA. « OPEN by 4 mA. B
OPENby 20 mA. « SHUT by 4 mA. (Airless SHUT) C
OPENby 4 mA. « SHUT by 20 mA. (Airless SHUT) D
SHUTby 4 mA. « OPEN by 20 mA. (Airless OPEN) Y
SHUTby 20 mA. « OPEN by 4 mA. W
OPENby 4 mA. « SHUT by 20 mA. (Airless SHUT) X
SHUTby 4 mA. « OPEN by 20 mA. (Airless OPEN) E
SHUTby 20 mA. « OPEN by 4 mA. (Airless OPEN) T
Positioner operationSmart positioner
OPEN by
loss of signal
Smart positioner
SHUT by
loss of signal

OSPDN225-EN
5/8
PNEUMATIC ACTUATOR SPECIFICATIONS
SOLENOID VALVE
Classification ( : Voltage code) Code
5-port Solenoid Valve
Return
(with bypass valve)
Lead wire 4N3S102K-L N43SL : Voltage
1 : 100V
AC
3 : 200V
AC
5 : 24V DC
DIN Connector 4N3S102K-D N43SD
DIN Connector (with lamp) 4N3S102K-N N43SN
Watertight cover 4N3S102K-W N43SW
5-port Explosion proof
solenoid valve
Return
(with bypass valve)
Conduit 4N4S102K-E01-H B0-
R
4N4S01- B0, NO
Flame proof packing
(Cable size 9.5 to 10.4 mm)
4N4S102K-E10-H B0-
R
4N4S10- B0, NO
Operate by solenoid valve (Normally Open)
TAD SHUT by solenoid off. « OPEN by power to solenoid.
TAO (Airless SHUT) OPEN by power to solenoid. « SHUT by solenoid off. (Spring-return)
TAC (Airless OPEN) SHUT by power to solenoid. « OPEN by solenoid off. (Spring-return)
DIMENSIONS
TAD
Actuator H W N N1
TAD-040 89.5 110 57 32
TAD-050 123 170 82 36
TAD-063 138 204 95 38
TAD-080 171 240 116 45
TAD-100 202 294 143 57
TAD-125 227 366 150 60
TAD-160 273 446 181 68
TAO TAC
Note) Cylinder direction of TAC-040 is the same as TAO.
Actuator W W1 N N1
TAO-040 TAC-040 249 55 92 46
TAO-050 TAC-050 305 85 103 50
TAO-063 TAC-063 367 102 119 52
TAO-080 TAC-080 435 120 142 59
TAO-100 TAC-100 530 147 174 71
TAO-125 TAC-125 688 183 193 74
TAO-160 TAC-160 838 223 231 82
N1
N
H
W
W1
W
N1
N
H
TAO TAC

OSPDN225-EN
6/8
INSTALLATION, OPERATION & MAINTENANCE INSTRUCTIONS
HANDLING & STORAGE
HANDLING
Do not drop or throw the product as it may break.
STORAGE
• Store away from dust, moisture and direct sunlight.
If possible, store in the original package.
• Do not remove a dust proof cap until the piping.
CHECKING
• Check the product code before installation.
• Make sure that the bolts are not loose.
INSTALLATION
PRECAUTIONS
• Flush the pipeline carefully before installing the
valve. Foreign particles, such as sand or pieces of
welding electrode, will damage the disk and seats.
• For valves with specified flow direction (DN), check
the arrows on the product before piping.
• Valve is shipped closed. (TAC is closed with a
manual unit. Without a manual is open.)
• The butterfly valve should be piped upstream of the
elbow. When piping downstream from the elbow,
considered a straight line that is at least five times
the length of the pipe.
• The valve stem should be mounted perpendicular to
the flow for biased fluid.
• Disc interference may also occur when valve is
installed in pipeline with smaller than normal inside
diameter such as thick wall pipe, or lining pipe.
Suitable corrective measurement must be taken
(taper boring the pipe or pipe liner, etc.)
PIPING FLANGES
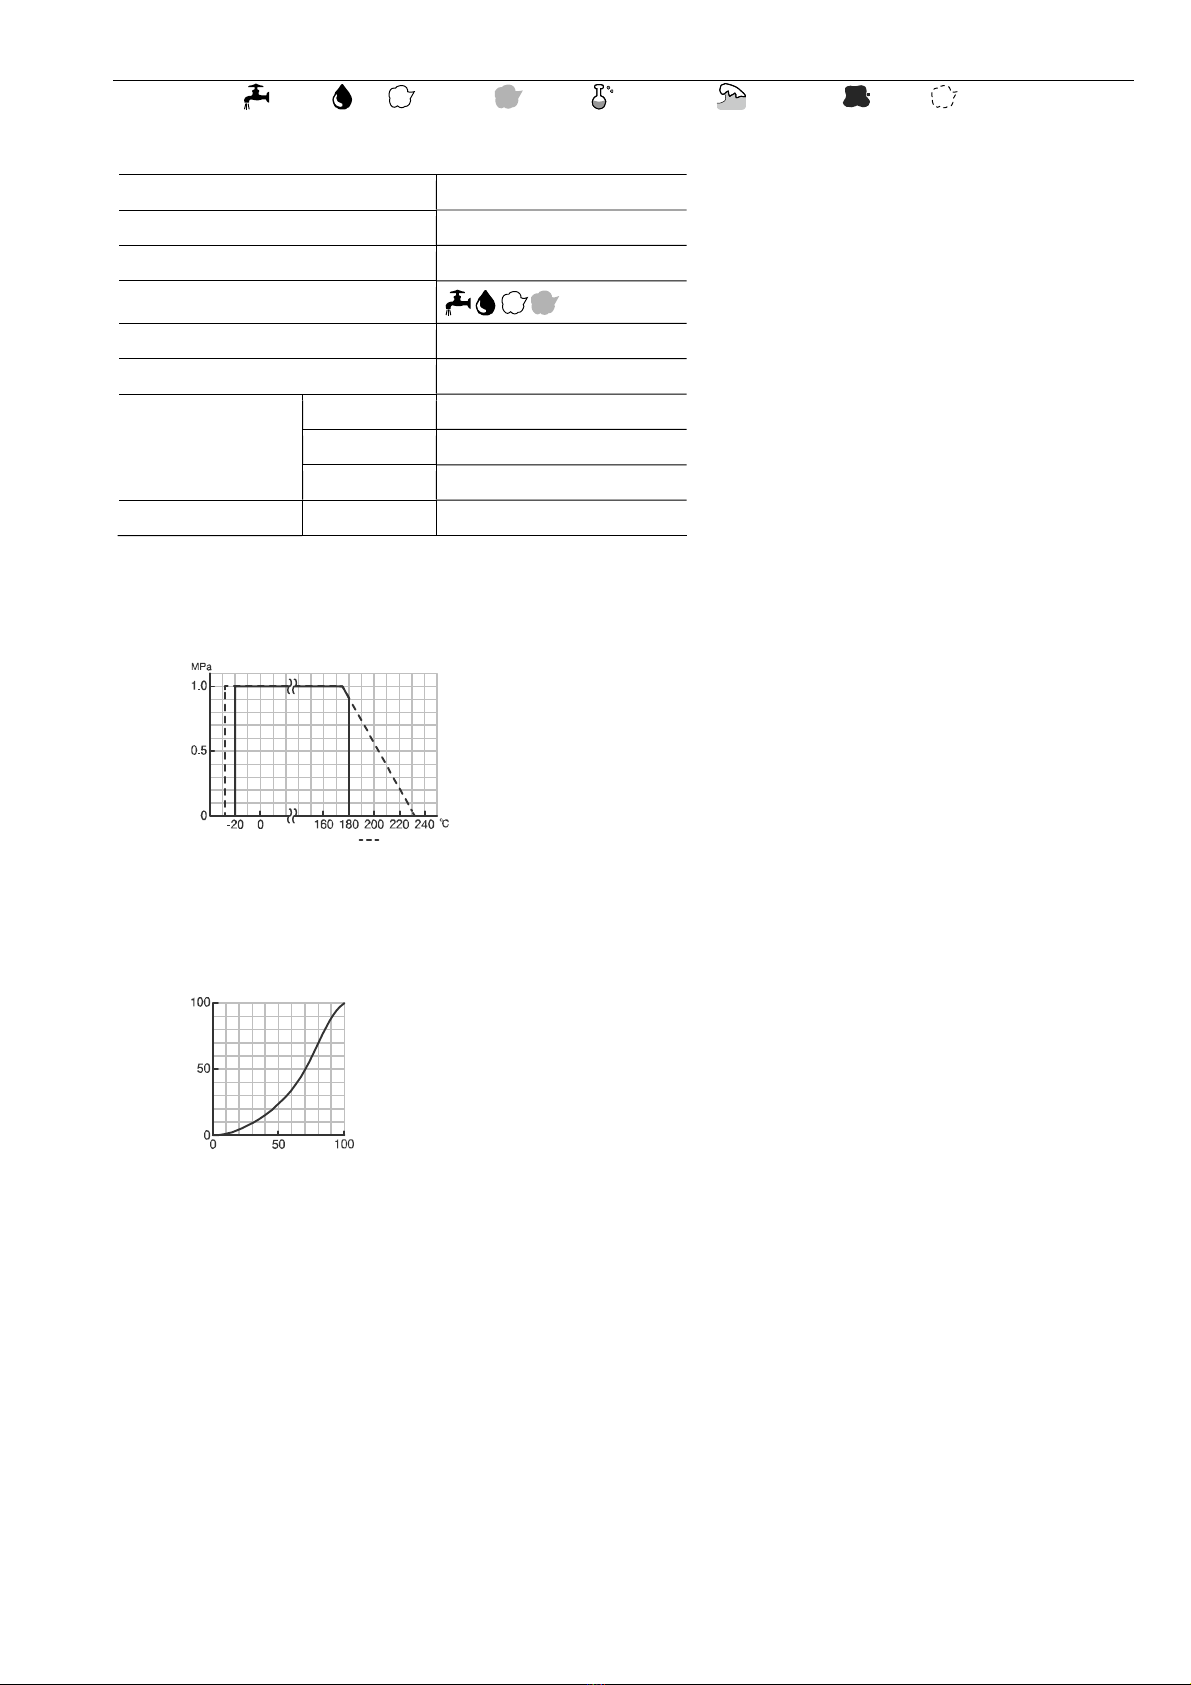
• Gasket should be selected appropriately to suit the
fluid, pressure and temperature.
Use spring washer to prevent from decreasing
surface pressure gasket when the temperature
change happens frequently.
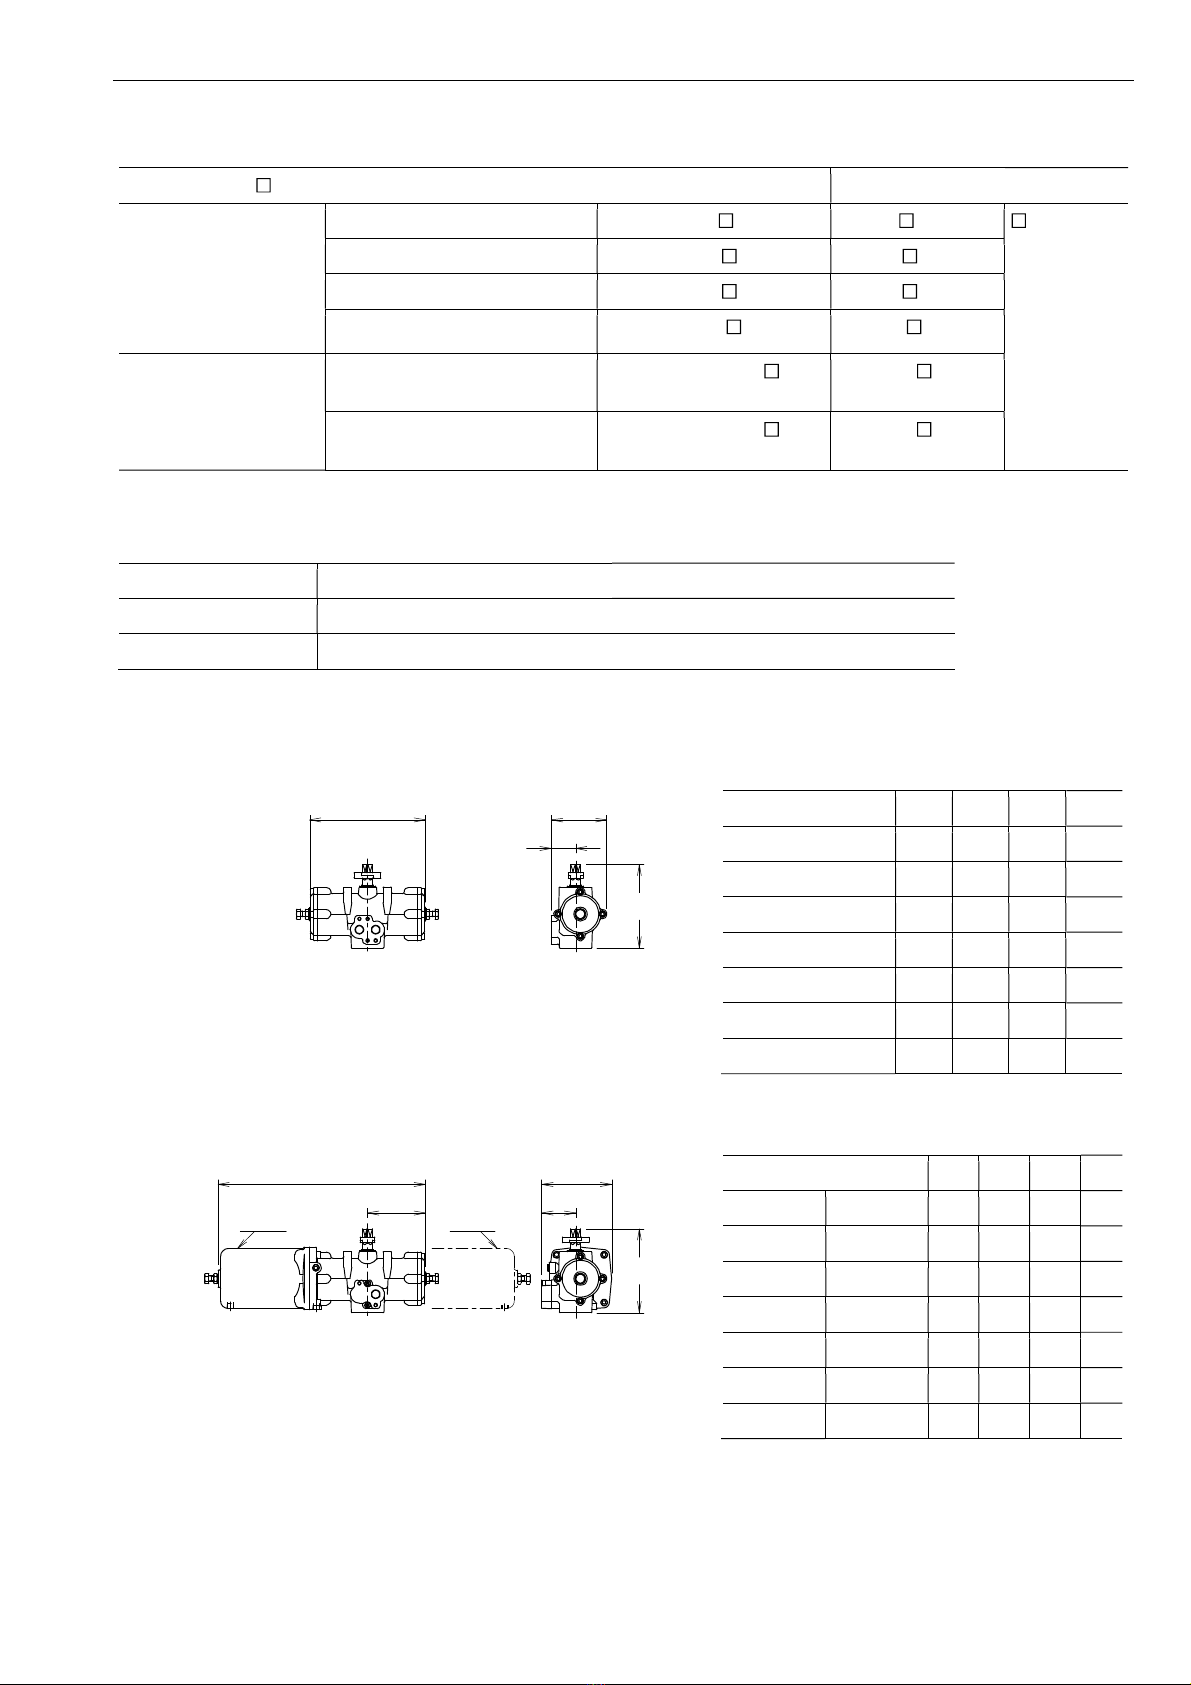
• Wafer type butterfly valve is put between two seats
of flanged-end and tightened with long bolts.
• Before bolts are tightened, valve should be centered
within the bolts to prevent possible disc interference
or damage by contact with the pipe or flange.
• Tighten all bolts using crossover method to load the
joint evenly.
ENVIRONMENT
• Do not install in place where corrosive gas is present
or where vibration is heavy (0.5 G or more).
• When radiant heat causes the surface temperature
of the control unit to exceed 50 °C, provide an
appropriate shielding plate.
• If there is a possibility that the fluid and drive part
freeze, please take measures to prevent freezing.
• For single-acting type, prevent water and dust from
coming into air exit.
POSITIONING
Should be positioned through 90° upward from
horizontal. Provide space around the product to
allow manual operation, inspection and replacement
work.
CAUTIONS FOR MAINTENANCE
Do not keep warm for maintenance of the valve
gland.
Fast
Slow Fast
Slow

OSPDN225-EN
7/8
INSTALLATION, OPERATION & MAINTENANCE INSTRUCTIONS
TIGHTEN THE GLAND NUTS
• Check that there is no leakage from the gland
packing.
• If it leakage, tighten gland nuts by alternately.
Do not over-tighten the gland nuts.
Recommended torques
Valve size [mm] Torque [Nm]
DN
080 3.5
100
125
150
7
200
250
300
14
AIR PIPING
• Pneumatic actuator has an air supply ports to
operate piston.
Double-acting type
TAD-040 : Rc 1/8
TAD-050 to 160 : Rc 1/4
Single-acting type
TAO / TAC : Rc 1/4
• Piping of double-acting type is connected by seal
tape on PORT A / B. Piping of single-acting type is
put seal tape only on the air intake port.
• The air supply port may be damaged if over-
tightened. Please lightly tighten by hand.
• Never put anything on the actuator or make it into a
foothold.
OPERATION
AIR SOURCE
• Use the filtered dry air (less than 40 ).
• Extra attention is needed where it's cold climate
(below 5 °C).
• When air pressure is high, reduce it to standard
pressure (0.4 to 0.7 MPa). Air pressure should not
exceed 0.7 MPa during operation test.
• Capacity of compressor and air tank are to be
calculated by capacity of piping and air consumption.
A margin of 30 % is required.
TEST OPERATION
Check the operation of pneumatic actuator before
fluid enters the piping.
Double-acting type Stop the air from the air source.
Release the residual pressure
in the air cylinder. Open the air
equalizer. Move the manual
shaft of actuator with a wrench.
Single-acting type Send the standard pressure air.
Confirm the opening / closing
operation by slowly moving the
actuator.
TESTING
After piping, check following points.
• Piping is correct.
• Air or fluid leakage from connection. Flow
direction of air is correct.
• Air pressure is in the range.
• Nothing interferes with operation when limit
switch or solenoid valve is attached.
ATTENTION
The opening and closing operation of the pneumatic
actuator is fast, which may affect the product life.
Please adjust the operation time of pneumatic
actuator using a speed controller.
Valve size [mm] Adjustment of operation time.
050 or more More than 2 seconds
Gland nut
PORT A PORT B
Air intake

OSPDN225-EN
Document is subject to change without notice.
NIPPON VALVE CONTROLS, INC.
1-21-19 Meieki minami, Nakamura-ku, Nagoya 450-0003 JAPAN
TEL: 81-52-582-6435 FAX: 81-52-582-6439
8/8
INSTALLATION, OPERATION & MAINTENANCE INSTRUCTIONS
MANUAL OPERATION
• Double-acting; stop the air supply and do not leave
the air inside of cylinder.
• Single-acting; cannot be operated manually.
Optional code with the handle: TAO-MT / TAC-MT.
• Before automatic operation, be sure to remove
wrench.
OPERATION (TAD)
After turning air pressure to 0, turn manual shaft
slowly with a smooth-jawed wrench to check the
direction of OPEN/SHUT position.
MAINTENANCE
• Do the routine maintenance at least once in half a
year.
• Do not set or take spring unit parts apart after
installing the pneumatic single-acting actuator.
Can be used with no oil supply.
• Confirm the air leakage.
• Confirm the air supply pressure.
• Confirm the dirt or grit inside of cylinder.
Lubrication Procedure (TAD / TAO / TAC)
In case of lubricating, use turbine oil or the
equivalent through a lubricator. (ISO VG 32.46).
Once lubricate, do the regularly.
Inspection items
• Confirm operation of opening and closing.
• Confirm whether screws are loose or not.
• Confirm the fluid temperature or pressure.
• Confirm the leak from valve stem.
• Confirm the bolt tightening torque.
TROUBLESHOOTING
Problem Cause Solution
Fail to
operate.
Air doesn't
come out.
Supply air.
Air pressure is
too low.
Adjust to standard
pressure level.
Stop in the
mid position.
There is a
foreign object
in the butterfly
valve.
Remove a foreign
object.
Valve is
distorted.
Replace the valve.
Leakage
from
valve seat
Damaged on
valve seat.
Replace the valve.
Replace the valve seat.
Leakage
from
valve stem
Gland packing
is worn or
distorted.
Tighten the gland nut.
Replace the gland
packing.
For more information contact
NIPPON VALVE CONTROLS, INC. for consultation.
Table of contents
Other VPro Control Unit manuals
Popular Control Unit manuals by other brands

H3C
H3C SecPath M9000 NSQM1MBFEA0 quick start guide

Sundance Spas
Sundance Spas SMT351 user manual

Radio Shack
Radio Shack Color Graphics Option installation instructions

Viessmann
Viessmann VITOSOLIC 100 operating instructions

Supermicro
Supermicro SuperBlade SBI-4129P-T3N user manual

Zeta Alarm Limited
Zeta Alarm Limited SmartConnect SCM-NM instruction manual

Feig Electronic
Feig Electronic ID ISC.LRM1002-E Integration manual

Neoway
Neoway Neo_M680 Hardware user's guide

M-system
M-system R3-NMW1F instruction manual

EMS
EMS LRP2000 Series Operator's manual

BFT
BFT ALPHA BOM Installation and user manual

TE Connectivity
TE Connectivity FlexWave Prism installation guide