Wachs POW-R-DRIVE II User manual

Part Number: 11-MAN-01
Revision No. Eibenstock Motor Revised:
Oct. 20
i
E.H. WACHS COMPANIES
100 Shepard St. Wheeling Il. 60090
Patent Pending
PIPE & VALVE
MAINTENANCE MACHINES
Mod. PRD II S/N:
POW-R-DRIVE II
VALVE OPERATOR
MODEL PRD II
IND
E.H. Wachs
600 Knightsbridge Parkway, Lincolnshire, IL 60069


TABLE OF CONTENTS
SECTION I STANDARD EQUIPMENT..........................................................................................4
SECTION II MACHINE SPECIFICATIONS...................................................................................5
SECTION III SAFETY INSTRUCTIONS.......................................................................................6
SECTION IV SET UP AND OPERATING PROCEDURES......................................................8-16
Electric Pow-R-Drive..............................................................................................................10-11
Hydraulic Pow-R-Drive..........................................................................................................12-13
Pneumatic Pow-R-Drive........................................................................................................14-15
Two Operator Operation.............................................................................................................16
SECTION V MISCELLANEOUS CHARTS AND GRAPHS...................................................18-19
SECTION VI MAINTENANCE....................................................................................................22
SECTION VII PARTS LISTS AND EXPLODED VIEWS........................................................23-32
Head Assembly-All Models....................................................................................................24-25
Parts List and Exploded View-Elecric 220v...........................................................................26-27
Parts List and Exploded View-Elecric 110v............................................................................28-29
Parts List and Exploded View-Hydraulic................................................................................30-31
Parts List and Exploded View-Pneumatic..............................................................................32-33
Parts List and Exploded View-Air Motor.................................................................................34-35
Pow-R-Drive Accessories.......................................................................................................36-37
Electrical Schematic..............................................................................................................38-39
SECTION VIII VALVE EXERCISING LOG.............................................................................40-43
SECTION IX ORDERING INFORMATION.................................................................................44
POW-R-DRIVE II

POW-R-DRIVE II
4
INTRODUCTION:
The E. H. Wachs Company has redefined portable
valve operating machines with the Pow-R-Drive II.
This lightweight, versatile hand held valve operator
provides power to easily operate valves from 6" to
60". It is perfect for hard to reach valves, valve
exercising and testing.
The Pow-R-Drive II offers these advantages:
• Operate 3 times more valves per day.
• Be ready for emergency "shut offs".
• Eliminate operator fatigue and back injury.
• Offers maximum valve protection.
• Operate valves where access is limited.
• Easy to store, easy to use.
• Can be used easily by one operator.
From Left to Right: Hydraulic, Electric
and Pneumatic Models
SECTION I STANDARD EQUIPMENT
PACKAGING:
The Pow-R-Drive II comes housed
in a compact steel storage case.
The following items should be in-
cluded in your Pow-R-Drive II case:
-
POW-R-DRIVEII
Valve Operator
-Extension Handle
-Operating Manual

POW-R-DRIVE II
5
SPECIFICATIONS:
Capacity: Operates all gate valves 6" to 60"
(15.3 to 152.4 cm) and other equip-
ment requiring mechanized turn-
ing.
Drive: • Two stage reduction.
• Planetary primary
• Bronze/Steel secondary
(120:1 reduction)
Requirements:
• Pneumatic: 60 cfm @ 90 psi.
• Hydraulic: 8 gpm @1800 psi.
• Electric: 110 V AC (60 Hz @ 3600
RPM) /220 V AC ( 50 Hz @ 3000 RPM).
(Requires a 15 amp or 3500 watt
generator.)
Peak Torque: 800 ft./lbs. (1084 N-m)
Motor Controls:
Electric: • 2 speed gearbox:
•Low RPM/high torque
•High RPM/low torque
• Single action on/off, forward/
reverse, neutral after release.
• Overload reset button
• GFI (ground fault interrupter)
with test and reset. ( 110 volt only )
Pneumatic: • Adjustable torque setting valve
from 0 to 800 ft./lbs. with torque
indicator gauge.
• Reversible pneumatic motor
with springloaded on/off lever.
• Automatic stop after release.
Hydraulic: • Adjustable torque setting valve
from 0 to 800 ft./lbs. with torque
indicator gauge.
• Reversing valve, springloaded
self centering automatic stop
after release.
Revolution
Counter: • Built in digital counter display.
• Push button reset counts in 1/10
revolution increments, forward
and reverse automatically.
Torque
Gauges: • Hydraulic: 0 to 800 ft./lbs. Glyc-
erine filled.
• Pneumatic: 0-800 ft./lbs.
Finish: Enamel paint, cadium plated
handles and accessories.
Valve Key
Size: 1" square solid (2.54 cm)
Socket: 2" square. AWWA standard (5 cm).
Dimensions: • Length: 39-3/4" (101 cm)
• Width: 7-3/4" (20 cm)
• Height: 7" (18 cm)
Storage Case: • Length: 40-1/2" (103 cm)
• Width: 10-1/4" (26 cm)
• Height: 8-1/2" (22 cm)
Weight: • Pneumatic: 37 lbs. (17 kg.)
• Hydraulic: 36 lbs. (16 Kg.)
• Electric: 32 lbs. (15 Kg.)
Standard
Accessories: • Torque arm extension for two
operators
Optional
Accessories: • Valve key (8 ft. (244 cm) or 4 ft.
(122 cm) long)
• 2" square AWWA standard ductile
iron socket
• stop collar
• 15/16 drive socket
SECTION II MACHINE SPECIFICATIONS

POW-R-DRIVE II
6
For your safety and the safety of others, read and
understand these safety recommendations and op-
erating instructions before operating.
SECTION III SAFETY INSTRUCTIONS
The E. H. Wachs Company takes great pride in
manufacturing safe, quality products with user safety
a priority.
The E.H. Wachs Company recommends that all users
comply with the following safety rules and instructions
when operating our equipment.
Read the Following thor-
oughly before proceeding.
WARNING
Impact resistant eye protection
must be worn while operating or
working near this tool.
For additional information on eye and face protection, re-
fer to federal OSHA regulations, 29 Code of Federal Regu-
lations, Section 1910.133., Eye and Face Protection
and American National Standards Institute, ANSI Z87.1,
Occupational and Educational Eye and Face Protection.
Z87.1 is available from the American National Standards
Institute, Inc., 1430 Broadway, New York, NY 10018.
Hearing protectors are required in high noise areas, 85
dBA or greater. The operation of other tools and equip-
ment in the area, reflective surfaces, process noises and
resonant structures can substantially contribute to and in-
crease the noise level in the area. For additional informa-
tion on hearing protection, refer to federal OSHA regula-
tions, 29 Code of Federal Regulations, Section 1910.95,
Occupational Noise Exposure and ANSI S12.6 Hearing
Protectors.
CAUTION
Personal hearing protection is rec-
ommended when operating or
working near this tool.
Some individuals are susceptible
to disorders of the hands and arms
when exposed to tasks which in-
volve highly repetitive motions and/
or vibration. Disorders such as Carpal tunnel syn-
drome and tendonitis can be caused or aggravated
by repetitious, forceful exertions of the hands and
arms.
CAUTION
• Use minimum hand grip force.
• Keep wrists straight.
• Avoid prolonged, continuous vibration exposure.
• Avoid repeated bending of wrists and hands.
• Keep hands and arms warm and dry.
ALWAYS WEAR PROTECTIVE EQUIPMENT:
1. READ THE OPERATING MANUAL!! Reading the setup
and operating instructions prior to beginning the setup proce-
dures can save valuable time and help prevent injury to opera-
tors or damage to machines.
2. INSPECT MACHINE & ACCESSORIES! Prior to machine
setup physically inspect the machine and it's accessories. Look
for loose bolts or nuts, lubricant leakage, excessive rust, etc. A
properly maintained machine can greatly decrease the chances
for injury.
3. ALWAYS READ PLACARDS & LABELS! All placards, la-
bels and stickers must be clearly legible and in good condition.
Replacement labels can be purchased from the manufacturer.
4. KEEP CLEAR OF ROTATING PARTS! Keep hands, arms
and fingers clear of all rotating or moving parts. Always turn
machine off before attempting any adjustments requiring con-
tact with the machine or it's accessories.
5. SECURE LOOSE CLOTHING & JEWELRY! Loose fitting
clothing, jewelry; long, unbound hair can get caught in the
rotating parts on machines. By keeping these things secure or
removing them you can greatly reduce the chance for injury.
6. KEEP WORK AREA CLEAR! Be sure to keep the work area
free of clutter and nonessential materials. Only allow those
personnel directly associated with the work being performed to
have access to the area if possible.
Keep clear of rotating parts during opera-
tion. Hands and arms should be kept a
minimum of 2’ away from moving parts
exept during starting and stopping.
CAUTION
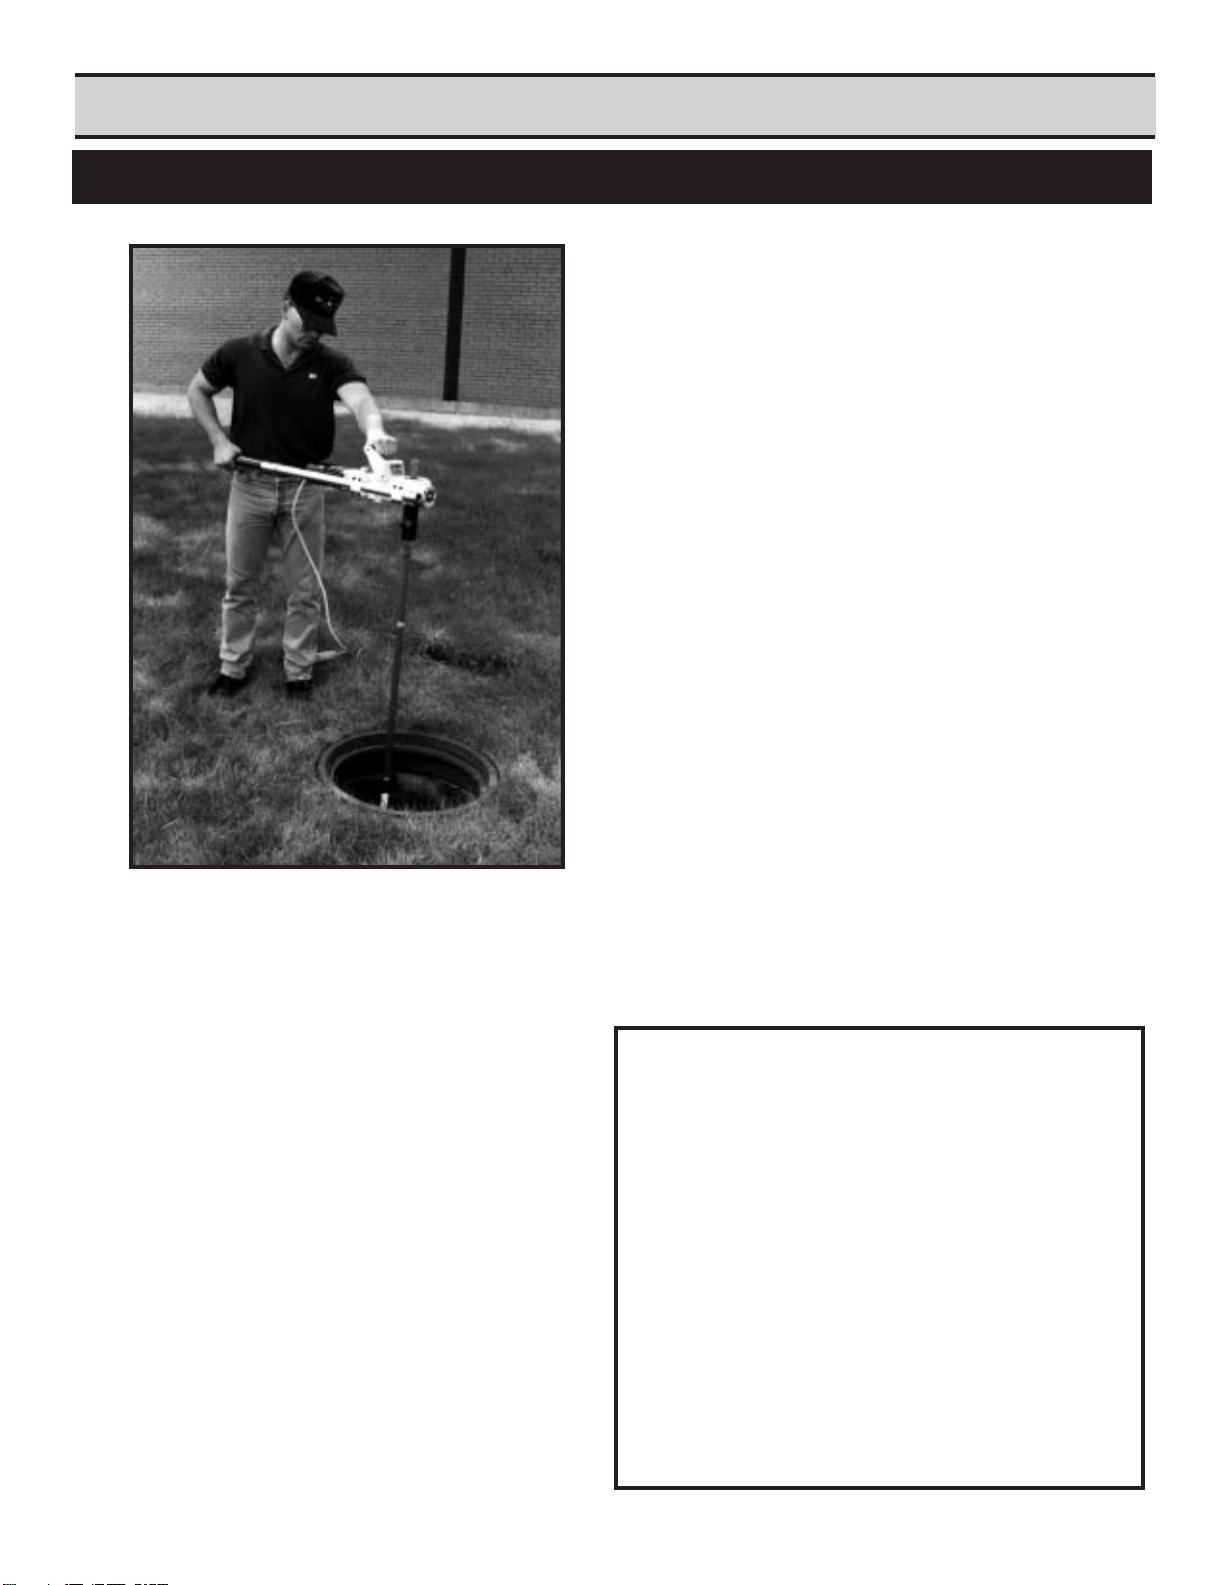
Users of the electric powered Pow-
R-DriveII Valve Operator should
avoid standing water whenever
possible. Do not expose electrical cord to water as
this may result in electrical shock.
CAUTION

POW-R-DRIVE II
7
Set Up
&
Operating Procedures
Section IV

POW-R-DRIVE II
8
Valve Maintenance Procedure
A valve that has not been operated for a number of
years needs to be closed by using a series of up and
down motions. Occasionally, crews attempting to
close a difficult valve use a T-handle or a cheater bar,
applying a great deal of pressure in one direction
simply to force the valve closed. The correct way to
exercise a valve is to begin with a steady amount of
torque in the direction necessary to close the valve,
moving through five to ten rotations, Then the
direction should be reversed for two or three revolu-
tions, followed by five or ten more turns in the closing
direction. This procedure should be repeated until
full closure is attained.
The reason for the cautious approach is that tuber-
culation and sediment have probably built up on the
gates, stem, and slides. If this material is compacted
while the valve is being closed, the torque required
to close the valve continues to build as the material
SECTION IV SET-UP AND OPERATION
is loaded. By using the procedure described, water in
the system can flush the debris that has broken loosen
away from the gate and slide. The stem is exercised
through the series of up and down motions. Once the
valve has been fully closed, it should be opened a few
turns so that the higher velocity water flowing under the
gates can move the remainder of the sediment down-
stream.
After the valve is reopened, it should be turned in the
closing direction one or two revolutions. Thus, the next
time the valve is operated, it will not be necessary to
start with a nut and stem jammed against the bonnet,
and there will be no guesswork about which way to turn
the nut because the valve will be free. Also, if it is
inadvertently turned the wrong way, one or two turns
can be made before a positive stops occurs, and by
reversing direction, full operation of the valve can be
effected.
Using the Pow-R-Drive II machines to operate valves is
easier on the valve because a steady turning torque is
applied rather than jerky motions. This prevents the
stem breakage that is sometimes caused by turning the
valve by hand. Also, more valves can be turned in less
time. A further advantage is that information about each
valve can be generated automatically by the revolution
counter and torque gauges for inclusion on permanent
records.
HOW TO DETERMINE AN
UNKNOWN VALVE ROTATION:
When the direction to turn the valve stem is not
known, select a rotation direction and proceed
with caution. If resistance is felt, immediately
reverse the rotation. Continue this procedure,
reversing direction when resistance is felt,
until a free turning direction is achieved. Docu-
ment the direction, open or closed position,
and number of turns required.

POW-R-DRIVE II
9
Operator should always change sides for opposite
rotation.
I. SET UP PROCEDURE (all models):
1. Insert valve key and socket into valve.
2. Install stop collar at a comfortable operating
height to support the weight of the Pow-R-
Drive II.
3. Mount the Pow-R-Drive II on the valve key
and rest on stop collar. Connect the power
source.
4. Zero the counter when valve is ready to be
turned by pressing the red reset button on the
counter face (Figure 1). Always use the
counter to determine the number of rotations
the valve has turned.
5. Determine direction of valve rotation and which
side of Pow-R-Drive to operate. The operator
should stand on the side of the machine which
allows the torque to PULL the machine handle
away from his body.
FIGURE 1
SECTION IV SET-UP AND OPERATION (cont.)
II. OPERATOR POSITIONING
Standing on the wrong side of the machine will allow
the handle to PUSH against the operator and can
knock him off balance or pin him against an obstacle
if torque suddenly increases. When positioned prop-
erly, an increase in torque will PULL the handle and
control out of the operator's hand and stop the ma-
chine (See illustrations below).
IMPORTANT: Always refer to the manual or the
valve direction decal
located on valve handle for
correct operation positions.
CAUTION: The Pow-R-Drive II is capable of
producing up to 800 ft./lbs. of torque to turn
valves. It is very important that proper proce-
dure be exercised when using the valve operat-
ing machine.
CAUTION: Always operate the Pow-R-Drive II at
the lowest torque valve acceptable to turn the
valve.

POW-R-DRIVE II
10
SECTION IV SET-UP AND OPERATION
INTRODUCTION
It is impossible to determine how much torque a
valve stem can take before breaking. Size, age,
condition, tuberculation, and period of time since
last operation will have an effect to this. The
recommended start-up procedure for operating a
valve is to set the Pow-R-Drive II to its lowest
torque setting.
CONTROLS AND COMPONENTS
ELECTRIC Pow-R-Drive II
1/10th Counter
W/Reset Button
High/Low Torque
Setting
Electric Motor
Lifting Handles
Overload
Reset Button
Power Head
Ground Fault
Interrupter
Forward/Reverse
Lever
Operator Position
Decal
Valve Socket
Stop Collar
Valve Operator
Extension Handle

POW-R-DRIVE II
11
SECTION IV SET-UP AND OPERATION
CAUTION: Before beginning turning sequence,
know which direction to turn the valve to avoid
breaking the valve stem.
OPERATING PROCEDURE:
Electric Pow-R-Drive II
1. After plugging in power cord, push reset but-
ton on GFI to power up unit (Figure 2).
2. Set speed control knob to high speed/low
torque setting.
The maximum torque output in (high speed/
low torque setting) is 500 ft./lbs. of torque with
a maximum of 14 rpm free running speed.
This setting should be sufficient for operating
most valves. (See Torque Chart) (Factory
rated 175 ft./lbs. of continuous torque output
in high speed/low torque setting.)
3. If the valve does not move in either direction,
switch speed control to low speed/high torque
setting.
The maximum torque output in low speed/
high torque setting is 800 ft./lbs. of torque with
a maximum of 7 rpm free running speed.
(Factory rated 375 ft./lbs. continuous torque
output in low speed/high torque setting.)
Once the valve has started turning, return the
speed control knob to the high speed/low torque
setting. This procedure will assure you that the
machine stops operating as soon as any type of
obstruction is encountered or when the valve is
seated.
DURING OPERATION:
When operating a valve, a build up of torque can
be felt by the operator. When this occurs, it is a
sign of either build up of material in the valve gate
slides or that the end of travel is approaching. The
operator should change sides and reverse the
valve direction for a few turns, doing this each
time resistance is felt. This method of exercising
cleans out tuberculin and other contaminant build
up. The counter will keep track of how many turns
you have put on the valve.
FIGURE 2
NOTE: More torque will be required to seat,
unseat or clear tuberculin from the valve.
NOTE: Aquick touch ofthe On/Off levermay
be necessary to fully engage gears.
NOTE: If the motor overload circuit breaker
pops while attempting to free a frozen valve,
reset the circuit breaker by pressing the
reset button and attempt to free the valve
again before switching to the low speed/
high torque setting.

POW-R-DRIVE II
12
INTRODUCTION
It is impossible to determine how much torque a
valve stem can take before breaking. Size, age,
condition, tuberculation, and period of time since
last operation will have an effect to this. The
recommended start-up procedure for operating a
valve is to set the Pow-R-Drive II to its lowest
torque setting.
SECTION IV SET-UP AND OPERATION
1/10th Counter
W/Reset Button
Hydraulic Motor
Lifting Handles
Power Head
Forward/Reverse
Lever
Operator Position
Decal
Supply Outlet
Torque Control
Knob
Torque Gauge
Valve Socket
Stop Collar
Valve Operator
Extension Handle
CONTROLS AND COMPONENTS
HYDRAULIC Pow-R-Drive II
CAUTION:DO NOT connector disconnecthoses
to valve operator or power source while power
source is operating.

POW-R-DRIVE II
13
OPERATING PROCEDURE:
Hydraulic Pow-R-Drive II
1. Rotate torque control knob counterclock-
wise to the lowest torque setting (Figure 3).
2. Engage the "power on" handle in either forward
or reverse direction. If valve does not turn,
release handle and engage in the opposite
direction (Figure 3).
3. Continue this process, increasing the torque
value 1/2 turn on the torque control until valve
stem breaks free. This method ensures that
only enough torque is supplied to turn the
valve. Once the valve has started turning,
reduce the torque setting to the lowest setting
which will keep the machine operating. This
procedure assures you that the machine will
stop operating as soon as any type of ob-
struction is encountered or valve begins to
seat.
DURING OPERATION:
When operating a valve, a build up of torque can
be felt by the operator. When this occurs, it is a
sign of either build up of material in the valve gate
slides or that the end of travel is approaching. The
operator should change sides and reverse the
valve direction for a few turns, doing this each
time resistance is felt. This method of exercising
cleans out tuberculin and other contaminant build
up. The counter will keep track of how many turns
you have put on the valve.
SECTION IV SET-UP AND OPERATION
CAUTION: Before beginning turning sequence,
know which direction to turn the valve to avoid
breaking the valve stem.
FIGURE 3
NOTE: When lever is depressed, torque indi-
cator will read the torque value being applied
to valve stem.
NOTE: More torque will be required to seat,
unseat or clear tuberculin from the valve.

POW-R-DRIVE II
14
Valve Socket
Stop Collar
Valve Operator
Extension Handle
INTRODUCTION
It is impossible to determine how much torque a
valve stem can take before breaking. Size, age,
condition, tuberculation, and period of time since
last operation will have an effect to this. The
recommended start-up procedure for operating a
valve is to set the Pow-R-Drive II to its lowest
torque setting.
SECTION IV SET-UP AND OPERATION
CONTROLS AND COMPONENTS
PNEUMATIC Pow-R-Drive II
1/10th Counter
W/Reset Button
Exhaust Ports
Lifting Handles
Power Head
Torque Gauge
Operator Position
Decal
Torque Control
Knob
Power Lever
Forward/Reverse
Ring
Air Inlet
CAUTION:DO NOT connector disconnecthoses
to valve operator or power source while power
source is operating.

POW-R-DRIVE II
15
PNEUMATIC MODEL:
OPERATING PROCEDURE:
Pneumatic Pow-R-Drive II
1. Rotate torque control knob counterclock
wise to the lowest torque setting (Figure 4).
2. press the power on lever in either forward or
reverse direction. If valve does not turn,
release lever and rotate motor direction ring
on motor body and repeat procedure.
3. Continue this process, increasing the torque
value 1/4 turn on the torque control until valve
stem breaks free. This method ensures that
only enough torque is supplied to turn the
valve. Once the valve has started turning,
reduce the torque setting to the lowest setting
which will keep the machine operating. This
SECTION IV SET-UP AND OPERATION
FIGURE 4
NOTE: When lever is depressed, torque indi-
cator will read the torque value being applied
to valve stem.
CAUTION: Before beginning turning sequence,
know which direction to turn the valve to avoid
breaking the valve stem.
CAUTION: PRD II Must be used with an inline
filtration system to stop water and air borne
contaminents. FAILURE TO COMPLY WILL DAM-
AGE MOTOR AND VOID WARRANTY.
NOTE:
1. More torque will be required to seat, un-
seat or clear tuberculin from the valve.
2. Maximum torque cut-off can be reset by
free running Pow-R-Drive II with no load and
adjusting torque control until torque indica-
tor gauge reads desired torque cut-off.
procedure assures you that the machine will
stop operation as soon as any type of obstruc-
tion is encountered or valve begins to seat.
DURING OPERATION
When operating a valve, a build up of torque
can be felt by the operator. When this occurs,
it is a sign of either build up of material in the
valve gate slides or that the end of travel is
approaching. The operator should change
sides and reverse the valve direction for a few
turns, doing this each time resistance is felt.
This method of exercising cleans out tuberculin
and other contaminant build up. The counter
will keep track of how many turns you have put
on the valve.
USE OF AIR LINE OIL:
An in-line oiling system should be utilized when
operating the pneumatic Pow-R-Drive II to lu-
bricate motor on a continuous basis.
When continuous load and high torque settings
are required, the use of an antifreeze oil to
lubricate the motor will reduce ice buildup and
maintain motor performance. (Kilfrost Anti-
Freeze Solution, Wachs Part No. 02-403-00)

POW-R-DRIVE II
16
TWO OPERATOR OPERATION:
1. An extension handle is provided with each
Pow-R-Drive II. It is designed to be inserted
into the end of the handle assembly near the
powerhead (see Figure 5). A convenient
quick release pin attached to the extension
handle is inserted through the handle and
extension to secure them.
SECTION IV SET-UP AND OPERATION
An extension handle should be used when the
torque required to turn a valve is more than one
operator can control easily.
The second operator should stand on the op-
posite side of the Pow-R-Drive II as the primary
operator. (see photograph)
The torque should be pulling the machine handle
away from both the secondary and primary
operator.
2. When the extension handle is inserted, the
machine can be used as a manual "T" wrench
if desired.
.
FIGURE 5

POW-R-DRIVE II
17
SECTION V
MISCELLANEOUS
CHARTSANDGRAPHS

POW-R-DRIVE II
18
TORQUE RPM AMPS RPM AMPS
FT/LBS
100 10 8.6 6 4
200 8 8 6.5 6
300 7 11 4 7
375 6 12 4 8
500 5 15 4 10
600 3.6 12
700 3 12.5
800 3 13.5
TORQUE RPM AMPS RPM AMPS
FT/LBS
100 10.2 3.1
175 9.94.45.23.2
300 7.4 6.1 4.8 3.5
375 5 7.5 4.5 4.5
500 2 10 3.6 5.5
600 2.8 6.2
700 1.5 7.5
800 .5 10
Torque Performance Charts
Electric 110 Volts Eibenstock
*High Speed
Low Torque
Setting
Low Speed
High Torque
Setting
* Factory rated continuous load high speed/low torque
** Factory rated continuous load low speed/high torque
Electric 220 Volts
*High Speed
Low Torque
Setting
Low Speed
High Torque
Setting
* Factory rated continuous load high speed/low torque
** Factory rated continuous load low speed/high torque
*
*
**
**
SECTION V MISCELLANEOUS CHARTS AND GRAPHS

POW-R-DRIVE II
19
*
*
* Factory rated continuous load * Factory rated continuous load
FT/LBS RPM FT/LBS RPM
100 24 100 13
200 22 200 11
300 20 300 7
400 17 400 5
500 10 500 4
600 8 600 3
700 6 700 2
800 1 800 1
Hydraulic Pneumatic
Based on 8 gpm @1800 psi Based on 90 psi @ 60 cfm
SECTION V MISCELLANEOUS CHARTS AND GRAPHS

This manual suits for next models
1
Table of contents
Other Wachs Industrial Equipment manuals