Walinga Ultra-Vac 6614D User manual

MODELS: 6614D, 7614D,
7816D & 8614D
ULTRA-VAC
®
OPERATOR’S MANUAL


WALINGA
Start-up/Commissioning Form
Effective: September 10, 2020
Version 1
This form must be filled out by the sales representative and/or dealer; and signed by both the sales
representative and/or dealer and the customer at the time of delivery.
Delivery date: MM/DD/YYYY
Owner Operator Name Sales Representative / Dealer Name
Phone Phone
Email Email
Address Address
City Prov/State City Prov/State
Postal Code/ZIP Country Postal Code/ZIP Country
Unit Serial Number
Blower Serial Number Airlock Serial Number
CONFIRMATION OF ACTIONS COMPLETED
All items and features accounted for
Pre-delivery inspection
Review of warranty terms
Review of standard notes and terms
Review operating and safety instructions
Operator manual supplied
Supplemental documents supplied
Guards installed and secured
All safety signs identified and reviewed
Discussion regarding applicable standards (see statement on reverse)

WALINGA
Start-up/Commissioning Form
Effective: September 10, 2020
Version 1
It is the responsibility of the Owner Operator to review and determine compliance to local and federal regulations.
These regulations include, but are not limited to, local and federal laws as well as standards published by the NFPA
(National Fire Protection Agency), ISO (International Organization for Standardization), OSHA (Occupational Safety
and Health Administration) or OH&S (Occupational Health and Safety Standards), and ANSI (American National
Standards Institute). Please note: It is a requirement in NFPA 652 that the final operator completes a dust hazard
analysis (DHA) of their facility and the products and processes it contains. Based on this, Walinga understands that a
DHA is required to be completed by the owner/operator prior to start-up/commissioning. In the event that a DHA is not
available at start-up/commissioning, the owner/operator must provide written acknowledgement of their responsibility
and intention to complete a DHA. The owner/operator also agrees that they shall be solely responsible for ensuring that
any applicable NFPA standards and regulations shall be satisfied in conjunction with the incorporation of Walinga’s
equipment into the buyer’s specific system of operations.
Date:_____________ Owner Operator’s Signature:_______________________________________
The above equipment has been received by me and I confirm that the sales representative / dealer has
completed the start-up/commissioning process.
Date:_____________ Owner Operator’s Signature:_______________________________________
I have completed the actions listed above and confirm that the owner operator has completed the start-
up/commissioning process.
Date:_____________ Dealer Representative’s Signature:___________________________________
I have completed the actions listed above and confirm that the owner operator has completed the start-
up/commissioning process.
Date:_____________ Manufacturer Representative’s Signature:______________________________
Additional notes:

Walinga Inc.
Pneumatic Conveying System
Warranty Terms
Walinga Inc. is committed to providing a quality product that will meet or exceed your expectations for many years
to come. Our warranty terms and our warranty claim process has been designed to ensure that each warranty claim
will be resolved in an orderly, fair and timely manner.
The Warranty
Walinga Inc. (“Walinga”) warrants that all new pneumatic products sold by Walinga Inc. will be free from defects in material
and workmanship (the “Walinga Warranty”).
Warranty Period
The warranty period for the Walinga Warranty shall expire on the date that is the earlier of: two (2) years after the date of
delivery to the original customer; or upon the expiration of five hundred (500) hours of operation; whichever date comes first.
Limitations of and exclusions from the Walinga Warranty
The Walinga Warranty applies to material and workmanship only.
With respect to any component parts that are supplied or manufactured by others, the warranty coverage on such
component parts will be strictly limited to the warranties of the manufacturers of such component parts.
The Walinga Warranty shall only be for the benefit of the original purchaser of the pneumatic products.
A Walinga Warranty may be transferable by the original purchaser to a third party for the balance of the warranty
period then remaining, provided that Walinga consents in writing to such transfer of warranty.
The Walinga Warranty is conditional upon proper storage, installation, use, maintenance, operation and compliance
with any applicable recommendations of Walinga.
Warranty Claim Procedure
Should you encounter any difficulties with your unit within its warranty period, please contact your local Walinga dealer or
sales representative, your local Walinga Service department or Walinga's Warranty Department to submit a warranty claim
application.
To speak with a Walinga Warranty Coordinator, contact:
Canada 1-888-WALINGA (ext 258)
International +1-519-824-8520 (ext 258)
USA 1-800-466-1197 (ext 8)
Email – warranty.u[email protected]
Australia 07-4634-7344
Email – mail@customvac.com.au
Required Warranty Claim information
The following information must be provided to Walinga in order for us to properly process and consider your warranty
application:
Customer name and contact information (email if available).
The equipment serial number and/or Vehicle Identification Number (if applicable).
Date of claimed failure.
Equipment hours of operation.
Details, description and photos (upon request) of the claimed failure and the corrective repairs attempted.
Warranty Conditions
Equipment must be registered within 30 days of being received by the buyer. It will be within the sole and
unfettered discretion of Walinga as to whether it will honour its warranty on non-registered equipment.

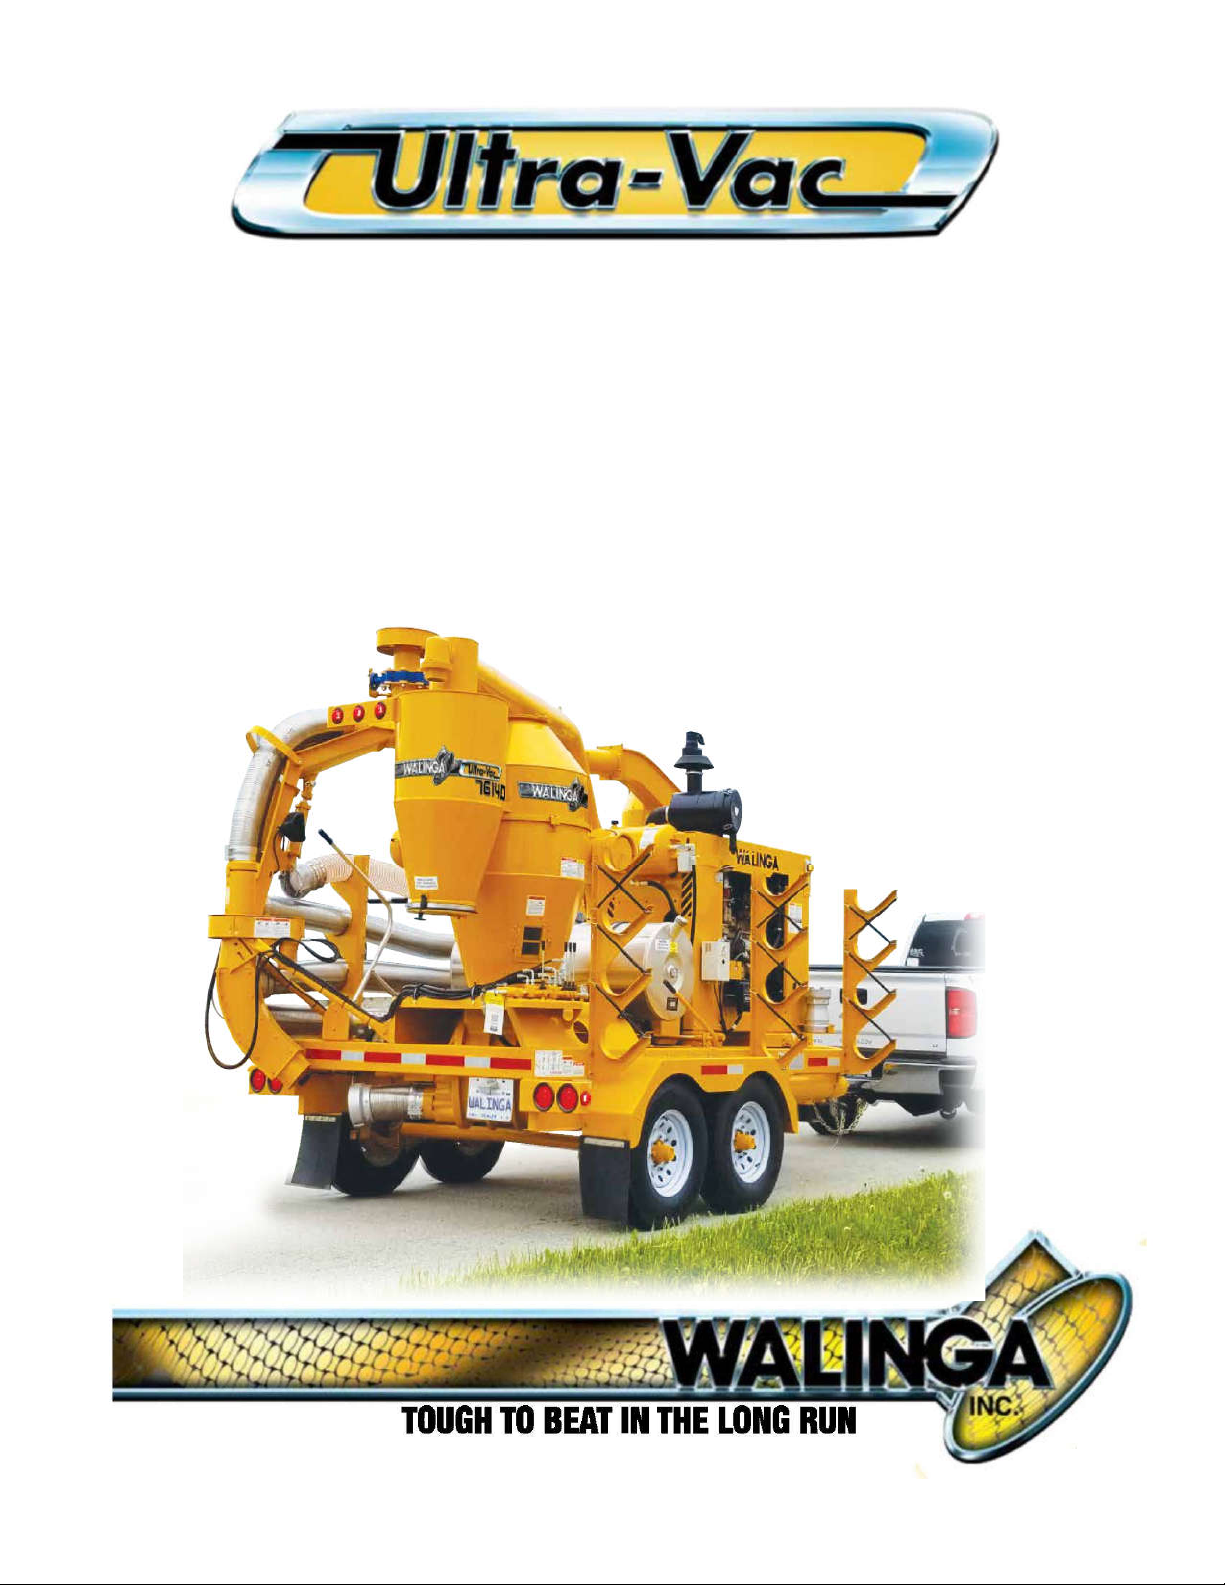
Warranty Conditions (continued)
The buyer is responsible for promptly notifying Walinga of any defects to the equipment. The buyer is also
responsible for making the equipment available to Walinga or its authorized repair facility for evaluation and repair.
Prior to making any repairs or parts replacements, a warranty application and any estimated associated costs must
be approved with the issuance of a claim number by an authorized Walinga representative. Undertaking any work
prior to receiving warranty authorization may result in a partial or complete loss of warranty coverage.
At Walinga's discretion, warranty repairs may be authorized to be completed at a repair facility convenient to the
buyer. In such situations the estimated labour time must be approved by Walinga prior to undertaking any work.
Labour hours will be reimbursed at the facilities posted hourly labour rate.
At Walinga's request, parts in question must be returned to the nearest Walinga service facility for evaluation. In such
situations a Returned Goods Authorization (RGA) number will be provided to the buyer. The returning shipment must
be clearly labeled with the assigned RGA number and include a copy of the RGA form. Unless otherwise arranged,
these parts are to be returned to Walinga within 30 days to ensure timely processing of your warranty claim. Failure
to return such parts may result in partial or complete loss of warranty coverage.
Replacement parts provided under warranty are covered for the remainder of the original equipment warranty period.
Walinga reserves the right to use new, remanufactured or refurbished components when performing warranty repairs
and replacements.
Walinga is entitled to a reasonable amount of time and a reasonable number of attempts to assess the claim,
diagnose the problem, and perform any necessary repairs.
The warranty offered on used or refurbished equipment is limited to that specified on the purchase contract. Where a
warranty period has not been stipulated on the purchase contract., and where such equipment is “used”, then such
equipment is considered by Walinga to be sold “as is, where is” without the Walinga Warranty. Where such
equipment is refurbished, then the Walinga Warranty shall apply.
Without limitation, Walinga reserves the right to reject a warranty claim or for any one or more of the following
reasons:
The warranty claim information provided is insufficient.
The product evaluation does not substantiate the claim.
The unit has been operated above and beyond its capacity or not maintained or serviced properly, resulting in
damages incurred to major components.
If the unit was equipped with a factory installed hour meter which has been disconnected, altered or inoperative for
an extended period of time; with the result being that the equipment’s operating hours cannot be verified.
It is apparent that the operator’s manuals have not been followed.
The equipment is not registered.
Without limitation, Walinga’s Warranty does not cover:
Damage or deterioration due to lack of reasonable care or maintenance.
Damage caused or affected by unapproved modifications to the equipment.
Damage caused by negligence or misuse of the equipment.
Damage caused by using the equipment for purposes for which it was not designed or intended.
Walinga’s liability under this warranty, whether in contract or tort, is limited to the repair, replacement or adjustment of
defective materials and workmanship. In no event will Walinga be responsible for any direct, indirect, loss of time, incidental
or consequential expenses including, but not limited to, equipment rental expenses, towing, downtime, inconvenience, or any
losses resulting from the inability to use the equipment. Further, Walinga shall not be liable for any damages or
inconvenience caused by any delay in the supply or delivery of any equipment or component parts thereof.
The selling Dealer/Sales Person makes no warranty of its own and has no authority to make any representation or promise
on behalf of Walinga, or to modify the terms or limitations of the Walinga Warranty in any way.
Punitive, exemplary or multiple damages may not be recovered unless applicable law prohibits their disclaimer.
Warranty related claims may not be brought forward as a class representative, a private attorney general, a member of a
class of claimants or in any other representative capacity.
The Walinga Warranty and all questions regarding its enforceability and interpretation are governed by the law of the country,
state or province in which you purchased your Walinga equipment. The laws of some jurisdictions limit or do not allow the
disclaimer of consequential damages. If the laws of such a jurisdiction apply to any claim against Walinga, the limitations and
disclaimers contained here shall be to the greatest extent permitted by law.

PCS Contact Info March 11,2020
Dear Customer,
Thank you for choosing WALINGA PNEUMATIC CONVEYING SYSTEMS. For your convenience, should you require
any information related to Parts, Service or Technical Engineering, please contact one of the following Walinga
Personnel in Guelph at 1-888 925-4642 unless noted*
TECHNICAL - ENGINEERING:
Duane Swaving *226-979-8227 pcs.techsupport@walinga.com
Ken Swaving *519 787-8227 (ext:100) k[email protected]
To speak with a Walinga Warranty Coordinator, contact:
Canada 1-888-WALINGA (ext 258)
Australia 07-4634-7344 Email – [email protected]
GUELPH SERVICE:
Kevin VanderZwaag *(519) 763-7000 (ext:273) [email protected]
ORIGINAL PARTS SALES:
Ontario and Eastern Canada:
(ext: 224) [email protected]
Parts Department Fax: (519) 824-0367
Manitoba and Western Canada:
Chad Yeo * 204-745-2951 (ext: 424) chad.[email protected]
USA:
John VanMiddlekoop * (800) 466-1197 (ext 3) [email protected]
SALES MANAGER:
Tom Linde *519-787-8227 (ext 5) [email protected]
Peter Kingma (800) 466-1197 jpk@walinga.com
CORPORATE HEAD OFFICE:
5656 Highway 6N
RR#5, Guelph, Ontario, N1H 6J2
PHONE: (888) 925-4642 FAX: (519) 824-5651
www.walinga.com
FACTORY DISTRIBUTION AND SERVICE CENTRES:
938 Glengarry Cres. Fergus, Ontario Canada N1M 2W7
Tel: (519) 787-8227 Fax: (519) 787-8210
1190 Electric Ave. Wayland , MI.USA 49348
Tel: (800) 466-1197 Fax: (616) 877-3474
70 3rd Ave. N.E. Box 1790 Carman, Manitoba Canada R0G 0J0
Tel: (204) 745-2951 Fax: (204) 745-6309
24 Molloy St, Toowoomba, Queensland Australia 4350
Tel: 07-4634-7344 Email: m[email protected]

TABLE OF CONTENTS
Warranty Registration Form & Inspection Report.....................................................
4
Serial Number Location..................................................................................................
6
1
Introduction .....................................................................................................................
8
2 Safety ............................................................................................................................. 9
2.1
General Safety ....................................................................................................... 10
2.2
Operating Safety .................................................................................................... 11
2.3 Safety Around Bins, Silos, Tanks and Boot Pits.................................................... 12
2.4 Maintenance Safety ...............................................................................................
13
2.5 Hydraulic Safety ..................................................................................................... 13
2.6 Storage Safety ....................................................................................................... 13
2.7 Transport Safety..................................................................................................... 14
2.8 Tire Safety.............................................................................................................. 14
2.9 Safety Signs ........................................................................................................... 14
2.10
Sign-Off Form......................................................................................................... 15
3
Safety Decal Locations................................................................................................ 16
4
Operation ...................................................................................................................... 20
4.1
To The New Operator Or Owner ...........................................................................
20
4.2 Machine Components .......................................................................................... 21
4.3 Break-In................................................................................................................ 23
4.4 Pre-Operation Checklist ....................................................................................... 23
4.5 Controls................................................................................................................ 24
4.6 Attaching/Unhooking ............................................................................................ 25
4.7 Machine Preparation ............................................................................................ 26
4.8
Operating ............................................................................................................. 27
4.9
Conveying Oilseeds.............................................................................................. 27
4.10
Transporting ....................................................................................................... 32
4.11 Storage ................................................................................................................ 34
5
Service And Maintenance.......................................................................................... 35
5.1.1 Fluids And Lubricants....................................................................................... 35
5.1.2 Greasing........................................................................................................... 35
5.1.3 Servicing Intervals............................................................................................ 36
5.1.4 Servicing Intervals............................................................................................ 39
5.2 Maintenance..................................................................................................... 40
5.2.1 Belt Tension And Alignment ............................................................................. 41
5.2.2 Blower Oil Changing And Breather Cleaning ................................................... 43
5.2.3
Airlock .............................................................................................................. 45
5.2.4 Air System Relief Valves .................................................................................. 46
6 Trouble Shooting ....................................................................................................... 47
6.1 Mobile Transfer Unit......................................................................................... 47
6.3 Blower .............................................................................................................. 50
6.4 V-Belt Drive....................................................................................................... 51
7 Specifications..............................................................................................................
52
7.1 Mechanical .......................................................................................................
52
7.2 Bolt Torque.......................................................................................................
53

SERIAL NUMBER LOCATION
Always give your dealer the Serial Number of your
Walinga Ultra-Vac® when ordering parts or
requesting service or other information.
The Serial Number plates are located where
indicated. Please mark the number in the space
provided for easy reference.
Machine Serial Number
______________________________________
Blower Serial Number
______________________________________
Airlock Serial Number
______________________________________

1 INTRODUCTION
Congratulations on your choice of a Walinga Ultra-Vac
®
to complement your farming operation. This
equipment has been designed and manufactured to meet the needs of the discriminating buyer for the
efficient moving of grain.
Safe, efficient and trouble free operation of your Ultra-Vac
®
requires that you and anyone else who will be
operating or maintaining the machine, read and understand the Safety, Operation, Maintenance and Trouble
Shooting information contained within the Operator’s Manual.
This manual covers Models 6614D,7614D,7816D, 8614D made by Walinga Inc. Differences are
explained where appropriate.
Keep this manual handy for frequent reference and to pass on to new operators or owners. Call your Walinga
dealer if you need assistance, information or additional copies of the manual. Contact your dealer for a
complete listing of parts.
OPERATOR ORIENTATION - The directions left, right, front (hitch) and rear (receiver tank) , as mentioned
throughout this manual, are as seen from the driver’s seat of the towing vehicle.

2
SAFETY
SAFETY ALERT SYMBOL
This Safety Alert symbol means
The Safety Alert symbol
ATTENTION! BECOME ALERT!
identifies important safety
YOUR SAFETY IS INVOLVED!
messages on the Walinga
Ultra-Vac® and in the manual.
When you see this symbol, be
alert to the possibility of
personal injury or death. Follow
the instructions in the safety
message.
Why is SAFETY important to you?
Accidents Disable and Kill
3 Big Reasons
Accidents Cost
Accidents Can Be Avoided
DANGER -
Indicates an imminently
hazardous situation that, if not
avoided, will result in death or
SIGNAL WORDS:
serious injury. This signal
word is to be limited to the most
Note the use of the signal words
extreme situations, typically for
DANGER, WARNING and CAUTION
machine components that, for
with the safety messages. The
functional purposes, cannot be
appropriate signal word for each
guarded.
message has been selected using the
following guidelines:
WARNING -
Indicates a potentially
hazardous situation, that if not
avoided, could result in death or
serious injury, and includes
hazards that are exposed when
guards are removed. It may
also be used to alert against
unsafe practices.
CAUTION -
Indicates a potentially
hazardous situation that, if not
avoided, may result in minor or
moderate injury. It may also be
used to alert against unsafe
practices.
9

SAFETY
YOU are responsible for the SAFE operation
and maintenance of your Walinga Ultra-Vac®.
YOU must ensure that you and anyone else
who is going to operate, maintain or work
around the Ultra-Vac® be familiar with the
operating and maintenance procedures and
related SAFETY information contained in this
manual. This manual will take you step-by-step
through your working day and alerts you to all
good safety practices that should be adhered to
while operating the Ultra-Vac®.
Remember, YOU are the key to safety. Good
safety practices not only protect you but also
the people around you. Make these practices a
working part of your safety program. Be certain
that EVERYONE operating this equipment is
familiar with the recommended procedures and
follows all the safety precautions. Remember,
most accidents can be prevented. Do not risk
injury or death.
• Remember to be an efficient operator. An
efficient operator is a very safe, cost
efficient and professional person.
• Ultra-Vac® owners must give operating
instructions to operators or employees before
allowing them to operate the equipment, and
at least annually thereafter.
• The most important safety feature on
this equipment is a SAFE operator. It is
the operator’s responsibility to read and
understand ALL Safety and Operating
instructions in the manual and to follow
these. All accidents can be avoided.
• Walinga feels that a person who has not
read, understood and been trained to
follow all operating and safety instructions
is not qualified to operate the equipment.
An untrained operator exposes himself and
bystanders to possible serious injury or
death.
• Do not modify the equipment in any way.
Unauthorized modification may impair the
function and/or safety of the equipment
and affect the life of the machine.
• Think SAFETY! Work SAFELY!
2.1 GENERAL SAFETY
1. Read and understand the
Operators Manual and all safety
signs before operating,
maintaining, adjusting or
unplugging the Ultra-Vac®.
2. Only trained competent persons
shall operate the Ultra-Vac®. An
untrained operator is not qualified
to operate the machine.
3. Have a first-aid kit available
for use should the need arise
and know how to use it.
4. Have a fire extinguisher
available and know how to use it.
5. Do not allow riders.
6. Wear appropriate protective gear.
This list includes but is not
limited to:
- A hard hat
- Protective
shoes with slip
resistant soles
- Protective goggles
- Heavy Gloves
- Wet weather gear
- Hearing protection
7. Before servicing, adjusting,
repairing or maintaining unit,
ensure that unit power source is
completely shut down and can
not start up.
8. Wear appropriate hearing
protection when operating
for long periods of time.
9. Know where overhead electrical
lines are located and stay away
from them. Electrocution can
occur without direct contact.
10. Review safety related items
annually with all personnel
who will be operating or
maintaining the Ultra-Vac®.

2.2
OPERATING SAFETY
1. Read and understand the Operator’s
Manual and all safety signs before using.
2. Place all controls in neutral, stop the
engine, remove ignition key and wait for all
moving parts to stop before servicing,
adjusting, repairing or unplugging.
3. Do not operate when any guards are
damaged or removed. Install and secure
guards before starting.
4. Keep hands, feet, clothing and hair away
from all moving and/or rotating parts.
5. Do not allow riders on the Ultra-Vac® or
towing vehicle during operation or
transporting.
6. Clear the area of all bystanders,
especially small children, before starting.
7. Stay away from overhead obstructions
and power lines when extending boom
and during operation and transporting.
Electrocution can occur without direct
contact.
8. Keep away from unloading boom when
moving, adjusting or setting. Keep others
away.
9. Clean reflectors, signs, and lights
before transporting.
10. Do not operate with leaks in the
hydraulic system.
13. Wear appropriate ear protection when
operating or long periods of time.
11. Do not place intake nozzle near feet
when standing on the top of grain.
12. Before applying pressure to the hydraulic
system, make sure all components are tight and
that steel lines, hoses and couplings are in good
condition.
13. Review safety items with all personnel annually.
11

2.3 SAFETY AROUND BINS,SILOS, TANKS AND BOOT PITS
Working in and around bins, silos, and tanks and boot pits.
Ultra-Vac operators and all other personnel assisting should strictly adhere to the procedures outlined below
before entering a storage structure. For additional details regarding these procedures, reference OSHA
Standards, or your local regulations. (see also Sect 4.10.1)
Entering a bin, silo, tank or other type of storage structure is
hazardous. You can suffocate and die from the materials stored inside
these structures. There also may be explosive, harmful or poisonous
gas or dust in the air.
Before entering a storage structure, Ultra-Vac operators and all other
personnel assisting should strictly adhere to safety procedures as follows:
(adapted from the Kansas Grain and Feed Association’s Safety, Health and
Environment Committee.)
1. The machine operator(s) and all assisting personnel should be aware of the
actions they will take in the event of an emergency.
2. The machine operator(s) and all assisting personnel should be trained in the general and specific safety
hazards associated with their work tasks.
3. The machine operator(s) and all assisting personnel should be trained in the general procedures and safety
practices for entering and working in bins, silos, tanks or other storage structures, as well as the safety
procedures for handling special tasks concerning entering and working in such structures.
4. The atmosphere within a bin, silo, tank or storage structure should be tested for the presence of
combustible gases, dusts, vapors and toxic agents.
5. Ventilation should be provided until the unsafe conditions are eliminated or as long as there is a
possibility of recurrence of the unsafe conditions while the bin, silo, tank or storage structure is occupied by
personnel.
6. Anyone entering the bin, silo, tank, storage structure or boot pit, should wear an appropriate
respirator and protective clothing, as long as there is a possibility of any unsafe atmospheric condition.
7. When entering bins, silos, tanks or storage structures from the top, personnel should wear a body harness
with lifeline, or use a boatswain’s chair.
8. An observer equipped to provide assistance and trained in rescue procedures, including notification
methods, should be stationed outside the bin, silo, tank or storage structure being entered. Visual, voice or
signal line communications should be constantly maintained between the observer and the party in the bin, silo,
tank or storage structure.
9. Equipment for rescue operations which is specifically suited for the bin, silo, tank or storage structure being
entered should be provided.
10. Do not enter bins, silos, tanks or storage structures under a bridging condition, or where a buildup of
materials could fall and bury you. It is also recommended that you do not walk or stand on grain or other
materials where the depth is greater than waist high.
11. Be aware of the extremely high suction at the intake nozzle. Stay away from nozzle intake area.

2.4 MAINTENANCE SAFETY
1. Follow ALL the operating, maintenance and safety information in the manual.
2. Support the machine with blocks or safety stands when changing tires or working beneath.
3. Follow good shop practices:
a. - Keep service area clean and dry.
b. - Be sure electrical outlets and tools are properly grounded.
c. - Use adequate light for the job at hand.
4. Use only tools, jacks and hoists of sufficient capacity for the job.
5. Place all controls in neutral, stop the engine, disconnect all electrical power sources, set the park brake on
tractor or towing vehicle , remove the ignition key and wait for al moving parts to stop before servicing.,
adjusting, repairing or unplugging.
6. Make sure all guards are in place and properly secured when maintenance work is completed.
7. Before applying pressure to a hydraulic system, make sure all lines, fittings and couplers are in good
condition.
8. Relieve pressure from hydraulic circuit before servicing or disconnecting from tractor.
9. Keep hands, feet, hair and clothing away from all moving and/or rotating parts.
10. Place hydraulic controls in neutral and stop the engine before working on Ultra-Vacs.
11. Clear the area of bystanders, especially small children, when carrying out any maintenance and repairs
or making any adjustments.
2.5 HYDRAULIC SAFETY
1. Make sure that all components in the hydraulic system are kept in good condition and are clean.
2. Replace any worn, cut, abraded, flattened or kinked hoses or metal lines immediately.
3. Relieve pressure before working on hydraulic system.
4. Do not attempt any makeshift repairs to the hydraulic fittings or hoses by using tape, clamps
or cements. The hydraulic system operates under extremely high-pressure. Such repairs will fail suddenly
and create a hazardous and unsafe condition.
5. Wear proper hand and eye protection when searching for a high pressure
hydraulic leak. Use a piece of wood or cardboard as a backstop instead of
hands to isolate and identify a leak.
6. If injured by a concentrated high-pressure stream of hydraulic fluid, seek
medical attention immediately. Serious infection or toxic reaction can
develop from hydraulic fluid piercing the skin surface.
7. Before applying pressure to the system, make sure all components are tight and that lines, hoses
and couplings are not damaged.
2.6 STORAGE SAFETY
1. Store unit in an area away from human activity.
2. Do not permit children to play on or around the stored machine.
3. Store the unit in a dry, level area. Support the base with planks if required.
13

2.7 TRANSPORT SAFETY
Refer to Section 4.9 TRANSPORTING - Towing (page 32) for detailed
information and regulations.
1. Make sure you are in compliance with all local regulations regarding transporting equipment on public
roads and highways.
2. Make sure that all the lights and reflectors that are required by local highway and transport authorities are
in place, are clean and can be seen clearly by all overtaking and oncoming traffic.
3. Make sure the discharge boom is placed in the transport position and resting in the boom saddle.
4. Attach securely to the towing vehicle using a retainer on the drawbar pin and a safety chain.
5. Do not allow anyone to ride on the Ultra-Vac® or towing vehicle during transport.
6. Reduce speed on rough roads and surfaces.
7. Stay away from overhead obstructions and power lines. Electrocution can occur without direct contact.
8. Always use hazard warning flashers on towing vehicle when transporting unless prohibited by law.
9. Add extra lights or use pilot vehicles when transporting during times of limited visibility or as required
by local regulations.
Use ANSI/ASAE S279.17 July,2013 as a minimum standard for Lighting and Marking of Agricultural
Equipment on Highways whether towing the Ultra-Vac during daytime or nighttime
.
2.8 TIRE SAFETY
1. Failure to follow proper procedures when mounting a tire on a wheel or rim can produce an
explosion which may result in serious injury or death.
2. Do not attempt to mount a tire unless you have the proper equipment and experience to do the job.
3. Have a qualified tire dealer or repair service perform required tire maintenance.
4. Ensure that the tires are kept inflated to the proper pressure.
2.9 SAFETY SIGNS
1. Keep safety signs clean and legible at all times.
2. Replace safety signs that are missing or have become illegible.
3. Replaced parts that displayed a safety sign should also display the current sign.
4. Safety signs are available from your Distributor or the factory.
How to Install Safety Signs
• Be sure that the installation area is clean and dry.
• Be sure temperature is above 50°F (10°C).
• Decide on the exact position before you remove the backing paper.
• Remove the smallest portion of the split backing paper.
• Align the sign over the specified area and carefully press the small portion with the exposed sticky backing
in place.
• Slowly peel back the remaining paper and carefully smooth the remaining portion of the sign in place.
•
Small air pockets can be pierced with a pin and smoothed out using the piece of sign backing paper
.

2.10 SIGN-OFF FORM
Walinga Inc. follows the general Safety Standards specified by the American Society of Agricultural
Engineers (ASAE) and the Occupational Safety and Health Administration (OSHA). Anyone who will be
operating and/or maintaining the Ultra-Vac® must read and clearly understand ALL Safety, Operating and
Maintenance information presented in this manual.
Do not operate or allow anyone else to operate this equipment until such information has been
reviewed. Annually review this information with personnel.
Make these periodic reviews of SAFETY and OPERATION a standard practice for all of your equipment. We
feel that an untrained operator is unqualified to operate this machine.
A sign-off sheet is provided for your record keeping to show that all personnel who will be working with the
equipment have read and understand the information in the Operator’s Manual and have been instructed
in the operation of the equipment.
SIGN-OFF FORM
DATE
EMPLOYEE’S SIGNATURE
EMPLOYER’S SIGNATURE
15

3
SAFETY DECAL LOCATIONS
The types of safety signs and locations on the equipment are shown on the following pages. Good safety
requires that you familiarize yourself with the various safety signs, the type of warning and the area, of
particular function related to that area, that requires your SAFETY AWARENESS.
Think SAFETY! Work SAFELY!
Fig. 3-1 Right Hand Side
Fig. 3-2 Rear
REMEMBER - If safety signs have been damaged, removed, become illegible or parts are replaced without
signs, new signs must be applied. New signs are available from your authorized dealer or factory direct.

3
SAFETY DECAL LOCATIONS (Cont’d)
The types of safety signs and locations on the equipment are shown on the following pages. Good safety
requires that you familiarize yourself with the various safety signs, the type of warning and the area, of
particular function related to that area, that requires your SAFETY AWARENESS.
•
Think SAFETY! Work SAFELY!
Decal A 53-15633-6 revA
Decal B 53-15637-6
Decal C 53-04730-6
Decal D 53-15638-6
REMEMBER - If safety signs have been damaged, removed, become illegible or parts are replaced without
signs, new signs must be applied. New signs are available from your authorized dealer or factory direct.
17

3 SAFETY DECAL LOCATIONS (Cont’d)
The types of safety signs and locations on the equipment are shown on the following pages. Good safety
requires that you familiarize yourself with the various safety signs, the type of warning and the area, of
particular function related to that area, that requires your SAFETY AWARENESS.
•
Think SAFETY! Work SAFELY!
Decal G 53-18290-6
Decal H 53-15639-6
Decal J 53-100397-6
Fig 3-5 Typical Decals on Sweep and
Suction Nozzle
REMEMBER - If safety signs have been damaged, removed, become illegible or parts are replaced without
signs, new signs must be applied. New signs are available from your authorized dealer or factory direct.
This manual suits for next models
3
Table of contents
Other Walinga Farm Equipment manuals
Popular Farm Equipment manuals by other brands

Greenbroz
Greenbroz M Dry Trimmer user manual

New Holland
New Holland CX720 Operator's manual

Lipco
Lipco WP 60 Original instructions

Bale Band-It
Bale Band-It GFC 100 Operator's manual

Fisher Engineering
Fisher Engineering STEEL-CASTER Series installation instructions

Bestway
Bestway Field Pro II 1000 Operator's manual