WAREMA WMS User manual

Operating and installation instructions
WMS Wind sensor
Keep for future use
Valid from 01 September 2021
warema_890376_alhb_en_v6•2021-09-01 We reserve the right to carry out improvements 1
AUTIONC
Never activate buttons on your transmitter
arbitrarily without visual contact to the sun
shading product. Children may not play with
this product - remote controls or transmitters
may not get into the hands of children!
Carry out the following steps in the sequence given to
ensure problem-free operation:
Please read these instructions carefully
Execute the necessary installation work with the system
in a de-energised state.
Take the wind sensor into service as described below
Check that the system is functioning correctly
Installation
The WMS Wind sensor is mounted on the drop profile of
the terrace awning. The wind sensor may not be exposed
to direct sunlight. When using multiple WMS Wind sen-
sors, the distance between the sensors must be at least
0.3m!
If the awning is delivered with the WMS, the mounting
plate for the wind sensor is preinstalled.
The "Mounting information" section contains the neces-
sary figures and instructions for your awning type.
Have the small parts needed to attach the mounting
plate ready.
De-energise the entire sun shading control system.
Screw the mounting plate of the wind sensor onto the
drop profile of the awning as shown in the figure. Note
also the additional mounting information in the table.
AUTIONC
If your awning has the minimum unit width
of the corresponding type (see the table),
an additional arm stop is necessary (not
included). First mount the arm stop and then
the wind sensor to prevent the articulated
arms from pushing off the wind sensor when
the awning is closed.
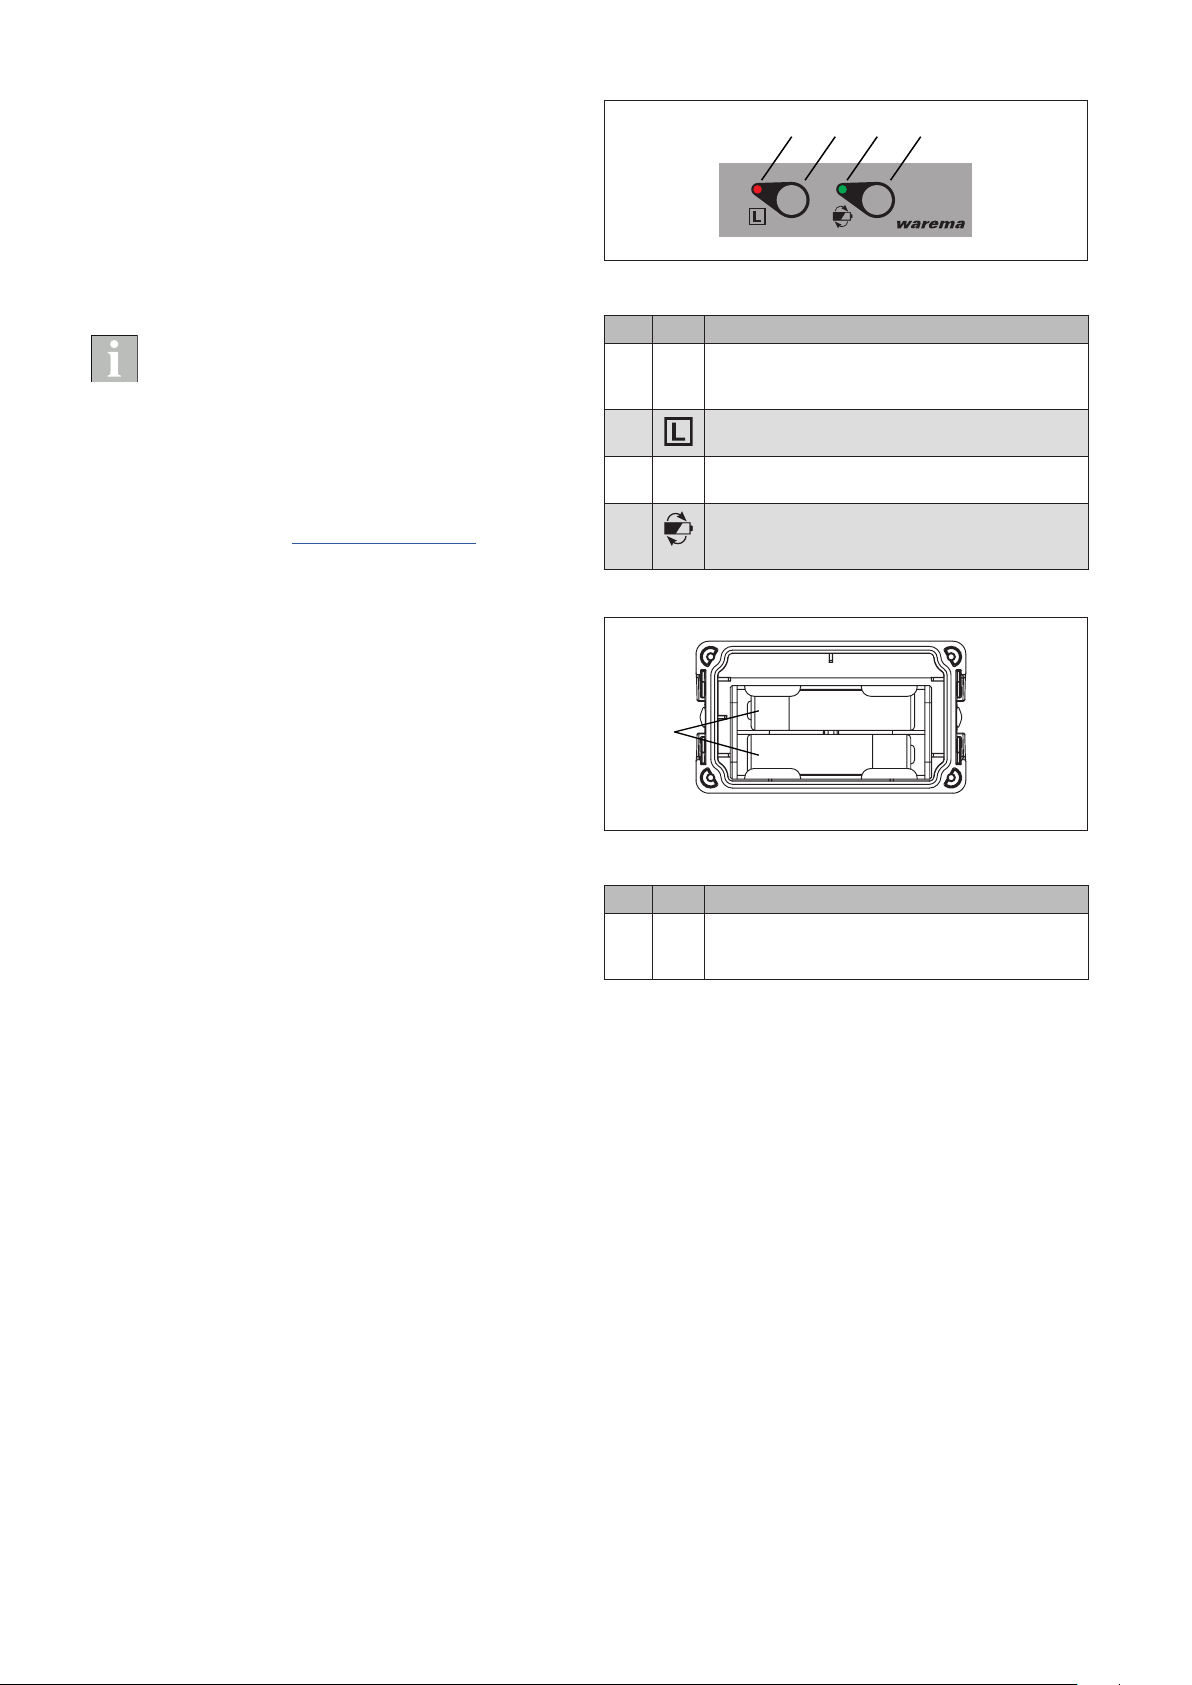
General information
Fig. 1 WMS Wind sensor
The WMS Wind sensor is designed for use with ter-
race awnings. The wind sensor is mounted on the drop
profile and evaluates the movements of the awning. In
high winds, the sensor sends a signal to the WMS Plug
receiver, which then retracts the awning. In awnings with a
valance roller blind, the valance is retracted first, and then
the awning.
The WMS Wind sensor is combined with a WMS Plug
receiver at the factory. The wind sensor is not visible in the
WMS radio network and communicates directly with the
plug receiver.
Various packages are available at the factory that fit the
projection of the awning (length when extended). Prefabri-
cated packages with the necessary number of wind sen-
sors and plug receivers are also available for awnings with
one or two valance roller blinds.
The awning can also be controlled by additional sensors
(e.g. photo, precipitation) in parallel to the wind sensor.
Intended use
The WMS Wind sensor was developed to control sun
shading systems. The approval of the manufacturer must
be obtained for uses outside of the purposes listed in
these instructions.
Safety instructions
ARNINGW
The electrical installation (assembly)/
dismantling must be performed by a cer-
tified electrician in accordance with VDE
0100 and/or with the standards and legal
requirements of the country in which the
device is being installed. The electrician
must observe the installation instructions
included with the electrical devices sup-
plied.

warema_890376_alhb_en_v6•2021-09-01We reserve the right to carry out improvements
2
Commissioning
Insert the supplied batteries into the battery compart-
ment as described in the "Maintenance" section.
Click the wind sensor into the mounting plate.
Switch on the power supply of the sun shading control
system.
Check the function of the wind sensor by shaking the
drop profile with the awning extended.
The unit is now ready for operation.
A receiver and the connected sun shading system
cannot be operated until a transmitter has been
learned in successfully! The learning process is
described in the receiver operating instructions.
In addition, you can obtain the "WMS in practice"
brochure with numerous practical examples of
learning, making settings and WMS networks; the
brochure is available free of charge from your spe-
cialist dealer. Alternatively, the brochure can be
downloaded at: http://www.warema.de.
Commissioning with the WMS Toolkit
If the WMS Wind sensor has not been programmed on the
WMS receiver at the factory (retrofitting, spare part, etc.),
the commissioning must be carried out using the free
WMS Toolkit software. A WMS Stick (art. no. 1002775) is
absolutely required for this.
Insert the supplied batteries into the battery compart-
ment.
Proceed as described in the WMS Toolkit software
manual.
After programming is completed, snap the wind sensor
into the mounting plate.
Check the function of the WMS wind sensor by shaking
the front rail when the awning is extended.
The unit is now ready for operation.
Operating elements and displays
Fig. 2 Operating panel of the WMS Wind sensor
Pos. Fig. Function
ARed LED
Indicates weak batteries, a wind alarm or a mal-
function
BLearn button
Causes the associated receiver to wave
CGreen LED
Indicates that the batteries are sufficiently charged
DBattery button
Displays the battery charge status or activates the
"Replace battery" mode
Back
+ AAA –
– AAA +
Fig. 3 Back of the WMS Wind sensor
Pos. Fig. Function
Batteries
The WMS Wind sensor requires two batteries of
type AAA (IEC LR03, "Micro")

3
warema_890376_alhb_en_v6•2021-09-01 We reserve the right to carry out improvements
Operation
Checking the battery charge status
Occasionally check the battery charge status of the wind
sensor. If the wind sensor can no longer respond, the awn-
ing is automatically retracted or is stopped after several
seconds if it is being extended to protect against wind
damage.
Button/
display Action/result
Briefly press the battery button.
The LEDs indicate the status of the wind
sensor:
GREEN flashes: Battery OK, communica-
tion with the plug receiver
is OK
GREEN flashes,
RED lights up: Battery OK; communica-
tion with the plug receiver
is faulty
RED flashes: The battery charge status
is critical
No display: The battery voltage is
already below the mini-
mum level
Replacing the batteries
Check the battery charge status at least once a year.
Replace the batteries if the red LED lights up after press-
ing the battery button. If the batteries are depleted, the
awning is automatically retracted or is stopped after
several seconds if it is being extended to protect against
wind damage.
Press the battery button for approx. 5 seconds until
the red LED lights up continuously and then take the
wind sensor off the mounting plate.
To replace the batteries (type AAA, IEC LR03, "Micro"),
remove the four screws on back of the housing. Open
the battery compartment (Fig. 3) and insert the new
batteries. Ensure the correct polarity: The plus (+) and
minus (-) poles of the batteries must agree with the
marks in the battery compartment.
Only use new batteries of the same type and always
replace both batteries. Use high quality batteries -
inexpensive batteries can leak and damage the device.
If the device is not used for a longer period, please re-
move the batteries. Do not use rechargeable batteries.
Clip the wind sensor back onto the mounting plate
and press any button on the wind sensor to end the
"Replace battery" mode.
Opening the "Replace battery" mode
Switch off the wind monitor as follows, for example to
replace the batteries.
Button/
display Action/result
Press the battery button for at least 5sec-
onds.
The red LED lights up.
The wind monitor is deactivated. The wind
sensor can be removed without initiating a
wind alarm.
The wind sensor goes into sleep
mode after 3minutes. The "Replace
battery" mode remains active. It con-
tinues to remain active even after the
batteries are replaced.
Press any button to end the "Replace bat-
tery" mode.
If the "Replace battery" mode cannot be activated
before replacing the batteries (e.g. the batteries
are depleted), you should activate the mode brief-
ly after inserting the new batteries. In this way,
the wind sensor can detect that you replaced the
batteries, enabling it to correctly determine the
battery charge status again.
Identifying the plug receiver
Button/
display Action/result
Press the learn button for at least 3sec-
onds.
The red LED lights up for half a second.
The plug receiver belonging to the wind
sensor (i.e. the connected awning) waves.

warema_890376_alhb_en_v6•2021-09-01We reserve the right to carry out improvements
4
Maintenance and cleaning
Storage
If you will not be using the awning for an extended period
(e.g. over the winter, during which negative temperatures
will shorten the battery life), take the WMS Wind sensor off
the mounting plate. Store the wind sensor in an enclosed
area and remove the batteries during this time.
Cleaning
Clean the enclosure with a soft, damp cloth. Do not use
detergents or cleaners, abrasive substances or steam
cleaners.
Liability
Failure to comply with the product information in these
instructions and use of the unit in a manner that contra-
venes its intended use and purpose may result in the
manufacture refusing to honour warranty claims for prod-
uct damage. In this case, liability for consequential harm
to persons or damage to property will also be excluded.
Follow the instructions in the operating instructions of your
sun shading system. Liability is also excluded for damage
to the sun shading system resulting from operation under
icy conditions.
Disposal
After use, the device and the batteries must be disposed
of according to legal regulations or brought to your local
recycling centre.
Technical data
WMS Wind sensor Min. Typ. Max. Unit
Supply
Battery type 2 x AAA (IEC LR03, "Micro")
Supply voltage 2.4 3.0 3.2 V DC
RF transmitter
Transmission frequency 2.40 2.48 GHz
Transmission power 0 dBm
Reception sensitivity -95 dBm
Range
(environment without interfer-
ence)
30 m
Enclosure
Dimensions (L×W×H in mm) 71 × 40 × 27
Degree of protection IP65
Safety class III
Miscellaneous
Conformity
Available at www.warema.de/ce
This device complies with the EMC directives for use in residen-
tial and commercial areas.
WAREMA Renkhoff SE declares herewith that this radio
system type WMS Wind sensor is in compliance with the
guideline 2014/53/EU.
Ambient conditions
Operating temperature -20 20 60 °C
Storage temperature -25 70 °C
Rel. humidity
(non-condensing)
10 40 85 %RH
Degree of soiling 2
Article numbers
WMS Wind sensor 1002 772
WAREMA Renkhoff SE
Hans-Wilhelm-Renkhoff-Strasse 2
D-97828 Marktheidenfeld
Germany
Other manuals for WMS
6
Other WAREMA Accessories manuals
Popular Accessories manuals by other brands

Thorn
Thorn SWITCHLITE MRE SLD2 Installation and commissioning instructions

C-Pen
C-Pen 200 user manual

JK Audio
JK Audio Daptor Three user guide

Adafruit Industries
Adafruit Industries BME280 user guide

Sennheiser
Sennheiser HZA 414 Bedienungsanleitung

ROSE DISPLAYS
ROSE DISPLAYS ECONOFRAME WITH CABLE CLIP AND CABLE AND... instruction sheet

K-Systems
K-Systems G210 InviCell user manual

Seifert
Seifert 841200S62 user manual

Dometic
Dometic A&E Systems 828 Series Replacement instructions

SolarEdge
SolarEdge SEHAZB-SCKT-MTR-XX installation guide

DVM International
DVM International DVM-SA30 quick start guide

Focusrite
Focusrite Scarlett 2i2 user guide