Waring WFP16SCD User manual

For your safety and continued enjoyment of this product,
always read the instruction book carefully before using.
An que votre appareil vous procure en toute sécurité beaucoup de
satisfaction, lire attentivement le mode d’emploi avant de l’utiliser.
Para su seguridad y para disfrutar plenamente de este producto,
siempre lea las instrucciones cuidadosamente antes de usarlo.
WFP16SCD
16 CUP 4 QT. FOOD PROCESSOR
With the LIQUILOCK™SEAL SYSTEM and
CONTINUOUS FEED OPERATION

2 3
IMPORTANT SAFEGUARDS
When using electrical appliances, basic safety precautions should
always be followed including the following:
1. READ ALL INSTRUCTIONS.
2. Unplug from outlet when not in use, before putting on
or taking off parts, before removing food from work
bowl, and before cleaning. To unplug, grasp plug when
pulling from electrical outlet. Never pull cord.
3. Unplug from outlet prior to handling or cleaning the unit.
4. Blades are sharp. Handle carefully.
5. Your Waring®Commercial food processor is a piece of
kitchen equipment, and like all other kitchen equipment,
extreme care must be used when operating it. Although
training requirements are minimal, only responsible and
prudent individuals should be allowed to operate this food
processor. It should not be used by or near children or
individuals with certain disabilities.
6. To avoid injury, never place cutting blade or disc on base
without rst having put the bowl properly in place.
7. Keep hands as well as spatulas and other utensils away
from moving blades or discs while processing food to
prevent the possibility of severe personal injury or damage
to the food processor. A plastic scraper may be used, but
must be used only when the food processor is not running.
8. To protect against risk of electrical shock, do not put base in
water or other liquids.
9. Avoid contact with moving parts. Never feed food by hand
when slicing or shredding. Always use food pusher.
10. Make sure motor has completely stopped before removing
the cover.
11. Do not operate any appliance with a damaged cord or plug,
or after appliance has been dropped or damaged in any
manner. Return appliance to the nearest authorized service
facility for examination, repair or adjustment.
12. The use of attachments not recommended or sold by
Waring Commercial may cause re, electric shock or injury.
13. Do not use outdoors.
14. Do not let cord hang over edge of table or counter, or touch
hot surfaces.
15. This product is ETL listed for commercial use. Use it only for
food preparation as described in this book.
16. Do not attempt to disable the cover interlock mechanism.
17. Be certain cover is securely locked in place before operating
appliance.
18. If the machine malfunctions for any reason, discard any food
being processed at that time.
19. This appliance is not intended for use by persons (including
children) with reduced physical, sensory or mental
capabilities, or lack of experience and knowledge, unless
they have been given supervision or instruction concerning
use of the appliance by a person responsible for their safety.
20. Children should be supervised to ensure that they do not
play with the appliance.
SAVE THESE INSTRUCTIONS
APPROVED FOR
COMMERCIAL USE

4 5
GROUNDING INSTRUCTIONS
For your protection, this appliance is equipped with a
3-conductor cordset.
120 volt units are supplied with a molded 3-prong grounding-type
plug (NEMA 5-15P), and should be used in combination with a
properly connected grounding-type outlet as shown in Figure 1.
If a grounding-type outlet is not available, an adapter as shown in
Figure 2 may be obtained to enable a 2-slot wall outlet to be used
with a 3-prong plug.
As shown in Figure 3, the adapter must be grounded by attaching
its grounding lug under the screw of the outlet cover plate.
CAUTION: Before using an adapter, it must be determined that
the outlet cover plate screw is properly grounded. If in doubt,
consult a licensed electrician. Never use an adapter unless you
are sure it is properly grounded.
INTRODUCTION
Waring®Commercial food processors are the most versatile food
processors in their class, featuring a LiquiLock®Seal System that
enables processing of large volumes of liquid without leakage and
the need to remove the S-blade while pouring. These professional
machines are prime examples of Waring’s seventy-ve years of
industry food service experience, as well as seventy-ve years of
food processing experience.
The WFP16SCD is both ETL and Commercial ETL listed.
This instruction book describes the WFP16SCD, which comes
with a sealed work bowl (also known as a batch bowl) and a
sealed/locked cutter blade (or S-blade) to CHOP, GRIND, PURÉE
and MIX. The patented LiquiLock®Seal System allows for
processing large volumes of liquids with no leakage. Additional
discs provided allow for shredding, slicing and whipping directly
in the sealed batch bowl. For large volume processing, the
WFP16SCD includes a continuous feed chute. This option allows
anything processed with an accessory disc to be processed
directly into a separate container. The WFP16SCD is the rst
of the LiquiLock®series food processors to introduce dicing
operation making it the most versitile LiquiLock®food processor
available.
Size, power and convenience
The wide feed tube makes processing high volumes of larger
sized foods convenient and easy. The motor shaft is built for
durability. The housing, work bowl, chute, covers and pushers are
all made from durable polycarbonate for heavy-use conditions
and easy cleanup. The clear bowl and processing covers are
convenient for viewing food processing and are made of
heavy-duty material to withstand heavy-duty use.

6 7
THE PARTS
The Waring WFP16SCD consists of the following standard
parts and accessories:
1. Diecast motor base with vertical heavy-duty shaft
2. Three control bottons
a. OFF
b. ON
c. PULSE
3. Safety interlock (not shown). Prevents machine from
operating until cover is in place
4. Sealed clear 4 quart (16 cups)/3.75L work bowl
5. Sealed clear work bowl cover
a. Small pusher used within the large pusher for smaller
vegetables, pepperoni, etc.
b. Large pusher with full-size and reduced-size feed
options
c. Large feed tube for maximum use of cutting surface
Note: This combination pusher allows use of the entire feed
tube for large foods and provides controlled processing for
small-diameter foods such as carrots, celery and pepperoni.
6. Sealed S-blade (cutter blade) to chop, grind, purée and mix:
Locks in place for liquid processing and easy pouring.
7. Adjustable slicing disc
8. Reversible shredding disc
9. Sealed whipping disc
10. Detachable disc stem for use with adjustable slicing disc and
reversible shredding disc
11. Dicing assembly
a.
3⁄8"slicing blade
b.
3⁄8"dicing grid
12. Cleaning brush (not shown)
13. Continuous feed chute
14. Continuous feed chute cover
15. Slinger
16. Dicing grid pick (not shown) 1
4
5
6
7
9
10
8
11
13
14
15
5a.
5c.
22a. 2b. 2c.
11a.
11b.
5b.

8 9
ASSEMBLY OF BATCH BOWL PARTS
We will use the terms work bowl, batch bowl and cutter bowl
interchangeably throughout this instruction book. They mean the
same thing.
Prior to First Use:
• Clean and sanitize the motor base. Wash, rinse, and sanitize
the work bowl, cover, food pusher, food pusher insert and
accessories.
• Place base on a counter or table near a 3-prong electrical
outlet. Position it so you look at the front of the unit and can see
the control panel. Do not plug in the cord until the processor is
completely assembled.
• Pick up the transparent work bowl, holding it in both hands with
the handle toward you.
• Place the bowl on the base, tting its central tube over the
motor shaft on the base and placing its handle slightly to the
left of back-center (at about a 7 o’clock position).
• Press the bowl down so the lower rim ts around the circular
platform. Turn the bowl counterclockwise as far as it will go. It
will lock into position with the tabs on the sides of the
platform.
Read this if assembling the batch bowl parts to use S-blade
(cutter blade) or whipping disc.
• Pick up the S-blade or whipping disc, noting the diagram on
the top of the plastic center. It matches the shape of the motor
shaft.
• Place the S-blade or whipping disc over the tip of the motor
shaft, lining up the inside of the hub with the shaft. Press it
down rmly, rotating the center hub until the blade or disc
assembly is fully seated. It should easily drop into place. Push
rmly to lock and seal S-blade or whipping disc hub in place.
Be sure it is pushed down as far as it will go. If it is not all the
way down, it may become damaged and any liquid may leak.
Push only on the center section (plastic part); never touch the
cutting blade, as it is extremely sharp.
• Check to be sure the blade or disc is all the way down by
turning it back and forth while gently pushing it down. If
properly installed and fully seated, the lower blade will be
positioned just above the inside bottom of the bowl.
• If processing food with the S-blade or whipping disc, now is the
time to add the food or liquid to the work bowl.
• Do not ll liquid over MAX LIQUID FILL LINE. If too much
liquid is used, it will overow. In this case, stop operation,
remove liquid to below MAX LIQUID FILL LINE and continue
processing.
Read this if assembling batch bowl parts to use accessory
discs in batch bowl.
To assemble the adjustable slicing disc (WFP16S10), you must
remove bowl cover. Position the disc stem over the drive shaft
securely. Next, select the desired thickness setting on your
adjustable slicing disc. There are 16 different positions ranging
from 1–6mm in thickness. Once you’ve set the thickness, position
the plastic receptacle over the disc stem securely. Do not turn on
the unit until the batch bowl is properly assembled with the cover.
To assemble the reversible shredding disc (WFP16S12), you must
remove bowl cover. Position the disc stem over the drive shaft
securely. Next, select the desired shredding blade size. Your
reversible shredding disc has ne shredding blades on one side
and medium shredding blades on the other. Be sure the desired
blade size is facing up, and position the disc on the disc stem
securely. Do not turn on the unit until the batch bowl is properly
assembled with the cover.
NEVER ATTEMPT TO START THE FOOD PROCESSOR
WITHOUT THE COVER LOCKED INTO POSITION.
Two pushers for feed tube
There is a large food pusher and small food pusher. The large
pusher is for processing larger foods. The small pusher nests in
the large pusher and can be used for smaller products, guiding
long thin vegetables for more precise cuts, or for jobs like slicing
pepperoni. Insert the small food pusher into the large food pusher
opening. Now you are ready to insert the large pusher into the
feed tube opening.

10 11
ASSEMBLY OF CONTINUOUS-FEED CHUTE PARTS
• Clean and sanitize the motor base, and wash, rinse, and sanitize
the continuous-feed chute, cover, slinger disc, food pusher,
food pusher insert and processing tools prior to initial use.
• Place the base on a counter or table near a 3-prong electrical
outlet. Position it so that you are looking at the front of the
unit and can see the control panel. Be certain that the cord
is unplugged. Do not plug in the cord until the processor is
completely assembled.
• Pick up the continuous-feed chute, holding it in both hands with
the chute pointing in the 4-o’clock position and the handle at
the 10-o’clock position. Place the chute on the base, tting its
center opening over the motor shaft.
• Press the chute down so the round lower rim of the chute ts
around the circular platform. Rotate counterclockwise until it
clicks into place and engages the rear interlock.
• Place the slinger (or ejector disc) in the bowl, sliding it over the
metal motor shaft until it reaches the bottom of the chute.
• Select the appropriate accessory disc. Follow directions on
page 9 to attach stem to disc.
• Place the cover on top of the chute with cover locking tab at
left of locking tab on chute. Press down and rotate the cover
until it latches to the tab on the continuous-feed chute. This will
prevent the lid from rising up during processing.
• The interlock tab on the cover will slide into the interlock slot on
the cover and engage the magnetic safety interlock switch. The
interlock switch prevents operation of the machine unless the
cover is in the proper position. With this switch engaged, the
food processor will operate if the power is on and the controls
are turned to ON or PULSE.
• To assemble the dicing assembly (WFP16S13) you may use only
the continuous feed. Do not attempt to use the dicing grid in
the batch bowl. First remove the continuous-feed chute cover
and be sure that the slinger is properly installed (see above for
assembly of continuous-feed chute). Position the dicing grid so
that it ts securely on the tabs of the continuous feed chute.
Guide the stem of the slicing blade through the center hole of
the dicing grid and over the drive shaft. Be sure that the slicing
disc is completely secured on the shaft by spinning the disc
lightly until it is almost ush with the dicing grid. Do not turn on
DISASSEMBLY OF BATCH BOWL PARTS
ALWAYS UNPLUG THE UNIT BEFORE DISASSEMBLING.
• Remove the large food pusher from the feed tube. Remove the
small pusher from the large pusher.
Disassembly when removing the S-blade or whipping
disc
• Remove the work bowl from the unit by rotating clockwise
(left) to disengage the tabs on the bottom of the bowl platform
from the work bowl. When the bowl handle is on the left
(about 7 o’clock position), you can gently lift the bowl straight
up and out.
It is recommended that you remove the bowl from the motor
base before you remove the S-blade or whipping disc.
NOTE: REMOVE ALL FOOD AND LIQUID BEFORE REMOVING
S-BLADE OR WHIPPING DISC, OR BOWL WILL LEAK.
• To remove the blade or disc, keep a slight downward pressure
on the top center hub of the blade or disc while removing the
bowl from the motor base. This will form a seal to prevent food
particles from spilling into the center tube of the bowl and onto
the motor base or the work surface. Remove all contents from
the batch bowl. Then remove the S-blade or whipping disc
from the bowl by pulling upward to unlock the seal. Handle the
S-blade with caution; the blades are extremely sharp.
Disassembly when removing an accessory disc
• Do not remove the work bowl until the accessory disc is
removed.
• To remove an accessory disc, place your ngers on the outer
edge of two opposite sides of the disc and lift. The disc should
remove easily off the disc stem. If the disc stem stays attached
to the disc, hold the disc in one hand with the stem facing away
from your hand and pull out the disc stem. Be careful not to
scrape your hand on any sharp edges.
• Remove the work bowl from the unit by rotating clockwise (left)
to disengage the tabs on the bottom of the bowl platform
from the work bowl. When the bowl handle is on the left (about
7 o’clock position), you can gently lift the bowl straight up and out.

12 13
OPERATING THE CONTROLS
• Plug the machine into an electrical outlet. The outlet must be
120V, 60Hz.
• There are three control buttons on the base unit.
The three controls are: ON
OFF
PULSE
How they work: ON: Press the ON button to start
the motor.
OFF: Press the OFF button to stop
the motor.
PULSE: To pulse the motor, press the
PULSE button down, then
release. The motor will run as
long as you hold the button
down; it stops when you
release the button.
HOW TO USE
Continuous use
For continuous processing, use the ON button which is located in
the middle.
Pulsing
• For rapid ON/OFF operation, use the PULSE. The motor runs as
long as you hold the button down; it stops when you release the
button.
• You control the duration of each pulse by the amount of time
you hold the button down. You control the frequency of pulses
by the rate at which you press the button.
• Pulsing gives you greater control over consistancy when
chopping, blending and mixing.
• Pulsing is also useful in processing hard foods. Pulse the food
a few times to break it up into smaller parts. Then proceed with
continuous use after the pieces are broken up and easier to
process.
the unit until the continuous-feed chute is properly assembled
with the cover.
To remove dicing assembly, rst rotate dicing blade counter-
clockwise and lift up from the edges. Be careful not to touch
the blade when removing dicing assembly as the blades are
very sharp. Next lift the dicing grid. NOTE: Dicing assembly
(WFP16S13) is to be handwashed only. DO NOT PUT
DICING BLADE OR GRID IN DISHWASHER.
NEVER ATTEMPT TO START THE FOOD PROCESSOR
WITHOUT THE CHUTE AND COVER LOCKED INTO
POSITION.
• Insert the small food pusher into the large food pusher opening.
Now you are ready to insert the large pusher into the feed tube
opening.
• Once feed chute is assembled, place separate container under
the feed chute.
DISASSEMBLY OF CONTINUOUS- FEED
CHUTE PARTS
ALWAYS UNPLUG THE CORD BEFORE DISASSEMBLING.
• Turn the cover clockwise until the safety interlock tab on the
cover is disengaged from the safety interlock switch on the
chute, and the tabs are clear of the tabs on the cover.
• Remove the large food pusher from the feed tube. Remove the
small pusher from the large pusher.
• Remove the continuous-feed chute from the motor base. If the
chute is pointing in the 4-o’clock position, just lift it up. If not,
rotate clockwise to disengage the tabs on the bottom of the
chute platform (motor base) from the slots on the bottom of the
continuous-feed chute.
• Use caution removing accessory discs as the blades are
very sharp.

14 15
Large pusher
This pusher is typically used when inserting vegetables
horizontally for longer cuts.
RESETTING THERMAL PROTECTION
The WFP16SCD Food Processor is equipped with an automatic
reset switch to protect the motor from overheating.
If your food processor stops running under heavy use, press the
OFF button and unplug the power cord. Empty the work bowl of
all its contents and discard. Allow approximately 30 minutes for
the motor to cool down.
Reassemble unit, plug the power cord back into the outlet and
run rst with the bowl empty. Put food into the bowl and continue
processing.
If your food processor does not function properly following
this procedure, discontinue use and contact a Certied Waring
Customer Service Center.
USE INSTRUCTIONS FOR S-BLADE
(CUTTER BLADE)
• The sealed S-blade (cutter blade) is designed for chopping,
grinding, puréeing, blending, mixing or kneading.
• Assemble the bowl and blade as instructed in the section titled
“Assembly of Batch Bowl Parts” (page 8).
Chopping and mincing
• To chop or mince in the bowl, ll the bowl up to ¾ full.
• To chop or mince most effectively, use the pulse function. This
allows for better control over consistancy. Continue pulsing until
the desired consistency has been reached.
• If chopped foods are processed continuously, the food could
be processed unevenly, i.e., food on the bottom will be nely
chopped and food on the top will be more coarse.
Chopping meat
Cut meat into 1-inch (2.5 cm) pieces to ensure an even chop.
Process no more than 2.25 lb. of meat. Press the PULSE button
• Always use the PULSE button for pulsing. Never move the
bowl and cover assembly on or off to control pulses. It is less
efcient and could damage the machine.
Turning the machine off with the OFF Button.
• Always switch the food processor off by pressing and releasing
the OFF button. This assures that the power is not supplied to
the motor.
• Always switch the food processor off and wait until rotation
stops before removing the cover.
• While the safety interlock switch will turn the machine off if the
bowl is rotated clockwise or the cover is removed while running,
this should not be the means of turning the machine on or off.
• As a safety precaution, always make sure the machine is off by
pressing the OFF button before pushing down the lid.
FOOD PREPARATION
• Prepare all food items to be processed by washing and peeling
as required. Remove pits, stones, and large seeds.
• Cut vegetables, meats, cheeses, etc. into sizes that will t
into either the small or large feed tube for processing with
accessory discs.
• Preparation for slicing: Produce that is long and cylindrical such
as carrots, cucumbers and celery should be cut at at both
ends. This will provide a consistent slice for all food processed.
FOOD PUSHER SELECTION
The feed tube can be used for adding ingredients while the food
processor is running. However, it is recommended that the food
pushers be left in place whenever possible to prevent splashing
and avoid unwanted additions to the work bowl.
Small pusher
This pusher is typically used when inserting vegetables vertically
for smaller cuts. It should be used when slicing foods such as
carrots, celery, pepperoni, etc. when a consistent, at result is
desired.

16 17
SLICING OPERATION
• The WFP16SCD comes with an adjustable slicing disc. The
adjustable slicing disc allows you to slice foods anywhere
from 1 to 6mm thick using 16 different slicing positions!
Prior to mounting the disc onto the motor shaft (see page
9 for assembly instructions), use the knob to select desired
thickness. Once you have selected the thickness and mounted
the disc onto the unit, you may secure the cover onto the batch
bowl or continuous fed chute and remove the pusher.
• Prepare all food items to be processed by washing and peeling
as required. Remove pits, stones, and large seeds. Be sure the
food will t into the proper feed chute. Foods such as carrots,
cucumbers, etc., should be cut at at both ends to provide a
consistent slice throughout the whole product.
• With foods like cabbage, lettuce or any product that has an
undesirable core, the core should be removed. Medium size
cabbage or lettuce heads may be cut into thirds to t in the
feed chute. Larger heads may need to be quartered.
• When food preparation is complete, ll the chosen feed tube,
position the pusher, turn the machine on and monitor the
results.
• Never try to slice soft cheese. Use only hard cheese.
Mozzarella may be sliced only when well chilled around 36˚F.
• When sliced food reaches nearly full capacity of the bowl,
remove all sliced food from the bowl.
SHREDDING OPERATION
• The WFP16SCD comes with a reversible shredding disc. Both
sides on this disc produce a perfect shred, one ne, the other
medium. When assembling the shredding disc, note that the
side facing up will be the size shred produced. When the disc
is secured, you may attach the cover on the batch bowl or
continuous feed chute and remove the pusher.
• Prepare all food items to be processed by washing and peeling
as required. Remove pits, stones, and large seeds. Be sure the
food will t into the proper feed chute.
• Select which feed tube to use. Horizontal placement of foods
such as carrots and zucchini will result in a longer shredded
3 or 4 times at a rate of 1 second on, 1 second off. If the food is
not chopped ne enough, let the processor run continuously for
a few seconds. If the machine has trouble starting, reduce the
amount of meat in the bowl and start again.
Chopping/grating hard cheese
To chop, place up to 2 lb. of uniformly cut 1-inch (2.5 cm) cubes
of chilled cheese into the bowl and pulse. For grated cheese,
pulse until the cheese is in small chunks (pea size), then allow
the processor to run continuously until you have the degree of
grating desired. Cheese with high moisture content can ball up if
processed too long.
Chopping onions, celery, cabbage, etc.
Cut onions in quarters, and other vegetables into 1-inch
(2.5 cm) cubes. Place the cubed food into the work bowl up to the
top of the bowl’s inner tube, and pulse until you reach the desired
consistency.
Note: If you let the blade run too long, the ingredients on the
bottom will become puréed or give you uneven results.
Purée or Mix
To purée tomatoes, vegetables and fruits, make sauces, or mix
and blend ingredients, place the ingredients into the bowl, turn
the unit on and allow it to run continuously until you reach the
desired consistency. Do not let the machine run unattended.
If too much liquid is used, it will overow. In this case, stop
operation, remove liquid to below the MAX FILL LINE and
continue processing.
Do not fill liquid past MAX LIQUID FILL LINE.
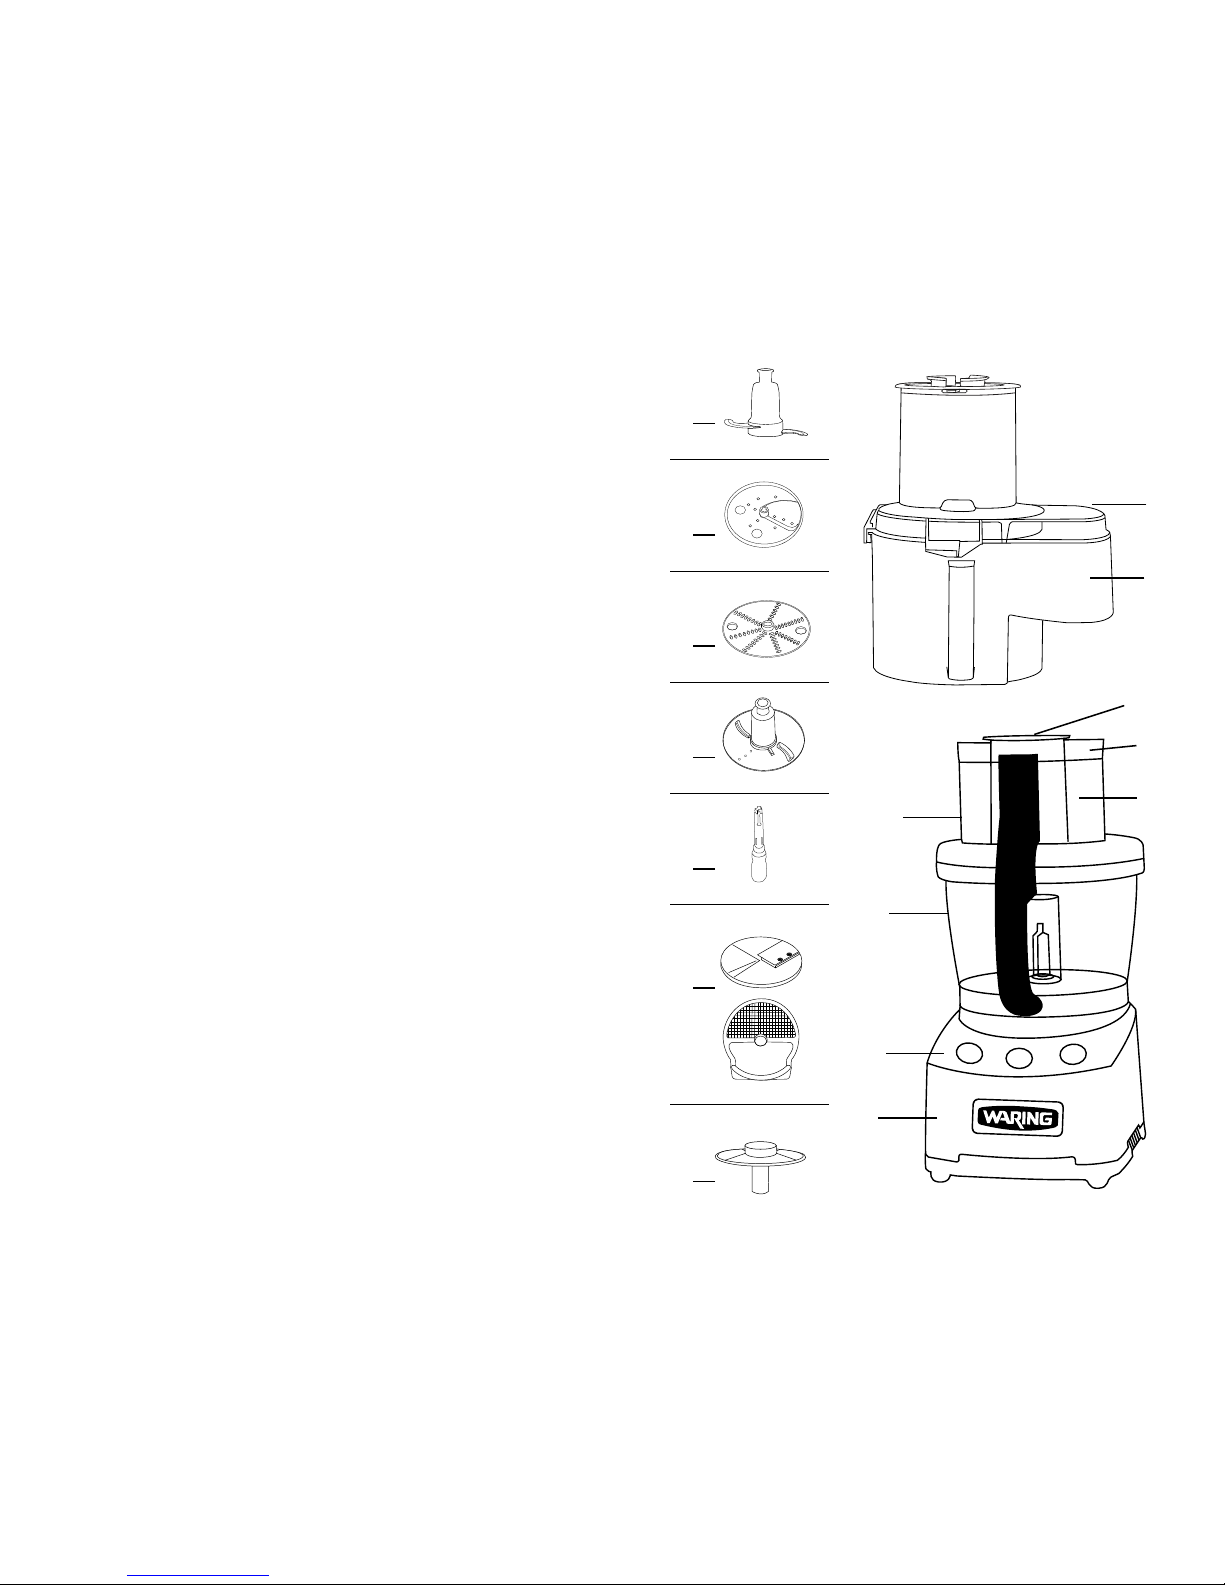
ACCESSORY DISC SELECTION AND USE
The food processor disc accessories are made to perform a wide
variety of food processing tasks: slicing, whipping, shredding and
dicing. Four (4) accessory discs are included with the WFP16SCD.
As of this printing they are:
WFP16S10 - Adjustable Slicing Disc
WFP16S11 - Sealed Whipping Disc
WFP16S12 - Reversible Shredding Disc
WFP16S13 - Dicing Assembly

18 19
the product will occur when the dicing grid requires cleaning.
The best way to clean the grid is to remove the continuous feed
lid and the slicing plate, and use the dicing grid pick included
to push through any product in between the grid blades.
• When using dicing feature: Select dicing grid and place in chute
on top of indentations on the bowl. Pick up slicing disc and
place on drive shaft so that the blade is ush with the dicing
grid. Pulsing is the best method for this operation.
• When dicing, if the disc gets jammed, remove the lid of the
continuous feed chute rst. Remove any food jammed in the
blade opening, then rotate the slicing plate counterclockwise
slowly to loosen the slicing plate. Reassemble and continue
dicing.
• Dicing assembly is to be hand washed only.
GRATING OPERATION
Waring Commercial offers grating discs as an optional accessory.
For grating, use instructions below.
• Prepare all food items to be processed by washing and peeling
as required. Remove pits, stones, and large seeds. Be sure the
food will t into the proper feed chute.
• Never try to grate soft cheese. Use only hard cheese.
Mozzarella may be grated only when well chilled around 36°F.
• For grating cheese, it is recommended that a slight pulsating
pressure be applied with the pusher, alternating push/no push
until the cheese block is completely grated. Cheese grating
puts more strain on the food processor motor than other tasks
and may cause overheating if too much pressure is applied in
a continuous manner.
• You can typically expect to grate 10 pounds (4.5 kg) of cheese
in about ve (5) minutes.
• After fteen (15) minutes of continuous cheese grating, allow
the machine to cool.
• It is recommended that you plan your food preparation in a
manner that will allow for ve minutes of grating, followed by
ve minutes of food preparation while the machine rests.
• When grated food reaches nearly full capacity of the bowl,
remove all grated food from the bowl.
product. Using the smaller chute and small pusher with food
inserted vertically will yield a shorter shredded product.
• Never try to shred soft cheese. Use only hard cheese.
Mozzarella may be shredded only when well chilled about 36˚F.
Always use PULSE operation when shredding cheese.
• When shredded food reaches nearly full capacity of the bowl,
remove all shredded food from the bowl.
SEALED WHIPPING DISC OPERATION
• The WFP16SCD comes with a sealed whipping disc. See page
8 for assembly instructions to install the whipping disc. Once
assembled, you are ready to start adding in your favorite
ingredients!
• The whipping disc makes any whipping job easy and quick.
Just pour in heavy cream and your choice of sweetening or
avor, and whip until cream is thick and uffy. For whipping
cream do not use more than 6-cups of heavy cream as it
could expand beyond the MAX FILL LINE during the process.
If cream leaks, stop operation, remove cream to below MAX
LIQUID FILL LINE and continue. Note that the seal will prevent
leaks and spills from the batch bowl cover, however when the
motor is running, the liquid could get whipped out through the
feed tube. To turn your cream into butter, keep whipping until
moisture is mostly separated from cream. Use your choice
of herbs and seasoning to make your own homemade herb
butter.
DICING OPERATION
• The dicing operation requires that product be sliced both
horizontally and vertically by the machine. The smaller the
dice required, the more difcult the cut is to achieve. Soft
or juicy product will tend to mush if the dice is too small or
the produce is too soft. Cheese and meat are the opposite
extreme. Because of the consistency of cheese and meat, it is
not recommended that this kind of product be diced. Damage
could occur to the blades and/or motor and will not be covered
under warranty.
• During the dicing operation, attention should be given to the
nished product. Any food in front of the blade should be
removed before the feed chute is relled. A visible change in

20 21
Unit stops running during processing
• The unit may have overheated. Refer to Resetting Thermal
Protection section (page 15).
• Turn unit off and unplug.
• Remove bowl attachment.
• Remove food being processed from inside the bowl and discard.
• Allow unit to cool for 30 minutes.
• Reassemble unit, and run rst with the bowl empty, then put
food into the bowl and try again.
Unit jams or vibrates excessively
• Turn unit off and unplug.
• Disassemble the batch bowl/accessories.
• Make sure there is no food in S-blade hub (if applicable).
• Clean food off accessory discs (if applicable).
• Reassemble unit, and run rst with the bowl empty, then put
food into the bowl and try again.
Unit will not come up to full speed
• Bowl is overloaded – remove food being processed and reload
using smaller quantities.
If unit does not operate after you have followed the above
• Check outlet to be sure there is current.
• Check to be sure circuit breaker is on.
• Check to be sure the fuse is not blown if there are fuses on this
circuit.
• Call a local Waring service agency.
If food processor makes grinding noise
• Turn unit off, unplug, disassemble, check bowl and blade to see
if they have been rubbing together.
• If bowl and blade are rubbing, call your authorized Waring
service agency.
JULIENNE DISC OPERATION
Waring Commercial offers a julienne disc as an optional accessory.
Follow the instructions below to operate.
• Prepare all food items to be processed by washing and peeling
as required. Remove pits, stones, and large seeds. Be sure the
food will t into the proper feed chute.
• If a long horizontal cut is desired – for example, squash sticks –
the food must be placed in the feed chute horizontally or on its
side. For nely chopped food results – for example, chopped
celery or nely chopped onions, you must insert the vegetables
vertically or standing up. For a very ne chop of onions, quarter
the onion and gravity-feed it through the chute.
Removing processed food from the batch bowl
1. Turn the machine off and wait for the blade to stop moving
before removing the lid and pusher.
2. If the blade holds the bowl locked when the motor stops,
move the handle of the bowl rapidly back and forth – rst
clockwise, then counterclockwise.
3. If using a disc, remove before tilting the bowl, using a spatula
to scrape off any food sticking to it. If using S-blade, it will
stay locked in the bowl when you tilt to pour. Use spatula
to scrape food out of bowl. NEVER USE FINGERS TO
REMOVE FOOD WHILE BLADE IS IN BOWL.
TROUBLESHOOTING
This section describes potential problems and the correct
solutions for them. Problems that cannot be solved with the
guidelines listed below should be referred to one of the Waring
Authorized Service Centers for assistance. A listing of authorized
service agencies is supplied with each Waring food processor.
Unit does not start when assembled correctly
• Pull the plug and try plugging into another outlet.
• Make sure the bowl is properly positioned on the motor base,
that the bowl cover is attached properly, and that the safety
interlock tab on the cover has properly engaged the safety
interlock switch.
• Press ON button.

22 23
NEVER IMMERSE THE MOTOR BASE IN WATER OR ANY
OTHER LIQUID.
Allow the unit to air-dry before using again.
Never use harsh, abrasive-type cleaners on any part of the
commercial food processor.
*Ajax® is a registered trademark owned by the Colgate-Palmolive Company.
**Clorox® is a registered trademark owned by the Clorox Company.
LIMITED WARRANTY
LIMITED FIVE YEAR MOTOR WARRANTY
LIMITED TWO YEAR PARTS AND LABOR WARRANTY
Waring Commercial warrants that this product’s motor shall be
free from defects in material and workmanship for a period of ve
years from the date of purchase when used with foodstuffs,
nonabrasive liquids (other than detergents) and nonabrasive
semi-liquids, providing it has not been subject to loads in excess
of indicated rating. All other components are warranted for a
period of two years from date of purchase.
Under this warranty, the Waring Commercial division will repair
or replace any part which, upon our examination, is defective in
materials and workmanship, provided the product is delivered
prepaid to the Waring Service Center, 314 Ella T. Grasso Ave.,
Torrington, CT 06790, or any factory-approved service center.
This warranty does not: a) apply to any product that has become
worn, defective, damaged or broken due to use or due to repairs
or servicing by other than the Waring Service Center or a factory
approved service center or due to abuse, misuse, overloading or
tampering; b) cover incidental or consequential damages of any
kind.
This warranty is applicable only to appliances used in the United
States or Canada; this supersedes all other express product
warranty or guaranty statements. For Waring products sold
outside of the U.S. and Canada, the warranty is the responsibility
of the local importer or distributor. This warranty may vary
according to local regulations.
This warranty is void if appliance is used on Direct Current (DC
current).
CLEANING AND MAINTENANCE
Clean the food processor and accessories prior to initial use and
after each use. Do not use harsh abrasive-type cleaners on any
part of the food processor. Cleaning must follow ETL sanitation
guidelines.
Wash the motor shaft with a small brush.
Wash, rinse, sanitize and dry the bowl, cover, small food pusher,
large food pusher, accessory discs, and S-blade prior to initial
use and after use, unless they will be used again immediately.
With the exception of the WFP16S13 dicing assembly, these items
are all dishwasher safe, and may be cleaned and rinsed in the
dishwasher instead of manually in the sink. The dicing assembly
(WFP16S13) grid and slicing blade are to be hand washed only.
Wash and rinse all of the above items after each use.
A stiff bristle brush will help to knock food particles out of the
crevices of the discs and blades before washing. Handle very
carefully as the blades are sharp.
For manual cleaning, it is recommended that you use washing
solutions based on non-sudsing detergents, and chlorine-based
sanitizing solutions that have a minimum chlorine concentration of
100 PPM. The following washing, rinsing, and sanitizing solutions,
or their equivalents, may be used:
SOLUTION PRODUCT DILUTION IN WATER TEMPERATURE
Washing *Ajax® ¼ oz. per Hot 115°F (46°C
Sanitizer 2½ gallons
Cleaner
Powder
Rinsing Plain Water Warm 95°F (35°C)
Sanitizing **Clorox® 1 tablespoon per Cold 50°F
Institutional gallon (10–21°C)
To clean and sanitize the motor base
Clean and sanitize the motor base prior to initial use and after
each use. Unplug the unit, then wipe down the exterior surfaces
of the motor base with cloth or sponge dampened with a soluble
detergent. Next, wipe down with rinse water. Prevent liquid from
running into the motor base by wringing out all excess moisture
from cloth or sponge before using it.

24 25

26 27
IMPORTANTES CONSIGNES
DE SÉCURITÉ
L'utilisation d'appareils électriques requiert la prise de précautions
élémentaires, parmi lesquelles les suivantes :
1. LIRE TOUTES LES INSTRUCTIONS.
2. Débrancher l’appareil après usage et avant toute
manipulation (y compris vider le bol) ou entretien. Saisir
le cordon d’alimentation par la fiche pour le débrancher.
Ne jamais tirer sur le cordon.
3. Débrancher l'appareil avant toute manipulation ou entretien.
4. Les lames sont très coupantes. Manipuler avec précaution.
5. Comme c’est le cas avec tout appareil ménager, il vous
faudra être prudent lorsque vous utilisez le robot de cuisine
Waring®Commercial. Bien que simple d’utilisation, ce robot
ne devrait être utilisé que par des personnes vigilantes.
Il ne devrait pas être utilisé par ou près d’enfants ou de
personnes souffrant d’un certain handicap.
6. An de prévenir tout risque de blessure, ne jamais installer le
couteau ou les disques avant de vous être assuré que le bol
est bien installé.
7. Tout contact avec le couteau ou le disque alors que
l’appareil est en marche pourrait provoquer des blessures
graves ou bien endommager l’appareil. Maintenir les
mains et les ustensiles loin des éléments en mouvement.
Vous pouvez utiliser une spatule en plastique une fois que
l’appareil est arrêté.
8. An de prévenir tout risque de choc électrique, ne jamais
placer le socle dans l’eau ou tout autre liquide.
9. Éviter tout contact avec les éléments en mouvement. Ne
jamais introduire la main ou les doigts dans l'entonnoir alors
que l'appareil est en marche. Utiliser le poussoir.
10. Attendre que le moteur soit à l’arrêt avant de retirer le
couvercle.
11. Ne pas utiliser l'appareil si le cordon d’alimentation
ou la che sont endommagés, s’il ne fonctionne pas
correctement, s'il est abîmé ou après qu'il soit tombé.
Envoyer l'appareil à un service après-vente autorisé an qu’il
soit inspecté, réparé ou réglé au besoin.
12. L’utilisation d’accessoires non recommandés ou vendus par
Waring Commercial peut présenter un risque d'incendie,
d'électrocution ou de blessure.
13. Ne pas utiliser l'appareil à l'air libre.
14. Ne pas laisser le cordon pendre au bord d'une table ou
d'un plan de travail, ni entrer en contact avec des surfaces
chaudes.
15. Cet appareil, agréé ETL, est à usage commercial. Ne
l'utiliser que pour la préparation des aliments, tel que décrit
dans ce manuel.
16. Ne pas essayer de forcer le mécanisme de sécurité de
l’appareil.
17. Vérier que le couvercle est bien fermé avant de mettre
l’appareil en marche.
18. En cas de mauvais fonctionnement de l’appareil pendant
l’utilisation, jeter le contenu du bol.
19. Cet appareil ne devrait pas être utilisé par des enfants ou
des personnes souffrant d’un handicap physique, mental
ou sensoriel, ou qui ne disposent pas des connaissances
ou de l'expérience nécessaires, à moins qu'une personne
responsable de leur sécurité leur en ait expliqué le
fonctionnement ou les encadre.
20. Il convient de surveiller les enfants an de s'assurer qu'ils ne
jouent pas avec l'appareil.
GARDER CES INSTRUCTIONS
USAGE COMMERCIAL AUTORISÉ

28 29
INSTRUCTIONS DE MISE À LA TERRE
Pour votre protection, votre appareil est doté d'un cordon avec
mise à la terre.
Les appareils de 120V sont équipés d'une che NEMA 5-15P. La
che doit être branchée dans une prise de terre correctement
congurée (Fig. 1).
Vous pouvez utiliser un adaptateur temporaire (Fig. 2) pour
brancher l’appareil dans une prise polarisée jusqu’à ce que vous
fassiez installer une prise de terre par un électricien.
An d'assurer la mise à la terre, la languette de l’adaptateur doit
être xée au boîtier par une vis en métal (Fig. 3).
ATTENTION : Vérier que le boîtier est mis à la terre avant
d'utiliser l'adaptateur. En cas de doute, demander conseil à un
électricien. Ne jamais utiliser un adaptateur, à moins qu'il ne soit
correctement mis à la terre.
INTRODUCTION
Les robots de cuisine Waring Commercial®sont les plus
polyvalents de leur catégorie. Dotés du système d'étanchéité
LiquiLock®, ils permettent de préparer de grands volumes de
liquide sans fuite et de vider le bol sans avoir à retirer la lame.
Ces appareils professionnels sont le fruit de 75ans d'expérience
dans la restauration et 75ans d'expérience dans la préparation
culinaire.
Le WFP16S est agréé "ETL" et "Commercial ETL".
Le WFP16S est équipé d'un bol hermétique et d'un couteau
étanche permettant de HACHER, MOUDRE, RÉDUIRE EN PURÉE
et MÉLANGER/MIXER. Le système d'étanchéité LiquiLock®
est un système breveté qui permet de préparer de grands
volumes de liquide, sans fuite. Votre nouveau robot de cuisine
inclut également des disques pour émincer, trancher et battre
directement dans le bol hermétique.
Haute capacité, puissance et commodité
L'entonnoir large permet de préparer une grande quantité
d'aliments plus gros, en moindre temps. L'arbre moteur est solide
et durable. Le socle-moteur, le bol, le couvercle et les poussoirs,
faits en polycarbonate, sont résistants et faciles à nettoyer. Le
bol et le couvercle transparents sont pratiques et conçus pour
résister à l'usage intensif qu'en font les professionnels, jours
après jour.

30 31
PIÈCES
Le robot multifonction WFP16S de Waring Commercial inclut les
pièces et accessoires suivants:
1. Socle moulé sous pression avec arbre moteur à usage
intensif
2. Trois boutons de commande
a. OFF (arrêt)
b. ON (marche)
c. PULSE (pulse)
3. Mécanisme de sécurité (non illustré) empêchant l’appareil de
se mettre en marche si le couvercle n’est pas bien fermé
4. Bol hermétique transparent de 3,75L
5. Couvercle transparent hermétique
a. Large entonnoir, pour réduire le temps de préparation
b. Gros poussoir, idéal pour les gros aliments
c. Petit poussoir, idéal pour les aliments ns (carottes,
céleri, saucisse, etc.)
Remarque: Le petit poussoir s'emboîte dans le gros
poussoir. Ce système de poussoir 2-en-1 permet d'utiliser
l'appareil pour préparer une grande variété d'aliments.
6. Couteau étanche pour couper, hacher, réduire en purée et
mélanger. Évite les fuites et reste en place lorsqu'on vide le
bol.
7. Disque à trancher réglable
8. Disque à émincer réversible
9. Disque à fouetter hermétique
10. Adaptateur amovible pour utilisation avec le disque à trancher
réglable et le disque à émincer réversible
2.
4.
1.
5.
8.
7.
9.
6.
10.
5a.
5c.
5b.
a. b. c.

32 33
ASSEMBLAGE DU BOL NORMAL
Avant la première utilisation:
• Nettoyer et désinfecter le socle. Laver, rincer et désinfecter le
bol, le couvercle, l’entonnoir, les poussoirs et les accessoires.
• Placer l’appareil sur un plan de travail ou une table, à proximité
d'une prise de courant, et de façon à faire face aux boutons de
commande. Ne pas brancher l'appareil avant d'avoir terminé
l'assemblage.
• Tenir le bol entre les deux mains, la poignée face à vous.
• Aligner l’arbre du moteur avec le cylindre qui se trouve au
centre du bol. La poignée devrait se trouver légèrement du
côté gauche.
• Enfoncer le bol sur le socle, et le tourner dans le sens inverse
des aiguilles d’une montre jusqu’à ce qu’il se bloque.
Installation du couteau ou du disque à fouetter
• Tenir le couteau/disque par la partie en plastique. Notez son
axe, conçu pour s’emboîter sur l’arbre du moteur.
• Aligner l’axe du couteau/disque à fouetter avec celui du
moteur. Enfoncer, en tournant légèrement jusqu'à ce que le
couteau/disque s'emboîte. Vous ne devriez pas rencontrer
de résistance. Pousser fermement pour bloquer et assurer
l'étanchéité du couteau/disque. Vérier qu'il est bien enfoncé.
S'il ne l'était pas, il pourrait être endommagé et il pourrait y
avoir des fuites. Ne jamais toucher le couteau, celui-ci étant
très aiguisé. Toujours le tenir par la partie plastique.
• Vérier que le couteau/disque est bien engagé, en le faisant
pivoter d'avant en arrière. La lame inférieure du couteau devrait
pratiquement toucher le fond du bol.
• Si vous souhaitez utiliser l’appareil avec le couteau ou
le disque à fouetter, vous pouvez maintenant mettre les
ingrédients dans le bol.
• Ne pas dépasser la ligne "MAX". Les ingrédients liquides
pourraient déborder. Si cela se produisait, arrêter l'appareil,
puis vider partiellement le bol (jusqu'à en dessous de la ligne
MAX) avant de continuer.
Installation des disques
Pour installer le disque à trancher réglable (WFP16S10): Retirer le
couvercle. Enfoncer l'adaptateur amovible sur l'arbre du moteur.
Le disque à trancher réglable permet d'obtenir des tranches
de 16 épaisseurs différentes de 1 à 6mm. Régler le disque sur
l'épaisseur voulue. Une fois l'épaisseur réglée, installer le disque
sur l'adaptateur. Fermer le couvercle avant de mettre l'appareil en
marche.
Pour installer le disque à émincer (WFP16S12): Retirer le
couvercle. Enfoncer l'adaptateur sur l'arbre du moteur. Le disque
réversible a deux côté: un côté qui produit des résultats ns,
et un autre qui produit des résultats moyens. Installer le disque
sur l'adaptateur, le côté que vous souhaitez utiliser vers le haut.
Fermer le couvercle avant de mettre l'appareil en marche.
NE JAMAIS ESSAYER DE METTRE L’APPAREIL EN MARCHE
ALORS QUE LE COUVERCLE N'EST PAS BIEN FERMÉ.
Poussoir 2-en-1
Cet appareil est doté de deux poussoirs: Un gros poussoir qui
s'emboîte directement dans l'entonnoir, et un petit poussoir
qui s'emboîte dans le gros poussoir. Choisir le poussoir désiré.
Utiliser le gros poussoir pour les gros légumes. Utiliser le petit
poussoir pour les aliments requérant une coupe plus précise,
comme par exemple les petits légumes, les légumes ns ou les
saucisses. Introduire le petit poussoir au centre du gros poussoir.
Introduire le gros poussoir dans l'entonnoir.
DÉSASSEMBLAGE DU BOL NORMAL
TOUJOURS DÉBRANCHER L'APPAREIL AVANT DE LE
DÉSASSEMBLER.
• Retirer le gros poussoir de l’entonnoir. Ensuite, retirer le petit
poussoir du gros poussoir.
Désassemblage du couteau ou du disque à fouetter
• Tourner le bol dans le sens des aiguilles d’une montre pour
libérer les pattes de verrouillage. La poignée du bol devrait se
trouver du côté gauche. Soulever alors le bol.
Il est conseillé de retirer le bol du socle-moteur avant
d’enlever le couteau ou le disque à fouetter.

34 35
INSTRUCTIONS
Mode continu
Pour utiliser l'appareil en mode continu, appuyer sur le bouton
ON.
Fonction "pulse"
• Pour utiliser la fonction pulse, appuyer sur le bouton PULSE
à plusieurs reprises. Le moteur continuera à tourner aussi
longtemps que vous appuierez sur le bouton et s'arrêtera
lorsque vous le relâcherez.
• La fonction "pulse" vous offre davantage de contrôle, car elle
permet de contrôler le nombre et la durée de chaque pulsation
avec précision. Laisser le temps aux aliments de redescendre
dans le fond du bol entre deux pulsations.
• La fonction "pulse" permet de contrôler la consistance des
aliments que vous hachez ou mixez avec plus de précision.
• La fonction "pulse" est aussi pratique pour hacher/moudre
les aliments durs. Utiliser la fonction "pulse" pour broyer les
aliments. Terminer de hacher en mode continu.
• Toujours utiliser le bouton PULSE pour contrôler les pulsations.
Ne jamais essayer de les contrôler en bougeant le bol ou le
couvercle. Cela pourrait endommager l’appareil.
Arrêt de l’appareil
Toujours éteindre l’appareil en appuyant sur le bouton OFF et
attendre que le couteau ou le disque soit complètement immobile
avant de retirer le couvercle. Cela prendra seulement quelques
secondes.
PRÉPARATION DES ALIMENTS
• Laver et peler les aliments si nécessaire. Enlever les queues,
les pépins et les noyaux.
• Couper les fruits, les légumes, le fromage ou la viande de
façon à ce que les morceaux entrent dans l’entonnoir, ou à la
taille désirée selon l'accessoire utilisé.
REMARQUE: VIDER LE BOL AVANT DE RETIRER LE
COUTEAU OU LE DISQUE À FOUETTER.
• Appuyer sur la partie plastique du couteau/disque tout en
soulevant le bol pour le maintenir en place. Cela évitera que
les aliments dégoulinent sur le socle-moteur ou votre plan
de travail. Vider le bol. Pour retirer le couteau ou le disque
à fouetter du bol, le soulever. Manipuler le couteau avec
précaution. Les lames sont très aiguisées.
Désassemblage des disques
• Retirer le disque avant de retirer le bol.
• Prendre le disque par les bords, entre deux doigts, et le
soulever. Il devrait se dégager sans problème. Pour retirer
l'adaptateur, tenir le disque dans une main, en prenant garde
de ne pas toucher les lames ou les râpes.
• Tourner le bol dans le sens des aiguilles d’une montre pour
libérer les pattes de verrouillage. La poignée du bol devrait se
trouver du côté gauche. Soulever alors le bol.
FONCTIONNEMENT DE L'APPAREIL
• Brancher l’appareil dans une prise électrique de 120V (60 Hz).
• Les boutons de commande se trouvent face à vous.
Les trois boutons de commande sont : ON (marche)
OFF (arrêt)
PULSE (pulse)
Fonctionnement: ON: Appuyer sur ce bouton pour mettre
l'appareil en marche continue.
OFF: Appuyer sur ce bouton une fois pour
éteindre l'appareil.
Appuyer, puis relâcher le bouton PULSE
pour utiliser le mode "pulse". Le moteur
continuera à tourner aussi longtemps que
vous appuierez sur le bouton et s'arrêtera
lorsque vous le relâcherez.

36 37
Hacher ou émincer
• Placer les ingrédients dans le bol, sans dépasser les ¾ de la
hauteur de ce-dernier.
• Pour obtenir de meilleurs résultats, utiliser la fonction "pulse".
Cela vous permettra de contrôler la consistance des aliments
avec plus de précision. Continuer jusqu’à obtention de la
consistance désirée.
• L’utilisation du mode continu pour broyer ou hacher pourrait
produire des résultats irréguliers (les ingrédients au fond du bol
sont broyés plus nement).
Hacher de la viande
Pour obtenir des résultats homogènes, couper la viande en
morceaux de 2,5 cm. Ne pas hacher plus de 1kg de viande
à la fois. Presser le bouton PULSE 3 ou 4 fois de suite, à un
rythme d'une seconde entre chaque pulsation. Pour obtenir une
texture plus ne, utiliser le mode continu (ON) pendant quelques
secondes. Si l’appareil a du mal à hacher, retirer un peu de viande
et continuer.
Râper/réduire en poudre du fromage dur
Couper le fromage (bien réfrigéré) en cubes de 2,5 cm et placer
les morceaux dans le bol, sans dépasser la capacité maximale
(900 g). Utiliser la fonction "pulse" pour râper le fromage et
terminer avec le mode continu pour le réduire en poudre. Vous
obtiendrez de meilleurs résultats avec des fromages secs. Les
fromages plus gras ont tendance s’empâter.
Hacher des oignons, du céleri, du chou etc.
Couper les oignons en quartiers et les autres légumes en
morceaux de 2,5 cm. Placer les morceaux dans le bol, sans
dépasser le haut du cylindre en plastique. Utiliser la fonction
"pulse" jusqu’à obtention de la consistance désirée.
Remarque: Ne pas trop hacher. Cela peut produire des résultats
irréguliers ou réduire les ingrédients qui se trouvent au fond du
bol en purée.
• Aliments à couper en rondelles ou en tranches: Couper les
deux bouts des aliments tels que les carottes, les concombres,
le céleri, etc. Vous obtiendrez ainsi de plus belles rondelles.
CHOIX DU POUSSOIR
Remarque - Lorsque vous utilisez le couteau:
Il est possible d'introduire des aliments dans l'entonnoir alors que
l'appareil est en marche. Toutefois, il est recommandé de laisser
le gros poussoir en place pour éviter les éclaboussures.
Petit poussoir
Le petit poussoir sert généralement à pousser les aliments
introduits à la verticale dans la goulotte au centre du gros
poussoir. Il permet d'obtenir des morceaux plus petits. Il s'utilise
typiquement pour couper les carottes, le céleri ou les saucisses
en rondelles.
Gros poussoir
Le gros poussoir sert à pousser les aliments introduits à
l’horizontale dans l'entonnoir. Il permet d'obtenir des morceaux
plus longs.
DISPOSITIF DE PROTECTION DU MOTEUR
Cet appareil est équipé d’un dispositif de protection thermique
qui arrête le moteur automatiquement en cas de surchauffe.
Si cela se produisait, arrêter et débrancher l'appareil. Vider le bol
et jeter le contenu. Laisser le moteur refroidir pendant 30 minutes.
Rebrancher l'appareil. Continuer.
Si l'appareil ne fonctionne pas comme il se doit, cesser
l'utilisation et contacter un service après-vente autorisé.
UTILISATION DU COUTEAU
• Le couteau est conçu pour hacher, broyer, réduire en purée,
mixer et pétrir.
• Installer le couteau, comme indiqué dans la section
"Assemblage du bol", avant de mettre les ingrédients dans le
bol.

38 39
• Laver et peler les aliments si nécessaire. Enlever les queues,
les pépins et les noyaux. Couper les aliments en morceaux
si nécessaire. Couper les deux bouts des aliments tels que les
carottes, les concombres, le céleri, etc. Vous obtiendrez ainsi
de plus belles rondelles.
• Retirer le cœur des légumes tels que le chou et la laitue. Les
choux/laitues de taille moyenne devront être coupés en trois
pour rentrer dans l'entonnoir. Les choux/laitues plus gros
devront être coupés en quatre.
• Après avoir préparé les aliments, les introduire dans l'entonnoir
voulu, introduire le poussoir dans l'entonnoir et allumer
l'appareil.
• Ne pas essayer de couper en tranches du fromage mou.
Utiliser du fromage dur uniquement. La Mozzarella peut être
coupée en tranches, mais seulement si elle est très froide.
• Vider le bol une fois que la capacité maximale est atteinte.
UTILISATION DU DISQUE À ÉMINCER
• Les accessoires accompagnant le WFP16S incluent un disque
à émincer réversible. Un côté du disque produit des résultats
ns, l'autre moyens. Installer le disque de façon à ce que le
côté que vous souhaitez utiliser soit vers le haut. Une fois le
disque installé, fermer le couvercle et retirer le poussoir.
• Laver et peler les aliments si nécessaire. Enlever les queues,
les pépins et les noyaux. Couper les aliments en morceaux si
nécessaire.
• Placer les aliments dans l'entonnoir désiré: Horizontalement
pour obtenir des longs bouts ; Verticalement pour obtenir des
petits bouts.
• Ne pas essayer d'émincer du fromage mou. Utiliser du
fromage dur uniquement. La Mozzarella peut être émincée,
mais seulement si elle est très froide. Congeler la Mozzarella
pendant 1 heure avant de l'émincer. Toujours utiliser la fonction
"pulse" pour émincer le fromage.
• Vider le bol une fois que la capacité maximale est atteinte.
Réduire en purée ou mixer
Pour réduire fruits et légumes en purée, émulsionner une sauce
ou mixer, mettre les ingrédients dans le bol et utiliser le mode
continu jusqu’à obtention de la consistance désirée. Ne pas
laisser l’appareil sans surveillance pendant le fonctionnement. Si
les ingrédients liquides débordent, c'est que le bol est trop rempli.
Si cela se produisait, arrêter l'appareil, puis vider partiellement le
bol avant de continuer.
NE PAS DÉPASSER LA LIGNE DE REMPLISSAGE MAXIMUM.
Arrêt de l'appareil
• Toujours utiliser le bouton OFF pour éteindre l'appareil. Cela
arrêtera le moteur.
• Éteindre l’appareil et attendre que le couteau soit
complètement immobile avant d’ouvrir le couvercle.
• Le mécanisme de sécurité arrêtera l’appareil si vous tournez
ou enlevez le couvercle. Toutefois, ne vous servez pas de cette
méthode pour arrêter l’appareil.
• Par précaution, toujours appuyer sur le bouton OFF avant
d'ouvrir le couvercle.
CHOIX DU DISQUE
Les disques inclus avec votre appareil sont capables de réaliser
un grand nombre de taches de préparation. Trois disques sont
inclus avec votre appareil. Au moment de l'impression, il s'agit
des accessoires suivants:
WFP16S10 - Disque à trancher réglable
WFP16S11 - Disque à fouetter hermétique
WFP16S12 - Disque à émincer réversible
UTILISATION DU DISQUE À TRANCHER
• Les accessoires accompagnant le WFP16S incluent un disque
à trancher réglable permettant d'obtenir des tranches de
16 épaisseurs différentes, de 1 à 6 mm! Régler l'épaisseur
désirée avant d'installer le disque sur l'arbre du moteur. Une
fois l'épaisseur des tranches réglée et le disque installé, fermer
le couvercle et retirer le poussoir.
Other manuals for WFP16SCD
1
Table of contents
Languages:
Other Waring Food Processor manuals

Waring
Waring WFP14SCE User manual

Waring
Waring WFP14E User manual

Waring
Waring VCM1000SK User manual

Waring
Waring WFP14SK User manual

Waring
Waring WFP16S User manual

Waring
Waring WFP16SCD User manual

Waring
Waring FP1000 User manual

Waring
Waring WFP16SC User manual

Waring
Waring WFP11SW User manual

Waring
Waring FP2200 User manual

Waring
Waring WFP11S User manual

Waring
Waring FPC14 User manual

Waring
Waring FP2200 User manual

Waring
Waring FP40 User manual

Waring
Waring WFP14SC User manual

Waring
Waring WFP7E/K User manual

Waring
Waring WFP16SE User manual

Waring
Waring WFP14SW User manual

Waring
Waring WFP14SCE/K/ARG User manual

Waring
Waring WFP16SCDE User manual