Wassermann HSS-88 User manual

Trimmer
HSS-88
USER MANUAL

Dear customer,
Thank you for choosing a product from the Wassermann range. Wassermann Denta -
Maschinen incorporates the highest standards of qua ity and the atest techno ogy.
In order to enjoy maximum performance and years of troub e-free operation, p ease read
this user manua carefu y before you connect this device and start work, and operate the
device according to the recommended guide ines. The operation safety and the
functiona ity of this device can on y be guaranteed if you fo ow both the genera safety
guide ines and the app ying aws to prevent accidents as we as the precautions given in
this user manua . We are not iab e for any damages which occur due to inappropriate
usage or fau ty operation of this device.
Make sure that anyone using this device has read and understood this user
manua .
Keep this user manua in a safe p ace where it can be referred to as required at
any time.
The unit comp ies with the re evant EU guide ines.
The unit is subject to the EU guide ines 2012/19/EU (WEEE Directive).
Company address:
Wassermann Denta -Maschinen GmbH
Rudorffweg 15-17
21031 Hamburg, Germany
Phone : +49 (0)40 730 926 -20/ -24 Fax.: +49 (0)40 730 37 24
export@wassermann-denta .com
www.wassermann.hamburg
Erste t: 22.08.17/ msc Version: 1 Auftrag: 168997/100
.

Contents
1 Features.......................................................................................................................................4
2 Safety Symbo s used in this Manua .............................................................................................4
3 Safety Guide ines.........................................................................................................................5
3.1 Potentia Dangers.................................................................................................................................. 5
4 Responsibi ity for Operation or Damage.......................................................................................6
5 App ication....................................................................................................................................6
6 Before Starting............................................................................................................................. 7
6.1 Transport............................................................................................................................................... 7
6.2 Insta ation............................................................................................................................................. 7
6.3 Storage.................................................................................................................................................. 8
7 Insta ation/ Start-up.....................................................................................................................8
7.1 Location................................................................................................................................................. 8
7.2 F ushing-water Connector...................................................................................................................... 8
7.3 Drain Hose............................................................................................................................................. 9
8 Assemb y.................................................................................................................................... 10
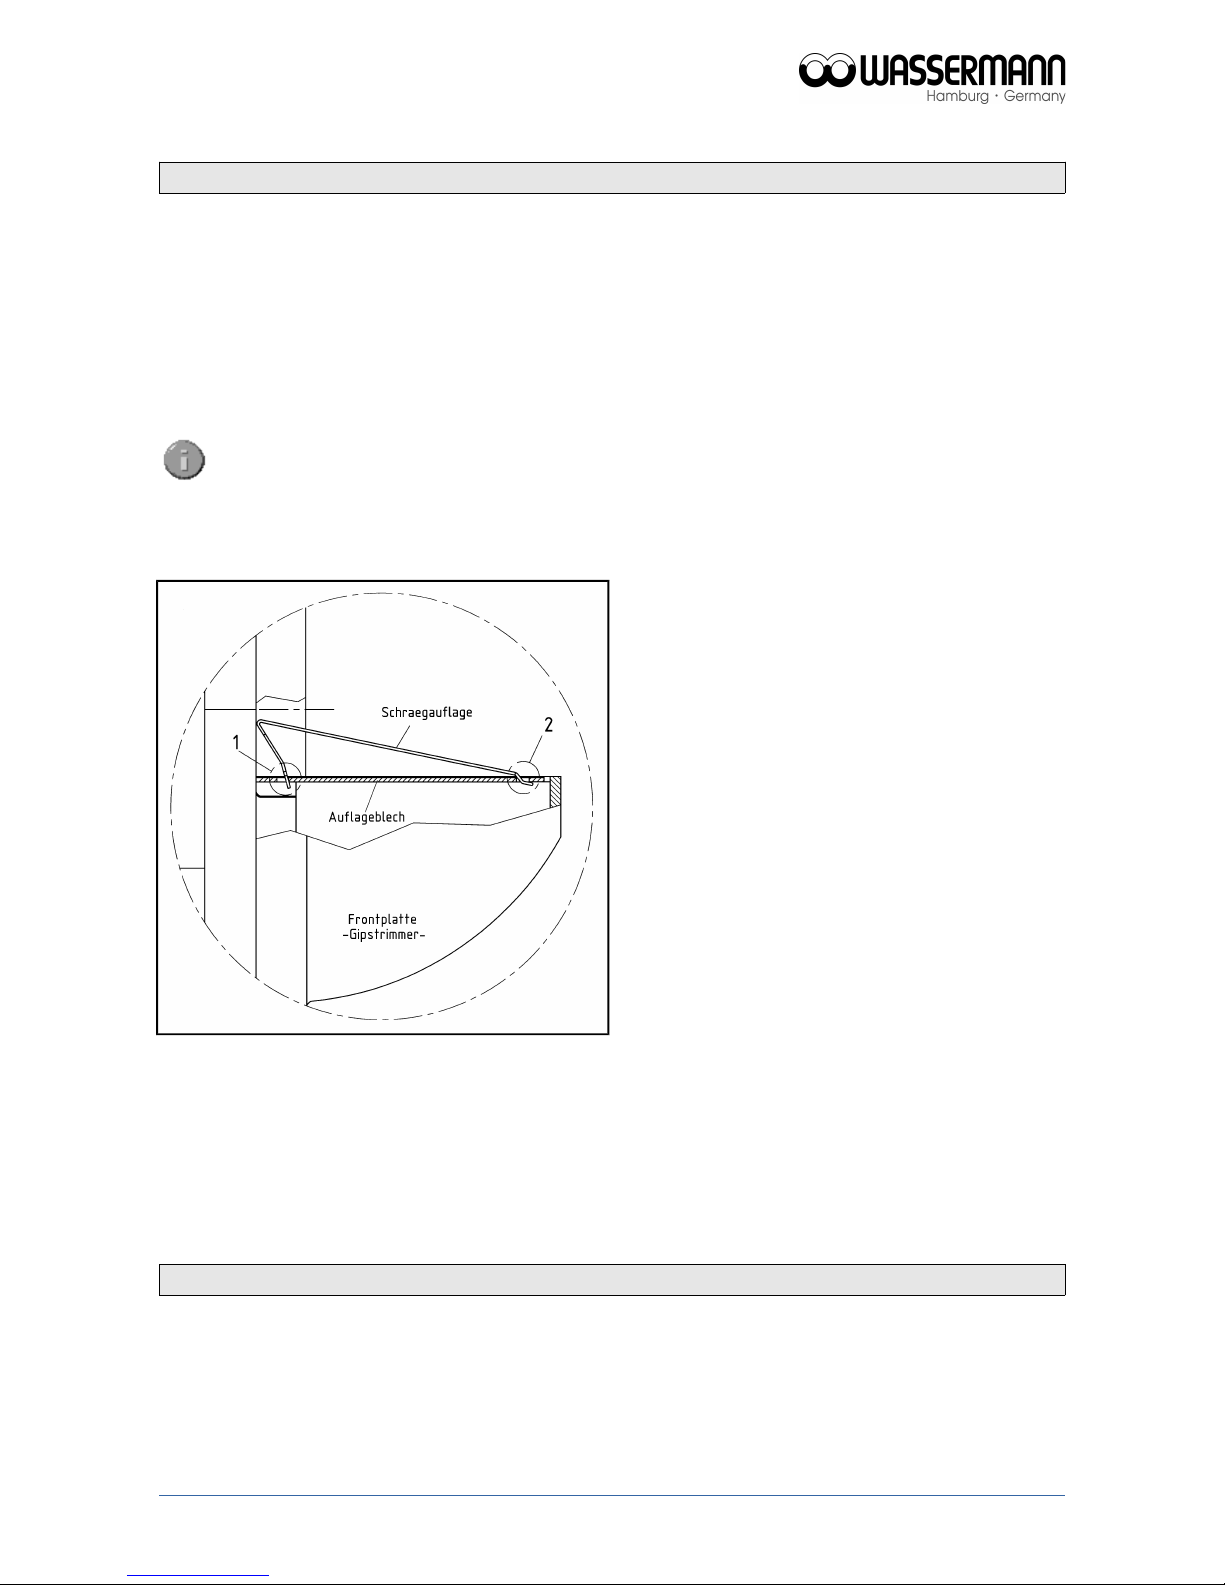
8.1 Insta ing the Ang ed Mount.................................................................................................................. 10
9 Supports..................................................................................................................................... 10
10 Operation.................................................................................................................................. 11
10.1 Genera Operating Instructions..........................................................................................................11
10.2 Water Regu ation............................................................................................................................... 11
11 Troub eshooting........................................................................................................................ 12
12 Care and Maintenance.............................................................................................................13
12.1 C eaning............................................................................................................................................ 13
12.2 Maintenance...................................................................................................................................... 13
12.3 Repairs.............................................................................................................................................. 14
12.4 Spare Parts........................................................................................................................................ 14
12.5 Service Hot ine 0049 (0)40 730 926 -20/ -24.....................................................................................14
12.6 Spare Grinding Discs.........................................................................................................................14
12.7 Scope of De ivery/ Accessories.........................................................................................................15
12.8 Grinding Disc Overhau ...................................................................................................................... 15
12.9 Warranty............................................................................................................................................ 16
13 Technica Data..........................................................................................................................16
14 Disposing of the Unit................................................................................................................17
14.1 Information on Disposa for Countries within the EU.........................................................................17
15 EU Dec aration of Conformity...................................................................................................18

1 Features
■ versati e, powerfu wet trimmer
■ can be used with a Wassermann discs and orthodontic attachments
■ mu tip e expansion options
■ the grinding attachment KMS can be de ivered a so on swiss- and EOS-version
■ high speed - 3000 min-1
■ very powerfu , maintenance-free motor, sp ash protected according to IP 54
■ sturdy, oxidation-free bench with ongitudina s ots and side openings – no water spi s
■ supp ied with so enoid va ve for automatic water supp y
■ powerfu disc and interna rinsing
■ easy to open using rear hand e
■ arge work section 13.5 x 10.5 cm
2 Safety Symbols used in this Manual
arning!
This is a warning of risk situations and dangers.
Fai ure to observe this warning cou d be ife-threatening. These warnings has to
be observed.
Information!
This symbo draws your attention to specific features that has to be observed.
4

3 Safety Guidelines
Configuring and operating this equipment requires precise knowledge and observance
of the instructions in this user manual. The equipment is designed on y for its intended
app ication.
ARNING:
•Servicing and repairs shou d be carried out on y by authorised specia ists.
•Before you carry out any c eaning or maintenance work, disconnect the
power p ug and prevent the motor from restarting accidenta y. You shou d
a so disconnect the water ine.
•A ways wear protective gogg es before working on the grinding disc.
•E ectric motors have dangerous, high-vo tage rotating parts.
Incorrect usage or inadequate maintenance cou d endanger personne
and equipment.
•Any work on the motor shou d be carried out on y by qua ified service
personne .
•A ow the condensors time to discharge before opening the unit.
•When working on the unit, wear c ose-fitting c othing and ro s eeves
inward on y. Do not wear g oves.
•Wear a hair net (or simi ar) if you have ong hair.
•Do not wear rings, chains, bang es or simi ar jewe ry when working with
the HSS-88.
•Turn off the tap overnight and at weekends.
Make sure that the equipment is connected to the correct power source.
3.1 Potential Dangers
Risk of injury: The trimmer’s rotating parts and the grinding disc are
dangerous.
5

4 Responsibility for Operation or Damage
The responsibi ity for operating the device ies exc usive y with the owner or user if said
device is incorrect y serviced, maintained or a tered by persons not emp oyed by an
authorised dea er or if the device is used in a manner contrary to its specified purpose.
The unit has to be maintained and operated in accordance with this user manua .
Wassermann Denta -Maschinen GmbH is not responsib e for damage arising from the
nonobservance of these instructions.
Warranty and responsibi ity provisions contained in the sa es and supp y conditions of
Wassermann Denta -Maschinen GmbH are not extended by these instructions.
Responsibility for the product becomes void if alterations are made to it by
third parties or if non-approved parts are installed. Only original
ASSERMANN parts should be used. If any damage results from the
installation of a non-approved disc, responsiblity lies with the person
installing that spare disc.
If diamond grinding discs are used, serious wear will result from grinding
embedded materials and metals. e will be in no way responsible in this
case.
5 Application
The HSS-88 p aster-cast grinder is used in denta aboratories exc usive y for grinding
(trimming) p aster mode s.
To avoid damaging the unit and/or its grinding disc, it shou d be used on y with p aster.
Using it with other materia s cou d fracture the disc.
On y use the device for this type of app ication.
6

6 Before Starting
6.1 Transport
Before transporting the unit, ensure that it has been unp ugged from the power socket.
Make sure that it is packed correct y in order to avoid accidenta damage.
Be sure to check for any transport damage when unpacking the goods. Note down
any damage if found.
6.2 Installation
Open the box, remove the packing materia s, and carefu y ift out the device and
accessories. Check the inc uded accessories.
The device has to stand horizonta y on a steady and even surface.
Insta the device in a p ace where it wi not b ock the working area and the
functiona ity (take the dimensions into account). When setting up the unit, ensure
that the grinding disc is readi y accessib e and that the unit is ocated near a sink.
To insta the flushing water connector, you' need a pressure hose with woven
iner measuring 0.5 inch (13 mm) in diameter, and for the drain, a p astic hose 1
inch (25 mm) in diameter.
Do not insta the unit outdoors or in p aces without proper venti ation.
Before start-up, be sure the device reaches room temperature.
7

6.3 Storage
If the unit is to be stored, even for a short time, its ocation can have a significant effect on
its operation. The ocation shou d be dry, we -venti ated and free of vibrations. It is
important for the unit to be seated on a wooden base and to be kept at a constant
temperature. The unit must not be stored or set up in the open air. If the unit is to be stored
for an extended period, protect it from moisture and dust.
7 Installation/ Start-up
7.1 Location
Because the trimmer operates on y with water, we recommend you insta it c ose to a tap.
The best p ace is right next to a washbasin. A further variation is to set up the trimmer on a
conso e* in the basin itse f (*avai ab e as accessory).
Before starting the unit, connect up the fo owing:
7.2 Flushing-water Connector
Insta the f ushing-water connector (pressure hose with woven iner) between the tap and
the hose connector on the unit. This connector is ocated at the rear, underneath the
motor. Use the c amps a ready mounted on the hose and tighten them firm y.
The tap must have a cut-off va ve so that the feeder hose does not remain under constant
pressure when the unit is not being used.
Retighten the hose clamps about 2 days after installation.
Be sure to turn off the tap overnight and at the weekend.
8

7.3 Drain Hose
The drain hose must be insta ed in such a way that b ockages cannot occur (sp ash
water). Arrange it in a continuous arc (no kinks) and with a permanent fa of at east 1 cm
per metre.
The end of the drain hose must be above the level of the plaster-cast
mounting position.
The end of the hose must not be under water.
As supp ied, the mount for the drain hose is angled to the right. However, it can a tered to
be front on. This position is recommended under awkward draining conditions.
If that is the case, simp y swap the ock cap and drain mounts.
Finally, insert the power p ug into the socket, making sure that the mains and the unit
operate on the same vo tage.
9

8 Assembly
8.1 Installing the Angled Mount
If required, the ang ed mount is just c amped in position on the HSS-88. P ease observe
the fo owing instructions.
Ensure that the mount is placed correctly in position. It should be installed in
accordance with the following diagram.
hen installing the angled mount,
ensure that positions 1 and 2 are
correctly located on the base.
Schraegauf age – ang ed mount
Auf ageb ech – base
Frontp atte – front p ate
Gipstrimmer – p aster trimmer
9 Supports
Aside from the item described in 8.1, Insta ing the ang ed mount, the HSS-88 p aster
trimmer does not required any other support mechanisms.
10

10 Operation
10.1 General Operating Instructions
A instructions for using the unit, whether in verba or written form, are based on our own
experience and experimentation and can on y be regarded as guide ines.
After switching on the unit, wait a few seconds for the motor to come up to speed.
The fu power of the motor can then be used. Never work the units to the point that
the motor abours to keep turning. This cou d resu t in over oading and motor
damage.
10.2 ater Regulation
The water supp y is regu ated at the tap. The amount of water is sufficient when the disc
remains more or ess its origina co our during grinding.
Grinding requires on y ight pressure and s ight eft and right movement of the cast.
It goes without saying that on y comp ete y set p aster casts shou d be ground. Soft
p aster cou d ead to b ockages, especia y in the hoses.
11

11 Troubleshooting
Fault Cause Solution
Water spurting
from work area
Water pressure too high Adjust water pressure at tap (see 8.2
Water regu ation)
Drain hose extended with a
sma er diameter hose
Ensure that the drain hose diameter is
1 inch (25.4 mm)
Drain hose kinked Ensure that the drain hose does not have
any kinks in it
End of drain hose ocated
be ow eve of p aster cast
mount
Ensure that the hose end is ocated
above mount eve
Ang e of drain hose too
sha ow
Ensure that there is a fa of at east 1 cm
per metre
Radius (bend) of drain hose
too sma
Ensure that the drain hose radius is as
even as possib e
Pipe bend (causing water
back-up) where it meets drain
hose
The bend must be en arged to at east
40 mm diameter
If the above recommendations do not so ve the prob em, contact your denta depot
or our service department.
12

12 Care and Maintenance
12.1 Cleaning
Before c eaning or servicing the unit, ensure that it is disconnected from the
mains power and cannot be switched on again accidenta y.
Keep the unit we away from water supp y.
Open the unit on y after the disc has come to a comp ete stop.
The identification p ate has a ways to be kept in easi y egib e condition and has
not to be removed.
Remove externa dirt (p aster each) from time to time with a damp c oth.
Use on y co d c eaners to avoid damaging the paintwork or removing the ettering.
The equipment shou d be c eaned at regu ar interva s to ensure troub e-free
operation.
It requires on y norma c eaning (sponge, damp c oth, mi d detergent) and no further
chemica additives.
12.2 Maintenance
The HSS-88 p aster-cast grinder is a ow-maintenance unit. However, when opening the
disc chamber for c eaning or to change the disc, be sure to c ean the sea ing surfaces and
re-coat them with water-inso ub e grease.
As a safety measure, check regu ar y that the hose retainers and water-supp y hoses are
firm y anchored.
13

12.3 Repairs
Servicing or repairs to the unit has on y to be carried out by qua ified technicians.
On y origina spare parts are to be used. Responsibi ity for the product is voided
if unauthorised persons a ter it or if inappropriate components are insta ed.
12.4 Spare Parts
If necessary p ease contact our service hot ine phone.
12.5 Service Hotline 0049 (0)40 730 926 -20/ -24
12.6 Spare Grinding Discs
Spare grinding discs are a ways supp ied with a tube of grease for sea ing the disc
chamber - Spare diamond grinding discs are a ways supp ied with an extractor for the o d
disc in addition.
Installing a spare disc on an existing disc mounted in the unit, regardless of
its origin or model type, is strictly prohibited by assermann.
arning!
The use of diamond grinding discs to grind embedded material and metals will
result in excessive wear on the blade. e assume no responsibility if this
occurs.
hen using spare discs, be sure to follow the instructions supplied when
changing discs.
14

12.7 Scope of Delivery/ Accessories
HSS-88 incl. grinding disc Item no.:
inc . diamond grinding disc 168998
inc . Dia-Quick grinding disc (part y diamonded) 168996
inc . corundum grinding disc 168999
inc . foi grinding disc 168991
Incl. in delivery Item no.:
Inc ined support 168037
Supp y hose, 1 m 320006
Discharge hose, 1 m 320017
Accessories Item no.:
Spare diamond grinding disc inc . pu er and grease 168063
Spare Dia-Quick grinding disc (part y diamonded), inc . grease 162063
Spare corundum grinding disc, inc . pu er and grease 168024
Spare foi grinding disc, fine, 1Set = 4 pieces, inc . grease 162013
Spare foi grinding disc, fine,1Set = 4 pieces, inc . grease 162023
Conversion kit, Dia-Quick and foi grinding disc 168071
Pressind too to roughen corundum grinding disc 710001
Sea ing grease for trimmer, 25 m 629002
Pu er for grinding disc change 164026
Orthodontic accessories for producing 3D orthodontic models
Orthodontic mode tab e KMS according to Begg 168140
Laser ight guide for mode tab e, cp . 168120
Orthodontic temp ate for the upper jaw (to grind the ower jaw/tuber eve ) 164034
12.8 Grinding Disc Overhaul
If, after some time, the surface of the corundum grinding disc becomes smooth or has
deve oped grooves, the disc may need to be ground back or roughened using a surface
grinder. If necessary, used corundum discs can be returned to the factory for refurbishing.
If a surface grinder is used, be sure to follow its user's manual and safety
instructions.
15

12.9 arranty
The warranty period for our equipment is 12 months. If fau ts occur within the
warranty period, contact your denta depot or get in touch direct y with our service
department.
Your equipment shou d on y be operated in perfect condition. If fau ts occur which
cou d harm operators or third parties, the unit shou d not be used unti it has been
fixed.
This warranty does not cover damage caused by improper use, externa mechanica
causes, transport damage or interference with the unit by unauthorized persons.
13 Technical Data
HSS-88
without grinding disc
Item no.: 168997
Vo tage 220–240 V / 50/60 Hz
Power consumption 4.6 A
Output 1000 W
W x H x D 330 x 335 x 410 mm
Weight 19.8 kg
Sound eve ≤ 70 dB (A)
Speed 3000 min-1
Duty S6 - 40 %
Tab e dimensions projecting 120 mm
Other vo tages on request.
Noise transmission measured within a circumference of 1 metre around and 1.6 metres
above the unit was 69 db (A), averaged over 50% id ing, 30% mid- oad and 20% fu oad.
This eve was determined in accordance with DIN 45635 Part 1.
Technica changes reserved.
16

14 Disposing of the Unit
The unit has to be disposed by an authorized recyc ing operation. The se ected company
has to be informed of a possib y hea th-hazardous residues in the unit.
14.1 Information on Disposal for Countries within the EU
To conserve and protect the environment, prevent environmenta po ution and
improve the recyc ing of raw materia s, the European Commission adopted a
directive that requires the manufacturer to accept the return of e ectrica
and e ectronic units for proper disposa or recyc ing.
Within the European Union units with this symbo shou d not therefore be disposed of
in unsorted domestic waste.
For more information regarding proper disposa p ease app y at your oca authoritie.
17

15 EU Declaration of Conformity
in accordance with 2014/35/EU (Low Vo tage Directive) and 2014/30/EU (E ectromagnetic
Compatibi ity Directive) and 2006/42/EC (Machinery Directive) and 2011/65/EU (RoHS
Directive)
Manufacturer: W A S S E R M A N N
Denta -Maschinen GmbH
Rudorffweg 15-17
21031 Hamburg
Germany
Product description: Trimmer for denta
app ications
Mode : HSS-88 inc . diamond grinding disc
HSS-88 inc . Dia-Quick grinding disc
HSS-88 inc . corundum grinding disc
HSS-88 inc . foi grinding disc
HSS-88 without grinding disc
Item no.168998
Item no.168996
Item no.168999
Item no.168991
Item no.168997
App icab e
standards:
DIN EN 61010-1
DIN EN 61000-6-3
DIN EN 61000-6-1
DIN 45635-1
DIN EN 60335-1
Hiermit wird bestätigt, dass die oben bezeichnete Maschine den genannten EU-Richt inien
entspricht. Diese Erk ärung wird ungü tig, fa s die Maschine ohne unsere Zustimmung
verändert wird.
This is to confirm that the above mentioned machine comp ies with the described EU
guide ines. This dec aration becomes inva id if the machine is modified without our
approva .
Cette machine est conforme aux normes en vigueur d´Union européenne. Cet avis est
nu et non avenant si cette machine est modifiée sans notre accord.
Esta máquina, anteriormente mencionada, cump e con os imites requeridos por e
reg amento UE. Ahora bien, esta dec aración quedará inva idada en caso de rea izar
modificaciones a aparato sin nuestra aprobación.
Hiermee wordt bevestigd dat bovengenoemde machine vo doet aan de voorgeschreven
EU normen. Deze verk aring ver iest ge digheid a s er zonder onze uitdrukke ijke
toestemming wijzigen aan de machine worden aangebracht.
P ace, date: Hamburg, 2017-08-22 Company stamp:
Signature : ________________________
Wi fried Wassermann
(Managing Director)
18

Notes:
19

Other manuals for HSS-88
2
Table of contents
Other Wassermann Dental Equipment manuals

Wassermann
Wassermann HSS-88 Operating and safety instructions

Wassermann
Wassermann Sidomix II User manual

Wassermann
Wassermann Wapo-Ex 12 II User manual

Wassermann
Wassermann HSS-AZ User manual

Wassermann
Wassermann HSS-99 Operating and safety instructions

Wassermann
Wassermann HSS-88 Operating and safety instructions

Wassermann
Wassermann Wapo-Mat III User manual

Wassermann
Wassermann Gobi Classic User manual

Wassermann
Wassermann HSS-99 User manual

Wassermann
Wassermann Timobil User manual