Wassermann WAPO-Ex User manual

Combination Automat
Wapo-Ex
Boil Out and Polymerisation Unit
USER MANUAL

Dear customer,
Thank you for hoosing a produ t from the Wassermann range. Wassermann Dental-
Mas hinen in orporates the highest standards of quality and the latest te hnology.
In order to enjoy maximum performan e and years of trouble-free operation, please read
this user manual arefully before you onne t this devi e and start work, and operate the
devi e a ording to the re ommended guidelines. The operation safety and the
fun tionality of this devi e an only be guaranteed if you follow both the general safety
guidelines and the applying laws to prevent a idents as well as the pre autions given in
this user manual. We are not liable for any damages whi h o ur due to inappropriate
usage or faulty operation of this devi e.
Make sure that anyone using this devi e has read and understood this user
manual.
Keep this user manual in a safe pla e where it an be referred to as required at
any time.
The unit omplies with the relevant EU guidelines.
The unit is subje t to the EU guidelines 2012/19/EU (WEEE Dire tive).
Company address:
Wassermann Dental-Mas hinen GmbH
Rudorffweg 15-17
21031 Hamburg, Germany
Phone : +49 (0)40 730 926 -20/ -24 Fax.: +49 (0)40 730 37 24
export@wassermann-dental. om
www.wassermann.hamburg
Erstellt: 07.07.17/ ms Version: 2 Auftrag: 170996 / ab #132640
.

Contents
1 Features.............................................................................................................................4
2 Safety Symbols used in this Manual..................................................................................5
3 Safety Guidelines...............................................................................................................5
4 Responsibility for Operation or Damage............................................................................6
5 Appli ation..........................................................................................................................6
6 Before Starting...................................................................................................................6
6.1 Transport.........................................................................................................................................6
6.2 Installation.......................................................................................................................................7
6.3 Storage............................................................................................................................................7
7 Installation/ Start-up...........................................................................................................8
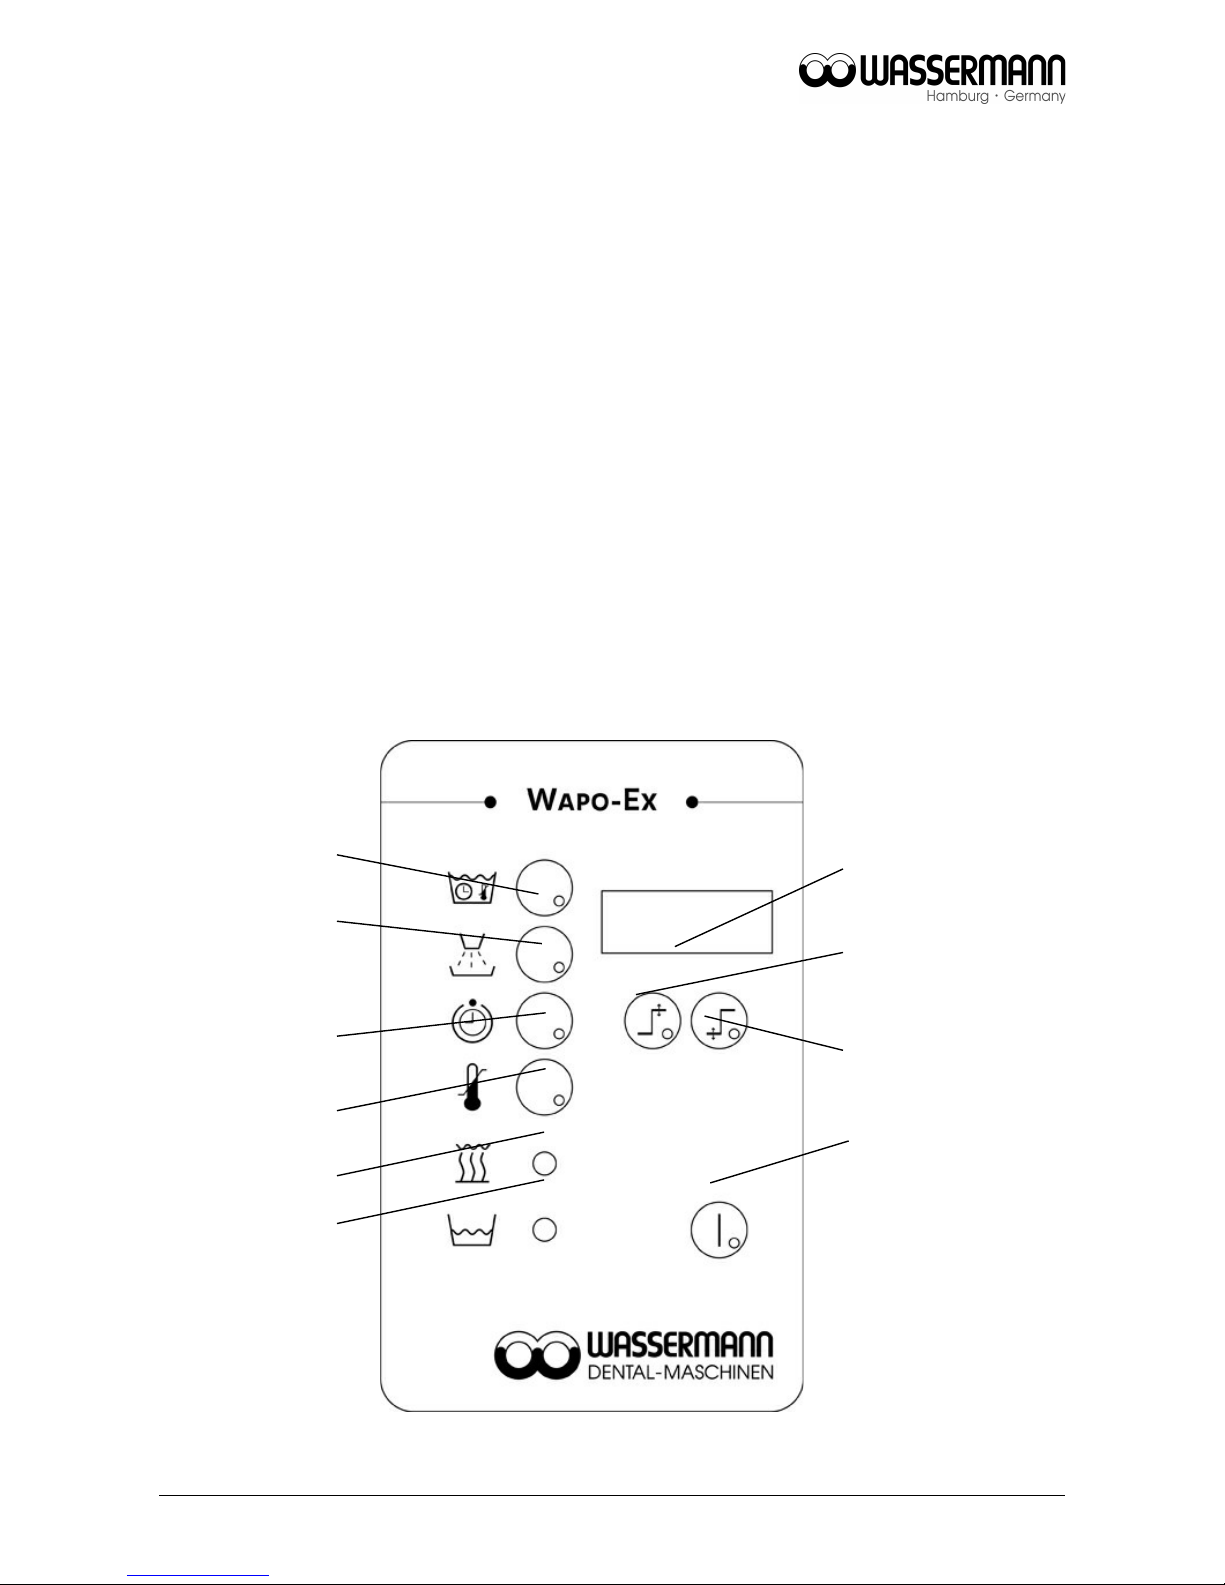
8 Operation...........................................................................................................................9
8.1 General Operating Instru tions.......................................................................................................9
8.2 Operation.......................................................................................................................................10
8.3 Setting Time and Temperature.....................................................................................................11
8.3.1 For S alding (button 2)..........................................................................................................11
8.3.2 Conversion Table °C - °F.......................................................................................................11
8.3.3 Polymerisation (Choi e of 3 Times and 3 Temperatures).....................................................12
8.3.4 Setting the Time.....................................................................................................................12
8.3.5 Setting the Temperature........................................................................................................13
8.4 Storing...........................................................................................................................................14
8.5 Spe ial Fun tion: “S alding during Polymerisation”......................................................................14
8.6 Manual Operation..........................................................................................................................14
9 Troubleshooting...............................................................................................................15
10 Care and Maintenan e...................................................................................................16
10.1 Cleaning......................................................................................................................................16
10.2 Maintenan e................................................................................................................................17
10.3 Repairs........................................................................................................................................17
10.4 Spare Parts.................................................................................................................................17
10.5 Servi e Hotline 0049 (0)40 730 926 -20/ -24..............................................................................17
10.6 S ope of Delivery/ A essories...................................................................................................18
10.7 Warranty......................................................................................................................................18
11 Te hni al Data...............................................................................................................19
12 Disposing of the Unit......................................................................................................19
12.1 Information on Disposal for Countries within the EU..................................................................19
13 EU De laration of Conformity........................................................................................20

1 Features
The proven Wassermann Wapo-Ex ombination automat, with an easy-to-read
multifun tion display, is an extremely ompa t pie e of ben h top equipment, whi h is
used for s alding wax and for polymerisation. It an take 4 half- aps for s alding and/or 6
aps in a denture for polymerisation. A housing and hamber in stainless steel ontribute
to its long servi e life.
The unit has a low-water monitor to prote t the heater, and for s alding small items, there
is a re essed lid and a hand-held spray in non-heat- ondu ting plasti .
The spe ial Wapo-Ex/ IVOCAP model has an automati water-level regulator.
•Combined table automat for s alding and polymerisation; simultaneous appli ations
possible (see hapter 8.5)
•Prompt swit h between the two modes thanks to its separate ompartments
•Capa ity: 4 flask halves for s alding, 6 flasks for polymerisation
•Reprodu ible work pro esses via programmable s alding and polymerisation
sequen es
•Informative display, enables a variety of fun tions in appli ations
•Clo k timer settings a urate to the minute and to a spe ifi degree
•Visual and audible water level indi ator
•Splash prote tion made of stainless steel
•Energy saving thermal insulation
•Integrated hand spray for manual s alding
•High quality onstru tion, most parts made of stainless steel
•In fa tory setting the main polymerization pro ess uts in 90 minutes automati ally
at 95° C 90 minutes before the program ends - the hoi e of 3 times and 3
temperatures is possible as an option
4

2 Safety Symbols used in this anual
Warning!
This is a warning of risk situations and dangers.
Failure to observe this warning ould be life-threatening.
These warnings has to be observed.
Information!
This symbol draws your attention to spe ifi features that has to be observed.
3 Safety Guidelines
Configuring and operating this equipment requires precise knowledge and observance
of the instru tions in this user manual. The equipment is designed only for its intended
appli ation.
WARNING:
Servi ing and repairs should be arried out only by authorised spe ialists.
Dis onne t the power plug before starting any maintenan e work.
Make sure that the equipment is onne ted to the orre t power sour e.
Risk of s alding!
Do not hold the hand spray by the nozzle or hose.
Do not point the spray at living reatures.
The water from the nozzle an be as hot as about 95°C, so should only be
sprayed near the unit lid or the washbasin.
Wear heat-resistant gloves when working with th Wapo-Ex.
5

4 Responsibility for Operation or Damage
The responsibility for operating the devi e lies ex lusively with the owner or user if said
devi e is in orre tly servi ed, maintained or altered by persons not employed by an
authorised dealer or if the devi e is used in a manner ontrary to its spe ified purpose.
The unit has to be maintained and operated in a ordan e with this user manual.
Wassermann Dental-Mas hinen GmbH is not responsible for damage arising from the
nonobservance of these instru tions.
Warranty and responsibility provisions ontained in the sales and supply onditions of
Wassermann Dental-Mas hinen GmbH are not extended by these instru tions.
5 Application
The Wapo-Ex is used for s alding up to 4 half- aps and up to 6 aps for polymerisation. A
divider in the trough reates two separate hambers. You an also s ald small items using
a hand spray.
Only use the devi e for this type of appli ation.
6 Before Starting
6.1 Transport
Before transporting the unit, ensure that it has been unplugged from the power so ket.
Make sure that it is pa ked orre tly in order to avoid a idental damage.
Be sure to he k for any transport damage when unpa king the goods. Note down
any damage if found.
6

6.2 Installation
Open the box, remove the pa king materials, and arefully lift out the devi e and
a essories. Che k the in luded a essories.
The devi e has to stand horizontally on a steady and even surfa e.
Install the devi e in a pla e where it will not blo k the working area and the
fun tionality (take the dimensions into a ount).
Do not install the unit outdoors or in pla es without proper ventilation.
Before start-up, be sure the devi e rea hes room temperature.
It is very important to have the unit onne ted rigidly to a drainage system as very
hot water (about 95°C) is involved. It will also fa ilitate emptying the unit ompletely
for leaning, for example.
6.3 Storage
The unit lo ation is very important when it omes to workpla e safety, even if it is only to
be set up there for a short period. The room should be dry, well ventilated and vibration-
free. An even temperature and wooden supports also help. The unit should not be stored
or set up outdoors. If the unit is to be stored for an extended period, prote t it from
moisture and dust.
7

7 Installation/ Start-up
Before starting the unit, onne t up the following:
•Use lips to atta h the drain hose supplied firmly to the unit and arrange a
suitable drainage system.
Finally, insert the power plug into the so ket, making sure that the mains and the unit
operate on the same voltage.
•Insert the filter white side down.
•Fill the unit with water (about 20 litres) at least up to the white plasti ring in the
ontainer.
•Turn on the main swit h (green ro ker swit h).
•The unit immediately heats up to its default setting (65°C), or to the last stored
s alding temperature.
•When the desired temperature has been rea hed, the yellow LED (9) goes out and
the unit is ready for operation.
The Wapo-Ex has a dry-run prote tion devi e to prevent the heater burning out
due to a la k of water (red LED). A warning signal also sounds while the program
is running.
Make sure that the water level is always above the white plasti ring (in the
ontainer), otherwise the heater will ut out automati ally and the red LED will
flash.
If the unit is not to be used for an extended period, pull out the power plug.
8

8 Operation
8.1 General Operating Instructions
All instru tions for using the unit, whether in verbal or written form, are based on our own
experien e and experimentation and an only be regarded as guidelines.
Warning: Risk of s alding!
Do not hold the hand spray by the nozzle or hose.
Do not point the spray at living reatures.
The water from the nozzle an be as hot as about 95°C, so should only be
sprayed near the unit lid or the washbasin.
Wear heat-resistant gloves when working with th Wapo-Ex.
The Wapo-Ex is ready for use when the temperature is above 60°C, that is, the
pump starts operation on e the set temperature has been rea hed. On addition
there is a safety step: the heating stops automati ally when the temperature of the
heating is higher than 99 °C.
The ball valve (top right on housing) needs to be set horizontal when s alding with
the hand spray. To take the pressure off the hose and hand spray, always reset the
valve to verti al when they are not being used.
Note: Each button has a built-in red LED. Start the program once the desired
temperature has been reached.
9

8.2 Operation
•Turn on main swit h (green ro ker swit h).
•The red water-level LED (10) should not ome on or flash. If it does, he k the
water level or the water-level sensor.
•Choose Polymerisation or S alding.
•Pla e prepared aps in unit.
•Set desired time and temperature for s alding (see 6.2.1).
•Set desired time and temperature for polymerisation (see 6.2.2).
•Use Start/Stop (7) to start the program.
•The yellow LED (9) omes on during heating.
•After the boiling out programm ends, a tone sounds and the heating and pump are
swit hed off.
•After the polymerisation programm ends, the heating is swit hed off.
10
1
2
3
6
7
5
4
8
9
10
Start/ Stop
Time
Temperature
Heater
Low water level
Digital display
Set / Plus
Default / Minus
Polymerisation
S alding

8.3 Setting Time and Temperature
8.3.1 For Scalding (button 2)
Setting the time:
1. Press Time (3).
2. Press Set (4).
3. Keep Time (3) pressed and set the desired time using Set (4) or Default (5).
Setting the temperature:
1. Press Temperature (6).
2. Press Set (4).
3. Keep Temperature (6) pressed and set the desired temperature using Default (5) and
Set (4).
8.3.2 Conversion Table °C - °F
= (TF − 32) / 1,8
100 °C = 212 °F
95 °C = 203 °F
90 °C = 194 °F
85 °C = 185 °F
80 °C = 176 °F
75 °C = 167 °F
70 °C = 158 °F
65 °C = 149 °F
60 °C = 140 °F
11

8.3.3 Polymerisation (Choice of 3 Times and 3 Temperatures)
The Polymerisation (1) and Set-Point (4) LEDs must be on, but not Start/Stop (7). Use the
buttons as des ribed below to set the fun tion. This allows you to he k and/or hange
stored values.
8.3.4 Setting the Time
12
1. Press and hold Time (3), then press
Start/Stop (7) on e. The first hara ter on the
display (8) flashes to indi ate that the value
an be hanged by pressing Set-Point (4) or
True Value (5) while Time (3) is held on.
Release all three buttons to store the
hanged value.
2. Store the value by simultaneously pressing
Polymerisation (1) and Set-Point (4).
3. For the se ond value, press and hold Time
(3) again, then press Start/Stop (7) on e. The
se ond hara ter on the display flashes.
Follow the same sequen e as above.
4. The pro edure is the same for the third
display hara ter. Ea h hange needs to be
stored.
5. If Time (3) is pressed and held, and
Start/Stop (7) pressed a fourth time, the total
of the three individual times is displayed.
Times assigned the value zero (0) are
ignored.
5
3
1
7
4
8

8.3.5 Setting the Temperature
13
1
8
6
45
7
1. Press and hold Temperature (6),
then press Start/Stop (7) on e.
The first hara ter on the display
(8) flashes to indi ate that the
value an be hanged by pressing
Set-Point (4) or True Value (5)
while Temperature (6) is held on.
Release all three buttons to store
the hanged value.
2. The value is stored by
simultaneously pressing
Polymerisation (1) and Set-Point
(4).
3. For the se ond value, press and
hold Temperature (6), then press
Start/Stop (7) on e. The se ond
hara ter on the display flashes.
Follow the same sequen e as
above.
4. The pro edure is the same for the
third display hara ter. Ea h
hange needs to be stored.
5. If Temperature (6) is pressed and
held, and Start/Stop (7) pressed a
fourth time, the first of the three
individual temperatures is
displayed.

8.4 Storing
Individual set values an be stored by simultaneously pressing S alding (2) or
Polymerisation (1) and Set (4). A “YES” on the display onfirms that the values have been
stored. As ea h new value is stored, the previous value is overwritten.
Warning: Pressing S alding (2) or Polymerisation (1) and Default (5) resets the
Wassermann default values. Storing the value using Polymerisation (1) and Plus (4) is
onfirmed by a “YES”.
Basic setting polymerisation Basic setting scalding
Time Temperature Time Temperature
6:30 h 70°C 15 min 65°C
0:00 h 0°C
1:30 h 95°C
8.5 Special Function: “Scalding during Polymerisation”
S alding is possible while the polymerisation pro ess is underway. The last stored
s alding time is used, not at the last stored s alding temperature, but at the default
temperature for the polymerisation pro ess.
S alding is started by pressing S alding (2). The s alding pro ess an be stopped by
pressing S alding (2) again.
Warning: All operations, including polymerisation, are stopped if you press
Start / Stop (7)!
8.6 anual Operation
On e the unit is ready for use, you an, at any time, a tivate the hand spray by turning the
ball valve (horizontal). Settings should be as des ribed under 6.2. When you have
finished, always return the ball valve to its original position (verti al).
14

9 Troubleshooting
Fault Cause Solution
Wapo-Ex does not heat
up
Dirty level sensor Clean level sensor
Water level too low Add water
Water-level LED omes
on and warning tone
sounds
Dirty level sensor Clean level sensor
Water level too low Add water until red LED goes out and tone
stops
Water pump inoperative Operating or set
temperature not yet
rea hed
Heat to operating temperature (min.
60°C) or set temperature
Multifun tion
display shows A
Water-temperature
above 100°C (A3
means 103 °C)
-faulty temperature
sensor
-faulty ontrol board
Turn off the water supply, swit h off the
unit ompletely, onta t servi e
Multifun tion
display shows F 1
Short- ir uit:
Faulty ele trial
omponent
Turn off the water supply, swit h off the
unit ompletely, onta t servi e
Multifun tion
display shows F 2
Faulty temperature
sensor
Turn off the water supply, swit h off the
unit ompletely, onta t servi e
If the above re ommendations do not solve the problem, onta t your dental depot
or our servi e department.
15

10 Care and aintenance
10.1 Cleaning
Dis onne t the power plug before starting any maintenan e work.
The identifi ation plate has always to be kept in easily legible ondition and has
not to be removed.
Remove external dirt from time to time with some form of old leaner.
Use only old leaners to avoid damaging the paintwork or removing the lettering.
The outside of the unit and fittings are best leaned with a sponge or soft loth and
mild detergent.
The equipment should be leaned at regular intervals to ensure trouble-free
operation.
At least:
Once a week
•Change water, adding Wax–Ex.
•Quantity: approx. 4 m/1 litre water, orresponding to approx. 90 - 110g per 20
litres.
•Clean level sensor (white plasti ring) with nailbrush or similar.
Every 2 weeks
•Change filter (white side down).
Every 4 weeks
•Clean unit with Kalk–Ex.
•Quantity: approx. 5 m/1 k litre water, orresponding to approx. 170 - 220g of
Kalk-Ex per 20 litres.
If heavy lime deposit, increase quantity appropriately!
16

Warning: Do not use materials ontaining solvents to dissolve wax, as this will
atta k the unit’s rubber omponents.
Warning: Let Kalk-Ex work for a maximum 12 hours.
Drain solution and rinse thoroughly.
To hange the filter and lean the level sensor (white ring), first remove the ap
ontainers. The perforated plate an then be taken out and you an remove the flat
filter. When inserting a new one, make sure that the white side is fa e down and that
the filter fits under the raised edge of the base plate. The base plate is easily
removed, giving ready a ess to the level sensor and the heater oil. Re-insert the
base plate with its raised edges fa ing upwards.
10.2 aintenance
The unit does not need any spe ial maintenan e. Just make sure it is lean and free of
lime build-up.
10.3 Repairs
Servi ing or repairs to the unit has only to be arried out by qualified te hni ians.
Only original spare parts are to be used. Responsibility for the produ t is voided
if unauthorised persons alter it or if inappropriate omponents are installed.
10.4 Spare Parts
If ne essary please onta t our servi e hotline phone.
10.5 Service Hotline 0049 (0)40 730 926 -20/ -24
17

10.6 Scope of Delivery/ Accessories
Included parts Item no.
Servi e set (10 filter mats, 1 L lime remover, 2 L wax remover) 170020
Dis harge hose, PVC-hose 19 x 4 (3/4“) -1.5 m 320030
Hose lip Ø 20-32 x 12.2 322017
Accessories Item no.
Servi e set (10 filter mats, 1 L lime remover, 2 L wax remover) 170020
Mobile stand 170100
Dis harge hose, PVC-hose 19 x 4 (3/4“) - per meter 320030
10.7 Warranty
The warranty period for our equipment is 12 months. If faults o ur within the
warranty period, onta t your dental depot or get in tou h dire tly with our servi e
department.
Your equipment should only be operated in perfe t ondition. If faults o ur whi h
ould harm operators or third parties, the unit should not be used until it has been
fixed.
This warranty does not over damage aused by improper use, external me hani al
auses, transport damage or interferen e with the unit by unauthorized persons.
18

11 Technical Data
Wapo-Ex Artikel Nr.: 170996
Voltage 220–240 V / 50/60 Hz
Power onsumption 9 A
Output 2000 W
W x H x D 550 x 570 x 400 mm
Weight 35,5 kg
Water apa ity approx. 20 l
Other voltages on request.
The noise level of the unit amounts to ≤ 70 dB (A).
Te hni al hanges reserved.
12 Disposing of the Unit
The unit has to be disposed by an authorized re y ling operation. The sele ted ompany
has to be informed of all possibly health-hazardous residues in the unit.
12.1 Information on Disposal for Countries within the EU
To onserve and prote t the environment, prevent environmental pollution and
improve the re y ling of raw materials, the European Commission adopted a
dire tive that requires the manufa turer to a ept the return of ele tri al
and ele troni units for proper disposal or re y ling.
Within the European Union units with this symbol should not therefore be disposed of
in unsorted domesti waste.
For more information regarding proper disposal please apply at your lo al authoritie.
19

13 EU Declaration of Conformity
in a ordan e with 2014/35/EU (Low Voltage Dire tive) and 2014/30/EU (Ele tromagneti
Compatibility Dire tive) and 2006/42/EC (Ma hinery Dire tive) and 2011/65/EU (RoHS
Dire tive)
Manufa turer: W A S S E R M A N N
Dental-Mas hinen GmbH
Rudorffweg 15-17
21031 Hamburg
Germany
Produ t des ription: Boil Out and
Polymerisation
Unit for dental
appli ations
Model: Wapo-Ex Item no. 170996
Appli able
standards:
DIN EN 61010-1
DIN EN 61000-6-3
DIN EN 61000-6-1
DIN 45635-1
DIN EN 60335-1
Hiermit wird bestätigt, dass die oben bezei hnete Mas hine den genannten EU-Ri htlinien
entspri ht. Diese Erklärung wird ungültig, falls die Mas hine ohne unsere Zustimmung
verändert wird.
This is to onfirm that the above mentioned ma hine omplies with the des ribed EU
guidelines. This de laration be omes invalid if the ma hine is modified without our
approval.
Cette ma hine est onforme aux normes en vigueur d´Union européenne. Cet avis est
nul et non avenant si ette ma hine est modifiée sans notre a ord.
Esta máquina, anteriormente men ionada, umple on los limites requeridos por el
reglamento UE. Ahora bien, esta de lara ión quedará invalidada en aso de realizar
modifi a iones al aparato sin nuestra aproba ión.
Hiermee wordt bevestigd dat bovengenoemde ma hine voldoet aan de voorges hreven
EU normen. Deze verklaring verliest geldigheid als er zonder onze uitdrukkelijke
toestemming wijzigen aan de ma hine worden aangebra ht.
Pla e, date: Hamburg,2017-07-07 Company stamp:
Signature : ________________________
Wilfried Wassermann
(Managing Dire tor)
20
Other manuals for WAPO-Ex
1
Table of contents
Other Wassermann Dental Equipment manuals

Wassermann
Wassermann HSS-88 Operating and safety instructions

Wassermann
Wassermann SG-1/2 D User manual

Wassermann
Wassermann WW-33 User manual

Wassermann
Wassermann Steam Box User manual

Wassermann
Wassermann HSS-99 Operating and safety instructions

Wassermann
Wassermann Sidomix II User manual

Wassermann
Wassermann HSS-AZ User manual

Wassermann
Wassermann Gobi Classic User manual

Wassermann
Wassermann HSS-88 User manual

Wassermann
Wassermann HSS-88 Operating and safety instructions