Webasto Telestart T100 HTM User manual

Operating Instructions
EN
Telestart T100 HTM 869

1About this document
1.1 Purpose of the document
These operating instructions are part of the product and provide the user with
information on the safe operation of the Telestart T100 HTM.
All the functions of the control element are explained in these operating in-
structions.
NOTE
Carefully read through and follow the heater operating instructions and
the safety information contained therein.
NOTE
The actual availability of these functions depends on each installed
heater.
1.2 Using this document
–Before operating the Telestart T100 HTM, carefully read and follow these
operating instructions as well as the operating instructions for the heater.
–Hand over the data carrier (e.g. CD or DVD) and the quick start guide(s) to
the subsequent device owner or user.
1.3 Use of symbols and highlighting
Texts with the symbol refer to separate documents which are enclosed or
can be requested from Webasto. Texts with the symbol refer to technical
features. Texts with the symbol or refer to possible material damage, risk
of accident or injury. Text with the symbol describes a necessary action.
Text with the symbol describes an action.
2Warranty and liability
Webasto shall not assume liability for defects or damage that are the result of
the installation and operating instructions being disregarded. In particular, this
liability exclusion applies in the following cases:
–mechanical damage to the equipment
–installation by untrained personnel
–failure to comply with inspection and service instructions
–conversion of the unit without permission from Webasto
–Improper use.
–repairs not carried out by a Webasto service workshop
–Installation without the appropriate tools and equipment.
2

3General safety information
DANGER
Danger of explosion
In environments with combustible vapours, flammable dust and haz-
ardous goods (e.g., petrol stations, tank facilities, fuel store, coal
bunkers, timber yard or grain warehouses).
uDo not switch on or operate the heater.
DANGER
Inhaling poisonous gases in the enclosed rooms
Poisoning and danger of suffocation.
uDo not switch the heater on (also not with programmed heating
start) in closed rooms that do not have an exhaust extraction unit.
DANGER
Danger of fire
Flammable materials or liquids in the hot air flow (air heaters).
uKeep the hot air flow free.
ATTENTION
Risk of injury from the defective unit
uDo not operate a defective Telestart T100 HTM.
uContact a Webasto service workshop.
4Intended use
The control element Telestart T100 HTM is currently approved for the following
applications:
Switching Webasto water heaters on and off.
3

5Overview
1
2
3
4
5
6
7
Housing with transmitter
Display
Arrow push button : Select
the Settings menu
Push button : Switch on
heater or ventilation
Battery housing cover
Arrow push button : Select
the Settings menu
Push button : Switch off
heater or ventilation
NOTE
The following generally applies: Press the and buttons at the
same time to navigate from the information display to the correspond-
ing setting mode. The respective symbol flashes. Change the setting by
pressing and/or . Press buttons and at the same time
again to exit the Setting mode and apply the set values.
5.1 Explanation of the display symbols
Sym-
bol
Function Sym-
bol
Function
Battery empty (full: no battery
symbol display)
Reception display (when trans-
mitting)
Battery at half capacity (full: no
battery symbol display)
HTM Heating Time Manage-
ment
Start-out time Heating
Comfort mode (example of
comfort level 4, area 1 to 5)
Time
Operating time Ventilation
4

6Functional description
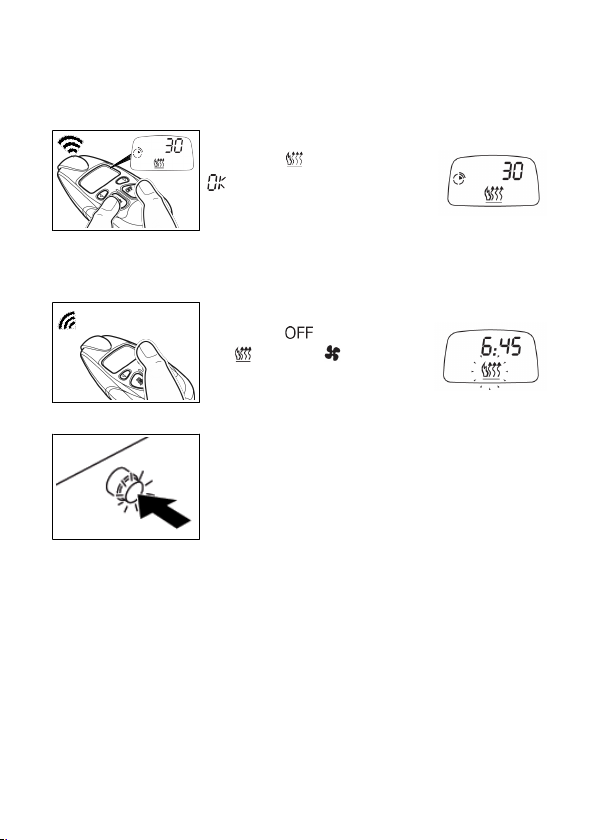
The heating time management (HTM)
system calculates the heating time and
the heater switch-on time depending
on the passenger compartment tem-
perature of the vehicle and the selec-
ted comfort level. Follow the setting
options described below.
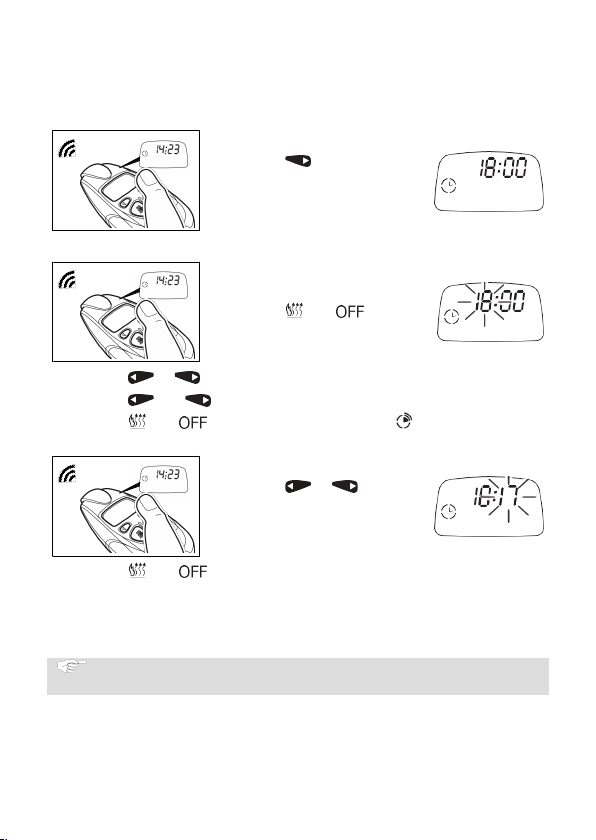
An optimum signal transmission is achieved in an open area or from elevated
locations. This makes it possible to operate the parking heater at distance of
approximately 1000 m from the vehicle.
When pressing the transmitter, hold it vertically upwards and do not cover the
top (see figure). If a radio transmission takes place between the Telestart T100
HTM transmitter and the receiver, this is indicated by the symbol in the upper
left corner of the display.
If you determine, since there is no feedback, that the operating signal has not
reached the vehicle, it frequently helps to change your location by a few
meters. Reception in built-upareas is limited accordingly.
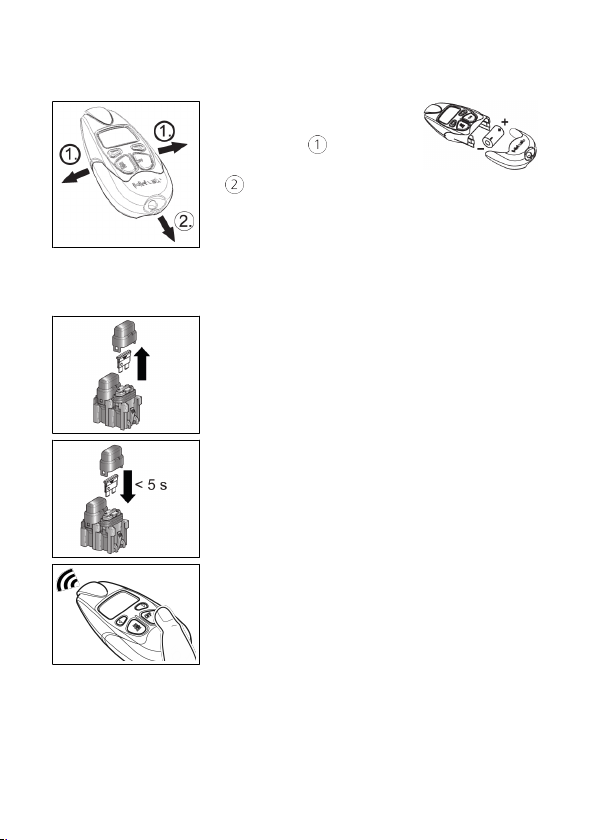
NOTE
When retrofitting heaters that are installed ex-works, the range of
functions may be limited. Please consult your installation partner about
this.
NOTE
: The signal has been received and forwarded to the heater.
: Error during signal transmission. Move to a different location
and repeat procedure.
7Setting up a vehicle heating system
uBefore switching on the heater (with the ignition on), set the vehicle heating
system to “warm”.
uSet the vehicle fan to the lowest setting (lower power consumption).
NOTE
Depending on the type of vehicle, the air-conditioning system can per-
form these settings automatically or partly autonomously. Ask your
specialist dealer to explain the optimum settings.
5

8Time
8.1 Call up time
Necessary action Indicator
uPress the push button once
until the time is displayed.
8.2 Setting the time
Necessary action Indicator
üThe time is called up.
uPress the and buttons
simultaneously.
uPress the or push button. Set the desired hour.
uPress the and buttons simultaneously.
uPress the and buttons simultaneously. The symbol stops flash-
ing. The heating time is set.
Necessary action Indicator
uPress the or push but-
ton. Set the desired minutes.
uPress the and buttons simultaneously. The symbol stops flashing.
The time is set.
9Operating mode
9.1 Calling up the operating mode
NOTE
The ventilation function is optional.
6

Necessary action Indicator
uPress the push button
three times until the heating
or ventilation symbol is
displayed.
9.2 Setting the operation mode
Necessary action Indicator
üThe heating or ventilation operat-
ing mode is selected.
uPress the and buttons
simultaneously. The indicator
flashes.
uPress the or button. Select heating or ventilation .
uPress the and buttons simultaneously. The operating mode is set.
10 Heating time
10.1 Calling up the heating time
Necessary action Indicator
uPress the push button
four times until the heating
time is displayed.
10.2 Setting the heating time
Necessary action Indicator
uPress the and buttons
simultaneously.
uPress the or push
button. Set the desired minutes.
uPress the and buttons simultaneously. The symbol stops flash-
ing. The heating time is set.
7

11 Switch on the heater
11.1 Hand-held transmitter
Necessary action Indicator
uPress the button.
: The signal has been received
and forwarded to the heater.
As a switch-on check, the display shows the symbol for operation and the re-
maining operation time (heating time in the example is 30 minutes).
12 Switching off the heater
Necessary action Indicator
uPress the button.
The heating or ventilation
symbol goes out.
12.1 Switching on and off with the push button
üThe parking heater or parking ventilation mode is
displayed on the push button.
uPress the push button (switch the heater or vent-
ilation on or off).
13 Teaching the unit
The hand-held transmitter Telestart T100 HTM must be taught on the Telestart
(receiver) in the vehicle.
13.1 Determining the installation position of the fuse
Depending on the heater and its installation or application, the Telestart fuse is
installed in the engine compartment or the vehicle interior.
üThe installation position is noted in the installation instructions during install-
ation.
8

13.2 Teaching the unit
uOpen the battery compart-
ment cover. Release the two
side sections . Remove
cover by pulling downwards
.
uInsert the battery in the
hand-held transmitter.
uEnsure the correct polarity
when inserting the battery
into the hand-held transmit-
ter.
uDetermine the fuse installation position of the
Telestart module (image serves as an example, in
the heater's wiring harness).
uPull the fuse of the Telestart module.
uReset the fuse (do not wait longer than 5 s)
> 1 s
uPress the OFF push button (hold it for at least 1
s). The hand-held transmitter has now been
taught.
9

14 HTM Heating-Time-Management
Information regarding the heating time:
We recommend matching the heating time to the driving time (heating
time = driving time)
Example: for a driving time of approx. 20 min. (in one direction), we re-
commend not exceeding a switch-on time of 20 min.
Heating time management / enables automatic preheating (not ventila-
tion) of the vehicle for a selected start-out time.
The system determines the preheating time of the parking heater depending
on the passenger compartment temperature of the vehicle.
The passenger compartment temperature reached at the start-out time can be
influenced by 5 comfort levels (C1 to C5). C1 is the lower comfort temperature
(short operating time) and C5 is the higher comfort temperature (long operat-
ing time). The start-out time can be activated up to 24 hours in advance.
14.1 Displaying the comfort level
Necessary action Indicator
uPress the push button three
times until the comfort level is dis-
played.
14.2 Changing the comfort level
NOTE
The start-out time must first be deactivated. See "Deactivating the
start-out time on page 12".
Necessary action Indicator
üThe comfort level has been selec-
ted.
uPress the and buttons
simultaneously. The comfort level
symbol flashes
uPress the or push button. Set the desired
comfort level.
10

uPress the and buttons simultaneously. The comfort level symbol
stops flashing.
The comfort level is set.
14.3 Calling up the start-out time
Necessary action Indicator
uPress the push button two
times until the start-out time
is displayed.
14.4 Setting the start-out time
Necessary action Indicator
üThe start-out time is selected.
uPress the and buttons
simultaneously.
uPress the or button. Select the desired start-out time.
uPress the and buttons simultaneously.
The symbol stops flashing. The start-out time is set.
14.5 Activating the start-out time
Necessary action
üThe start-out time must be set, see "Setting the
start-out time on page 11".
uCalling up the start-out time, see "Calling up the
start-out time on page 11".
uPress the button.
The display contains the symbol for heating time man-
agement and the start-out time.
Indicator
11

14.6 Deactivating the start-out time
Necessary action
The start-out time must be set, see "Setting the
start-out time on page 11".
Calling up the start-out time, see "Calling up the
start-out time on page 11".
The start-out time must be activated, see "Activating the start-out time on
page 11".
uPress the button.
The symbol disappears. The start-out time is deactiv-
ated.
Indicator
15 Displaying the vehicle temperature
Necessary action Indicator
uPress the push button two
times until the temperature is dis-
played.
NOTE
The displayed temperature corresponds to the passenger compartment
temperature near the installation location of the temperature sensor.
In case of severe temperature fluctuations, the actual temperature may
be displayed with a delay at the temperature sensor.
12

16 Battery
ATTENTION
Improper use can cause the batteries to leak, overheat or explode.
uWhen handling the battery, follow all instructions and warnings that
are supplied with or printed on the battery.
uThe battery is not rechargeable therefore never attempt to charge the
battery.
uNever short-circuit the battery.
uNever expose the battery to high heat.
uDo not transport the battery together with metal objects, e.g. neck-
laces or hair pins.
uThe risk of the battery leaking is greatest when the battery is dis-
charged. To avoid damage to the hand-held transmitter you should
remove the battery when it is discharged or if the hand-held transmit-
ter will not be used for a prolonged period.
uIf liquid from a damaged battery comes in contact with clothing, the
eyes or the skin, immediately flush the affected area with ample wa-
ter.
uDispose of the battery in accordance with locally applicable disposal
regulations. Insulate the contacts with insulating tape.
uKeep new and used batteries out of the reach of children. Swallow-
ing the battery can seriously damage your health. If a battery is swal-
lowed immediately seek medical assistance.
16.1 Battery disposal
Batteries and electronic devices are subject to the current versions of
the European Directive 2006/66/EC or 2002/96/EC and must not be
disposed of as household waste.
Every consumer is therefore legally obligated to dispose of batteries
and used/scrap electronic devices in the marked recycling containers
at a waste collection point or return to retail trade. Return is free of
charge.
Dispose of packaging in corresponding recycling container in accordance with
national regulations.
16.2 Changing the battery
See "Teaching the unit on page 9".
13

16.3 Battery status
NOTE
When the battery is fully charged, no charge state is displayed.
Charge state Display example
Battery at half capacity
Battery flat
16.4 Restarting
To extend the life of the battery, we recommend removing the battery from
the hand-held transmitter if it is not to be used for a longer period of time.
uInsert the battery. See "Teaching the unit on page 9".
17 Maintenance and handling
Battery and hand-held transmitter:
–Avoid damage.
–Do not let it heat up over 70°C (e.g. direct sunlight).
–Operating temperature between 0°C to +50°C.
–Only store the unit in a dry and dust-free environment.
–Protect against moisture
–Only clean the display with a clean and dry cloth.
18 Declaration of Conformity
The Telestart T100 HTM was developed, manufactured, tested and supplied in
accordance with the relevant directives, regulations and standards for safety,
EMC and environmental compatibility.
Webasto declares that the product Telestart T100 HTM is manufactured and
delivered in accordance with the directives and regulations.
The complete CE Declaration of Conformity can be found in the download area
at https://dealers.webasto.com.
14

These are the original instructions. The German language is binding.
You can request your language if it is missing. The telephone number of each country can be
found in the Webasto service centre leaflet or the website of the respective Webasto representat-
ive of your country.
Webasto Thermo & Comfort SE
Postfach 1410
82199 Gilching
Germany
Company address:
Friedrichshafener Str. 9
82205 Gilching
Germany
Only within Germany
Tel: 0395 5592 229
Ident No. 9028755C • 06/19 • Errors and omissions excepted • © Webasto Thermo & Comfort SE
www.webasto.com
Other manuals for Telestart T100 HTM
2
This manual suits for next models
1
Table of contents
Other Webasto Remote Control manuals

Webasto
Webasto Telestart T100 HTM User manual

Webasto
Webasto Telestart T91 User manual

Webasto
Webasto Telestart T91 Holiday User manual

Webasto
Webasto Telestart T91 User manual

Webasto
Webasto Telestart T70 User manual

Webasto
Webasto ThermoCall TC4 User manual

Webasto
Webasto Telestart T80 User guide

Webasto
Webasto Telestart T91 Manual

Webasto
Webasto Telestart T91 Owner's manual

Webasto
Webasto ThermoConnect TCon2 User manual