WePresent WiPG-1000 User manual

1
WiPG-1600 User’s Manual
WiPG-1000
User's Manual
version: 2.01

2
WiPG-1600 User’s Manual
Table of Contents
1Overview ................................................................................................................................... 3
2Package Contents ...................................................................................................................... 4
3USB Token Contents................................................................................................................... 4
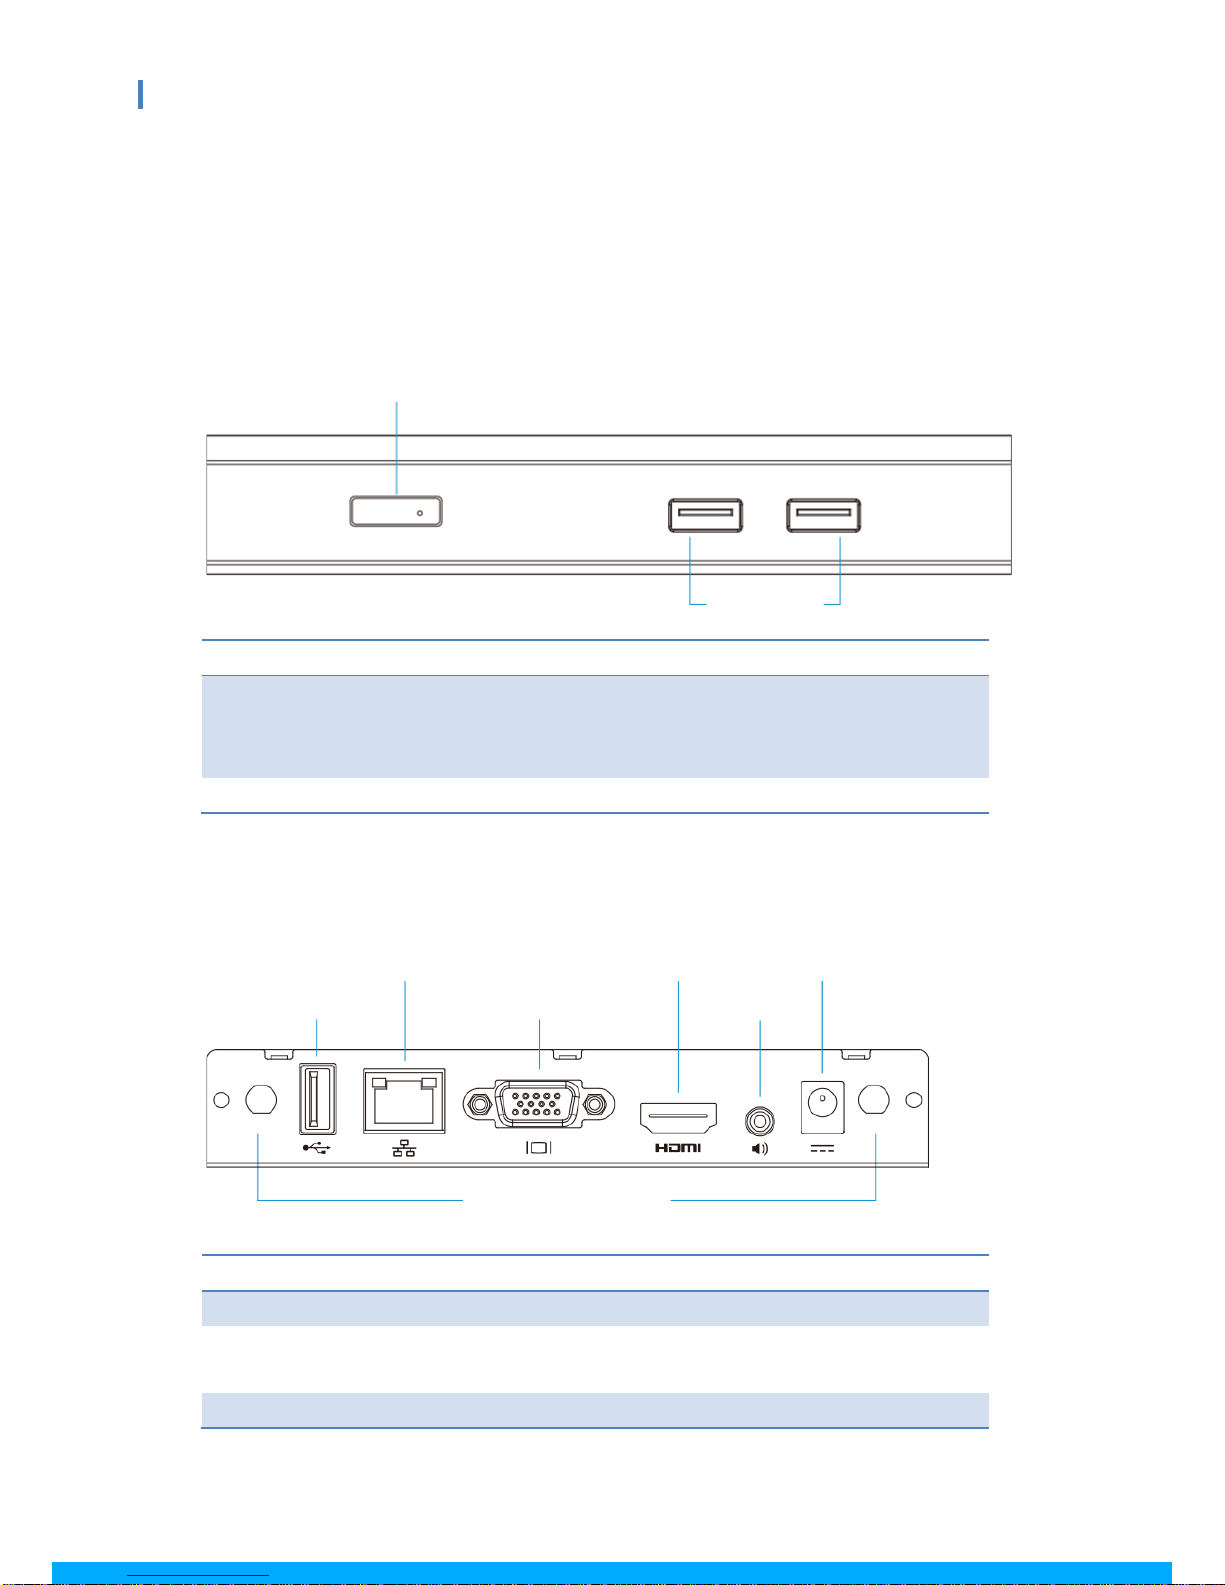
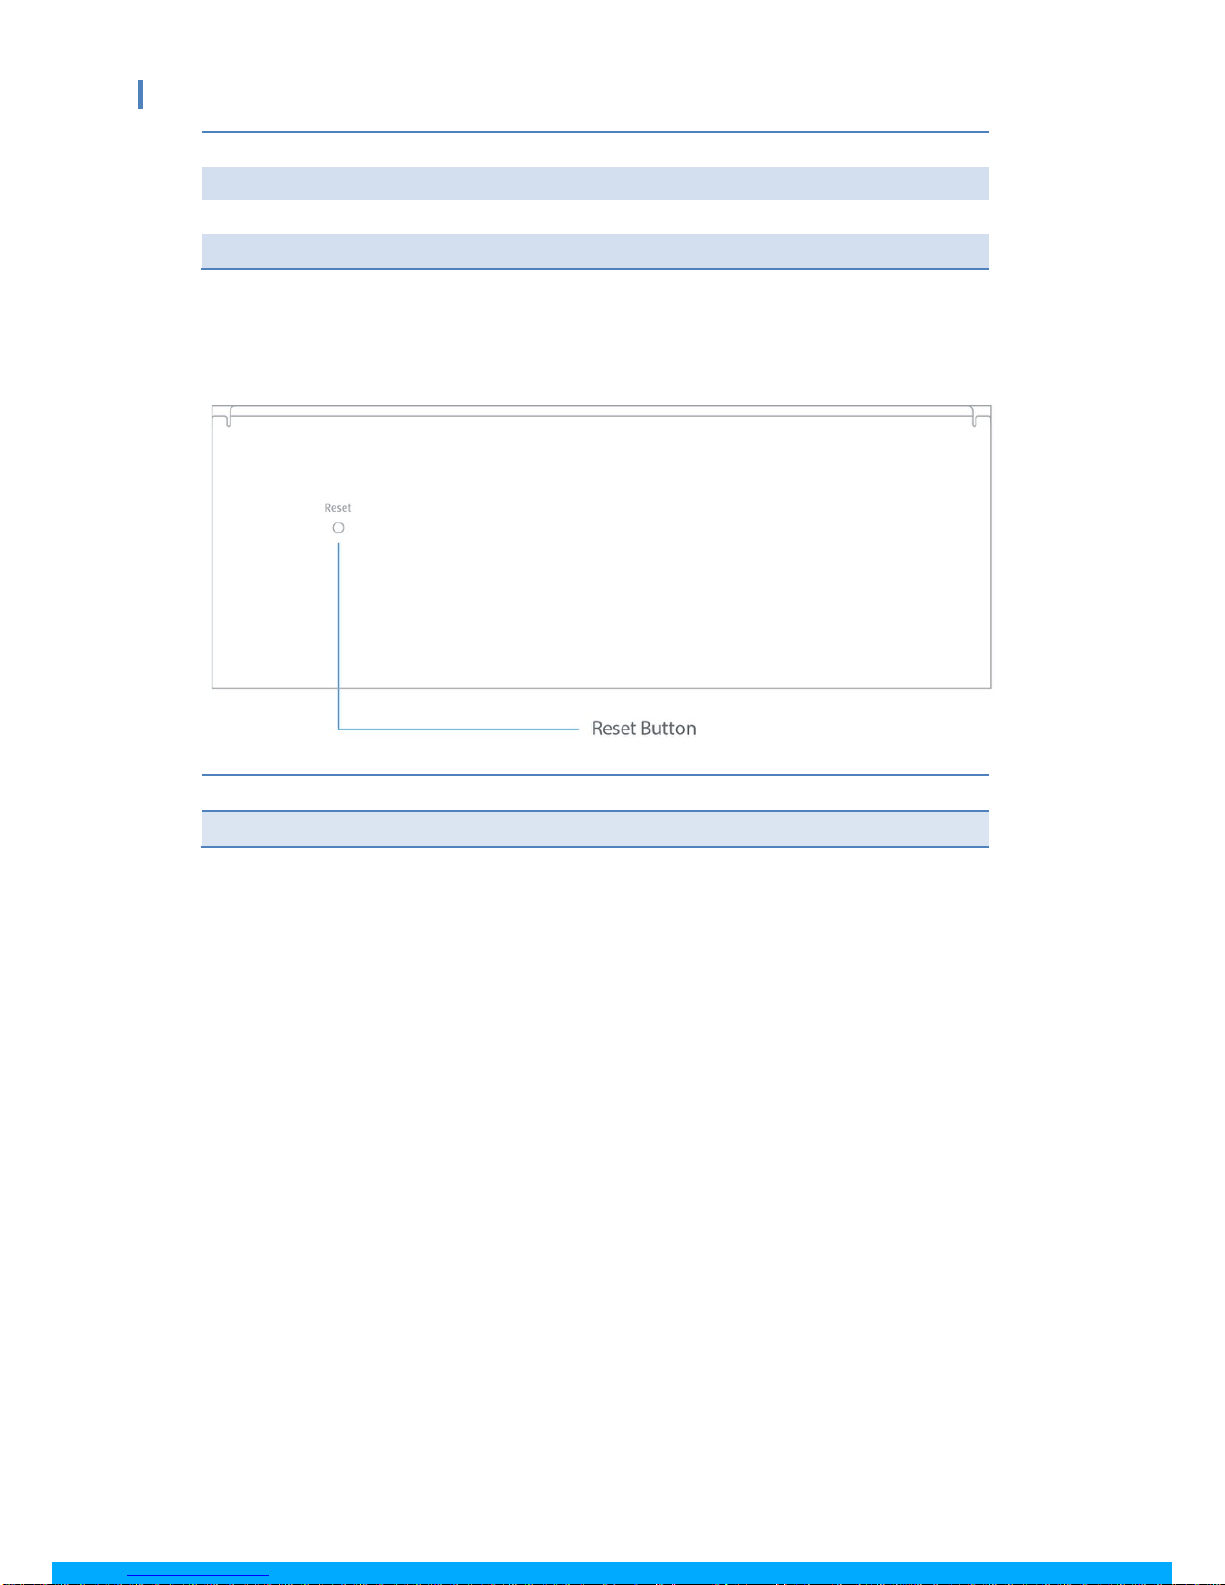
4Physical Details .......................................................................................................................... 5
5What You Might Need ............................................................................................................... 7
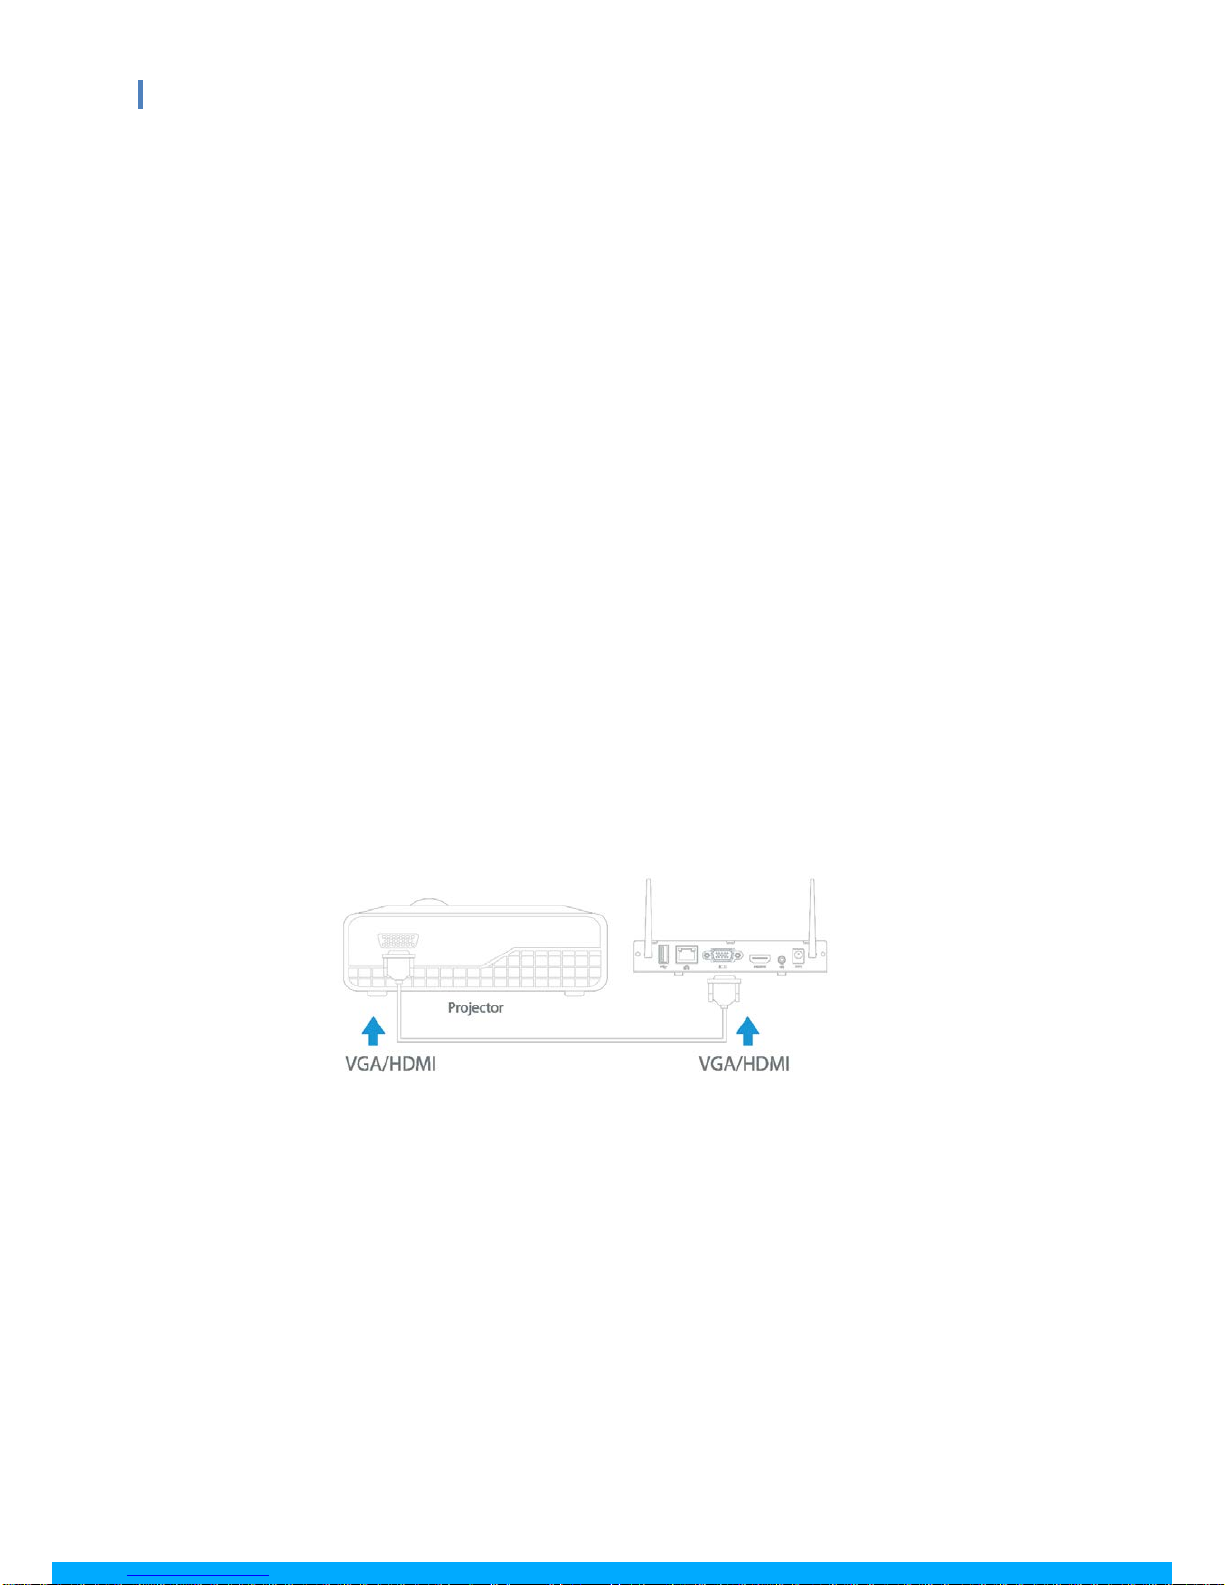
6Hardware Installation ................................................................................................................ 7
7Standby Screen of the Projector/Display................................................................................... 8
8Web Management................................................................................................................... 10
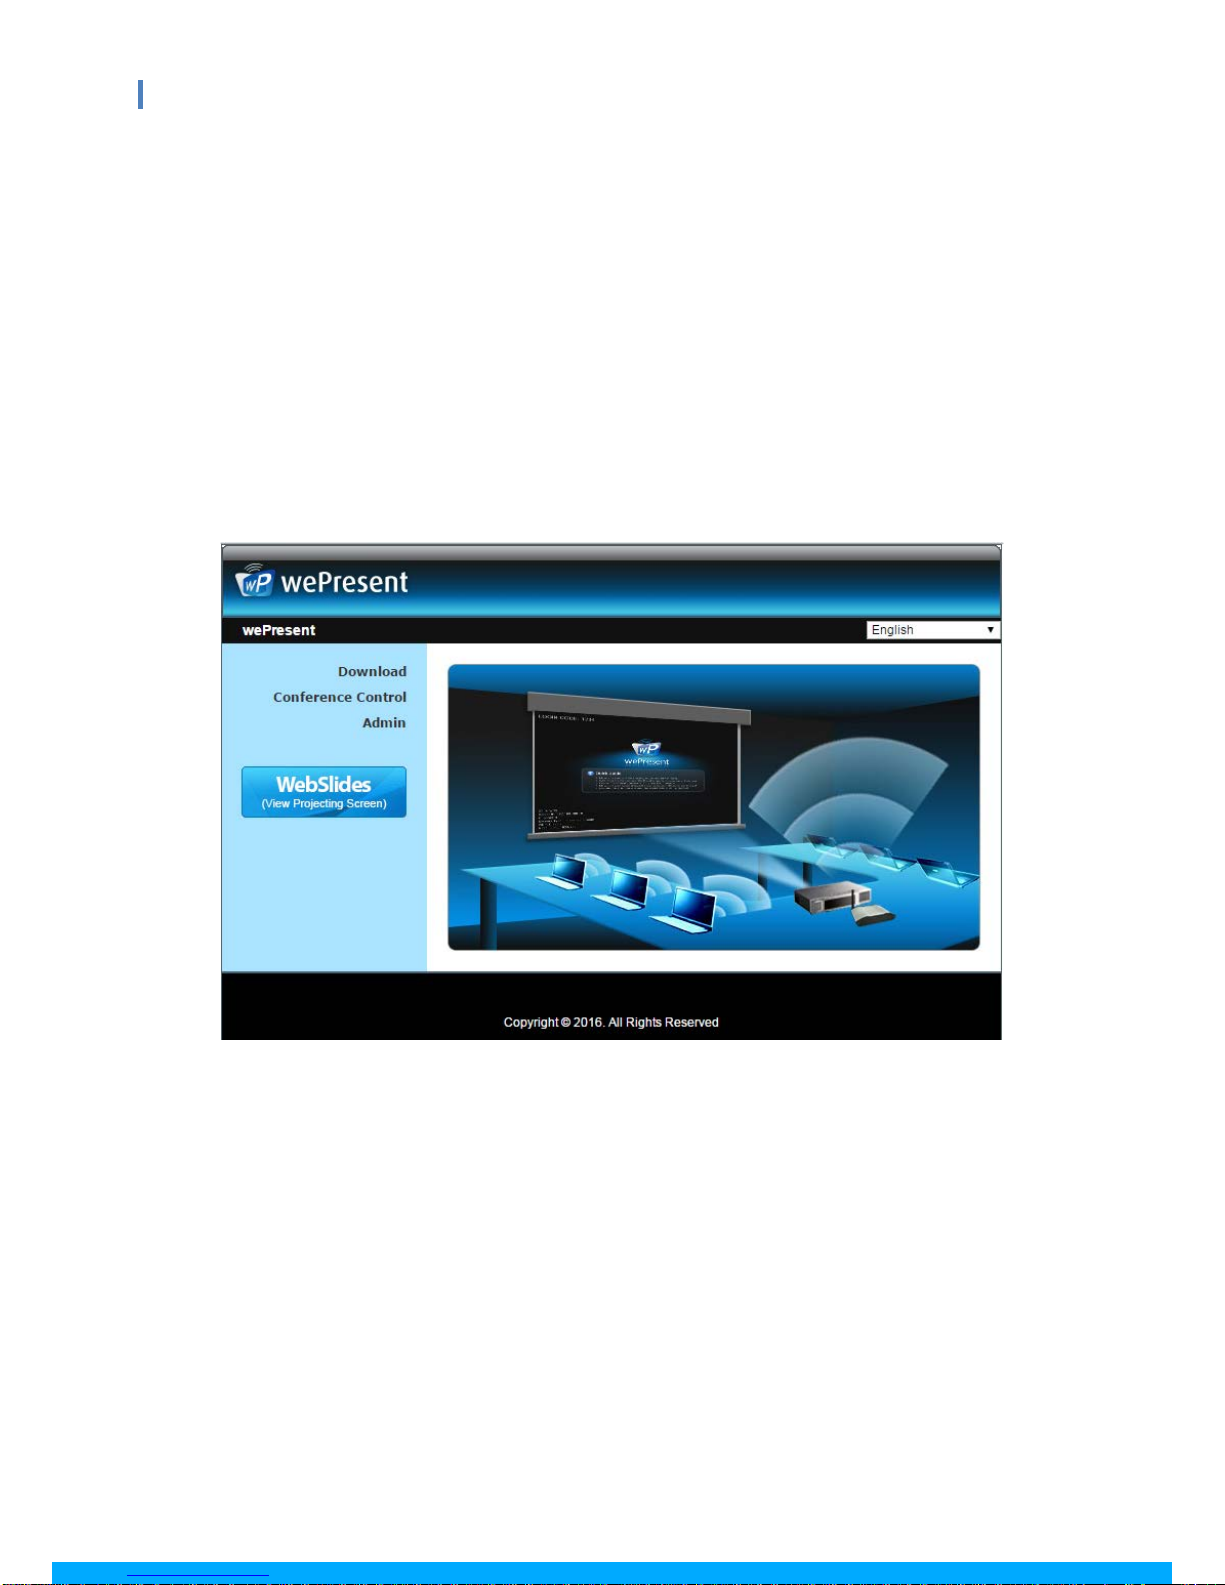
8.1 Home Page.......................................................................................................................... 10
8.2 Download............................................................................................................................ 10
8.3 Conference Control............................................................................................................. 11
8.4 WebSlides ........................................................................................................................... 12
8.5 Admin ................................................................................................................................. 13
8.5.1 System Status...................................................................................................................... 13
8.5.2 Device Setup ....................................................................................................................... 14
8.5.3 Network Setup.................................................................................................................... 15
8.5.4 OSD Setup........................................................................................................................... 18
8.5.5 Change Passwords .............................................................................................................. 19
8.5.6 Reset to Default .................................................................................................................. 20
8.5.7 Firmware Upgrade .............................................................................................................. 21
8.5.8 WebSlides Setup ................................................................................................................. 23
8.5.9 Reboot System.................................................................................................................... 24
8.5.10 Logout ............................................................................................................................ 24
9Using MirrorOp (Sender) to Start Projection...........................................................................25
9.1 Start the MirrorOp application ...........................................................................................25
9.2 Main User Interface of MirrorOp (Sender) ......................................................................... 28
9.3 A Complete User’s Guide on MirrorOp (Sender) ................................................................29
10 Use the SidePad Function with MirrorOp Receiver................................................................. 30
11 Launch WebSlides.................................................................................................................... 36
12 Wall-Mount Kit ........................................................................................................................ 39

3
WiPG-1600 User’s Manual
1Overview
wePresent WiPG-1000 is a professional wireless presentation gateway. With the
revolutionary “interactive” and “wireless” features, wePresent WiPG-1000 enables
users to deliver presentations wirelessly from a PC, Mac, iPad, iPhone or any Android
device to a projector, to use a tablet or smartphone to control the projecting PC/Mac,
and to view the presenting slides!
Basic Features
Wireless screen and audio projection
Remote desktop control
Support Windows: 7 / 8 / 10
Support macOS: 10.9 and above
Plug and show! No installation is required; just plug in the accompanied
token to a USB port, and a hassle-free presentation can be started in
seconds.
The MirrorOp Presenter app supports iOS/Android mobile devices
High-speed projection (up to 30 fps)
4-to-1 split screen projection (turn one projector into four; increase meeting
productivity right away)
Conference control (allow moderators to streamline meetings)
Provide session security login, wireless WEP/WPA/WPA2 key and gatekeeper
functions to protect presentation contents and maintain office network
security
Web management (including the software download and device settings)
Support the WiFi AP-Client mode

4
WiPG-1600 User’s Manual
2Package Contents
wePresent WiPG-1000 Base Unit
wePresent USB Token
Power Adapter (DC +5V, 2.6A)
Two Detachable WiFi Antennas
Quick Installation Guide
Warranty Card
CE DoC and Warning Statement
3USB Token Contents
MirrorOp Installer for Windows
MirrorOp Installer for Mac
Executable MirrorOp Application for Windows
Executable MirrorOp Application for Mac
VDD Driver (For Windows 8/10 Virtual Extended Screen)
SVS Driver (For Mac Extended Screen)
SNMP MIB File
User Manual (for WiPG-1000)
User Manual (for MirrorOp Sender)

5
WiPG-1600 User’s Manual
4Physical Details
Front Panel
Description
Power Button and LED Indicator Power on/off button.
LED indicator: red - system loading,
green - system ready
USB Port (Front) 2 USB ports for USB mouse/keyboard/thumb drive
Rear Panel
Description
WiFi Antennas 2 detachable antennas for better WiFi performance
USB Port (Rear) USB port for USB mouse/keyboard/thumb drive/IWB
device (HID type)
Ethernet Port 10/100M RJ-45 port
Power Button/LED Indicator
USB Port
WiFi Antennas
USB Port
Ethernet Port
VGA Port
HDMI Port
Audio Jack
Power Jack

6
WiPG-1600 User’s Manual
VGA Port For VGA projector/display
HDMI Port For HDMI projector/display
Audio Jack (3.5mm) For speaker
Power Jack DC 5V in
Bottom Side
Description
Reset Button For hard reset
* * *To perform a hard reset to restore your WiPG-1000 device to the factory default
settings, please follow the below procedures:
1. Long press the reset button and hold.
2. Turn on the WiPG-1000 and wait for over 10 seconds until the LED indicator turns
green.
3. Release the reset button.
4. The WiPG-1000 will be restored to the factory default settings.

7
WiPG-1600 User’s Manual
5What You Might Need
Projector/display with VGA/HDMI interface (Required)
Ethernet cable (Required if you want to disable the WiFi of the WiPG-1000)
Windows or Mac computer
Apple iPhone, iPad or iPod touch
Android phone or tablet
Speaker
USB mouse/keyboard
USB HID IWB device
6Hardware Installation
1) Connect the WiPG-1000 to the projector/display through the VGA/HDMI port and
turn on the projector/display power.
2) Connect the power adapter to the WiPG-1000 and press the power button to turn
on the device. The system is ready when the LED indicator turns green.
The default standby screen as shown below will be displayed when the
system is ready.

8
WiPG-1600 User’s Manual
3) If you disable the WiFi of the WiPG-1000, you need to connect the device to an
existing IT network through an Ethernet cable.
4) Insert the speaker cable to the WiPG-1000 audio jack for audio output. (A speaker
is required for audio output when using VGA.)
5) Insert the USB mouse/keyboard/IWB device to the WiPG-1000 front/rear USB port
for OSD (On-Screen Display) control or remote control.
7Standby Screen of the Projector/Display
1) The following information will be shown on the standby screen: (a) software
download instructions; (b) WiFi network name or SSID [default SSID is
WiPG-1000-xxx (xxx are the last three numbers of the MAC ID shown on the
bottom side of the WiPG-1000 device)]; (c) IP address [default IP address is
192.168.100.10]; (d) login code.
2) If there is any sender device connected to the WiPG-1000, click on and a list
SSID/Hostname
Login Code
IP Address

9
WiPG-1600 User’s Manual
of connected sender devices will be shown on the standby screen. The conference
moderator can use the USB mouse/keyboard to select which device to use and
control it remotely.
3) If you need more advanced information, please click the “Setup” icon and you
can: (a) find the FW version, resolution, and WiFi security information; (b) make a
Plug & Show USB token.
4) The screen saver mode will be activated if no sender device is connected. The
system will return to the standby status immediately when any sender device is
connected.

10
WiPG-1600 User’s Manual
8Web Management
8.1 Home Page
1) Make sure your sender device connects to the WiPG-1000 successfully.
2) Open the browser of the sender device, and enter the receiver IP address in the
address bar of the browser. You can find the receiver IP address on the standby
screen of the projector/display. (Default IP address is 192.168.100.10)
8.2 Download
1) Select the “Download” function.
2) Please select “Utility for Windows” or “Utility for Mac” (and click “Download”).
Then, execute the installation program.
Note: Please disable the “Smart Screen Filter” in the IE browser; otherwise you
might not be able to download the file.

11
WiPG-1600 User’s Manual
8.3 Conference Control
1) Select the “Conference Control” function, and a list of connected sender devices
will be shown.
2) Enter the password and then click “Login”. (Default password: moderator)
3) After login, you can see a user-list on the screen which indicates all the users
connected to the WiPG-1000.

12
WiPG-1600 User’s Manual
4) There are three columns: “Name”, “Play Control” and “IP Address”.
5) Play Control: There are six buttons – (a) (full screen); (b) (upper-left
quadrant of the screen); (c) (upper-right quadrant of the screen); (d)
(lower-left quadrant of the screen); (e) (lower-right quadrant of the screen);
(f) (stop)
6) Uncheck the “Allow control from this page only”, and the centralized control will be
disabled, allowing users to project the screen to WiPG-1000 freely.
8.4 WebSlides
1) Press the “WebSlides” button to enter the WebSlides page.
2) Enter the password if necessary.
3) Start to capture the current projecting screen.

13
WiPG-1600 User’s Manual
8.5 Admin
1) Click [Admin], and then enter the password to log in to the web admin page.
(Default Password: admin)
8.5.1 System Status
Click [System Status], and the current system status will be shown.
< Model Name >: WiPG-1000P
< Versions >
♦Firmware Version: version number of the installed firmware
< Network Status >
♦IP address: IP address of the WiPG-1000 device
♦Subnet Mask: subnet mask
♦Default Gateway: default gateway
♦Wireless MAC address: wireless MAC address
♦Wire MAC address: wire MAC address
< Connection Status >
♦Projecting Status: “Waiting for projecting” or “Projecting”
♦Total Users: the number of users logging into the WiPG-1000 device

14
WiPG-1600 User’s Manual
8.5.2 Device Setup
Click [Device Setup], and the device setting items will be displayed.
< Device Setup >
♦Choose VGA or HDMI (output option)
♦Resolution:
HDMI: 720p, 1080i, 1080p
VGA: UXGA (1600x1200), WXGA+ (1440x900), WXGA (1360x768, 1280x768,
1280x800), XGA (1024x768), and SVGA (800x600).
♦Code: You can select “Disable”, “Random”, or “Use the following code” to set a
specified 4-digit number as the login code.
♦IWB USB Port: You can configure the IWB USB port to support the “IWB (HID)” or
“Mouse/Keyboard” device.
< SharePod Pairing Settings >:
♦Choose “Apply wePresent’s WiFi settings” or “Apply the following WiFi settings”. (If
you choose “Apply the following WiFi settings”, input the SSID to which the
SharePod should connect.)
♦Encryption: The default setting is “Disable”. (If you have entered the SSID manually,
you can also choose “WEP”, “WPA AES”, “WPA2 AES”, “WPA TKIP”, or “WPA2 TKIP”.)

15
WiPG-1600 User’s Manual
♦Key: If the “Encryption” function is enabled, you have to set a key value according
to the encryption mode you have selected.
< AirPlay >
♦“Enable” or “Disable” the AirPlay feature.
Note: If a login code is set on the WiPG-1000 device, you will be asked for a password
when you use AirPlay on Mac or iOS devices. Please enter the same login code
in the AirPlay password dialog box.
< Apply >
♦Confirm and save all changes.
< Cancel >
♦Cancel all changes.
8.5.3 Network Setup
Click [Network Setup], and the network setting items will be shown.

16
WiPG-1600 User’s Manual
<Note: The network configuration of WiPG-1000 is automatic via DHCP>
The default setting of the WiPG-1000 is DHCP client. When the WiPG-1000 is
connected to a LAN that already has a DHCP server present, the WiPG-1000 takes an IP
address assigned to it by the server. When the WiPG-1000 is connected to a LAN that
does not have a DHCP server, the WiPG-1000 can become the DHCP server in the
network.
< IP Setup >
♦You can select “obtain an IP address automatically” or “Use the following IP
address”
♦IP Address: The default value is 192.168.100.10.
♦Subnet Mask: The default value is 255.255.255.0
♦Default Gateway: The default value is 192.168.100.10
♦DNS Server: The default value is 192.168.100.10
< DHCP Server Setup >
♦You can select “Auto” (Enable/Disable the DHCP Server) or “Disable”
♦Start IP: The start IP address of the DHCP Server
♦End IP: The end IP address of the DHCP Server
♦Subnet Mask: The default value is 255.255.255.0
♦Default Gateway: The default value is 192.168.100.10
♦DNS Server: The default value is 192.168.100.10
< Wireless Setup >
♦Wireless LAN: The default value is “Enable”.
♦Host Name and Domain Name: The default name is “WiPG-1000-xxx”(xxx are
the last three numbers of the MAC ID shown on the bottom side of the
WiPG-1000)
♦SSID Broadcast: The default value is “Enable”
♦Band: The default value is “2.4 GHz” ( the “5 GHz” option is available in some
regions)
♦802.11 mode: The default value is “2.4G B/G/N mixed”
♦Channel: The default value is “Auto” (you can also choose to set a fixed
channel). The “Auto” option means that after the WiPG-1000 is powered on,
the system will scan all the wireless channels and select a clear channel
automatically.
♦Encryption: The default value is “Disable” (you can also choose “WEP”, “WPA”
or “WPA2”)
♦Key: If the “Encryption” function is enabled, you have to set a key value

17
WiPG-1600 User’s Manual
according to the encryption mode you selected
♦Channel Bandwidth: “20MHz” or “Auto” (20MHz/40MHz) [The default value is
“Auto”]
< AP Client >
♦Connect to Existing AP: The default value is “Disable” (if you choose “Enable”,
input the SSID of the existing AP you want to connect to).
♦Encryption: The default value is “Disable” (if you “Enable” the “Connect to
Existing AP” function, you can select “WEP”, “WPA AES”, “WPA2 AES”, “WPA
TKIP” or “WPA2 TKIP”)
♦Key: (If the “Encryption” function is enabled,) you have to set the “Key” value
according to the encryption mode you selected.
< Gatekeeper >
♦You can choose “All Pass”, “All Block”, or “Internet Only” [The default value is
“All Pass”]
< SNMP >
♦You can choose “Enable” or “Disable” [The default value is “Enable”]
< Apply >
♦Click the “Apply” button, and follow the reboot instructions as they appear on
the screen (for the modifications to take effect).
< Cancel >
♦Cancel all the modifications

18
WiPG-1600 User’s Manual
8.5.4 OSD Setup
Click [OSD Setup], and you can change the standby image
< Change Standby Image >
♦Restore to default: Restore the standby image to the default one.
♦Browse: Browse and choose an image file you wish to display on the standby
screen.
♦Image File Upload: Upload the image file you selected.
< Display Option >
♦Device Information: “Show All” or “Hide All” [The default value is “Show All”]

19
WiPG-1600 User’s Manual
♦User-List: “Enable”(show the user-list) or “Disable” (hide the user-list) [The
default value is “Enable”]
♦Connect Info: “Enable” (show the overlay connection info) or “Disable” (hide
the overlay connection info) [The default value is “Enable”]
♦Font Color: Adjust the font color of system information [The default value is
white (#FFFFFF)]
♦Screen Saver Settings: (a) “Enable” or “Disable” the screen saver [The default
value is “Enable”; (b) Configure the “Idle Time” (minutes) [The default value is 5
mins]
8.5.5 Change Passwords
Click [Change Password], and you can change the password settings.
(Length: up to 8 characters)
< Conference Control >
<Enter New Password>:Enter the new password you want to use for
“Conference Control”.
<Confirm New Password>: Confirm the new password by entering it once
again.

20
WiPG-1600 User’s Manual
<Apply>: Confirm and save the new password.
< Admin >
<Enter New Password>:Enter the new password you want to use for “Admin”.
<Confirm New Password>: Confirm the new password by entering it once
again.
<Apply>: Confirm and save the new password.
8.5.6 Reset to Default
Click [Reset to Default] to restore your WiPG-1000 device to the factory default
settings.
<Apply>: Confirm to perform the reset.
*** To perform a hard reset to restore your WiPG-1000 device to the factory default
settings, please follow the below procedures:
A. Long press the reset button (on the bottom side of the WiPG-1000)
and hold.
B. Turn on the WiPG-1000 and wait for over 10 seconds until the LED
indicator turns green.
C. Release the reset button.
D. The WiPG-1000 will be restored to the factory default settings.
Other manuals for WiPG-1000
4
Table of contents
Other WePresent Projector Accessories manuals

WePresent
WePresent WiCS-2100 User manual

WePresent
WePresent WiCS-2100 User manual

WePresent
WePresent WiPG-1000P User manual

WePresent
WePresent WiCS 2100 User manual

WePresent
WePresent WP-820 User manual

WePresent
WePresent WiPG-1500 User manual

WePresent
WePresent WiPG-1600 User manual

WePresent
WePresent WiPG-1600w User manual

WePresent
WePresent WiPG-2000 User manual