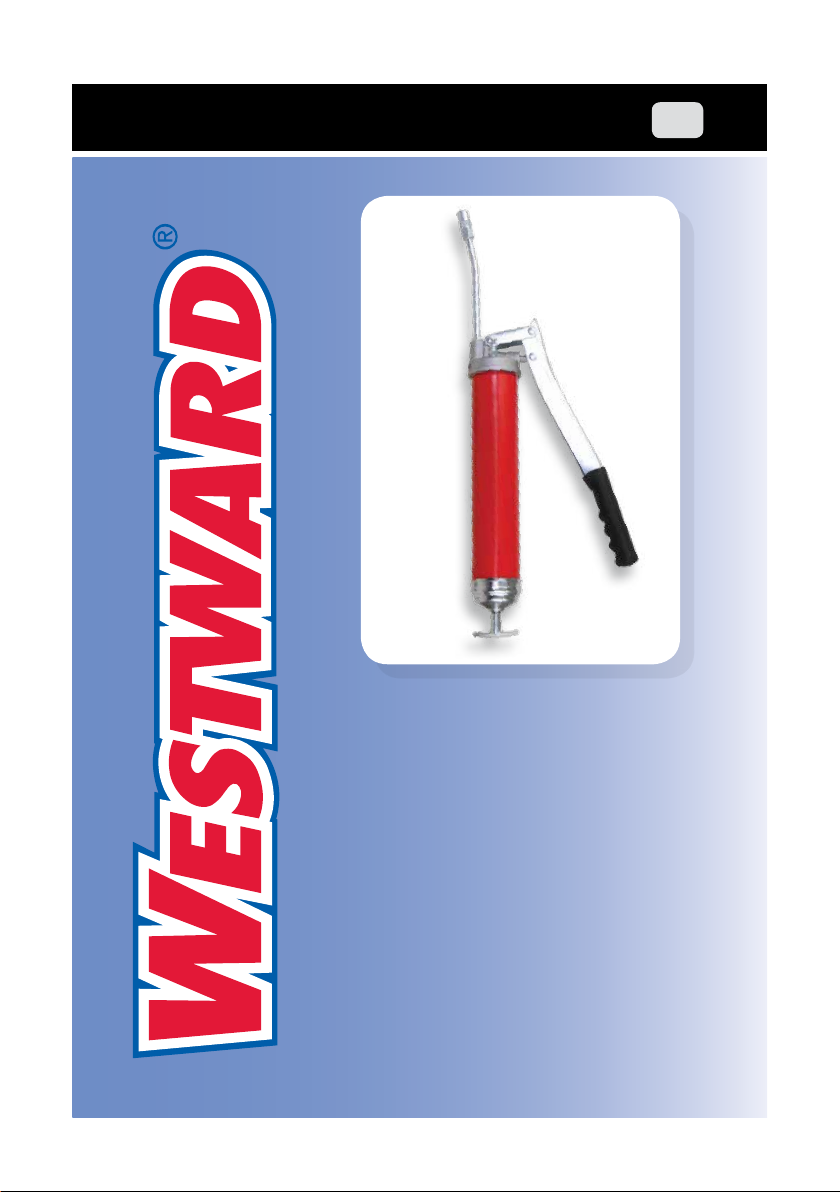
Westward 48UJ77 Instructions for use
Operating Instructions & Parts Manual EN
Supa-Lite
Lever Grease
Gun
Model 48UJ77

PLEASE READ AND SAVE
THESE INSTRUCTIONS.
READ CAREFULLY
BEFORE ATTEMPTING
TO ASSEMBLE, INSTALL,
OPERATE OR MAINTAIN THE
PRODUCT DESCRIBED.
PROTECT YOURSELF AND
OTHERS BY OBSERVING ALL
SAFETY INFORMATION. FAILURE
TO COMPLY WITH INSTRUCTIONS
COULD RESULT IN PERSONAL
INJURY AND/OR PROPERTY DAMAGE!
RETAIN INSTRUCTIONS FOR FUTURE
REFERENCE.
PLEASE REFER TO BACK COVER
FOR INFORMATION REGARDING
WESTWARD’S WARRANTY AND OTHER
IMPORTANT INFORMATION.
Model #: ___________________
Serial #: ___________________
Purch. Date: _______________
Printed in India
Version 03/ 2016
© 2015 W.W. Grainger, Inc.
All Rights Reserved
BEFORE YOU BEGIN
GettinG Started Safety /
SpecificationS
aSSembly /
inStallation operation troubleShootinG maintenance /
repair
• Spanner (14mm)
Tools needed:
• See General Safety Instructions on page 2, and Cautions and Warnings
as shown.
1
• Goggles, Safety Gloves, Safety Helmet, and Safety Boots
Protection equipment (PPE) requirements:
UNPACKING
Steps:
1. Wear cotton gloves before unpacking.
2 . U s e s m a l l k n i f e o r s c i s s o r t o c u t t a p e s o n t h e c a r t o n f o r
opening/ unpacking. Be careful of any sharp carton edges.
3. Check to ensure all components are present.
Contents:
Grease Gun
6" Bent Steel Extension
Professional Coupler
GENERAL SAFETY INSTRUCTIONS
GettinG Started
Safety /
SpecificationS
aSSembly /
inStallation
operationtroubleShootinG
maintenance /
repair
Grease or empty cartridge in the barrel is under
pressure from the internal spring. Be extremely
careful when removing either end of the barrel. Connections of the hose
must be secured tightly to avoid any oil leakage.
SPECIFICATIONS
Always before refilling make sure that the plunger
rod is completely outward and is in locked position
Always use safety goggles when using the grease
gun.
Excess grease if left on floor, tools or equipment can
create slippery surfaces.
2
Description 48UJ77
Cartridge Size 14 oz.
Bulk Size 16 oz.
Handle Style Lever
Max. Pressure 10,000 PSI
Delivers Up to 1 oz. / 32 strokes
Extension Style 6" Bent Steel Extension
Lever Handle Grip Yes
Bulk Loader Valve Yes
Air Release Valve Yes
Grease filling options
Cartridge Yes
Bulk Yes
Filler Pump Yes
GettinG Started Safety /
SpecificationS
aSSembly /
inStallation operation troubleShootinG maintenance /
repair
ASSEMBLY INSTRUCTIONS
3
1. Assembly of rigid extension
Rigid extension can be used in easily accessible grease fittings and it also makes
greasing a one hand operation. Rigid extension has two threaded ends, one end
closer to the bend must be used to screw coupler & the other end must be screwed
with the gun head opening.
2. Removing empty cartridge
Remove any cartridge in the grease gun barrel prior to refilling. To check if a cartridge
is in the barrel, first compress the spring by pulling the plunger handle fully outward.
Remove the grease gun head by turning it counter clockwise. Release the plunger
rod from the notch and push it forward allowing the grease cartridge to come out.
3. Locking and unlocking the plunger rod
This gun incorporates a groove on its plunger rod just below the follower & a notch in
its end cap. Plunger rod can be locked in its extreme position by simply pushing the
groove inside the notch. To release the plunger rod simply pull out the rod from the
notch & slowly push the plunger rod inside.Ensure slow movement, as releasing the
plunger rod quickly with open barrel can cause accident.
4. Priming
Usually after loading, all grease equipment have some trapped air pockets in grease.
Trapped air causes zero or reduced grease discharge. Removing these air pockets
from grease is referred to as Priming or Air Bleeding. It is highly recommended to
prime the grease gun after every loading. If the grease gun has been in regular use,
priming can be done without having to remove the grease gun extension & coupler
from the grease gun head.

GettinG Started
Safety /
SpecificationS
aSSembly /
inStallation
operationtroubleShootinG
maintenance /
repair
OPERATING INSTRUCTIONS
4
Cartridge Loading Bulk Loading Filler Pump
Pull the plunger rod
handle all the way back
and lock it using the notch
in the end cap.
Pull the plunger rod
handle all the way back
and lock it using the notch
in the end cap.
Wipe the grease gun’s
bulk loader valve free
of grease and possible
debris.
Activate the transfer pump
until a small amount
of grease comes out.
This step will minimize
transferring of any trapped
air from the ller pump to
grease gun.
Remove the gun head
by rotating it in counter-
clockwise direction.
Remove the gun head
by rotating it in counter-
clockwise direction.
Connect the bulk loader
valve tightly to the loader
adapter on the ller pump
line.
Remove the plastic cap
from the cartridge and
insert the open end of the
cartridge into the grease
gun barrel until the rim
of the pull-tab end meets
the rim of the barrel. Now
remove the pull-tab seal.
Screw back the grease
gun head tightly onto the
barrel.
Fill the barrel with grease
using a scoop. When the
barrel is completely lled
with grease, shake the
grease gun barrel to allow
the grease to settle down.
Then screw back the
grease gun head tightly
onto the barrel.
Start operating the transfer
pump, keeping your hand
on the grease gun, lightly
pushing it down onto the
ller pump.
Once the gun barrel is
lled, pumping would get
very hard. Stop now &
disconnect the bulk loader
valve from the ller pump
line. Wipe the bulk loader
valve again.
prime the grease gun
1. Release and push the plunger rod 2-3 times inwards and simultaneous press
the manual air release valve present at the top of the grease gun head allowing
trapped air to escape.
2. Operate the gun, if the grease comes out smoothly from the coupler, then the
grease gun is primed. If not then repeat step 1-2.

GettinG Started Safety /
SpecificationS
aSSembly /
inStallation operation troubleShootinG maintenance /
repair
TROUBLESHOOTING
Symptom Possible Cause(s) Corrective Action
Grease gun pumps
little or no grease
1. Air is trapped in
grease
1. Priming is required,refer
"Prime the grease gun"
section.
2. Blocked extension 2. Remove the extension
and operate the grease
gun. If the gun dispenses
grease then the gun is ne
and you need to either
clean the extension or
replace it
3. Grease too thick or
cold
3. Keep the grease warm
and away from extreme
cold or use thinner grease
Excessive grease
leaks out from the
back side of the
rubber follower
around the plunger
rod
Rubber follower is
damaged
Replace the grease gun
Grease leaks from
the connection
between the
grease gun head
& the extension or
between extension
& coupler
Loose connection Tighten the connection using
teon or any other thread
sealant
5

GettinG Started
Safety /
SpecificationS
aSSembly /
inStallation
operationtroubleShootinG
maintenance /
repair
Maintenance
6
Grease gun and extension should be kept clean and checked for damage before each
use.
Greasing a grease fitting / nipple
1. The grease coupler provided at the end of the grease gun extension has a jaw type
construction. The coupler jaws snaps on to a grease fitting and maintains a tight fit.
2. When connecting the coupler to the grease fitting, press the coupler straight onto
the grease fitting to form a snug fit. Start operating the grease gun with the coupler
as square to the grease fitting as possible.
3. Once greasing is completed, slightly tilt the coupler, twist and pull back. The tilt and
twist action will allow easy removal of the coupler from the grease fitting.
To Remove:
Tilt, Twist &
Pull

GettinG Started Safety /
SpecificationS
aSSembly /
inStallation operation troubleShootinG maintenance /
repair
parts ILLUstratION
For Repair Parts, call 1-800-323-0620
24 hours a day – 365 days a year
Please provide following information:
-Model number
-Serial number (if any)
-Part description and number as shown in parts list
7

GettinG Started
Safety /
SpecificationS
aSSembly /
inStallation
operationtroubleShootinG
maintenance /
repair
parts list
8
Parts Description Qty.
1 Barrel Assembly 1
2Head 1
3Rubber Washer 1
4 Check Valve Spring 1
5Steel Ball (1/4") 2
6Non Return Spring 1
7Adaptor 1
8O-Ring 1
9Piston 1
10 Rivet 2
11 U-Clip 1
12 Rivet 1
13 Handle 1
14 Grip 1
15 Bulk Loader Valve Assembly 1
16 Air Release Valve 1
17 Grease Bend Pipe 1
18 Hydraulic Coupler 1
Other Westward Tools manuals


