White Rodgers 50M56U-801 User manual

50M56U-801
Single Stage | Direct | HSI
Integrated Furnace Control Kit
INSTALLATION INSTRUCTIONS
FAILURETO READ AND FOLLOW ALL INSTRUCTIONS CAREFULLY BEFORE
INSTALLING OR OPERATING THIS CONTROL COULD CAUSE PERSONAL
INJURY AND/OR PROPERTY DAMAGE.
Description ........................................................................................................................................................................ Page 1
Electrical Specifications .................................................................................................................................................... Page 1
Installation ......................................................................................................................................................................... Page 2
Wiring Diagram ................................................................................................................................................................. Page 3
Operation .......................................................................................................................................................................... Page 4
System Lockout and Diagnostic Features ......................................................................................................................... Page 5
Troubleshooting ................................................................................................................................................................. Page 5
Definition of Terms and Timing Specifications ................................................................................................................... Page 7
DESCRIPTION
ELECTRICAL SPECIFICATIONS
CONTENTS
The50M56U-801kitis aHSI IntegratedFurnace Controldesigned
to replace virtually all 120V Lennox HSI single stage furnace
controls using a PSC blower motor.It employs a microprocessor
to continually monitor, analyze, and control the proper operation
of the gas burner, inducer, and fan.The Kit contains:
white-rodgers.com
emersonclimate.com
PART NO. 37-7616B
37-7616A
1620
• 50M56-801 Integrated Furnace Control
• 2 Harness Assemblies
• Control Label
• Wire Ties
• Installation Instructions
Electrical Specication [@77 deg F (25 deg C)]
Input Voltage 25 VAC 60Hz
Max Input Current .45A @ 25 VAC
Gas Valve Relay 1.5 amp 0.6 PF @ 30 VAC
Ignitor Relay 1.2 amp @ 120 VAC
Inducer Relay 2.8 amp @ 120 VAC
Circulator Relay 10 amp FLA @ 120 VAC
Circulator Relay 25 amp LRA @ 120 VAC
Humidier Load 1.0 amp @ 24 VAC or 120 VAC
Electronic Air Cleaner 1.0 amp @ 120 VAC
Minimum current to insure ame detection 0.25 µa DC*
Maximum current for non-detection 0.1 µa DC*
Maximum allowable leakage resistance 100 M ohms
Operating Temperature Range
-40° to 175°F (-40° to 80°C)
HUMIDITY RANGE:
5% to 93% relative humidity (non-condensing)
MOUNTING
Surface mount standoffs
Gases Approved
Natural, Manufactured, Mixed, Liqueed Petroleum, and LP Gas Air Mixtures are all approved for use.
Timing Specication
Flame Establishing Time 0.8 sec
Flame Failure Response Time 2.0 sec
*Measured with a DC microammeter in the ame probe lead

2
INSTALLATION
OEM REPLACEMENT INSTRUCTIONS - 50M56U-801
Lennox Model
Furnace using
control:
NOTE: Ignitor must be replaced with
120V Ignitor
(Recommend 21D64-2) 75M21 Ignitor
- Remove existing control and verify
part number to be replaced
- Reference Wiring diagram
- Install harness 0115-0303 into the
Inducer and Ignitor 4-pin connector
- Plug in remaining connections
81W03
1012-969A
17W70
100973-01,02
1012-969
78M4701
78M1701
75M1701
Lennox,
Armstrong,
Ducane
Furnaces
using control:
- Remove existing control and verify
part number to be replaced
- Reference Wiring diagram
- Plug in all connections.
56W19
94W83
R47582-001
103085-01
1012-967
103085-02
103085-03
1012-83-9673A
1012-977A
81W11
56L8501
12L4201
50A55-120
80M2701
1012-968
Lennox Model
Furnace using
control:
- Remove existing control and verify
part number to be replaced
- Reference Wiring Diagram
- Install harness 0115-0303 into the
Inducer and Ignitor 4-pin connector.
- Install harness 0115-0302 into the
main 12-pin connector.
- Plug in remaining connections.
74W03
103098-01
1195-100
1195-83-100A
Follow Appliance Manufacturer’s recommended installation
or service instructions to ensure proper operation after
installation
All installation procedures should be carried out ONLY
by a qualified Heating and Air Conditioning contractor
orlicensedelectrician, accordingtoLocal andNational
Electrical codes and Ordinances.
WARNING
!
FIRE HAZARD
• Do not exceed the specified voltage.
• Replace existing control with exact model and dash
number.
• Protect the control from direct contact with water
(dripping, spraying, rain, etc.).
• If the control has been in direct contact with water,
replace the control.
• Label all wires before disconnection when servicing
controls. Wiring errors can cause improper and
dangerous operation.
• Route and secure wiring away from flame.
SHOCK HAZARD
• Disconnect electric power before servicing.
• Ensure proper earth grounding of appliance.
• Ensure proper connection of line neutral and line hot
wires.
EXPLOSION HAZARD
• Shut off main gas to appliance until installation is
complete.
WARNING
!
Failure to comply with the following warnings could
result in personal injury or property damage.

3
IND
IGN
IND-N
IGN-N
Fault Recall
LED Diagnos cs
Inducer
Motor
Blower
Motor
Line
120 VAC
TH FS HLO
TR RO PSO
MV COMGND HLI
MV ROI PSI
Rollout
(N.C.)
Y W R G C
Gas Valve
Flame Sense
Neutral
120 VAC
High Limit
(N.C.)
Aux
(N.C.)
Pressure Switch
(N.O.)
EAC
120V
HUM
24V
Twinning
HUM
120V
120V
Ignitor
120 VAC
24 VAC CLASS II
TRANSFORMER
24 VAC
TH TR
Cool off Delay
60s* 2s
Heat on Delay
45s 30s*
60s*
120s*
90s
180s
SW1
SW1
SW1
SW1
SW1SW1
OFF
OFF
OFF
OFF
OFF
OFFON
ON
ON
ON
ON
ON
1
2
3
4
1
2
3
4
1
2
3
4
1
2
3
4
1
2
3
4
1
2
3
4
Heat off Delay
* = Default
Note: Cycle power after changes are made.
WIRING DIAGRAM

4
Standby
Call for Heat (Y&G)
Cool ON Delay
(2 seconds)
Cooling until
Thermostat Satised
Blower Off Delay*
45/60 Seconds
System off
Thermostat
Outdoor Compressor
Outdoor Condenser Fan
Blower Motor
EAC
LED LED blinks green 1/4s ON time and 2s OFF time
*All Dipswitch timing changes made during an active call will not go into effect until the next active call.
Time
Output
Standby
Call for Heat (W)
Self-Check
Pre-Purge
(15 seconds)
Ignitor
Warm up
(17-19
Seconds)
Ignition
Activation
Period
(<3s)
Heat ON
Delay*
Selectable
(30/45
seconds)
Heating until
Thermostat
Satised
Post-Purge
(25 seconds)
Blower Off
Delay*
60/90/120/180
Seconds
System off
Thermostat
Inducer
Pressure Switch
Ignitor
Gas (MV)
Flame Sensor
Blower Motor
Humidier (120V)
Humidier (24V)
EAC
LED LED blinks yellow 1/4s ON time and 2s OFF time
*All Dipswitch timing changes made during an active call will not go into effect until the next active call.
Time
Output
HEAT MODE
COOL MODE
OPERATION
Standby
Call for Heat (G)
Cool ON Delay
(2 seconds)
Cooling until
Thermostat Satised
Blower Off Delay*
2/60 Seconds
System off
Thermostat
Blower Motor
EAC
LED LED blinks green continuously
*All Dipswitch timing changes made during an active call will not go into effect until the next active call.
Time
Output
FAN MODE

5
SYSTEM LOCKOUT
& DIAGNOSTIC FEATURES
SYSTEM LOCKOUT FEATURES
When system lockout occurs,
1. Diagnostic LED will flash or glow continuously to indicate
system status.
2. Gas valve is de-energized.
3. Circulator blower is energized at heat speed, and, if
4. Flame is sensed, the inducer blower is energized.
(System lockout will never override the precautionary
features.)
To RESET the control after System Lockout
• Interrupt the call for Heat or Cool at the thermostat for at
least 1 second but less than 20 seconds.
(If flame is sensed with the gas valve de-energized,
interrupting the call for heat at the thermostat will not
reset the control.)
OR
• Interrupt the 24 VAC power at the control for at least 1
second. You may also need to reset the Flame Rollout
Sensor switch.
Serviceable Parts
50M56U-801has onlyone serviceablepart –anautomotive
type fuse, which protects the low voltage transformer from
damage if the output is short-circuited.
• If the fuse has opened up, remove whatever caused
the short circuit and replace the fuse with only a 3 Amp
automotive type fuse.
• If the fuse does not correct the condition, REPLACE
the entire 50M56U-801 control. There are no other user
serviceable parts.
DIAGNOSTIC FEATURES
The 50M56U-801 control continuously monitors its own
operation and the operation of the system.
• If a failure occurs, the LED will indicate a failure code as
shown on page 5 in flash – pause sequences.
• Flash will last approximately for 0.25 seconds, and each
pause will last approximately 2 seconds.
FAULT RECALL
Control must be in STANDBY mode (no call for heat or cool)
• Last 5 fault codes stored can be displayed on the
Diagnostic LED.
• Press the FAULT RECALL switch for approximately 2
seconds or until the LED turns off.
• Release the switch and the LED will remain off for 2
seconds.
• Fault codes will display beginning with the most recent
fault first with a 2 second pause between codes.
• After the stored fault codes have all displayed, the LED
will remain off for 2 seconds and then turn on to indicate
return to normal status.
(While displaying the stored fault codes, the control will
ignore any new call for heat, cool or fan.)
FAULT CODES RESET Automatically after 14
days. To manually reset see steps below.
Control must be in STANDBY switch mode (no call for
heat or cool)
Press the FAULT RECALL switch for approximately 5-10
seconds or until the LED begins to rapid flash.
• Release the switch and the LED will turn off for 2 seconds
indicating that the codes are erased.
• After 2 seconds, the LED will turn on to indicate return
to normal status.
• If the switch is held pressed for over 10 seconds, the rapid
flash will stop and the LED will turn on to indicate return
to normal status and the fault codes will not be erased.
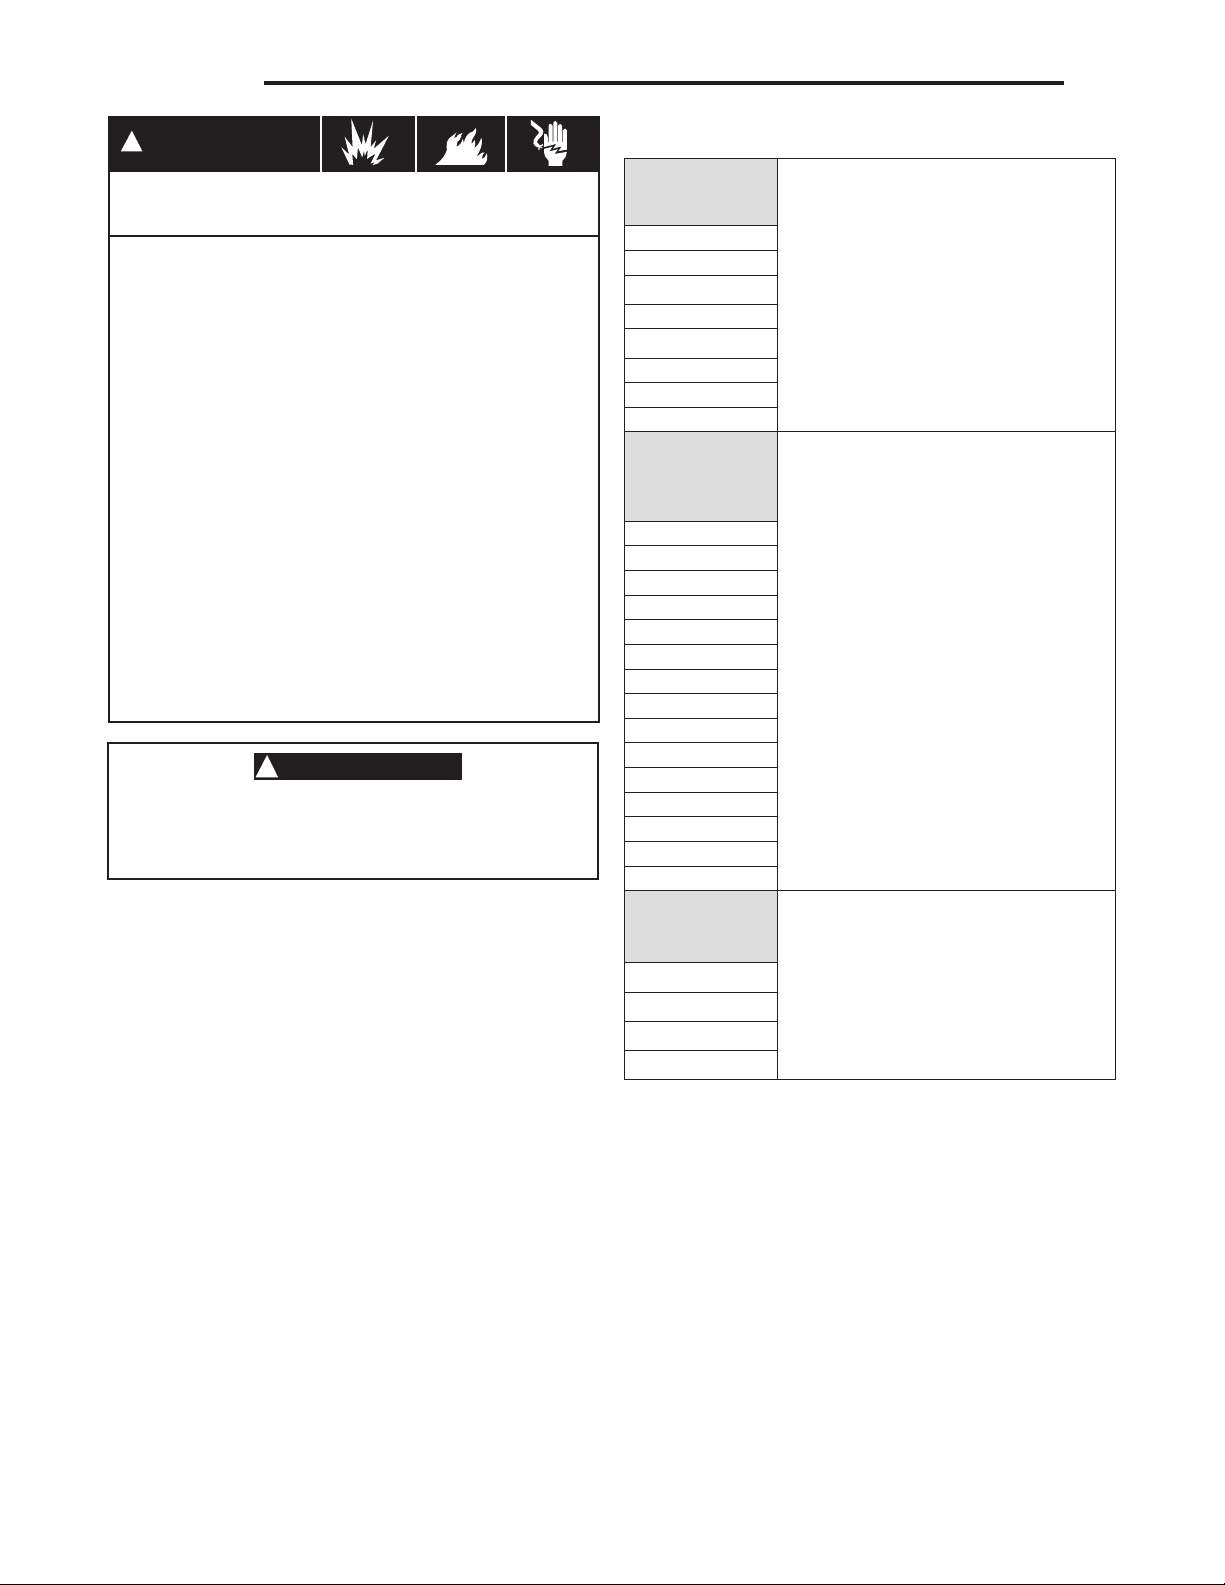
TROUBLESHOOTING
Green
LED
Flash
Amber
LED
Flash
Red
LED
Flash Error/Condition Comments/Troubleshooting
Below flash codes shall be stored if fault occurs
1 Flame Present Without Gas
Valve Energized - Verify the gas valve is operating and shutting down
properly.
- Flame in burner assembly should extinguish promptly
at the end of the cycle.
- Check orifices and gas pressure.
2 Pressure Switch Stuck Closed /
Inducer Error - Check switch function, verify inducer is turning off.
- Refer to wiring diagram, terminals PSI / PSO
3 Pressure Switch Stuck Open /
Inducer Error - Check pressure switch function and tubing.
- Verify inducer is turning on and pulling sufficient
vacuum to engage switch.
- Refer to wiring diagram, terminals PSI / PSO.
4 High Limit Switch Open - Verify continuity through limit switch circuit.
- Refer to wiring diagram terminals, HLI / HLO.
Table of contents
Languages:
Other White Rodgers Control System manuals