GL1500
Benutzerhandbuch
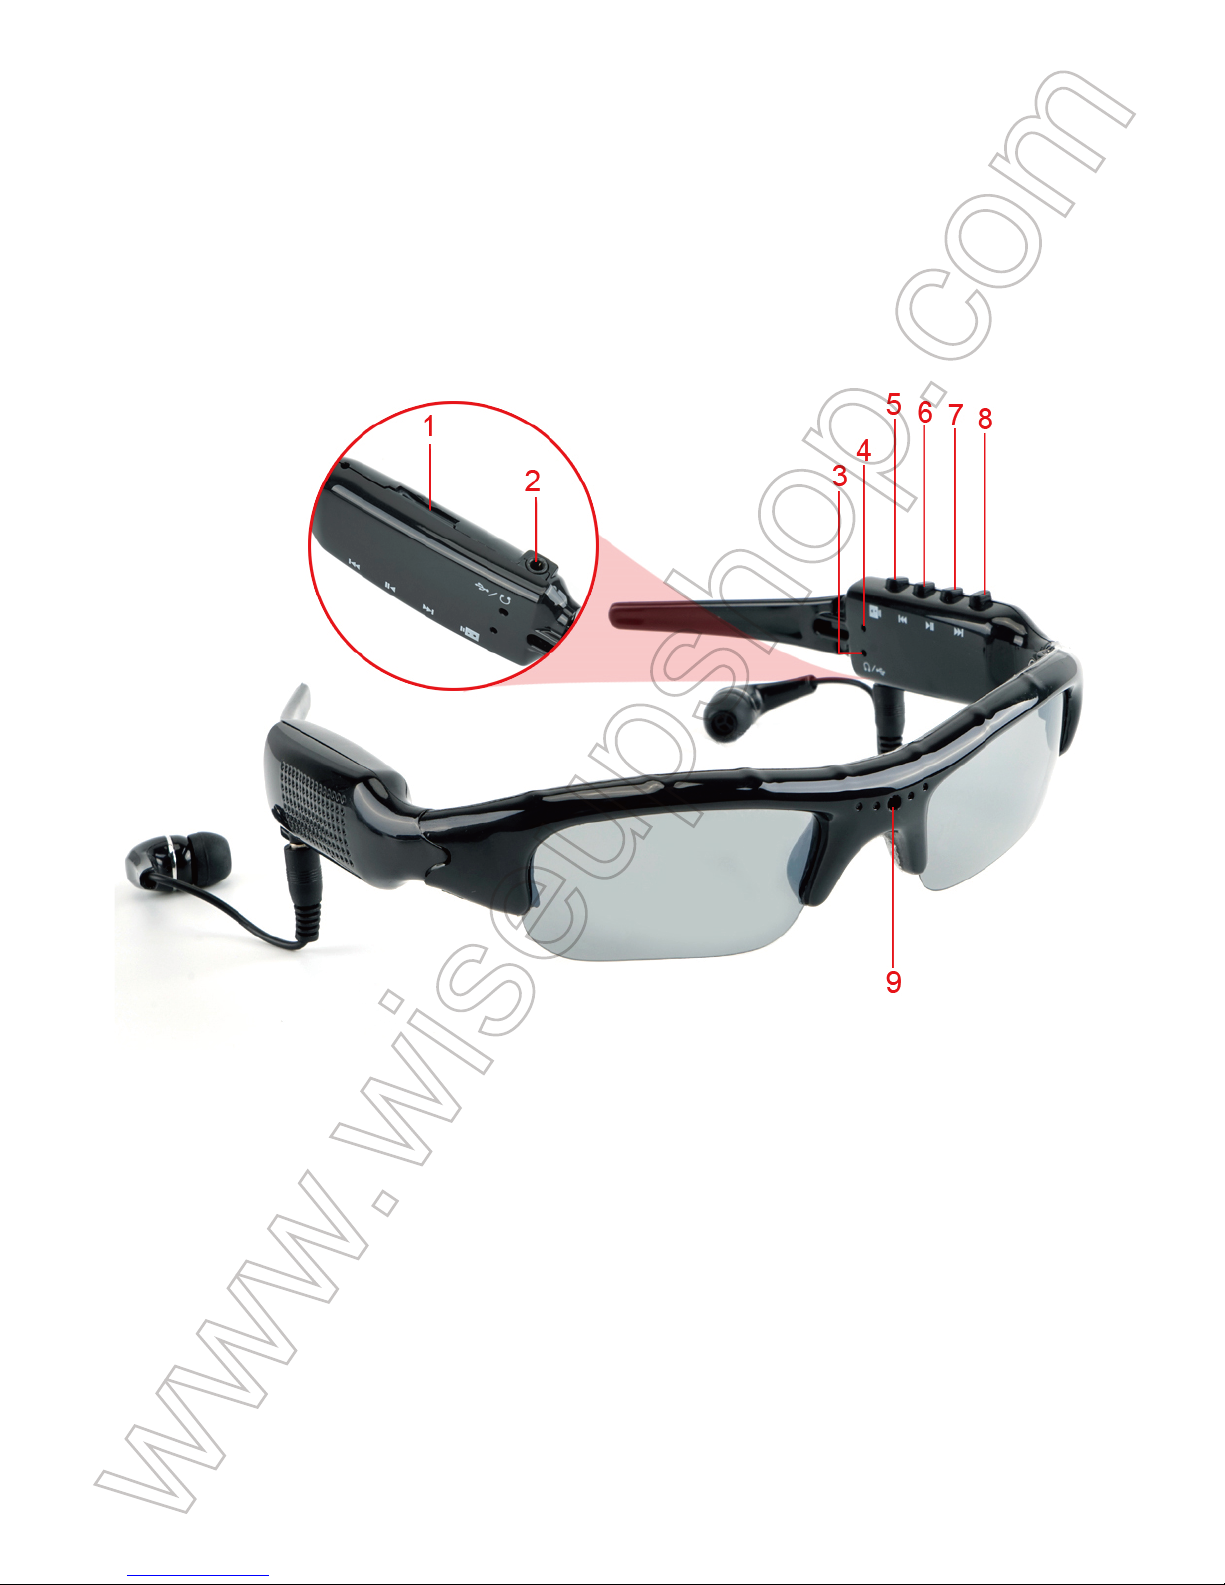
I. Produktübersicht
1. Micro SD Kartensteckplatz
2. USB Port / Kopfhöreranschluss
3. Red/Blue Indikator Licht
4. Reset-Taste
5. Camera/Video Aufnahmetaste
6. Previous / V- Knopf
7. Power Schaltfläche
8. Next/V+ Knopf
9. Kamera Objektiv
II. Was ist in der Box
-1 × Gläser Kamera
-1 × USB-Kabel
-1 × AC110-230V bis DC 5V Netzteil
-2 × Kopfhörer
-1 × 8GB Micro SD Card (bereits in den Micro SD Kartensteckplatz eingebaut)
III. Betrieb
>> Vor der Verwendung bitte sicherstellen, dass Ihre Kamera voll aufgeladen ist.
>> Bitte stellen Sie sicher, dass die Micro SD-Karte bereits formatiert ist und sicher in den
SD-Kartensteckplatz der Kamera eingepasst ist, oder es funktioniert nicht. Wir empfehlen
Ihnen, eine SDHC Class 10 Micro SD Karte zu verwenden.
[Hinweis]:
1). Wenn keine Micro SD-Karte in die Kamera eingelegt ist, leuchtet die rote Kontrollleuchte für 5
Sekunden und schaltet sich dann nach 3maligem Blinken aus. Die Kamera schaltet sich automatisch
ab.
2). Wenn die Micro SD-Karte defekte Dateien enthält, blinkt die rote Kontrollleuchte 3 Mal und
schaltet sich dann aus. Die Kamera wird automatisch heruntergefahren.
3.1. EINSCHALTEN / AUSSCHALTEN
3.1.1. Schalten Sie die Kamera ein, indem Sie den Netzschalter 3 Sekunden lang drücken.
Die rote Kontrollleuchte leuchtet auf und blinkt einmal und leuchtet dann auf und zeigt an,
dass die Kamera automatisch in den Standby-Modus geschaltet ist.
3.1.2. Schalten Sie die Kamera aus, indem Sie den Netzschalter 2 Sekunden lang drücken.
Die rote Kontrollleuchte erlischt.
[Hinweis]:
1). Wenn sich die Kamera im Standby-Modus ohne Betrieb mehr als 2 Minuten befindet, schaltet
sich die rote Kontrollleuchte aus. Die Kamera schaltet sich automatisch ab.
2). Wenn sich die Kamera in einer extrem niedrigen Batterie befindet, blinkt die Kontrollleuchte,
sobald die Kamera eingeschaltet ist, 6 Mal und schaltet sich dann aus. Die Kamera schaltet sich
automatisch ab.
3.2 . VIDEOAUFNAHME
3.2.1. Schalten Sie die Kamera ein, indem Sie den Netzschalter 3 Sekunden lang
drücken. Die rote Kontrollleuchte leuchtet auf und blinkt einmal und leuchtet dann auf und
zeigt an, dass die Kamera automatisch in den Standby-Modus geschaltet ist.
3.2.2. Drücken Sie die Videoaufnahme-Taste für 2 Sekunden, um die Videoaufnahme zu
starten. Die rote Kontrollleuchte schaltet sich aus, dann blinkt die blaue Kontrollleuchte 3
mal und blinkt langsam.
3.2.3. Drücken Sie die Videoaufnahme-Taste einmal, um die Videoaufnahme zu beenden.
Die blaue Kontrollleuchte blinkt zweimal und schaltet sich aus, dann bleibt die rote
Kontrollleuchte fest und zeigt an, dass die Kamera wieder in den Standby-Modus versetzt
wird.
[Hinweis]:
1). Eine Videodatei wird alle 30 Minuten automatisch generiert und gespeichert.
2). Die Kamera kann Video für 1 Stunde kontinuierlich auf eine volle Ladung aufnehmen.
3). Video Auflösung: 640X480 Video Format: AVI
4). Wenn sich die Kamera während der Videoaufnahme in der Batterie befindet, schaltet sich die
blaue Kontrollleuchte aus, dann leuchtet die rote Kontrollleuchte für 1 Sekunde und schaltet sich
dann aus. Die Kamera wird automatisch heruntergefahren und die Videodateien werden automatisch
auf der Micro SD-Karte gespeichert.
3.3. KAMERA / NOCH FOTOGRAFIE
3.3.1. Schalten Sie die Kamera ein, indem Sie den Netzschalter 3 Sekunden lang drücken.
Die rote Kontrollleuchte leuchtet auf und blinkt einmal und leuchtet dann auf und zeigt an,
dass die Kamera automatisch in den Standby-Modus geschaltet ist.
3.3.2. Drücken Sie einmal die Kamera-Taste, um ein Foto aufzunehmen. Die blaue
Kontrollleuchte blinkt einmal und schaltet sich aus, dann bleibt die rote Kontrollleuchte solide
und zeigt an, dass die Kamera wieder in den Standby-Modus versetzt wird.
IV. Musik Spielen
>> Die Musikwiedergabe kann nicht gleichzeitig mit der Kamera funktionieren.
>> Bitte importiere die MP3-Dateien im Voraus in die Micro SD-Karte, oder es wird keine
Musik zum Spielen geben.
>> Da es keine Lautsprecher gibt, stecke bitte das Headset ein, um Musik zu hören.
4.1. EINSCHALTEN / AUSSCHALTEN
4.1.1. Schalten Sie den MP3-Player ein, indem Sie den Netzschalter 3 Sekunden lang
drücken. Die rote Kontrollleuchte leuchtet auf und blinkt einmal und leuchtet dann auf und
zeigt an, dass die Kamera automatisch in den Standby-Modus geschaltet ist.
4.1.2. Schalten Sie den MP3-Player aus, indem Sie den Netzschalter 2 Sekunden lang
drücken. Die rote Kontrollleuchte erlischt.
4.2. MUSIK SPIELEN / PAUSE
4.2.1. Drücken Sie einmal die Ein- / Aus-Taste, um Musik im Standby-Modus wiederzugeben.
Die rote Kontrollleuchte blinkt während der Musikwiedergabe.
4.2.2. Drücken Sie die Power-Taste erneut, um die Wiedergabe zu beenden. Die rote
Kontrollleuchte hört auf zu blinken und leuchtet auf und zeigt an, dass der MP3-Player
wieder in den Standby-Modus versetzt wird.
4.2.3. Drücken Sie die Power-Taste einmal, um den vorherigen oder nächsten Song zu
spielen.
4.3. VOLUME ERHÖHUNG / DECREASE
Drücken Sie während der Musikwiedergabe einmal die V + Taste / V-Taste, um die Lautstärke
zu erhöhen oder zu verringern.
V. Video- / Bilddatei hochladen
5.1. Schalten Sie die Kamera aus, entfernen Sie die Micro SD-Karte und legen Sie sie in
einen Kartenleser ein.
5.2. Legen Sie den Kartenleser in einen geeigneten PC-Computer ein.
5.3. Die Micro SD-Karte wird als Wechseldatenträger erkannt.
5.4. Auf alle Dateien kann im Laufwerk zugegriffen werden.
VI. Einstellzeit / Datumsstempel
6.1. Schalten Sie die Kamera aus, entfernen Sie die Micro SD-Karte und legen Sie sie in
einen Kartenleser ein.
6.2. Legen Sie den Kartenleser in einen geeigneten PC-Computer ein.
6.3. Der Ordner "Wechseldatenträger" wird angezeigt.
6.4 Klicken Sie auf das Laufwerk im Stammverzeichnis und öffnen Sie die txt-Dokumentdatei
mit dem Namen "time.txt". Wenn Sie es nicht finden können, erstellen Sie eine neue.
6.5. Schreiben Sie das aktuelle Datum und die Uhrzeit in die Datei "time.txt" mit dem
richtigen Format:
JJJJ-MM-TT HH: MM: SS (zB: 2016-04-12 14:24:32). Diese Datei speichern
6.6. Starten Sie die Kamera neu und das System wird das Programm automatisch
aktualisieren.
VII. Aufladen
7.1. Schließen Sie die Kamera an eine Steckdose an, indem Sie das USB-Kabel und den
mitgelieferten DC5V-Ladeadapter verwenden.
7.2. Die rote Kontrollleuchte blinkt während des Ladevorgangs.
7.3. Es dauert 1 Stunde, um eine volle Ladung zu erhalten.
7.4. Die rote Kontrollleuchte schaltet sich aus, wenn die Kamera voll aufgeladen ist.
VIII. Zurücksetzen
Wenn aus irgendeinem Grund die Kamera nicht mehr reagiert oder nicht ordnungsgemäß
funktioniert, wird ein schneller Reset wieder in den normalen Betrieb zurückversetzt.
Betrieb: Wenn die Kamera eingeschaltet ist, verwenden Sie einen Pin, um die Reset-Taste
einmal zu drücken. Die Kamera schaltet sich automatisch ab. Sie können die Kamera mit den
werkseitigen Standardeinstellungen neu starten.