WiT WT901C User manual


WT901C RS485 | manual v23-0213 | www.wit-motion.com
- 2 -
Tutorial Link
Google Drive
Link to instructions DEMO:
WITMOTION Youtube Channel
WT901C RS485 Playlist
If you have technical problems or cannot find the information that you need in the
provided documents, please contact our support team. Our engineering team is
committed to providing the required support necessary to ensure that you are
successful with the operation of our AHRS sensors.
Contact
Technical Support Contact Info
Application
● AGV Truck
● Platform Stability
● Auto Safety System
● 3D Virtual Reality
● Industrial Control
● Robot
● Car Navigation
● UAV
● Truck-mounted Satellite Antenna Equipment

WT901C RS485 | manual v23-0213 | www.wit-motion.com
- 3 -
Contents
Tutorial Link .............................................................................. - 2 -
Contact .................................................................................... - 2 -
Application................................................................................ - 2 -
Contents................................................................................... - 3 -
1 Introduction.......................................................................... - 5 -
1.1 Warning Statement ....................................................... - 6 -
2Instructions of 2023 New Software .......................................... - 7 -
3Use Instructions with PC......................................................... - 8 -
3.1 Connection Method........................................................ - 8 -
3.1.1 Serial Connection.................................................... - 8 -
3.2 Software Introduction .................................................. - 12 -
3.2.1 Main Menu ........................................................... - 12 -
3.2.2 Menu of Configuration ........................................... - 14 -
3.3 Calibration ................................................................. - 17 -
3.3.1 Accelerometer Calibration ...................................... - 17 -
3.3.2 Magnetic Field Calibration ...................................... - 19 -
3.3.3 Gyroscope Automatic Calibration............................. - 21 -
3.3.4 Reset Z-axis Angle ................................................ - 22 -
3.3.5 Reset Height to 0 .................................................. - 22 -
3.4 Configuration.............................................................. - 23 -
3.4.1 Baud Rate............................................................ - 23 -
3.4.2 Standby and Wake Up ........................................... - 24 -
3.4.3 Placement Direction .............................................. - 25 -
3.4.4 Data Recording..................................................... - 26 -
3.4.5 Data Playback ...................................................... - 28 -
3.4.6 Bandwidth ........................................................... - 30 -

WT901C RS485 | manual v23-0213 | www.wit-motion.com
- 4 -
3.4.7 Restore Factory Setting.......................................... - 32 -
3.4.8 6-axis/ 9-axis Algorithm ........................................ - 33 -
3.4.9 Set MODBUS Address ............................................ - 34 -
4Multiple Module Cascades ..................................................... - 35 -
4.1 Software Operation ..................................................... - 37 -
5Sample Code ...................................................................... - 38 -

WT901C RS485 | manual v23-0213 | www.wit-motion.com
- 5 -
1 Introduction
The WT901C is a multi-sensor device detecting acceleration, angular velocity,
angle as well as magnetic filed. The small outline makes it perfectly suitable
for industrial retrofit applications such as condition monitoring and predictive
maintenance. Configuring the device enables the customer to address a
broad variety of use cases by interpreting the sensor data by smart
algorithms.
WT901C’s scientific name is AHRS IMU sensor. A sensor measures 3-axis
angle, angular velocity, acceleration, magnetic field. Its strength lies in the
algorithm which can calculate three-axis angle accurately.
WT901C is employed where the highest measurement accuracy is required.
It offers several advantages over competing sensor:
•Heated for best data availability: new WITMOTION patented zero-bias
automatic detection calibration algorithm outperforms traditional
accelerometer sensor
•High precision Roll Pitch Yaw (X Y Z axis) Acceleration + Angular Velocity +
Angle + Magnetic Field output
•Low cost of ownership: remote diagnostics and lifetime technical support by
WITMOTION service team
•Developed tutorial: providing manual, datasheet, Demo video, free software
for Windows computer, communication protocol for project development
•WITMOTION sensors have been praised by thousands of engineers as a
recommended attitude measurement solution

WT901C RS485 | manual v23-0213 | www.wit-motion.com
- 6 -
1.1 Warning Statement
Putting more than 5 Volt across the sensor wiring of
the main power supply can lead to permanent damage
to the sensor.
VCC cannot connect with GND directly, otherwise it
will lead to the burning of the circuit board.
For proper instrument grounding: use WITMOTION
with its original factory-made cable or accessories.
For secondary developing project or integration:
use WITMOTION with its compiled sample code.
WT901C RS485 | manual v23-0213 | www.wit-motion.com
- 7 -
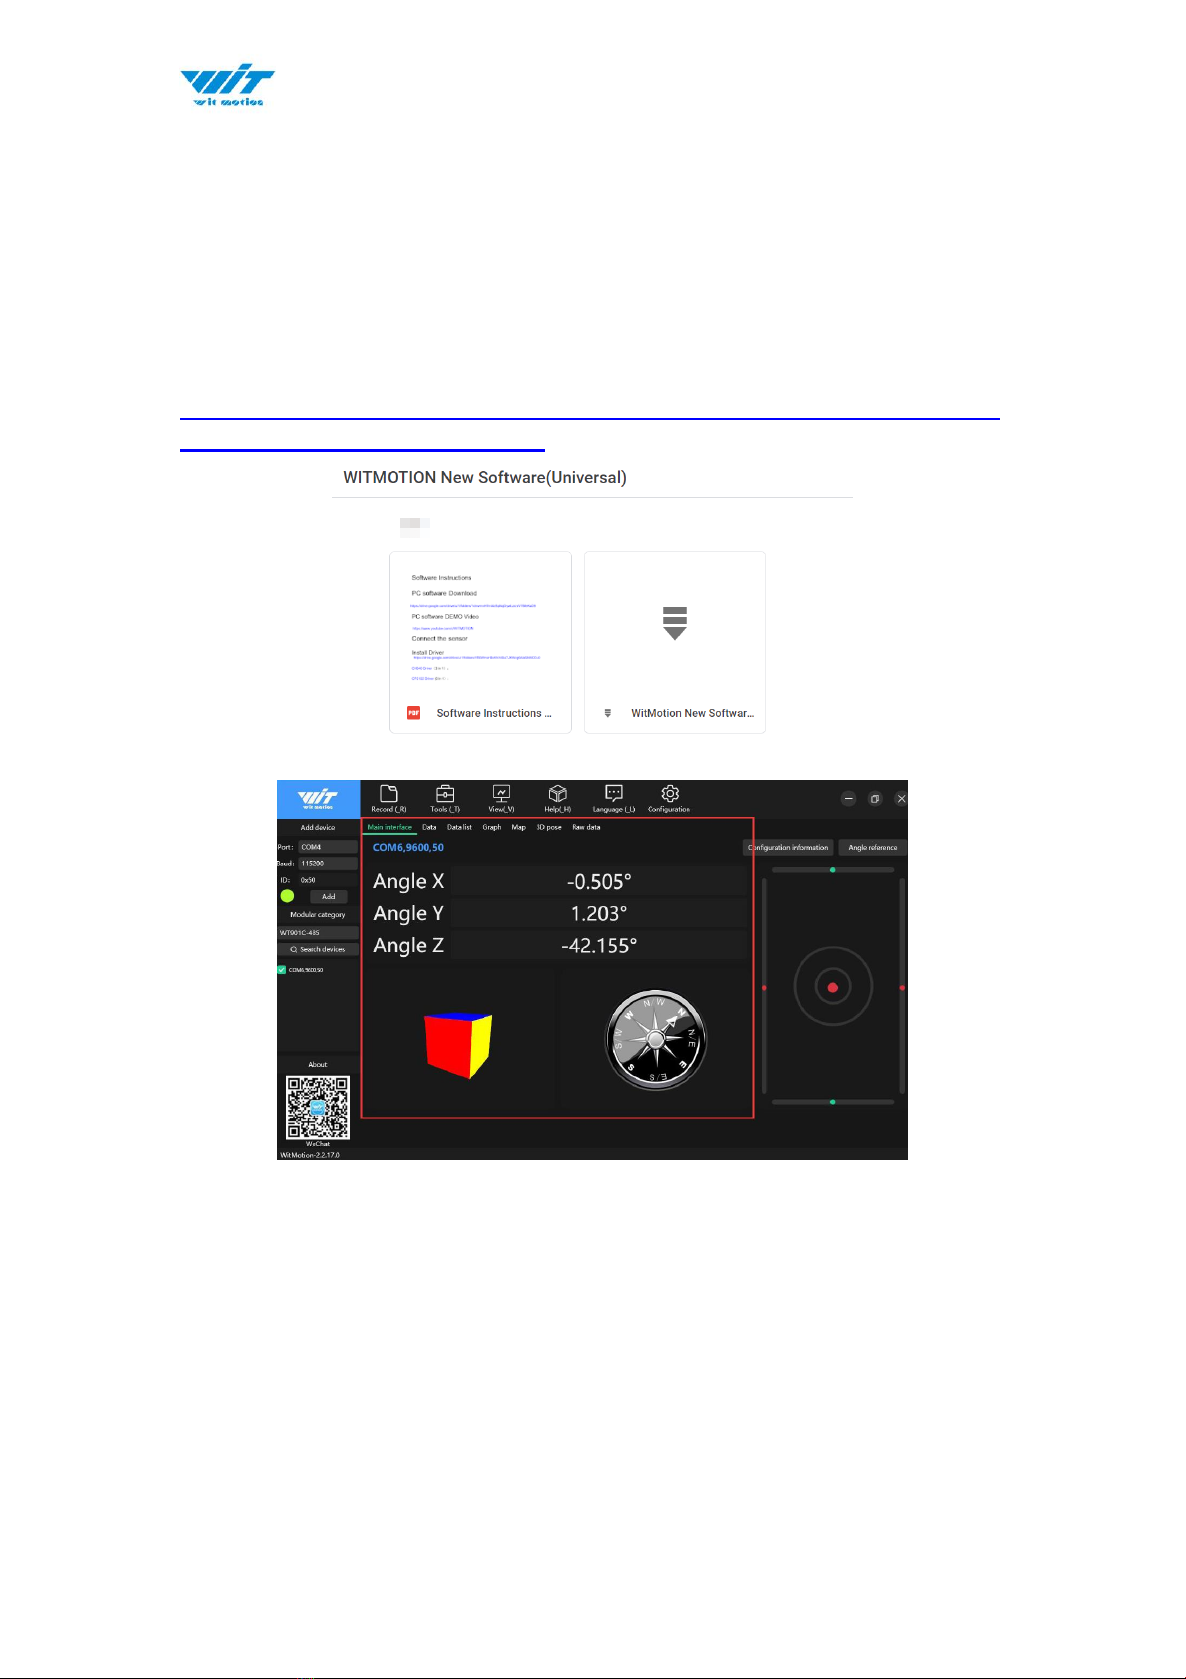
2Instructions of 2023 New Software
In order to improve the user experience and our customer service, we develop
a new version PC software.
Below is the new software and universal instruction download link.
https://drive.google.com/drive/folders/1dnwmnH7mi4zBpNqDywLz
rzsV7BfeKaD9?usp=share_link
Note:
The 2022 old version software will be reserved for use. You can check
“Chapter 3 Use Instructions with PC” for more details. ↓↓↓
WT901C RS485 | manual v23-0213 | www.wit-motion.com
- 8 -
3Use Instructions with PC
3.1 Connection Method
PC software is only compatible with Windows system.
WT901C RS485 Playlist
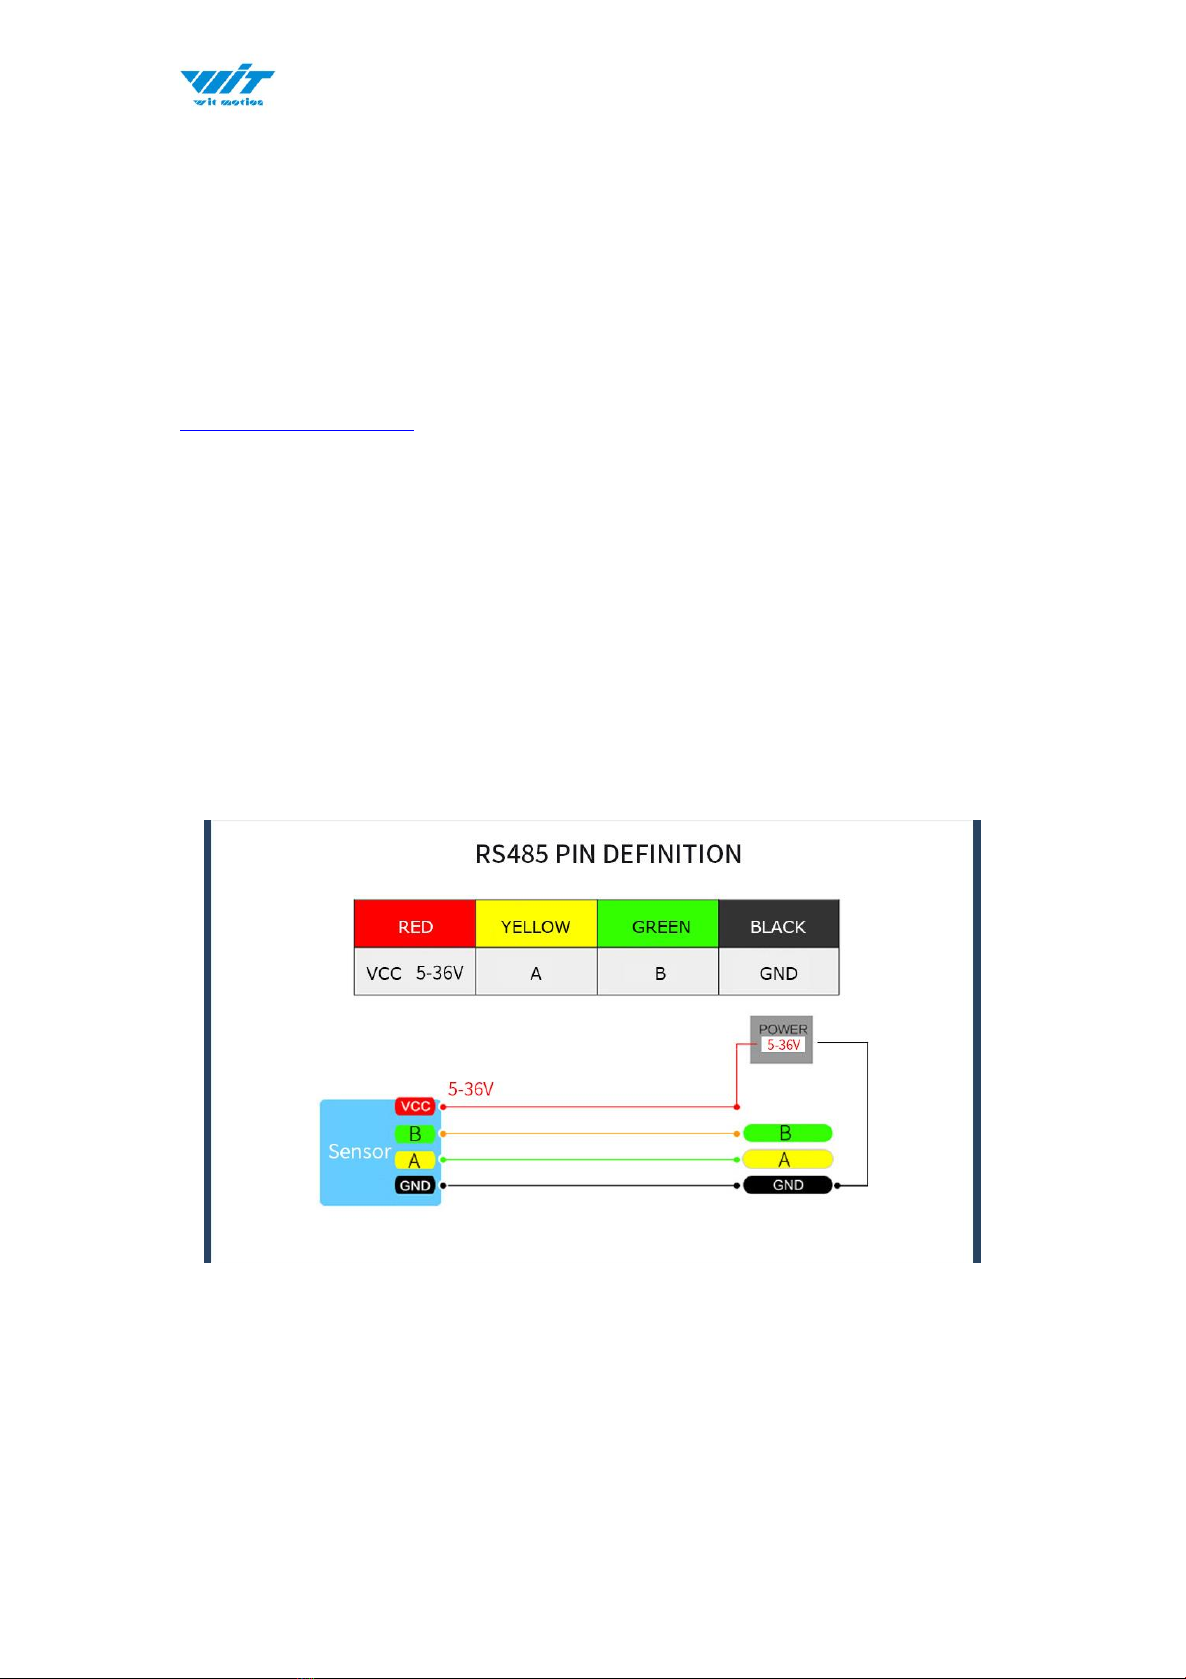
3.1.1 Serial Connection
Step 1. Connect the sensor with a serial converter
PIN Connection:
VCC - 5-36V
B - B
A - A
GND - GND
(VCC 5-36V is recommended for connection)
WT901C RS485 | manual v23-0213 | www.wit-motion.com
- 9 -
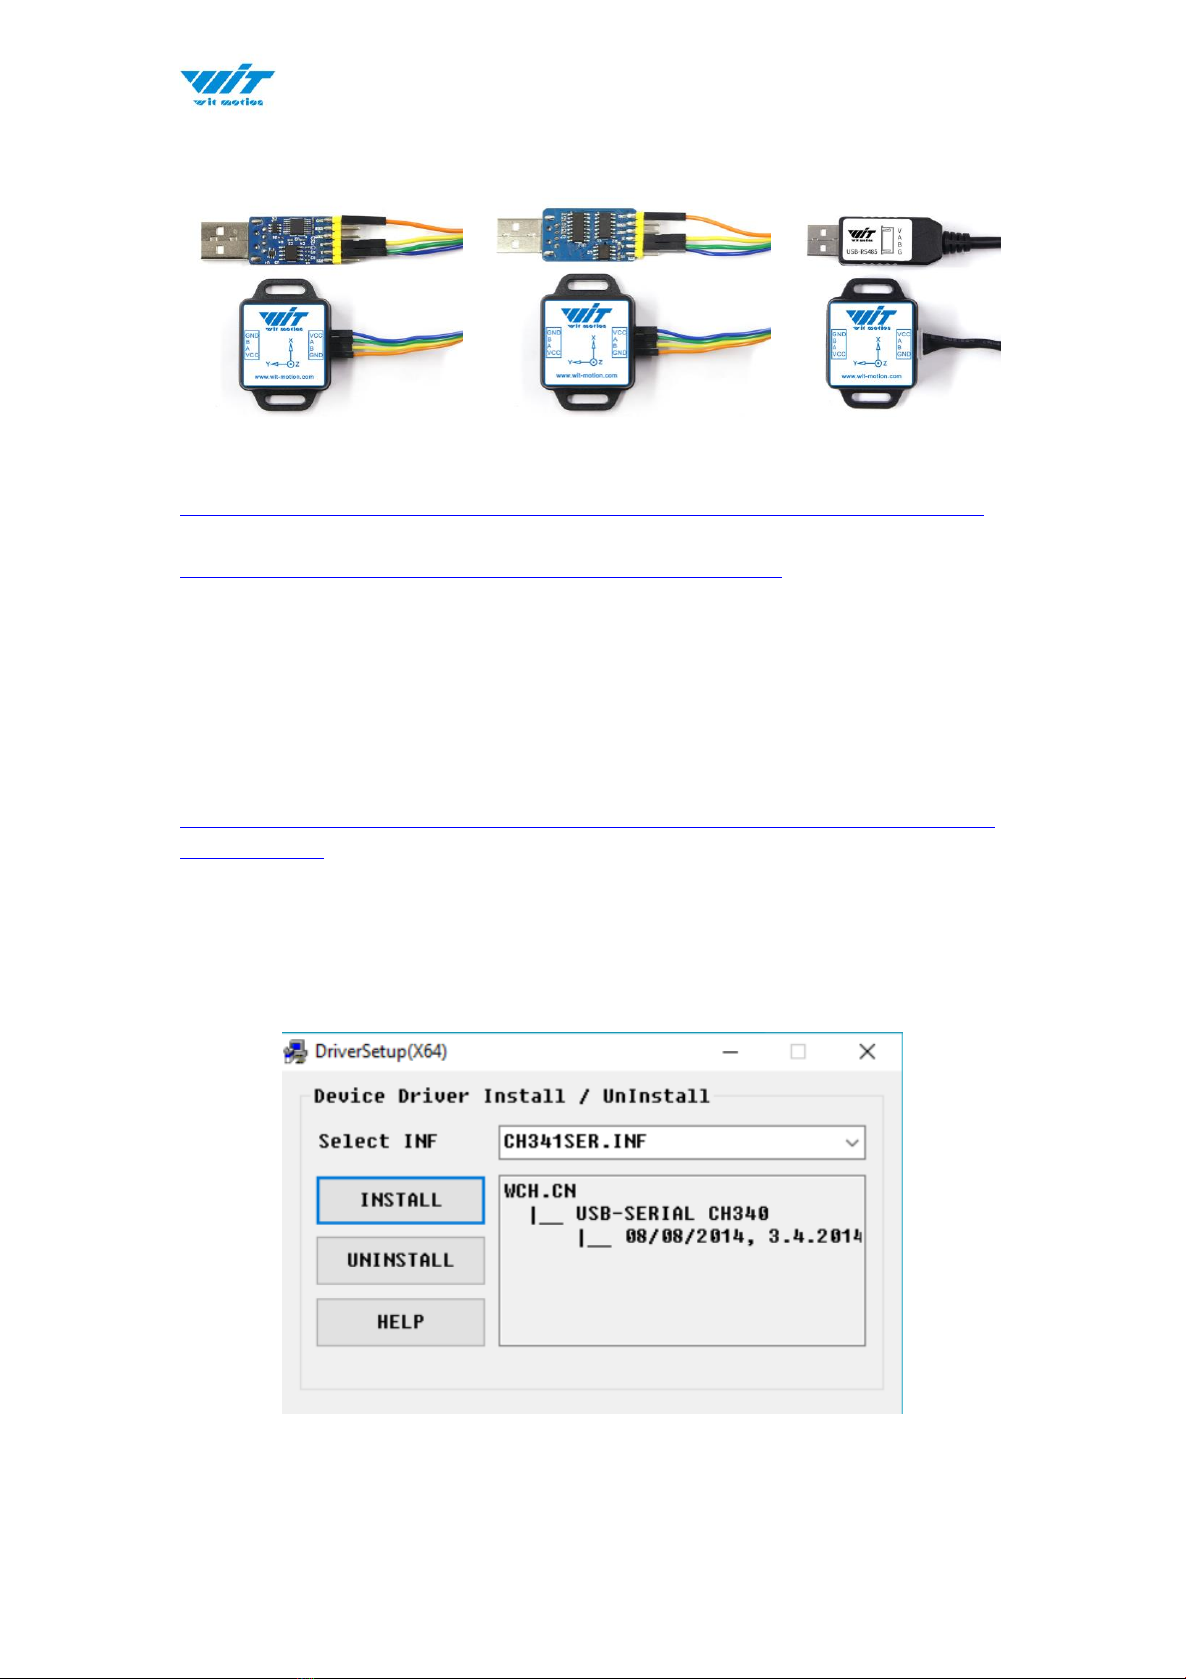
Recommended tools:
3-in-1 converter 6-in-1 converter RS485 serial cable
Link to tutorial of 3-in-1 serial converter/ RS485 serial cable (CH340 driver)
Link to tutorial of 6-in-1 serial converter (CP2102 driver)
Step 1. Connect the sensor with offered dupont line or RS485 line.
Step 2. Unzip the software and install the driver CH340
https://drive.google.com/file/d/1I3hl9Thsj9aXfG6U-cQLpV9hC3bVEH2V/view
?usp=sharing
*How to Install and update the CH340 driver
Click the "Uninstall" button first. Then click on the "Install" button.
WT901C RS485 | manual v23-0213 | www.wit-motion.com
- 10 -
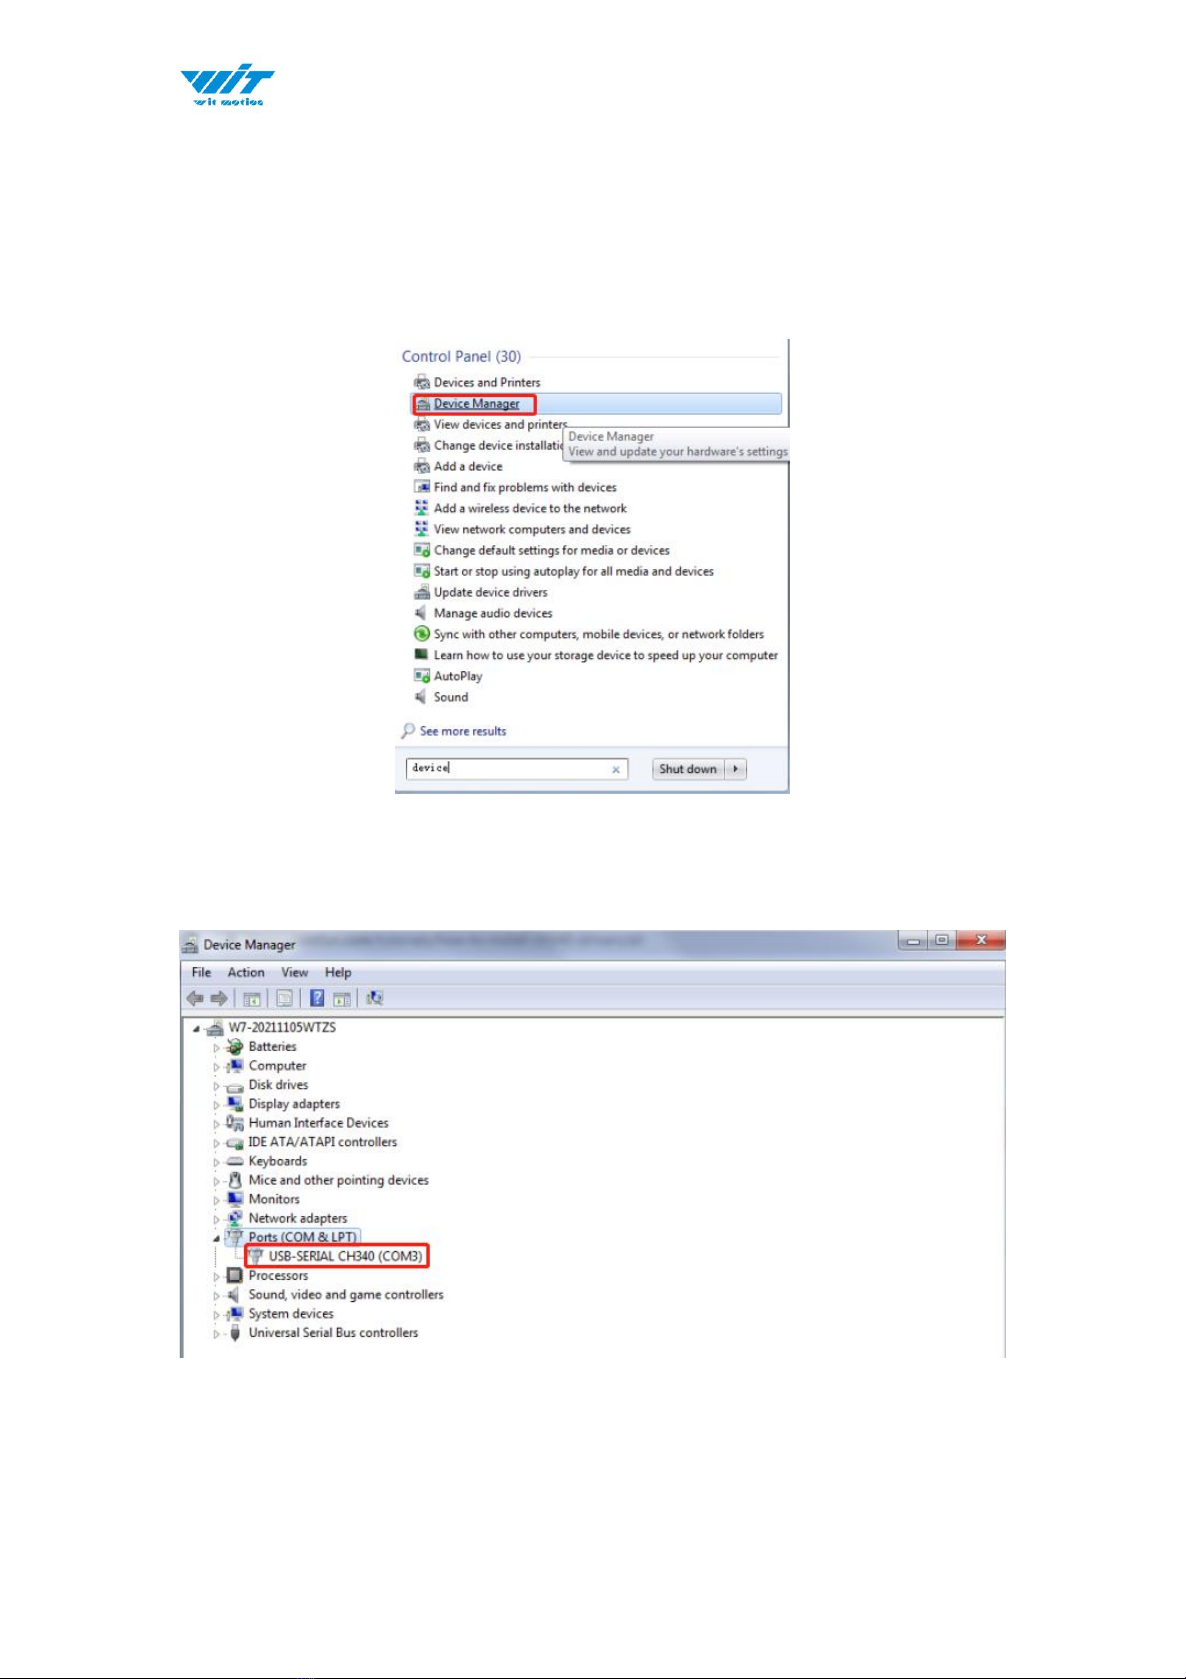
*How to verify your driver is working
1)To check that the CH340 enumerates to a COM port, you can open the device
manager. You can click the Start or ⊞(Windows) button and type "device
manager to quickly search for the application.
2)After opening the device manager, you will need to open the Ports (COM &
LPT) tree. The CH340 should show up as USB-SERIAL CH340 (COM##).
Depending on your computer, the COM port may show up as a different number.
Other manuals for WT901C
1
Table of contents
Other WiT Accessories manuals


