WMF AMBIENT Krauter@home User manual

nl
da
sv
fi
no
1
2
7
8
6
3
4
5
Kräuter @home
AMBIENT
Kundendienst-Adresse:
WMF consumer electric GmbH
Standort Trepesch
Steinstraße 19
D-90419 Nürnberg
Germany
Tel.: +49 (0) 7331 256 256
Hersteller:
WMF consumer electric GmbH
Messerschmittstraße 4
D-89343 Jettingen-Scheppach
Germany
www.wmf-ce.de
Änderungen vorbehalten - IB-19010011-04-1708
type: 0419010011
de
en
fr
it
es
Gebrauchsanweisung 8
Operating Manual 14
Mode d’emploi 20
Istruzioni per l’uso 26
Instrucciones de uso 32
Gebruiksaanwijzing 38
Brugsanvisning 44
Användarguide 50
Käyttöohje 56
Bruksanvisning 62

A
B
C
D
E
F
G
H
I
J
K
no
Apparatet oppfyller kravene i henhold til direktivene 2014/35/EU, 2014/30/EU og
2009/125/EU.
Dette produktet må ikke kastes som vanlig husholdningsavfall etter endt levetid, men
må leveres inn til mottak for gjenvinning av EE-produkter.
Ifølge merkingen på materialene kan disse gjenvinnes. Ved gjenbruk, gjenvinning av
stoffene og andre former for bruk av kasserte apparater yter du et viktig bidrag til
miljøet.
Vennligst forhør deg hos kommunen hvor du kan levere EE-avfall.
Endringer forbeholdes

Aufbau
1 Zwei Deckelhälften mit Aussparungen für Pflanzentöpfe
2 Wasserstandsanzeiger/ Schwimmer mit abnehmbarer
Chromkappe
3 LED-Einsatz
4 Wassertank
5 Edelstahl-Übertopf
6 Einführungsloch für Stecker
7 Zwei Dochthalter
8 Zwei Nylondochte
Nachkaufset: 4 Dochte und 2 Dochthalter
Layout
1 Two half-lids with recesses for plant pots
2 Water-level display/float with removable chrome cap
3 LED insert
4 Water tank
5 Stainless steel cachepot
6 Insertion hole for plug
7 Two wick holders
8 Two nylon wicks
Replacement set: 4 wicks and 2 wick holders
Montage
1 Deux parties de couvercles avec cavités pour les pots de
fleurs
2 Indicateur de niveau d‘eau/flotteur avec capuchon chromé
amovible
3 Modèle à LED
4 Réservoir d‘eau
5 Cache-pot en acier inoxydable
6 Trou d‘introduction pour la fiche
7 Deux supports de mèche
8 Deux mèches en nylon
Kit de remplacement: 4 mèches et 2 supports de mèche
Struttura
1 Due metà di coperchio con incavi per vasi per piante
2 indicatore del livello d‘acqua/galleggiante con cappuccio
cromato estraibile
3 Inserto LED
4 Serbatoio dell‘acqua
5 Coprivaso in acciaio inox
6 Foro di inserimento per connettore
7 Due supporti per stoppino
8 Due stoppini di nylon
Set di ricambi: 4 stoppini e 2 supporti per stoppino
Componentes
1 Dos medias tapas con escotaduras para macetas
2 Indicador del nivel de agua/flotador con tapa de cromo
extraíble
3 Interior LED
4 Depósito de agua
5 Cubretiestos de acero inoxidable
6 Agujero para introducir el enchufe
7 Dos soportes de mechas
8 Dos mechas de nailon
Juego de repuesto: 4 mechas y 2 soportes de mechas
Onderdelen
1 Twee dekselhelften met uitsparingen voor bloempotten
2 Waterstandindicator/ vlotter met
afneembaar chromen kapje
3 Led-inzetstuk
4 Waterreservoir
5 Roestvrijstalen sierpot
6 Invoeropening voor de netstekker
7 Twee wiekhouders
8 Twee nylon wieken
Apart verkrijgbare set: 4 wieken en 2 wiekhouders
Opbygning
1 To dækselhalvdele med udsparinger til urtepotter
2 Vandstandsmåler/svømmer med aftagelig kromhætte
3 LED-indsats
4 Vandbeholder
5 Urtepotteskjuler i rustfrit stål
6 Indføringshul til stik
7 To vægeholdere
8 To nylonvæger
Tilkøbssæt: 4 væger og 2 vægeholdere
Konstruktion
1 Två lockhalvor med ursparningar för blomkrukor
2 Vattennivåindikator/flottör med borttagbar kromhätta
3 LED-insats
4 Vattenbehållare
5 Ytterkruka i rostfritt stål
6 Införingsöppning för stickkontakt
7 Två vekhållare
8 Två nylonvekar
Att köpa till vid behov: Fyra vekar och två vekhållare
Laitteen osat
1 Kaksi kansiosaa, joissa aukot kukkaruukuille
2 Vesimääränäyttö ja uimuri irrotettavalla
kromisuojuksella
3 LED-osa
4 Vesisäiliö
5 Ruostumattomasta teräksestä valmistettu koristeruukku
6 Pistokkeen sisäänvientiaukko
7 Kaksi imeytinpidikettä
8 Kaksi nylonimeytintä
Lisäsetti: 4 imeytintä ja 2 imeytinpidikettä
Deler
1 To dekselhalvdeler med utsparinger til plantepotter
2 Vannivåindikator/ flottør med avtakbar kromhette
3 LED-innsats
4 Vanntank
5 Potteskjuler i rustfritt stål
6 Innføringshull for støpsel
7 To vekeholdere
8 To nylonveker
Sett som kan kjøpes i tillegg: 4 veker og 2 vekeholdere

9
de
8
Gebrauchsanweisung
Wichtige Sicherheitshinweise
▪ Kinder dürfen nicht mit dem Gerät spielen.
▪ Geräte können von Personen mit reduzierten physischen, sensorischen
oder mentalen Fähigkeiten oder Mangel an Erfahrung und/ oder
Wissen benutzt werden, wenn sie beaufsichtigt oder bezüglich des
sicheren Gebrauchs des Gerätes unterwiesen wurden und die daraus
resultierenden Gefahren verstanden haben.
▪ Dieses Gerät darf nicht von Kindern benutzt werden. Das Gerät und
seine Anschlussleitung sind von Kindern fernzuhalten.
▪ Das Gerät nur mit dem dazugehörigen Netzteil betreiben.
▪ Wenn das Netzteil beschädigt wird, muss es ersetzt werden. Es ist
beim Hersteller oder seinem Kundendienst erhältlich.
▪ Dieses Gerät ist dazu bestimmt, im Haushalt und ähnlichen
Anwendungen verwendet zu werden, wie beispielsweise:
⋅in Küchen für Mitarbeiter in Läden, Büros und anderen
gewerblichen Bereichen;
⋅in landwirtschaftlichen Anwesen;
⋅von Kunden in Hotels, Motels und anderen Wohneinrichtungen;
⋅in Frühstückspensionen.
Das Gerät ist nicht für den rein gewerblichen Gebrauch bestimmt.
▪ Das Gerät ist bei nicht vorhandener Aufsicht und vor dem
Zusammenbau, dem Auseinandernehmen oder Reinigen stets vom
Netz zu trennen.
Vor dem Benutzen
Das Gerät darf nur für den vorgesehenen Zweck gemäß dieser Gebrauchsanweisung verwendet
werden. Lesen Sie deshalb die Gebrauchsanweisung vor der Inbetriebnahme sorgfältig, sie gibt
Anweisungen für den Gebrauch, die Reinigung und die Pflege des Gerätes. Bei Nichtbeachtung
übernehmen wir keine Haftung für eventuelle Schäden. Bewahren Sie die Gebrauchsanweisung
sorgfältig auf und geben Sie diese gemeinsam mit dem Gerät an Nachbenutzer weiter. Beachten Sie
auch die Garantiehinweise am Ende der Gebrauchsanweisung.
Beim Gebrauch die Sicherheitshinweise beachten.
Technische Daten Übertopf
Nennspannung: 12 V
Leistungsaufnahme: 0,5 A
Schutzklasse: III
Technische Daten Netzteil
Netzspannung: 220-240 V~
Stromaufnahme: 50 Hz 0,3 A
Schutzklasse: II
Weitere Sicherheitshinweise
▪ Das Netzteil nur an eine vorschriftsmäßig installierte Schutzkontaktsteckdose anschließen.
Zuleitung und Stecker müssen trocken sein.
▪ Die Anschlussleitung nicht über scharfe Kanten ziehen oder einklemmen, nicht herunterhängen
lassen sowie vor Hitze und Öl schützen.
▪ Ein Verlängerungskabel nur in einwandfreiem Zustand einsetzen.
▪ Das Netzteil nicht an der Leitung oder mit nassen Händen aus der Steckdose ziehen.
▪ Das Gerät nicht auf heiße Oberflächen z.B. Herdplatten o.Ä. oder in der Nähe der offenen
Gasflamme abstellen, das Gehäuse könnte dabei anschmelzen.
▪ Wenn das Gerät nicht benutzt wird, das Netzteil ausstecken.
▪ Das Gerät darf nur in Innenräumen betrieben werden.
▪ Das Gerät nur auf ebenem Untergrund aufstellen, da sonst der Wassertank auslaufen könnte.
▪ Den LED-Einsatz nie ins Wasser stellen oder mit Wasser reinigen. Nur mit feuchtem Tuch säubern.
▪ Das Gerät nicht in Betrieb nehmen bzw. sofort das Netzteil ausstecken, wenn:
⋅Gerät, Anschlusskabel oder Netzteil beschädigt ist,
⋅der Verdacht auf einen Defekt nach einem Sturz oder Ähnlichem besteht,
⋅das Gerät undicht ist.
In diesen Fällen das Gerät zur Reparatur geben.
▪ Bei Zweckentfremdung, falscher Bedienung oder nicht fachgerechter Reparatur wird keine
Haftung für eventuelle Schäden übernommen. Ebenso sind Garantieleistungen in solchen Fällen
ausgeschlossen.
Verwendung
Der WMF AMBIENT Kräuter @home ist ein stilvoller Übertopf, der Pflanzenpflege und Indoor-
Dekoration vereint:
▪ Er ist perfekt für 2 Kräuter-/ Blumentöpfe mit Erde (Standard Ø 12 cm, Höhe 10 cm).
▪ Er besitzt eine intelligente Wasserzufuhr mittels Dochtbewässerung. Die Pflanzen holen sich genau
so viel Wasser, wie sie brauchen. Dadurch wird Über- und Unterdosierung verhindert.
▪ Durch den eleganten Wasserstandsanzeiger (2) wissen Sie immer, wann Sie den Wassertank (4)
nachfüllen müssen.
▪ Ein gefüllter Wassertank (4) reicht bis zu vier Tage (je nach Wasserbedarf der Pflanzen und Wärme
im Raum).
▪ Das individuell ein- und ausschaltbare Ambient Light besitzt drei verschiedene Helligkeitsstufen.
Einfach das Edelstahlgehäuse (5) berühren – und es leuchtet.
▪ Achten Sie darauf, dass sich in unmittelbarer Nähe keine leitenden Gegenstände befinden und
führen Sie das Kabel geradlinig vom Gerät weg, um einen störungsfreien Betrieb der WMF Easy
Touch-Funktion zu gewährleisten.
de

10 11
de
Kräuter-/ Blumentöpfe einsetzen
Zum besseren Verständnis sind die wichtigsten Schritte in Bildern auf der Umschlagseite erklärt (im
Fließtext durch Großbuchstaben gekennzeichnet).
▪ Packen Sie die einzelnen Teile des WMF AMBIENT Kräuter @home aus.
▪ Setzen Sie den Wassertank (4) in den Edelstahl-Übertopf (5) [A]. Der Führungssteg am Boden des
Übertopfes muss im seitlichen Schlitz des Wassertanks sitzen [B]. Der Wassertank sitzt dann fest
und wackelt nicht.
▪ Füllen Sie so viel Wasser ein, bis das Wasser die MAX-Markierung erreicht [C].
▪ Setzen Sie den LED-Einsatz (3) in den Übertopf ein, so dass er passgenau auf dem Wassertank
aufsitzt. Dabei muss sich der Netzteilanschluss auf der Seite des Loches am Übertopf befinden.
Beachten Sie beim Einsetzen den silbernen Knopf auf der Seite des Netzteilanschlusses
hineinzudrücken [D].
▪ Bereiten Sie den ersten Pflanzentopf mit Docht vor:
⋅Legen Sie den Docht in die Gabel des Dochthalters. Spannen Sie den Docht an den Längsseiten
des Dochthalters und halten Sie beide Dochtenden am unteren Ende des Dochthalters fest [E].
⋅Schieben Sie den Docht mit Dochthalter in eines der Löcher an der Unterseite des
Pflanzentopfes bis zum Anschlag hinein [F]. Falls es schwer geht, drehen Sie den Dochthalter
beim Hineinschieben.
⋅Lassen Sie den Docht los und ziehen Sie den Dochthalter heraus. Der Docht bleibt automatisch
im Topf [G]. Bewahren Sie den Dochthalter auf. Sie können den Dochthalter auch im
Pflanzentopf stecken lassen, damit er nicht verloren geht.
▪ Setzen Sie den Pflanzentopf mit Docht in den Wassertank auf die Stege, so dass der Pflanzentopf
mit seinem Bodenprofil passgenau auf den Stegen festsitzt [H].
▪ Verfahren Sie mit dem zweiten Pflanzentopf in derselben Weise.
▪ Nehmen Sie die Chromkappe vom Schwimmer ab.
▪ Nehmen Sie die Deckelhälfte mit der Öffnung für den Schwimmer und stecken Sie den
Schwimmerstab von unten durch diese Öffnung.
▪ Setzen Sie die Chromkappe wieder auf den Schwimmerstab [I].
▪ Setzen Sie nun die Deckelhälfte in den Übertopf auf den Vorsprung des LED-Einsatzes. Halten Sie
dabei den Schwimmer fest und positionieren Sie dessen Fuß in die am Boden des Wassertanks
vorgesehene Führung [J]. Der Schwimmer sitzt richtig, wenn Sie ihn nach unten drücken und er
automatisch wieder nach oben kommt.
▪ Setzen Sie die andere Deckelhälfte ein – ebenfalls auf den Vorsprung des LED-Einsatzes. Halten Sie
dabei mit der anderen Hand die Pflanzen so, dass sie nicht eingeklemmt werden.
▪ Gießen Sie die Pflanzen mit etwas Wasser von oben, damit der Wasserfluss zwischen Docht,
Wurzeln und Wassertank hergestellt ist.
▪ Stecken Sie das Kabel in das Loch im Edelstahl-Übertopf (6) und schließen Sie das Netzteil an [K].
Tipp
Flüssige Pflanzennährstoffe oder –dünger können dem Wasser beigefügt werden.
Bedienung
Ambient Light ein-/ ausschalten mit der Easy Touch-Technologie
▪ Berühren Sie das Edelstahlgehäuse (5) an einer beliebigen Stelle, um die Beleuchtung
einzuschalten. Durch wiederholtes Berühren des Gehäuses durchlaufen Sie 3 Helligkeitsstufen und
das Ausschalten der Beleuchtung.
Aus 1. Stufe 2. Stufe 3. Stufe Aus
1. Berührung 2. Berührung 3. Berührung 4. Berührung
Wasser nachfüllen
Wenn die Chromkappe des Wasserstandsanzeigers (2) nur noch wenig aus der
Führung heraussteht, sollten Sie wieder Wasser nachgießen.
Gießen Sie das Wasser durch die Öffnung am Wasserstandsanzeiger.
Füllen Sie so viel Wasser nach, damit die Chromkappe des Wasserstandsanzeigers auf
gleicher Höhe mit der Abdeckung ist.
Steht die Chromkappe höher, stehen die Pflanzentöpfe im Wasser und bekommen zu
viel Wasser.
Schwimmer ggf. auf richtigen Sitz prüfen: Der Schwimmer muss senkrecht in der Schwimmerführung
sitzen.
Reinigung und Pflege
Vor dem Reinigen den Netzstecker ziehen.
Ziehen Sie den Netzstecker und nehmen Sie das Kabel von dem Edelstahl-Übertopf (5) ab.
Den LED-Einsatz (3) und den Edelstahl-Übertopf (5) keinesfalls in Wasser tauchen, sondern außen nur
mit einem feuchtem Tuch abwischen.
Keine scheuernden Reinigungsmittel verwenden.
Alle übrigen Teile (Wassertank, beide Abdeckungshälften, Schwimmer, Dochte und Dochthalter)
können mit warmem Wasser und der Zugabe von Spülmittel gereinigt werden. Anschließend
abtrocknen.
Zur leichten Reinigung können diese Teile auch in der Spülmaschine gereinigt werden.

12 13
de
Tipp
Wenn Sie das Gefühl haben, dass die Pflanzen zu wenig Wasser bekommen oder schnell verwelken,
überprüfen Sie, ob
▪ der Schwimmer richtig sitzt,
▪ genügend Wasser im Tank ist,
▪ die Dochte richtig in der Erde/ in den Blumentöpfen sitzen
▪ oder eventuell zu viel Wasser im Wassertank ist.
Garantie-Information
Für unsere Geräte übernehmen wir gegenüber dem Endkunden eine 24-monatige Haltbarkeitsgarantie.
Sie beginnt mit dem Kauf des Gerätes durch den Endkunden und gilt im Gebiet der Bundesrepublik
Deutschland.
Ansprüche aus dieser Garantie sind unter Vorlage des Kaufbelegs direkt gegenüber unserem zentralen
Kundendienst geltend zu machen.
Von der Garantie ausgeschlossen sind Schäden durch normalen Verschleiß, unsachgemäßen Gebrauch,
Nichteinhaltung der Entkalkungsanweisung, unterbliebene Pflege.
Der Endkunde besitzt zusätzlich zu den Ansprüchen aus dieser Garantie gesetzliche Ansprüche wegen
Mängeln des Gerätes gegenüber seinem direkten Verkäufer/Händler, die durch diese Garantie nicht
eingeschränkt werden.
Das Gerät entspricht den Europäischen Richtlinien 2014/35/EG, 2014/30/EG und
2009/125/EG.
Dieses Produkt darf am Ende seiner Lebensdauer nicht über den normalen
Haushaltsabfall entsorgt werden, sondern muss an einem Sammelpunkt für das
Recycling von elektrischen und elektronischen Geräten abgegeben werden.
Die Werkstoffe sind gemäß ihrer Kennzeichnung wiederverwertbar. Mit der
Wiederverwendung, der stofflichen Verwertung oder anderen Formen der
Verwertung von Altgeräten leisten Sie einen wichtigen Beitrag zum Schutze
unserer Umwelt.
Bitte erfragen Sie bei der Gemeindeverwaltung die zuständige Entsorgungsstelle.
Änderungen vorbehalten

14 15
en
Important safety information
▪ Children must not play with the appliance.
▪ Appliances can be used by persons with reduced physical, sensory or
mental capacities or a lack of experience and/or knowledge if they are
supervised or have been instructed on how to use the appliance safely
and they understand the hazards involved.
▪ This appliance must not be used by children. Keep the appliance and
its power cord out of the reach of children.
▪ Operate the appliance only together with the appropriate mains
adapter.
▪ If the mains adapter is damaged, it must be replaced. This is available
from the manufacturer or its customer service department.
▪ This appliance is designed for use in households and similar
environments, e.g.
⋅Staff kitchen areas in shops, offices and other commercial
environments;
⋅Farmhouses;
⋅By guests at hotels, motels and other residential facilities;
⋅At bed-and-breakfast establishments.
The appliance is not intended for purely commercial use.
▪ Always disconnect the appliance from the mains supply if it is to
be left unattended, as well as before assembling, disassembling or
cleaning it.
Before use
The appliance may only be used for the intended purpose in accordance with this instruction manual.
For this reason, please read the instruction manual carefully before use because it provides instructions
for using, cleaning and caring for the appliance. We accept no liability for any damage caused by a
failure to heed the instructions. Keep this instruction manual in a safe place and pass it on to any
subsequent user together with the appliance. Please also note the warranty information at the end of
the operating manual.
The safety precautions must be observed during use.
Technical data on cachepot
Voltage: 12V
Power consumption: 0.5 A
Protection class: III
Technical data on the mains adapter
Mains voltage: 220-240 V~
Power consumption: 50 Hz, 0.3A
Protection class: II
Additional safety information
▪ The mains adapter should be connected only to earthed wall sockets that have been installed in
accordance with the regulations. The power cable and plug must be dry.
▪ Do not pull or clamp the connection cable over sharp edges. Do not leave it dangling. Protect it
from heat and oil.
▪ Only use an extension cable if it is in perfect condition.
▪ Never pull the mains adapter out of the socket by the cable or with wet hands.
▪ Do not place the appliance on hot surfaces such as hotplates or near open gas flames because this
could melt the casing.
▪ When the appliance is not being used, pull the mains adapter out of the socket.
▪ The device may only be operated indoors.
▪ To prevent the water tank from leaking, always stand the device on a flat surface.
▪ Never place the LED insert in or clean it with water. Only clean it with a damp cloth.
▪ Stop using the appliance and/or unplug the mains adapter immediately if
⋅The appliance, cable or mains adapter is damaged;
⋅You suspect that the device may be defective following a fall or similar incident;
⋅The appliance is leaking.
In such cases, arrange for the appliance to be repaired.
▪ We accept no liability for any damage caused as a result of misuse, incorrect operation or improper
repairs. Warranty claims are likewise excluded in such cases.
Use
The WMF AMBIENT Kräuter @home is a stylish cachepot which combines plant care and indoor
decoration:
▪ It is perfect for 2 herb/plant pots and soil (standard Ø 12cm, height 10cm).
▪ It has an intelligent water supply system using wick watering. The plants take just as much water
as they need. This prevents over- and under-watering.
▪ Thanks to the elegant water-level display (2) you always know when you need to top up the water
tank (4).
▪ A filled water tank (4) lasts for up to four days (depending on the plants’ need for water and the
temperature of the room).
▪ The individually controllable ambient light has three different brightness settings. Simply touch the
stainless steel casing (5) to switch it on.
▪ Please note that no electrically conductive objects should be placed near the device, and ensure
that the cable is not twisted to guarantee trouble-free use of the WMF Easy Touch function.
Operating Manual
en

16 17
en
Inserting herb/plant pots
For better understanding, the most important steps are explained using pictures (identified by capital
letters in the text) on the front cover page.
▪ Unpack the individual parts of the WMF AMBIENT Kräuter @home set.
▪ Place the water tank (4) into the stainless steel cachepot (5) [A]. The nose on the base of the
cachepot must sit in the side slot of the water tank [B]. The water tank is then firmly attached and
doesn’t wobble.
▪ Fill with water to the MAX mark [C].
▪ Place the LED insert (3) into the cachepot so that it sits snugly on the water tank. For this, the
power connection must be on the same side as the hole on the cachepot [D]. The two guide noses
on the water tank help the LED insert to sit flush.
▪ Set up the first plant pot with a wick:
⋅Place the wick between the tines of the wick holder. Stretch the wick along the length of the
wick holder and hold both wicks at the bottom end of the wick holder [E].
⋅Use the wick holder to slide the wick as far as it will go into one of the holes on the underside
of the plant pot [F]. If this is difficult, twist the wick holder whilst pushing in.
⋅Let go of the wick and pull the wick holder out. The wick stays in the pot automatically [G].
Keep the wick holder in a safe place. You can also leave the wick holder sticking into the plant
pot to prevent it getting lost.
▪ Place the plant pot and wick in the water tank on the stays so that the plant pot with the profile
of its base sits firmly on the stays [H].
▪ Repeat this process with the second plant pot.
▪ Remove the chrome cap from the float.
▪ Take the half-lid with the opening for the float and pass the float rod through this opening from
below.
▪ Put the chrome cap back on the float rod [I].
▪ Now put the half-lid on the cachepot on the jut of the LED insert. In so doing, hold the float firmly
and position its foot in the designated slot on the base of the water tank [J]. The float is positioned
correctly if it automatically bobs back up again when you press it downwards.
▪ Now also place the other half of the lid on the jut of the LED insert. In so doing, hold the plants
with your other hand to prevent them getting wedged in.
▪ Pour some water onto the plants from above to establish the flow of water between the wick, roots
and water tank.
▪ Insert the cable through the hole in the stainless steel cachepot (6) and connect the mains adapter
[K].
Tip
Liquid plant nutrients or fertilisers may be added to the water.
Operation
Switching the Ambient light on and off using the Easy Touch technology
▪ Touch anywhere on the stainless steel casing (5) to switch the light on. Repeatedly touching the
casing scrolls through the three brightness settings and then switches the light off.
Off 1st setting 2nd setting 3rd setting Off
1st touch 2nd touch 3rd touch 4th touch
Topping up with water
If the chrome cap on the water level display (2) protrudes even slightly out of its slot,
you should add more water.
Pour water in through the opening by the water-level display.
Top it up with enough water that the chrome cap on the water-level display is level
with the cover.
If the chrome cap is higher, the plant pots are sitting in the water and getting too
much water.
If necessary, check that the float is inserted correctly: the float must sit vertically in the slot.
Cleaning and care
Unplug the mains plug before cleaning.
Pull out the mains plug and remove the cable from the stainless steel cachepot (5).
Under no circumstances should you immerse the LED insert (3) and stainless steel cachepot (5) in
water. If necessary, simply wipe the outside with a damp cloth.
Never use abrasive cleaning agents.
All other parts (the water tank, both halves of the lid, the float, the wicks and wick holders) can be
cleaned using warm water and detergent. Then dry off.
These parts can also be put in the dishwasher for easy cleaning.
Tip
If you think that the plants are not getting enough water or wilting too soon, check whether
▪ The float is properly in place;
▪ There is enough water in the tank;
▪ The wicks are firmly in place in the soil/plant pot; or
▪ There is too much water in the water tank.

18 19
en
For UK use only
• This product is supplied with a 13 A plug conforming to BS 1363 fitted to the mains lead. If the plug
is unsuitable for your socket outlets or needs to be replaced, please note the following. If the plug is
a non-rewireable one, cut it from the mains lead and immediately dispose of it. Never insert it into a
socket outlet as there is a very great risk of an electric shock.
• The replacement of the plug at the mains lead has to be done according to the following
instructions:
Warning - This appliance must be earthed!
Important: The wires in this mains lead are coloured in accordance with the following code:
green/yellow Earth
blue Neutral
brown Live
As the colours of the wires in the mains lead of this appliance may not correspond with the coloured
markings identifying the terminals in your plug, proceed as follows:
⋅the wire which is coloured green and yellow must be connected to the terminal which is
marked with the letter E or by the earth symbol , or coloured green or green and yellow,
⋅the wire which is coloured blue must be connected to the terminal which is marked with the
letter N or coloured black,
⋅the wire which is coloured brown must be connected to the terminal which is marked with
the letter L or coloured red.
• If a 13 A (BS 1363) plug is used it must be fitted with a 3 A fuse conforming to BS 1362 and be
ASTA approved. If any other type of plug is used, the appliance must be protected by a 5 A fuse either
in the plug or adapter or at the distribution board. If in doubt - consult a qualified electrician.
• Never use the plug without closing the fuse cover.
The appliance complies with the European directives 2014/35/EU, 2014/30/EU and
2009/125/EU.
At the end of its lifetime this product must not be disposed of through the
normal domestic waste, but it should be handed to an assembly point for the
recycling of electrical and electronical appliances. You can inquire about details
at the local administration.
Subject to technical changes.

20 21
fr
Consignes de sécurité importantes
▪ Ne pas laisser les enfants jouer avec cet appareil.
▪ Les personnes ayant des capacités physiques, sensorielles ou mentales
restreintes ou ayant un manque d’expérience et/ou de connaissances
peuvent utiliser cet appareil sous surveillance, si elles ont été formées
à l’utilisation sécurisée de cet appareil, et si elles ont compris les
dangers pouvant résulter de l’usage de l’appareil.
▪ Cet appareil ne doit pas être utilisé par des enfants. L’appareil et son
câble d’alimentation doivent être tenus hors de portée des enfants.
▪ Ne faire fonctionner l‘appareil qu‘avec le bloc d‘alimentation
correspondant.
▪ Lorsque le bloc d‘alimentation est endommagé, il doit être remplacé.
Cette pièce est disponible auprès du fabricant ou de son service client.
▪ L’appareil est conçu pour un usage domestique ou pour des
applications similaires telles que:
⋅dans des cuisines réservées au personnel dans des boutiques, des
bureaux ou d’autres secteurs professionnels;
⋅dans des exploitations agricoles;
⋅par des clients dans des hôtels, des motels et autres établissements
résidentiels;
⋅dans des chambres d’hôtes.
L’appareil n’est pas conçu pour un usage purement commercial.
▪ L’appareil doit toujours être débranché en cas d’absence de
surveillance, avant le montage, le démontage ou le nettoyage.
Avant l’utilisation
L’appareil ne doit être utilisé que pour l’usage prévu conformément à ce mode d’emploi. Nous
vous invitons à lire attentivement le mode d’emploi avant la mise en service, car il vous donne des
indications concernant l’utilisation, le nettoyage et l’entretien de l’appareil. Nous déclinons toute
responsabilité en cas de dommage résultant du non-respect des consignes. Conservez soigneusement
ce mode d’emploi et transmettez-le avec l’appareil en cas de remise à une tierce personne. Consultez
également les informations concernant la garantie à la fin de ce mode d‘emploi.
Respectez les consignes de sécurité lors de l’utilisation.
Caractéristiques techniques du cache-pot
Tension nominale: 12V
Puissance: 0,5 A
Catégorie de protection: III
Caractéristiques techniques du bloc d’alimentation
Tension du secteur: 220-240V~
Consommation de courant: 50Hz 0,3A
Catégorie de protection: II
Consignes de sécurité supplémentaires
▪ Brancher le bloc d’alimentation uniquement sur une prise de courant de sécurité, installée
conformément aux prescriptions. Le câble d’alimentation et la prise doivent être secs.
▪ Ne pas tirer le câble d’alimentation sur des bords tranchants, ne pas le coincer, ne pas le laisser
pendre et le protéger de la chaleur et de l’huile.
▪ Utiliser uniquement une rallonge en bon état.
▪ Ne pas débrancher le bloc d’alimentation en tirant sur le câble ou avec les mains mouillées.
▪ Ne pas poser l’appareil sur des surfaces chaudes, par ex. plaques de cuisson ou équivalent ou à
proximité d’une flamme de gaz, car le boîtier pourrait fondre.
▪ Débrancher le bloc d’alimentation lorsque l’appareil n’est pas utilisé.
▪ L‘appareil doit être uniquement utilisé en intérieur.
▪ L‘appareil doit être posé uniquement sur un sol plat, afin d‘éviter toute fuite du réservoir d‘eau.
▪ Ne jamais plonger le module à LED dans l‘eau et ne jamais le nettoyer à l‘eau. Le nettoyer avec un
chiffon humide.
▪ Ne pas mettre l’appareil en marche ou le débrancher immédiatement si:
⋅l’appareil, le câble de raccordement ou le bloc d’alimentation est endommagé,
⋅l’appareil a été endommagé suite à une chute ou équivalent,
⋅l‘appareil fuit.
Dans ces cas, porter l’appareil en réparation.
▪ Nous déclinons toute responsabilité en cas de dommage découlant de l’utilisation détournée, de la
mauvaise utilisation ou de la réparation inappropriée de l’appareil. Toute intervention sous garantie
est également exclue dans de tels cas.
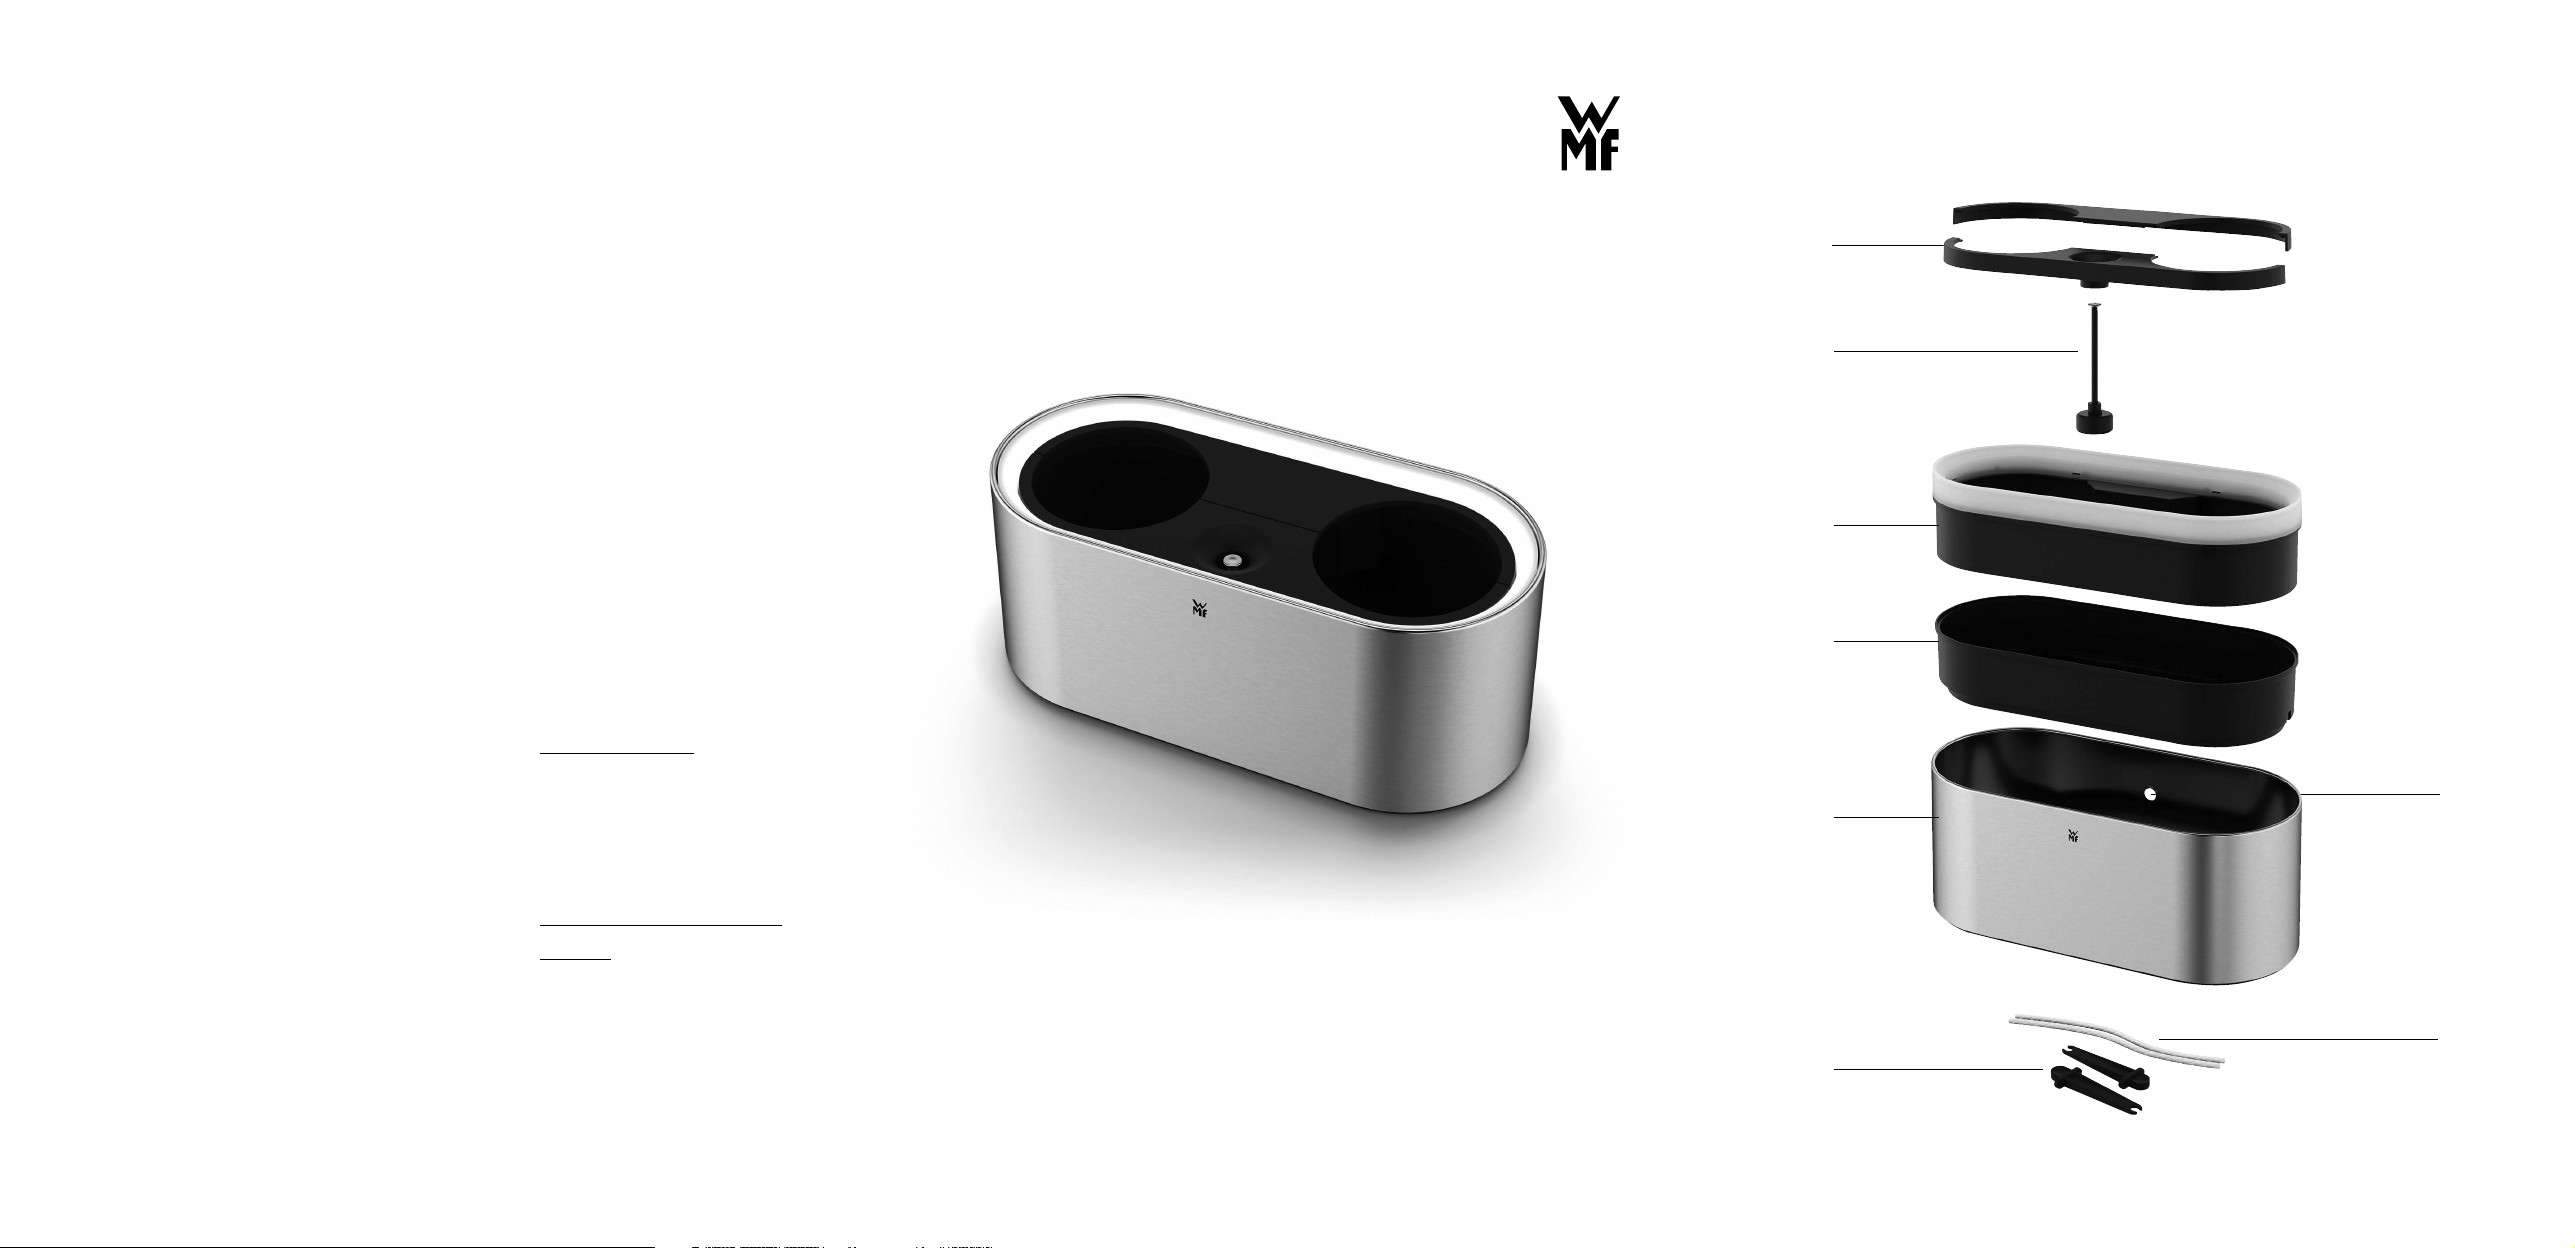
Utilisation
Le cache-pot à herbes WMF AMBIENT @home est un cache-pot élégant, associant soin des plantes et
décoration intérieure:
▪ Il est idéal pour 2 pots de fleurs/herbes avec de la terre (Ø standard 12cm, hauteur 10cm).
▪ Il possède une arrivée d‘eau intelligente dotée d‘une mèche d‘irrigation. Les plantes absorbent donc
autant d‘eau qu‘elles en ont besoin. Il est ainsi possible d‘éviter tout sur-dosage ou sous-dosage.
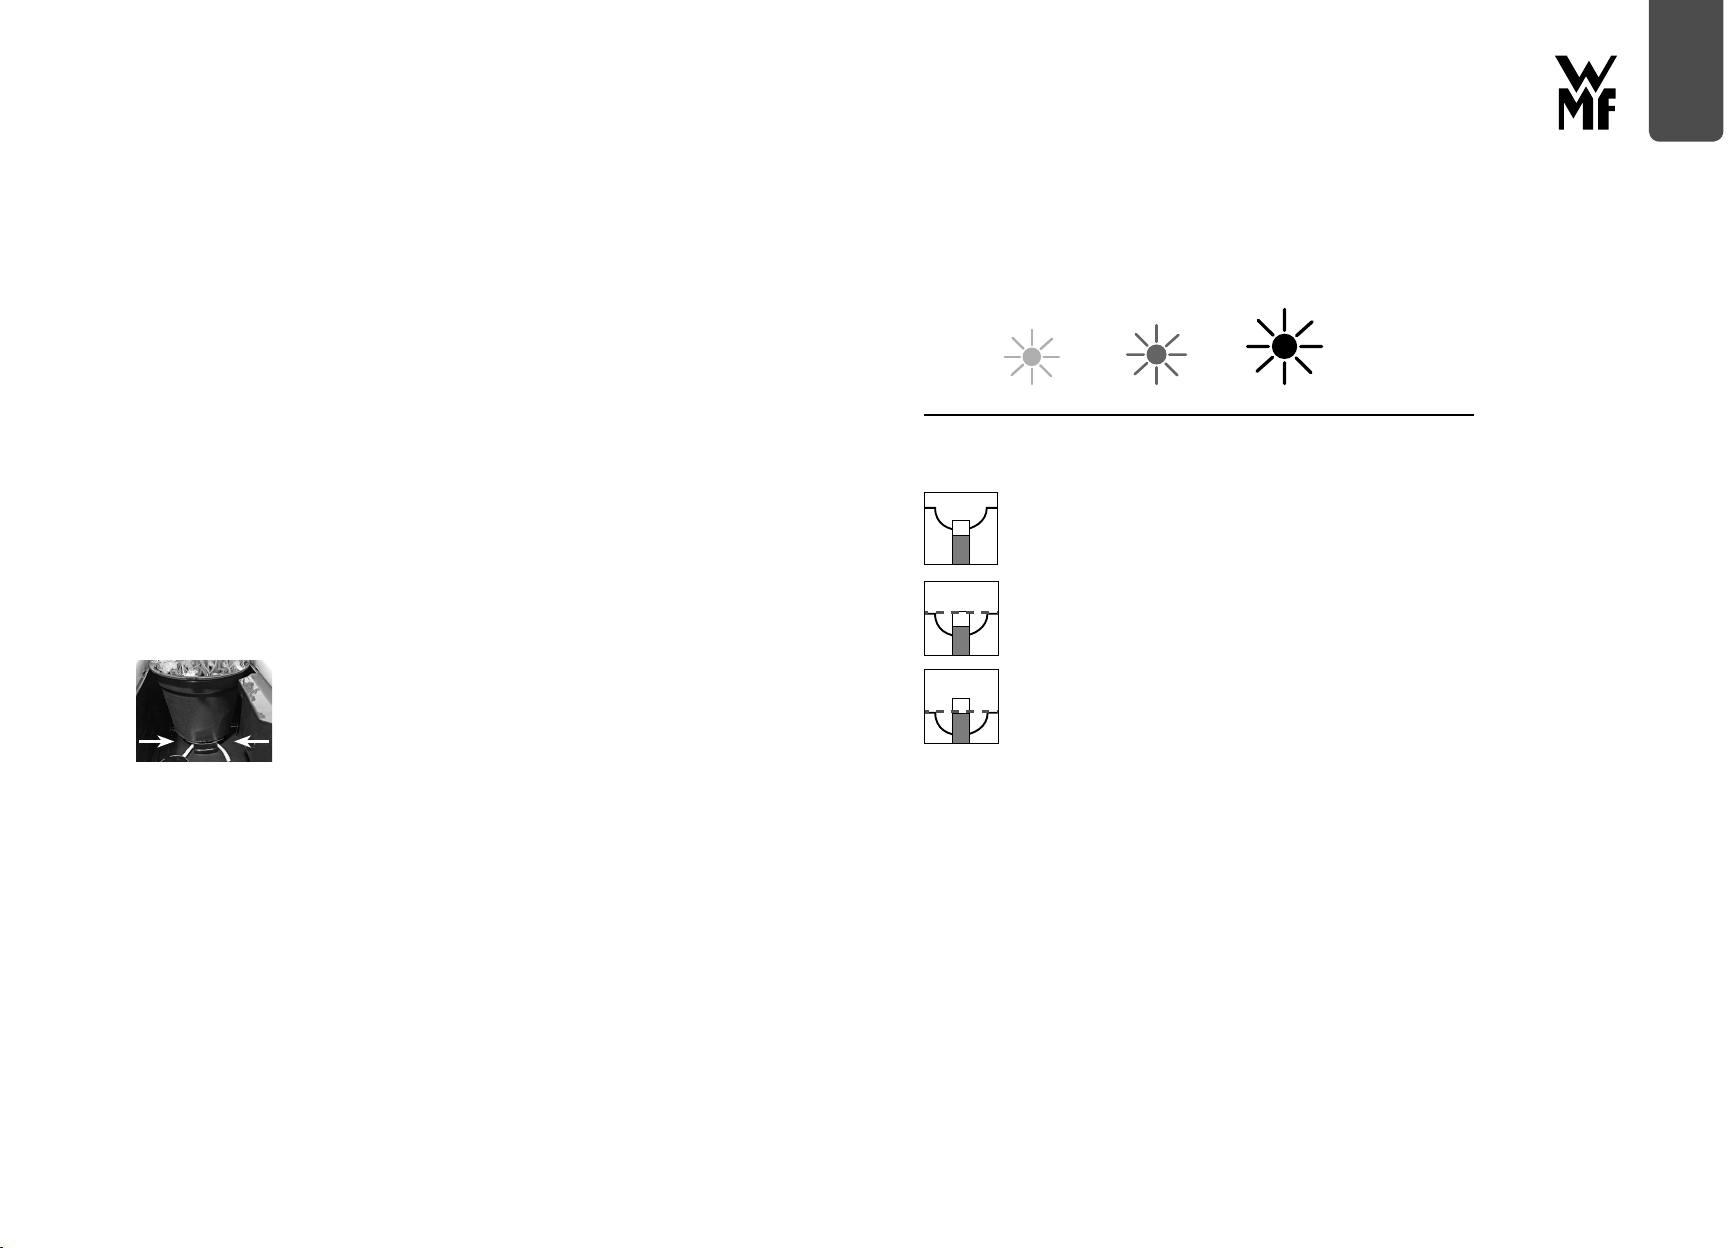
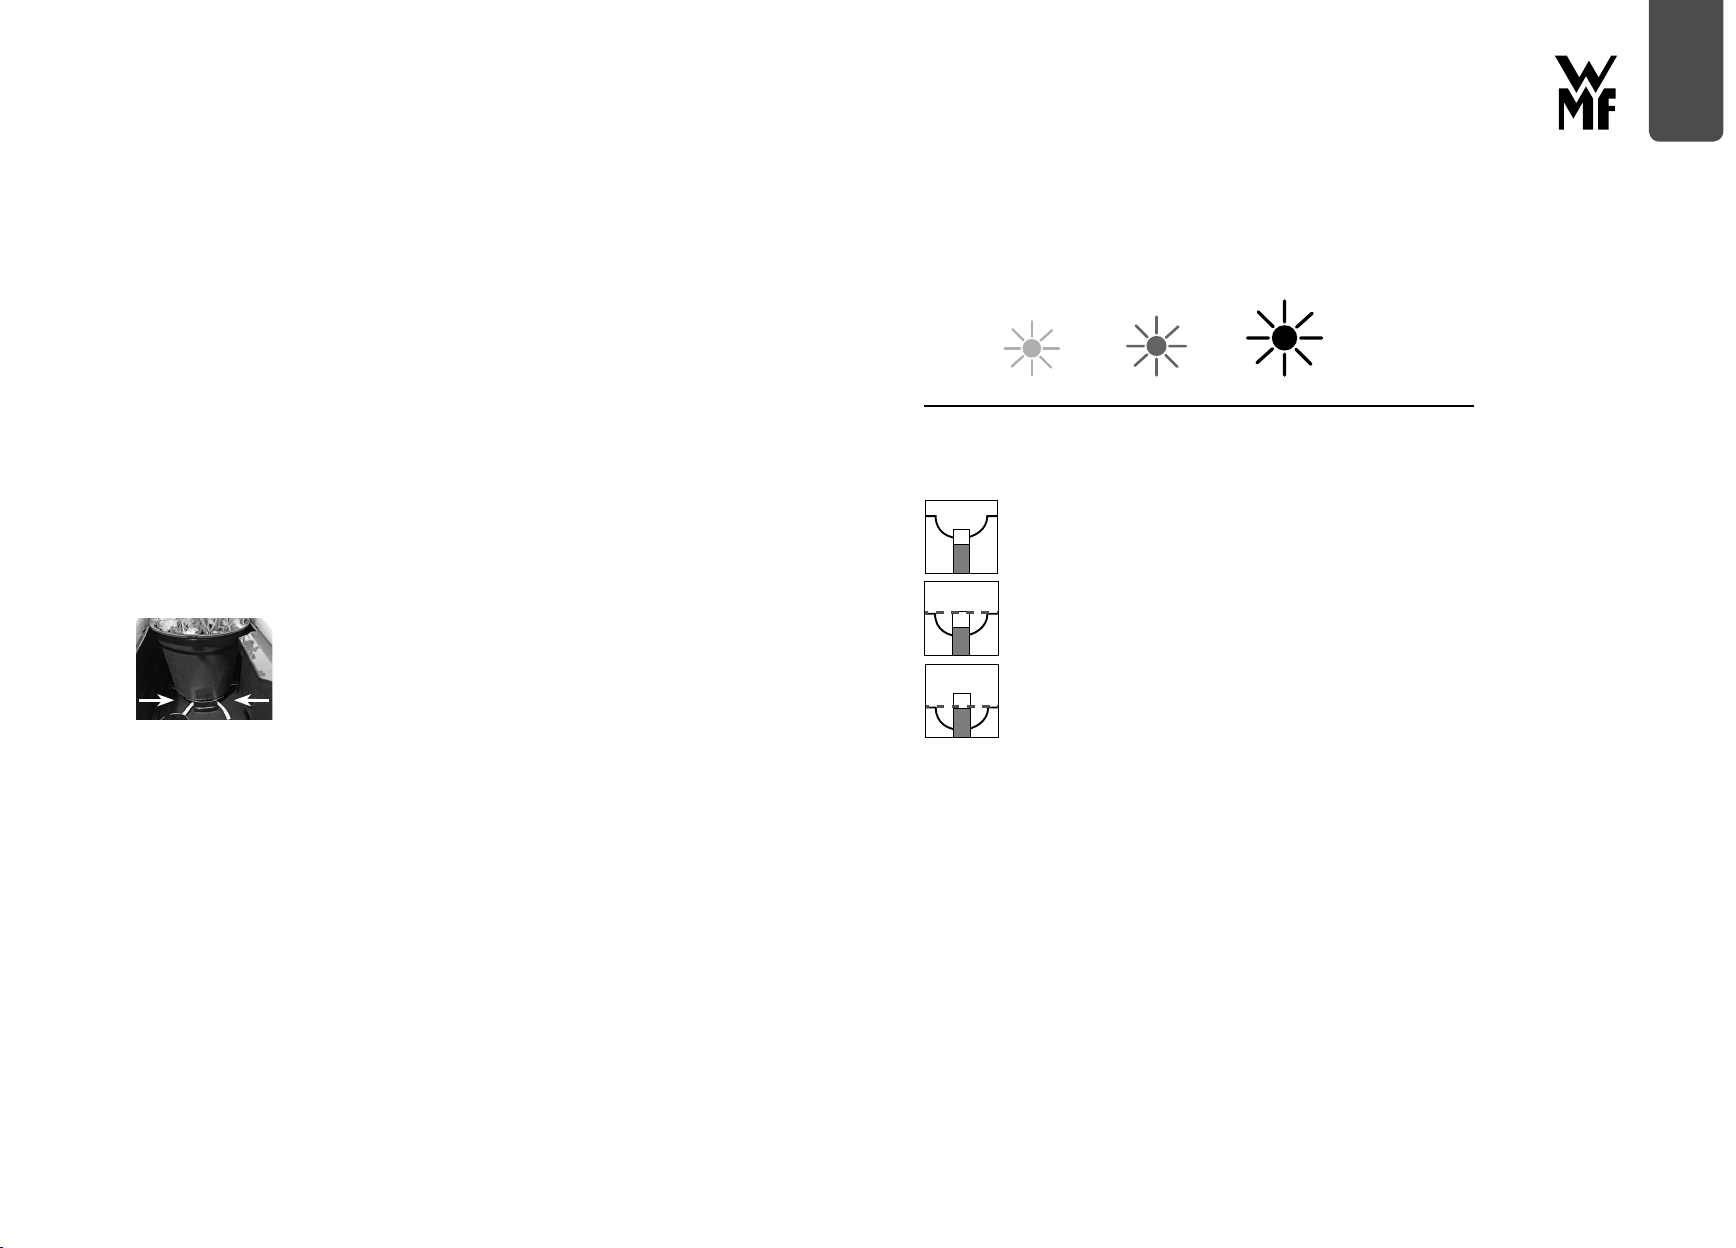
▪ Grâce à l‘élégant indicateur de niveau d‘eau(2), vous savez à tout moment quand il faut remplir le
réservoir d‘eau(4).
▪ Un réservoir d‘eau(4) plein tient jusqu‘à quatre jours (en fonction des besoins en eau des plantes et
de la chaleur dans la pièce).
▪ La lumière d‘ambiance, pouvant être allumée et éteinte individuellement, possède trois niveaux de
luminosité différents. Il suffit de toucher le boîtier en acier inoxydable(5) – et il s‘allume.
▪ Veillez à ce qu’aucun objet conducteur ne se trouve à proximité immédiate et à éloigner dans toute
sa longueur le câble de l’appareil afin de garantir le bon fonctionnement de la fonction WMF Easy
Touch.
Mode d’emploi
fr

22 23
fr
Insérer un pot de fleurs/herbes
Afin de faciliter la compréhension, les principales étapes sont illustrées sur la page de couverture
(indiquées par des majuscules dans le texte libre).
▪ Déballez les composants individuelles du cache-pot à herbes WMF AMBIENT @home.
▪ Placez le réservoir d‘eau(4) dans le cache-pot en acier inoxydable(5) [A]. L‘ergot au fond du
cache-pot doit être inséré dans la fente latérale du réservoir d‘eau [B]. Le réservoir d‘eau est alors
stable et n‘oscille pas.
▪ Remplissez-le d‘eau jusqu‘à atteindre le repère MAX [C].
▪ Insérez le module à LED(3) dans le cache-pot afin qu‘il repose précisément sur le réservoir d‘eau.
L‘alimentation électrique doit alors se trouver sur le côté du trou du cache-pot [D].
▪ Préparez le premier pot de fleurs avec la mèche:
⋅Insérez la mèche dans la fourche du support de mèche [E].
⋅Étirez la mèche sur le côté long du support de mèche et maintenez fermement les deux
mèches au niveau de l‘extrémité inférieure du support de mèche [F].
⋅Poussez la mèche avec le support dans l‘un des trous sur le côté inférieur du pot de fleurs
jusqu‘à la butée [G]. Si cela devient difficile, faites tourner le support de mèche en le poussant
à l‘intérieur.
⋅Laissez la mèche en place et tirez sur le support de mèche pour le retirer. La mèche reste
automatiquement dans le pot [H]. Rangez le support de mèche. Vous pouvez laisser le support
de mèche sur le pot de fleurs afin de ne pas le perdre.
▪ Placez le pot de fleurs avec la mèche dans le réservoir d‘eau sur la traverse, de manière à ce que le
fond du pot de fleurs repose fermement et précisément sur les traverses [H].
▪ Procédez de la même manière avec le deuxième pot de fleurs.
▪ Retirez le capuchon chromé du flotteur.
▪ Prenez la partie de couvercle dotée de l‘ouverture pour le flotteur et insérez la tige de flotteur
depuis le dessous à travers cette ouverture.
▪ Remettez de nouveau le capuchon chromé sur la tige de flotteur [I].
▪ Placez maintenant la partie de couvercle dans le cache-pot sur la saillie du module à LED.
Maintenez fermement le flotteur pendant cette opération et positionnez son pied dans le guidage
prévu au fond du réservoir d‘eau [J]. Le flotteur est bien positionné s‘il revient automatiquement
vers le haut lorsque vous le poussez vers le bas.
▪ Placez maintenant l‘autre partie de couvercle – également sur la saillie du module à LED. Maintenez
fermement les plantes avec l‘autre main pendant cette opération pour qu‘elles ne soient pas
bloquées.
▪ Versez un peu d‘eau sur les plantes depuis le dessus pour mettre en place l‘écoulement d‘eau entre
la mèche, les racines et le réservoir d‘eau.
▪ Placez le câble dans le trou dans le cache-pot en acier inoxydable(6) et branchez-le au bloc
d‘alimentation [K] .
Conseil
Il est possible d‘ajouter des substances nutritives ou nutriments pour plantes dans l‘eau.
Utilisation
Allumer/éteindre la lumière d‘ambiance grâce à la technologie Easy Touch
▪ Il suffit de toucher n‘importe quelle partie du boîtier en acier inoxydable(5) pour allumer
l‘éclairage. En touchant de nouveau le boîtier, vous passez par les 3 niveaux de luminosité, puis
vous pouvez éteindre l‘éclairage.
OFF 1er Niveau 2è Niveau 3è Niveau OFF
1er contact 2è contact 3è contact 4è contact
Remplir l‘eau
Lorsque le capuchon chromé de l‘indicateur de niveau d‘eau(2) ne dépasse plus
qu‘un peu du guidage, il convient de remettre de l‘eau.
Versez l‘eau par l‘ouverture sur l‘indicateur de niveau d‘eau.
Remplissez avec l‘eau jusqu‘à ce que le capuchon chromé de l‘indicateur de niveau
d‘eau soit à la même hauteur que le couvercle.
Si le capuchon chromé dépasse, les pots de fleurs sont dans l‘eau et en reçoivent
donc trop.
Vérifiez le bon positionnement du flotteur le cas échéant: Le flotteur doit être à la verticale dans le
son guidage.
Nettoyage et entretien
Débrancher l‘appareil avant le nettoyage.
Débrancher le bloc d‘alimentation et retirer le câble du cache-pot en acier inoxydable(5).
Ne jamais plonger le module à LED(3) ni le cache-pot en acier inoxydable (5) dans l‘eau, les nettoyer
avec un chiffon humide.
N’utilisez pas de nettoyants abrasifs.
L‘ensemble des autres pièces (réservoir d‘eau, les deux parties de couvercle, flotteur, mèche et support
de mèche) peut être nettoyé à l‘eau chaude avec un peu de produit vaisselle. Bien sécher le tout.
Ces pièces peuvent également être nettoyées en lave-vaisselle pour plus de facilité.

24 25
fr
Conseil
Lorsque vous avez le sentiment que les plantes ne reçoivent pas assez d‘eau ou qu‘elles fanent vite,
vérifiez si
▪ le flotteur est bien positionné,
▪ la quantité d‘eau dans le réservoir est suffisante,
▪ si la mèche repose bien dans la terre/dans le pot de fleurs
▪ ou éventuellement si la quantité d‘eau dans le réservoir est trop importante.
L’appareil est conforme aux Directives Européennes 2014/35/EU, 2014/30/EU et
2009/125/EU.
Au terme de son utilisation ce produit ne doit pas être éliminé avec les déchets
ménagers habituels, mais il doit être déposé dans un point de collecte pour le
recyclage d’appareils électriques et électroniques.
Les matériaux sont recyclables conformément à leur identification. Grâce à la
réutilisation, le recyclage de matériaux ou d’autres formes de recyclage des
vieux appareils vous contribuez de manière significative à la protection de notre
environnement.
Veuillez contacter votre municipalité pour connaître le centre de traitement
compétent.
Sous réserve de modifications

26 27
it
Importanti istruzioni di sicurezza
▪ I bambini non devono giocare con l’apparecchio.
▪ Queste apparecchiature possono essere utilizzate da persone con
ridotte capacità fisiche, sensoriali o mentali o prive di esperienza e/o
di conoscenze, solo se sorvegliate o previamente istruite riguardo
all’utilizzo sicuro dell’apparecchio e se ne hanno compreso i pericoli
risultanti.
▪ Questo apparecchio non deve essere utilizzato da bambini. Tenere
l’apparecchio e i suoi cavi di collegamento fuori dalla portata dei
bambini.
▪ Azionare l‘apparecchio solo con il relativo alimentatore.
▪ Se danneggiato, l‘alimentatore va sostituito. L‘alimentatore è
disponibile presso il produttore o il rispettivo servizio clienti.
▪ Questo apparecchio può essere utilizzato solo in ambito domestico e
in contesti applicativi analoghi, come ad esempio:
⋅in cucine per i collaboratori di negozi, uffici e altri settori
commerciali;
⋅in tenute agricole;
⋅in hotel, motel e altre strutture ricettive;
⋅in strutture Bed and Breakfast.
Questo apparecchio non è destinato ad un uso puramente
commerciale.
▪ L’elettrodomestico deve essere sempre scollegato dalla presa di
corrente nei seguenti casi: quando rimane incustodito, prima del
montaggio e dello smontaggio o della pulizia.
Prima dell’uso
L’apparecchio deve essere impiegato solo per l’uso previsto, nel rispetto delle presenti istruzioni.
Pertanto, prima dell’uso, leggere attentamente il manuale che contiene le istruzioni per l’uso, la
pulizia e la manutenzione dell’apparecchiatura. In caso di inosservanza, decliniamo ogni responsabilità
per eventuali danni. Conservare accuratamente le istruzioni per l’uso e, in caso di cessione
dell’apparecchio, consegnarle all’utente successivo insieme all’apparecchio. Prestare attenzione anche
alle istruzioni per la garanzia alla fine del manuale.
Durante l’uso osservare scrupolosamente le istruzioni per la sicurezza.
Dati tecnici del coprivaso
Tensione nominale: 12 V
Potenza assorbita: 0,5 A
Classe di protezione: III
Dati tecnici del cavo di allacciamento
Tensione di rete: 220-240 V~
Corrente assorbita: 50 Hz 0,3 A
Classe di protezione: II
Ulteriori istruzioni di sicurezza
▪ Collegare il cavo di allacciamento soltanto a una presa Schuko installata a norma. Il cavo di
alimentazione e la spina devono essere asciutti.
▪ Non tirare o incastrare il cavo di collegamento su spigoli taglienti, non lasciarlo sospeso e
proteggerlo dal calore e dall’olio.
▪ Usare solo una prolunga in perfette condizioni.
▪ Non staccare l’alimentatore dalla presa, tirandolo per il cavo o con le mani bagnate.
▪ Non posizionare l’apparecchio su superfici calde, ad esempio su piastre elettriche o simili oppure in
prossimità di fiamme libere, perché l’alloggiamento potrebbe fondersi.
▪ Se l’apparecchio non viene utilizzato, staccare l’alimentatore.
▪ L’apparecchio deve essere utilizzato esclusivamente in ambienti chiusi.
▪ Posizionare l‘apparecchio esclusivamente su superfici piane, altrimenti il serbatoio dell‘acqua
potrebbe perdere.
▪ Non immergere mai l‘inserto LED in acqua e non pulirlo con l‘acqua. Pulirlo esclusivamente con un
panno umido.
▪ Non mettere in funzione l’apparecchio o staccare subito l’alimentatore, se:
⋅l’apparecchio, il cavo di collegamento o l’alimentatore sono danneggiati,
⋅si sospetta un difetto dopo una caduta o un evento simile,
⋅l‘apparecchio non è ermetico.
In questi casi far riparare l’apparecchio.
▪ Non ci si assume alcuna responsabilità per eventuali danni causati da un utilizzo per scopi diversi
da quelli previsti, da un uso errato oppure da riparazione non professionale. In questi casi è altresì
esclusa la garanzia.
Utilizzo
Il WMF AMBIENT Kräuter @home è un coprivaso elegante che riunisce la cura delle piante con la
decorazione indoor:
▪ perfetto per 2 vasi per piante aromatiche/da fiore (standard Ø 12 cm, altezza 10 cm).
▪ È dotato di un sistema di irrigazione intelligente tramite stoppino. Le piante dispongono sempre
della quantità d‘acqua che effettivamente necessitano. In questo modo si evitano eccessi e carenze
d‘acqua.
▪ Grazie all‘elegante indicatore di livello d‘acqua (2) è sempre possibile sapere quando è necessario
riempire il serbatoio dell‘acqua (4).
▪ Il serbatoio dell‘acqua (4) pieno è sufficiente fino a quattro giorni (in base al fabbisogno di acqua
delle piante e alla temperatura del locale).
▪ La luce ambiente può essere accesa e spenta in base alle esigenze individuali ed è dotata di tre
livelli di luminosità. È sufficiente toccare il corpo in acciaio inossidabile (5) per accendere la luce.
▪ Accertarsi che nelle immediate vicinanze non vi siano oggetti conduttori e allontanare il cavo dal
dispositivo in linea retta per garantire il corretto funzionamento della funzione WMF Easy Touch.
Istruzioni per l’uso
it

28 29
it
Inserimento dei vasi di piante aromatiche/da fiore
Per una migliore comprensione i passaggi principali sono illustrati nelle immagini del retro di
copertina (indicate nel testo con lettere maiuscole).
▪ Asportare la confezione dai singoli componenti del WMF AMBIENT Kräuter @home.
▪ Inserire il serbatoio dell‘acqua (4) nel coprivaso in acciaio inox (5) [A]. La sporgenza sul fondo
del coprivaso deve inserirsi nella fessura laterale del serbatoio dell‘acqua [B]. In questo modo il
serbatoio dell‘acqua è ben saldo.
▪ Aggiungere acqua fino al livello indicato da MAX [C].
▪ Inserire ora l‘inserto LED (3) nel coprivaso in modo che sia posizionato con precisione nel serbatoio.
Il collegamento elettrico deve trovarsi sul lato del foro nel coprivaso [D].
▪ Preparare il primo vaso con lo stoppino:
⋅inserire lo stoppino nella forcella del supporto per stoppino. Tendere lo stoppino sui lati
lunghi del supporto e tenere saldamente i due estremi dello stoppino sulla parte inferiore del
supporto [E].
⋅Spingere lo stoppino con il supporto per stoppino in uno dei fori sul lato inferiore del
vaso fino a battuta [F]. Eventualmente ruotare il supporto con lo stoppino per facilitare
l‘inserimento.
⋅Lasciare lo stoppino e sfilare il supporto per stoppino. Lo stoppino resta automaticamente
nel vaso [G]. Conservare il supporto per stoppino. È anche possibile lasciare il supporto per
stoppino nel vaso per evitare di perderlo.
▪ Inserire il vaso con lo stoppino nel serbatoio dell‘acqua sui supporti in modo che il profilo del fondo
del vaso coincida con i supporti e che sia posizionato saldamente [H].‘
▪ Procedere allo stesso modo con il secondo vaso.
▪ Togliere il cappuccio cromato dal galleggiante.
▪ Prendere la metà del coperchio con l‘apertura per il galleggiante e inserire la bacchetta del
galleggiante dal basso attraverso questa fessura.
▪ Inserire il cappuccio cromato sulla bacchetta del galleggiante [I].
▪ Inserire ora la metà del coperchio nel coprivaso sulla sporgenza dell‘inserto LED. A questo scopo
tenere il galleggiante e posizionarne la base nella guida dedicata sul fondo del serbatoio dell‘acqua
[J]. Il galleggiante è posizionato correttamente se, quando viene premuto verso il basso, torna
automaticamente verso l‘alto.
▪ Inserire l‘altra metà del coperchio – sempre sulla sporgenza dell‘inserto LED. Con l‘altra mano tenere
le piante in modo che non restino bloccate.
▪ Bagnare le piante dall‘alto con un poco di acqua in modo da instaurare la circolazione d‘acqua tra
stoppino, radici e serbatoio dell‘acqua.
▪ Inserire il cavo nel foro del coprivaso in acciaio inox (6) e collegarlo all‘alimentazione elettrica [K].
Consiglio
È possibile aggiungere concimi o fertilizzanti liquidi all‘acqua.
Uso
Accendere/spegnere la luce d‘ambiente con la tecnologia Easy Touch
▪ Toccare il coprivaso in acciaio inox (5) in un punto qualsiasi per accendere la luce. Toccando
ripetutamente il coprivaso si passa tra i 3 diversi livelli di luminosità e si spegne la luce.
Spento 1. livello 2. livello 3. livello Spento
1. tocco 2. tocco 3. tocco 4. tocco
Aggiunta di acqua
Quando il cappuccio cromato dell‘indicatore del livello d‘acqua (2) sporge poco dalla
guida è necessario aggiungere dell‘acqua.
Versare l‘acqua attraverso l‘apertura nell‘indicatore del livello d‘acqua [N].
Aggiungere tanta acqua affinché il cappuccio cromato dell‘indicatore del livello
d‘acqua si trovi alla stessa altezza della copertura.
Se il cappuccio cromato è più alto, i vasi sono immersi nell‘acqua e ricevono troppa
acqua.
Controllare eventualmente la posizione corretta del galleggiante: il galleggiante deve essere
posizionato verticalmente nella sua guida.
Pulizia e manutenzione
La spina va staccata prima della pulizia.
Staccare la spina elettrica ed estrarre il cavo dal coprivaso in acciaio inox (5).
Non immergere assolutamente in acqua l‘inserto LED (3) e il coprivaso in acciaio inox (5), ma pulirli
esternamente con un panno umido.
Non usare detergenti abrasivi.
Tutti gli altri componenti (serbatoio dell‘acqua, le due metà del coperchio, galleggiante, stoppini e
supporti per stoppino) possono essere lavati in acqua con un poco di detergente. Quindi asciugarli.
Per una pulizia più facile è possibile lavare questi componenti in lavastoviglie.

30 31
it
L’apparecchio è conforme alle direttiveeuropee 2014/35/EU, 2014/30/EU e
2009/125/EU.
Questo prodotto, quando non è piùusabile, non deve venire gettato nei
rifiuticasalinghi ma portato in un punto diraccolta di riciclaggio per
apparecchielettrici e elettronici. Informazioni dettagliate si possono ottenere
presso le relativeamministrazioni comunali.
Salvo cambiamenti tecnici.
Consiglio
Se si ha l‘impressione che le piante ricevano troppa poca acqua o se appassiscono rapidamente,
controllare se
▪ il galleggiante è posizionato correttamente,
▪ vi è sufficiente acqua nel serbatoio,
▪ gli stoppini sono posizionati correttamente nella terra/nei vasi
▪ o se vi è troppa acqua nel serbatoio.

32 33
es
Advertencias de seguridad importantes
▪ Los niños no deben jugar con el aparato.
▪ Este aparato puede ser utilizado por personas con discapacidades
físicas, psíquicas o sensoriales o que carezcan de la experiencia o los
conocimientos necesarios para usarlo solo si lo hacen bajo vigilancia o
si reciben las instrucciones necesarias para utilizarlo con seguridad y
comprenden los peligros relacionados con su uso.
▪ Este aparato no debe ser utilizado por niños. Mantenga el aparato y
los cables de conexión fuera del alcance de los niños.
▪ Utilice el aparato solamente con la fuente de alimentación
correspondiente.
▪ Si la fuente de alimentación está dañada, debe sustituirla. Puede
pedirla al fabricante o al servicio al cliente del mismo.
▪ Este aparato está diseñado para el uso doméstico u otras aplicaciones
similares, tales como:
⋅en cocinas para el personal de tiendas, oficinas y otros ámbitos
comerciales;
⋅en fincas agrícolas;
⋅para clientes de hoteles, moteles y otros establecimientos de
hospedaje;
⋅en pensiones con desayuno.
No está diseñado para el uso meramente comercial.
▪ El aparato deberá ser desconectado de la red retirando el enchufe
cuando no esté vigilado y antes de montarlo, desmontarlo o
limpiarlo.
Antes de usarlo
Utilice el aparato solo para el fin para el que se ha diseñado y siempre siguiendo las instrucciones de
uso de este manual. Antes de poner en funcionamiento esta máquina, lea atentamente el manual de
instrucciones de uso, que le indicará cómo utilizarla, limpiarla y mantenerla en buen estado. No nos
responsabilizamos de los daños que puedan producirse por un uso no conforme al previsto. Guarde
bien estas instrucciones y entréguelas al siguiente usuario junto con el aparato. Tenga en cuenta
también las advertencias de la garantía contenidas al final de las instrucciones de uso.
Respete siempre las indicaciones de seguridad durante el uso.
Datos técnicos del cubretiestos
Tensión nominal: 12 V
Consumo de energía: 0,5 A
Clase de protección: III
Datos técnicos de la fuente de alimentación
Tensión de red: 220-240 V~
Consumo de corriente: 50 Hz 0,3 A
Clase de protección: II
Otras indicaciones de seguridad
▪ Enchufe la fuente de alimentación solamente a una toma de corriente con puesta a tierra que esté
instalada correctamente según las normativas correspondientes. El cable y el enchufe deben estar
secos.
▪ No tire del cable de conexión cuando éste se encuentre sobre bordes afilados ni lo aprisione, no
deje que cuelgue y protéjalo del calor y del aceite.
▪ Utilice exclusivamente un cable alargador en perfecto estado.
▪ No desenchufe nunca la fuente de alimentación tirando del cable o con las manos mojadas.
▪ No coloque el aparato sobre superficies calientes, como fuegos de cocina y similares, ni cerca de
llamas de gas abierto, la carcasa podría derretirse.
▪ Cuando el aparato no se utiliza, desconecte la fuente de alimentación.
▪ El aparato solo se puede utilizar en espacios cerrados.
▪ Coloque el aparato solo sobre superficies planas, ya que de lo contrario el depósito de agua podría
dejar escapar líquido.
▪ No coloque nunca el interior LED en agua ni lo limpie con agua. Límpielo solo con un paño
húmedo.
▪ No ponga en funcionamiento el aparato y desconéctelo inmediatamente de la fuente de
alimentación si:
⋅el aparato, el cable de conexión o la fuente de alimentación están dañados,
⋅tiene la sospecha de que se haya podido producir algún fallo después de una caída del aparato
o similar,
⋅el aparato no es hermético.
En estos casos, envíe el aparato para que sea reparado.
▪ No asumiremos ninguna responsabilidad por posibles daños en caso de un uso diferente al previsto,
un manejo incorrecto o una reparación que no haya sido realizada por profesionales. En esos casos
están excluidas también las prestaciones de garantía.
Utilización
El WMF AMBIENT Kräuter @home es un cubretiestos elegante que combina el cuidado de las plantas
con la decoración interior:
▪ Es perfecto para dos macetas de hierbas o de flores con tierra (estándar Ø 12 cm, altura 10 cm).
▪ Dispone de una alimentación de agua inteligente mediante riego por mecha. Las plantas toman la
cantidad de agua que necesitan. Así se evita una dosificación insuficiente.
▪ Gracias al elegante indicador de nivel de agua (2) sabrá siempre cuándo debe rellenar el depósito
de agua (4).
▪ Un depósito de agua lleno (4) alcanza para hasta cuatro días (dependiendo de la cantidad de agua
que necesitan las plantas y de la temperatura ambiente).
▪ La luz Ambient Light, que se puede encender y apagar individualmente, tiene tres niveles de
luminosidad distintos. Basta con tocar la carcasa de acero inoxidable (5) para que se ilumine.
▪ Asegúrese de que no haya ningún objeto conductor en la proximidad inmediata y conduzca el
cable en línea recta apartándolo del aparato para garantizar el funcionamiento sin perturbaciones
de la función WMF Easy Touch.
Instrucciones de uso
es

34 35
es
Colocar las macetas de hierbas o de flores
Para una mejor comprensión, los pasos principales se explican con imágenes en la página de cubierta
(marcada mediante mayúsculas en el texto corrido).
▪ Desempaque las diferentes piezas del WMF AMBIENT Kräuter @home.
▪ Coloque el depósito de agua (4) en el cubretiestos de acero inoxidable (5) [A]. El resalte en el suelo
del cubretiestos debe quedar dentro de la ranura lateral del depósito de agua [B]. El depósito de
agua queda entonces bien fijado y no se tambalea.
▪ Introduzca agua hasta alcanzar la marca MAX [C].
▪ Coloque el interior LED (3) en el cubretiestos de manera que quede a ras sobre el depósito de agua.
La conexión de corriente debe encontrarse entonces en el lado del agujero en el cubretiestos [D].
▪ Prepare la primera maceta con mecha:
⋅Coloque la mecha en la horquilla del soporte de mechas. Tense la mecha a lo largo de los lados
del soporte de mechas y sostenga los dos extremos de la mecha en el extremo inferior del
soporte de mechas [E].
⋅Introduzca la mecha con el soporte de mechas en uno de los agujeros en el lado inferior de la
maceta hasta el tope [F]. Si no entra con facilidad, gire el soporte de mechas al introducirlo.
⋅Suelte la mecha y extraiga el soporte de mechas. La mecha queda automáticamente en la
maceta [G]. Conserve el soporte de mechas. También puede dejar el soporte de mechas dentro
de la maceta para que no se pierda.
▪ Coloque la maceta con la mecha en el depósito de agua sobre la parte que sobresale de manera que
el perfil de la maceta quede fijado allí a ras [H].
▪ Proceda de la misma manera con la segunda maceta.
▪ Quite la tapa de cromo del flotador.
▪ Tome la media tapa con la apertura para el flotador e introduzca la vara del flotador desde abajo
por ese agujero.
▪ Coloque de nuevo la tapa de cromo sobre la vara del flotador [I].
▪ Coloque a continuación la media tapa en el cubretiestos, en la parte salediza del interior LED. Al
hacerlo sostenga firmemente el flotador y posicione el pie del mismo en la guía prevista para ello
en el suelo del depósito de agua [J]. El flotador está bien colocado cuando se presiona hacia abajo
y vuelve hacia arriba automáticamente.
▪ Coloque la otra media tapa también en la parte salediza del interior LED. Con la otra mano
sostenga las plantas de manera que no queden aprisionadas.
▪ Riegue las plantas con un poco de agua desde arriba para establecer el flujo de agua entre la
mecha, las raíces y el depósito de agua.
▪ Inserte el cable en el agujero del cubretiestos de acero inoxidable (6) y enchufe la fuente de
alimentación [K].
Sugerencia
Puede agregar nutrientes o abono para las plantas al agua.
Manejo
Encender y apagar la iluminación Ambient Light con la tecnología Easy Touch
▪ Toque cualquier parte de la carcasa de acero inoxidable (5) para encender la iluminación. Tocando
varias veces la carcasa pasará por 3 niveles de luminosidad y apagará la iluminación.
Apagada 1. Nivel 2. Nivel 3. Nivel Apagada
1.er toque 2.do toque 3.er toque 4.to toque
Rellenar agua
Cuando la tapa de cromo del indicador del nivel de agua (2) sobresalga solo un poco
de la guía, debe rellenar agua.
Introduzca el agua por la apertura del indicador del nivel de agua [N].
Introduzca agua hasta que la tapa de cromo del indicador del nivel de agua esté a la
misma altura que la tapa.
Si la tapa de cromo está más arriba, las plantas se encuentran en el agua y reciben
demasiada agua.
En caso necesario, compruebe que el flotador esté bien colocado: el flotador debe estar colocado
verticalmente en la guía del flotador.
Limpieza y cuidados
Antes de limpiar, desenchufe el aparato.
Desenchufe el enchufe de red y quite el cable del cubretiestos de acero inoxidable (5).
No sumerja nunca el interior LED (3) ni el cubretiestos de acero inoxidable (5) en agua. Para limpiarlos
frótelos por fuera con un paño húmedo.
No utilice productos de limpieza abrasivos.
Todas las demás piezas (depósito de agua, ambas medias tapas, flotador, mechas y soporte de mechas)
se pueden limpiar con agua tibia y detergente lavaplatos. Séquelas después de lavarlas.
Para una limpieza fácil, estas piezas se pueden limpiar también en el lavavajillas.

36 37
es
Sugerencia
Si tiene la sensación de que las plantas no reciben suficiente agua o se secan rápidamente, compruebe
si
▪ el flotador está bien colocado,
▪ hay suficiente agua en el depósito,
▪ las mechas están bien introducidas en la tierra/en las macetas
▪ o si hay demasiada agua en el depósito de agua.
El aparato cumple con las directivas europeas 2014/35/EU, 2014/30/EU y
2009/125/EU.
Al finalizar su ciclo de vida, el producto no debe tirarse al cubo de basura
doméstico, sino que debe llevarse a un punto de recogida y reciclaje para aparatos
eléctricos y electrónicos.
Los materiales se reutilizan conforme a su etiquetado. Volver a usar, reciclar o
utilizar con otro fin aparatos viejos ayuda a proteger el medio ambiente.
Pregunte a las autoridades locales por el lugar específico donde debe entregar o
tirar el producto para su eliminación.
Sujeto a modificaciones

38 39
nl
Belangrijke veiligheidsinstructie
▪ Kinderen mogen niet met het apparaat spelen.
▪ Apparaten mogen door personen met verminderde fysieke, sensorische
of mentale vaardigheden of gebrek aan ervaring en/of kennis worden
gebruikt, wanneer ze onder toezicht staan of over het veilige gebruik
van het apparaat zijn geïnstrueerd en de daaruit resulterende risico‘s
hebben begrepen.
▪ Dit apparaat mag niet door kinderen worden gebruikt. Het apparaat
en de stroomkabel moeten op een voor kinderen niet toegankelijke
plaats worden bewaard.
▪ Gebruik het apparaat alleen met de bijbehorende adapter.
▪ Als de adapter beschadigd is, moet hij worden vervangen. Hij is
verkrijgbaar bij de fabrikant of diens klantenservice.
▪ Dit apparaat is bedoeld voor huishoudelijk en vergelijkbaar gebruik,
zoals:
⋅in keukens voor medewerkers van winkels, kantoren en andere
zakelijke omgevingen;
⋅bij agrarische bedrijven;
⋅door klanten van hotels, motels en andere accommodaties;
⋅in bed and breakfasts.
Het apparaat is niet bedoeld voor puur zakelijk gebruik.
▪ Het apparaat moet bij niet aanwezig toezicht en voor het
monteren, het demonteren en het reinigen te allen tijde van de
stroomvoorziening losgekoppeld worden.
Vóór het gebruik
Het apparaat mag alleen voor het beoogde doel en overeenkomstig deze gebruiksaanwijzing worden
gebruikt. Lees daarom de gebruiksaanwijzing goed door voordat u het apparaat in gebruik neemt;
deze bevat instructies voor het gebruik, de reiniging en het onderhoud van het apparaat. Wanneer u
de gebruiksaanwijzing niet in acht neemt, zijn wij niet aansprakelijk voor eventuele schade. Bewaar de
gebruiksaanwijzing goed en geef deze samen met het apparaat aan een volgende gebruiker. Let u ook
op de garantie-instructies aan het einde van de gebruiksaanwijzing.
Neem bij het gebruik de veiligheidsinstructies in acht.
Technische gegevens sierpot
Nominale spanning: 12 V
Vermogen: 0,5 A
Elektrische veiligheidsklasse: III
Technische gegevens adapter
Netspanning: 220-240 V~
Stroomopname: 50 Hz 0,3 A
Elektrische veiligheidsklasse: II
Aanvullende veiligheidsinstructies
▪ Sluit de stekker alleen aan op een volgens de voorschriften geplaatst en geaard stopcontact. Kabel
en stekker moeten droog zijn.
▪ Zorg ervoor dat de stroomkabel niet langs scherpe randen loopt of beklemd raakt, laat de kabel niet
naar beneden hangen en bescherm de kabel tegen hitte en olie.
▪ Gebruik alleen verlengkabels die volledig intact zijn.
▪ Trek de stekker niet aan de kabel of met natte handen uit het stopcontact.
▪ Plaats het apparaat niet op hete oppervlakken zoals fornuizen of in de buurt van de open gasvlam.
De behuizing kan daardoor beginnen smelten.
▪ Als het apparaat niet wordt gebruikt, de stekker uit het stopcontact trekken.
▪ Het apparaat mag alleen in binnenruimtes worden gebruikt.
▪ Plaats het apparaat uitsluitend op een vlakke ondergrond omdat anders het waterreservoir kan
uitlopen.
▪ Het led-inzetstuk nooit in water zetten of reinigen met water. Maak het alleen schoon met een
vochtige doek.
▪ Neem het apparaat niet in gebruik of trek de stekker meteen uit het stopcontact wanneer:
⋅het apparaat, de aansluitkabel of de adapter beschadigd is,
⋅na een val enz. het vermoeden bestaat dat het apparaat defect is,
⋅het apparaat lekt.
In dat geval moet u het apparaat ter reparatie afgeven.
▪ Bij oneigenlijk gebruik, verkeerde bediening of onvakkundige reparatie accepteren wij geen
aansprakelijkheid voor eventuele schade. In dergelijke gevallen zijn garantievergoedingen ook
uitgesloten.
Gebruik
De WMF AMBIENT Kräuter @home is een stijlvolle sierpot die plantenverzorging en
binnenhuisdecoratie combineert:
▪ hij is perfect voor 2 potjes kruiden of bloemen met aarde (standaard Ø 12 cm, hoogte 10 cm).
▪ Hij is uitgerust met een intelligente watertoevoer door middel van een vochtige wiek. De planten
zuigen precies zoveel water op als ze nodig hebben. Dit voorkomt dat u te veel of te weinig
doseert.
▪ De elegante waterstandindicator (2) toont u altijd wanneer u het waterreservoir (4) moet bijvullen.
▪ Een gevuld waterreservoir (4) is voldoende voor vier dagen (afhankelijk van de zuigkracht van de
planten en de omgevingswarmte).
▪ Het individueel in- en uitschakelbare Ambient Light heeft drie verschillende lichtsterkteniveaus.
Raak even de roestvrijstalen behuizing (5) aan – en de sierpot licht op.
▪ Let erop dat er zich geen geleidende voorwerpen in de directe nabijheid bevinden en leid de
kabel recht van het toestel weg, zodat een storingvrije werking van de WMF Easy Touch-functie
gegarandeerd is.
Gebruiksaanwijzing
nl

40 41
nl
Kruiden-/bloempotjes inzetten
Om u wegwijs te maken zijn de belangrijkste stappen afgebeeld op de omslagpagina (in de tekst
aangeduid met drukletters).
▪ Pak de verschillende onderdelen van uw WMF AMBIENT Kräuter @home uit.
▪ Plaats het waterreservoir (4) in de roestvrijstalen sierpot (5) [A]. De uitstulping op de bodem van de
sierpot moet in de zijdelingse inkeping van het waterreservoir zitten [B]. Het waterreservoir zit nu
vast en kan niet verschuiven.
▪ Vul het reservoir met water tot aan de MAX-markering [C].
▪ Plaats het led-inzetstuk (3) in de sierpot zodat het precies op het waterreservoir rust. Zorg er
daarbij voor dat de stroomaansluiting zich aan de kant van het gaatje in de sierpot [D] bevindt.
▪ Maak de eerste bloempot met de wiek klaar:
⋅leg de wiek in de vork van de wiekhouder. Span de wiek over de lange zijde van de wiekhouder
en houd de twee uiteinden van de wiek vast aan de onderkant van de wiekhouder [E].
⋅Steek de wiek samen met de wiekhouder door een van de gaatjes aan de onderkant van de
bloempot en schuif hem tot in de aanslag [F]. Als dit moeilijk gaat, draait u de wiekhouder
terwijl u hem erin schuift.
⋅Laat de wiek los en trek de wiekhouder eruit. De wiek blijft vanzelf in de bloempot zitten [G].
Bewaar de wiekhouder. U kunt de wiekhouder ook in de bloempot laten zitten zodat u hem
niet verliest.
▪ Plaats de bloempot met de wiek in het waterreservoir op de brugjes, zodat de bloempot met zijn
bodemprofiel goed vastzit op de brugjes [H].
▪ Doe hetzelfde met de tweede bloempot.
▪ Verwijder het chromen kapje van de vlotter.
▪ Neem de dekselhelft met de opening voor de vlotter en steek de vlotterstaaf langs onderen door
deze opening.
▪ Plaats het chromen kapje weer op de vlotterstaaf [I].
▪ Plaats nu de dekselhelft in de sierpot op de vooruitstekende rand van het led-inzetstuk. Hou daarbij
de vlotter vast en plaats zijn voet in de geleiding die daarvoor is aangebracht op de bodem van het
waterreservoir [J]. De vlotter zit goed als u hem naar onderen drukt en hij vanzelf weer naar boven
komt.
▪ Plaats nu de andere dekselhelft, eveneens op de vooruitstekende rand van het led-inzetstuk. Houd
met uw andere hand de planten vast zodat ze niet vastgeklemd raken.
▪ Giet wat water op de planten zodat er een vochtverbinding ontstaat tussen de wiek, de wortels en
het waterreservoir.
▪ Steek de kabel in de opening van de roestvrijstalen sierpot (6) en sluit de adapter aan [K].
Tip
U kunt vloeibare voedings- of meststoffen voor planten toevoegen aan het water.
Bediening
Ambient Light in-/uitschakelen met de easy touch-technologie
▪ Raak de roestvrijstalen behuizing (5) op om het even welke plaats aan om de verlichting in te
schakelen. Als u de behuizing meerdere keren aanraakt, activeert u achtereenvolgens 3 lichtsterktes
en schakelt u de verlichting uit.
Uit Stand 1 Stand 2 Stand 3 Uit
1 x aanraken 2 x aanraken 3 x aanraken 4 x aanraken
Water bijvullen
Als het chromen kapje van de waterstandindicator (2) nog maar een beetje boven de
geleiding uitsteekt, moet u weer water bijvullen.
Giet water door de opening aan de waterstandindicator [N].
Vul zolang water bij tot het chromen kapje van de waterstandindicator op gelijke
hoogte staat met de afdekking.
Als het chromen kapje hoger staat, staan de bloempotten in het water en krijgen de
planten te veel water.
Controleer evt. of de vlotter goed zit: de vlotter moet loodrecht in de vlottergeleiding zitten.
Reiniging en onderhoud
Trek voor het reinigen de stekker uit het stopcontact.
Trek de stekker uit het stopcontact en neem de kabel van de roestvrijstalen sierpot (5) weg.
Dompel het led-inzetstuk (3) en de roestvrijstalen sierpot (5) nooit onder in water, maar neem de
buitenkant alleen af met een vochtige doek.
Gebruik geen schurende schoonmaakmiddelen.
Alle andere delen (waterreservoir, beide afdekhelften, vlotter, wiek en wiekhouder) kunt u
schoonmaken met warm water waaraan afwasmiddel is toegevoegd. Nadien afdrogen.
U kunt deze delen ook in de afwasmachine plaatsen voor een gemakkelijke reiniging.
Table of contents
Languages:
Other WMF Accessories manuals
Popular Accessories manuals by other brands

turck
turck RI360P1-DSU35-CNX4 Series Instructions for use

SICK
SICK TriSpector1000 operating instructions

Prolitec
Prolitec AirQ AQ570 installation instructions

Sport-thieme
Sport-thieme 113 5985 Assembly & instruction manual

AltumView
AltumView Sentinare user manual

Dorner
Dorner 3200 Series Installation, maintenance & parts manual