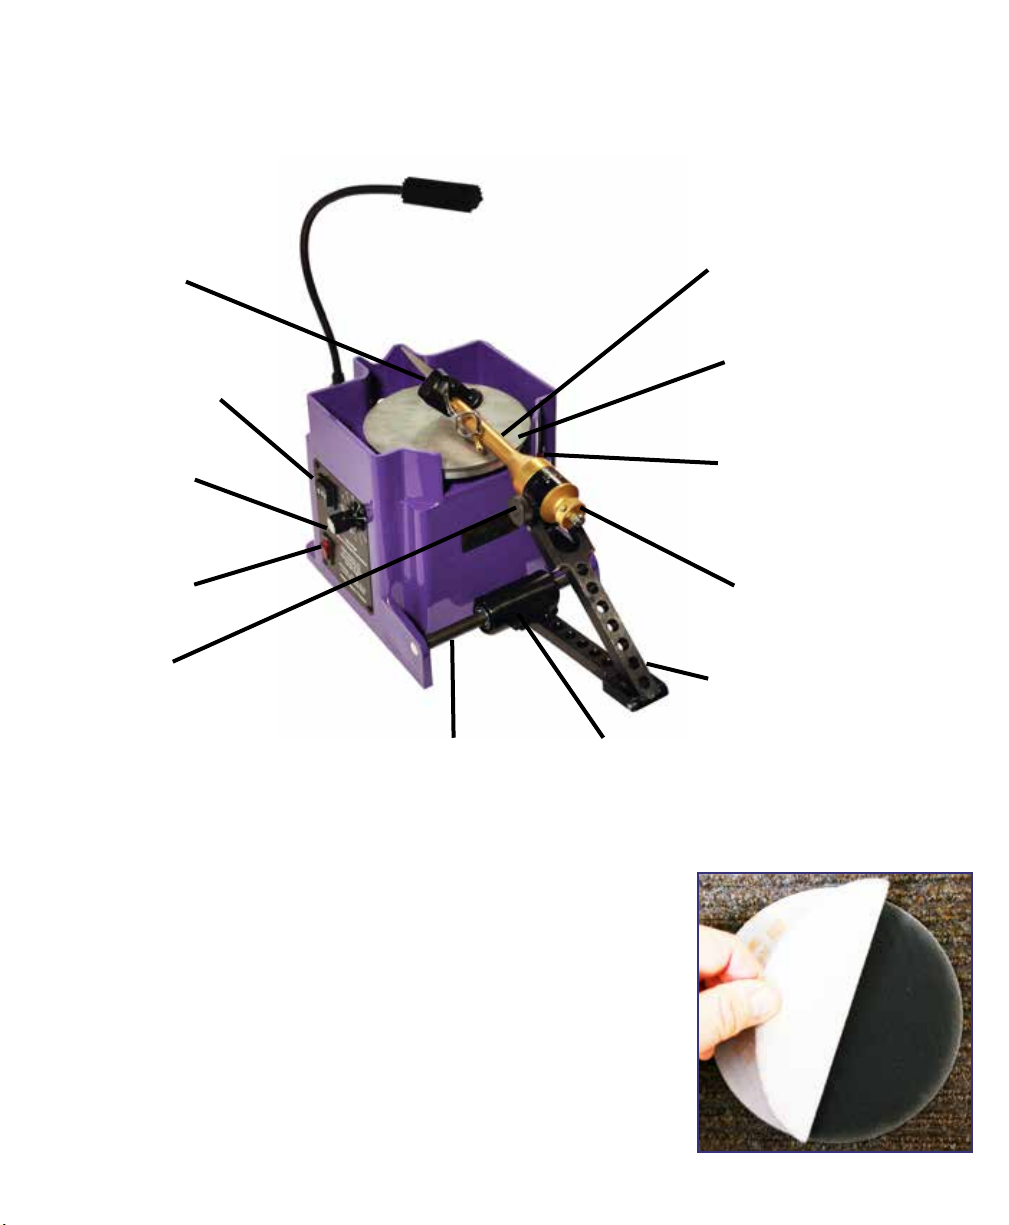
WOLFF HIRA-TO User manual

2/18/2019
SCISSORS
SHARPENING
SYSTEM
Operators Manual
CUSTOMER SERVICE (800) 888-3832
developed and manufactured in the USA by Wol Industries, Inc.
for creating the world’s nest convex edge.

2
History of Wol Industries, Inc.
In 1957 Lee Wol, Inventor of the Twice As Sharp® started a sewing machine sales and service
business. Fabrics and a complete line of sewing needs were added in 1963, and the number of
employees grew to 25 to handle the volume. During those years Lee did a great deal of scissors
sharpening and repair and made important modications on the available scissors sharpening
equipment.
In 1971 Lee and Mary Wol became the rst major importer and disributor of plastic handled
scissors in the United States. They started to manufacture sewing scissors in 1973 under the trade
name of KNIP. A U.S. patent was granted on the KNIP.
The scissors factory was sold to American Scissors Corp. in 1980 and moved to the south. Lee
set up the factory and innovated many new manufacturing processes. The July 1983 Consumers
Reports rates the American Scissors designed and produced by Lee Wol as a best buy. He also
designed a full line of unique plastic handled scissors with interchangeable parts.
Lee worked on the perfecting of scissors sharpening equipment for many years. It is necessary to
accurately control the cutting angles, reduce burr formation during sharpening, and do deburring
and micro-sharpening as a nal process. This method produces scissors that are normally twice
as sharp, hence the name Twice As Sharp®. A US patent was granted along with several foreign
patents.
Wol Industries has grown rapidly with many new products for scissors sharpeners. In 1990
a technical department and additional equipment were added so that we will always be able to
bring to you the most advanced scissors sharpening equipment.
Technical support is availalbe Monday through Friday 8:00 AM to 5:00 PM eastern standard
time. Call with your sharpening questions. If it is regarding a specic shear, please have the shear
in hand. If your question is regarding a problem with the sharpener, please have the sharpener
nearby.
Wol®, Twice As Sharp® and Hira-To® are registered trademarks of Wol Industries, Inc. and
may only be used in regard to items sharpened by using the equipment and methods described in
this manual. Any other uses are forbidden without written permission from Wol Industries, Inc.

3
Subject Page
History. . . . . . . . . . . . . . . . . . . . . . . . . . . . . . . . . . . . . . . . . . . . . . . . . . . . . . . . .2
Technical Support, Trademark Usage . . . . . . . . . . . . . . . . . . . . . . . . . . . . . . . . .2
Table of Contents ................................................3
Parts Names for the Hira-To® .......................................4
Set up and Safety ................................................5
Analyze the Shear . . . . . . . . . . . . . . . . . . . . . . . . . . . . . . . . . . . . . . . . . . . . . . . .6
Setting the Angle for a Right Hand Shears . . . . . . . . . . . . . . . . . . . . . . . . . . . . .7
Setting the Angle for a Left Hand Shears . . . . . . . . . . . . . . . . . . . . . . . . . . . . . .8
Clamping the Blade ...............................................9
Matching your Angle ............................................10
Machine Controls ...............................................11
Bringing up the Edge with a 30 Micron Disc ..........................12
Smoothing the Convex Surface with a 15 Micron Disc ..................13
Smoothing the Convex Surface with a 9 Micron Disc . . . . . . . . . . . . . . . . . . . 14
Working the Inside Line ..........................................15
Applying Diamond Paste on new Felt Pad . . . . . . . . . . . . . . . . . . . . . . . . . . . . 17
Reapplying Diamond Paste on used Felt Pad ..........................18
Polishing the Blade ..............................................19
Reassembling a Shear . . . . . . . . . . . . . . . . . . . . . . . . . . . . . . . . . . . . . . . . . . . . 21
Removing the Burr ..............................................23
Balance the Shears ..............................................24
Testing the Shears . . . . . . . . . . . . . . . . . . . . . . . . . . . . . . . . . . . . . . . . . . . . . . . 24
Consumables for the Hira-To®. . . . . . . . . . . . . . . . . . . . . . . . . . . . . . . . . . . . . 25
Parts Included with the Hira-To®. . . . . . . . . . . . . . . . . . . . . . . . . . . . . . . . . . . 26
Notes . . . . . . . . . . . . . . . . . . . . . . . . . . . . . . . . . . . . . . . . . . . . . . . . . . . . . . . . . 27
Limited Warranty, Disclaimer, Guarantee. . . . . . . . . . . . . . . . . . . . . . . . . . . . . 28
Table of Contents

4
Part Names for the Hira-To®
Pivot Arm
Fixture Head Convexing Grip
Angle Adjustment
Knob
Magnetic Head
Plate
Arm Shaft
Speed Control
Knob
On/O Switch
Angle Lock
Knob
Forward/Reverse
Switch
Arm Slide
Counter Clockwise
Indicator Light
Attaching abrasive Disc’s on the metal plates
a. PSA - remove the backing and stick the abrasive to the soft
backing plate.
b. H&L - press the loop backed abrasive onto the metal plate with
the hook pad on it.

5
Set up and Safety
a. Inspect machine for shipping damage. Look for broken or bent
parts. Notify freight carrier if damaged.
b. Plug machine into a 3 wire grounded receptacle only.
c. Use safety glasses and face mask to catch dust and grit.
(Glasses provided are only for protection from ying grit and
not intended for production work with danger from ying
parts.)
d. For true left hand shears turn the motor on counter-clockwise
and the red counter-clockwise LED will ash.
Attaching the Hira-To®Arm Assembly
a. Lay the Arm in front of the Hira-To as pictured
b. Attach the arm assembly to the arm slide using
the two allen screws and the 3/16” allen wrench.

6
Hira-To®Sharpening System
1. Analyze the shear
A. Check to see if the shear has been sharpened before and that it
has been sharpened properly, whether it is a convexed or beveled
edged shear.
B. Check for knicks visually on the edge. Then slowly close the shear
to feel if there are any knicks along the edge as you close.
C. Check the shear tips to see if they are not closing correctly or to
see if the blades overlap.
D. Visually check the set of the scissor
to see if it is over or under-set.
E. Check the bumper to make sure it is there and not damaged.
F. Check for any damage on the screw or parts of the pivot
assembly.
G. Disassemble the shear and inspect all screws, washers,
nuts, bolts, and bearings, storing all parts in a secure
container. When taking apart scissors with tension
assemblies, be sure to pay close attention to how the
shear came apart so you can reassemble it properly after
sharpening.
H. At this point it is good to clean the pivot holes and check for cracks in the shear and for
pits in the washer seat.
I. Examine the ride line and cutting edge to determine how much work needs to be done on
the inside and how much metal needs to be removed from the edge.
J. Check for any loose or missing nger tangs.
Split Screw
Clicker and Spring

7
2A. Setting the Angle for a Right Hand Shear
A. Loosen the angle lock knob.
B. Turn the angle adjustment knob on the rear of the xture
while applying light counter pressure to the convexing grip
until the right hand angle mark (R) is about 42º.
C. Snug down the angle lock
knob.
D. Now that there is light tension on the internal angle
adjustment shaft, turn the angle adjustment knob clockwise
and set your xture to 45º.
E. Once your right hand angle mark is set at 45º, tighten the
angle lock knob.
F. Follow steps A - E for other angle settings.
Loosen the Angle Lock Knob
Turn the angle adjustment knob
Tighten the Angle Lock Knob

8
2B. Setting the angle for a True Left Hand Shear
The blades are reversed on a true left hand shears
A. Loosen the angle lock knob.
B. Rotate the angle adjustment knob on the rear of the xure
counter-clockwise while applying light pressure to the
counter pressure to the convexing grip until the left hand
angle mark (L) is at about 42º.
Note: Remember your angles are reversed when sharpening a
true left hand shears.
C. Snug down the angle lock knob.
D. Now that there is light tension on the internal angle
adjustment shaft, turn the angle adjustment knob counter-
clockwise and set your xture to 45º.
E. Once your left hand angle mark is set at 45º, tighen the angle
adjustment knob.
WARNING - to prevent damage to the disk or shears
When sharpening a right hand shears the disc must be turning “CLOCKWISE”
When sharpening true left hand shears the disc should be turning “COUNTER CLOCK WISE”
Note - the Red Counter Clockwise Indicator Light
will be ashing when the disk is running counter clockwise
Note: When you are sharpening a left hand shear, the 45º mark
on your fixture will remain constant, all the other angle
markings will be reversed. This means that the 65º angle
mark is actually 25º when sharpening a true left hand
shears. The 25º angle mark is actually 65º when sharpening
a true left hand shears.
Angle Lock Knob
Angle Adjustment Knob
55 35
65 45 25
Left Hand Scissors

9
3. Clamping the blade
A. Hold the xture with your left hand as shown.
B. Holding the blade with your thumb insert the blade
into the clamp. The inside of the blade should be
facing up.
C. Tighten the clamp screw to lock the blade in the
clamp. Make sure 1/2 of the screw hole is covered
by the clamp as shown.
Inside of the blade
Screw hole
Clamp screw

10
4. Matching your angle
Note: For true left hand scissors turn motor on counter-clockwise.
A. After clamping the blade in the head of
the xture and with the xture set at 45º,
place a 30 micron disc on the head of the
machine. While holding the xture at the
set angle- stop position, set the Hira-To®
speed to 2 and turn the machine on so the
disc is spinning clockwise. Holding your
blade against the 45º stop lightly touch the
30 micron disc and then lift it o the disc.
B. Rotate the head of the xture around to see
where the blade has been scratched by the
pad.
C. If the scratch on the blade is farther from
the edge, this means your angle is too steep.
Adjust your angle to 40º and test your blade
again.
If the scratch on the blade is riding the edge, your angle is too at. Adjust your angle
to 50º and test your blade again.
*The purpose of the scratch test is to match the angle as closely as
you can without making the angle too steep or too at.
Note: Most high-end beautician shears
should be sharpened at 45º.
Fixture

11
5. Machine controls
Forward - clockwise Speed control
Power switch
Reverse - counter clockwise
Reverse LED
Counter Clockwise
True left hand scissors
Arm rest position
Neutarl position

12
6. Bringing up an edge with a 30 micron disc
A. Start the sharpening process with a 30 micron
disc. Set the Hira-To® to the neutral position,
install the 30 micron disc.
Note: For true left hand scissors turn motor on counter-clockwise.
B. Set the Hira-To® speed to 5 (50%) and turn the machine on so
the disc is spinning clockwise.
B. Lay the blade on the disc and gently rotate
the blade back and forth in the xture while
watching for a burr to come up. Be careful
to lighten pressure on the tip and the
throat of the blade. Do your best to follow
the gentle curve of the cutting edge.
C. Once you see that your burr has come up, lift
the blade o the disc, rotate the xture, check
the cosmetics (dead spots, appearance of
the convex front surface, etc.), and feel for a
burr. *If the blade needs more work or if you
cannot feel a burr, continue to work the blade
on the disc until you achieve a satisfactory
edge.
Burr

13
7. Smoothing the convex surface with a 15 micron disc
A. Once you have completed your sharpening on the 30
micron disc, set the Hira-To® to the neutral position,
remove the 30 micron disc, and replace it with a 15.
Note: For true left hand scissors turn motor on counter-clockwise.
B. Set the Hira-To® speed set to 6 and turn the machine
on so the machine is spinning clockwise.
C. Lay the blade on the disc and gently rotate the blade
back and forth in the xture.Be careful to lighten
pressure on the tip and the throat of the blade. Do
your best to follow the gentle curve of the cutting
edge.
D. After working your blade on the 15 micron disc, lift the
blade o the disc, rotate the xture, and check the
cosmetics (appearance of the convex front surface).
*If the scratches are still too deep from the 30 micron disc,
continue to work the blade on the disc until you smooth the
convexed surface of the blade (Note: We do this step to
smooth over the scratches from the 30 micron disc).
Burr

14
8. Smoothing the convex surface with a 9 micron disc
A. Once you have completed your sharpening on the
15 micron disc, set the Hira-To® to the neutral
position, remove the 15 micron disc, and replace it
with a 9.
Note: For true left hand scissors turn motor on counter-clockwise.
B. Set the Hira-To® speed at 8 and turn the machine on so the
machine is spinning clockwise.
C. Lay the blade on the disc and gently rotate the
blade back and forth in the xture.Be careful to
lighten pressure on the tip and the throat of the
blade. Do your best to follow the gentle curve
of the cutting edge.
D. After working your blade on the 9 micron disc,
lift the blade o the disc, rotate the xture, and
check the cosmetics (appearance of the convex
front surface).
*If the scratches are still too deep from the 15
micron disc, continue to work the blade on the
disc until you smooth the convexed surface of the
blade. (Note: We do this step to smooth over the
scratches from the 15 micron disc.)
Burr

15
9. Working the Inside Ride Line
A. Remove the blade from the Hira-To® xture
and set it aside. Wet your Shapton 6,000 grit
water-stone and clean and aten the stone with
a DMT W8 water stone sharpener or similar
attening stone as shown.
B. Wipe the water-stone clean and wet it down..
C. Place your blade on the block as shown. Pull
the blade towards you keeping it at against the
water-stone to remove the burr, only move it in
the direction shown.. This will pull back your
burr.
Using the edge of the water stone to remove the burr

16
9. Working the Inside Ride Line - continued
E. Place the blade on the water-stone at 45º
as shown.
F. Place your ngers on the blade as shown,
With about 10 - 12 lbs of pressure on the
screw hole work the blade back and forth
until a consistent ride-line is achieved.
G. Make sure you have a consistent
ride-line from pivot to tip is not
repeat step 9-F.
10. Repeat step 6, on page 12 to
step 9 for the second blade.
Inside Ride-Line

17
11A. Applying diamond paste on new felt pad
A. Place your felt disc on the head of the Hira-To®.
B. Apply six lines of paste to the disc in a pie shaped
pattern. Between the pie wedges apply 2 lines of
paste.
C. Once the paste is applied, rub it into the felt pad with your
nger.
D. Add diamond paste to the felt pad until the the entire
felt pad is covered as shown.

18
11B. Applying diamond paste on used felt pad
A. Place your felt disc on the head of the Hira-To®.
Run your nger across the felt disc, do you feel the
diamond polishing compound on your nger. If you
have compound move to step 12.
B. Put the diamond paste of the felt pad as shown.
C. Once the paste is applied, rub it into the felt pad with
your nger.
D. Felt pad will look like these after adding diamond
paste.
NOTE
Each application of Diamond Paste
should last for about 10 shears (20 blades).

19
12. Polishing the Blade
Note - if you are sharpening - polishing a true left hand shears start the machine with the
head turning in the counter clockwise direction. The red counter clockwise indicator light
will be ashing.
A. Set the Hira-To® speed at 10 and turn the
machine on so the machine is spinning
clockwise.
B Spray a light mist of water on the plate while
running at 10, wipe the excess water o. This
will reduce dust from the earlier steps.
C.. Insert the blade into the Hira-To® clamp.
.

20
12. Polishing the Blade - continued
D. Place your blade on the spinning disc
and gently rotate the blade back and
forth in the xture
E. Be sure to rotate your xture to the
full stop position on every rotation to
ensure proper polishing of the cutting
edge.
F. After polishing the blade for 30 seconds
or so, lift your blade o the disc, rotate
the head of your fixture, and check
your cosmetics. You are checking to
see if the blade is nely polished and
the majority of the scratches have been
removed. You will NOT be able to feel
a burr.
G. Carefully wipe the blade to remove any diamond polishing paste.
H. Once you have achieved a nely polished edge, repeat step 12, page 19 for your
second blade.
Note: The polishing pad will turn black with use, no need to clean the pad only add addiontal
polishing compound as needed.
Table of contents
Other WOLFF Tools manuals

WOLFF
WOLFF JUNIO-STRIPPER 230 V/ 50 Hz Operating and installation instructions

WOLFF
WOLFF PRIMO-STRIPPER Repair manual

WOLFF
WOLFF Cayman Stripper 230V/50Hz User manual

WOLFF
WOLFF GreenCut Repair manual

WOLFF
WOLFF EF 135 Operation instructions

WOLFF
WOLFF Piranha10289 Operating and installation instructions

WOLFF
WOLFF OGC-TAS User manual