Worktrainer HomeFit User manual

HomeFit©
NL Gebruikershandleiding HomeFit©thuiswerkbureau
EN User manual HomeFit© home oce desk
D Benutzerhandbuch HomeFit© Homeoce-Tisch

14
User manual HomeFit© home ofce desk
Introduction
First of all, we would like to thank you very much for choosing one of our products. Our products have
been developed and produced in one of our own factories. We have used our many years of expe-
rience in development and production to create a product that matches your wishes as closely as
possible.
And still, we are improving and optimising our products on a daily basis.
This manual provides you with the necessary instructions to install and maintain the chosen product
in the best possible way so that you will enjoy it for years to come. If, despite all the care and attention
we give to our products, there is a problem with the installation or use of our product, please contact
our sales department or assembly team. They can certainly help you solve any problems you may
have.
Changesand/ormodicationstotheproductduringinstallationoruseoftheproductmayonlytake
place in consultation with us, but are at all times at the risk and expense of the person making the
changes.
Contents of the user manual
Quick-start manual p.15
1. Technicalspecications p.16
2. Precautions and safety instructions p.16
3. Description of the product; composition of the product p.17
4. Assembly; installation; commissioning of a HomeFit©p.18
5. Description of the controls; method of use p.19
5.1. Opening the HomeFit©and making it suitable for use as a desk p.19
5.2. Adjusting the height of the worktop p.19
5.3. Initialisation of a HomeFit©in case of malfunction p.19
5.4. Gyrosense operated anti collision system p.20
5.5. Adjustment of the sensitivity of the lowering protection p.20
5.6. Adjustment of height display in inches p.20
5.7. Duty cycle and intensity of use p.21
5.8. Closing the HomeFit©and making it suitable for use as a cabinet p.21
6. Maintenance and maintenance schedule p.21
6.1. Cleaning p.21
6.2. Adjustment of the doors p.22
6.3. Adjustment of cable tension worktop locking system p.22
6.4. Lubrication locking system p.22
7. Decommissioning p.23
8. Disassembly, demolition; storage and transport p.23
9. Malfunctions and repair p.24
VepaDrentea
Industrieweg 31
7903 AH Hoogeveen
T: +31 528 297111

15
Quick-start manual
max.
40 cm
CLICK
1
2
3
4
5
CLICK
2
2
3a
3b
4
5
3
4
5
6
11
4a 4b
To cabinetUnpack To desk
ENGLISH

16
Chapter 1: Technical
specications
The HomeFit©homeoceisavailableinjustone
size. Colours and top decors as mentioned in
our colour charts. For a current version please
contact your reseller.
The fully foldable electrically adjustable sit/stand
deskhasthefollowingtechnicalspecications:
• Adjustment range 68-118 cm
• Load 220-240V / 50-60 Hz
• Maximum power 2.9 A.
• Maximum output 300 W.
• Duty cycle: 7.5%. Max. 20 seconds full load,
240 seconds rest.
• Adjustment speed depending on load approx.
45 mm/sec.
• Maximum load work top during adjustment 50
kg evenly distributed.
• Noiselevel≤50dB(A).
• Powerconsumptioninstandby≤0.3watt.
• Dimensions HomeFit©as cabinet shape
68x105x30cm(HxWxD).
• Dimensions HomeFit©as standing desk in
highestposition118x105x80cm(HxWxD).
Chapter 2: Precautions and
safety instructions
For safe use of the table, it is necessary to read
this manual completely before using the product
Warning: This symbol indicates poten-
tial health hazards if the instruction is
not followed correctly.
Warning: This symbol indicates that
potential hazards may arise from the
electrical system.
Warning: this symbol indicates that
potential hazards may arise in con-
nection with clamping of, for example,
limbs.
It is not allowed to open the controls.
Make sure that during installation and
during operation the power supply
cable cannot become trapped and can
move freely enough. It should also be
checkedifthecablesareofsucientlengthin
relation to the range of adjustment.
Do not sit or stand on the unfolded
worktop There is a high risk of person-
al injury to the user and any bystand-
ers and permanent
damage to the furniture.
Make sure that the door blocking
mechanism in the right door is activat-
ed during use. Non-activation
may result in unstable furniture if the
doors are unintentionally closed.
In order for the system to function properly, it is
of the utmost importance to read and follow the
assembly instructions in chapter 4 carefully.
The HomeFit©homeocedeskshouldbe
installedonaatandstableoor.Thetables
shouldbeplacedonaatandstableoor.
During use:
In case of visible damage to the table, it may not
be used until it has been established whether the
observed damage prevents safe working.
The foldable worktop is intended as a
height-adjustable worktop for use in a
home situation. Do not sit or stand on
the table. There is a high
risk of personal injury to the user and any by-
standers and permanent damage to the furniture.
Ensure that the worktop is not subject-
ed to a heavier load than stated in the
technicalspecication.Thereisarisk
of irreparable damage to the system
and a risk of personal injury.
When the table is subjected to a max-
imum load of 50 kg evenly distributed
over the worktop,
the maximum duty cycle must be care-
fullyobservedduringadjustment(seetechnical
specicationschapter1).Failuretoobservethe
duty cycle under high load could result in perma-
nent damage to the adjustment mechanism.

17
When the table makes a non-normal
noise during use, starts smoking and/
orsmells,cutothepowersupply
immediately.
When using the tables, it is recom-
mended to periodically check that
the electrical supply cables have not
become trapped and can still move
freely enough.
Please make sure that the table can
freely move up and down and that any
obstacles are removed before using
the table.
The minimum clearance around the worktop
should be 25 mm. This to prevent possible
clamping during adjustment.
Make sure that the door blocking
mechanism in the right door is acti-
vated during use. Non-activation may
result in unstable furniture
if the doors are unintentionally closed.
The product is intended for home use. Children
may only transform and adjust the height of the
table in the presence of, and instructed by, an
adult.
Chapter 3: Description and
composition of the product
HomeFit© general:
The HomeFit©homeocedeskfullymeetsthe
latest preferences and requirements of a modern
ergonomichomeoce.Youcanquicklyandeasi-
lytransformthecabinetintoafully-edgedwork-
place by opening the doors and folding up the
worktop. The worktop contains the controls for
electrically adjusting the desired working height
and it is possible to switch comfortably between
working in a sitting or standing position.
The standard built-in electronically controlled
Gyrosense ensures that any obstacles, such as
a seat rail underneath the worktop, are auto-
matically detected when the worktop is raised
or lowered. The controls will then respond by
moving slightly in the opposite direction so that
the obstacle can be removed.
Thestoragecompartmentoersspaceforstoring
work related materials such as laptop, mouse,
phone charger, work folder or binder.
The cabinet is built around a traverse to which
top carriers, folding worktop, legs, storage com-
partment, side panels and doors are mounted.
Top, folding worktop, side panels and doors
All worktops are made of melaminated 18 mm
thickchipboard,70%PEFCcertied.Available
colours and dimensions according to current
colour charts.
Frame/legs
The frame of this furniture is made from a welded
steel plate crossbeam and top frame to which the
two-piece legs are mounted.
An ingenious blocking and unlocking mechanism
connects the foldable worktop to this crossbeam.
Assembly
Thanks to the unique construction of this piece
of furniture and the compact dimensions of the
folded
furniture, it will be delivered to your home fully
assembled. All you have to do is unpack it and
connect it to the power network.
Electrication/cabling
Yourworkplaceisequippedwithaconnection
cable with a grounded angled connector.
The HomeFit©:
1. In closed form,
2. as a desk at seating height and,
3. as a desk at standing height.
2 3
1
ENGLISH

18
Chapter 4: Assembly; instal-
lation; and commissioning
HomeFit©
YourHomeFit©home
ocedeskwillbedeliv-
ered fully assembled.
A trolley, for example,
can be used for moving
inandrelocating.You
can move the furniture
on the trolley as follows.
If there is no trolley
available, move the
furniture by lifting it with
2 people. Lift the top and
keep the doors closed
with the other hand so
that they cannot open.
Sliding the furniture can
haveadverseeectson
the furniture and/or your
oor.
Thefurnitureshouldbeusedonaatandstable
surface.Ifthesurfaceisnotat,thismayad-
verselyaectthestabilityandproperfunctioning
of the desk.
The HomeFit©homeocedeskisdesignedin
such a way that it can stand freely in the room
and it is not necessary to attach it to a wall.
Prior to installation and commissioning
you must remove the
packaging material and
dispose of it in accord-
ance with local municipal
guidelines. The packag-
ing consists of recycled
cardboard and plastic
strapping.
To remove the plastic
straps you should prefer-
ably use sharp scissors.
After this you can remove the cardboard box and
place the furniture where you want start using it.
Werecommendtoplaceitwiththe(open)back
against a wall so that the doors with the handles
are in the direction of the open available space.
Then connect the furniture to the power supply
by plugging the supplied power cord into the
socket.
Note: the space be-
tween the socket and
the furniture must not
exceed 40 cm. Or use
an(approved)
extension cord.
Note: the power cord
must be able to move
freely enough when
the height of the
furniture is adjusted
and must never be
trapped.
Wiring diagram for cables:
All cables have already been connected in our
factory according to the diagram below.
1. Motor cable 1.
For furniture with
only 1 motor such
as HomeFit©, this
connection should
be used.
2. Motor cable 2
(optional)
3. Motor cable 3
(optional)
4. Optional expansion extra cable.
5. Connectorforcontrolpanelordisplay.(or,
whenyou'requalied,aUSBprogramming
cable).
Connect the power
cable to the other side
of the control unit.
Make sure that the
cable can move freely
when adjusting.
max.
40 cm

19
Chapter 5: Description of
operation; method of use
5.1: Opening the HomeFit©and making it
suitable for use as a desk
The HomeFit©homeocefurniturecaneasily
be transformed from a cabinet to an ergonomi-
cally sound, electrically operated workplace. The
furniture is delivered to your home as a "closed"
cabinet.
To transform it into a desk, proceed as follows:
1. Open the left and
right door in any
order until they open
approximately 90
degrees.
Note: On the inside
of the right door is a
blocking mechanism.
Make sure that the
door is opened far
enough and that
this mechanism is
activated. It prevents the doors from closing
inadvertently when the worktop is folded open
and the table is adjusted to height, which could
make the furniture unstable.
2. Then take hold of the
lid in the middle at
the bottom and pull
it up in one smooth
movement until it
clicks into the fas-
teners in a horizontal
position. The lid is
now secured and can be used as a desktop.
Note: The unfolded worktop is intend-
edasanoceworktop.Sittingoreven
standing on this worktop can cause
physical injury and irreparable damage
to the furniture.
By performing actions 1. and 2. the cabinet has
been transformed into a desk and can now be
adjusted to a comfortable sitting or standing
height.
5.2: Adjusting the height of the worktop
YourHomeFit©homeocedeskhasbeen
extensively tested at the factory and is ready for
immediate use.
Youcanadjusttheheightofyourdeskbypress-
ing the arrow keys.
= Desk up
= Desk down
When you press one of the arrow keys, the
display will light up and show the currently set
height. The readout will go into sleep mode after
approx. 10 seconds and will then no longer be
readable. Press one of the keys shortly to make
the readout visible again.
In the event of an electronic malfunction, an error
code may appear on the display. See chapter 9.
5.3: Initialisation of a HomeFit© in case of
malfunction
Occasionally, due to various causes, the adjust-
ment system may no longer work and an error
message is shown in the display.
To initialise the HomeFit©the following steps
must be taken:
• Arrow up , press 4 times in rapid succession.
• When done properly you'll hear a beep
• After the beep the display
will show the following
value: P01
• Now press the up or down
arrow until the display will
show the value P09.
• Now shortly press the down arrow . The
display is now in reference
mode and will show the
following:
• Then press and hold the arrow down and
the table will slowly go down. Note: press and
hold the arrow until the table is all the way
down and the display shows a height value
again.
• When the desk height is readable again on the
display, initialization has been successful and
thedeskcanbe(re)used.
ENGLISH

20
5.4 Gyrosense operated anti collision system
The HomeFit©tables are equipped with an elec-
trically operated motor adjustment. In addition,
the table controls are equipped as standard with
a Gyrosense that automatically detects any ob-
stacles while adjusting the height of the worktop.
If the worktop detects an obstacle during adjust-
ment, the movement in the direction of the obsta-
cle will stop and reverse. The worktop will move
approx. 3 cm. in the opposite direction. This can
occur in both the upward and downward move-
ment. The purpose of this is to move the worktop
to a position where it is free from the obstacle. To
change the sensitivity of the Gyrosense please
refer to the description below under point 5.5.
Note: The Gyrosense sensor registers
the smallest possible changes in the
movement of the table. However, this
cannot exclude with 100%
certainty that damage to goods or injury to per-
sons may occur as a result of the movement of
the table. It is at all times
the responsibility of the person operating the
table to ensure that the table can move freely so
that damage to goods or injury to persons close
to the table cannot occur!
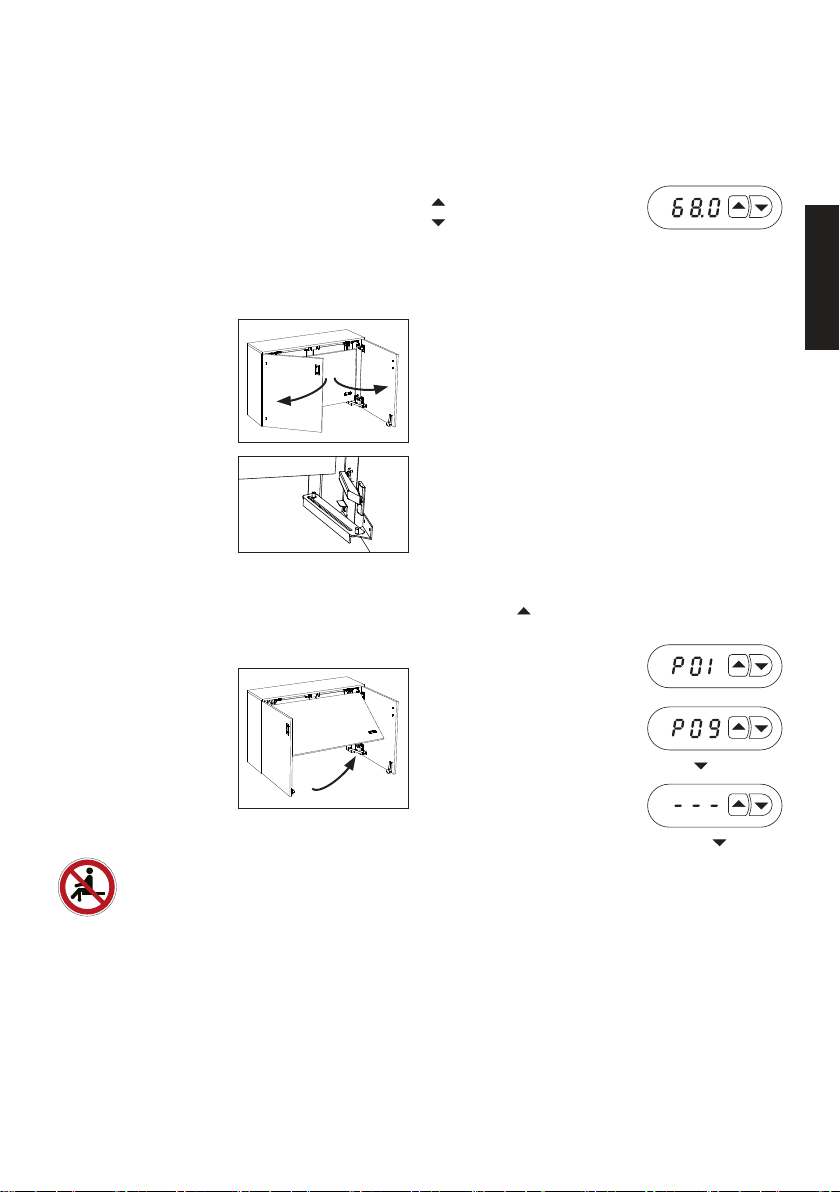
5.5: Adjustment of the sensitivity of the lower-
ing protection
The height indicator lights up when you press
one of the arrows. The use of the table can
cause the table to run heavier or lighter over
time. In both cases this could promote unwanted
activation of the lowering protection. By default,
thetableissetwithamediumsensitivity(position
3).Byusingthestepsasdescribedbelow,the
setting can either be adjusted or improved.
• Press up arrow 4 times in rapid succession,
when done properly you'll hear a beep.
• After the beep the display
will show the following
value: P01
• Now press the up arrow
until the display will show
the value P08.
• Now shortly press the down arrow . The
display is now in programming mode.
• The display now shows the set sensitivity by
means of a value.
• The sensitivity can be changed by using the up
arrow .
Four settings are possible:
1. Theloweringprotectioniso.
2. Highest sensitivity.
3. Medium sensitivity.
4. Low sensitivity.
After setting the desired sensitivity with the
arrows,itmustbeconrmedbypressingthe
down arrow once. The newly set sensitivity in
now activated.
The display has the option to show error codes
for diagnostic feedback. We refer to the table in
chapter 9 for the most common error codes and
possible solutions.
When you press one of the above buttons, the
display will light up and show the currently set
height. The readout will go into sleep mode after
approx. 10 seconds and will then no longer be
readable.
5.6: Adjustment of height display in inches.
YourHomeFit©homeoceisequippedwitha
display with height reading as standard. It is pos-
sible to display the current height value in inches.
Proceed as follows:
• Press up arrow , 4 times in rapid succession,
when done properly you'll hear a beep
• After the beep the display will
show the following value: P01
• Now press the up arrow
until the display will show the
value P10.
• Now shortly press the down
arrow . The display is now in programming
mode.
• The display will now read a value of 1 or 0.
• Change the value by pressing the up arrow .
• Conrmthevaluebypressingthedown
arrow .
• The display is now changed.
0: metric display
1: display in inches.

21
5.7: Duty cycle and intensity of use
The HomeFit©homeocedeskhasbeende-
signed to allow for alternate use between sitting
and standing and to promote this alternation by
providing a high level of user-friendliness. The
construction has been designed in such a way
that this is possible without any problems.
When the table is subjected to an extremely
heavy load, e.g. due to multiple monitors and/
or computer equipment or other devices, a
maximum duty cycle of 7.5% applies. This means
that if the table is under maximum load, it is
advisable not to use the adjustment for at least 4
minutes after 1 complete adjustment from sitting
tostandingorviceversa(approx.14seconds).
This prevents overheating of the motor
and transmission which can be detrimental to the
life span of the system. The duty cycle is also
indicated on the control unit's label.
When the system does overheat, please refer to
the list of error messages in chapter 9, starting
on page 24.
5.8: Closing the HomeFit©and making it suita-
ble for use as a cabinet
If you want to transform your HomeFit©home
ocefromadesktoacabinetagain,please
proceed as follows:
1. Make sure that the foldable part of the worktop
is empty.
Tip: If you want to store work-related items
such as a laptop or work binders in the special-
ly designed shelf at the bottom of the cabinet
section, simply set your worktop to the highest
position. This is the best way to access the
storage space.
2. Then press the down arrow and set the top
to the lowest possible position.
Adjusting the table downwards may
lead to a potential risk of getting
caught. Make sure that the worktop
can move freely downwards and that there are
no obstacles in the way. Extra alertness is re-
quiredif(small)childrenareinthesameroom.
3. If you adjust the table downwards as described
above, it will automatically stop at a height of
approx. 72 cm. This is 2 cm above the lowest
position where the small worktop almost touch-
es the side panels. By again pressing down on
the arrow , the table will go the last bit to the
bottom with only 1/3 of the normal speed and
power and will leave only a few millimetres of
spacesothattheworktopwilltperfectlyonto
the side panels.
4. Unlock the worktop
by pulling on the
handle that sits in
the middle under the
worktop on the seat
side and move the
worktop slowly downwards until it touches the
shelf.
5. Then close the doors and the transformation is
complete
Note: to close the
right door, you must
deactivate the door
lock mechanism. This
can be done simply
by pressing your foot
against the back side,
so that the handle is
released and you can
close the door.
Chapter 6: Maintenance
YourHomeFit©furniture is essentially main-
tenance-free and therefore does not require
periodic maintenance.
Maintenance as described below can take place
at own discretion and frequency.
6.1: Cleaning maintenance
For the cleaning and maintenance of the
HomeFit©homeocedeskwedistinguishthe
following parts:
• Moving parts.
• Desktops side panels and doors in MFC.
• Metal parts powder coated.
Moving parts:
The adjustment mechanism of the HomeFit©
homeocedeskiscompletelymaintenance-free
and requires no additional maintenance.
Desktops side panels and doors in MFC:
When required, the worktops, side panels and
doors can be cleaned with a soft cloth and, in
case of more intensive soiling, with soapy water.
ENGLISH

22
Avoid strong detergents, solvents and stain
removers. Treatment with abrasives is strongly
discouraged as it can lead to irreparable damage.
Please refer to the table below for an overview of
the various types of stains.
Metal parts powder coated:
The powder coated metal parts can be cleaned in
the same way as the desktops. See table below.
For the various types of stains on desktops and
metal parts we recommend:
Recommended
Stain type cleaning product
Water based felt-pen - Warm soapy water Per-
manent marker - Turpentine / Benzene
Ink stains - Soapy water
Black ballpoint pen - Soapy water
Shoe marks - Soapy water
Wax - Soapy water
Coee -Soapywater
Grease - Warm soapy water Other
stains - Turpentine, warm soapy
-water or benzene
6.2: Adjustment of the doors
Over time, it may happen that the doors no
longertproperly.Thehingesweusecanbe
easily adjusted by yourself.
Proceed as follows:
To adjust the height of
the doors: use the centre
screw.
To adjust the width, use
the front screw.
To adjust the depth, use
the back screw.
6.3 Adjustment of cable tension worktop
locking system
The unlocking the block-
ing pins that are used
to block the fold-away
worktop may become
looser over time. With the
adjustment screw behind
the lock, you can easily
re-tighten this a little if
necessary.
6.4 Lubrication locking mechanism.
The blocking mechanism
isfactory-ttedwiththe
InteronpasteHT1200
lubricant. This agent is
characterised, among
other things, by long-term
lubrication and adhesion
to metal parts.
We do not believe that
further lubrication is nec-
essary. In case you are
of the opinion that after
some time the desktop
willclickmoredicult
into its blockage, we recommend applying the
lubricant at the indicated position. Other common
greases or lubricants such as acid-free petroleum
jelly or graphite powder can also have a lubricat-
ingeect.
max. ± 3.0 mm
+
-
mm0.2±
+
-
mm0.2-/0.3+
-
+

23
Article Component Recycling group
Base frame Legs and crossbeam Scrap metal
Motor Scrap metal
Controls Electronics recycling
Power cord and other cables Wiring scrap
Columns Lower leg Scrap metal
Spindle and transmission Scrap metal and plastic recycling
Side panels MFC top Chip board processing
Doors MFC top Chip board processing
Hinges Scrap metal
Fixed worktop MFC top Chip board processing
Moving worktop MFC top Chip board processing
Metal frame with handle Scrap metal
Cabling for unlocking Scrap metal
Controls Electronics recycling
Display Electronics recycling
Cable and power cord Electronics recycling
Chapter 7: Decommissioning
If there is visible damage to the HomeFit©homeocedesk,thetableshouldnotbeuseduntil
it has been determined whether the observed damage prevents safe working. When the table makes a
non-normalnoiseduringuse,startssmokingand/orsmells,cutothepowersupplyimmediately.
Ifthereisreasontoshutdownthedesk,itissucienttodisconnectthepowersupplybypullingthe
power cord from the socket.
Chapter 8: Disassembly, demolition, storage and transprt.
Disassembly:
Should the desk be disassembled, you can disassemble the various hinges and other parts with a
screwdriver.
Transport (indoors):
In case of in-house relocation/transport of the HomeFit©homeocedesk,itisadvisabletomovethe
furniture fully assembled, with two people.
Demolition and recycling:
When the product has reached the end of its life cycle, we recommend disassembling the product in
the smallest possible components. We have tried to take this into account during the development of
the product so that as many components as possible can be disposed of for reuse through designated
channels.
ENGLISH

24
Chapter 9: Faults and repairs
It may happen that something occurs during use
causing the HomeFit©homeocedesktonot
work anymore.
We strongly recommend that you do not
open components such as motors, con-
trols and displays yourself, but that you
consult trained and authorised mechanics.
If you press one of the arrows and the display
does not light up and the table moves up or
down, take the following steps:
Checkwhetherpowerisavailable.(trya
lamp,forexample).
Check that all plugs are properly inserted
into the various contact points. By ad-
justing and possibly tightening of cables,
plugs can come loose.
If the power supply is OK, check the display for
error messages. The most common messages
and solutions are shown in the table below.
* Should this message occur when the table is in
its lowest or highest position and an initialisa-
tion is unsuccessful, it is best to contact your
reseller or the manufacturer.
An initialisation or reset is described in chapter 5:
Descriptionofoperation;methodofuse.(chapter
5.3page19).
For malfunctions that do not appear on the list or
cannot be solved by yourself, please contact your
reseller or the manufacturer.
Any replacement parts can be purchased via
your reseller or the manufacturer.
Error code malfunction possible solution
none display does not light up No power available.
con Communication problem. There is no connection between control box and display. Check
plug, possibly replace display.
- - - Initialisation position. Initialisation must take place.
F01 error in the initialisation. Press any button on the display. If this does not work, discon-
nect the power supply for at least 20 seconds.
F02 error in the initialisation. Press any button on the display. If this does not work, discon-
nect the power supply for at least 20 seconds.
F03 reading error. Press any button on the display. If this does not work, discon-
nect the power supply for at least 20 seconds.
F04 inconsistency. Press any button on the display. If this does not work, discon-
nect the power supply for at least 20 seconds.
F05 Gyrosense activated. Press any button on the display.
F06, F07
or F08
Height of power level activates stop on the
motor port.
Reduce weight load of the table. *
F09 Maximum capacity of engine energy level
has been reached. (I2t) Overheating.
Let the motor cool for at least 10 minutes.
F10 Maximum capacity of controls energy level
has been reached. (I2t) Overheating.
Let the controls cool for at least 10 minutes.
F11 Maximum capacity of power supply energy
level has been reached. Overheating.
Let the controls cool for at least 10 minutes.
F12 Maximum temperature outgoing energy
engines has been reached.
Let the controls cool for at least 10 minutes.
F14 Maximum stroke of the spindles has been
reached.
Controls will automatically go into initialisation mode.
F15 Motor is overloaded or blocked. Reduce weight load of the table or unblock.
Table of contents
Other Worktrainer Indoor Furnishing manuals