Worx WG115E Installation manual

Electric Grass Trimmer WG115E
SAFETY AND OPERATING MANUAL
ORIGINAL INSTRUCTIONS

WG115E

3
Electric Grass Trimmer
WG115E WG115E
PRODUCT SAFETY
GENERAL SAFETY
WARNINGS
WARNING! Read all safety warnings
and all instructions. Failure to follow
the warnings and instructions may result in
electric shock, fire and/or serious injury.
SAVE ALL WARNINGS AND
INSTRUCTIONS FOR FUTURE
REFERENCE.
If the supply cord is damaged, it must be
replaced by the manufacturer, its service
agent or similarly qualified persons in order to
avoid a hazard.
IMPORTANT
READ CAREFULLY BEFORE USE
KEEP FOR FUTURE REFERENCE
Safe operating practices
1. Training
a) Read the instructions carefully. Be familiar
with the controls and the correct use of the
machine.
b) Never allow children, persons with reduced
physical, sensory or mental capabilities
or lack of experience and knowledge or
people unfamiliar with these instructions
to use the machine, local regulations may
restrict the age of the operator.
c) Keep in mind that the operator or user
is responsible for accidents or hazards
occurring to other people or their property.
2. Preparation
a) Before use check the supply and extension
cord for signs of damage or aging. If
the cord becomes damaged during use,
disconnect the cord from the supply
immediately. DO NOT TOUCH THE CORD
BEFORE DISCONNECTINGTHE SUPPLY. Do
not use the machine if the cord is damaged
or worn.
b) Keep extension cords away from moving
hazardous parts to avoid damages to the
cords which can lead to contact with live
parts.
c) Before use, always visually inspect
the machine for damaged, missing or
misplaced guards or shields.
d) Never operate the machine while people,
especially children, or pets are nearby.
3. Operation
a) Keep supply and extension cords away
from cutting means.
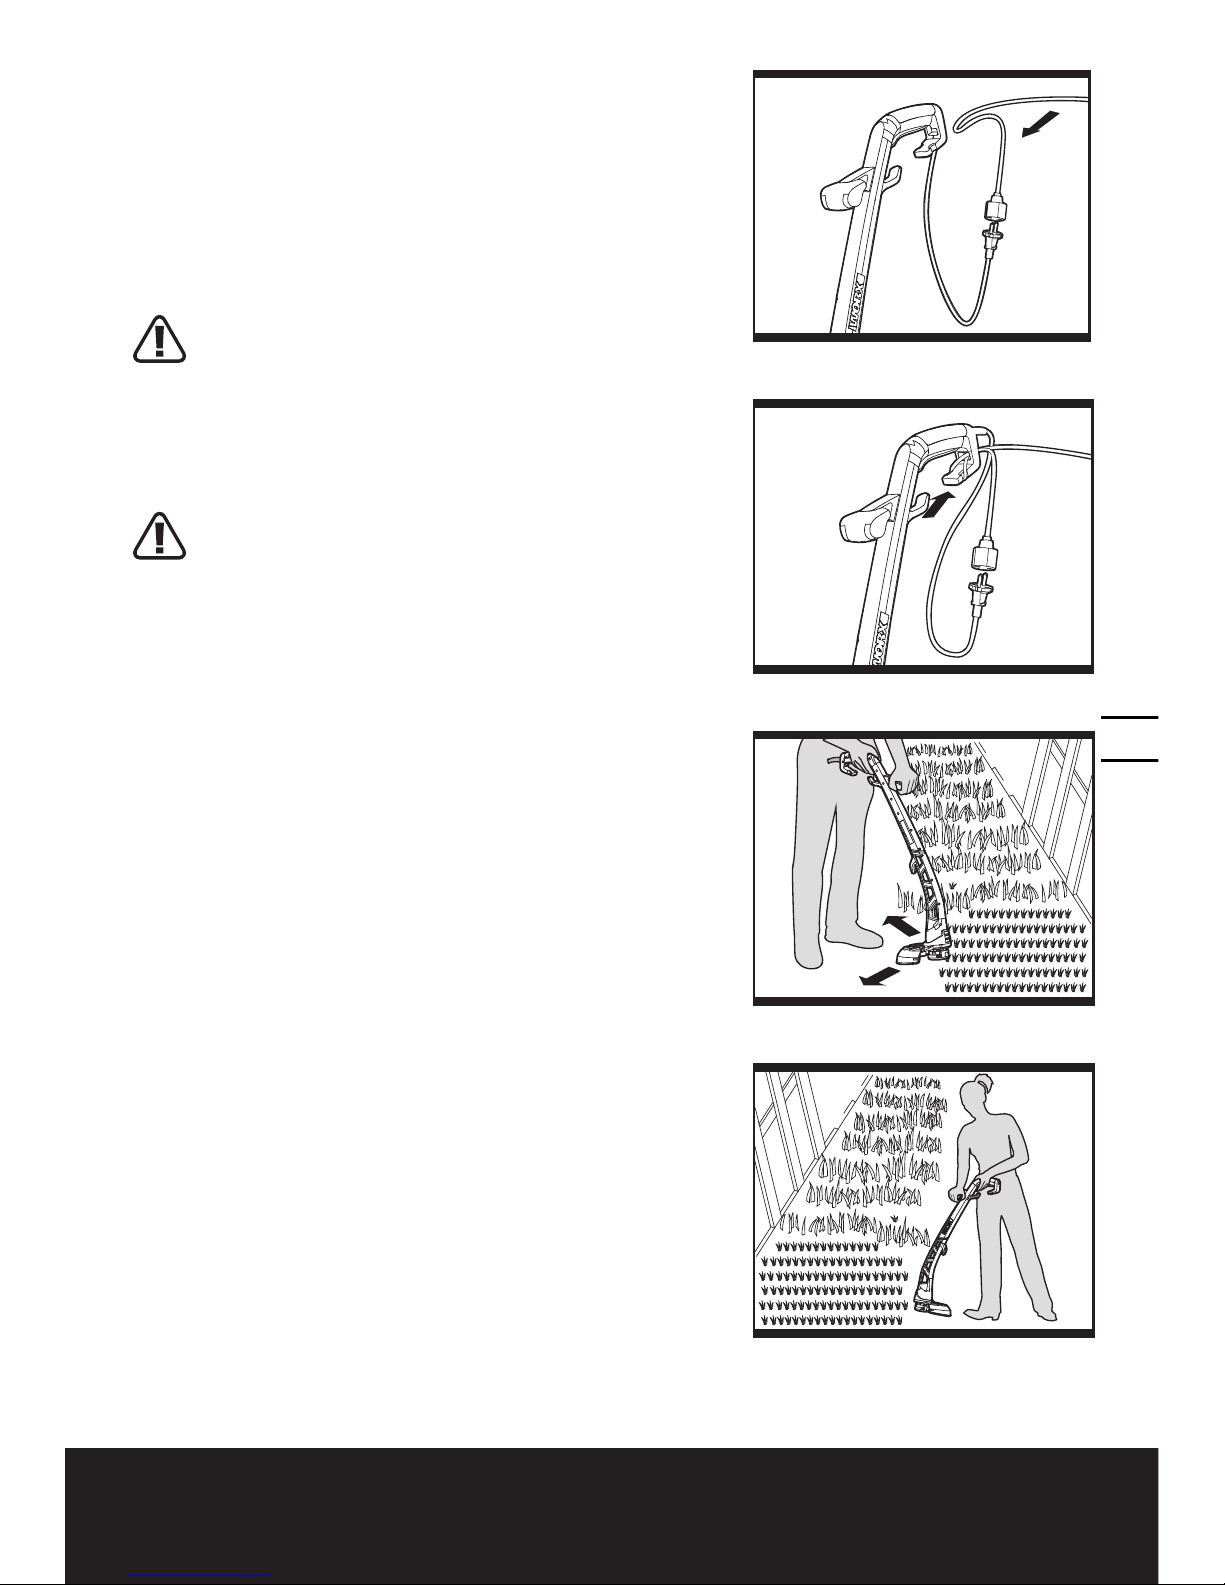
b) Wear eye protection, long trousers and
stout shoes at all times while operating the
machine.
c) Avoid using the machine in bad weather
conditions especially when there is a risk of
lightning.
d) Use the machine only in daylight or good
artificial light.
e) Never operate the machine with damaged
guards or shields or without guards or
shields in place.
f) Switch on the motor only when the hands
and feet are away from the cutting means.
g) Always disconnect the machine from the
power supply (e.g. remove the plug from
the mains)
1)
Whenever the machine is left unattended;
2) Before clearing a blockage;
3) Before checking, cleaning or working on
the machine;
4) After striking a foreign object;
5) Whenever the machine starts vibrating
abnormally.
h) Take care against injury to feet and hands
from the cutting means.
i) Always ensure that the ventilation
openings are kept clear of debris.
j) Never fit metal cutting elements.
k) Always be sure of your footing on slopes.
l) Walk, never run.
m) Not overreach and keep the balance at all
times.
n) Not to touch moving hazardous parts
before the machine is disconnected from
the mains and the moving hazardous parts
have come to a complete stop.
4. Maintenance and storage
a) Disconnect the machine from the power
supply (e.g. remove the plug from the
mains) before carrying out maintenance or
cleaning work.
b) Use only the manufacturer’s recommended
replacement parts and accessories.
c) Inspect and maintain the machine
regularly. Have the machine repaired only
by an authorized repairer.
d) When not in use, store the machine out of
the reach of children.
5. Recommendation
The machine should be supplied via a residual
current device (RCD) with a tripping current of
not more than 30 mA.

4
Electric Grass Trimmer WG115E
SYMBOLS
Read operator’s manual
Double insulation
Wear eye and ear protection
Wear dust mask
Do not expose to moisture.
Keep bystanders away
Disconnect the mains plug if
the cord becomes damaged or
entangled.
Waste electrical products must not
be disposed of with household
waste. Please recycle where
facilities exist. Check with your
local authorities or retailer for
recycling advice.

5
Electric Grass Trimmer
WG115E WG115E
6
5
3
4
3
1
2
9
8
7

6
Electric Grass Trimmer WG115E
1. CABLE HOOK
2. ON/OFF SWITCH
3. CABLE STORAGE HOOK
4. UPPER SHAFT
5. LOWER SHAFT
6. SAFETY GUARD
7. CUTTING LINE
8. CUTTING HEAD ASSEMBLY
9. AUXILIARY HANDLE
10. CUTTING HEAD COVER (See Fig. F)
11. CAP RELEASE LATCH (See Fig. F)
12. SPOOL (See Fig. F)
13. EYELET (See Fig. F)
14. CUTTING HEAD (See Fig. F)
Not all the accessories illustrated or described are included in standard delivery.
TECHNICAL DATA
Type WG115E(1-designation of machinery, representative of Lawn Trimmer)
Voltage 220-240V~50Hz
Power input 320W
No load speed 11000/min
Max. cutting diameter 25cm
Diameter of line 1.65mm
Line length 2x5m
Protection class /II
Machine weight 1.7kg

7
Electric Grass Trimmer
WG115E WG115E
NOISE AND VIBRATION DATA
A weighted sound pressure LpA =84dB(A)
KpA 3.0dB(A)
A weighted sound power LwA =96dB(A)
Wear ear protection when sound pressure is over 80 dB (A)
Typical weighted vibration
ah<2.5 m/s2
uncertainty K= 1.5m/s2
WARNING: The vibration emission value during actual use of the power tool can differ
from the declared value depending on the ways in which the tool is used dependant on the
following examples and other variations on how the tool is used:
How the tool is used and the materials being cut or drilled.
The tool being in good condition and well maintained
Using the correct accessory for the tool and ensuring it is sharp and in good condition.
The tightness of the grip on the handles and if any anti vibration accessories are used.
And the tool is being used as intended by its design and these instructions.
This tool may cause hand-arm vibration syndrome if its use is not adequately managed
WARNING: To be accurate, an estimation of exposure level in the actual conditions of use
should also take account of all parts of the operating cycle such as the times when the tool
is switched off and when it is running idle but not actually doing the job.This may significantly
reduce the exposure level over the total working period.
Helping to minimise your vibration exposure risk.
ALWAYS use sharp chisels, drills and blades
Maintain this tool in accordance with these instructions and keep well lubricated (where
appropriate)
If the tool is to be used regularly then invest in anti vibration accessories.
Avoid using tools in temperatures of 100C or less
Plan your work schedule to spread any high vibration tool use across a number of days.
ACCESSORIES
Safety Guard 1
Spool WA0007
We recommend that you purchase your accessories from the same store that sold you the tool.
Refer to the accessory packaging for further details. Store personnel can assist you and offer
advice.

8
Electric Grass Trimmer WG115E
OPERATING INSTRUCTIONS
NOTE: Before using the tool, read the
instruction book carefully.
INTENDED USE
The machine is intended for the cutting of grass and
weeds under bushes, as well as on slopes and edges
that can not be reached with the lawn mower.
ASSEMBLY
WARNING! The guard must always be on the
tool to protect the user.
To avoid injury from unexpected starting or
electrical shock during assembly or
adjustment, do not plug the power cord into a
source of power.
1. ASSEMBLING THE TRIMMER SHAFT (See Fig.
A)
First make sure the cable is not twisted.
Locate the Lower Shaft (5) into the Upper Shaft (4).
Grasp both the Lower and Upper Shafts and Push
firmly together until a click can be heard.
NOTE: Once the Upper and Lower Shaft is assembled it
can not be disassembled.
Ensure internal cable is not trapped or twisted.
2. FITTING THE GUARD (See Fig. B1, B2)
Attach the Safety Guard (6) to the trimmer head making
sure the sides are located into the grooves (See Fig.
B1).
Secure the safety guard onto the trimmer head with the
screw (a) provided (See Fig. B2).
WARNING! Take great care when doing this
as the guard has a very sharp cutting edge
(See Fig. B3).
Never operate the tool without the guard
properly in place. Use of the unit without having
installed the guard will cause the motor to
overheat, and void the warranty.
a
1
2
33
Click
A
B1
B2
B3

9
Electric Grass Trimmer
WG115E WG115E
3. ELECTRICAL SUPPLY CABLE STRAIN RELIEF
(See Fig. C1, C2)
For strain relief of the cable, form a loop at the end
of the extension cable. Locate the cable through the
handle and secure by placing the loop over the Cable
Hook (1) and pull the cable back.
4. ON/OFF SWITCH
•
To start, press and hold the On/Off Switch (2).
• Release the On/Off Switch to stop.
WARNING: The cutting head continues to
rotate after the trimmer has been switched
off. Wait until it has stopped completely then lay
down the tool.
OPERATION
WARNING: Always wear eye protection.
Never lean over the trimmer head. Rocks
or debris can ricochet or be thrown into the eyes
and face and cause blindness or other serious
injury.
Wear eye protection and heavy clothing. Hold
front handle with one hand and auxiliary handle
with the other hand. Keep unit below waist level.
Work only from your right to your left to ensure
debris is thrown away from you. Without bending
over, keep line near and parallel to the ground
(perpendicular when edging) and not crowded
into material being cut.
Make sure that line is fed out before operation.
Make sure motor is running at full speed before
trimming.
Use only 1.65mm diameter cutting line. Other
sizes of line will not feed properly and will result
in improper cutting head function or can cause
serious injury. Do not use other material such as
wire, string, rope, etc. Wire can break off during
cutting and become a dangerous missile that can
cause serious injury.
TRIMMING (See Fig. D1, D2)
While trimming, move the trimmer from left to right,
keeping it well away from the body.Tilt the front of the
trimmer head to cut shorter grass. DO NOT overload
your trimmer. Overloading your trimmer can be
avoided by making sure the motor speed does not drop
too much while trimming.
Cutting Around Trees and Bushes
Carefully cut around trees and bushes so that they do
not come into contact with the Cutting Line (7).
Plants can die if you damage the bark.
C1
C2
D1
D2

10
Electric Grass Trimmer WG115E
AUTOMATIC LINE FEED SYSTEM
When you first switch on the trimmer, a small length of
line is fed out.
A ‘clattering’ noise will be heard for a short time. This
is normal and is caused by the line bumping up against
and being cut by the line cutter. Once the line is cut to
the correct length, the ‘clattering’ noise will stop and
the trimmer motor will run at full speed.
To feed more line, stop the trimmer completely, then
restart, allowing the motor to reach full speed. Repeat
this until you hear the ‘clattering’ noise of the line
cutting. (Do not repeat this procedure more than 6
times.)
MANUALLY FEEDING THE LINE (See Fig. E, F)
Press and release the manual line feed button, located
on the side of the cutting head, while gently pulling out
the lines until it reaches the line cutter.
When the required amount of line is fed out, gently
pull on the second line (there is no need to press the
manual line feed button again). If the line extends past
the line cutter, too much line has been fed out.
If too much line is fed out, remove the spool cap and
click the spool counter-clockwise until the line is at the
desired length.
1
2
10
11
12
14
13
E
F
G1
G2

11
Electric Grass Trimmer
WG115E WG115E
REMOVING THE CAP (See Fig. G1)
Press and hold in the two Cap Release Latches (11).
Pull the Cutting Head Cover (10) off of the Cutting
Head (14). Keep the Cutting Head Cover, Spool (12),
and inside of the Cutting Head clean from debris. To
replace the cap, align the Cap Release Latches and
press it firmly back onto the Cutting Head. Ensure that
it is correctly connected by trying to remove it without
depressing the two latches.
CHANGING THE LINE SPOOL
(See Fig. G2, G3)
First take off the Cutting Head Cover (10) and remove
the old Spool (12). Place the new Spool into the Cutting
Head (14). Feed one line through the eyelet, and then
repeat for the second line. Reattach the Cutting Head
Cover.
WARNING! Your Trimmer is designed to
only use line with a maximum diameter of
1.65mm. Only use nylon line.
IMPORTANT - Always wind the line onto the
upper section of the spool first.
G3
H
I
1
2
10
11
12
14
13
E
F
G1
G2

12
Electric Grass Trimmer WG115E
TO MANUALLY WIND LINE (See Fig. H, I, J, K)
IMPORTANT! Your trimmer is designed to use only
line with a maximum diameter of 1.65mm. Take
approximately 5m of line and insert 15mm of line into
one of the holes in the upper section of the Spool (12)
(See Fig. H). Wind the line in the direction of the arrows
on the top of the spool (See Fig. I, J).
Leave approximately 100mm of line unwound and
place it into the cleat. Repeat on the lower section of
the Spool.
Care should be taken to ensure that the line is neatly
coiled on the spool (See Fig. K). Failure to do so will
impair the efficiency of the automatic line feed.
MAINTENANCE
Remove the plug from the socket before carrying
out any adjustment, servicing or maintenance.
There are no user serviceable parts in your lawn
trimmer. Never use water or chemical cleaners to clean
your lawn trimmer. Wipe clean with a dry cloth. Always
store your lawn trimmer in a dry place. Keep the motor
ventilation slots clean. Keep all working controls free of
dust. If you see some sparks flashing in the ventilation
slots, this is normal and will not damage your lawn
trimmer.
If the supply cord is damaged, it must be replaced by
the manufacturer, its service agent or similarly qualified
persons in order to avoid a hazard.
Clean the moulded plastic housing of the machine
using a soft brush and clean cloth. Do not use water,
solvents or polishes. Remove all debris, especially from
the motor cooling vents.
Store in a secure, dry place out of the reach of children.
Do not place other objects on the product.
G3
H
I
RIGHT WRONG
J
K

13
Electric Grass Trimmer
WG115E WG115E
TROUBLE SHOOTING
The following table gives checks and actions that you can perform if your machine does not
operate correctly.
If these do not identify/remedy the problem, contact WORX Customer Service.
WARNING: First switch off and remove plug from electrical outlet.
Symptom Possible cause Remedy
Machine fails to operate
Power turned off
Electrical socket faulty
Extension cable damaged
Fuse faulty/blown
Turn power on
Use another socket
Inspect cable, replace if damaged
Replace fuse
Machine functions
intermittently
Extension cable damaged
Machines internal wiring
damaged
Inspect cable, replace if damaged
Contact Service Agent
Trimmer seems to be
struggling to cut the grass at
its usual rate
Grass is too high Cut in stages
Trimmer is not cutting Line is too short/broken
off
Feed the line manually/
automatically
Line can not be fed
Spool empty
Line inside the spool
entangled
Replace the spool
Inspect the spool, rewind if
necessary
Line keeps breaking
Line inside the spool
entangled
Trimmer used incorrectly
Inspect the spool, rewind if
necessary, Only trim with the tip
of the line, avoid stones, walls
and other hard objects
Feed the line regularly to maintain
full cutting width.
ENVIRONMENTAL PROTECTION
Waste electrical products must not be disposed of with household waste. Please recycle
where facilities exist. Check with your local authorities or retailer for recycling advice.

14
Electric Grass Trimmer WG115E
PLUG REPLACEMENT
(ONLY FOR REWIRABLE
PLUG OF UK & IRELAND)
If you need to replace the fitted plug then
follow the instructions below.
IMPORTANT
The wires in the mains lead are colored in
accordance with the following code:
Blue = Neutral
Brown = Live
As the colors of the wires in the electrical cord
of this appliance may not correspond with the
colored markings identifying the terminals
in your plug, proceed as follows.The wire
which is colored blue must be connected to
the terminal which is marked with N.The wire
which is colored brown must be connected to
the terminal which is marked with L.
WARNING: Never connect live or
neutral wires to the earth terminal of the
plug. Only fit an approved 13ABS1363/A plug
and the correct rated fuse.
NOTE: If a moulded plug is fitted and has to
be removed take great care in disposing of the
plug and severed cable, it must be destroyed
to prevent engaging into a socket.
Connect
Blue to N
(neutral)
Outer sleeve
firmly clamped
Cable grip
Brown L (live)
13 Amp fuse approved
to BS1362
DECLARATION OF
CONFORMITYY
We,
Positec PowerTools (Europe) Ltd,
PO Box 6242, Newbury, RG14 9LT, UK
Declare that the product
Description Electric Grass Trimmer
Type WG115E (1-designation of
machinery, representative of Lawn
Trimmer)
Function Cutting grass and similar soft
vegetation and for trimming grass edges
Complies with the following Directives,
2006/42/EC, 2014/30/EU, 2011/65/EU,
2000/14/EC amended by 2005/88/EC
2000/14/EC amended by 2005/88/EC:
- Conformity assessment procedure as per
Annex VI.
- Measured Sound Power Level 94.8dB(A)
- Declared Guaranteed Sound Power Level
96dB(A)
The notified body involved
Name: Intertek Testing & Certification Ltd
(notified body 0359)
Address: Davy Avenue, Knowlhill, Milton
Keynes, MK5 8NL
Standards conform to,
EN 60335-1
EN 50636-2-91
EN 62233
EN ISO 3744
EN 55014-1
EN 55014-2
EN 61000-3-2
EN 61000-3-3
The person authorized to compile the technical
file,
Name Russell Nicholson
Address Positec Power Tools (Europe) Ltd,
PO Box 6242, Newbury, RG14 9LT, UK
Suzhou 2016/05/31
Allen Ding
Deputy Chief Engineer,Testing & Certification

WG115E

Copyright © 2016, Positec. All Rights Reserved.
AR01171801
www.worx.com
Table of contents
Other Worx Trimmer manuals