Xtramus NuStreams-P5G User manual

Standalone Switch/Router Tester
User’s Manual
(NuStreams-P5G/NuStreamsP9A)
USM Ver 1.2

2
E-mail: sales@xtramus.com
Website: www.Xtramus.com
XTRAMUS TECHNOLOGIES®
Foreword
Copyright
Copyright © 2011 Xtramus Technologies, all rights reserved. The information contained in this document is the property of Xtramus
Technologies. No part of this publication shall be reproduced, stored in a retrieval system, or transmitted, in any form or by any
means, without the prior written permission of Xtramus Technologies.
Disclaimer
The information contained in this document is subject to change without notice and does not represent a commitment on the part of
Xtramus Technologies. The information in this document is believed to be accurate and reliable. However, Xtramus Technologies
assumes no responsibility or liability for any errors or inaccuracies that may appear in the document.
Trademarks
NuStreams-P5G, NuStreams-P9A, NuSet-MiniPG, NuSet-MiniPG-Config, and NuSet-MiniPG-UG are trademarks or registered
trademarks of Xtramus Technologies. All other trademarks and registered trademarks are the property of their respective owners.
Warranty
Xtramus Technologies warrants for the hardware provided along with this document under proper usage and conditions in normal
environment; any improper operation or in irregular environment may possibly cause this product NOT function well. For detailed
terms, please contact your local dealer.
Contact Information
Xtramus Technologies
Website: www.xtramus.com
Tel: +886-2-8227-6611
Fax: +886-2-8227-6622

3
E-mail: sales@xtramus.com
Website: www.Xtramus.com
XTRAMUS TECHNOLOGIES®
Revision History
Date
Version
AP Version
History
2011/03/17
Ver 1.0
First draft version
2011/04/25
Ver 1.1
1. Page 38&45, add notes so the readers can
understand that this manual is for
NuSet-MiniPG-Config/UG only.
2. Page 39, add a note regarding to warning
messages.
2011/07/12
Ver 1.2
Ver 1.0b019
1. Change USM template.
2. Page 3, changing Revision History format.
3. Page 8, replacing “UTP Port”with “RJ45
Port”.

4
E-mail: sales@xtramus.com
Website: www.Xtramus.com
XTRAMUS TECHNOLOGIES®
Table of Contents
Foreword........................................................................................................................................2
Revision History............................................................................................................................3
1. Standalone Switch/Router Tester Overview ............................................................................6
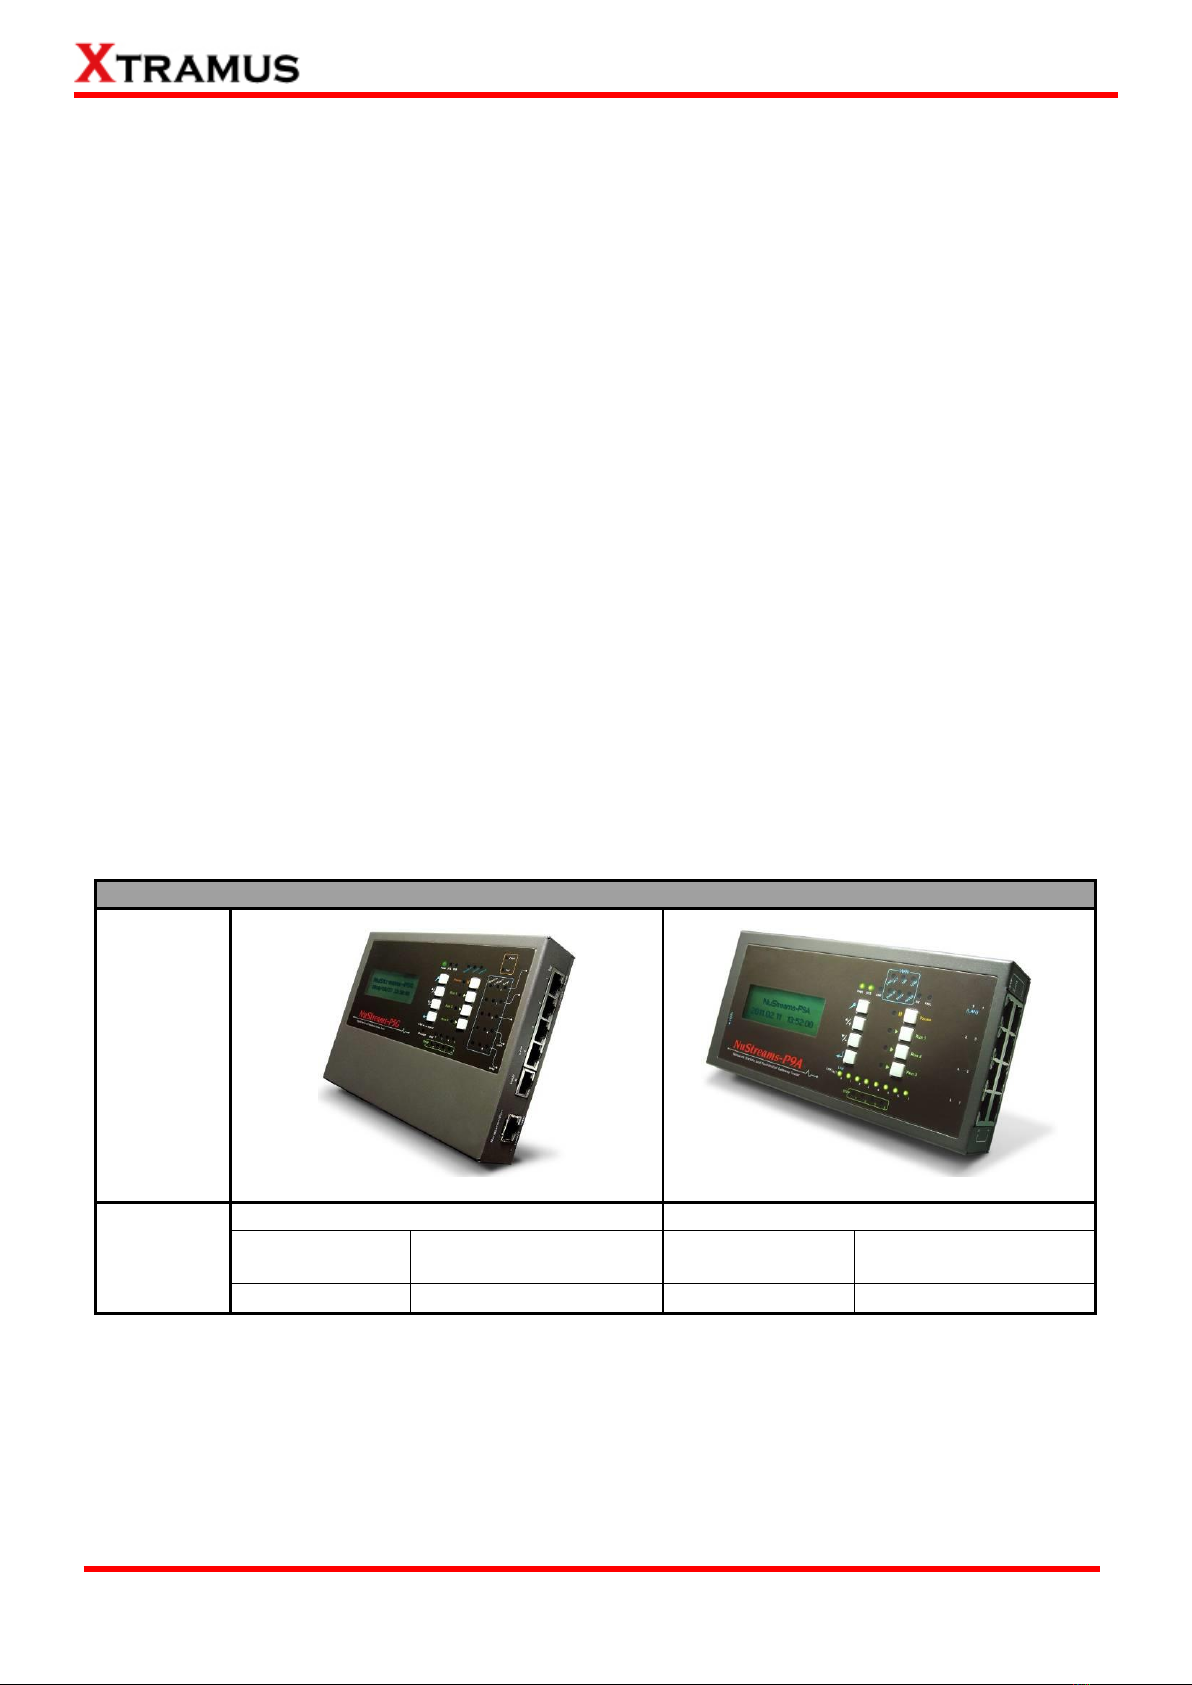
1.1. General Description of NuStreams-P5G & NuStreams-P9A ..........................................6
1.2. Key Advantages of NuStreams-P5G & NuStreams-P9A.................................................7
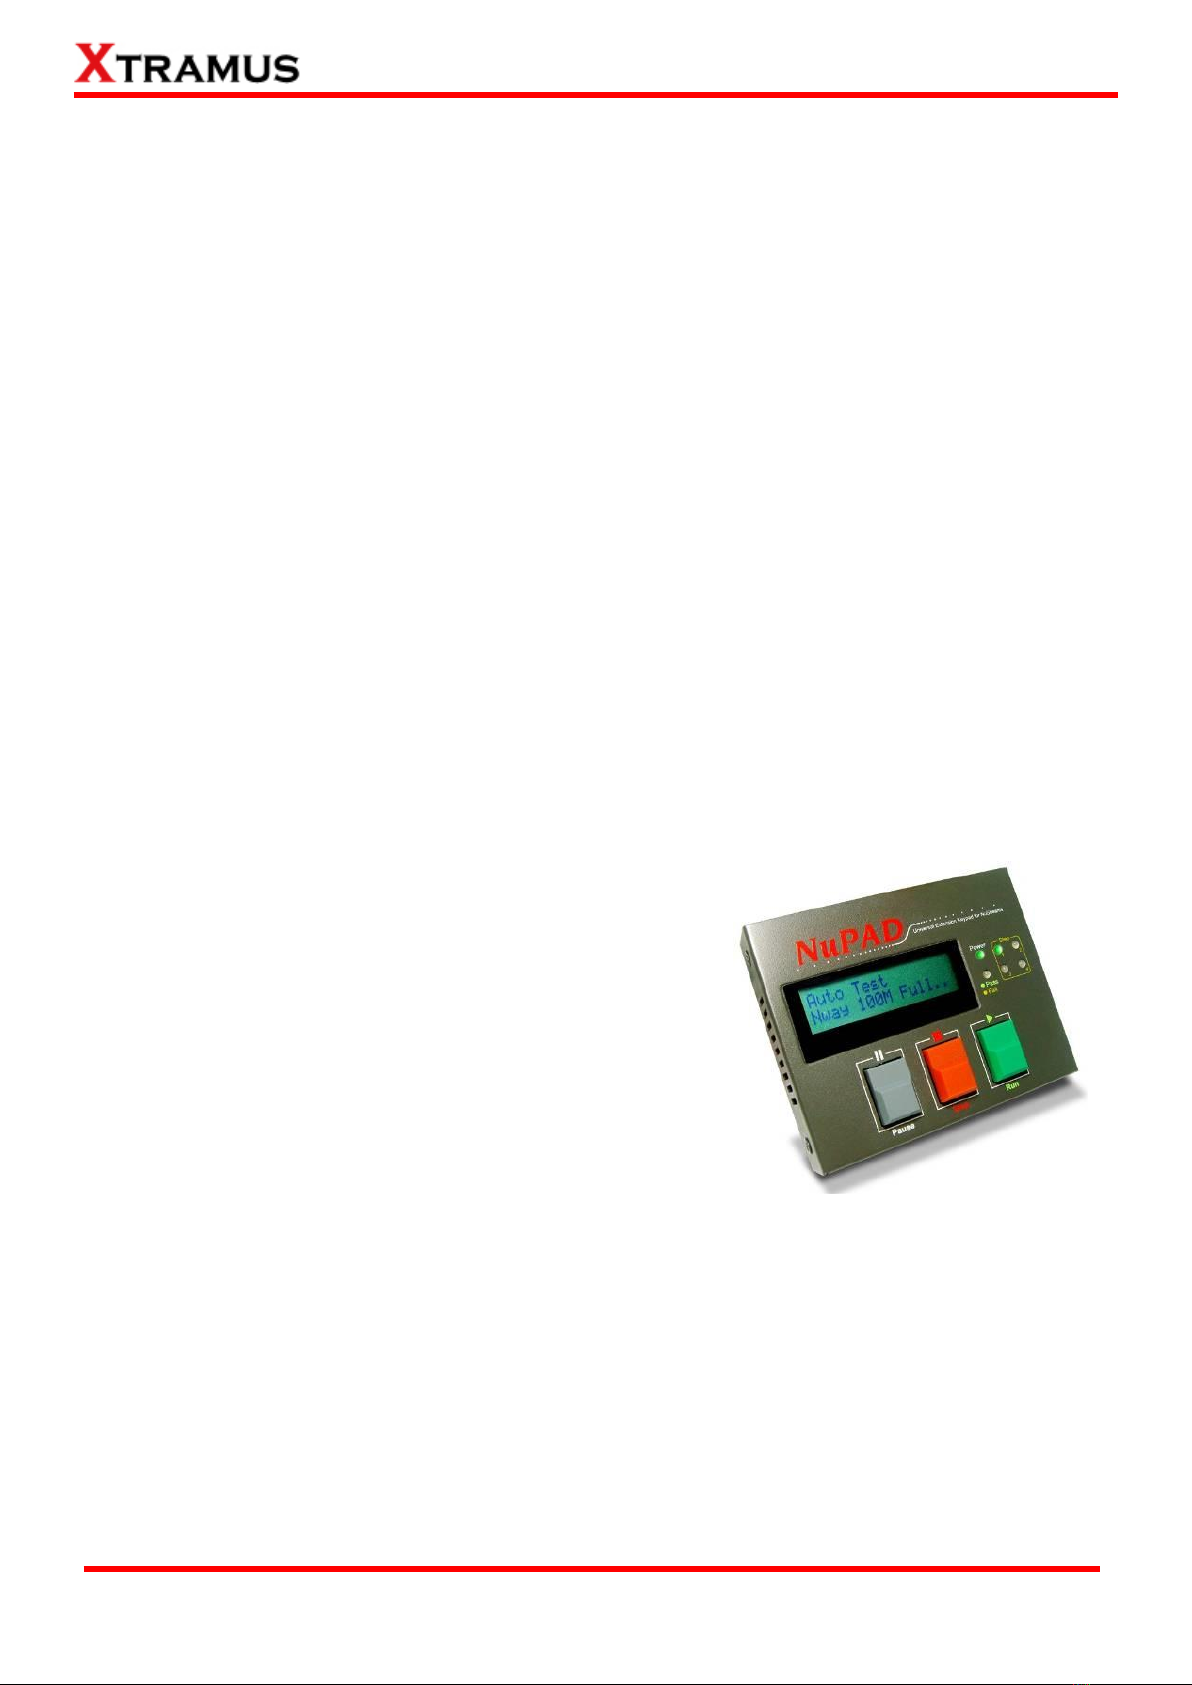
1.3. NuPAD Overview...............................................................................................................7
2. NuStreams-P5G & NuStreams-P9A Function Overview..........................................................8
2.1. Interface Ports ..................................................................................................................8
2.1.1. NuStreams-P5G Interface Ports..................................................................................8
2.1.2. NuStreams-P9A Interface Ports..................................................................................8
2.2. Front Panel –LCD & LEDs...............................................................................................9
2.2.1. NuStreams-P5G Front Panel –LCD & LEDs ..............................................................9
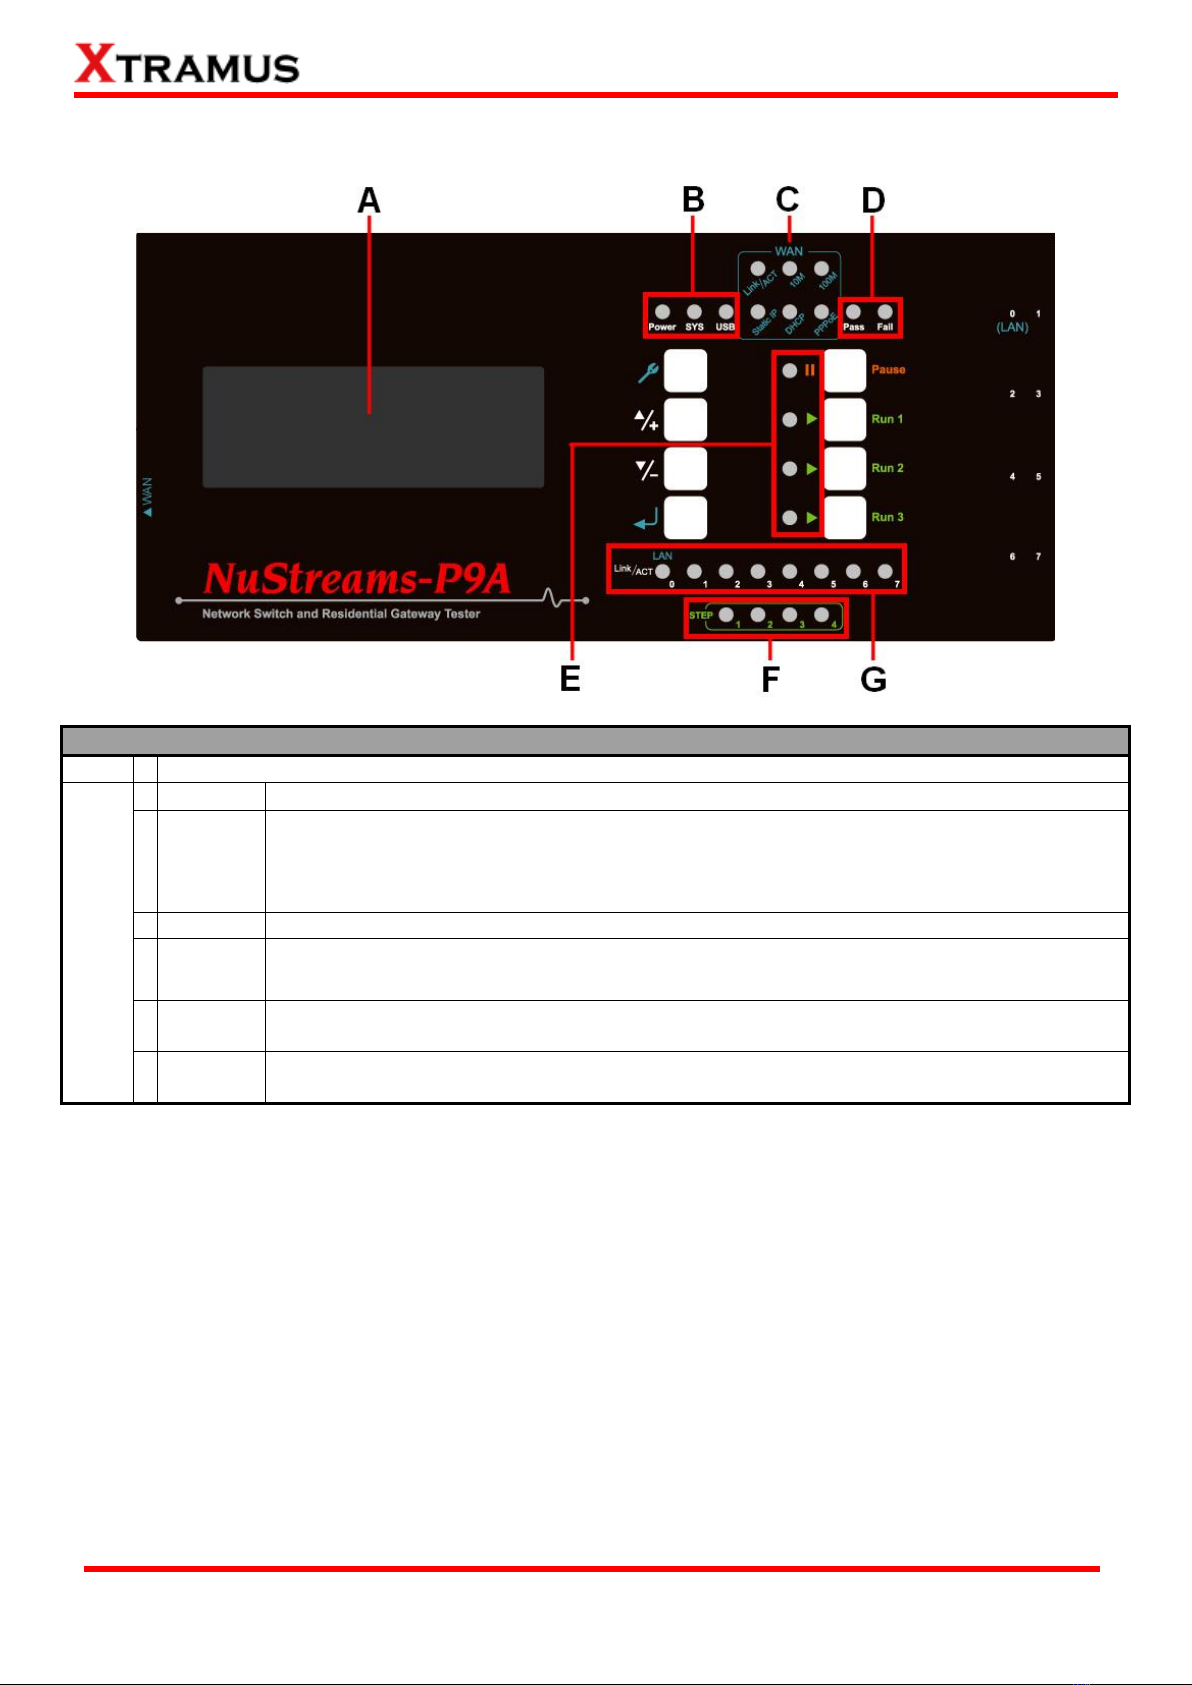
2.2.2. NuStreams-P9A Front Panel –LCD & LEDs.............................................................10
2.3. Front Panel –LED Status...............................................................................................11
2.3.1. NuStreams-P5G Front Panel –LED Status ..............................................................11
2.3.2. NuStreams-P9A Front Panel –LED Status...............................................................12
2.4. NuStreams-P5G & NuStreams-P9A Front Panel –Buttons..........................................13
3. Hardware Installation of NuStreams-P5G & NuStreams-P9A...............................................14
3.1. Hardware Installation for NuStreams-P5G....................................................................14
3.1.1. Installation for Residential Gateway (Broadband Router) Test ..............................14
3.1.2. Installation for Switch Test........................................................................................15
3.1.3. Installation for Residential Gateway (Broadband Router) + Switch Test...............16
3.2. Hardware Installation for NuStreams-P9A....................................................................17
3.2.1. Installation for Residential Gateway (Broadband Router) Test ..............................17
3.2.2. Installation for Switch Test........................................................................................18
3.2.3. Installation for Residential Gateway (Broadband Router) + Switch Test...............19
4. Making Settings with Front Panel Buttons & LCD ................................................................20
4.1. NuStreams-P5G Front Panel Buttons & LCD................................................................20
4.1.1. NuStreams-P5G Buttons Overview ..........................................................................20
4.1.2. NuStreams-P5G LCD Overview ................................................................................21
4.1.3. NuStreams-P5G Front Panel Functions –Basic Controls ......................................22
4.1.4. NuStreams-P5G Front Panel Functions –Test Setting ...........................................24
4.1.5. NuStreams-P5G Front Panel Functions –Test Log.................................................26
4.1.6. NuStreams-P5G Front Panel Functions –System Setting......................................27
4.1.7. NuStreams-P5G Front Panel Functions –System Information ..............................28
4.2. NuStreams-P9A Front Panel Buttons & LCD ................................................................29
4.2.1. NuStreams-P9A Control Buttons Overview .............................................................29
4.2.2. NuStreams-P9A LCD Overview.................................................................................30
4.2.3. NuStreams-P9A Front Panel Functions –Basic Controls.......................................31
4.2.4. NuStreams-P9A Front Panel Functions –Test Setting............................................33
4.2.5. NuStreams-P9A Front Panel Functions –Test Log.................................................35
4.2.6. NuStreams-P9A Front Panel Functions –System Setting......................................36
4.2.7. NuStreams-P9A Front Panel Functions –System Information...............................37
5. NuSet-MiniPG ..........................................................................................................................38
5.1. Installing/Uninstalling NuSet-MiniPG............................................................................39
5.2. NuSet-MiniPG Overview.................................................................................................43
5.2.1. Starting NuSet-MiniPG...............................................................................................43
5.2.2. NuSet-MiniPG Overview............................................................................................44
5.3. NuSet-MiniPG-Config Functions ...................................................................................45
5.3.1. NuSet-MiniPG-Config Functions Overview..............................................................45
5.3.2. NuSet-MiniPG-Config Function –Menu Bar ............................................................46
5.3.2.1. Menu Bar –File ...................................................................................................46
5.3.2.2. Menu Bar –Task..................................................................................................47
5.3.2.3. Menu Bar –Log...................................................................................................47

5
E-mail: sales@xtramus.com
Website: www.Xtramus.com
XTRAMUS TECHNOLOGIES®
5.3.2.4. Menu Bar –Service.............................................................................................48
5.3.2.5. Menu Bar –Languages.......................................................................................48
5.3.2.6. Menu Bar –Help..................................................................................................48
5.3.3. NuSet-MiniPG-Config Function –Quick Launch Buttons.......................................49
5.3.3.1. Quick Launch Buttons –Reconnect..................................................................49
5.3.3.2. Quick Launch Buttons –Load & Save...............................................................49
5.3.3.3. Quick Launch Buttons –Get Task/Apply All .....................................................50
5.3.3.4. Quick Launch Buttons –Get Log/Clear Log/Log Folder..................................50
5.3.4. NuSet-MiniPG-Config Function –Info/Run Select List............................................51
5.3.5. Configuring Tasks with NuSet-MiniPG-Config.........................................................53
5.3.5.1. NuSet-MiniPG-Config Task Setting –Router.....................................................54
5.3.5.2. NuSet-MiniPG-Config Task Setting –Switch.....................................................56
5.3.5.3. NuSet-MiniPG-Config Task Setting –Router + Switch .....................................57
5.4. NuSet-MiniPG-UG Functions .........................................................................................59
5.4.1. NuSet-MiniPG-UG Functions Overview....................................................................59
5.4.2. NuSet-MiniPG-UG Function –Menu Bar ..................................................................60
5.4.2.1. Menu Bar –File ...................................................................................................60
5.4.2.2. Menu Bar –Upgrade...........................................................................................60
5.4.2.3. Menu Bar –Languages.......................................................................................67
5.4.2.4. Menu Bar –Help..................................................................................................67
5.4.3. NuSet-MiniPG-UG Function –Quick Launch Buttons.............................................68
5.4.3.1. Quick Launch Buttons –Reconnect..................................................................68
5.4.3.2. Quick Launch Buttons –Firmware Upgrade.....................................................68
5.4.3.3. Quick Launch Buttons –FPGA Upgrade...........................................................68
5.4.3.4. Quick Launch Buttons –NuPAD Firmware Upgrade........................................68
5.4.3.4. Quick Launch Buttons –License Upgrade .......................................................69
5.4.4. NuSet-MiniPG-UG Function –Info Select List .........................................................69
6. Controlling Tests with NuPAD ................................................................................................70
6.1. NuPAD Functions Overview...........................................................................................70
6.2. Connecting NuPAD with NuSTreams-P5G/NuStreams-P9A.........................................71
6.3. Starting DUT Tests with NuPAD.....................................................................................72

6
E-mail: sales@xtramus.com
Website: www.Xtramus.com
XTRAMUS TECHNOLOGIES®
1. Standalone Switch/Router Tester Overview
1.1. General Description of NuStreams-P5G & NuStreams-P9A
NuStreams-P5G and NuStreams-P9A are stand-alone Switch/Residential Gateway (Broadband
Router) test devices for testing switches and broadband routers (along with their switch ports) at
wirespeed. Also, both NuStreams-P5G and NuStreams-P9A can also connect to PC for accessing its
simple and easy-to-use configuration utility.
Each of NuStreams-P5G and NuStreams-P9A’s 3 RUNscontains 4 Tasks. These Tasks allow users to
simultaneously performing tests under different transmitting/receiving speeds with a single button. This
innovative design can greatly reduce the time consumed when performing product tests.
With 3 different Test Types (Router, Switch, and Router + Switch) available, NuStreams-P5G and
NuStreams-P9A can perform tests on switch/router, or combining each of these test subjects under
“Router + Switch”Test Type, and test a broadband router’s WAN/LAN performance at the same time.
NuStreams-P5G and NuStreams-P9Asupport bi-direction LAN/WAN test packets with 253 IP addresses.
Each IP has its own settings and transmitting/receiving counters, including independent statistics and
calculations for latency and Serial Number. Also, both DUT and NuStreams-P5G’s IP addresses can be
any IP of 256 IP addresses from Class C.
Please refer to the table down below for a general comparison between NuStreams-P5G and
NuStreams-P9A.
NuStreams-P5G/P9A Comparison Table
Model Name
NuStreams-P5G
NuStreams-P9A
Test Ports
10/100/1000 Mbps RJ45 Port
10/100 Mbps RJ45 Port
For Router Test
LAN Port ×4
WAN Port ×1
For Router Test
LAN Port ×8
WAN Port ×1
For Switch Test
Switch Port ×5*
For Switch Test
Switch Port ×8
*NuStreams-P5G’s WAN Port can act as Switch Port 5 when performing switch test.
Also, NuStreams-P5G and NuStreams-P9Acome with a utility software. NuSet-MiniPG allows users to
set DUT test criteria, upgrading NuStreams-P5G firmware/FPGA, and accessing detail test logs/statistics
for further analysis.

7
E-mail: sales@xtramus.com
Website: www.Xtramus.com
XTRAMUS TECHNOLOGIES®
1.2. Key Advantages of NuStreams-P5G & NuStreams-P9A
Compact, lightweight, and portable test device for testing network switches and routers
Flexible WAN port connection for router tests:
Static IP
DHCP (Dynamic Host Configuration Protocol)
PPPoE (Point-to-Point Protocol over Ethernet)
Supporting bi-direction LAN/WAN test packets with 253 IP addresses. Each IP has its own settings
and transmitting/receiving counters, including independent statistics and calculations for latency,
Serial Number, and VLAN Tags
DUT, NuStreams-P5G, and NuStreams-P9A’s IP addresses can be any IP of 256 IP addresses from
Class C
Supports and can receive packet in PPP LCP, IPCP PAP formats
Tests are performed automatically in a step-by-step manner, which make NuStreams-P5G a more
productive solution than traditional PC-based solutions
Both NuStreams-P5G and NuStreams-P9A can be connected with external bar code readers
NuStreams-P5G and NuStreams-P9A’s hardware information, such as fan speed and system
temperature, is available and can be checked
LCD screen for displaying test results and related statistics
1.3. NuPAD Overview
Built to be light and easy-to-handle, NuStreams-P5G and
NuStreams-P9A are both designed to meet the needs of
production lines. However, considering the buttons on
NuStreams-P5G/P9A might be too small to operate, an
optional keypad NuPAD is available to solve this
inconvenience.
NuPAD is an optional keypad with intuitive platforms and
easy-to-use buttons, and can be connected to
NuStreams-P5G or NuStreams-P9A in mass production line.
Although possessing no configuration functions, the lighter and smaller NuPAD provides 3 big, durable
buttons (RUN 1~3) for users to operate the test procedure easily without touching configuration buttons
on the top panel of NuStreams-P5G and NuStreams-P9A.
NuPAD KEY ADVANTAGES
Simple, easy to operate, performing tests fast
Easy for maintenance. If NuPAD malfunctions, there’s no need to fix/replace the NuStreams-P5G/P9A
that’s connected to it
Intuitive Buttons for production crews to verify test results fast

8
E-mail: sales@xtramus.com
Website: www.Xtramus.com
XTRAMUS TECHNOLOGIES®
2. NuStreams-P5G & NuStreams-P9A Function Overview
2.1. Interface Ports
2.1.1. NuStreams-P5G Interface Ports
Ports Description
A
Console Port
38400 bps RJ45 Console Port for connecting NuStreams-P5G and NuPAD
B
USB Port
Standard Type A USB Port
C
Power Jack
DC 12 V Power Jack
D
Management Port
100 Mbps RJ45 Management Port for connecting NuStreams-P5G and PC
E
WAN Port*
10/100/1000 Mbps Ethernet RJ45 WAN Port ×1
F
Switch Port 1~4
10/100/1000 Mbps Ethernet RJ45 Switch/LAN Ports ×4
*The WAN Port serves as Switch Port 5 when performing Network Switch Test.
2.1.2. NuStreams-P9A Interface Ports
Ports Description
A
Console Port
38400 bps RJ45 Console Port for connecting NuStreams-P9A and NuPAD
B
Mini USB Port
Standard Type A USB Port
C
WAN Port*
10/100 Mbps Ethernet RJ45 WAN Port ×1
D
Power Jack
DC 12 V Power Jack
E
Switch Port 0~7
10/100 Mbps Ethernet RJ45 Switch/LAN Ports ×8

9
E-mail: sales@xtramus.com
Website: www.Xtramus.com
XTRAMUS TECHNOLOGIES®
2.2. Front Panel –LCD & LEDs
2.2.1. NuStreams-P5G Front Panel –LCD & LEDs
LCD & LEDs Descriptions
LCD
A
LCD Display
Screen
Test Start Time
Packets Received
Test End Time
Error Packets
Packets Transmitted
Test Fail/Pass
Throughput (packets/second) base on pre-defined allowable tolerance
LEDs
B
System Status
Power
SYS
USB
C
Test Status
Pause: Current running
test paused
Run 1/2/3: Test Task of Run 1/2/3 is
running
D
WAN Type
Static IP
DHCP
PPPoE
E
Test Status
Pass: DUT Test Pass
Fail: DUT Test Fail
F
Router
(LAN ↔WAN)
NuStreams-P5G is set to test Broadband Router.
G
Test Step Status
Test starts from Step 1 to Step 4
1. Link Status Test
3. Test Starts
2. Auto Negotiation Connection Test
4. Test Finished
H
Switch (SW 2~5)
NuStreams-P5G is set to test Switch. LED 2~5 indicates the number of
ports used.
I
LAN Ports (1~5)
Status
Reserve
Link/ACT
Error

10
E-mail: sales@xtramus.com
Website: www.Xtramus.com
XTRAMUS TECHNOLOGIES®
2.2.2. NuStreams-P9A Front Panel –LCD & LEDs
LCD & LEDs Descriptions
LCD
A
4 x 20 characters LCD that display system information, status, and menu
LEDs
B
System
Power: Power ON
SYS:System ready
USB:USB connection status
C
WAN
Link/Act: Connected with
DUT WAN port
10M: 10 Mbps
connection linked
100M: 100 Mbps connection
linked
Static IP: Using static IP
as router WAN connection
DHCP: Using DHCP as
router WAN connection
D
Test
Pass: DUT passes the test
Fail: DUT does not pass the test
E
Hotkey
|| Pause: Pause current running test
►Run 2: Test Task of Run 2 is running
►Run 1: Test Task of Run 1 is running
►Run 3: Test Task of Run 3 is running
F
LAN
Link/ACT
NuStreams-P9A’s LAN ports are connected to DUT’s (switch or router) LAN ports. LAN
LED 0~7 will be on accordingly
G
STEP
NuStreams-P9A’s testing process includes 4 steps. STEP LED 1~4 will show the testing
process accordingly

11
E-mail: sales@xtramus.com
Website: www.Xtramus.com
XTRAMUS TECHNOLOGIES®
2.3. Front Panel –LED Status
2.3.1. NuStreams-P5G Front Panel –LED Status
The table down below contains NuStreams-P5G’s front panel LED status and their meanings.
LED
Status
Description
B
System
Status
Power
Green ON
NuStreams-P5G is on
SYS
Green OFF
NuStreams-P5G’s CPU system down
Green ON
NuStreams-P5G CPU system initializing
Green Blinking
NuStreams-P5G’s CPU system active and running
Yellow ON
NuStreams-P5G is not starting properly
Yellow Green
Blinking
NuStreams-P5G is upgrading firmware
USB
Green ON
NuStreams-P5G is connecting to PC via USB cable
C
Test
Hotkey
Status
Pause
Yellow ON
The current running test is paused
Run 1
Green ON
All Tasks stored in Run 1 are running
Run 2
Green ON
All Tasks stored in Run 2 are running
Run 3
Green ON
All Tasks stored in Run 3 are running
D
WAN
Type
Static IP
Green ON
DUT WAN connection is set to Static-IP
DHCP
Green ON
DUT WAN connection is set to DHCP
PPPoE
Green ON
DUT WAN connection is set to PPPoE
E
Test
Status
Pass
Green ON
DUT test passed
Fail
Red ON
DUT test failed
F
Router
(LAN ↔WAN)
Green ON
NuStreams-P5G is set to test Broadband Router
G
Test Step
Step 1
Green ON
Link Status Test
Step 2
Green ON
Auto-Negotiation connection test
Step 3
Green ON
Starting DUT tests
Step 4
Green ON
Test complete, generating test results and report
H
Switch Port Number
(2~5)
Green ON
NuStreams-P5G is set to test Switch. LED 2~5
indicates the number of ports used
I
LAN Port
Status
(1~5)
Reserve
Green ON
LAN Port is preserved for test
Link/ACT
Green ON
LAN Port is connected to DUT
Green Blinking
NuStreams-P5G is sending test packets via LAN
Port
Error
Yellow ON
Error occurred during test

12
E-mail: sales@xtramus.com
Website: www.Xtramus.com
XTRAMUS TECHNOLOGIES®
2.3.2. NuStreams-P9A Front Panel –LED Status
The table down below contains NuStreams-P9A’s front panel LED status and their meanings.
LED
Status
Description
Power
On
NuStreams-P9A is on
SYS
Off
NuStreams-P9A’s CPU system down
On
NuStreams-P9ACPU system initializing
Green Blinking
NuStreams-P9A’s CPU system active and running
Yellow On
NuStreams-P9A is not starting properly
USB
Green On
NuStreams-P9A is connecting to PC via USB cable
WAN
10M/100M
Green On
NuStreams-P9A’s connection with DUT is active
Link/ACT
Green On
WAN connection established and standing-by
Green Blinking
Test packets sending via WAN ports
Static IP
Blue On
DUT WAN connection is set to Static-IP
DHCP
Amber On
DUT WAN connection is set to DHCP
PPPoE
Green On
DUT WAN connection is set to PPPoE
Pass
Green On
DUT test passed
Fail
Red On
DUT test failed
LAN
Link/ACT
0 ~ 7
Green On
NuStreams-P9A’s connection with DUT is active
Green Blinking
The corresponding LAN port is performing test
STEP
1
Green On
Auto-Negotiation
2
Residential Gateway: Waiting ARP Reply
Switch: Sending Learning Packets
3
Starting DUT tests
4
Test complete, generating test results and report

13
E-mail: sales@xtramus.com
Website: www.Xtramus.com
XTRAMUS TECHNOLOGIES®
2.4. NuStreams-P5G & NuStreams-P9A Front Panel –Buttons
Buttons Descriptions
J
Configuration
Buttons
Enter the Main Menu(*) or return to the previous Menu
Move the select cursor up
Move the select cursor down
Execute the selected selection
K
Operation
Buttons
||
Pause
Pause the current running test
►
Run1
Start all Tasks set in Run 1. Up to 4 Tasks can be configured in
Run 1 hotkey. Press this button to test ALL TASKS AT ONCE.
►
Run2
2nd hotkey that works as Run 1
►
Run3
3rd hotkey that works as Run 1
*Menu will be displayed on the LCD screen.

14
E-mail: sales@xtramus.com
Website: www.Xtramus.com
XTRAMUS TECHNOLOGIES®
3. Hardware Installation of NuStreams-P5G & NuStreams-P9A
NuStreams-P5G and NuStreams-P9A can perform tests on Residential Gateway (Broadband Router),
Switch, or Residential Gateway + Switch. Each test has its own different test options and parameters.
To perform tests on different DUTs mentioned above, you have to connect your NuStreams-P5G or
NuStreams-P9A differently. Please see the installation structure mentioned in this chapter for more detail
information.
3.1. Hardware Installation for NuStreams-P5G
3.1.1. Installation for Residential Gateway (Broadband Router) Test
While performing tests on Residential Gateway (Broadband Router), both WAN and LAN ports of the
DUT must be connected to NuStreams-P5G with CAT-5 UTP cables as shown in the figure down below:
If NuStreams-P5G’s WAN/LAN Ports and DUT’s ports are connected via CAT-5 UTP cables correctly,
the Link/ACT LEDs located on NuStreams-P5G’s LAN Port Status LED will be ON accordingly.

15
E-mail: sales@xtramus.com
Website: www.Xtramus.com
XTRAMUS TECHNOLOGIES®
3.1.2. Installation for Switch Test
While performing tests on Switch, DUT LAN ports must be connected to NuStreams-P5G with CAT-5
UTP cables as shown in the figure down below:
If both NuStreams-P5G’s Switch Port 1~5 and DUT’s ports are connected via CAT-5 UTP cables
correctly, the Link/ACT LEDs located on NuStreams-P5G’s LAN Port Status LED will be ON
accordingly.

16
E-mail: sales@xtramus.com
Website: www.Xtramus.com
XTRAMUS TECHNOLOGIES®
3.1.3. Installation for Residential Gateway (Broadband Router) + Switch Test
While performing tests on Residential Gateway (Residential Router) + Switch, both WAN and LAN
ports of the DUT must be connected to NuStreams-P5G with CAT-5 UTP cables as the installation
structure when performing tests on Residential Gateway (Residential Router) as shown in the figure
down below:
Test options for Residential Gateway (Residential Router) + Switch and Residential Gateway
(Residential Router) are very similar, with minor differences listed in the table down below:
DUT Type
Residential Gateway + Switch
Residential Gateway
LAN Port Select
✓
✘
Flow Control
✓
✘
If NuStreams-P5G’s WAN/LAN Ports and DUT’s ports are connected via CAT-5 UTP cables correctly,
the Link/ACT LEDs located on NuStreams-P5G’s LAN Port Status LED will be ON accordingly.

17
E-mail: sales@xtramus.com
Website: www.Xtramus.com
XTRAMUS TECHNOLOGIES®
3.2. Hardware Installation for NuStreams-P9A
3.2.1. Installation for Residential Gateway (Broadband Router) Test
While performing tests on Residential Gateway (Residential Router), both WAN and LAN ports of the
DUT must be connected to NuStreams-P9A with CAT-5 UTP cables as shown in the figure down below:
If both NuStreams-P9A and the DUT are connected with CAT-5 UTP cables correctly, NuStreams-P9A’s
LAN and WAN LEDs will be ON accordingly.

18
E-mail: sales@xtramus.com
Website: www.Xtramus.com
XTRAMUS TECHNOLOGIES®
3.2.2. Installation for Switch Test
While performing tests on Switch, DUT LAN ports must be connected to NuStreams-P9A with CAT-5
UTP cables as shown in the figure down below:
If both NuStreams-P9A and the DUT are connected with CAT-5 UTP cables correctly, NuStreams-P9A’s
LAN LEDs will be ON accordingly.

19
E-mail: sales@xtramus.com
Website: www.Xtramus.com
XTRAMUS TECHNOLOGIES®
3.2.3. Installation for Residential Gateway (Broadband Router) + Switch Test
While performing tests on Residential Gateway (Residential Router) + Switch, both WAN and LAN
ports of the DUT must be connected to NuStreams-P9A with CAT-5 UTP cables as the installation
structure when performing tests on Residential Gateway (Residential Router) as shown in the figure
down below:
Test options for Residential Gateway (Residential Router) + Switch and Residential Gateway
(Residential Router) are very similar, with minor differences listed in the table down below:
DUT Type
Residential Gateway + Switch
Residential Gateway
LAN Port Select
✓
✘
Flow Control
✓
✘
If both NuStreams-P9A and the DUT are connected with CAT-5 UTP cables correctly, NuStreams-P9A’s
LAN and WAN LEDs will be ON accordingly.

20
E-mail: sales@xtramus.com
Website: www.Xtramus.com
XTRAMUS TECHNOLOGIES®
4. Making Settings with Front Panel Buttons & LCD
All parameters for DUT tests can be configured via control buttons located on the front panel. Also,
configuring, testing, and system information are displayed and can be viewed on the LCD screen as well.
Before performing any tests, NuStreams-P5G or NuStreams-P9A should be connected to DUT properly
according to DUT’s type. Please refer to 3. Hardware Installation of NuStreams-P5G & NuStreams-P9A
for more detail information.
4.1. NuStreams-P5G Front Panel Buttons & LCD
4.1.1. NuStreams-P5G Buttons Overview
With NuStreams-P5G’s control buttons located on its front panel, all test parameters and system
configurations can be set via these buttons.
Buttons Descriptions
J
Configuration
Buttons
Enter the Main Menu(*) or return to the previous Menu
Move the select cursor up
Move the select cursor down
Execute the selected selection
K
Operation
Buttons
||
Pause
Pause the current running test
►
Run1
Start all Tasks set in Run 1. Up to 4 Tasks can be configured in
Run 1 hotkey. Press this button to test ALL TASKS AT ONCE.
►
Run2
2nd hotkey that works as Run 1
►
Run3
3rd hotkey that works as Run 1
*Menu and setting options will be displayed on the LCD screen.
This manual suits for next models
1
Table of contents
Other Xtramus Test Equipment manuals
Popular Test Equipment manuals by other brands

PCB Piezotronics
PCB Piezotronics ICP Y482A22/NP Installation and operating manual

Viavi
Viavi AVX-10K Operation manual

Hanna Instruments
Hanna Instruments HI 38040 instruction manual

Covita
Covita bedfont Micro+ basic Smokerlyzer manual

Megger
Megger MIT400/2 Series quick start guide

SIGLENT
SIGLENT SDS2000X Plus Series user manual